Additional board (additional) for the door frame: purpose, types, installation
If you put a door frame and its width is less than the thickness of the wall, this gap must be closed with something. To do this, use extras on the interior door. About what they are, how they look, what they are, how to put them, and we will talk further.
The content of the article
What is add-on
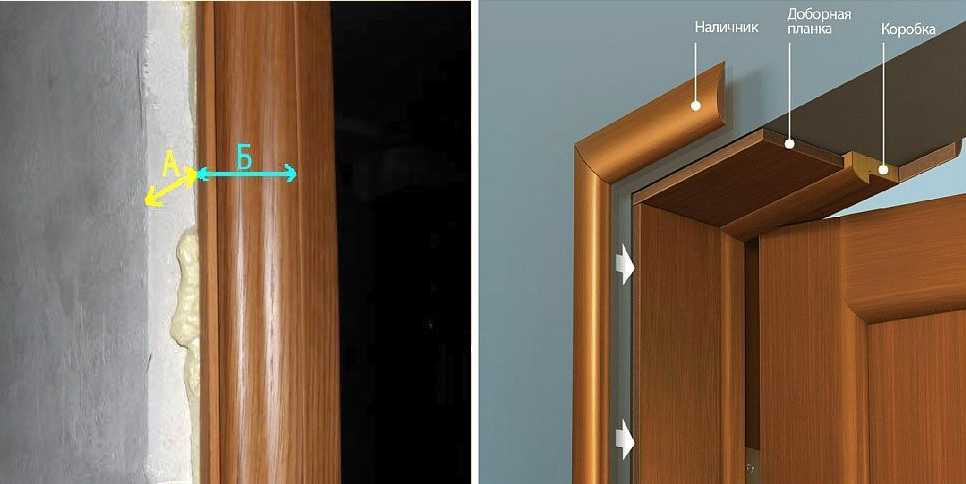
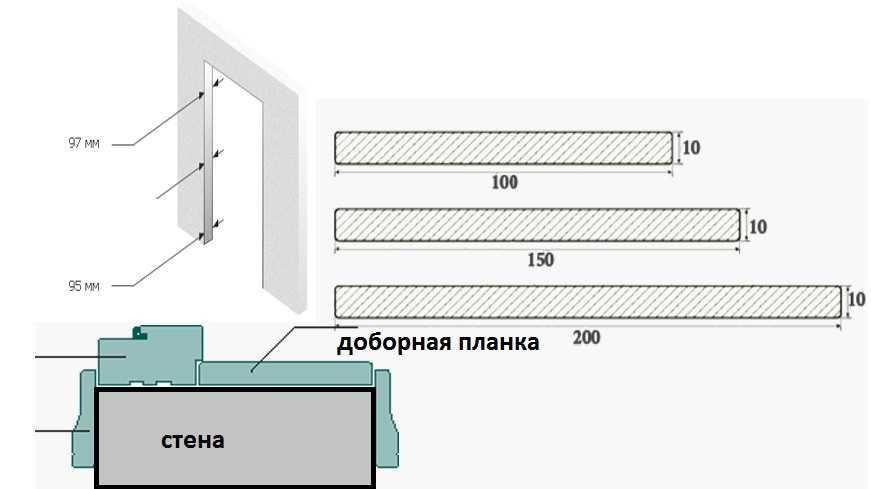
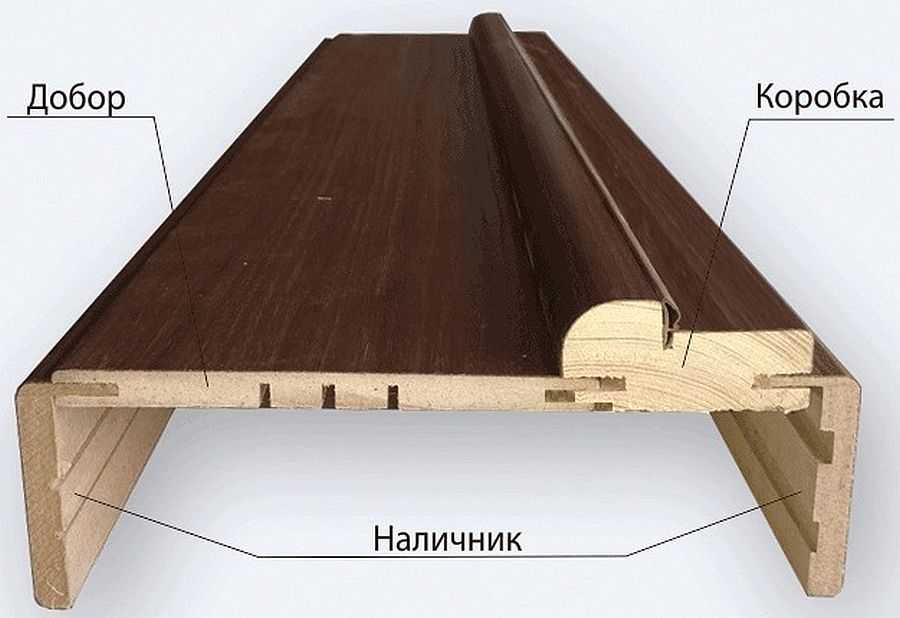
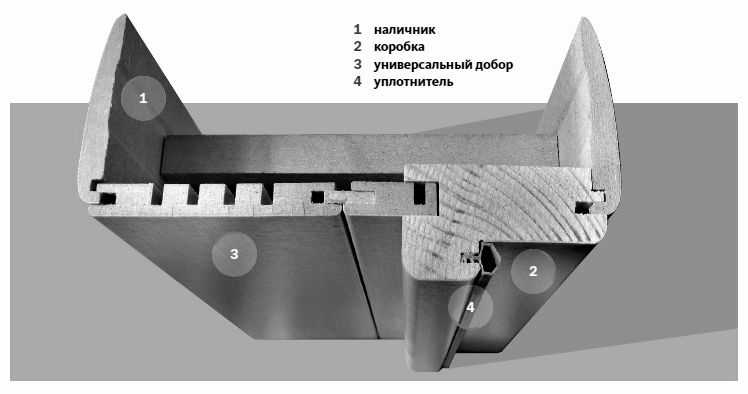
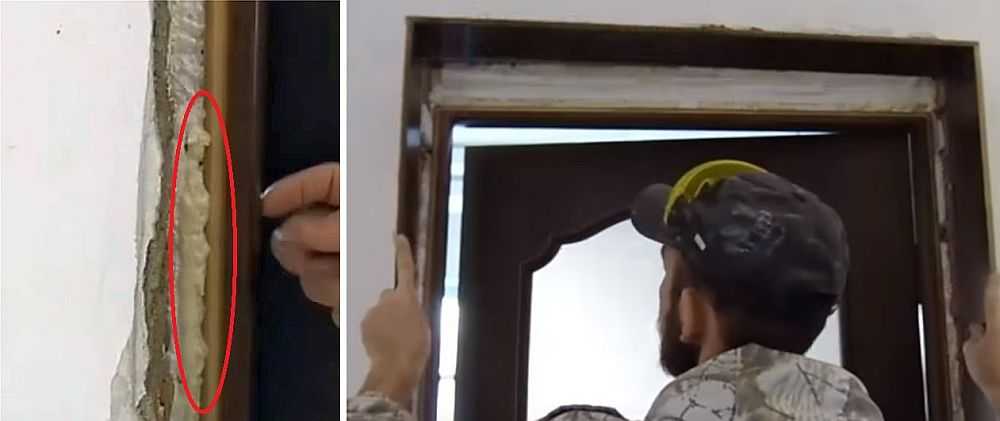
When installation of interior doors, a situation arises when the box is narrower than the thickness of the wall. In such cases, a special board is used, which is attached to the door frame, covering the remaining space. This board is called finishing on the interior door. The name "additional board" and "additional board" are also found. Then you can attach a platband to it, which will close the gap between the extension and the wall.
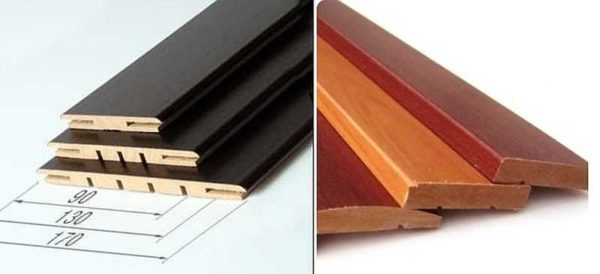
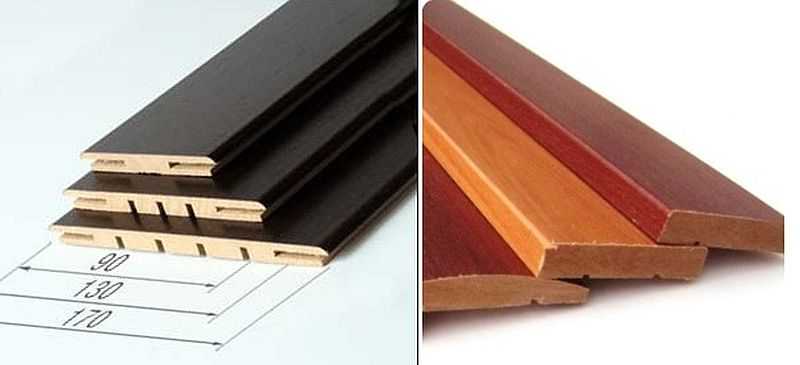
Dobor - board for expanding the door frame to wall thickness
That is, the door fitting is an additional part of the door frame. It is a board of a certain size, which is joined to the door frame. They put it on one side - the opposite of the one through which the door opens. You can also call this board an expander - it displays its real purpose.
If the wall thickness is more than 140 mm, you have to install a door frame expander - an additional board
There may be nuances in the docking of the docking. Often, the shape of the door frame is specific - with a special relief (protrusions, depressions, roundings). Then you will have to look for a set of this particular company, otherwise it will be problematic to dock them.
Materials and sizes
Each of the manufacturers produces a certain set of additional boards, in which the length is fixed - 230-250 cm, the thickness / width changes. For example, there are options (thickness, width, length):
- 10 * 50 * 2350 mm;
- 10 * 100 * 2350 mm;
- 15 * 150 * 2350 mm.

Shape, thickness, width can be different
Thickness and width - each factory has its own. It can be 60 mm, and 65 mm or 75 mm. In general, any set. What if none of them are right for your case? Take a larger width than required, then cut off the excess. And if your opening is wider than all the options available? Order the size you want (many manufacturers make to order) or splice the two smaller sizes. Another option is to use telescopic trims. They come with a bend around the corner, which can cover your lack of width.
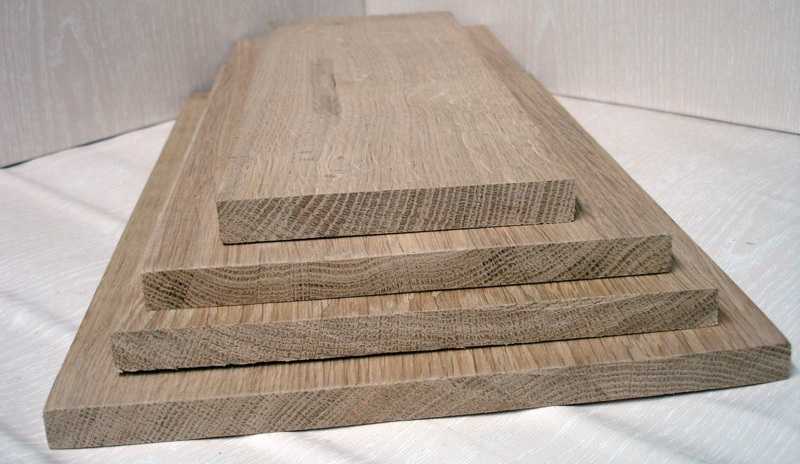
If the doors are made of solid oak, it makes sense to put the same complement
What materials are used for interior doors? From the same as platbands:
- wood;
- MDF;
- Chipboard.
MDF and chipboard can be covered with veneer, laminated. Wooden ones can be with or without processing. Match the material and color to the door frame. And this is another reason to take from the same manufacturer - even if the color / texture name is the same, there is no guarantee that they will actually be the same.
Types of add-ons
There are two types of boarding boards:
- With straight edges. An ordinary board that is attached end-to-end with a box. May be:
- with decorative edge;
- without decorative edge.
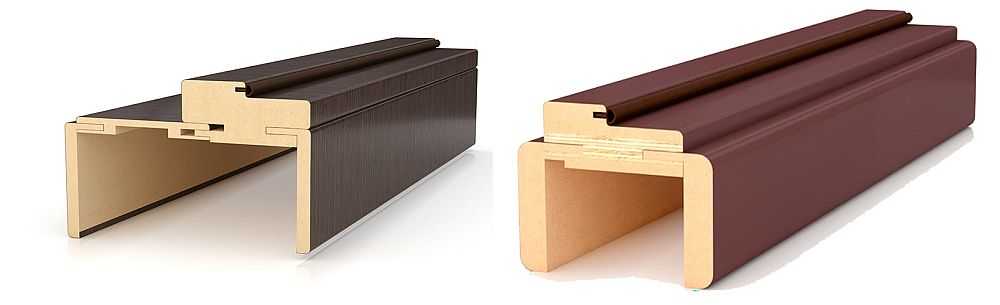
Types of accessories for interior doors: telescopic on the left, ordinary - on the right
- Telescopic extension. With molded grooves for connection to the box.
Completion on an interior door with straight edges is the most common board. In this case, it must be matched only by color and size. The complement is pressed to the box, fixed with self-tapping screws installed obliquely. One of the ends of the additional strip can be machined. This is necessary if the casing can be displaced.
Installation of an extension with smooth edges (not telescopic)
It is not very convenient to attach this type of extensions. You have to think about not splitting the bar, about how to close the caps of the screws. However, there is no need to select according to the shape of the grooves / protrusions, which is far from simple and only binds to one manufacturer.
If there are protrusions, grooves, fillets, you need an extension for the interior door of the same company as the box
The telescopic door frame has pre-formed grooves. From the point of view of docking, this is a very convenient option: they drove the protrusion into the groove, tapped until the complete coincidence, and the whole installation. But only if the match is perfect. What else is telescopic extension convenient for? You can install a telescopic casing in it (if it fits).
How to install extensions on an interior door
At this point, we will talk about ordinary slats - with straight ends. They are sold in lengths of 2100-2300 mm. One door needs three slats: One to the right and one to the left, and a piece from the third will go to the top. If you put several doors at the same time and they have the same color, one plank will go to the two "tops".
How to attach extensions to an interior door
The planks are usually wider and longer than necessary and will need to be trimmed. What tool? With what you have. Suitable for any machine that cuts DMF, chipboard or wood. To decorate the corners, you may need a miter box (if you are going to join the box (and extensions) at 45 °. It is also convenient to use it so as not to "fill up" the saw cut and make it strictly perpendicular.
We take measurements and make blanks
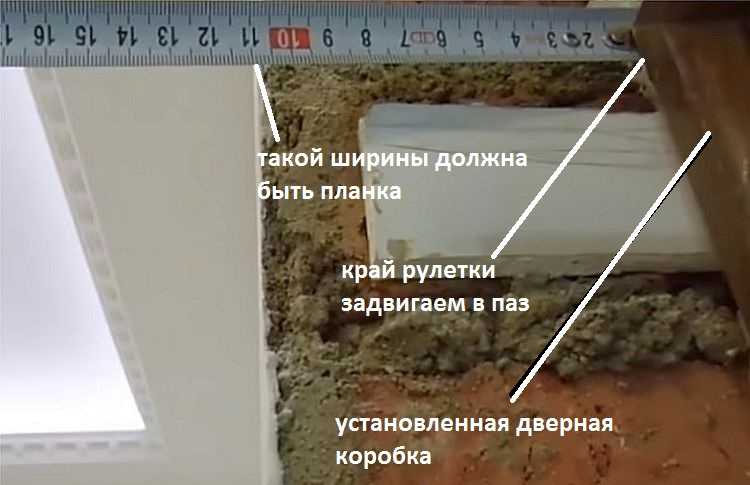
Before installing the extensions on the interior door, you need to know the exact dimensions of the expansion strips. To do this, we install a door frame in the doorway, fix it. Draw an opening on the plan, it will be easier to write the dimensions. Next, we take a tape measure and a level, measure the size of the extensions that you need.
- The width of the extension is determined as follows: insert the measuring tape of the tape measure into the groove until it stops. We apply a level to the wall, at the intersection with the tape of the tape measure, we determine the required width. We take measurements at six points: two on each side. If the wall has an unequal thickness, we take the width of the addition according to the largest figure.

We measure exactly
- The length of the finishing strip. Again we take a tape measure, measure along the opening - from the floor (threshold, whoever has it) to the beginning of the groove in the box of the installed door. We measure right and left, because again there may be a difference. We measure the upper part from the beginning of the box to its end (not from the groove).
Now we cut out the ones that we need from the standard planks. Make marks with a pencil - a simple pencil is clearly visible on light strips, on dark ones you can take a white one. We try on the cut strips in the opening, if necessary, cut them a little.
We collect
Before you put the extras on the interior door, they must be connected together. We lay out the cut additional strips on the floor in the form of the letter "P". If they have a processed edge, lay it out so that the edge is on one side. The planks will need to be connected to each other. If they are made of MDF or chipboard, it is necessary to pre-drill holes in the top bar.

Preparing for assembly
For this, it is better to take a square (ideally a carpenter's one, but a regular school one will do as well). Draw a line on the plank that marks the middle of the plank thickness. If the thickness of the board is 10 mm, the line is 5 mm from the edge. If the strip is 15 mm thick - at a distance of 7.5 mm. We put two points on this line, and then drill holes. Diameter - 1 mm less than the diameter of the screws.
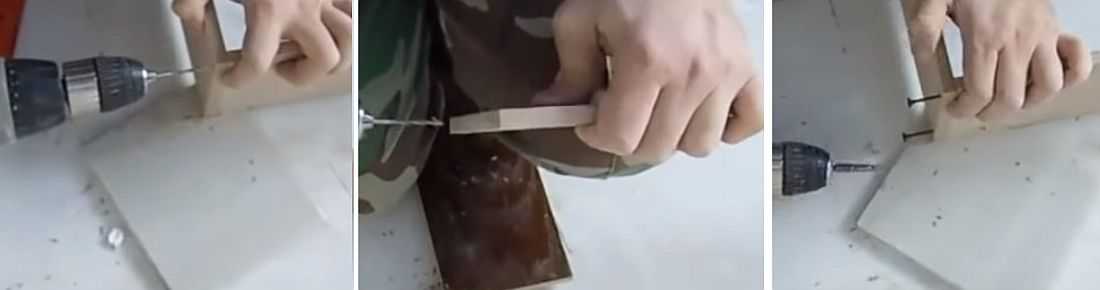
We complete the assembly of the door frame
Next, the holes must be transferred to long strips. To do this, we join them, align the edges. Using a drill, we transfer the marks to the end of the strip, then deepen to the required length (along the length of the self-tapping screw). Having made the holes, we join the strips, tighten the fasteners.The fittings for the interior door are half assembled. But don't rush to add a second plank. It is necessary to try on the already collected "in place".
Fitting and trimming
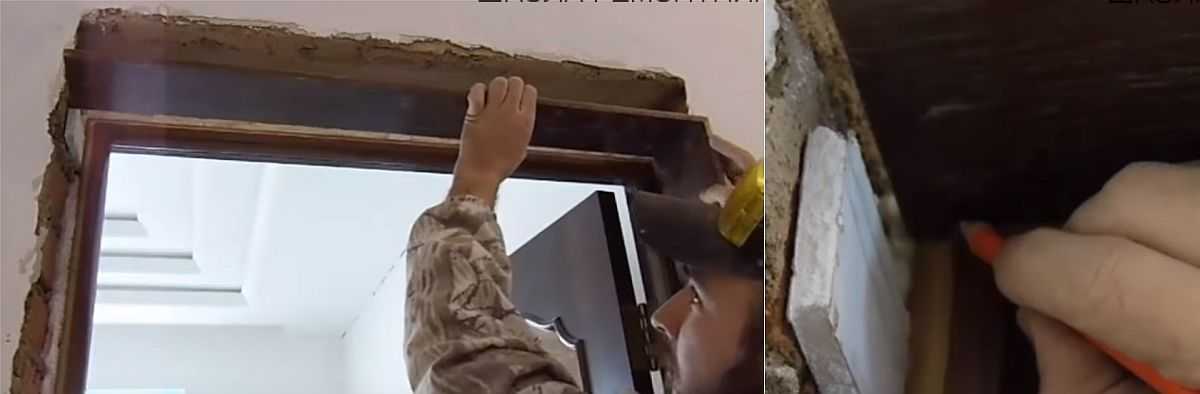
We put the assembled L-shaped part in place, driving the strips into the groove in the door frame. The upper jumper turned out to be larger (we measured it this way). We take a pencil, put a mark where the groove begins. Try to be precise as this is important. The excess may not be cut off. Just draw a line along the mark and make marks on it, then drill holes. After assembly, the letter "P" is obtained. We have assembled the fittings for the interior door, now we need to install and secure it.
Installation in a door frame
The add-on can now be installed. Check the opening first. If the doors were placed on foam, it can block the groove. We cut off the excess so that the planks go freely. We insert the U-shaped structure into the groove, tapping with the palm on the end. We start from the top, then to the sides.
We put in place, after removing the excess of polyurethane foam
We take masking tape, we fix the strips to the walls with it. If in some places the extension to the interior door does not fit tightly to the box (there is a gap), we remove this gap with the help of linings. For this, mounting wedges can be used. If not, use Styrofoam. You just need to set the bar exactly, for this purpose, dense foam is enough.
Additional box fixing
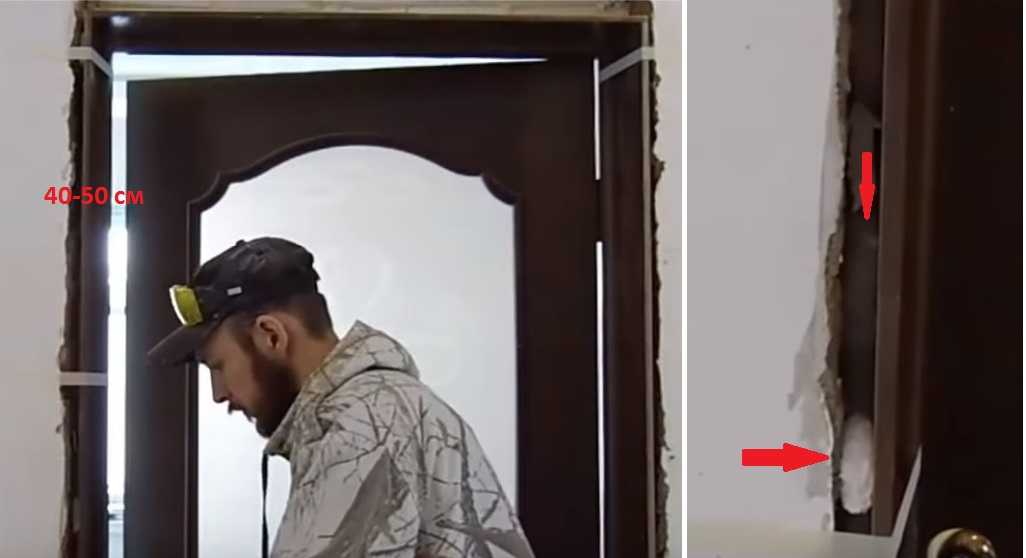
You also need to align the addition to the interior door to the level. You shouldn't be guided "by eye", use the level. With the help of a level and wedges, we remove all protrusions and debris. In the process, fix the leveled areas with masking tape. The distance between the tacks is 40-50 cm. One at the top and the bottom (retreating about 10 cm), and then at equal intervals.
How to fix the extensions: during installation
Further, using polyurethane foam with low expansion, we fill the space between the wall and the additional strip with it. Read the instructions on the bottle before use. It may be better to wet the surfaces. In any case, it is necessary to lay the polyurethane foam in stages, otherwise it can bend the additional strips. We'll have to rip everything off, clean and foam over again.
So, first we apply the foam deep into the gap. A little, one lane. At the same time, we make strips across the entire width near the "potholders" (an example of applying foam to the door frame in the photo above on the right). The foam in the area of the tacks will give the bar stability, the strip in the far part - near the joint - will press the filler to the groove, but it will not bend the bar.
We leave the foam on the side slats to polymerize, but for now we are filling the gap from above. If it is as big as in the photo, it makes no sense to translate a lot of foam. It is easier to cut the "bookmark" from the foam, put a wooden block of a suitable size. It is slightly smaller in size than free space. A gap of at least 1 cm should remain on all sides. But too large gaps are not needed.
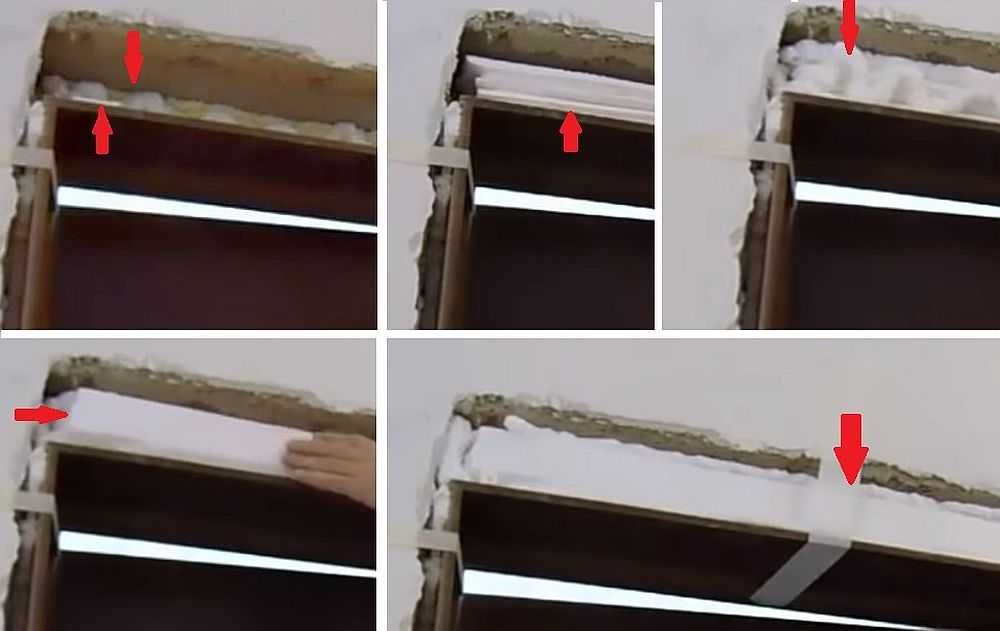
How to put accessories on an interior door: fill in the upper gap
Then we proceed like this:
- Place small pieces of Styrofoam 1 cm or so under the embedded part.
- Apply a layer of foam with a snake to the back wall (if any).
- We put a mortgage bar, fill the cracks around the perimeter with foam. Again, not too much so that the foam pad does not bend down.
- If necessary, set the "front" bar (in the photo above, bottom left). If the width of the bar is sufficient, we skip this stage.
- We align the position of the additional plank with the help of the building level, fix it with masking tape.
After the first layer of foam has frozen (the time is indicated on the cylinder), fill in the rest of the space. If the extension to the interior door has a significant width, it is possible (and better) to apply the foam in two stages. But each time you have to wait for the polymerization time. After that, it remains only to install the platbands.
How to attach an extension to a door frame if it is thicker than the selected quarter
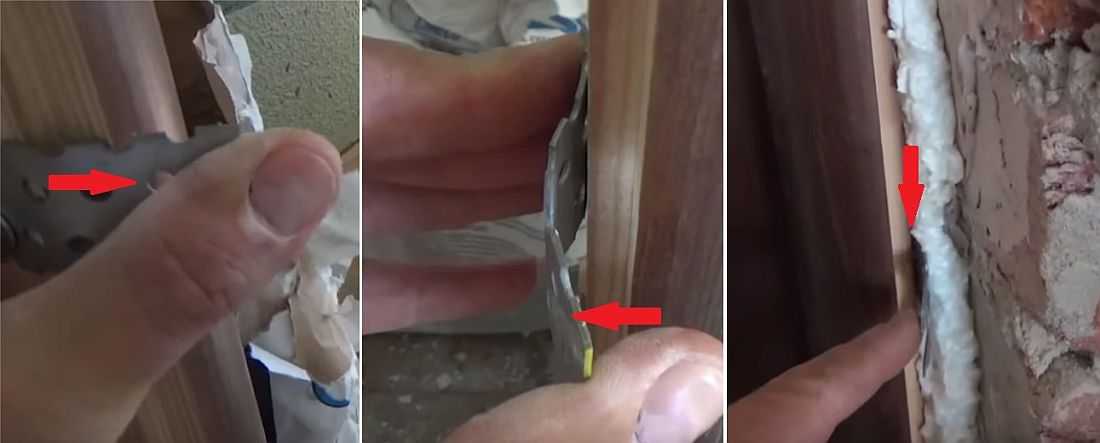
The addition is often thicker than the quarter chosen in the box.What to do then? How to make sure that the dock rested without gaps and held firmly? There is a simple way - to drill holes obliquely, screw in self-tapping screws, then close the holes with caps to match. Everything is more or less clear here, but not very nice - the stubs are still visible.
There is another way. Looking for plasterboard suspensions. Only they should be the strongest and thickest. We separate the parts of the perforated tape from the suspensions. Each gets two parts. You will also need small screws (fleas). We fasten the perforated tapes to the door frame around the perimeter - at the corners, retreating 10-15 cm, also from below, and in height at a distance of 40-50 cm.
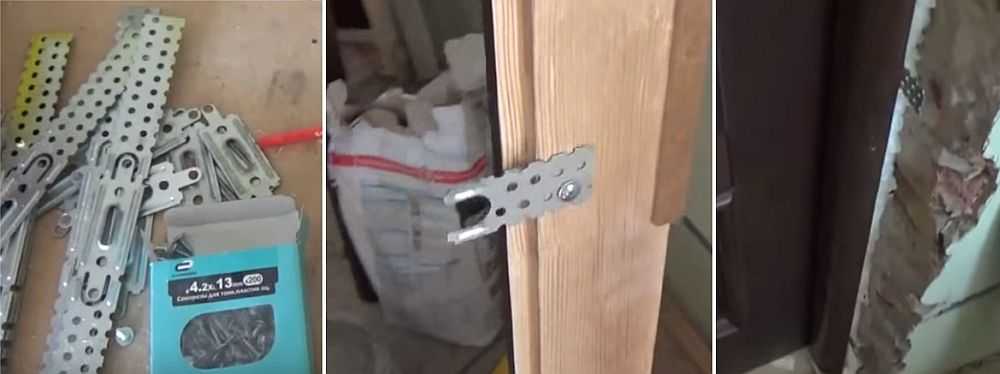
How to fix the addition
We screw in the self-tapping screws stepping back 1.5-2 cm from the edge of the box (middle photo). One self-tapping screw per piece of metal tape is enough. When the door frame is installed, the tape will stick out. These slats are thin so that even the smallest gap will not be a problem. If the extension on the interior door is the same width, just insert it. The plates, due to their elasticity, press it tightly.
How to put addons if they are thicker than a quarter
If the set is wider, first bend them to the front, then put them back. Due to the fact that they are not fixed to the edge, they bend, become like an arc.
This is how it can work out - without the slightest gap
Now we insert additional strips, winding them between the plates and the groove. They will press the bar tightly. The cracks will not be visible even upon closer inspection.
-
 How to open a door without a key if the door has slammed or the key is lost
-
 Dimensions of standard doorways: interior and exterior
-
 Magnetic locks and latches for interior doors - modern and practical!
-
 Door handles for interior doors: types, choice
-
 How to choose a video peephole (door peephole with a video camera)


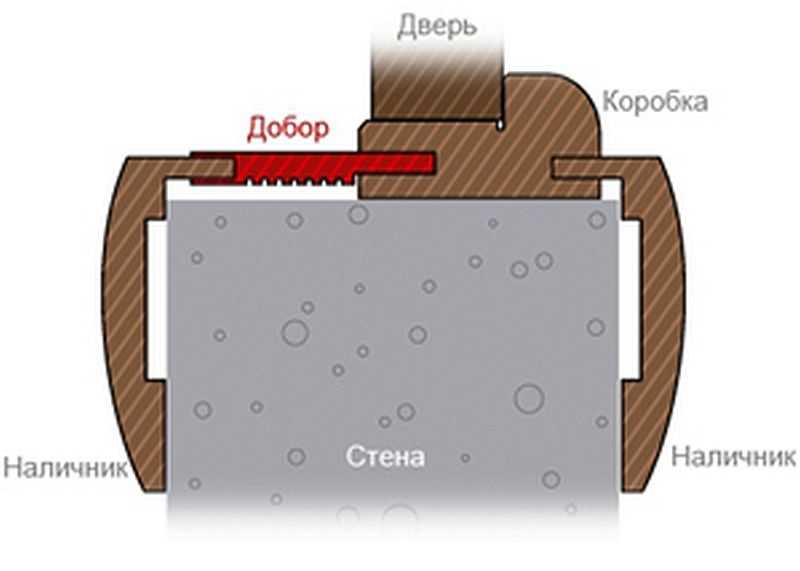
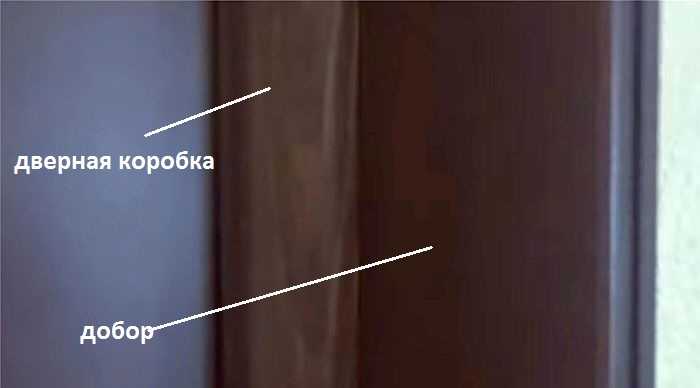
In the second picture, the complement is drawn on the wrong side