How to adjust the front door: metal, PVC
Even the best doors can begin to creak or sag over time: no one can cancel the force of gravity and friction. And if you have heavy steel ones, then even the metal will get tired of holding them. After the summer, plastic also "sag" - they almost always remain open in the heat, which leads to such results. There is no need to endure these "outrages", as well as spend money on their elimination. Adjusting the entrance doors is a delicate matter, but in most cases you can do it yourself. Once you have adjusted the hinges and baffle with your own hands, then you can easily repeat.

Do-it-yourself adjustment of the front door can be done even by fragile female hands))
The content of the article
Adjusting the metal entrance door
If you have a steel front door, the following problems may arise with it:
- creak;
- draft - blowing from under the canvas (slots around the perimeter or from above / below);
- closes with difficulty.
The solution to all these problems is called "front door adjustment", but this includes very different measures - from trivial lubrication and replacement of the seal, to the actual adjustments and mechanical influences.
Sometimes, to fix the problem, you need to go through all the methods, and sometimes the problem that has arisen can be eliminated only radically - by replacement. Most often, this situation occurs with cheap Chinese products. Adjustment of Chinese-made entrance doors is almost impossible. Of course, you can try to do something with your own hands: firms and craftsmen do not undertake them.
Eliminate the creak
Doors can creak for two reasons: the grease of the hinges is clogged or the door leaf touches the frame. Although both are called "creak", the character of the sound is different. It will be easier to cope with clogging of the loops, therefore, they usually start with this procedure.
Hinge lubrication
First, we remove the old grease, at the same time removing the dirt adhering to it. The procedure is standard: wipe with a soft cloth wherever traces are visible. If this procedure has not been done for several years, and the hinges are of the standard classic type, and even detachable, the canvas can be removed. Better to clean when removed.

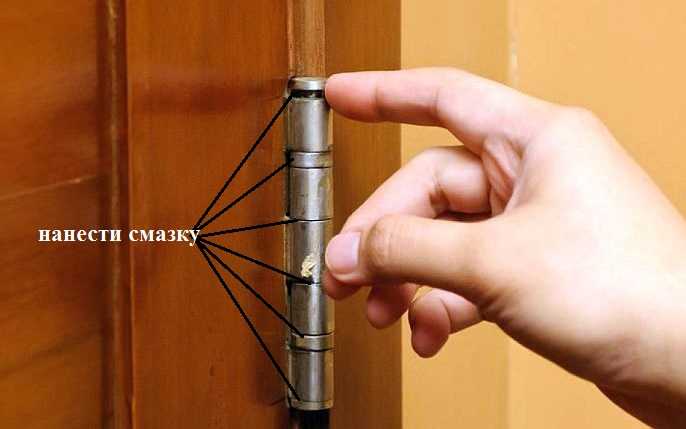
Traditional hinges are best lubricated when removed.
If the hinges are rusty and will not come off, although they should, do not try to knock them down with a hammer or sledgehammer. Do more harm than help. It is better to buy a rust remover. They are usually sold as sprays. Apply to rusted hinge and wait for the prescribed time. Then remove the canvas from the hinges and clean. But this time it is necessary to remove all the rust as well. To clean metal, then coat with rust converter and only then with grease.
After the old grease is removed, take the "fresh" one and apply it to the hinges. If the blade is removed, no problem will arise - lubricate the pin and ring. If you see any other rubbing mechanisms on the frame, lubricate them too.
In traditional hinges, squeaking may occur due to the washer on the rod being worn away. You examine it after you have removed the door leaf. If there are signs of abrasion, they are replaced. Install a new carbide washer. You can put an engraver instead. He will also compensate for the load.
If the hinges are one-piece, find a can of liquid lubricant (the most common WD40) or machine oil that can be applied with a large syringe.Handle all rubbing parts carefully.
One-piece hinge lubrication
There is one more method, but it is destructive. A hole is drilled in the upper part of the hinge, which is then filled with grease. The trick is not to damage the mechanism inside.
If the hinges are hidden, find all the swivel parts and lubricate them. These models often have holes in which oil is applied.
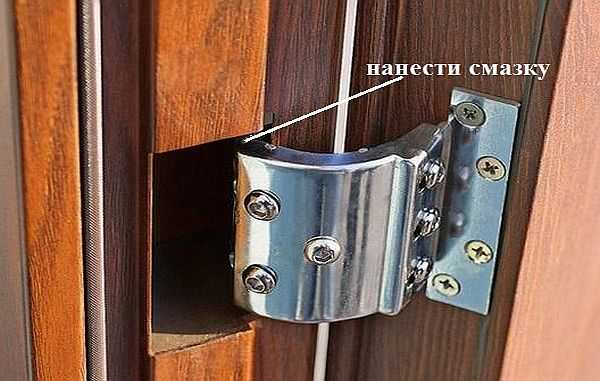
One of the models of hidden hinges
After applying the grease, swing the doors from side to side several times, distributing the grease. If this was the case, the creak goes away. The final touch is to wipe off excess oil.
How to lubricate the front door hinges
It is necessary to choose a lubricant primarily according to the temperatures at which the loop is operated. If the hinges go outside, a compound is needed that does not thicken at low temperatures. Here the choice is not very large:
- Litol. Operates reliably at temperatures from -40 ° C to + 120 ° C.
- Solid oil. The temperature range is slightly lower, but also sufficient: from -35 ° C to + 65 ° C.
For entrance doors that go into the entrance and are operated at freezing temperatures, you can add a few more items to this list:
- machine oil;
- universal grease WD40;
- machine lubricants.

Popular lubricant "for everything"

Elimination of friction on the box
If after processing the hinges, the creak remains, most likely it is caused by the friction of the door leaf on the frame. Examine the door frame for abrasions. If you find any signs of abrasion, see which hinge is closer. It will need to be regulated, if possible.
The difficulty lies in the fact that there are a lot of types and models of loops and it is impossible to say unambiguously what needs to be done. All that is possible is to list the main points that can be. Based on these, you may be able to determine how to "heal" your door.
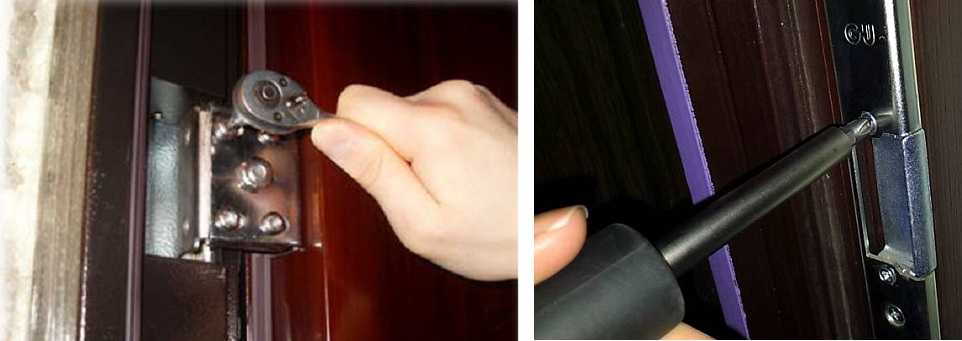
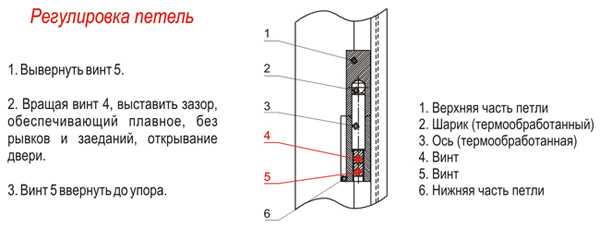
Two types of hinges for an entrance metal door with adjustment
Standard hinges are not adjustable. In this case, the adjustment of the entrance doors consists in replacing the washer. They are selected of greater or lesser thickness, adjusting the position of the door leaf. Some ball-top hinges have an adjusting screw. Unscrewing it, slightly raise the door, twisting it - lower it. You can try to fix the situation with it.
If standard hinges on a steel door are welded, we can assume that this has been exhausted. If they are set on screws, the fixing screws are loosened, move the sash in the desired direction as far as possible. Then the screws are tightened. Check if the problem is gone. If not, try with a different loop. Sometimes it is necessary to loosen all the loops, and tug the canvas in this position. In general - determine the place where to press and where to press.
There are hinge models in which the adjustment holes are hidden under a protective cap. But you won't be able to remove it just like that: it is fixed with a bolt that is unscrewed from inside the room. An example of adjusting such a loop in the video.
If the hinges on the front door are screwed on, you can eliminate the friction of the door leaf on the frame with their help. First loosen the screws near the abrasion area. Try to move the door leaf slightly. To begin with, you can knock with your palm or fist, moving it in the right direction. Try to open / close a couple of times. Did it help? Screw the set screws back. And try to open / close again.
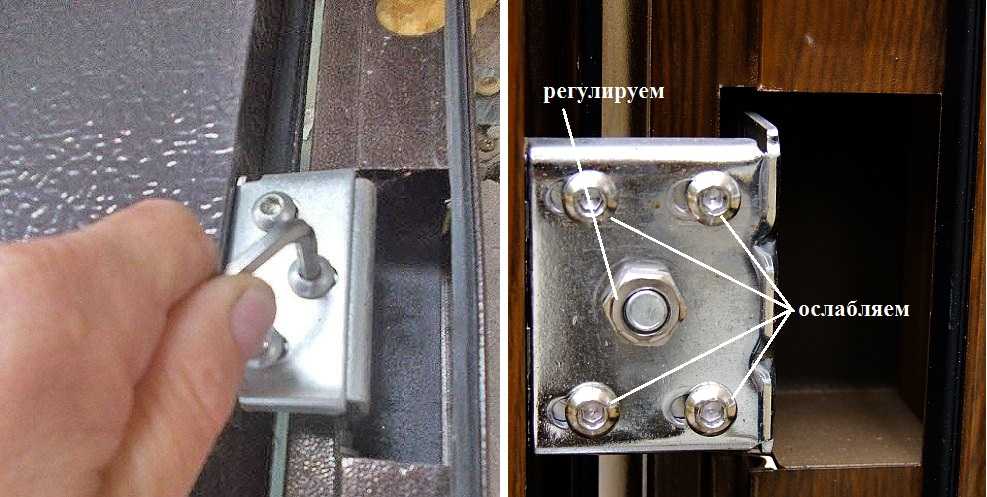
Hinges that can be loosened or tightened
If it does not help, you can use some kind of lever, hit with a rubber mallet or a hammer through the board. But don't overdo it. You need to be especially gentle with Chinese products: they are too flimsy.
If these manipulations also did not work, you will have to loosen the screws on all hinges and try to move the canvas over the entire area. Grasp the edge of the canvas with your hands and wobble it. In this case, the hinges should fall into place. Trying to open and close.If there is no squeak, tighten the bolts. That's all, the adjustment of the hinges of the front door cannot give more. The next thing to try is to change the geometry of the door frame. About this in the next paragraph.
The photo above (right picture) shows an adjustable hinge. By loosening the screws, you can turn the adjusting screw. Doesn't help - we try to move the canvas as described above.
We eliminate the loose porch (blowing from under the door)
Sometimes it blows from under the front door. If you examine the perimeter, you will most likely find that in some place the adhesion of the door leaf to the door frame is loose. There may be a decent size gap. You can check your suspicions with a piece of paper. You open the doors, insert a piece of paper between the canvas and the jamb, and close the doors. If the narthex is normal, the paper is either pulled with very great effort, or is clamped so much that it is impossible to remove it. Just break up. If the sheet is removed freely, then the fit is insufficient.
The simplest explanation is that the seal has lost its elasticity. If the doors are several years old, this is possible. And the first thing you do is change the seal. Didn't help or only partially solved the problem? Moving on.
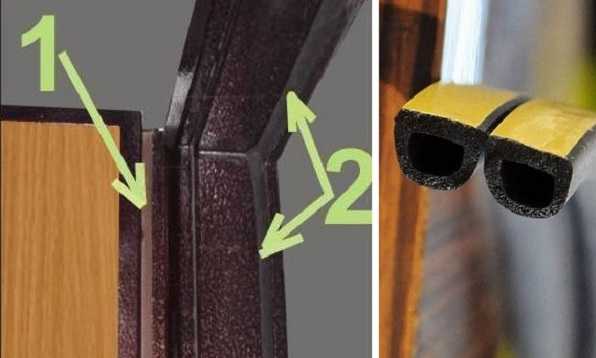
Replacing the seal is the first step if it comes out from under the front door
If the leaf is displaced relative to the door in the horizontal plane, we try to eliminate the draft from under the front door by first moving the door leaf. This is described above: loosen the fastening screws on the hinges, then try to move the canvas in the right direction. Check the result - the gap has disappeared - tighten all the screws to their original position.
Sometimes gaps under the front door arise due to the skewed door frame. This is verified with a level. Most likely, it skewed in the place where the sheet of paper can be freely removed. The second option, on the contrary, the box was kicked out in the place where the sheet is pressed, due to the fact that the “normal” part cannot be pressed. All this is determined with the help of an eye and level. Having decided what the problem is, we are trying to return the geometry to normal. The measures depend on how the box is installed:
- On the anchor. We loosen the anchor on the side where the box needs to be adjusted. To do this, remove the decorative overlays. A through hole is hidden under them, through which they attached it to the wall. Inside you can see the head of the anchor. Unscrew it a few turns with a screwdriver. Having unscrewed we straighten the position of the box. We close the doors, check. Everything is fine - we tighten the anchor.

Two types of mounting holes
- On the lugs. There are very few chances to correct the situation with little blood. Especially if the slopes have already been completed. You can try using a hammer and a board, knocking on the curved places. If the box is made of normal metal, it may straighten. If the product is from China, the box is likely to bend. In this case, sadly, only reinstallation can help. The doors will have to be cut and then re-installed.

See the video for an option to correct the gap in the vestibule. After front door installation it turned out that it was blowing strongly from under it. The owner corrected the distortion with a hammer.
We eliminate the sagging of the door (shuffles on the threshold)
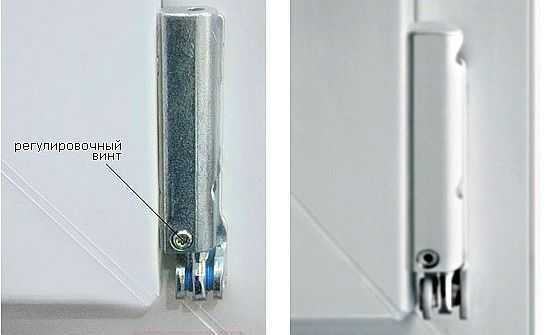
If, after several years of operation, the doors began to open with difficulty, while rubbing against the threshold, most likely, the fact is that the ball or bearings have worn out. If there are adjustments, you don't even have to remove them. Simply unscrew one of the bolts and lift it up slightly.
Adjustable front door hinge: correcting sagging
If there is no adjustment, there are several options:
- replacement of loops;
- replacement of bearings with new ones;
- installation of washers instead of bearings.
All this is determined based on the situation and the design of the loop.
Adjustment of plastic entrance doors
Problems can be the same: friction, hinges creak and a loose fit to the frame, which can cause blowing.But the adjustment of PVC doors is simpler - hinges and mechanisms are standardized, there are not so many types. So there is a hope that you will cope with the problems with your own hands, without calling the master.
Adjusting the balcony door
After the summer, the plastic doors to the balcony sag: in the summer they often remain open for a long time, which is why such a nuisance happens. Then they hit the threshold, an unpleasant sound is heard, the plastic is erased. In this case, you need to lift the canvas up. This is done using the adjustment located at the top of the lower hinge.
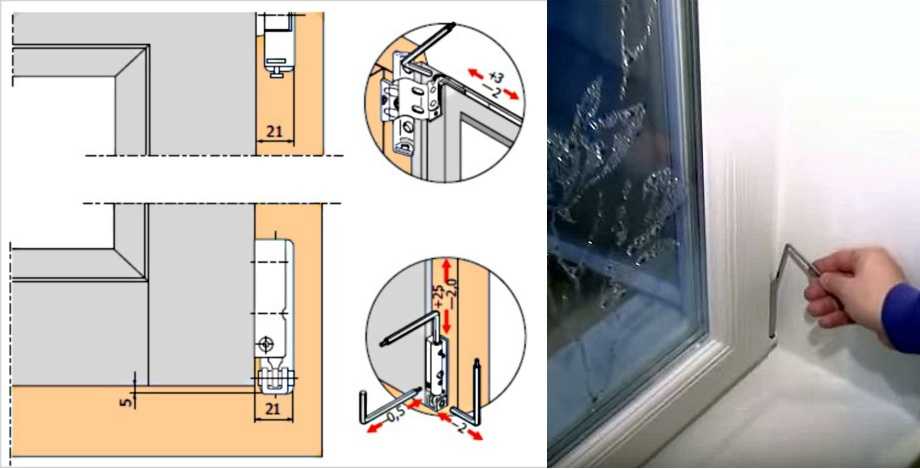
Adjusting the sag of the plastic door
They do it with the lock open, but the door is closed. Take a hex key (usually 4 or 5) and insert it into the hole, turn it a few turns. It is not necessary to lift strongly immediately, as this can cause other problems. Raise only until the problem is fixed.
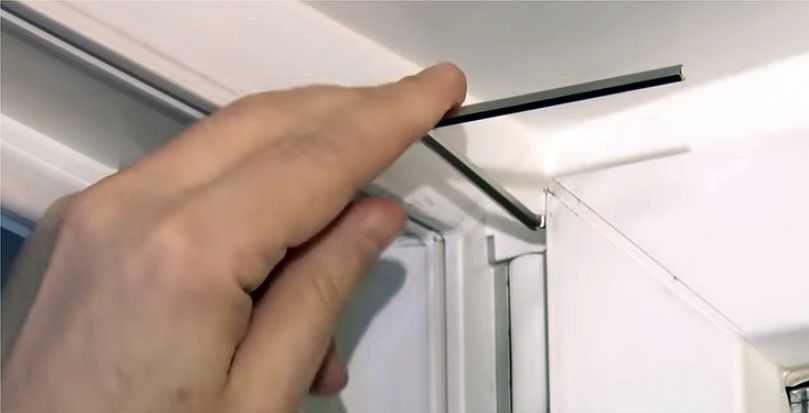
Sometimes, when closing the door, they rub from the side, touching the metal clips. It turns out that you need to move the canvas towards the looped part. For this there is another adjustment on the same hinge. It is located below, visible when the door is open.

Adjusting the balcony door when rubbing against the rack
This adjustment is carried out in the same way with a couple of turns clockwise or counterclockwise. If you need to prevent the doors from rubbing against the rack, twist counterclockwise. Do a couple of turns, check. Once the problem is gone, stop. Otherwise, you can move it so much that the lock will no longer "cling" to the counterpart.
If the upper left corner "clings", you need to adjust the loop that is at the top. The principle is the same: one or two turns, until the trouble is eliminated.
Upper Buttonhole Adjustment - Upper Left Corner Presser
Clamp adjustment (to prevent bleed through)
Sometimes a weak clamp is observed from the side of the locking part. It seems that the canvas adjoins exactly, but it pulls noticeably from under the door. In summer this is not a problem, but with the onset of cold weather, the temperature significantly decreases. There are two ways. The first is to adjust the pressure pins. These are metal projections on the sash.
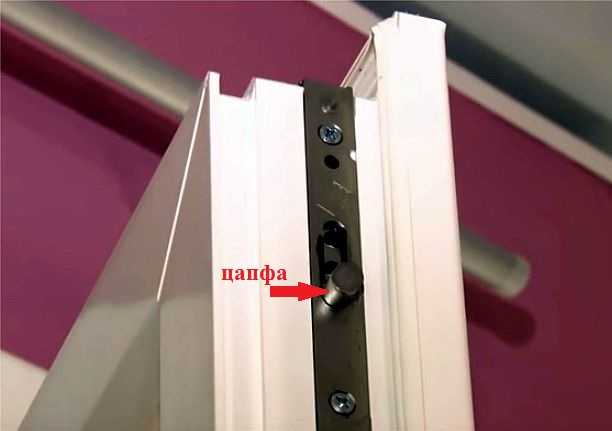
Trunnions on a metal-plastic door
They are of two types. as in the photo above - oval, and round, but with an eccentric in the middle. The position of this element determines the degree of pressing the sash to the frame. The way to change the position depends on the shape of the trunnion. If it is the same as in the photo, take the pliers, squeeze and twist slightly. Maximum pressure if the long side is turned horizontally, minimum - if it is directed vertically upward. There are also all intermediate options.
If there is an eccentric in the center of the trunnion, then there is also a hole for a hexagon. Insert it and turn, achieving the desired degree of pressure.
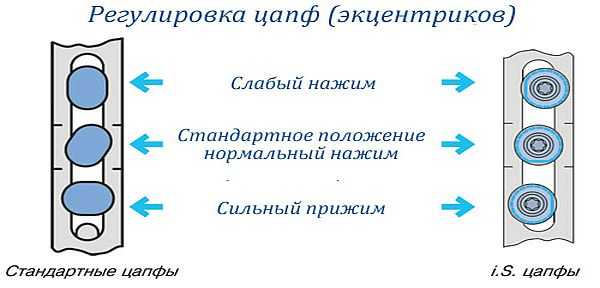
The position of the pins and the degree of clamping of the sash of the plastic door
It is not recommended to set the maximum value for the staza: the seals will quickly lose their elasticity. Also make sure that all eccentrics are turned the same way. This ensures that the fittings work properly.
But sometimes there is a situation that the sash of the balcony door is not tightly pressed from the hinge side. This is also eliminated by adjusting the hinges. At the bottom, it is under the protective cap. Take it off (pull it up). Take the key (hex) and adjust the pressure of the lower right corner of the balcony plastic door with a couple of turns.
There is a plastic door pressure regulator
There are also hidden hinges on the frame, which also have the ability to adjust the pressure. They are located on the hinge side of the frame. Adjustment with the same Allen key. Turns "clockwise" and "counterclockwise".
Pressure adjustment with hidden hinges
Adjustment of entrance doors made of plastic
Plastic entrance doors have different hinges, and there is no locking and tilt fittings. They have closed overhead loops. They have three adjustments:
- the height of the door leaf relative to the frame - from the bottom of the hinge;
- the density of pressing the canvas to the frame - on top of the loop;
- horizontal movement of the sash - lateral
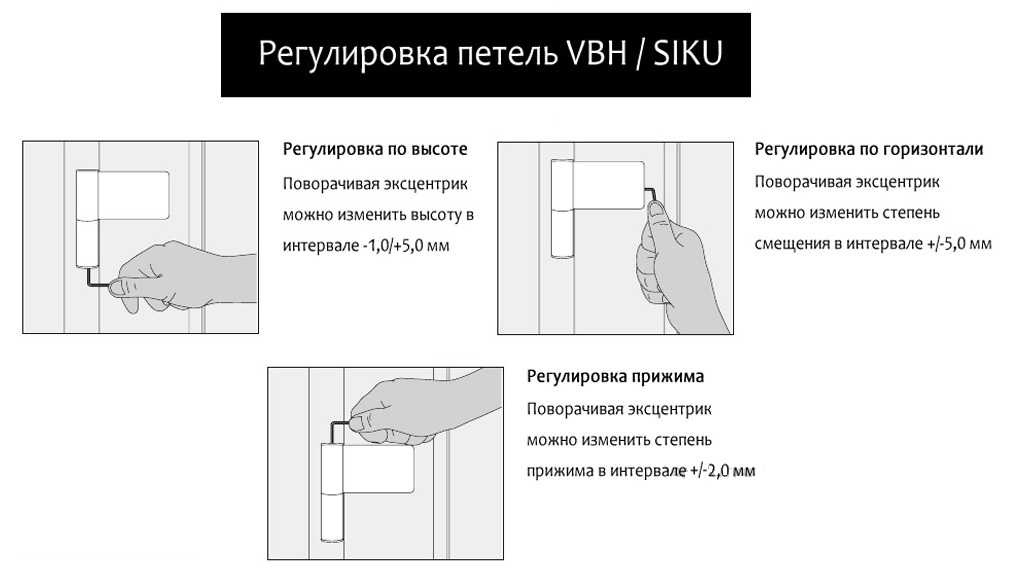
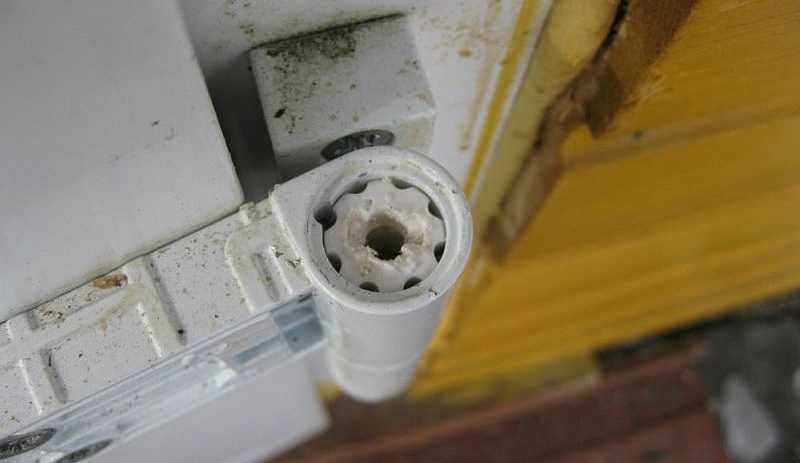
Where are the holes with which the plastic entrance door is adjusted
There are enough of them if the doors were initially set correctly: the limits of position changes are significant, which makes it possible to compensate for the changes that have occurred during operation.
If there is a creak in the hinges, they must be lubricated. To do this, remove the upper cap and into the opened hole, into which the grease is put. Since plastic doors are installed as entrance doors mainly in private houses and they go out into the street or into an unheated vestibule, then you select a lubricant that does not thicken at low temperatures (Litol and Solidol).
Put grease here
In some models of hinges, the lid simply pops off, in others, you need to unscrew it and then pull it out. Determined locally.
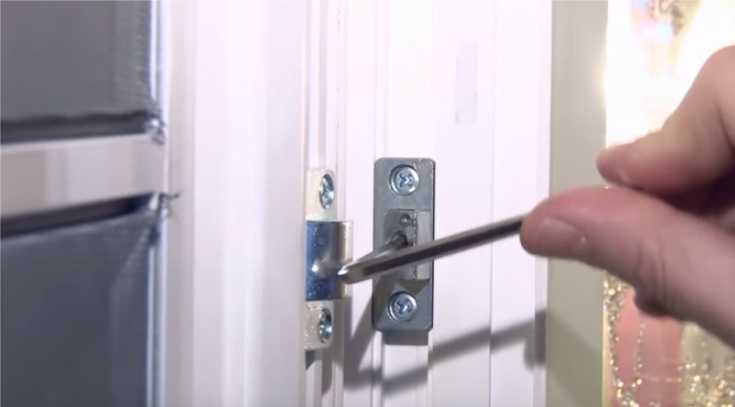
Sometimes a situation arises when intervention is required: the lock is poorly fixed. If the sash pressure is normal, the striker must be corrected. She is mobile in such doors. Loosen the mounting screws, use a screwdriver to move the bar slightly in the desired direction and tighten the screws back. Checking. Should help.
-
 How to open a door without a key if the door has slammed or the key is lost
-
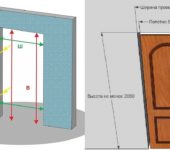 Dimensions of standard doorways: interior and exterior
-
 Magnetic locks and latches for interior doors - modern and practical!
-
 Door handles for interior doors: types, choice
-
 How to choose a video peephole (door peephole with a video camera)


