Installing and connecting a kitchen hood
In order for the apartment or house to have fresh and clean air, the kitchen must have very good ventilation. Natural ventilation cannot cope with the task of timely removal of odors during cooking, therefore a special forced ventilation device is hung over the stove - a kitchen hood. How to install the hood correctly, how to fix it and bring it into the ventilation system - more on that later.
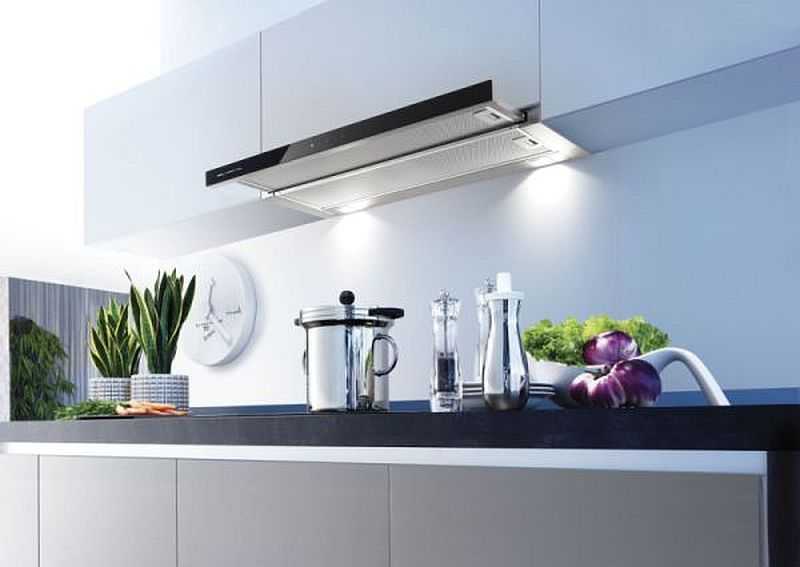
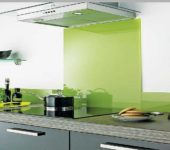
Installing a hood in the kitchen is a wise decision
The content of the article
How to hang a cooker hood over a stove
With the correct size, it is equal in width or even slightly larger than the width of the slab. To install the hood correctly, it is necessary to position and secure it correctly. The electric hood is located exactly above the stove. The installation height depends on the type of hob:
- Above the gas hob, the minimum permissible height of the hood is 75 cm.
- Above the electrical value is slightly less - 65 cm minimum.
You determine the exact height yourself - according to the height of the hostess who will cook. The bottom edge of the hood should be just above her head. It is not worth hanging lower than the minimum distance, but higher you can. But if you need to hang equipment higher than 90 cm from the level of the stove, you need a unit with increased power - so that polluted air is removed efficiently.
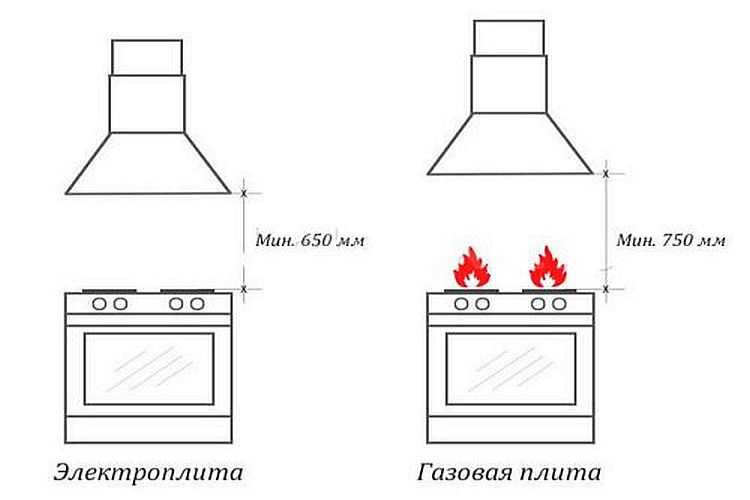
The minimum height for installing hoods above a gas and electric stove
The hood is attached depending on the type. Built-in - to a specially ordered cabinet. Hinged (flat) and domed (fireplace) - to the wall. The fireplace hoods themselves can consist of two parts - a unit with a motor and filters and a dome. Both parts are attached independently of each other, but so that their outputs coincide.
Separately, it should be said about island hoods. They are attached to the ceiling. The kit includes a suspension system and clear recommendations on what and how to do.
Installation steps
The entire installation and connection process can be broken down into several stages:
- First, you need to install the hood in the right place. This involves physically attaching it to a wall or ceiling.
- The second stage is connecting to power supply. If there is an outlet nearby, there should be no difficulties. Otherwise, you will have to pull the wire from the nearest source; as a temporary measure, you can use a carrier (extension cord).
- The last stage is relevant only for models with exhaust air output to the ventilation system. At this stage, the air duct is connected and its output to the ventilation duct.
It is not difficult to correctly hang the hood in the kitchen with your own hands.
If there is an outlet nearby, there will be no problems with the electrical connection. The other stages are also not very difficult, but we will consider them in more detail.
Wall mountable or domed model
Although outwardly these two models are different, they are attached to the wall. They have four holes on the back of the case - two on the left, two on the right. Many manufacturers supply their products with a mounting template on which the locations of the fasteners are marked. All that is needed is to lean the template against the wall, transfer the marks. If there is no template, measure the distance between the holes, transfer to the wall. If there is an assistant, you can ask to hold it at the selected height, and make the marks yourself.
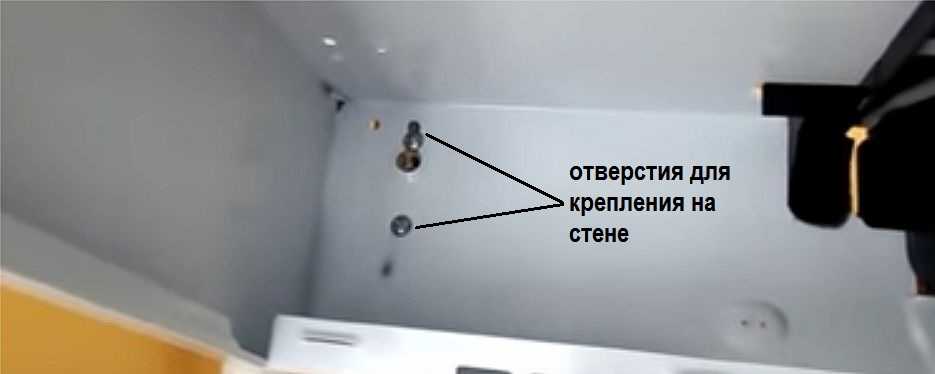
It is necessary to fix the hood to the wall through regular holes in the case
Then everything is simple: with the help of a drill we make holes of a suitable size, insert plastic plugs for the dowels, then hang the hood on the dowel-nails. Naturally, we check the horizontality of the installed equipment.
This method is good if the wall is flat and does not interfere. Often a gas pipe runs next to the stove, which makes it impossible to hang the hood close to the wall. In this case, you can nail wooden bars onto the wall, and the hood can already be attached to the bars. This is a simple option, but not very good - the bars are covered with soot and it is difficult to wash them.
The second option to install the hood behind the pipes is to use a hairpin screw (the second name is a plumbing stud). They have a thread for screwing into the wall, a smooth part, which makes it possible to carry the hood at a certain distance from the wall and a smaller thread with two nuts, with which we will fix the body. There are these studs in different sizes, choose which one you need, but all nuts are made for a bit or an octagonal wrench.
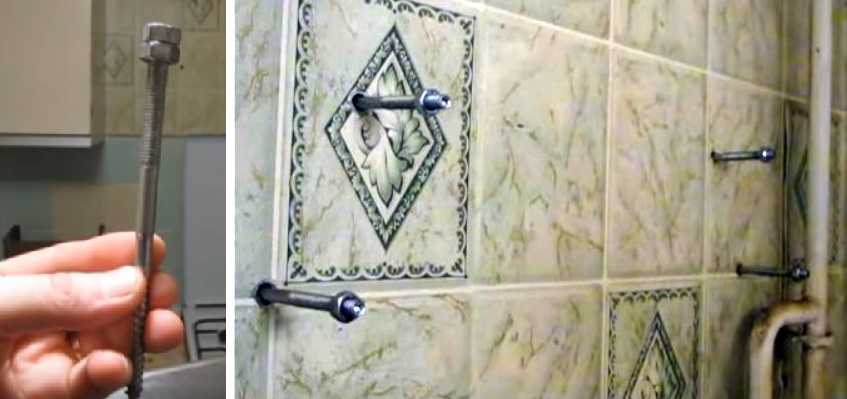
How to install a hood on a wall if a gas pipe interferes or the wall is uneven
This type of hood mounting is universal, simple in execution, and reliable. It is also more convenient to maintain - the metal is usually stainless, it is not difficult to wash it from deposits.
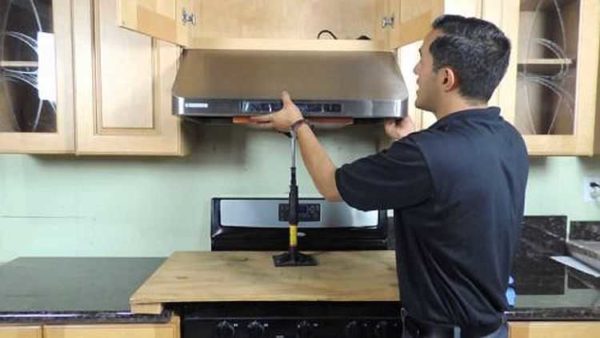
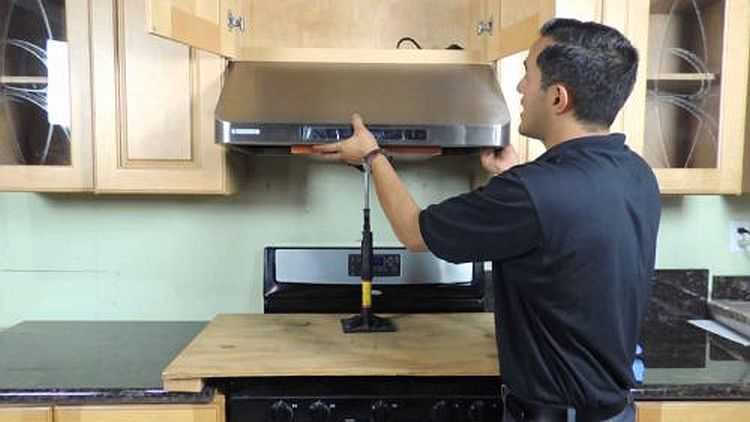
Installing a built-in hood in a cabinet
The built-in hood is almost completely hidden in the cabinet made for it. It is fastened in the same way as described above - on screws, only they are screwed into the walls. Only beforehand in the shelves located above it is necessary to make holes for the air duct. This is done after the hood is purchased, since the location of the air outlet depends on the company and model.
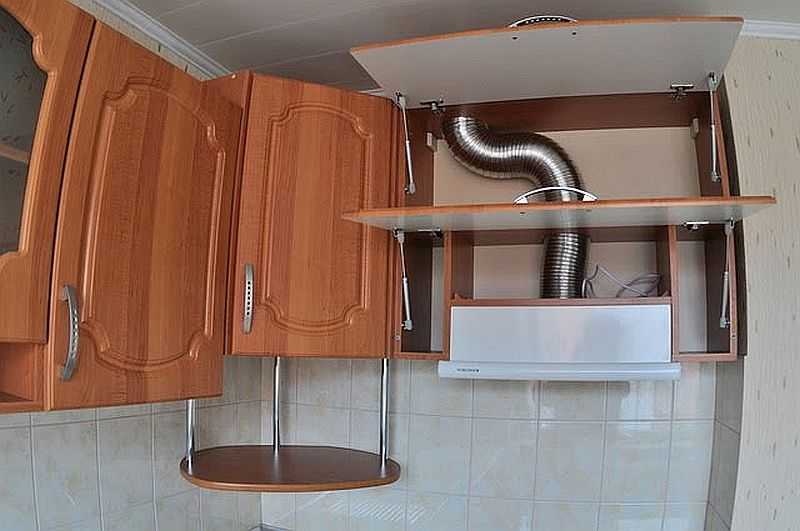
Installation example of a built-in hood
If the locker is hanging, it is better to remove it. Install the hood in the removed cabinet, mark the location of the air outlet on the bottom shelf, cut it out. To do this, it is easier to use a jigsaw and a file with fine teeth. Almost no chips are left by the laminate file. If you wish, you can seal the cut point with a plastic C-shaped furniture profile. They are tough and flexible. Flexible to use is simple - it bends at any angle, rigid ones will have to be warmed up with a construction hairdryer before installation. These profiles are "set" on glue, most often "liquid nails" are used. After installation in place, remove the remnants of the glue (with a damp clean cloth), fix it with masking tape to the shelf. We cut off the excess profile with a file with a fine tooth, clean the cut with fine-grain sandpaper.
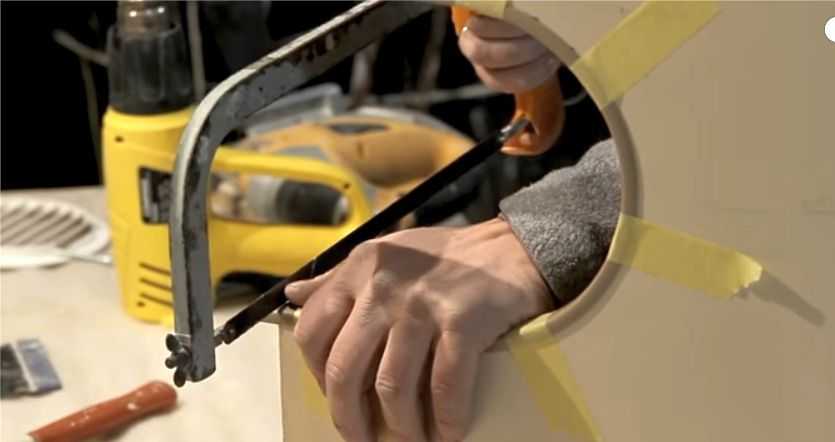
The process of preparing the cabinet for installing the hood
In the same way we make holes in other shelves. By the way, they may no longer be round, but rectangular - depending on the section of the duct you have chosen.
After that, all the shelves are installed in place, the cabinet is hung and fixed. A built-in hood is attached to it with screws through the holes in the housing. Next is the process of connecting the air duct.
How to connect the hood to electricity
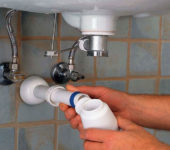
Since the power consumption of cooker hoods rarely exceeds 1 kW, they can be plugged into ordinary sockets. It is desirable that they be grounded. This requirement must be met if you want the warranty to be valid.
If the wiring in the apartment is old, you can throw the grounding or grounding wire yourself. Just don't fix it to water or heating pipes. This threatens with the possibility of electrical injury or even death for you, members of your slaughter or neighbors.
To stretch the ground wire, on the shield, find a bus with wires attached to it or a pipe to which a stranded wire is welded / screwed. You can also connect your own stranded wire to these devices (without folding back those that are already there).For it to work normally, the cross-section must be 2.5 mm, the conductor is stranded copper, a non-combustible sheath is desirable.
Connect the hood through the Vago terminal blocks
Some of the hoods come with a fork at the end. With the connection of such models, no questions asked - into the outlet and that's it. But there are models in which the cord ends with wires. This is not due to the greed of the manufacturer, but in order for the consumer to decide how best to connect the equipment. If you want - you can connect the plug. This option is not suitable - take the terminal block and connect through it. Another option is Wago terminal blocks. They need to take three pieces - according to the number of wires. In one terminal block, the same wires are connected from the hood and from the shield - phase to phase (here the colors may be different), zero (blue or blue) to zero, ground (yellow-green) to ground.
Cooker hood air duct
One of the stages of installing the hood is the selection and installation of air ducts. Air at room temperature is removed from the kitchen, therefore there are no special requirements for air ducts and any can be used. Three types are commonly used:
- Aluminum corrugated sleeve. It is good because it is easy to give it the desired shape - it bends easily at any angle. They simply take a piece of the desired length and shape it as desired. Disadvantage: the hood will be noisy as the air flow causes noise and resonance. The second negative point is that the surface is ribbed, which creates additional difficulties for air flow. Well, one more drawback is that it is difficult to care for: soot and dust are clogged into the grooves, it is difficult to clean it.
- Plastic (PVC) round duct. Convenient to use round polymer pipes. The air duct of the required configuration is assembled from shaped elements - bends, bends, adapters, couplings. They are connected to the pipe due to the presence of extensions on the fittings. To prevent the elements from separating during operation, the joints can be coated with glue (liquid nails or Moment). Another option is to fasten it with self-tapping screws - three to four pieces for each connection. The advantage of PVC air ducts for the hood is that they are "quiet", smooth inner walls do not impede air movement, the outer ones are easy to clean. The disadvantage is the more complicated assembly process (compared to aluminum corrugation).
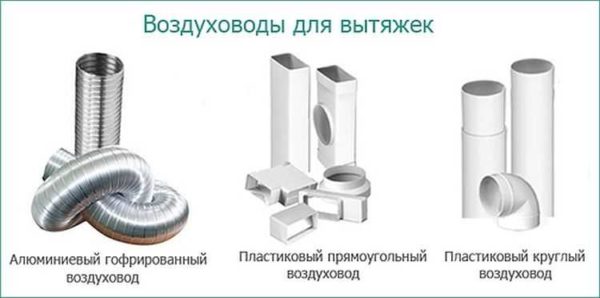
Types of air ducts for kitchen hoods
- Plastic square duct. Also made from polyvinyl chloride (PVC), but has a rectangular cross-section. All other characteristics are the same. Rectangular air ducts are used if it is necessary to save space - they hide well behind plasterboard partitions, behind stretch or suspended ceilings.

There is also a difference between a plastic and a corrugated duct - the price. Polymers are more expensive. Despite this, if you have the opportunity to install a hood using PVC, install them. With the same cross-section, they provide more efficient air discharge and also produce less noise.
The cross-section of the duct pipes is determined by the size of the outlet on the hood. In the case of rectangular pipes, an adapter is used.
Dimensions of air ducts for hoods
Round air ducts are available in three sizes: 100 mm, 125 mm and 150 mm. This is the diameter of plastic pipes and corrugated sleeves. There are more cross-sections of flat air ducts and they are presented in the table.
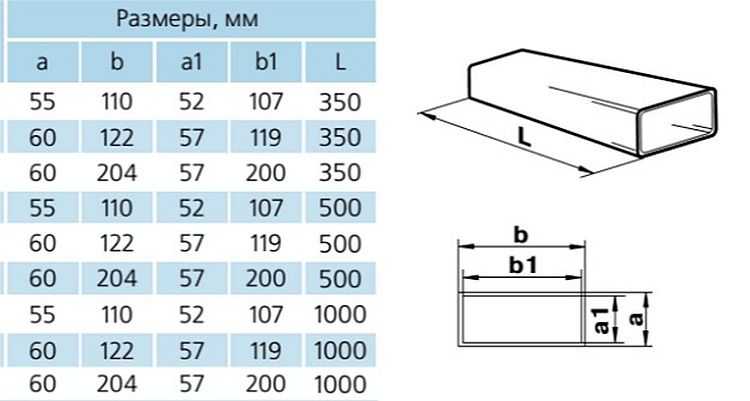
Dimensions of flat PVC air ducts for hoods
How to choose the size? In the case of round pipes, their diameter should be the same as the outlet of the hood. It is very undesirable to put an adapter on the outlet, and then use a smaller diameter air duct - this will reduce the speed of air purification. And even if the hood is very powerful, then it will not cope with air purification.
With the choice of a rectangular duct cross-section - its cross-sectional area should not be less than the cross-sectional area of the outlet pipe. And the connection is made through a suitable adapter.
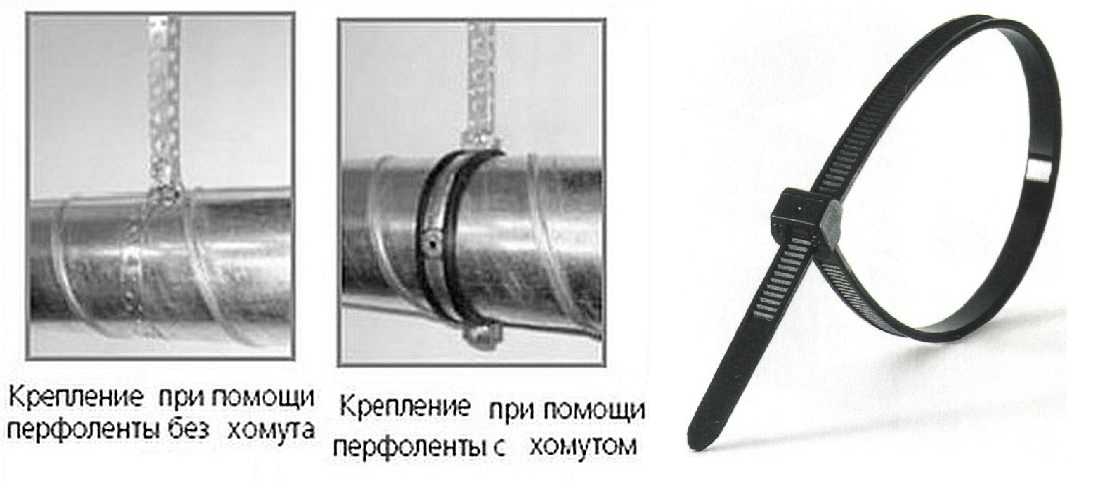
How to attach the corrugation to the hood and ventilation
If you decide to install the hood and use an aluminum corrugation for the duct, you will need to think about how to attach it to the cabinet and to the ventilation. To do this, you will need clamps of a suitable size. They can be metal or plastic.
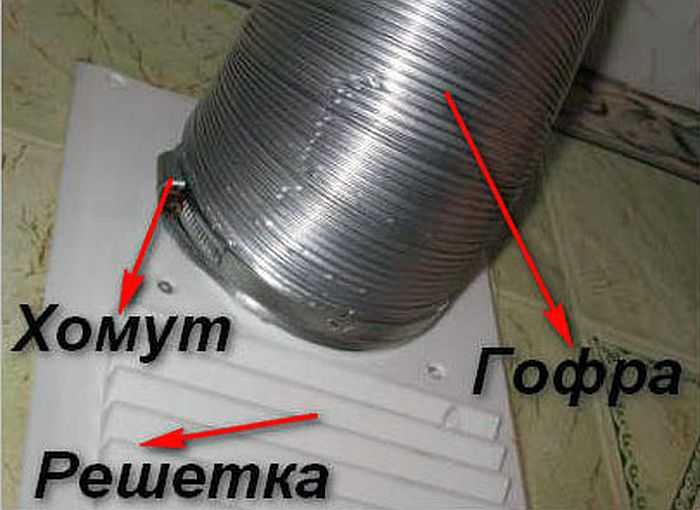
To connect the hood to the ventilation system, you will also need a special ventilation grill. It has a hole in the upper part for connecting the air duct pipe. In the lower part there are openings for removing air from the kitchen by means of natural circulation when the hood is not working.
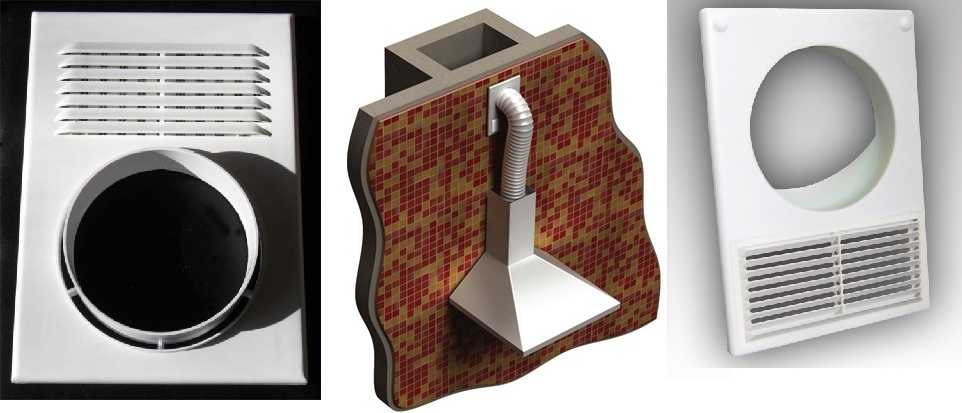
Fastening the corrugation to the grille on the wall
For fastening the corrugation, a lattice with a protrusion is suitable - there is a rim of several centimeters around the hole, on which the corrugation is put on, after which it is fastened using a clamp of a suitable size.
According to the same principle, the corrugated duct is attached to the hood. It has a ledge on which the corrugation is put on. The connection is tightened with a clamp.
How to fix the duct to the walls
For plastic air ducts, there are special fasteners in the form of latches. They are first mounted on the wall using dowels. The installation step depends on the curvature of the route, but on average 1 fastener per 50-60 cm is sufficient. Pipes are inserted into these latches during installation with little effort.
If the duct is to be fixed to the ceiling, the same fixings can be used. But if it is necessary to maintain a certain distance from the ceiling, this type of installation will not work. In such cases, they take perforated drywall hangers, attach them to the ceiling, then to them with small PVC screws an air duct for the hood.
Corrugation fastening methods
Corrugated air ducts are attached to the walls using clamps or large plastic ties. To the ceiling, if necessary, they are also mounted using perforated aluminum hangers.
Where and how to bring the air duct
Most often, the air duct from the hood in the kitchen is connected to the ventilation hole through which natural ventilation (due to the draft) flows. This is wrong, since in this case most of the grille is closed by the air duct, and the exchange of air through the remaining openings will be clearly insufficient.
A significant part of the ventilation grill is closed and ventilation in the apartment will be insufficient
Correctly connect the air duct to a separate ventilation duct. In this case, the same grille is installed on the hole as in the photo above.
If there is no separate ventilation duct, but there is an outer wall nearby, you can bring the pipe outside by placing a grate outside. These are two ways to have adequate ventilation and to ensure that the hood works properly.
How to take outside
To install the hood and bring the air duct into the wall, you need to make a hole in it. And this is the only difficulty. Next, an air duct is inserted into this hole, sealed with a solution. Outside, the hole is closed with a lattice - so that no debris gets in, birds and small animals do not settle.
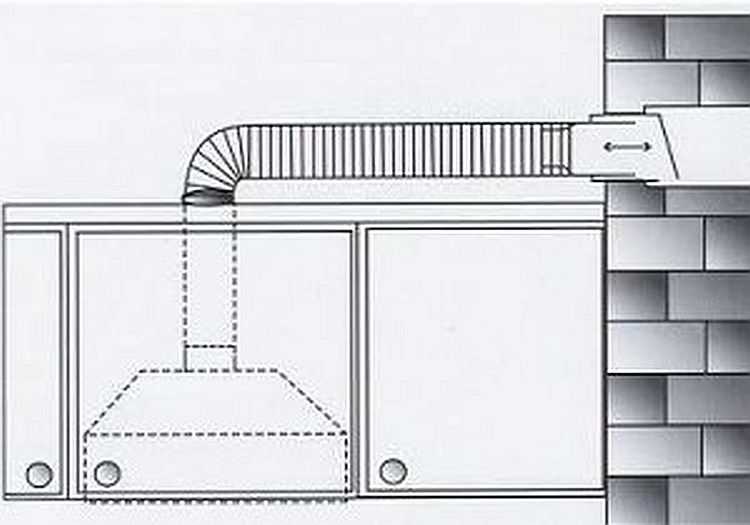
One of the examples of installing a hood in a kitchen with air outlet through the wall
To prevent air from blowing into the room from the street, a check valve is installed (in the figure above, it is indicated by an oblique line). By the way, it is advisable to install it when connecting the air duct to the ventilation system - so that smells from the pipes do not enter the room.
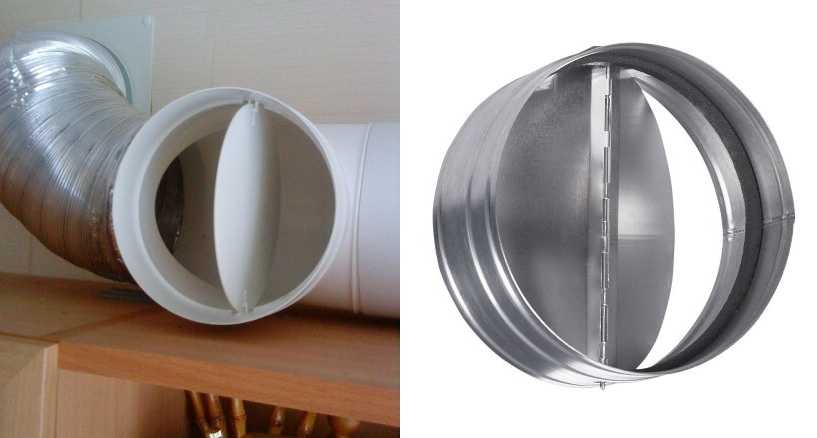
It looks like a check or anti-return valve for air ducts
The non-return or anti-return air valve is a lightweight plastic or metal plate. It is movably attached in two places to the pipe - above and below, the petals are supported by a weak spring. While the hood is not working, the valve closes off the air from the outside. When the hood is turned on, the air flow bends the plate forward, depressing the spring. As soon as the hood is turned off, the plate is returned to its place by means of springs.If you install a hood without this valve, it may be too cold in the kitchen in winter - the outside air will easily enter the room.
So that the hood does not interfere with natural ventilation in the kitchen
By the way, using a tee and a non-return valve, you can install the hood so that it does not interfere with the natural ventilation in the kitchen. You will need a special ventilation grill to connect the hoods, a check valve and a tee. A tee is attached to the vent grating, an air duct from the hood is connected to its lower inlet, and a check valve is placed on the free outlet, then only so that the petals are locked when air passes from the pipe (pictured below).
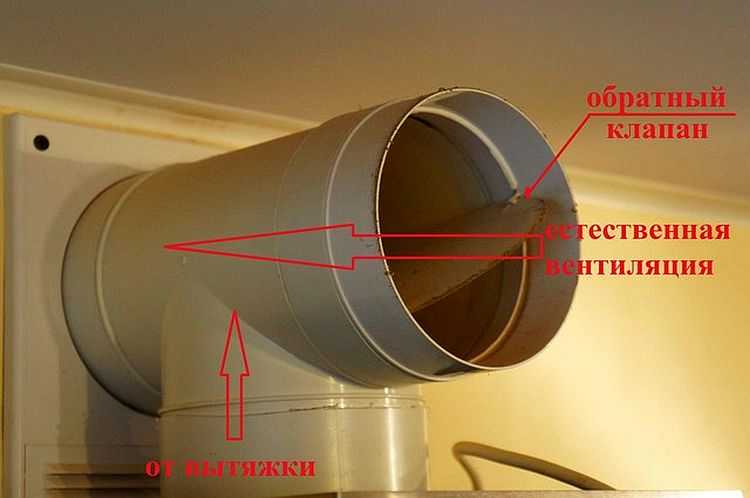
Anti-return valve for normal natural ventilation in the kitchen
How does such a system work? When the hood is turned off, the petals of the check valve are bent, air from the kitchen enters the ventilation duct through the grate and the open outlet of the tee. When the hood is turned on, the air flow from it unfolds the valve plate, and the air goes into the ventilation system. When the hood is turned off, the springs open the air again through the tee.
Outwardly, such a system does not look very attractive and it will have to be masked in some way. But this is the only way to connect the hood to the only existing ventilation outlet and not reduce air exchange.


Good day. I need to turn on the hood. Lay the air duct and make a hole in the wall to the street ...