We build a country toilet: projects, drawings, dimensions
This article presents samples of country toilets: drawings of booths, their average sizes, some recommendations for construction. The design can be different: there are projects of rectangular, triangular, diamond-shaped. You choose the shape, then the material, and you can start building. There are drawings, the structure is not the most difficult. Just keep in mind that the sizes are for people of average height and build. They can be easily changed without really changing the design.
Country toilet design can be simple or intricate
The content of the article
Street toilet layout
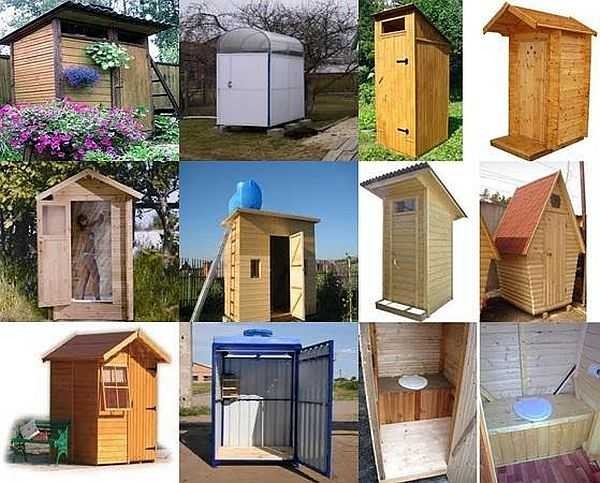
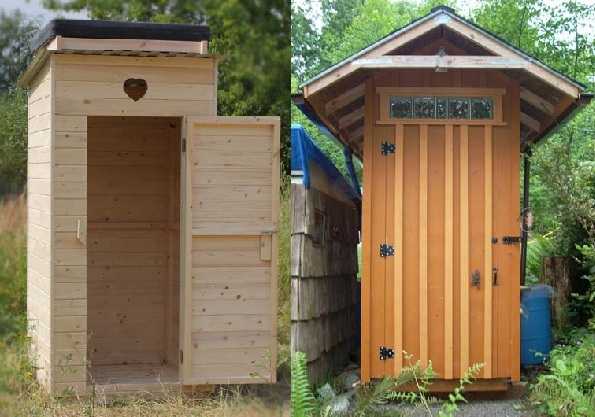
The most common option for a country or garden toilet is a rectangular building. It is also called the "birdhouse" because in the version with a pitched roof it is very similar to it.

The project of a country toilet made of wood of the "Birdhouse" type
In the drawing of the toilet shown in the photo above, a 40 mm thick board was used for decoration. The construction is very inexpensive. Doors can be made of the same planks, fastened with planks at the top, bottom and obliquely. Hinges can be placed outside - barn, decorating the building in a deliberately rough style.
Samples of country toilets: the drawings are the same, the design is different
Despite the fact that the building is utilitarian, if desired, it can be given an attractive look and the birdhouse will turn into a quite attractive small building. For example, you can make a small mill out of this building.
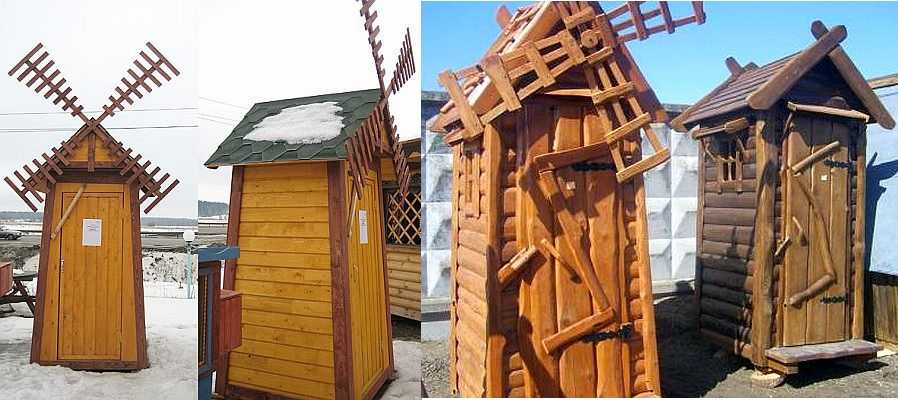
Country toilet-mill - a little imagination and an unsightly building becomes a decoration of the site (to increase the size of the picture, click on it with the left mouse button)
The same birdhouse, but from a log house - a completely different look. Everything will look especially harmonious if the building on the site is built (or will be built) also from a log.
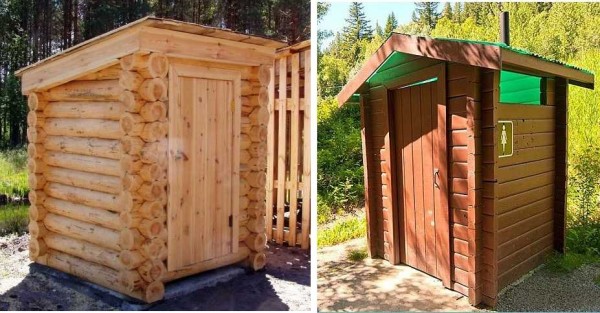
Even the simplest log toilet looks almost exotic. Moreover, it can be used as a winter version (to increase the size of the picture, click on it with the left mouse button)
For regions where wood is a luxury, and it is irrational to spend it on building a toilet, the same structure can be sheathed with another material. For example, the frame is sheathed with any sheet material - plywood, fiberboard, gypsum fiber board. Finishing material - tiles or decorative stone - can be laid on them outside. An even more budgetary option is to sheathe it with corrugated board.
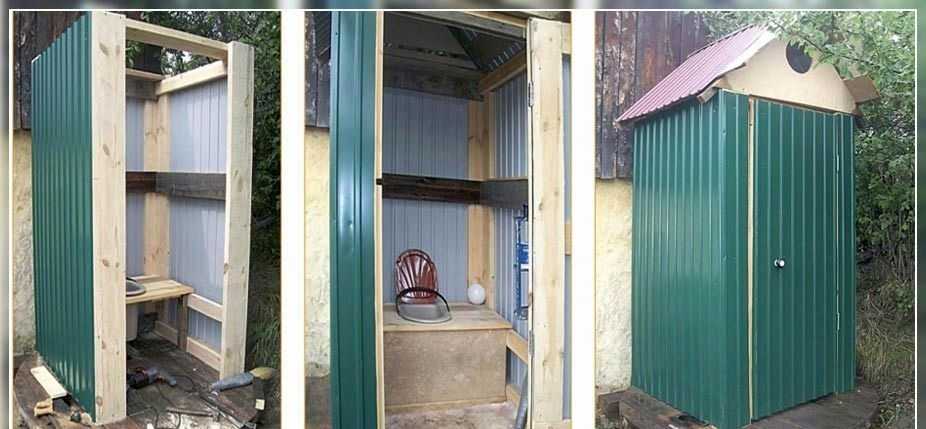
A toilet in the country with their own hands is built from any material. This one is made of corrugated board (to increase the size of the picture, click on it with the left mouse button)
This is the type of toilet that is easy to build out of bricks. They are usually made in half a brick. There are no difficulties even for an inexperienced bricklayer. Offset masonry, cement-sand mortar.
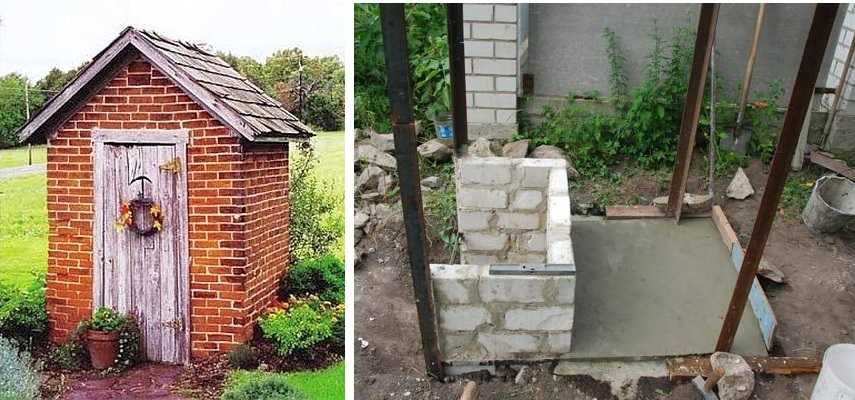
Using the same project and drawing, you can build a toilet out of bricks (to increase the size of the picture, click on it with the left mouse button)
Step-by-step instructions for building an outdoor toilet here.
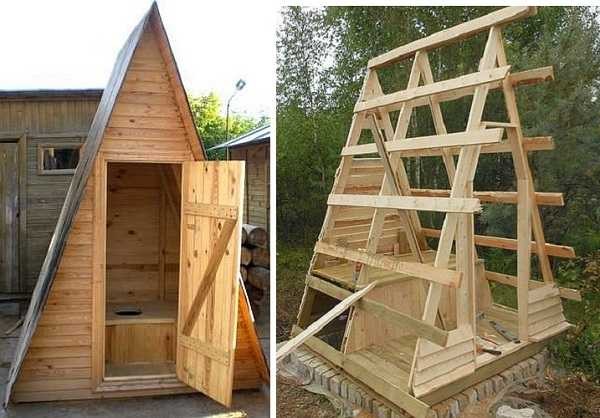
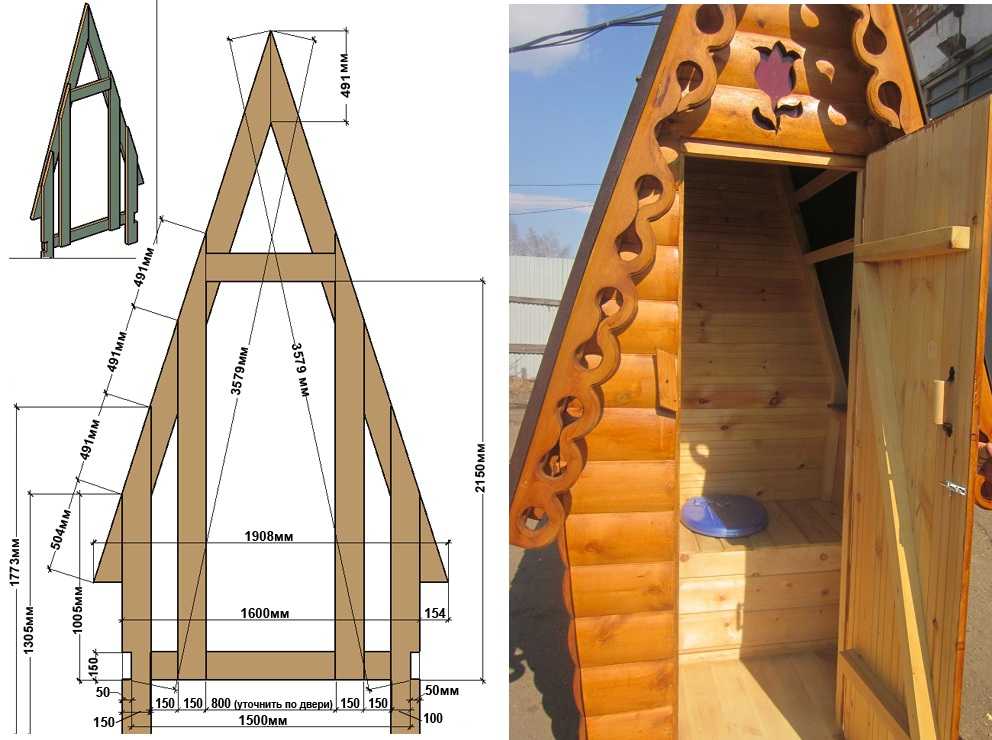
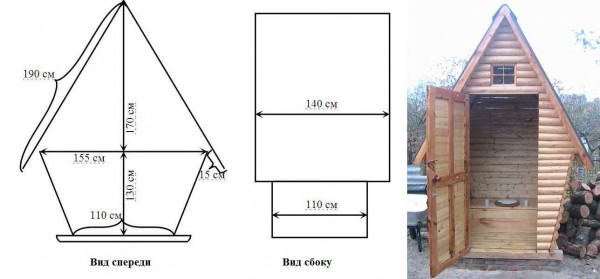
Toilet type "Shalash" (triangular)
This toilet stall has a triangle shape. The side walls are also the roof slope. You can build such a toilet with your own hands in a few hours. Drawings with approximate dimensions are given in the picture below. You can and should make adjustments to them: all dimensions are given for people of average build.
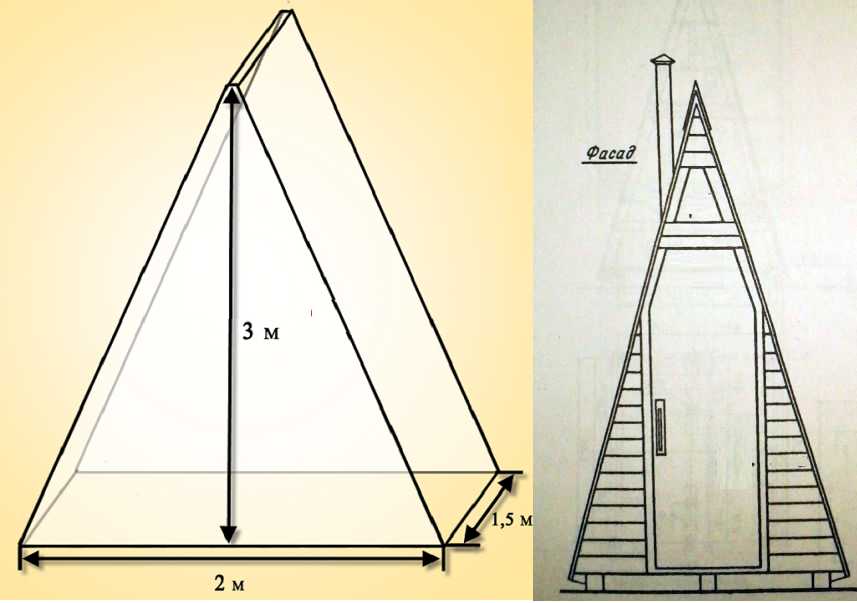
Drawing of a country toilet of the "Shalash" type (to increase the size of the picture, click on it with the left mouse button)
If you need wider doors, you do not have to push the base, which is already considerable in this project, but make doors of a non-standard shape - as in the figure on the right.
Sheathing with finishing materials in the Shalash toilets is carried out only in front and behind. Roofing material is laid on the side surfaces. You can use any, but soft tiles or polymer slate look good.
Having drawings of a triangular toilet in the country is easy to build
In the photo on the right, the crate is made for sheet roofing material - plastic slate was used - it is of different colors, it is relatively inexpensive, it can be mounted simply - with nails and gaskets.
If you are planning to use a soft roofing material - roofing material, bituminous tiles or something similar, make the crate solid - from a sheet of moisture-resistant plywood, Chipboard, GVL. They are attached to the frame with self-tapping screws, roofing materials are laid on top.
Read about ventilation in an outdoor toilet and shower here... About, how to get rid of odors is written in this article.
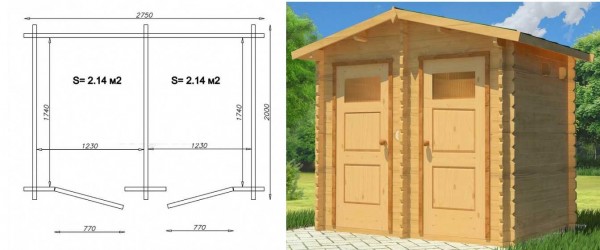
Drawing of the toilet "Teremok"
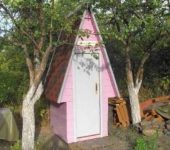
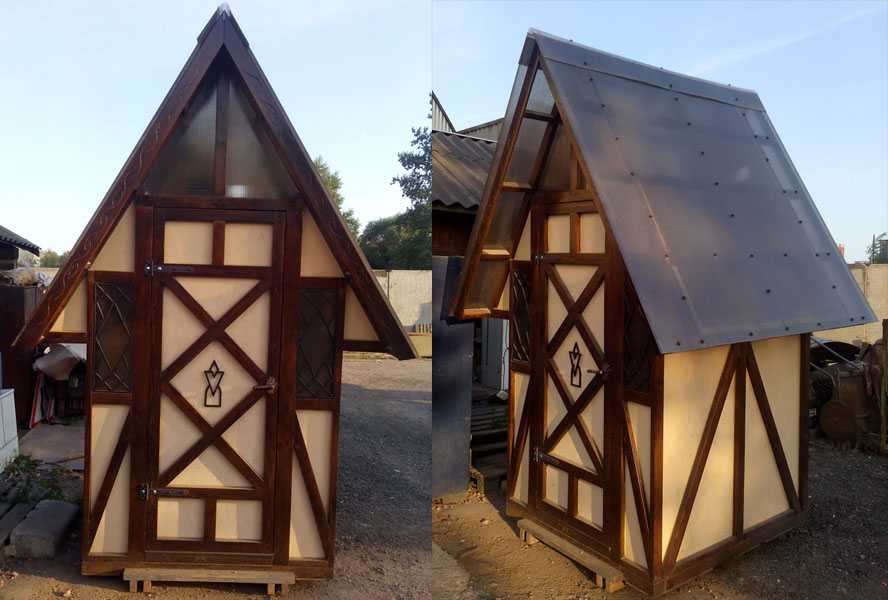
This toilet has a diamond shape. In comparison with the "Shalash" it takes longer to build, but it also looks more decorative. With the appropriate design, it will not spoil the landscape in the least.
Drawing of the toilet "Teremok" with dimensions (to enlarge the picture, click on it with the left mouse button)
A diamond-shaped toilet house at a summer cottage looks good. Outside, you can beat the frame with round timber of a small diameter, sawn in half, thick clapboard, block house, ordinary board. If you are using a board, do not nail it end-to-end, but placing it a couple of centimeters on the lower one, like a spruce cone. You can, of course, and end-to-end, but the appearance will not be the same ...
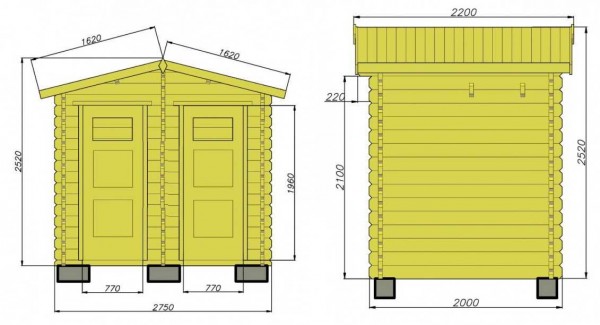
The second option: the "Teremok" country toilet is made with beveled side walls.
Country toilet "Teremok" - the second project with dimensions (to enlarge the picture, click on it with the left mouse button)
The main snag in any small wooden toilet is to secure the doors well. The door frame is the most stressed part, especially on the side where the doors are attached. To fasten the door pillars to the frame beams, use pins - this way the fastening will be reliable.
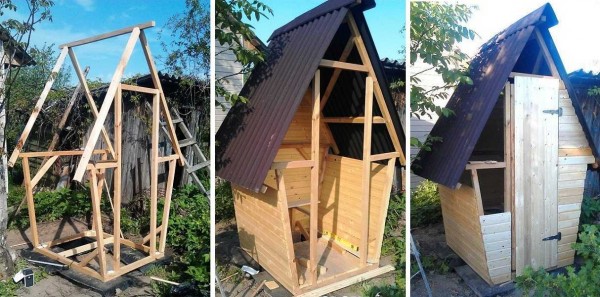
Photo illustrations: builds a toilet in the country with his own hands. The drawings are presented above
From this simple, in general, design, you can make a restroom in any style. For example, in Dutch. The decoration is simple - light plastic, on top of which are filled with characteristic beams painted with stain. Pay attention to the glass inserts and the fact that the roof of this instance is made of polycarbonate. If the polycarbonate is multilayer, it shouldn't be hot)))
Country street toilet in the form of a Dutch house
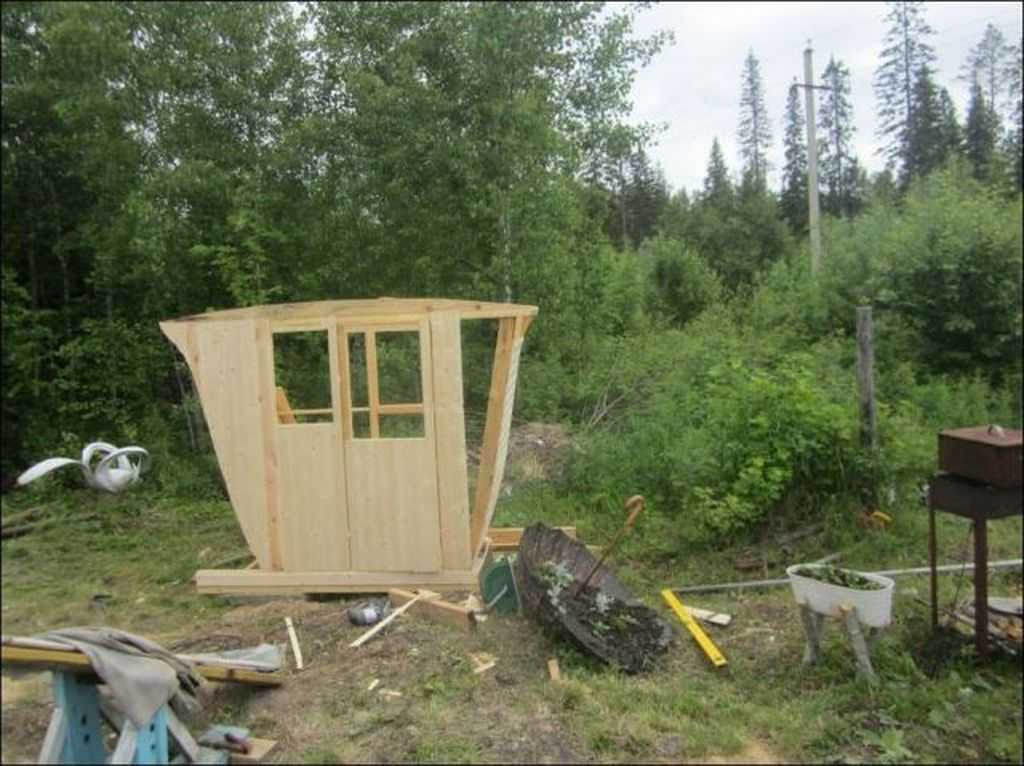
You can even turn the Teremok toilet into a royal carriage. This is no joke ... confirmation in the photo. All you need to do is change the shape and add a few decorative elements typical for carriages. So you get a toilet in the form of a carriage.
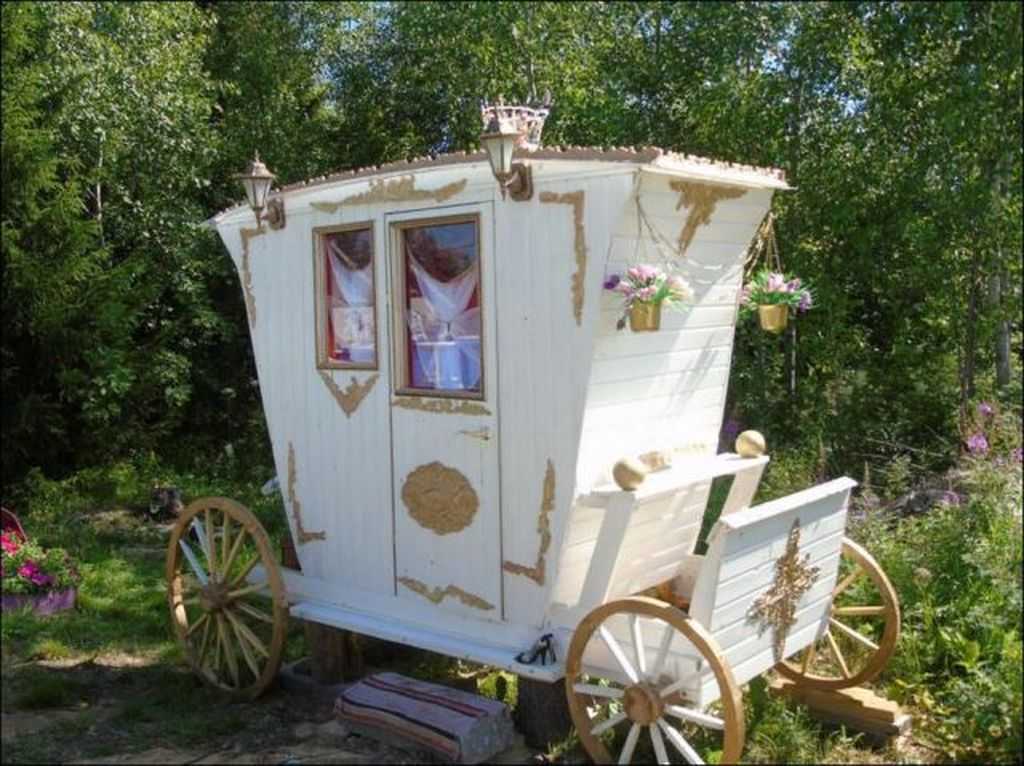
Street toilet carriage
Here are some photos of the manufacturing process. A dry closet was installed in the original, therefore the construction is simple: there is no need to think about the pit and the nuances associated with it... but such a booth can be adapted to any type ...
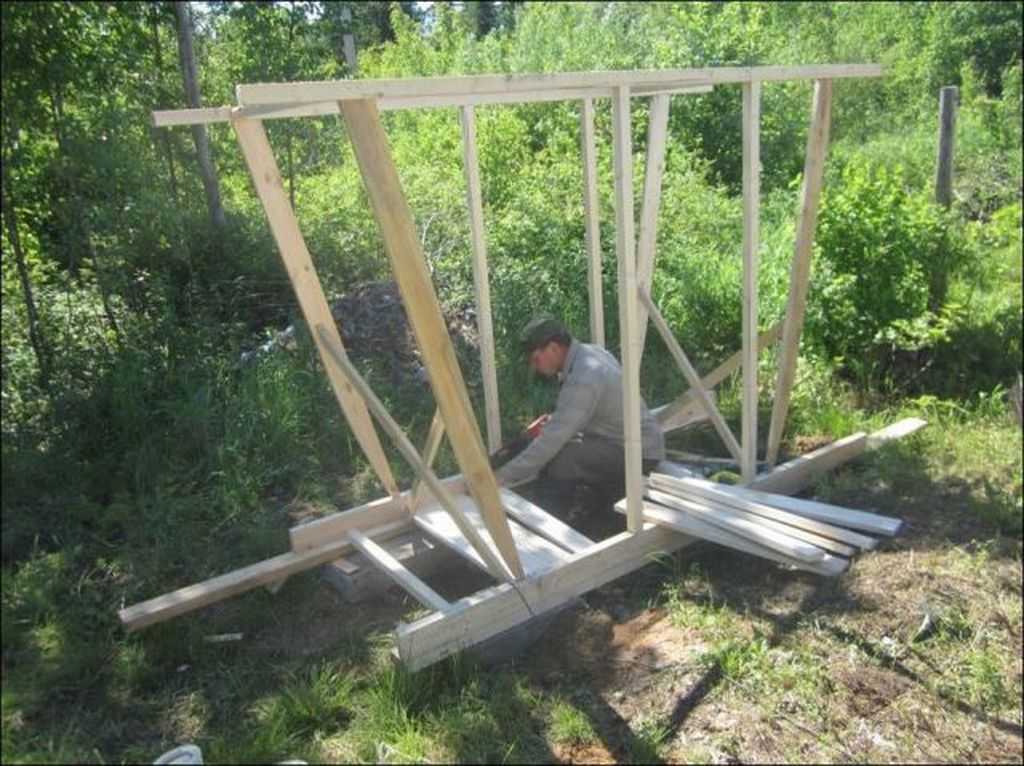
Frame of characteristic shape
Note that the shape is achieved thanks to the planks set at an angle, and the smoothly tapering bottom is achieved by appropriately trimmed supports.
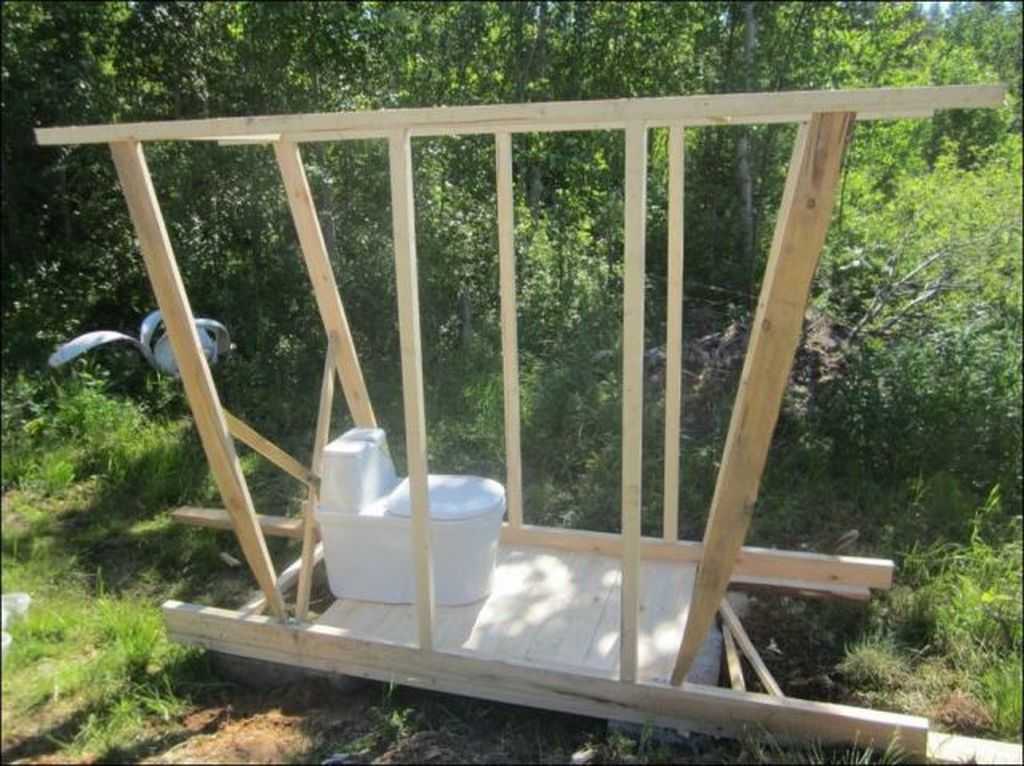
A dry closet is installed on the podium
The floor is sewn up with short boards, then the sheathing begins outside. At the top, the carriage also has a smooth bend - cut out the corresponding guides from the short boards, nail them to the already existing side posts and you can start the outer wall cladding.
Wall cladding
The inside is also sheathed with clapboard. The outside of the toilet-carriage is whitewashed, from the inside the wood has a natural color. After that, there is the decoration and the addition of characteristic details - monograms painted in gold, lanterns, "gold" chains, wheels.
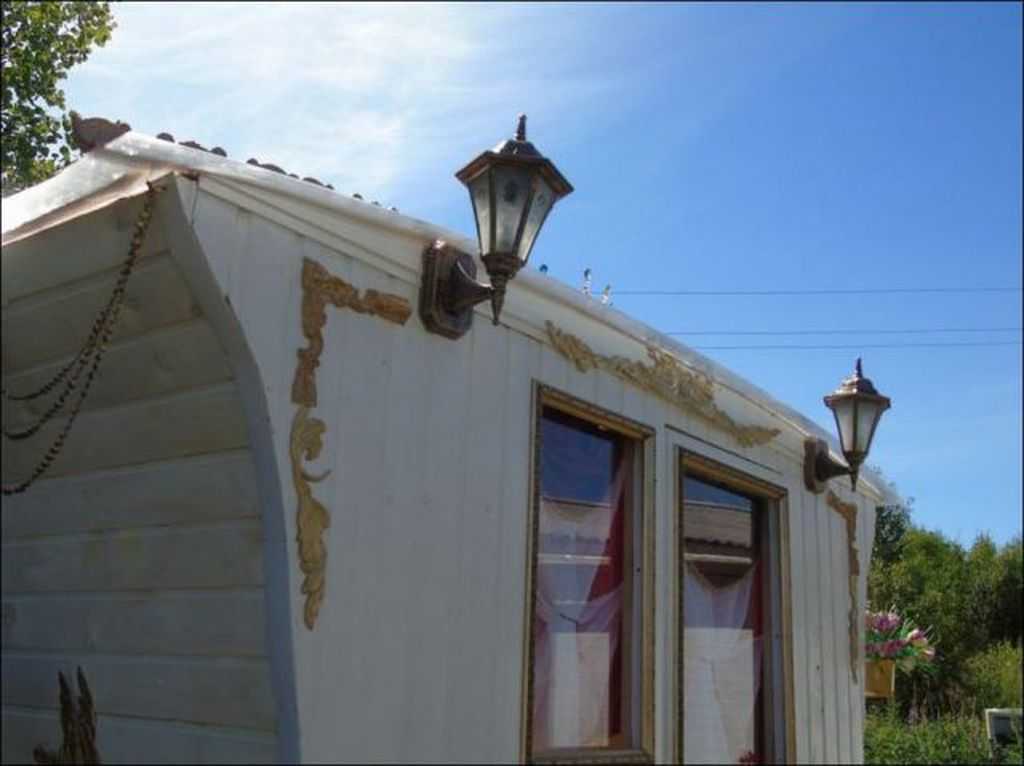
Painting and decorating
"Tsarist" curtains and flowers))) There was even a washstand and a small sink.

Inside view of the windows
After all the efforts, we have the most unusual toilet in the area. Few can boast of such a thing ...

Also suitcases in the trunk))
Warm restroom
It is quite comfortable to use a toilet with a wall in one board in summer. But not all summer cottages are visited only in the warm season. For the autumn-spring period, at least some kind of insulation is needed, which will block the drafts.
In this case, the design of the toilet is no different. Only increase the dimensions by 5-10 cm more: the cladding will be double - outside and inside, and insulation is laid between the cladding. The doors will also need to be insulated - double doors are too heavy for such a building, but from the inside they can be covered with a piece of linoleum, dermantine and other well-washable material.
About building a toilet with your own hands (with a photo report you can read here).
Combined shower-toilet
The second necessary building in the country is a shower. And if so, then why build two separate structures if they can be built under one roof. Several drawings of country toilets with a shower for self-construction are published below.

Option of a combined toilet for giving a shower (to enlarge the picture, click on it with the left mouse button)
Second project of toilet and shower under one roof.
Appearance and drawing of a toilet and a shower for a summer residence in one building (to enlarge the picture, click on it with the left mouse button)
View and dimensions of the toilet + shower in front and on the side (to enlarge the image, click on it with the left mouse button)
As you may have guessed, the building is simply doubled in width. If you want, you can create your own project, according to your wishes and needs. A drawing of a utility block with a toilet will be exactly the same. You may need to make one of the rooms a little larger. You just provide for this when planning and manufacturing supports for a building.