How to build a house for 10-20 chickens with your own hands
Household or country housekeeping is a great help. Even a dozen chickens will be provided with eggs and meat. The first thing to do is to build a chicken coop for 10-20 chickens. Construction can be quite inexpensive.
The content of the article
Optimal dimensions
If you approach the question of determining the size of the chicken coop scrupulously, then for each breed of bird there is a certain norm of "living space". But in the country or in a private house, a thoroughbred bird is rarely kept. Therefore, they proceed from the average.
There are some general guidelines to follow when creating a chicken coop project.
We estimate the area and dimensions of the building
When building a chicken coop, they usually proceed from the planned number of birds. It is believed that 2-4 hens can live on 1 square meter of area. If we are talking about broilers, you can take 3-4 pieces per square meter. They are inactive and this area is enough for them. If we talk about layers or meat and egg breeds, it is believed that the optimal amount is 2-3 birds per square of area. So, a hen house for 10 broiler chickens can have an area of 2-3 squares, a hen house for 10 hens - when keeping layers or meat and egg breeds - requires 4-5 squares. If you decide to build a chicken coop for 20 chickens, the area for broilers will be 5-7 squares, for egg and meat - 8-10 squares.
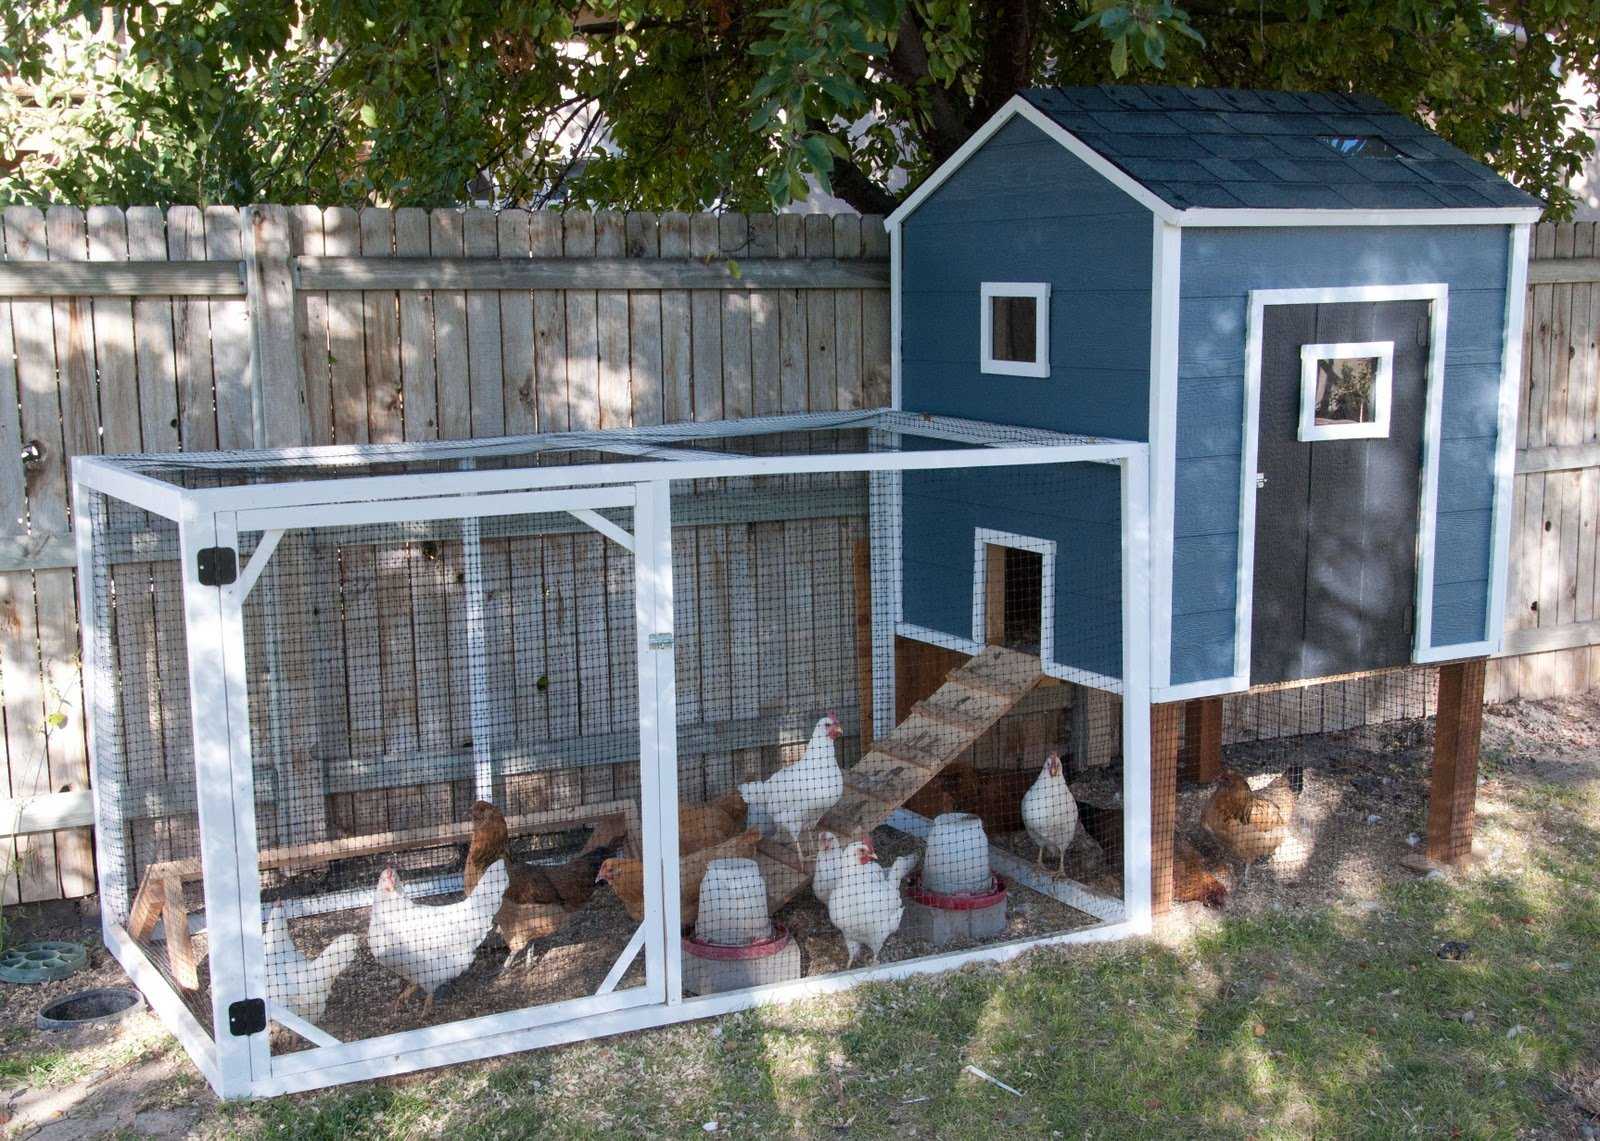
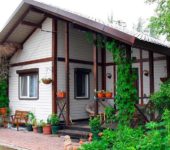
A beautiful chicken coop for 10-20 chickens can not be hidden in the backyard
But knowing the area of a chicken coop for 20 chickens or 10 is not all. We still need to decide on the size. Most often they try to make a rectangular building: 3 * 1.5 m; 4 * etc. In this case, you can clean up in the house without going inside - a rake, a scraper, a broom will even reach the far corners. Square ones in this regard are not so convenient, although a small chicken coop for 10-20 chickens will not be large anyway. So a square is okay.
What is the height of the chicken coop
When building a chicken coop, you also need to decide on the height of the building. For birds, a height of about 140-150 cm is enough. But you must remember that you will have to clean up, collect eggs, change the bedding in the poultry house. So, when choosing the height of the house, they proceed from their own convenience. For this reason, the roof is made higher than the level of the head - so that you can walk upright.
The height depends on whether you will go inside for service or not
No overlap
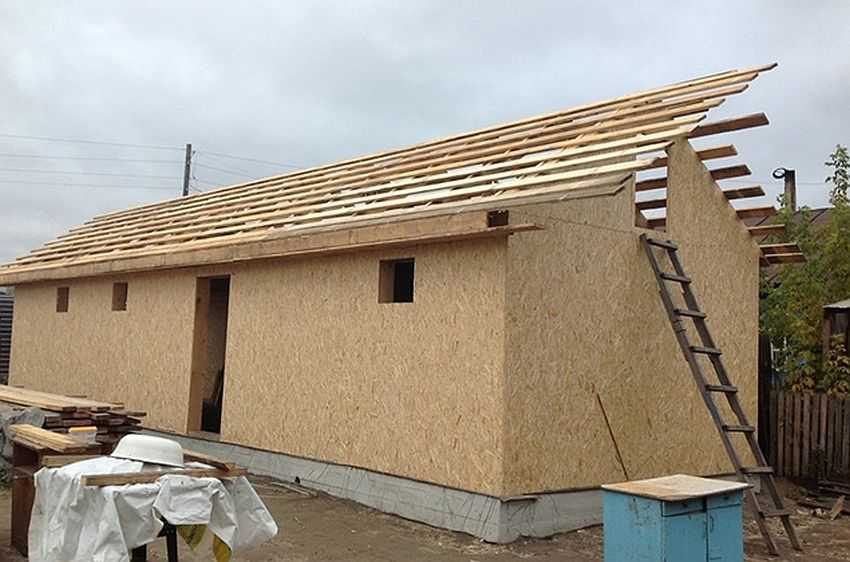
When constructing a roof, there are two options. First: if the poultry house is without overlap (ceiling), you can drive out the walls by about 140-150 cm, make the roof gable and raise the ridge 180-200 cm (or a little higher, as you like). In this case, it will be possible to move in the center of the room without problems, but we still rarely walk along the edges. There is usually a roost and nests, there may be a bedding. You will have to work carefully in this area, protecting your head.
There may be no overlap inside either
The advantage of this option is that with such a device we save on wall material. The downside is that more is spent on insulating the roof: it must be insulated over the entire area, which is much more than is required for insulating the ceiling. But, in general, this option is less expensive, but also less convenient (you have to take care of your head).
With an attic
The second option for how to build a hen house for 10-20 chickens is to make a mini-copy of an ordinary house.In this case, the walls are driven in to the height that is necessary for free movement inside. This is a person's height, plus 10-20 cm. But keep in mind that part of the height will go to the floor, there will be another floor, a bedding on it. Each requires about 15 cm in height. So, if the height of the owner of the chicken coop is 180 cm, you will have to make walls with a minimum height of 220-230 cm.
With overlap, you will have to insulate less
As you can see, this option will require more materials for the walls, but only the ceiling (ceiling) can be insulated, and the attic can be left cold. The attic can also be used to store straw, bedding, etc. But do not forget about the rodents, which adore such storage facilities and can become a problem.
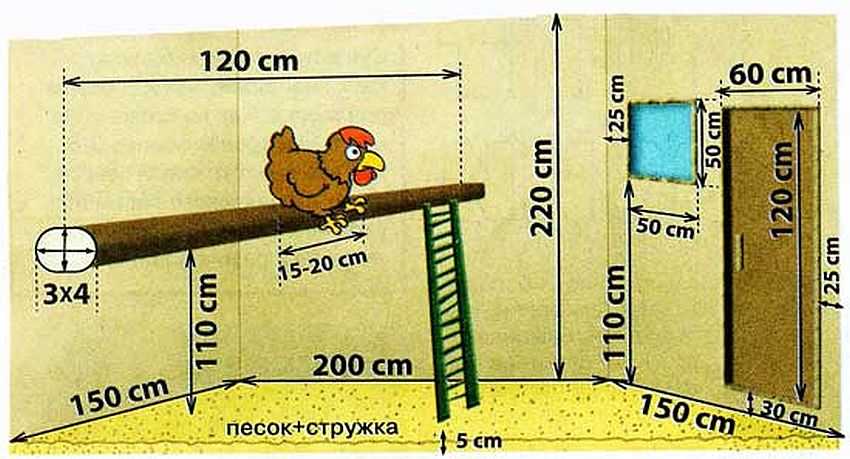
On the pillars
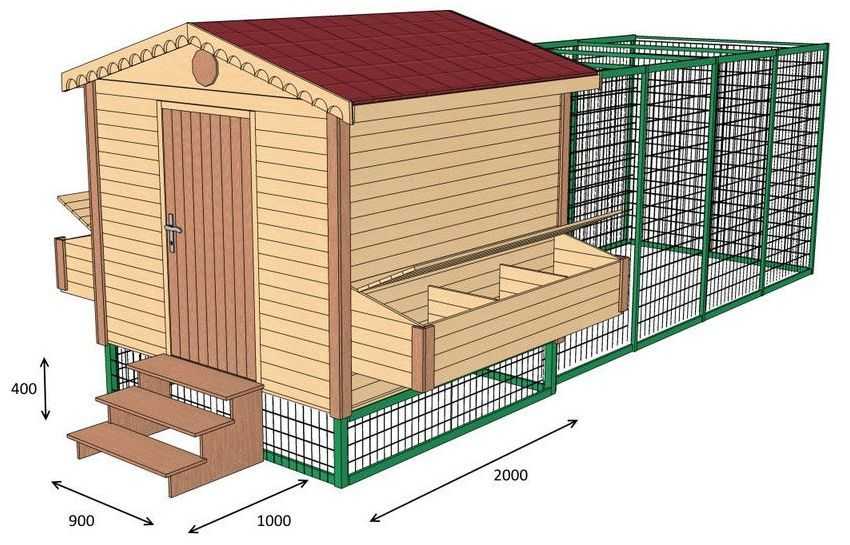
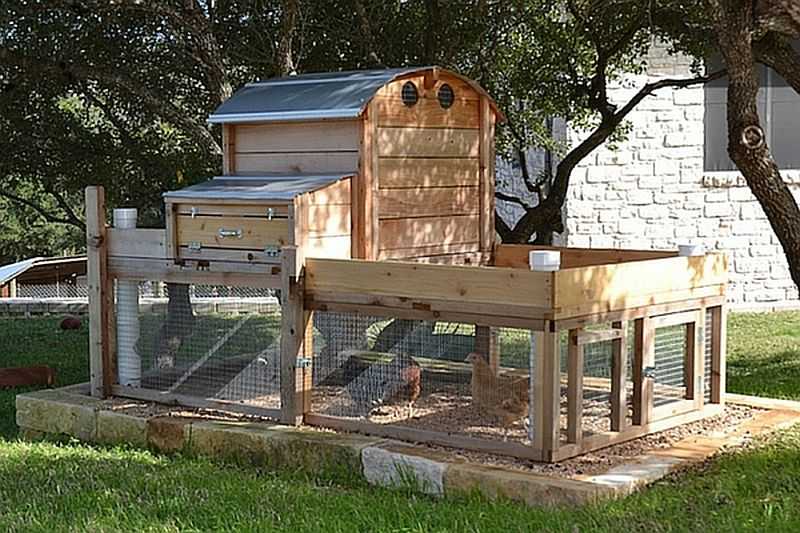
Another option is to make a chicken coop for 10 chickens on poles. In this case, 4 beams are dug into the ground at the corners of the building, the floor overlap is done at a height of 50-80 cm from the ground level. The roof is made at a height of 180-200 cm. In general, this is a convenient option for a mini-chicken coop for a summer residence. Option, rather summer, but can be insulated. In order for the bird to enter and exit, an inclined ladder is made of boards with thin perches nailed after about 10 cm - to make it easier for the bird to move.
What is not an option for a mini-chicken coop for 5-6 chickens
In general, you choose the height and general construction plan at your own discretion.
Material for building a chicken coop
For the walls of the hen house, the material is chosen depending on the intended mode of use. For a summer chicken coop, boards, plywood, OSB are suitable. Such buildings are made according to the principle of frame housing construction: they assemble a frame from a bar, sheathe it with boards or sheet material. The task of such buildings is to protect from the sun, wind and rain, and they cope with it perfectly.
For a winter chicken coop, you can use the same materials as for a summer one, but the walls will have to be insulated. You can also use logs, timber, gas or foam concrete, adobe, cinder block, shell rock, sandstone, etc. In principle, any building materials. If there is material left from the construction of a house, a bathhouse, a shed, it can be used. Only part of the material during the construction of a winter chicken coop requires mandatory insulation, others can do without (depending on the thickness of the wall, winter temperatures).
Boards, OSB, lining, plywood - these are the most popular materials for building a chicken coop
A chicken coop for 10-20 chickens is usually covered with inexpensive material. Most often it is roofing or slate, but any other material can be used. Only if you are planning a metal roof (from metal tiles, corrugated board), keep in mind that chickens do not like noise. During rain or hail, they may become frightened, which will affect the number of eggs or weight gain.
Insulation - mineral wool or foam. Mineral wool is vapor-permeable, therefore normal humidity can be automatically maintained in the chicken coop (if the walls are also vapor-permeable). Polyfoam does not allow moisture to pass through, but it is cheaper and is used to build a budget poultry house. It is only worth remembering that mice love to settle in such a heater (foam and mineral wool). And this is a disaster. To prevent them from accessing the inside of the wall, it is tightened on both sides with a fine metal mesh (the size of the cell - the smaller the better).
There is also extruded polystyrene foam. It is much more expensive than the options listed above, but the plus is that fungi do not grow in it, bacteria do not multiply, insects and rodents do not like it. And yet - it has excellent thermal insulation characteristics and, to insulate the chicken coop, a thickness of 2-3 cm is enough (foam is needed more than 5 cm), so in fact the cost of insulation will not grow very much.
Drawings and projects
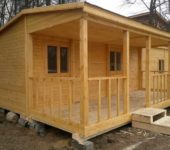
The summer chicken coop for 10-20 chickens is a small building, usually made of wood. A mini-poultry house with a walk, which will contain less than a dozen birds, measures 3 * 1.5 m. Moreover, this is with a walk - a fenced-off area.The very same room where the chickens will spend the night and rush has a depth of 80-100 cm, a width of 140-160 cm, and its height is about 1 meter.
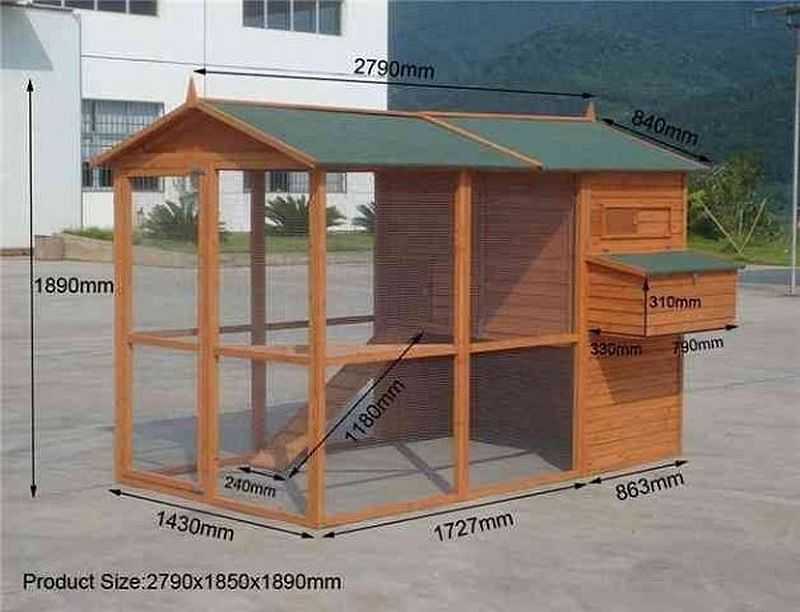
Summer chicken coop for 5-9 hens with a walk - a very small building
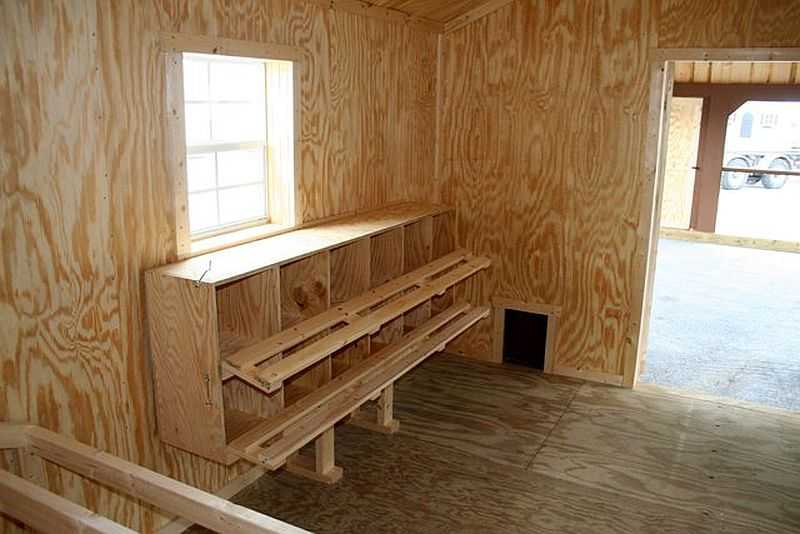
For service - changing bedding, cleaning - there is a door in the back wall. There is a small, shuttered window for light. In general, it is ideal for summer cottages for seasonal keeping of a small number of chickens.
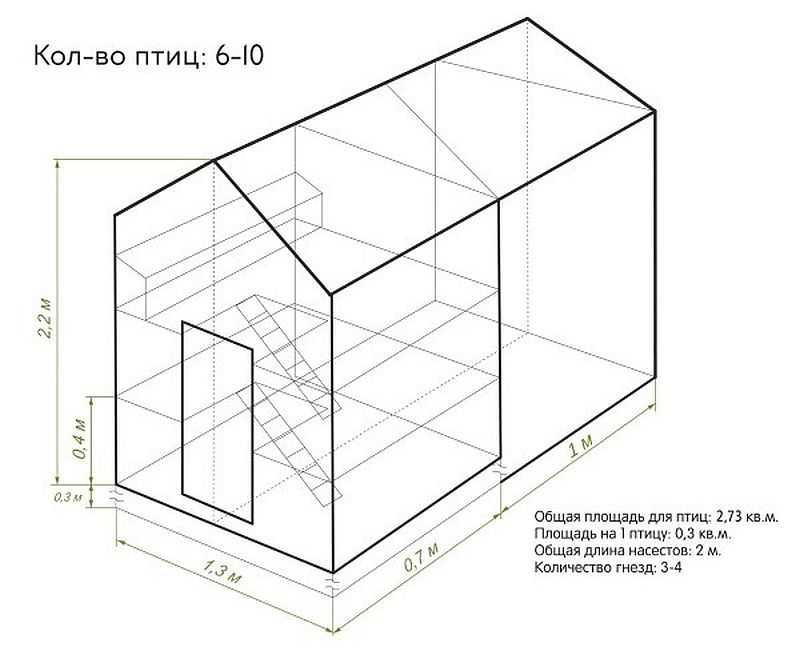
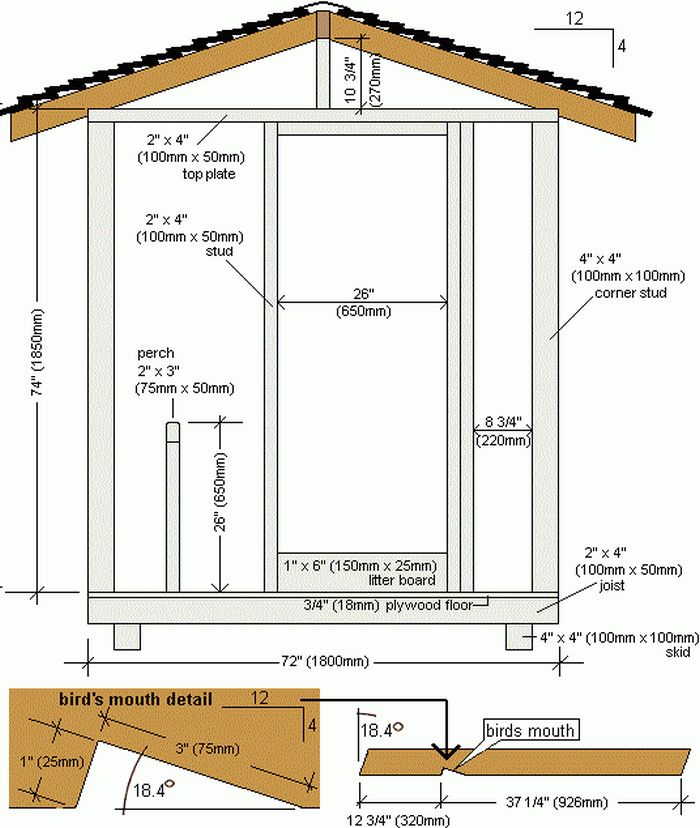
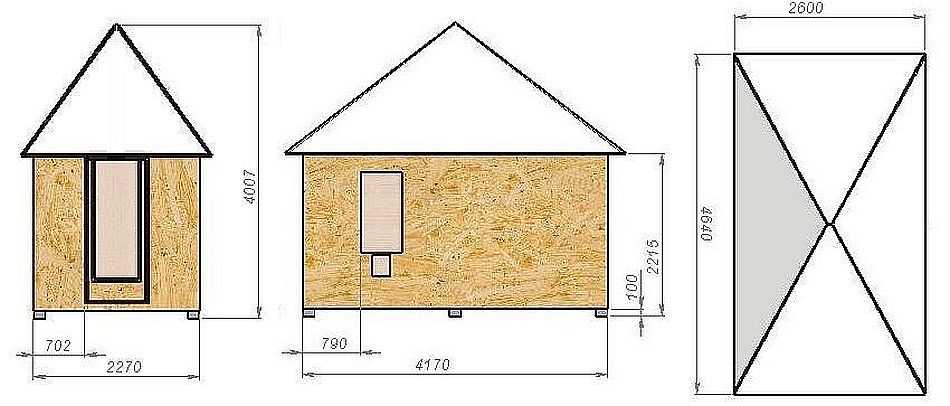
A chicken coop for 10-15 chickens is already a more serious building. Dimensions are doubled: 1 * 2. The height may still be small - all service can be done through a door in the back wall. There is no need to go inside. Is that as a last resort.
Drawing with the dimensions of a chicken coop for 10-15 chickens
For an even larger number of poultry, an even larger shed for chickens must be made. This is really a barn or a shed. You can already enter such a room.
If the winters are heavy with snow, you will have to make high slopes, and the roof - hipped
Please note that even the smallest house should have windows. No one will install metal-plastic, but glass must be mandatory. In a seasonal chicken coop one glass is enough, in a winter one it is better to put two. Moreover, the second can only be put on cold weather. And one more thing: it is advisable to have shutters on the window. This will give you the ability to change the length of daylight hours.
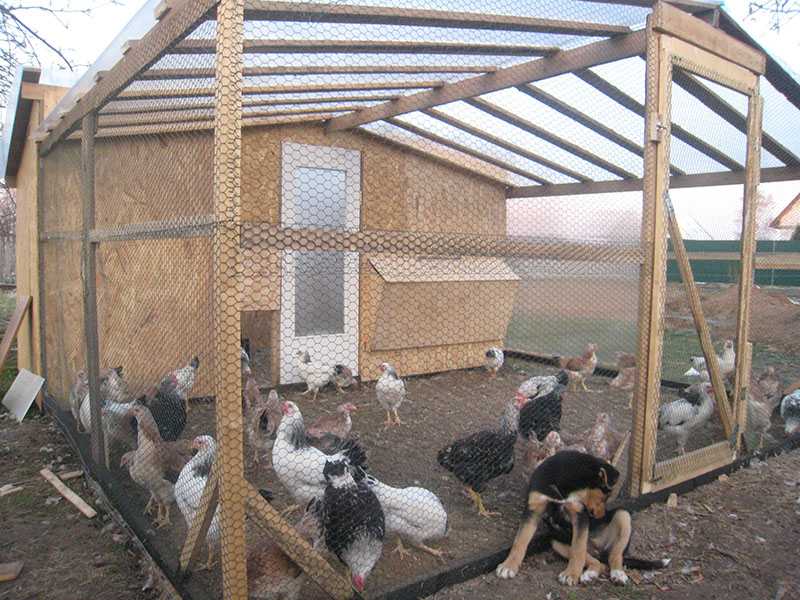
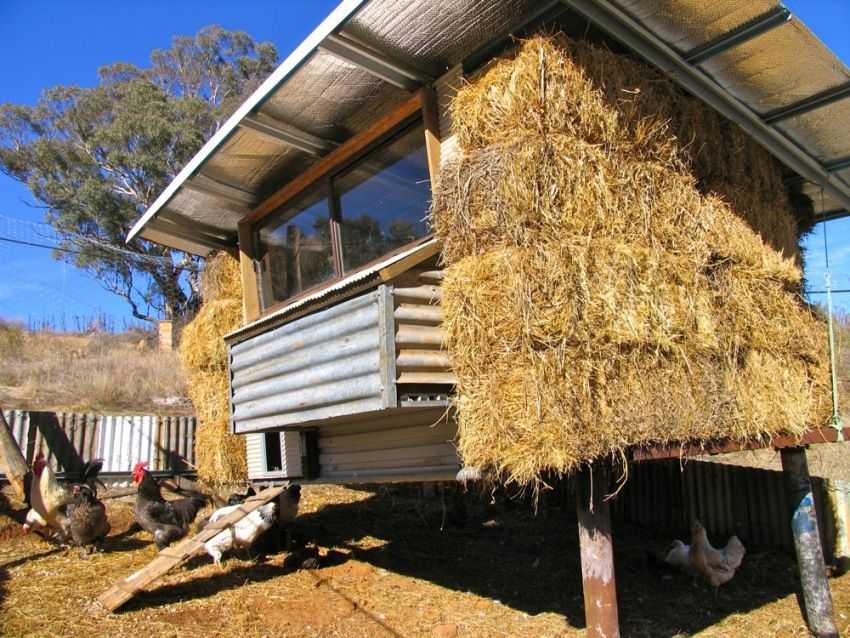
There are projects of chicken coops of unusual shapes - in the form of a triangle or a wigwam. This type of building is optimal. When spending a minimum of funds for construction, we get a solid area.

Unusual shape. It turns out the floor area is large, and the costs are very small
This chicken coop for 10-20 chickens is built using frame technology. There are no walls as such, they are covered with soft roofing material. A very rational building. It is also suitable for snowy regions: with such a slope, little will linger.
Chicken coop for 10-20 chickens: choosing and making a foundation
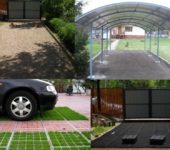
The type of foundation depends on the type of material selected. If this is a frame building or a beam, logs will be used, the most optimal is a columnar foundation. Costs in time and money are minimal, reliability is sufficient, and possible distortions of the posts are compensated by the strapping and elasticity of the material.
Even a small chicken coop is best placed on a base.
If the walls will be erected from blocks of any type, brick, shell rock and any similar material, a strip foundation is needed. The costs are more, but it won't work in another way. An even better option is a slab foundation, but the costs are even higher. But you can use the slab as a rough floor and with such a foundation, any frost heaving is not scary.
Site preparation for foundation
To build a chicken coop for 10 chickens with your own hands, first clear the area. The entire fertile layer must also be removed. Its thickness can be 20 cm or more, and maybe only 5. In any case, we remove everything, including stones, roots, etc. We level the site, ram it. For ramming, you can use a large-diameter piece of log with a crossbar-handle nailed on top.

You can also use stones. It is only important to remove the fertile layer
It is necessary to remove the soil because the animals and plant residues in it under the building begin to rot. So it is imperative to remove the fertile soil layer. We carry out further construction work on the cleared and leveled site.
Column foundation
The posts for the foundation for the poultry house can be made of bricks, but the easiest way is to use concrete blocks 20 * 20 * 40 cm. They fit perfectly. If you are building a chicken coop for 10-20 chickens, it is unlikely that your structure is larger. The longest side length that can be is 4 meters. If the winter is snowy, you can put three supports on this side: two at the edges and one in the middle. If the length of the chicken coop wall does not exceed 3 meters, we put only supports in the corners.
In the selected places we dig holes, which are slightly larger in size than the future pillars.The depth of the holes is 25-30 cm. We pour crushed stone of the middle fraction at the bottom, ram it well. The thickness of the compacted layer is 15 cm. Pour sand onto the compacted crushed stone and also ram it well. Blocks can be placed on this base. They must be placed "on the horizon". To do this, you can use pegs with a rope stretched along the level, or you can put flat strips on the blocks, lay the building level on them and navigate along it.
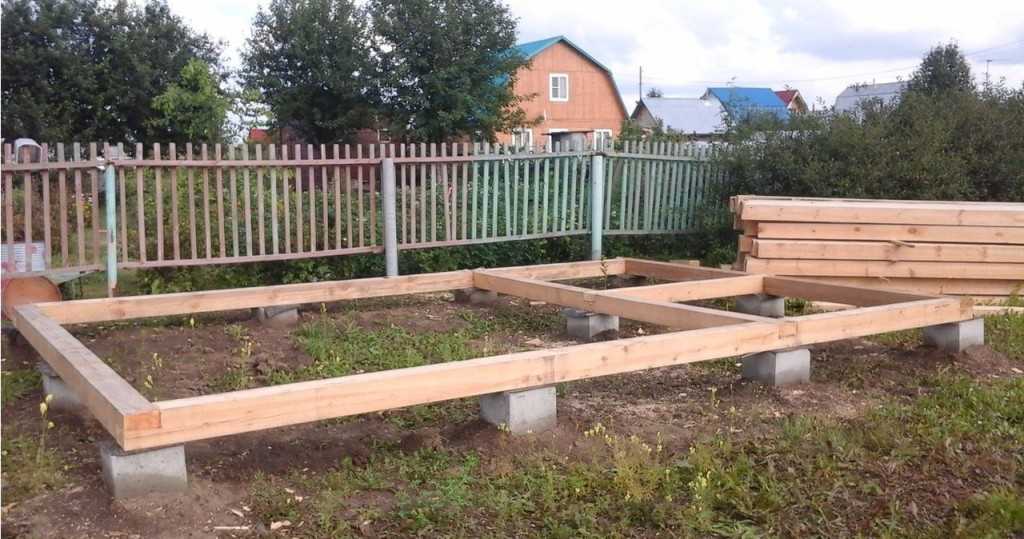
It is on such blocks that they usually put wooden and frame chicken coops
After the blocks are aligned, you can start laying the strapping. This is either a timber (for a frame or timber construction), or a log. The strapping bar / log must be treated with impregnation. Under them, it is advisable to lay a piece of roofing material or waterproofing material folded in two layers on the posts (a modern and improved analogue of roofing material). That's all, you can build a chicken coop further.
Chicken coop strip foundation
The strip foundation is usually made for a chicken coop for 20 chickens, which will be built from any building blocks, wood concrete, adobe, shell rock, brick, etc. To make a tape of concrete, you will have to dig a trench at least 50 cm deep and at least 35 cm wide around the perimeter of the future building.Try to make the walls of the trench even, and if the soil is loose, with a slight slope.
The bottom of the trench is cleared of stones, roots, leveled, tamped. Crushed stone of the middle fraction is poured at the bottom, tamped. Layer thickness - 15 cm (compacted). Building sand is poured on top and rammed. The thickness of the layer is about 10 cm. Further, the formwork is assembled from the boards into the trench for pouring concrete. The formwork panels should rise above the ground by at least 10-15 cm. In this case, the floor of the chicken coop will be slightly raised.
Tape base - for serious buildings or very difficult soils
To increase the resistance to ground movements during frost heaving, reinforcement is placed inside the strip foundation. In this case, two rods with a diameter of 10-12 mm (ribbed, not smooth) are sufficient, which are located at a distance of about 15 cm from each other.The distance from the rods to the formwork panel is at least 5 cm.The distance from the bottom must be the same or more ...
The last step in the construction of a strip foundation for a chicken coop for 10-20 chickens is pouring concrete. Concrete grade - M150, you should not do less. The proportions are standard: for 1 part of M400 cement, we take three parts of medium-sized crushed stone and four parts of dry sand. Water - 0.7-0.8 parts. We mix everything and pour it into the formwork. Having aligned the upper edge, cover the foundation with foil and wait 1-3 weeks. If it is warm (+ 20 ° C and above) we wait a week, if from + 17 ° C to + 20 ° C - two, if less than + 17 ° C - three. Then you can remove the formwork and continue construction.
Remember that the concrete foundation, even for a chicken coop for 10-20 chickens, must be waterproofed. It can be covered twice with bituminous mastic, or you can lay two layers of roll waterproofing. If the humidity in the area is high, it is better to use both.
Warming and vapor barrier
The walls in the hen house are erected according to the selected technology. There are no nuances here. In insulation, in fact, too, but it's worth talking about insulation, since after all, this building has its own characteristics.

Lay thermal insulation between two layers of cladding - here's a winter chicken coop for you
Mineral (basalt or glass) wool
Thermal insulation with mineral wool is most often done if the chicken coop for 10-20 chickens is built on the principle of frame housing. The assembled frame is sheathed outside, laying a layer of waterproofing under the material (plywood, OSB, boards). At the same time, please note that a ventilation gap of 2-3 cm should remain between the insulation and the outer casing.It can be provided by slats stuffed between the posts or a stretched twine (fasten with staples from a stapler). The second option is less reliable, but faster and cheaper.
To insulate a chicken coop with mineral wool, it is best to take hard or semi-rigid mats. They are cut into pieces of the desired length and inserted into the spacer between the uprights from the side of the room. It turns out that from the outside they rest against the planks or a stretched twine. The thickness of the insulation is 5-10 cm (depending on the region) and the material of the outer skin, but in any case, when mounted, it should not protrude beyond the racks. If the width of the racks is not enough, and the insulation is needed thick, planks / boards are stuffed over the racks.

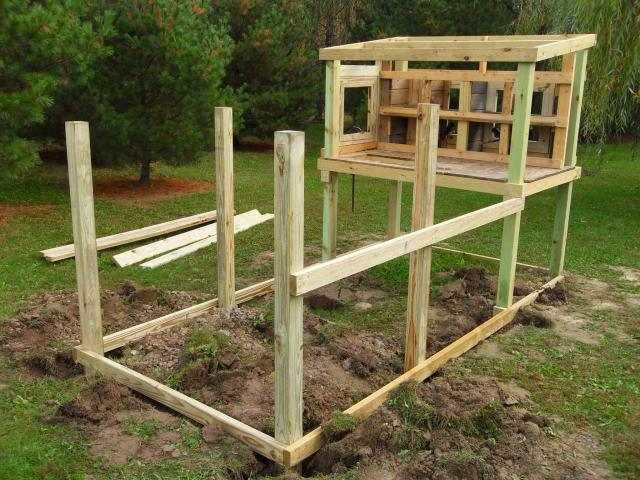
An example of a frame for a chicken coop
During construction, place the racks in such a step that the distance between them is 3-5 cm less than the width of the insulation. Due to its greater width, the insulation will hold (elastic force works). Just be careful: measure the actual roll width, do not use the number that is on the roll. There may be a difference of a couple of centimeters, the edges may bend, so that it will be difficult to install insulation as a result, as it will fall out. When insulating, try to keep the pieces adjacent to each other without gaps. If there are any, fill in thin strips. The installed insulation can be fixed using ordinary twine and staples from construction stapler.
A vapor barrier membrane is fixed on top of the mounted insulation. In the simplest version, this is a film with a density of 200 microns. But it is better to take exactly the vapor barrier membrane. It is attached to the posts with wooden slats using small nails or staples from a stapler. At the joints, one sheet should go and the other by at least 15 cm. Double-sided tape is used to glue the sheets. The result is a double seam, which provides a normal degree of protection against steam penetration. On top of the vapor barrier film, you can attach the material of the inner cladding (plywood, OSB, GVL, gypsum board, boards).
Not an option. Also insulation ... It remains only to come up with something with the floor
So, when insulating a chicken coop with mineral wool, the wall cake looks like this (from the inside-out):
- inner lining;
- vapor barrier;
- insulation;
- ventilation gap;
- waterproofing;
- outer cladding.
The sequence of layers prevents moisture from penetrating into the insulation from the inside. This task cannot be 100% completed - the vapors still penetrate. Therefore, there must be a ventilation gap between the insulation and the waterproofing. Due to this, steam trapped in the insulation is released. It is this construction that guarantees that the insulation will work.
Styrofoam and expanded polystyrene
With foam and expanded polystyrene insulation, everything is a little easier. It is vapor-tight by itself, so it is not necessary to protect it from steam penetration. If the chicken coop for 10-20 chickens is built on a frame principle, you can lay foam plastic between the racks. It is cut with a fine-toothed saw (for metal) and fixed with low expansion polyurethane foam. In order to prevent the insulation from walking, strips are stuffed along the racks on both sides. It is possible to lay polystyrene and polystyrene foam both from the street and from the side of the room. Plating can be done in any order. The only thing: from the side of the street under the cladding it is better, after all, to fix the waterproofing. Especially for foam - it “blooms” from moisture in large quantities.

Expanded polystyrene is also used to insulate a chicken coop
If the chicken coop for 10-20 chickens is made of vapor-permeable material (foam and gas concrete, timber, log), it must be insulated with foam outside. There should be a ventilation gap between the wall and the insulation, which will allow moisture to evaporate from the wall. To do this, a crate is stuffed onto the wall with a strip 20-30 mm thick. Then the counter crate is stuffed in the opposite direction. The thickness of the bars is not less than the thickness of the insulation. Between the strips of the counter-lathing, foam plastic / extruded polystyrene foam is fixed to the assembly foam. Then, on top, you can mount the outer skin.
Ventilation
Chickens do well in normal humidity. With a decrease or increase, they begin to hurt (high humidity is more dangerous), therefore ventilation in the chicken coop should creep in during the planning period. A hole is made in one of the walls for air flow. To do this, you can insert a piece of plastic pipe into the wall and pick up a cover for it.
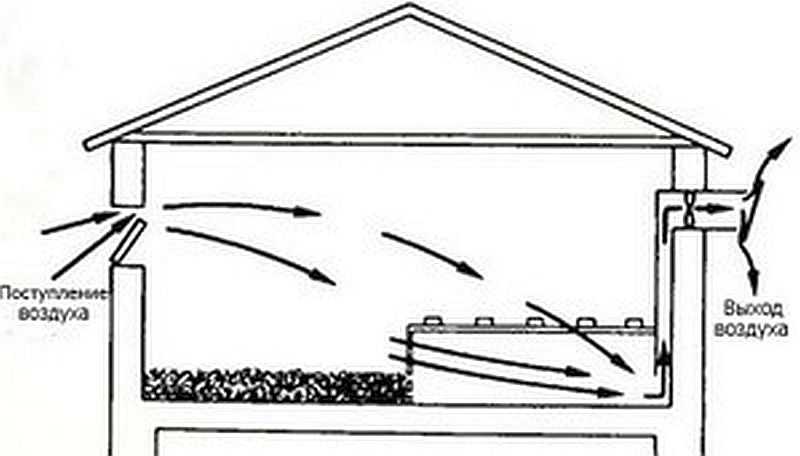
Ventilation is very important
The outflow of air from the hen house (exhaust) is a pipe run through the roof or the top of the wall. On the street, the pipe rises for some distance above the roof and ends with a fungus or a visor - to protect it from precipitation and foliage. Place the supply and exhaust in opposite corners so that the air travels the greatest distance. This type of ventilation is called natural, but it does not always work stably.
For stable operation, a fan with a cover is embedded in the upper part of the wall. It is better if it has several speeds. This type of ventilation does not depend on the weather, but depends on the availability of electricity and requires human intervention. In principle, you can do both the one and the other method and use it as needed.