Tile and laminate joining - we do beautifully
When connecting two materials that are different in texture and texture, it is necessary to somehow arrange the place of their connection. In this article, we will discuss how to beautifully join laminate and tile. The methods are different, as are the results.
The content of the article
Where can there be a joint and how best to arrange it
Different floor coverings are used in a modern house or apartment. In the places of their connection, differences in height are often formed - due to the different thickness of the coating. It is possible to arrange such a transition beautifully and reliably only by knowing what and how to do it. Most often, tiles and laminate flooring have to be joined. These are the two most popular types of flooring for a variety of indoor applications. The junction of tiles and laminates in place of position occurs in two places:
- Under the door, where the coverings of the two rooms are combined. It is easier and more effective to finish the joint with a small special nut.
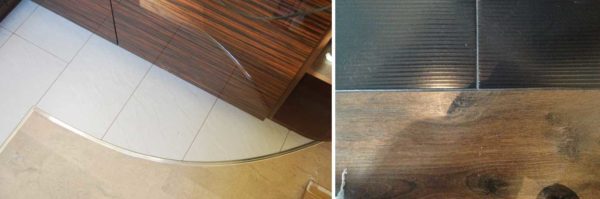
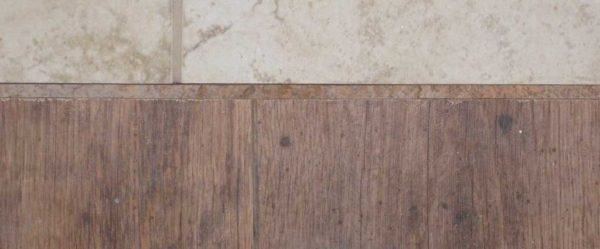
Two types of design of the junction of tiles and laminate - with and without a threshold
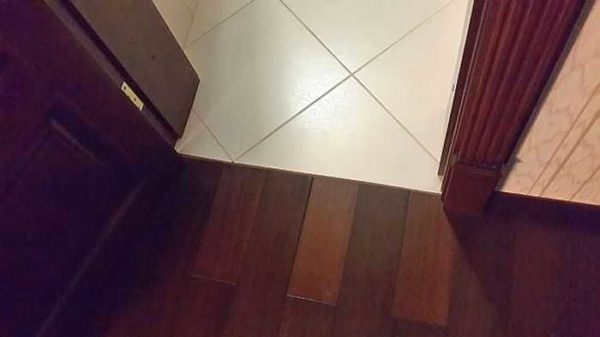
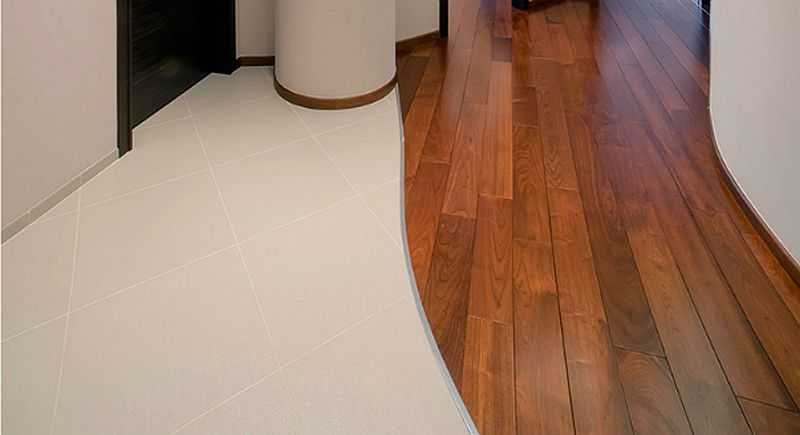
- In an open space, where the tile / laminate transition emphasizes the zoning of the room. In this case, a more natural transition will be if you arrange the joint without additional inserts.

As you already understood, there are two ways to make a laminate-tile joint - with and without a sill. The first requires a high quality tile trim, the same gap between the two materials throughout the seam. Only in this case a decent result is obtained. The second is simpler in execution, does not require special precision when trimming the material and special skills when performing. But it looks a little "rude".
Docking methods without a nut
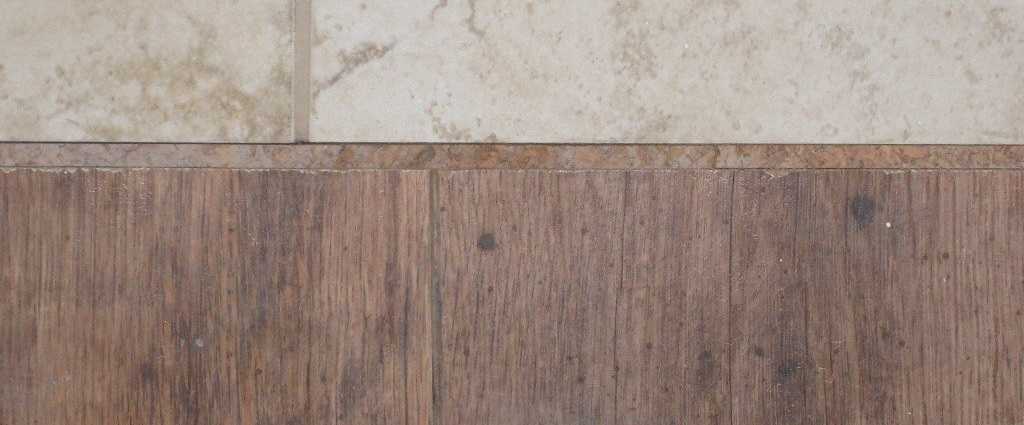
When joining tiles and laminate without a sill, the problem of height difference must first be solved: due to a layer of glue, the tile can be higher. Only after that you can start working. Also, the joint will look good if it is carefully processed, the gap will be even.

This is how neatly you can arrange the connection of the tile with the laminate
If two different materials are joined - ceramics and laminate - it is impossible to place them close to each other without a gap. When the temperature or humidity changes, they can increase in size (the laminate suffers more from this). The presence of a gap prevents the problem - allows it to change in size without compromising the integrity of the coating. When joining laminate and tile without a sill, this gap is filled with a suitable elastic material.
Whatever material is used for sealing, the edge of the laminate adjacent to it must be treated with a protective compound that prevents moisture absorption. Most often, a sealant is used for this. Better - silicone, which, after drying, does not lose elasticity and does not turn yellow over time.
Cork expansion joint
A cork expansion joint can be placed between the tiles and the laminate. This is a thin strip of cork, which is painted on one side and covered with a layer of protective varnish or finished with a layer of veneer. The second option is a larger wood surface, you can choose a color that is very similar to your flooring. But they use it more often to join parquet - it costs a lot.
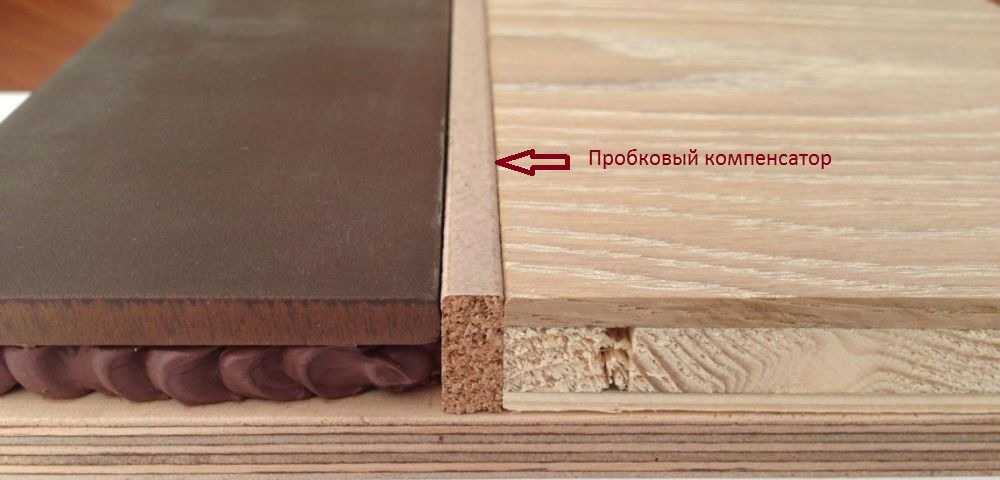
This is how the joint between laminate and tile with a cork expansion joint looks like
Dimensions
In addition to the fact that the "face" of the cork expansion joint is finished with different materials, it can be of different shapes: with different types of chamfer or without. In addition, the sizes can be different:
- length:
- standard - 900 mm,
- under the order - from 1200 mm to 3000 mm;
The color is matched to one of the materials
- width - 7 mm and 10 mm;
- height - 15 mm, 18 mm, 20 mm, 22 mm.
Standard length cork expansion joints are only good if the joint is under the door. Then its length is sufficient. In other situations, you either have to merge or order.
Mounting
Install the cork expansion joint at the junction of the tile and laminate when laying the flooring. When one type has already been laid, and the second will only fit. First of all, if it is necessary to cut the height of the cork, it is not always possible to find the ideal option. Therefore, carefully, with a sharp knife, we cut off the excess.
More preparatory work - finishing the laid edge. We remind you once again that it must be smooth and well finished. Most often, the edge is sanded with sandpaper, leveling the cutting marks.
A cork expansion joint is mounted on glue, preferably for wood. The installation site is well cleaned and degreased beforehand. Further, the process is as follows:
- Apply a strip of glue close to the already laid material. You can - in a zigzag, you can - in parallel stripes.
- We lay the strip of cork, slightly pressing it against the already laid material.
It looks like a seam close up
- We fold back the cork and apply the sealant.
- We press the cork back. We remove the squeezed out sealant with a sponge soaked in water, then wipe it with a dry cloth. His tracks shouldn't be seen at all.
- Next, we put the second material close to the cork. If it is a laminate, we coat its cut with silicone without fail. When laying tiles, this is also desirable, but the seam can be filled with glue, which is also not bad, although not so beautiful.
If done correctly, you get a neat, unobtrusive seam. What is good, you can design both straight and curved joints.
Grout for joints
If the materials have already been installed, the laminate / tile joint can either be filled with a sill or filled with tile grout. We will talk about sills later, but now we will discuss how to use grout.
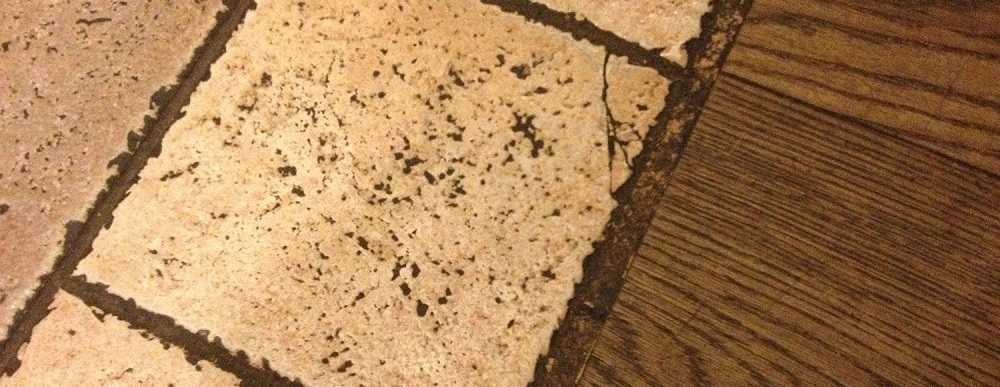
The grout is used in the same color as the tile joints.
The edges of the laminate must be coated with silicone. It can also fill the joint by about 2/3. When the silicone is dry, fill the remaining space with diluted grout, level it and wait until it dries.
A simple and effective way. But only if the edges are processed with high quality. For greater color stability and easier maintenance, it is better to cover the seam with a colorless varnish.
Cork sealant
The joint between laminate and tile can also be sealed with cork sealant. It is itself a sealant, so this is the only option where the cut of the laminate does not need to be protected from moisture. Another plus - the dried composition has the color of cork - light brown. If it suits you, you don't have to worry about painting it.
Cork sealant is a mixture of cork bark chips and a water-based binder. Without dyes, after drying, it has a cork color - light brown. There are palettes painted in basic colors. Produced in polyethylene tubes, can be applied using a closed-type pistol (with a container) or a spatula. Can be used for filling joints in floor coverings.
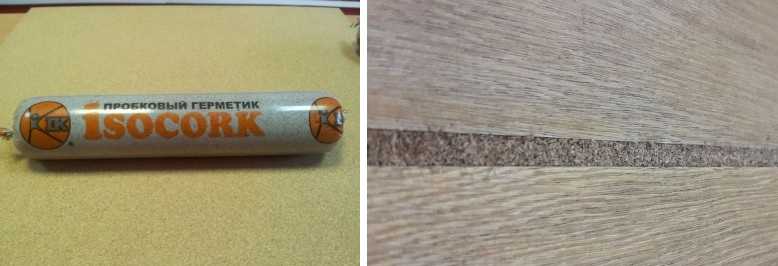
Cork sealant and the result of its use
When using this composition, you will most likely have to use a spatula. Therefore, on both sides of the seam we glue masking tape. We clean the seam itself, remove the dust. You can work at temperatures above + 5 ° C.
It is simple to seal the joint between tiles and laminate with cork sealant:
- We open the tube. The composition in it is ready to use, but for convenience it can be poured into a container with wide edges. You can also try to make a small hole and fill in the seam through it.
- We fill the seam (with a spatula or directly from the tube - as it happens).
- We cut off the excess, level the surface, running with a spatula from edge to edge of the seam.
From the height you can't even see what the seam is filled with
- We are waiting for drying. This process depends on the thickness of the joint and the temperature. Usually takes 24 to 48 hours.
- Immediately after leveling, remove the masking tape with sealant residues. If it is somewhere on the floor, clean it with a damp cloth until it dries. Wash the tool with water.

After drying, we have a tile and laminate joint ready to use. The only drawback is that the base color is not suitable for everyone. And one more thing - you need to carefully and evenly distribute it immediately after application. Then you will not be able to align or fix it.
Using sills
Making a joint between laminate and tile using sills makes sense in three cases. The first is when the joint is under the door. In this case, the presence of a nut is logical and “does not hurt the eye”. The second option is when there is a difference in the heights of the two materials being joined. There is simply no other way out.
Don't you think that such a joint spoils the impression?
And the third case. When in the hallway near front door the tiles are laid out, and then there is the laminate. Even if their level is the same, it is better to put a nut here. It rises slightly above the finish and will retain sand and debris that is inevitably brought in by shoes. This is the option when you can close your eyes for some aesthetic imperfection.
Types of sills for joining materials
There are the following sills that can be used to close the joint between laminate and tile:
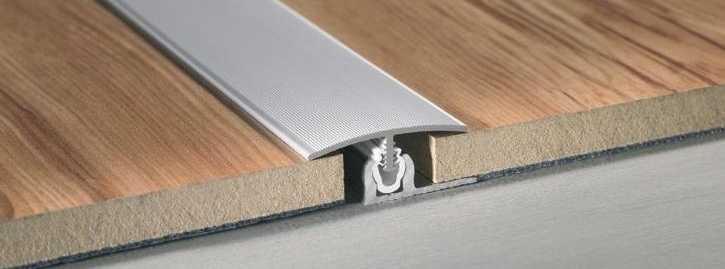
- Flexible PVC profile. Consists of a base and a decorative strip. The base is attached to the floor in the seam, and the decorative strip is snapped into place. It comes in two types - for the joint of materials of the same thickness (maximum difference 1 mm) and for joints with drops (the difference can be 8-9 mm).
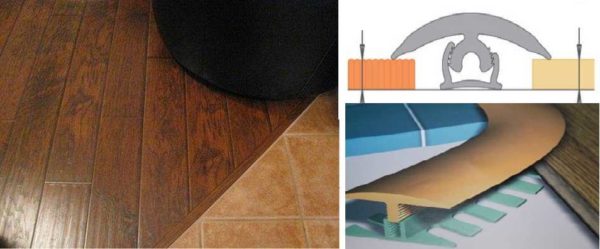
Using a PVC profile to design the seam between tiles and laminate
- Flexible metal profile. Bends due to the elasticity of the metal (alloy) and a special figured edge. Used for both straight and curved sections. It can be T-shaped and L-shaped. In the case of using an L-shaped profile, laminate is loaded into it. The tile is then glued close to the edge, filling the gap with tile glue, then filling it with a grout. There are flexible metal thresholds unpainted - aluminum, there is a decorative paint (powder composition).
How to make the transition from tiles to laminate
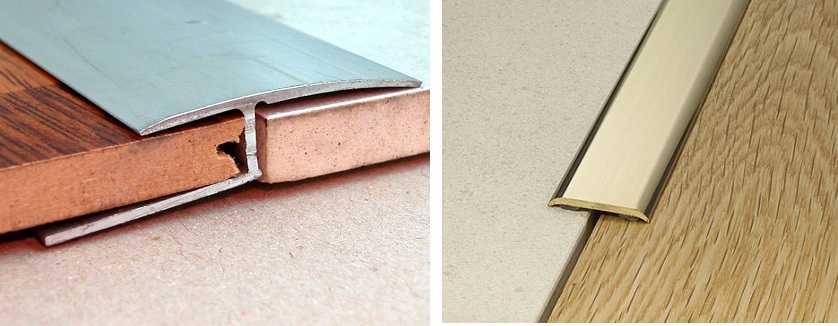
- Aluminum nut. Used for straight seam. Ideal for decorating the connection under the door. It happens in the form of a T-shaped or H-shaped profile. The width of the "shelves" and the height of the nut itself, the radius of the back bend - all this varies. In such sills, holes are usually drilled through which they are attached to the base using dowels or self-tapping screws. There are also self-adhesive ones - this is the easiest option to install. During installation, so that dust and dirt do not clog under the sill, it can be coated with sealant on the back side. After installation, remove excess and wipe clean.

Aluminum sills are used on straight sections


It just seems that the options are few. There are all these sills in different sizes and colors, with different locking systems. There are a lot of them in large stores.
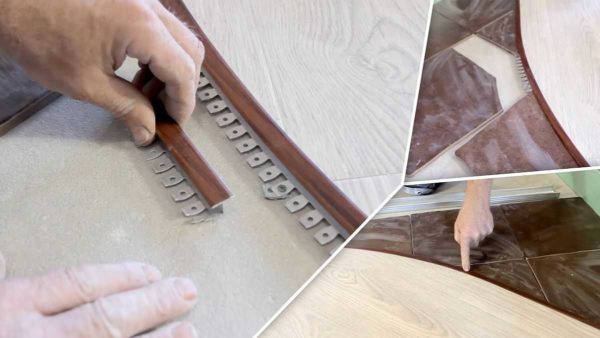
Installation of flexible PVC profile
As already mentioned, the flexible PVC joining profile consists of a base and a decorative strip, which is held on it due to the elastic force. It must be mounted after the tiles have been laid, but before installing the laminate.
This is how the junction looks in section
First, the base is mounted along the cut of the laid tile. It is attached to dowels or screws. Choose fasteners with flat caps - so that in a twisted state it almost does not protrude and does not interfere with installing the cover.
The installation process is as follows:
- The base of the flexible PVC profile is laid along the edge of the tile. Its top edge should be flush with the finish surface. If necessary, you can cut a strip of backing under the laminate.
- The base is fixed to the floor.
- If installation of dowels is required, the points of installation of fasteners are marked, the profile is removed, holes are drilled, plastic tabs are installed. Then you can screw the base.
- When using self-tapping screws, pre-drilling may be required (depending on the type of base). The step of installing the fasteners depends on the degree of curvature of the joint. The base of the docking profile must follow its outline exactly.
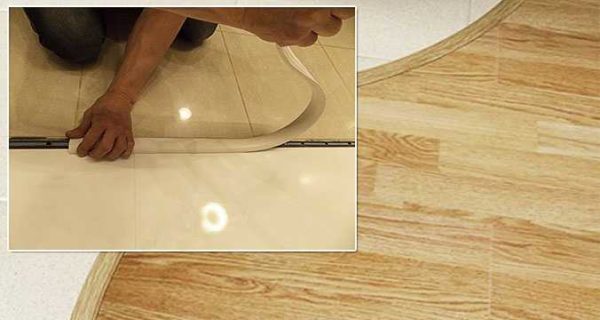
When installing PVC tape, you have to make serious efforts.
- Then we lay the laminate.
- The laminate has been laid, now we forcefully fill the decorative PVC cover into the installed base. It is elastic and does not fit into the groove very well. You need to press well with your palm, you can even tap it with a rubber mallet.
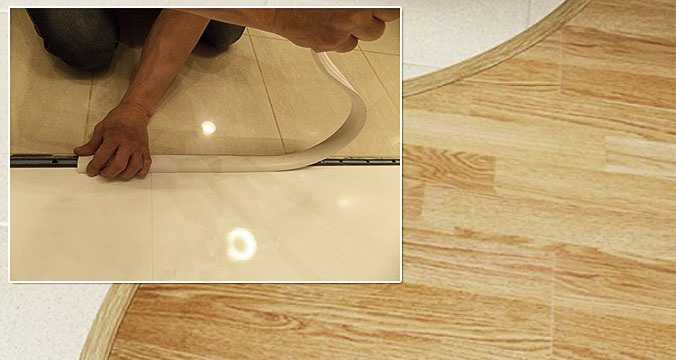
With the help of a flexible PVC profile, the joint between laminate and tile is easy to close. Outwardly, of course, not everyone likes it, but the installation is simple.
Video on the installation of sills at the junction of laminate and tile / porcelain stoneware


you need a T-shaped joint between the tile and the laminate without a sill. brass