How to make flowers from corrugated paper (60 photos)
Home decor is a constant and continuous work. In the process, new techniques and types of work are being mastered. In this article, we will talk about how to make flowers from corrugated paper. This paper can be found in flower shops. But in a larger assortment, it is in specialized institutions that sell everything for needlework. You will also need wire or thin sticks for work (bamboo skewers are also suitable), glue and scissors.
The content of the article
General principles and rules
Despite the fact that corrugated paper flowers are made different, the principles of work are the same. Here are briefly general rules to help you make paper flowers with your own hands, very similar to real ones.
- Cut several petals of the same size at once. To do this, fold the paper in several layers.
- The petals are usually made in different sizes. Roses, for example, have at least four different ones, and daisies - 2-3. In general, you can follow the rule - the more petals a flower has, the more different sizes.

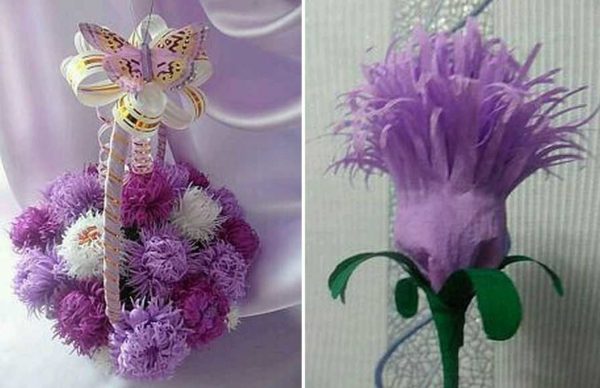
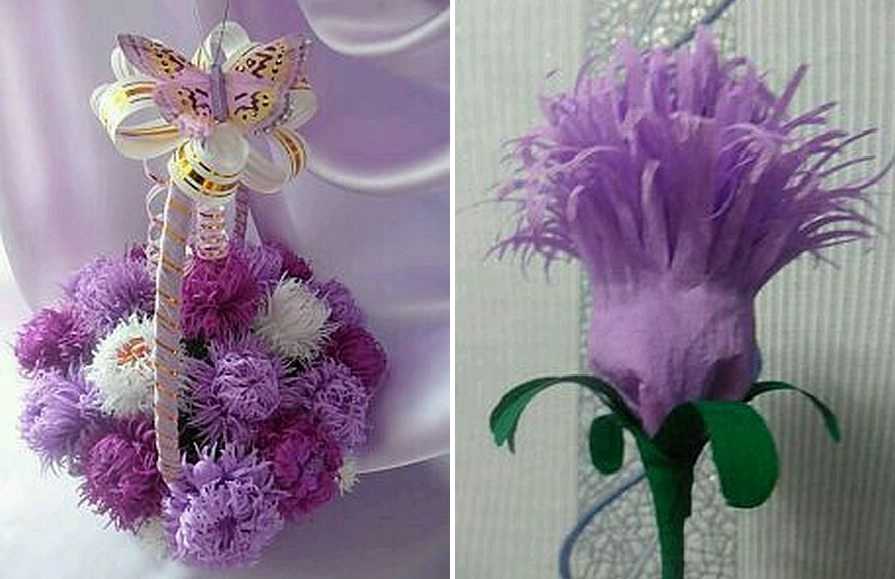
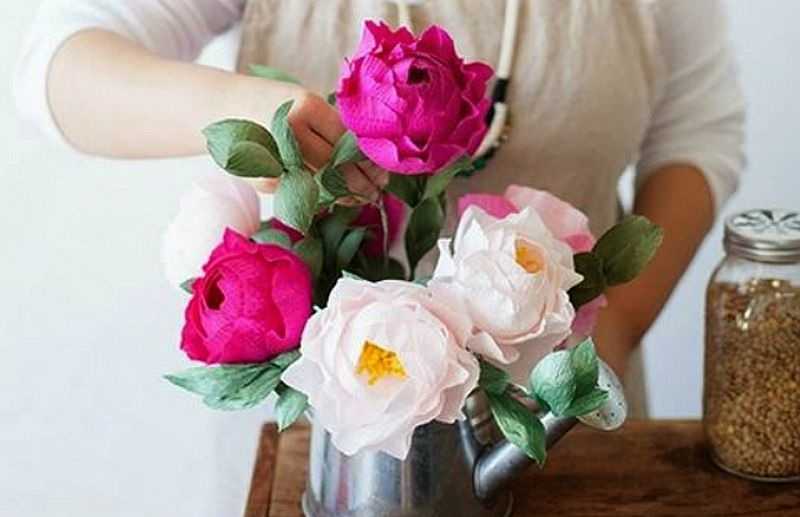
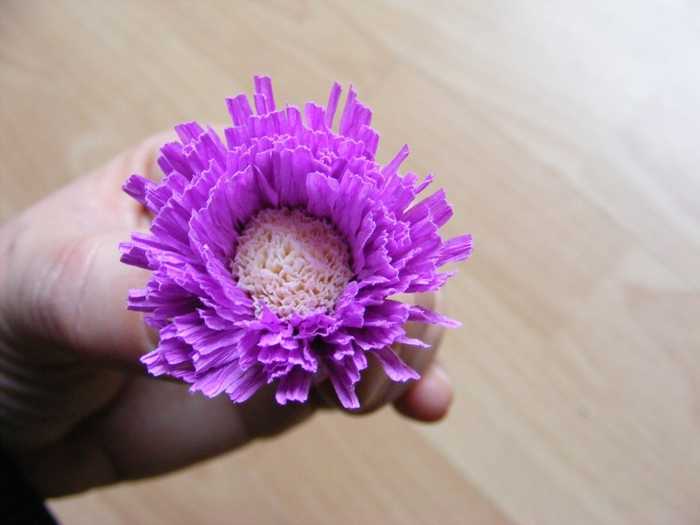
Adorable corrugated paper flowers can decorate your interior or be a gift
- Don't try to make the petals and leaves perfectly even or exactly the same. In nature, they are different and unique. You should do the same.
- As you wind the petals around the stem, wrap your fingers around the wrapped part well, rolling the paper around the stem. The tighter you press, the tighter the petals will adhere to one another. By adjusting this effort, you can get flowers of different sizes and appearance from absolutely identical petals.
- Coat each petal on the stem with glue in the warp.
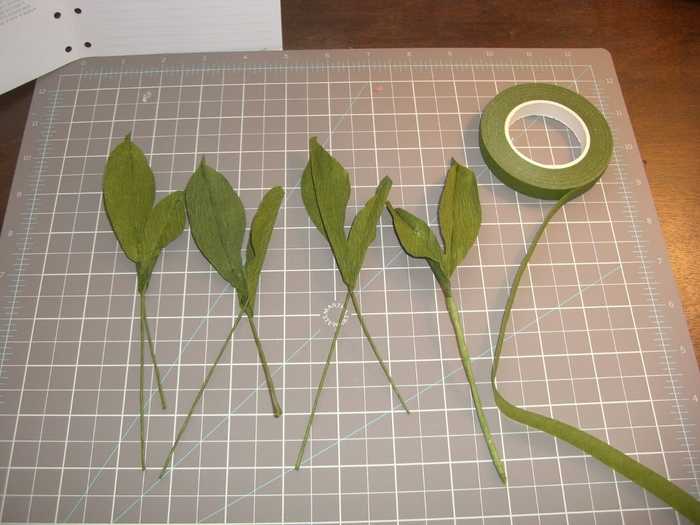
Here, in fact, are all the rules. And one more thing: the stem is prepared first. For it, wire or sticks of different thickness are used, which is wrapped in a long thin strip of green corrugated paper. The tape can be coated with glue, and then wound onto the base. You can roll it dry, and fix the edge with a drop of glue. Another point: if you are going to collect a composition from flowers, leave the lower 1/3 of the stem without decoration - it will be easier to make a bouquet.
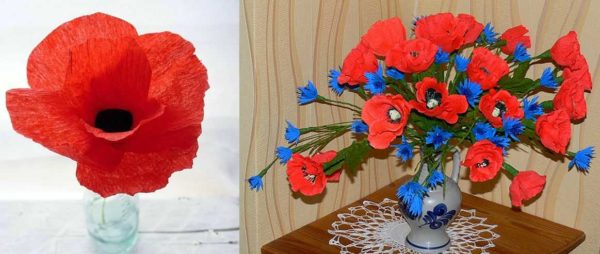
Poppies
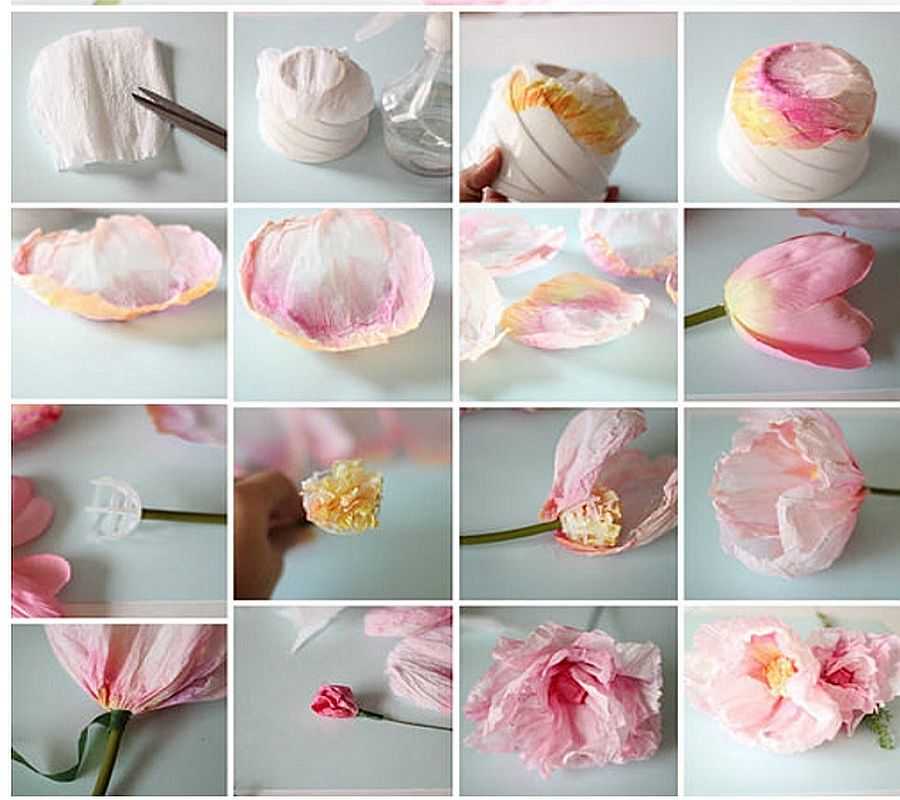
Corrugated paper poppies are very easy to make. It is important to find the right shade of scarlet. You will also need a small piece of black for the core. But, if it is not there, you can use any dark one, then paint it black.
We make poppy from corrugated paper like this:
- We fold a small square from paper napkins of any color. We wrap it with black corrugated paper. If there is no black, take any dark one, then paint it.
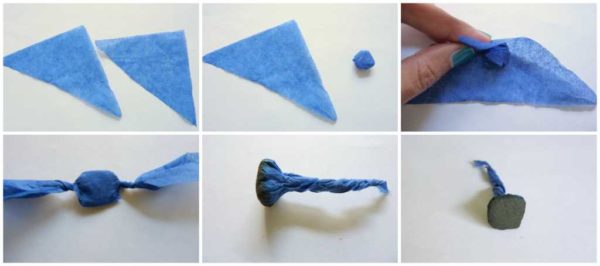
Making the core
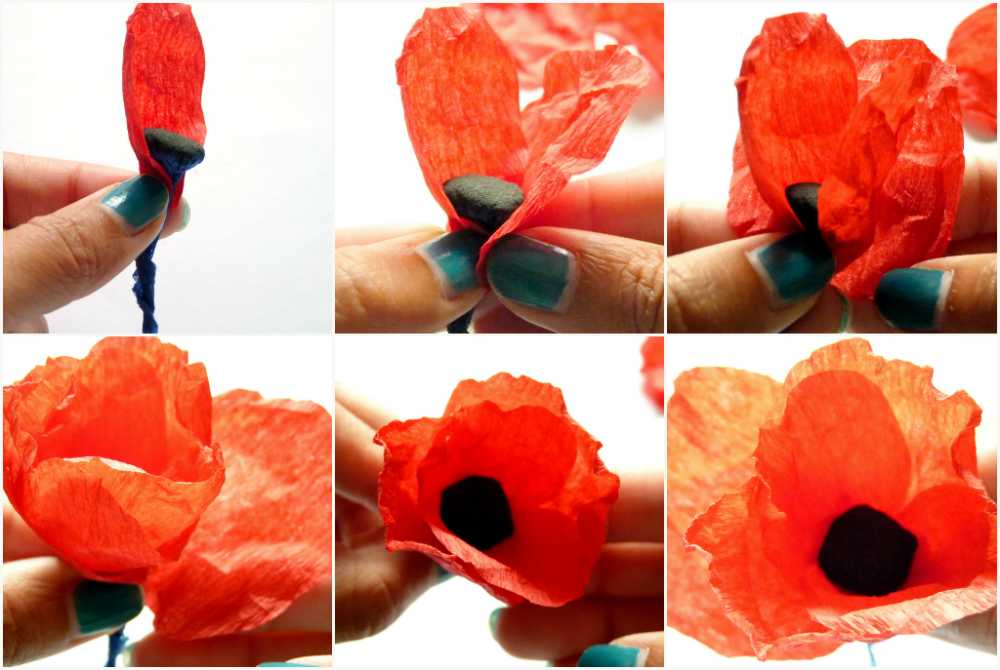
- Cut out two or three petals of different sizes from scarlet paper: small, medium and large.
- We collect the petals all together (do not put them in a neat pile) and crush them into a ball.
- We disassemble the ball into petals.

Preparatory work
- We take the core, wrap the first small petal around it from left to right.
- The second small petal partially overlaps the first, followed by the middle one, too.

We collect flowers from corrugated paper with our own hands
- The second middle and two large petals form the second row. They are located so that their central part overlaps the junction of the previous row.

Shaping and shaping the stem
- Gathering everything together, insert the wire into the base, wrap the base with thread, glue it.We wrap it in green paper.
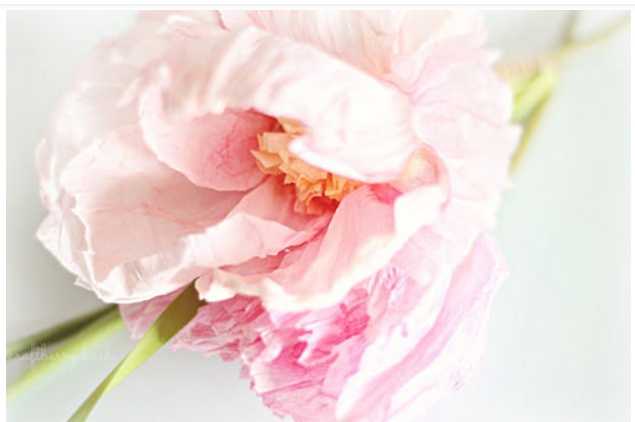
Here's a flower made of corrugated paper


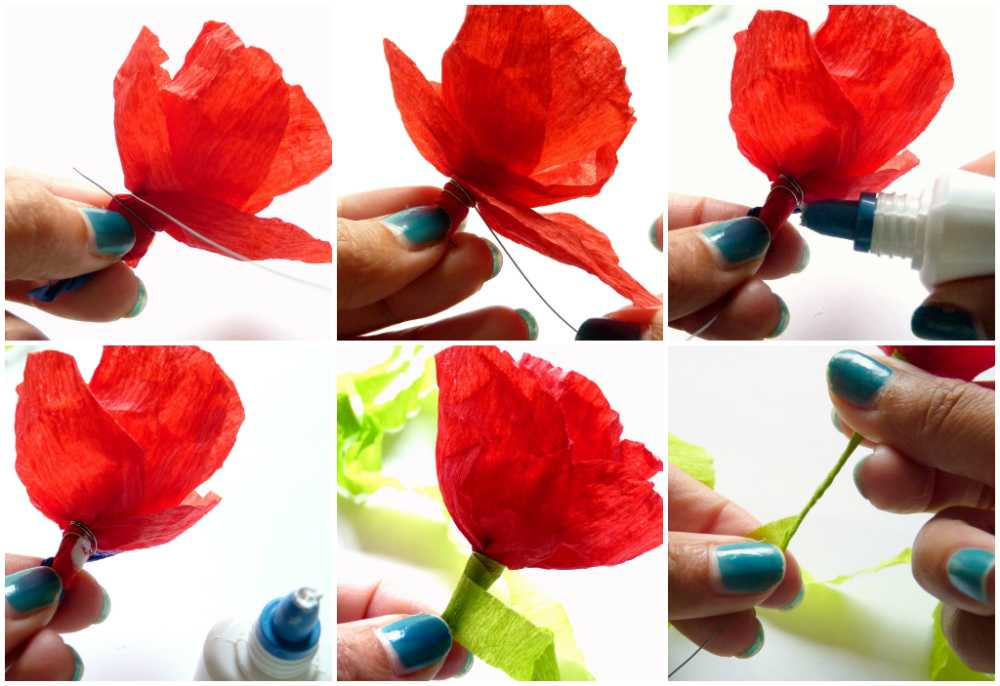

Poppy is one of the easiest colors to DIY from corrugated paper. At the same time, it looks very good. You can use them in a campaign with other flowers, or make a bouquet with only poppies.
Even such a simple flower can be made in different ways. First of all, you can change the middle. In the master class described above, the core of the flower is very simple. It can be made more like natural. Using the same technology, we make the middle, but from white paper. And from black (can be painted) we cut out a strip about 1 cm wide and 4-5 cm long.On one side we cut it into thin stripes (a couple of millimeters wide). We twist the resulting "noodles", getting thin stamens. We wrap the stamens around the core, and then we proceed according to the same algorithm.
How to make paper and candy crocuses
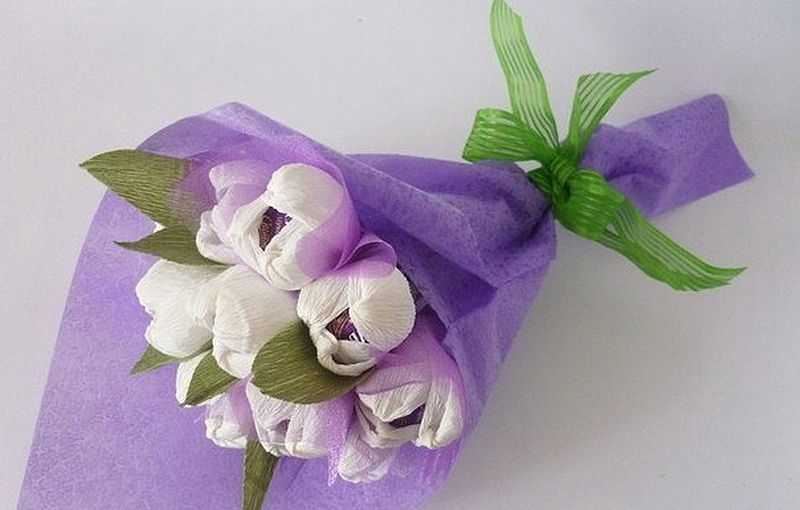
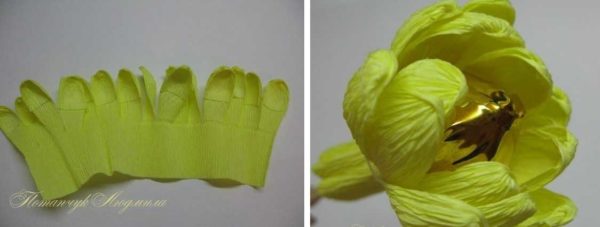
An unusual gift can be made by using candies as the core of flowers. It turns out an original sweet gift. Such a core can be made in flowers with a large hollow bud inside - a tulip or crocus, for example. Moreover, corrugated paper crocuses are very easy to make. Everything will take 5-10 minutes. Not more.
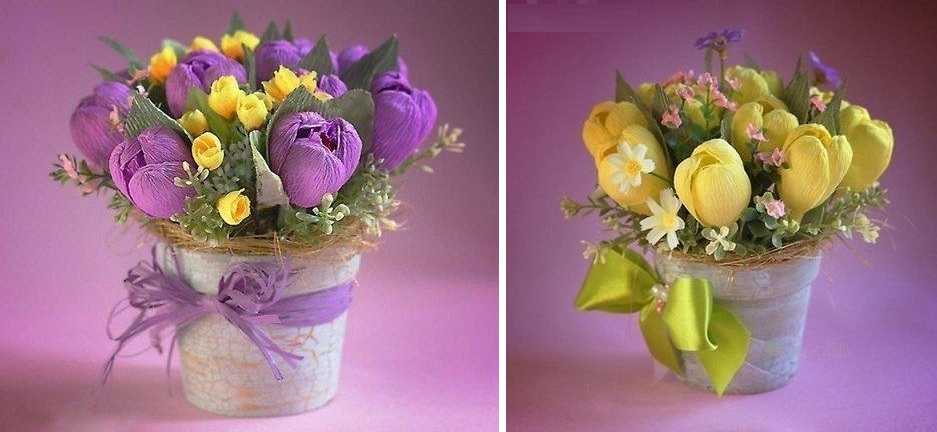
A bouquet of corrugated paper with sweets is a nice surprise
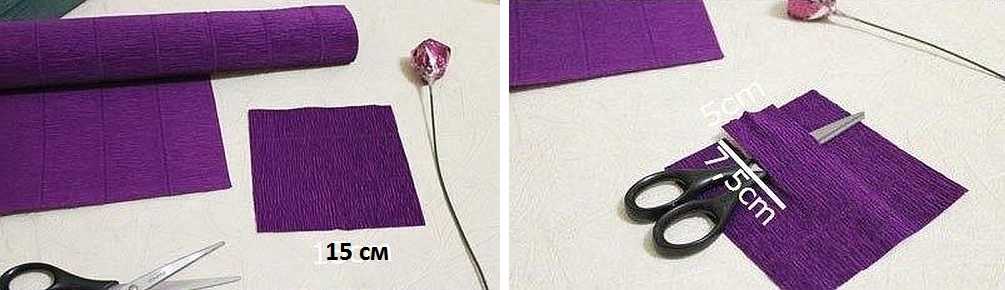
- Cut out a square with a side of 15 cm from paper.
- We divide it into three parts, making a cut to a depth of 7.5 cm. Three petals are obtained.

First step: cutting out the blanks
- Each petal, measuring 5 cm from the top, scroll around its axis and bend the upper part down.
- Use your fingers to give them a concave shape.

Second step: form the petals
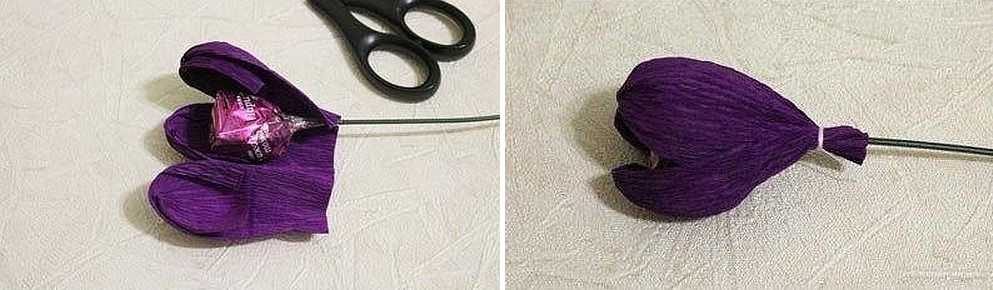
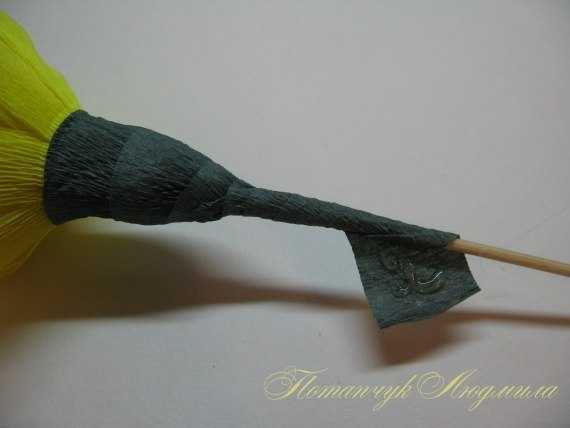
- We take the formed petals, wrap them around the stem so that each petal takes its place - about 1/3 of the entire diameter. To do this, the bottom edge will have to be crushed well.
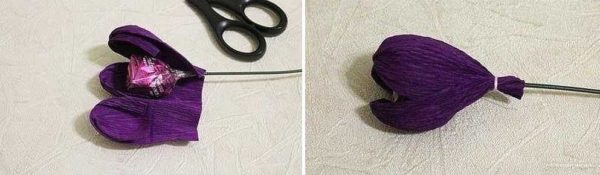
Step 3: attach the petals to the stem
- We make leaves from green paper. Cut out a rectangle with sides 5 * 8 cm.
- We divide it into three parts, making incisions to a depth of 8 cm.
- Having stepped back 3 cm from the edge, we twist the strip of paper around its axis, fold the upper part down, straighten it and give it a rounded shape.
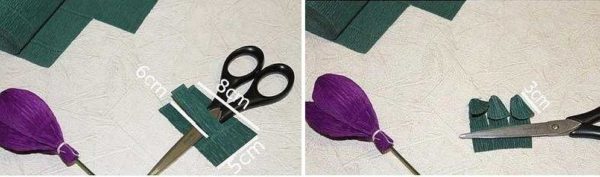
Step 4: making leaves
- We wrap the leaves around the bud. They should fall at the junction of the petals.

Step 5: finalizing the crocus
- We take a narrow strip of green paper, twisting it around the wire, we make out the stem.


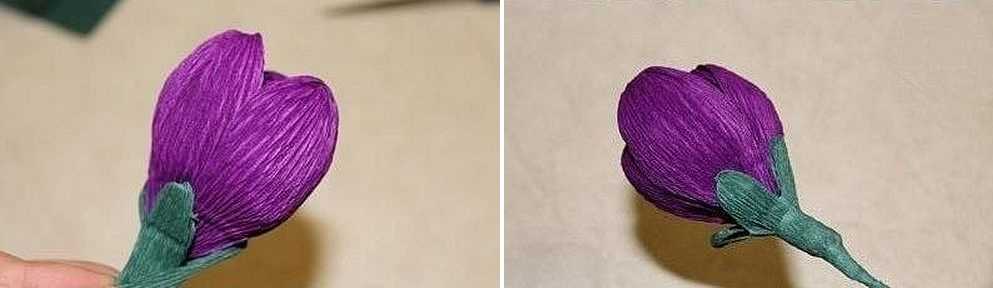
That's all, crocus made of corrugated paper and sweets is ready. Having made 7-9 pieces of these colors, you can put them in the basket. For more variety, you can make some small flowers.
Chrysanthemum
Chrysanthemums can be made using the technology described above. The difference is that there will be many petals and they will be narrow. And the principle is the same: we twist the upper part of the petal, lower it down. Only in the case of chrysanthemums, it is necessary to give the entire petal a curved shape.
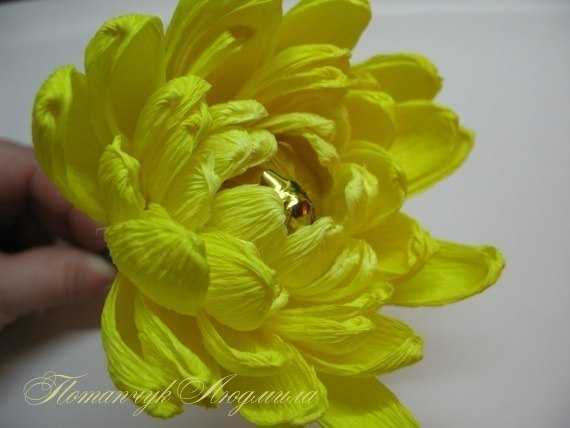
We make just such a chrysanthemum from corrugated paper
For these paper chrysanthemums, candy is also used as a core. These corrugated paper flowers are best made from a material that is not too bright. The tones are softer, softer. For foliage, muted greens are also chosen. For more believability, take paper of two close shades and make petals in two shades.
So, do it yourself chrysanthemum from corrugated paper:
- We tie a candy to a bamboo long skewer (the wire bends), For this you need to take a piece of foil, wrap the candy. You can fix it with threads or a ribbon.

The petals can be the same
- Cut out a rectangle from paper. Width 10 centimeters, length - about 20 cm (more can be, there will be a denser flower).
- Cut into strips about 1 cm wide.It should turn out 18-20 petals.
- Twist each petal, stepping back about 3 cm from the edge.Give the petals a curved shape.
Almost ready
- We twist the strip around the stem.We make sure that the petals of the second row fall at the junction of the petals of the first row. Similarly, we place the third row and all subsequent ones.
- We squeeze the base with our fingers, twisting it around the stem, fasten it with a thread.
Finishing touches - decorating the stem
- We take a long thin strip of green corrugated paper, wrap it around the base of the color and the "stem",

This chrysanthemum variant looks pretty good. But for greater believability, you can make petals of different sizes. You need at least three gradations: small, medium and large. They will differ more in length than in width. Such a flower will look more magnificent, it will look richer in a bouquet. Try it.
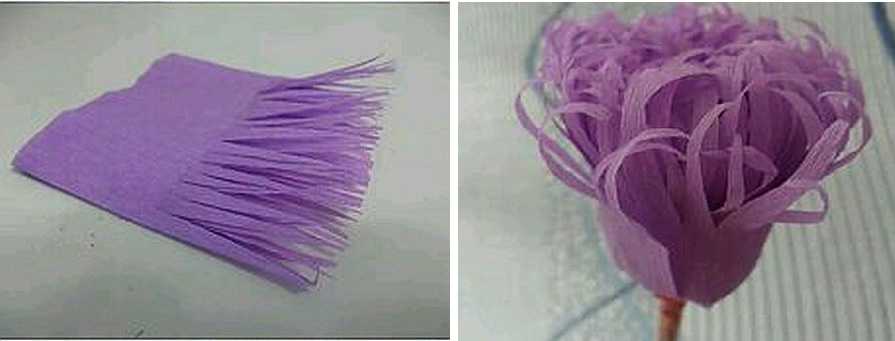
Asters - simple and original
For simple yet eye-catching corrugated paper flowers, try making asters. They are made from corrugation in bright and pastel shades. They look best in a bouquet, and the colors can be different.
- We cut out a strip of paper 8-12 cm wide, three to four times longer.
- We fold the paper several times.
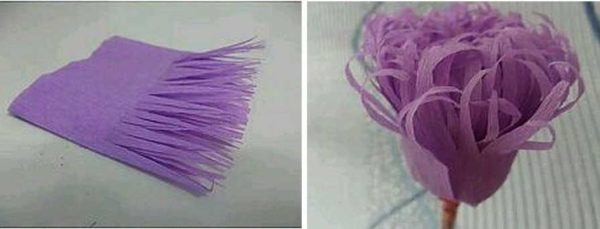
Simple corrugated paper flowers - asters
- Cut into thin strips - several millimeters wide (2-4 mm, as it turns out).
- Bend the petals with your fingers. The bending radius can be different, but the direction is approximately the same. During work, the tape can be left unfolded and work with several petals at once. This is more believable. And, when assembling, it will take less time to lay the petals.
This is how you can get a bouquet
- Twist the shaped petals around the wire / bamboo stick. We try to wrap those petals that are closer to the center inward more, those that are further, bend them with a smaller radius.
- Crumple the base of the flower (uncut part), twisting it around the stem, fix it with a thread.
- Using a narrow green stripe, decorate the base of the flower and the stem.
Corrugated paper asters can also be made from petals of different sizes - shorter ones closer to the center of the flower (there should be fewer of them), and longer ones at the periphery (there are more of them). You can bend them in one direction, or in the opposite direction. As you like best.
Corrugated paper roses: a step-by-step manufacturing algorithm (2 methods)
The good thing about corrugated paper flowers is that they can be made in different ways. The material is very plastic, it easily changes shape because there are several ways. Someone wants to achieve more "naturalness", and someone is important about speed.
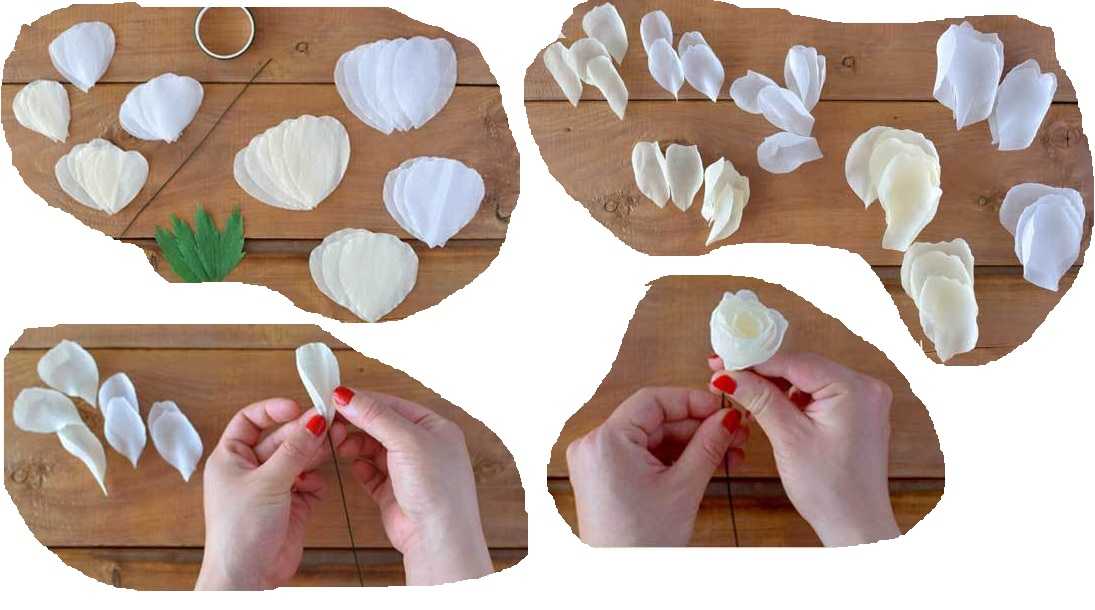
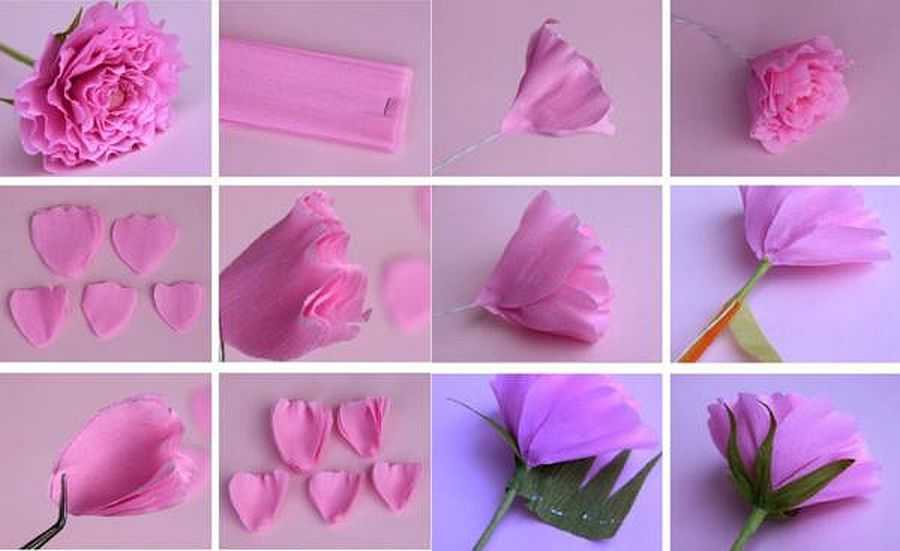
1 way (natural look)
For roses made of corrugated paper, it is better to choose paper of two or three very similar shades. This will make the flower look more natural. For example, white and crepe paper was used for the flower in the photo. The number of petals of different shades is arbitrary, as is their placement in the bud.
This is what you should get: very beautiful flowers from corrugated paper
The manufacturing procedure is as follows:
- Cut out 8 small, 10 medium and large and 8 super-large petals. The number of pure white and crepe - half.
- Cut out a long ribbon from green paper - wrap the stem, several (4) leaves - long and narrow, which are at the bottom of the flower in real roses.
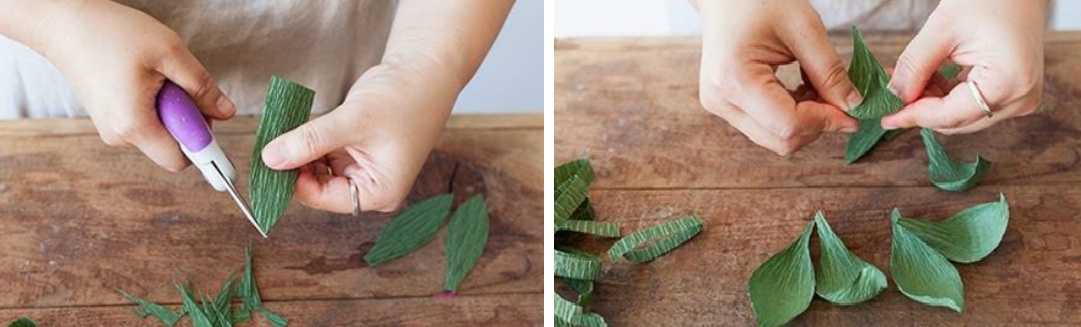
- Use your fingers to give the petals a rounded shape. We straighten it from one edge, even turning the edge back a little. From the other, on the contrary, we twist.

Diy corrugated paper flowers: making a rose
- We wind the tape on the wire. If the flowers will be used in the composition, leave about 1/3 without the ribbon - this will make it easier to insert them.
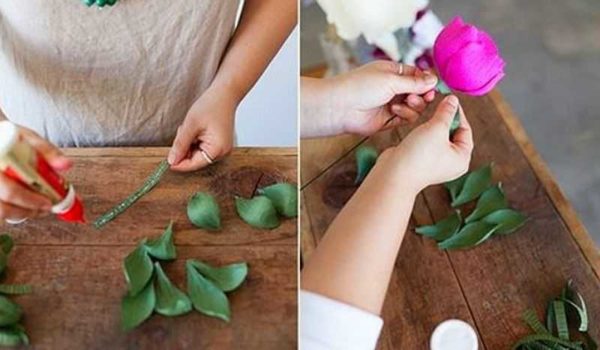
- Take the smallest petal, twist its bottom edge around the wire. He should wrap the stem completely. The petal will turn out to be almost folded. Apply glue to the lower part, glue the next small petal. We press one to the other tightly about half. From the second row, the effort can be slightly weakened - the bud opens up a little.

Final steps
- Next, in the same technique, add all the other petals in order: medium, large and very large. When we glue the large petals, each of them covers only half of the "stem" with the petals wrapped around it.
- We glue the leaves last.
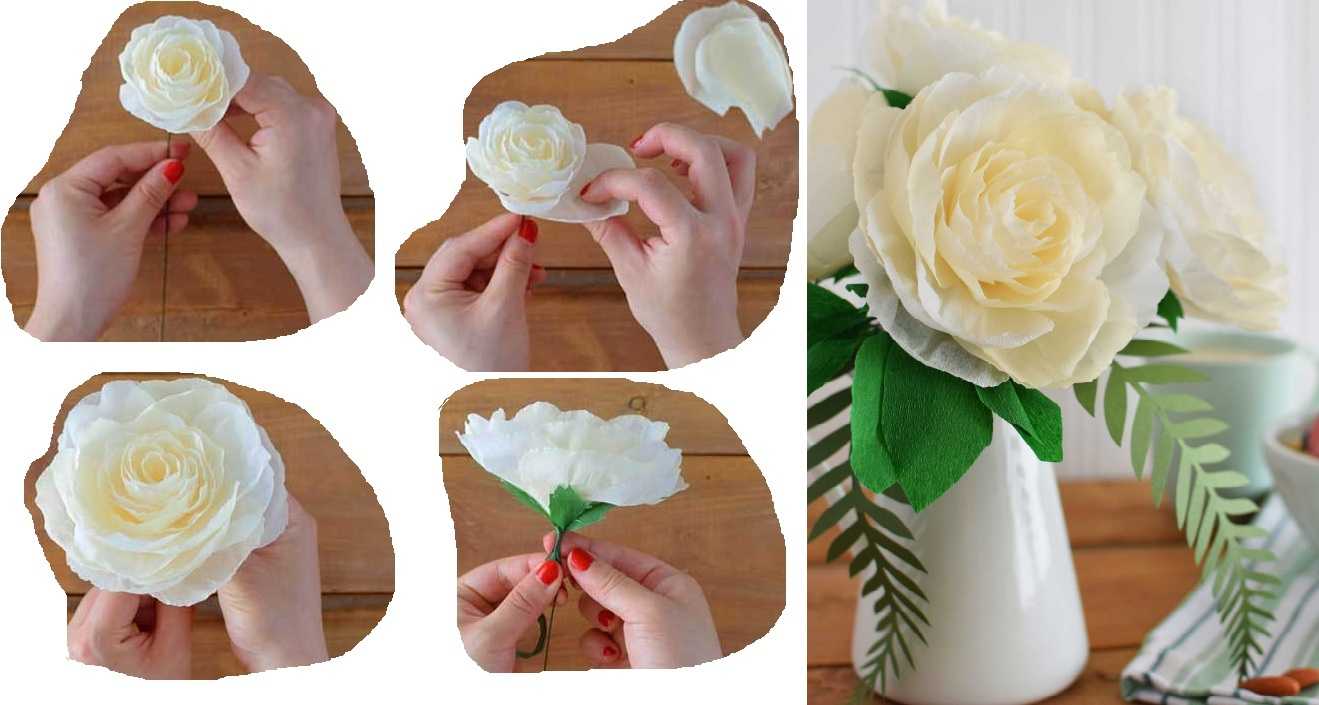
As a result, we will get a beautiful rose made of corrugated paper. In this version, it looks like a real flower. There is an easier and faster way (pictured below).
Method 2 (simple and fast)
Cut out a strip of paper 7-8 cm wide. You can make it uneven - narrower on one side, wider on the other. We fold it starting from the narrow edge with an "accordion". The width of the "accordion" is 3.5 -4.5 cm. Cut out the petals from the resulting stack 2/3 of the height.
We wind the petals onto the wire (you can not wrap it with a green ribbon for now), starting from the narrow edge. As we twist, we give them a shape with our fingers - stretch them on one side, crush them against the stem. Having installed all the petals, we fix them with a thread (just by winding a few turns). We correct the petals, forming a bud.
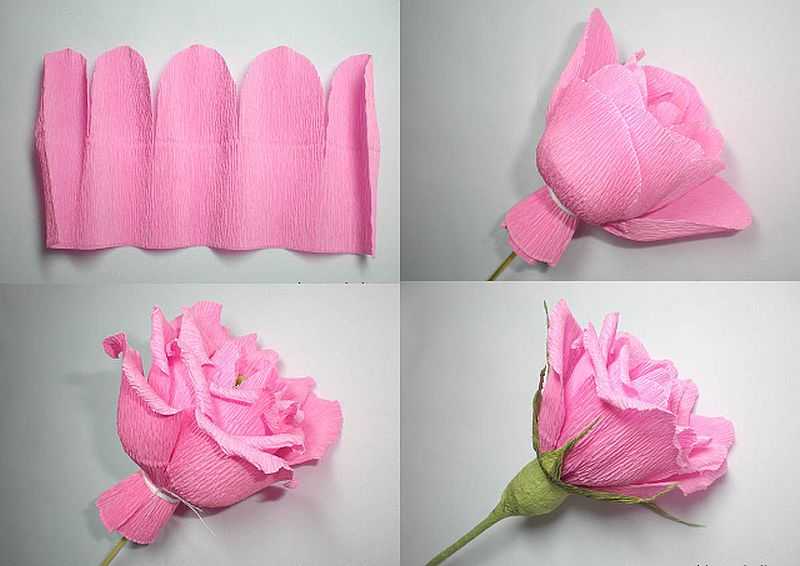
You can quickly make a rose from corrugated paper
From green paper, folding it like an accordion, cut out long and narrow petals. Please note that their ends will need to be twisted, so they should not be so narrow (noticeably 1 cm). We wrap the cut petals from below, under the petals, twist the leaves with our fingers, and then draw up the stem.
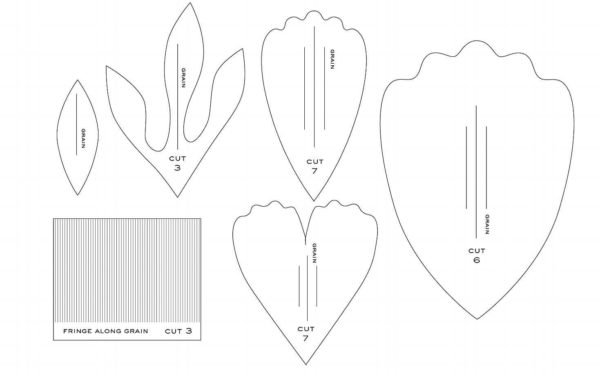
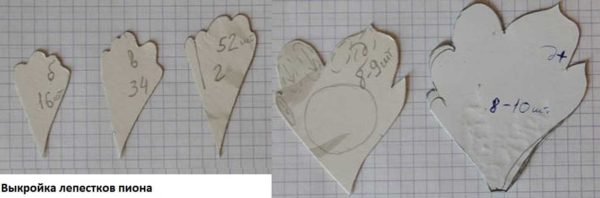
Corrugated paper peonies (with patterns)
For peonies, you need yellow corrugated paper for the core, green for the foliage, pink, cream, crimson for the flower itself. A wire or thin stick is suitable for the stem. You will also need PVA glue.
These are such beautiful corrugated paper flowers you can get
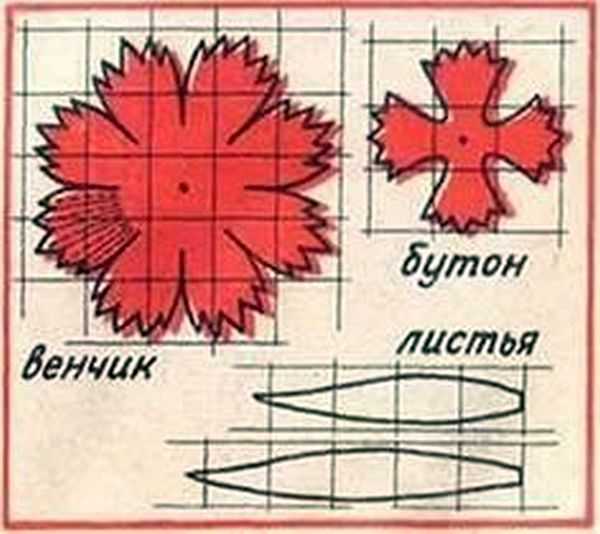
Corrugated paper peony is a rather complicated flower to make. It has many different petal shapes. You can't do without a pattern. But there are many varieties of peonies, so there are several patterns. Here are two options. The first one can be printed, cut out and used as a template - it is given in full size image. The second option can be drawn with your own hands in the cells.
-
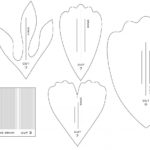
- Life size pattern of peony petals
-
- Pattern of peony petals, which you can draw yourself on a sheet in a cage
Step-by-step manufacturing process with a photo:
- Cut out a strip of yellow paper 4-5 cm wide and 10-12 cm long. Fold it several times, cut into thin "noodles", leaving about 1 cm of uncut edge.
- We roll the resulting tape into a tight roll, using the whole edge for this. We grease it with glue and twist it. It turns out a shaggy yellow core around which the petals will be attached. We fix this middle on a stick / wire, which will be the stem.

We start to make a peony from corrugated paper
- Cut out the petals from paper. The minimum quantity is 20 pieces (all types), but the more, the more fluffy the flower will be. On the second pattern, the number of petals is indicated on each; on the first, explanations are needed. There are also numbers there. This is the required number of petals.
- Stretch each petal in the middle, without touching the edges, giving them a convex shape. Don't try to make them the same. This is not required. In the process, you can still stretch or squeeze a little.
- We start folding the petals from the smallest ones. We place them around the existing center. Place the first small petals just slightly overlapping their edges. We coat the base with glue.

Making the leaves that grow from the bottom of the flower calyx
- Next, take the middle petals. We lay them with a slight approach to one another.
- Then we put the large and the last - very large leaves. We coat each layer with a small amount of glue at the base.
- Leaves are also required. We cut them out of green paper. On the one hand, we squeeze them, forming a petiole, on the other, we straighten them in the middle, giving them a curved shape (similar to a boat).
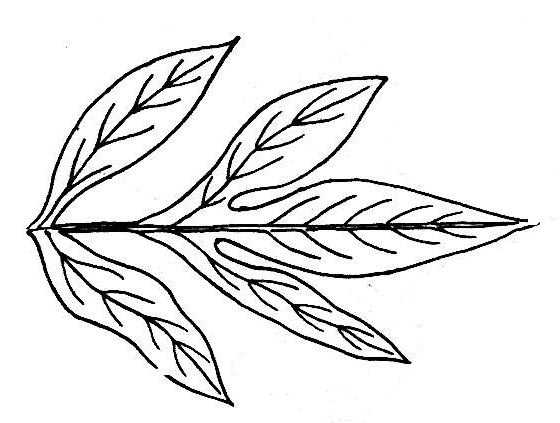
Peony leaf pattern
- We attach the leaves under the bud, bend them down.
- You can also make leaves, like a peony, but this will also require a thin wire and a few cut curly leaves. Streaks cannot be made on corrugated paper, but they can be marked with paint.

What can happen
- We glue each leaf to the wire, wrap the petiole with a thin strip, then attach it to the stem.
The assembly process is a creative activity
- We take a long narrow strip of green corrugated paper (about 1 cm wide, 20-30 cm long - depending on the length of the stem). We wrap the base of the flower, then smoothly move to the stem. At the end, we fix the edge of the paper with a drop of glue.


The corrugated paper peony is ready. Usually they make up a bouquet. When you do the following, don't try to make them exactly the same. All flowers in nature are unique. Yours should be different too.
You can make such a bouquet of paper peonies with your own hands.
You can play with the size and number of petals, mixing petals of different shades, similar in color. You can try using paint to darken the petals at the base. In general, there are a lot of options.
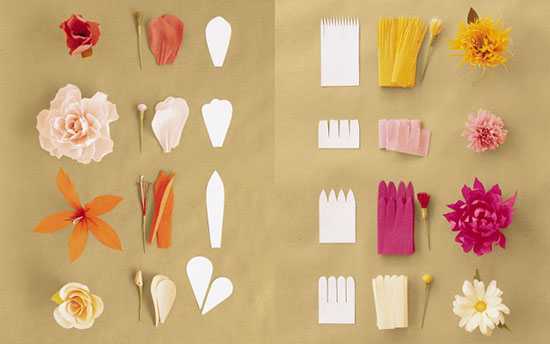
Corrugated paper flowers: photo ideas, patterns
Using the techniques described above, you can make any flower. The main snag is in the shape, number and size of the petals. The most important thing is still the form. It is characteristic of each petal. Sizes are arbitrary. Not only do flowers come in different sizes in nature, it has recently become fashionable to decorate the interior with giant growth flowers. The decoration is original, but specific. It is necessary to increase the basic patterns many times, it is difficult to work with large scales. It is best to practice on normal sized flowers first and then move on to larger ones.
Cornflower is easy and quick to make, but it looks great
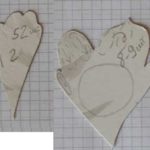
A little about patterns. They can be found not only. If it happens in the summer, take the desired flower, disassemble it into petals. From the whole pile, select the most characteristic ones, attach to a sheet of paper, circle. Then the shape must be corrected taking into account the fact that these are still paper flowers. The final pattern will take shape after a few trial and error. We will post several patterns and master classes in photos in this section.
Cornflowers
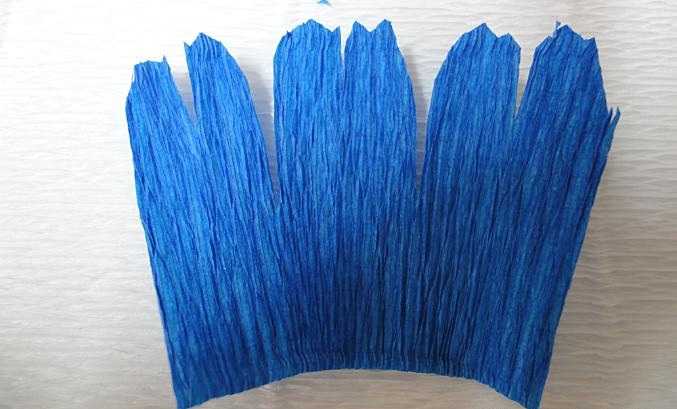
The simpler the flower, the more ways to make it. Cornflower from corrugated paper can be made using different techniques. Examples are in the photo.

You can't tell from a distance
We cut out such petals in order to get flowers from corrugated paper as in the photo above.

Another technique
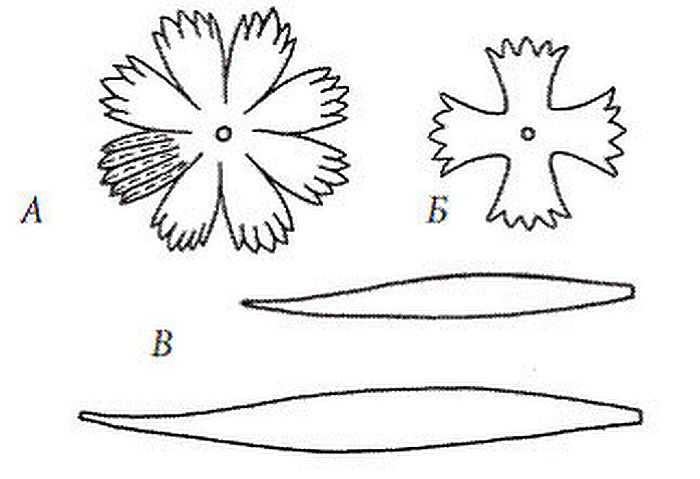
If you want to make it very similar to the real one (A - a pattern for a blossoming flower, B - for a bud)
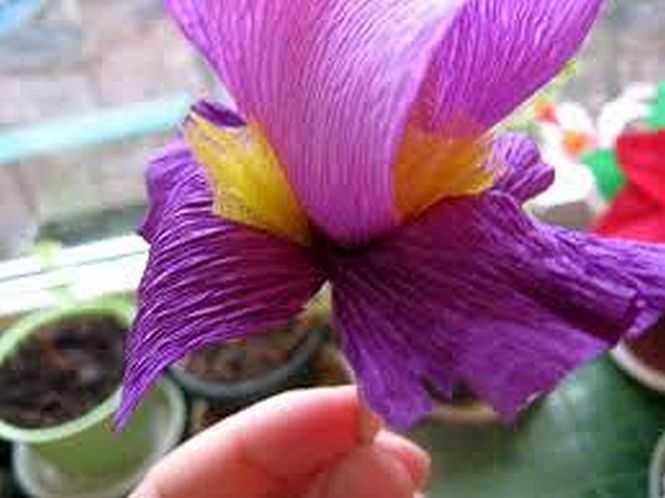
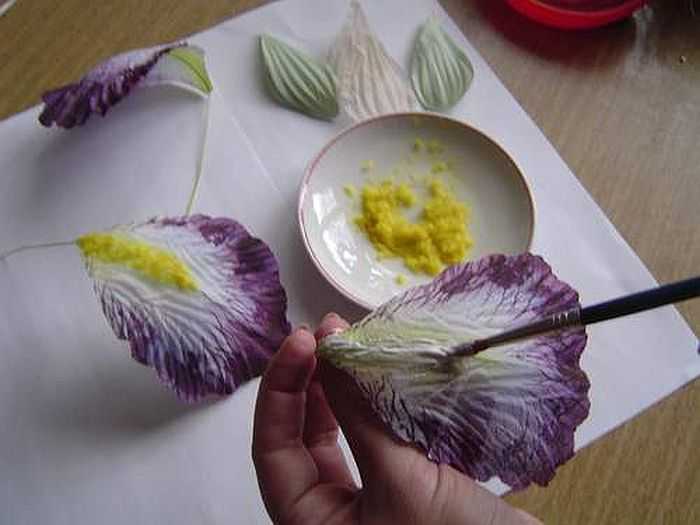
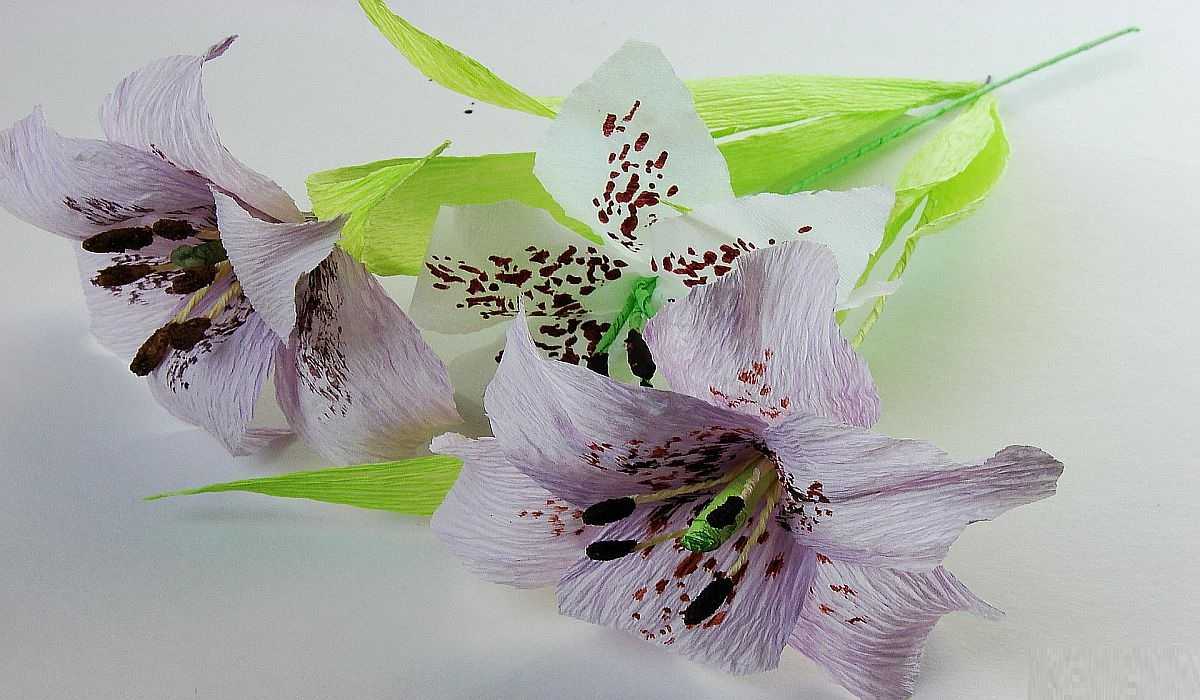
Iris
Making iris from paper takes some imagination. A very unusual flower. The photo shows several techniques that allow you to achieve different effects. Some flowers just resemble the original, some are very similar to it.
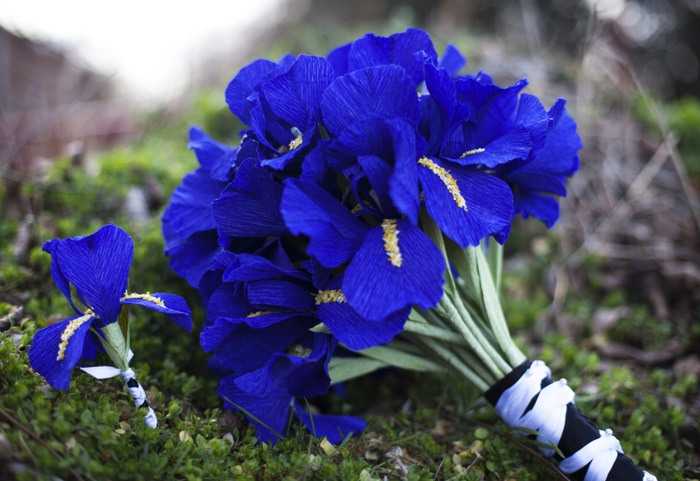
They are very beautiful both live and made of paper
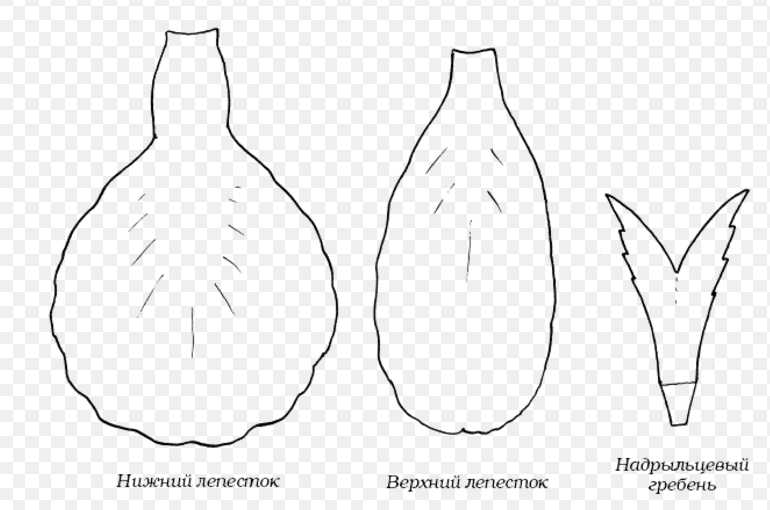
Iris petals pattern
Cut out, give them a curved shape
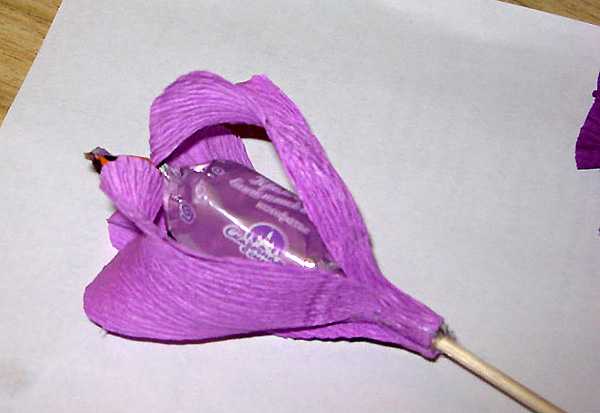
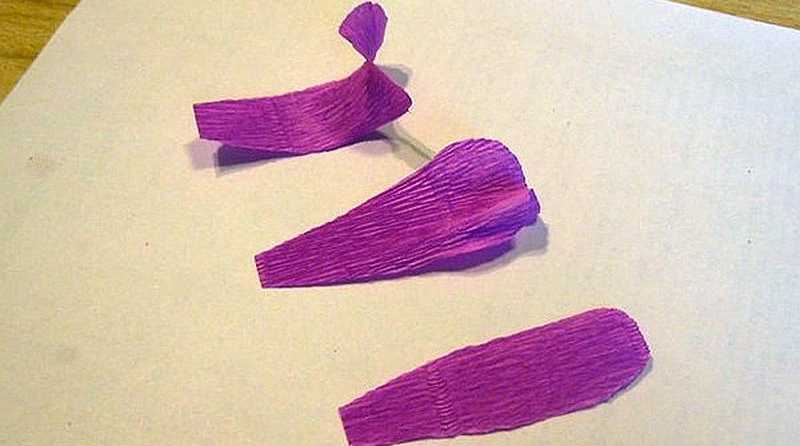
You can use candies as a core
With such a core, they are more believable
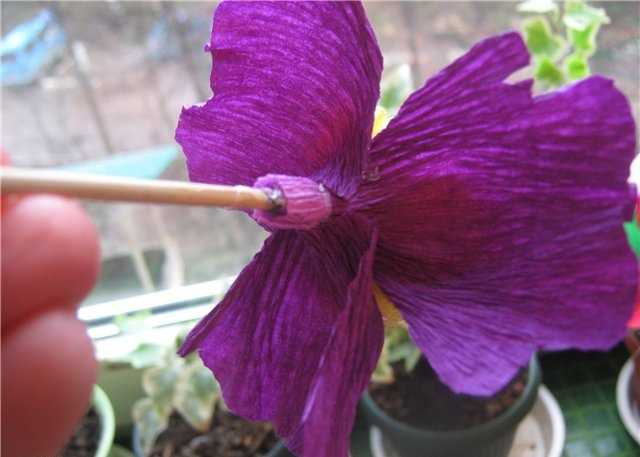
How to attach them to the stem
Difficult but very beautiful
Anything different

There is no limit to perfection: the core of the poppy can be made from thread
Lilies ... Beautiful, but several techniques are applied
Large core corrugated paper aster
Step-by-step photos of making paper carnations
Pansies - a pattern for making from corrugated paper
You can consider the shape of the petals for different colors.
For the "advanced". Very beautiful flower turns out
The process of making this flower in the photo above
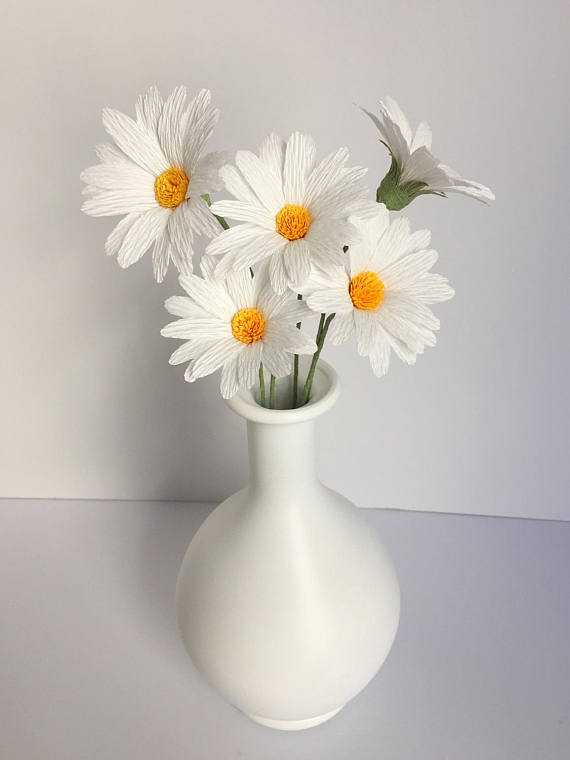
Cute daisies - an option for beginners
-
 Buying an apartment: what documents are required, their verification
-
 How to deal with cockroaches in an apartment, the best remedy for cockroaches
-
 How many square meters in a hundred square meters of land: measurement, calculation
-
 Conversion of inches to cm and mm, centimeters to inches, tables, applications, formulas
-
 Floor stands for flowers


