DIY mirror decoration
One way to personalize your home is to decorate it with DIY items. A wide field of activity opens up when decorating. The most common item can be turned into at least the original one. For example, a mirror decor transforms an ordinary piece of glass into a stylish and original piece.
The content of the article
Basic principles of decorating mirrors
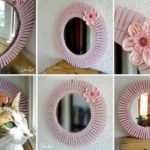
Do-it-yourself mirror decor is made using a variety of materials, including those that are usually sent to the trash can, and if bought, they cost very little. For example, straws from old newspapers or magazines. In some cases they are used without staining, in others they are dyed. It is more convenient to paint in the form of a spray - it is applied in an even thin layer, staining occurs several times faster than when using a brush. You can also use broken china, a mirror, colored glass, shells, pebbles, rhinestones, glass drops, buttons, ropes, plastic bottles, twigs, wooden slats and sticks, plastic spoons and other strange things.
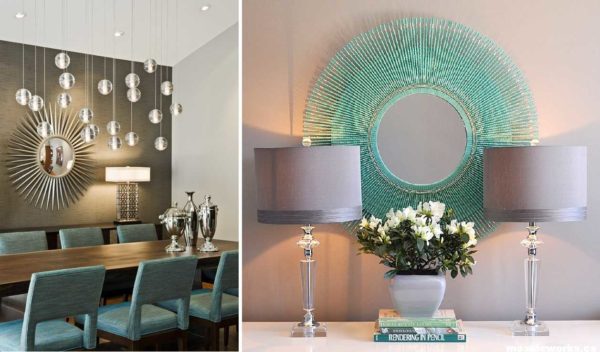
DIY mirror decor can be made for any style
All this wealth is usually glued onto transparent silicone. It is sold in hardware stores, in small tubes or larger cartridges for a construction gun. It is more convenient to work with a pistol - it is easier there to control the effort and get the required portion of glue, which is problematic with a regular tube.
Please note that silicone is acidic and neutral. Acidic until it dries very much like vinegar and you can work with it only in a well-ventilated area. Neutral silicone sealant doesn't smell like anything, but it costs more. Still acidic, until it hardens, can corrode the paint that is applied to the decor. When buying, pay attention to the setting time. This is the time during which you can still fix something, move it. As soon as the glue begins to polymerize, nothing can be done - it is covered with a hard film. The average time for the formation of a surface film is 10-20 minutes, but there are also more “long-playing” compositions.
You can use the most unusual materials
There are two decorating techniques:
- The decor is outside the mirror. In this case, a base is cut out of thin fiberboard or thick cardboard, which is larger than the mirror in size. It can be of any shape - round, square, or arbitrary. Decor is glued to the base, after the glue dries, a mirror is inserted into the finished frame.
- Decorating the mirror along the edge. In this case, the glue and all the fragments are applied directly to the mirror surface.
It seems that there are slight differences, but the design looks different in different techniques. The second allows you to get an openwork mirror decor, which, as it were, is highlighted by a reflection.
Examples of decor for round and oval mirrors
First, let's talk about the decor that is "built" around the mirror. The circle is beautifully decorated. You can make the sun, flower, star, etc. from it. Lots of options. Most often, the decor is also built in the form of a circle, but it can be a square, a multi-ray star, or any arbitrary shape.
Round mirror decor examples
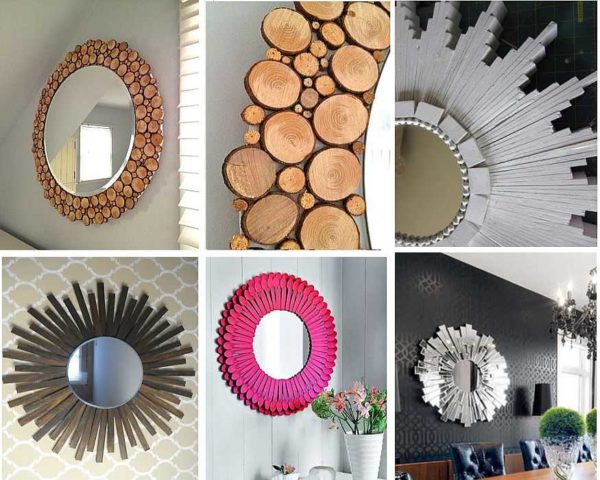
From sticks or tubes of paper
You can decorate a round mirror with chopsticks for Chinese food or straws twisted from sheets of a newspaper or magazine. If the tubes are rolled out of the newspaper, they will have to be painted.Made from thin, glossy paper on which magazines are printed, can be used without painting. Sticks can also be painted, you can leave them as they are.
For painting, find acrylic paint of the desired color in a can, lay the tubes on a sheet of unnecessary paper, paint on one side from a distance of 20-25 cm. When dry, turn over all the straws / sticks and apply paint on the other side.
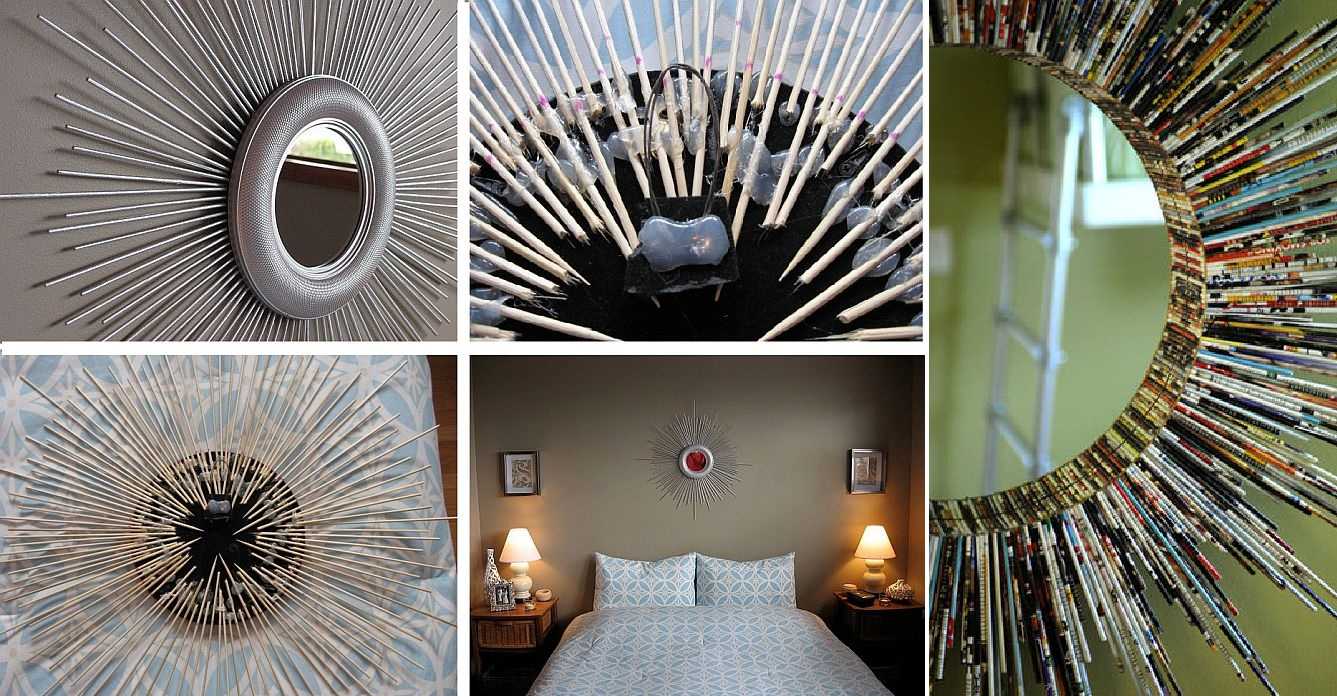
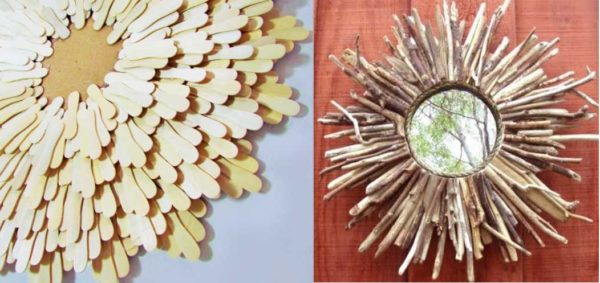
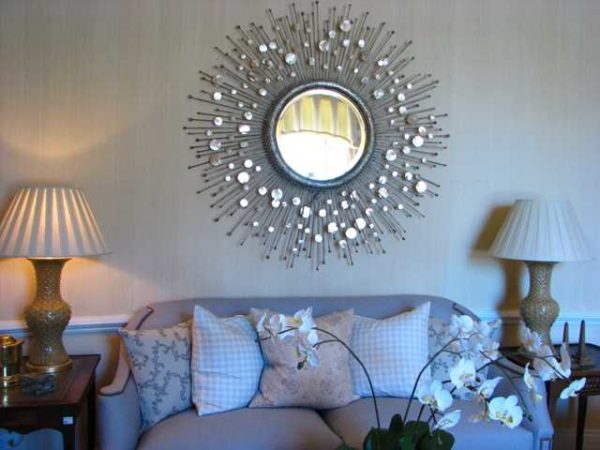
DIY mirror decor in the form of the sun
Next, you need silicone. Apply glue to the back of the mirror. You can - with a short strip (so that it does not have time to freeze while you lay out the rays), you can drop it. If the back of the mirror is not protected by anything, the silicone must be neutral. The acidic will dissolve the amalgam and the mirror will be damaged. We spread the rays on the glue, wait for the glue to set. After 24 hours, you can safely hang the unique mirror in place.
-
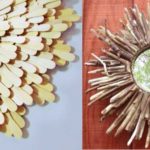
- In the same technique, but using ice cream sticks and twigs
-
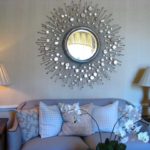
- If you add mirror drops to the rays, it turns out very beautiful
-

- With other materials, the look is different
The mirror can be with or without a rim - your choice. Instead of sticks / straws, you can use strips of glass, wood, plastic, etc.
From plastic spoons
In this version, a circle of a larger diameter is cut out of thin fiberboard or thick cardboard. how much more - choose yourself. Place the mirror in the center, trace around it with a pencil or marker. The decor should not protrude beyond this line.
We take plastic spoons, cut off the handles from them, and glue the scoops around the perimeter of the mirror. There are three or more such layers. They look like petals. When gluing, try to place them very tightly to each other so that the substrate does not shine through. They can be set straight or slightly turned to one side.
For the best effect, they can also be colored. The paint can be with a metallic effect, you can paint the entire decor in one color or in different colors.
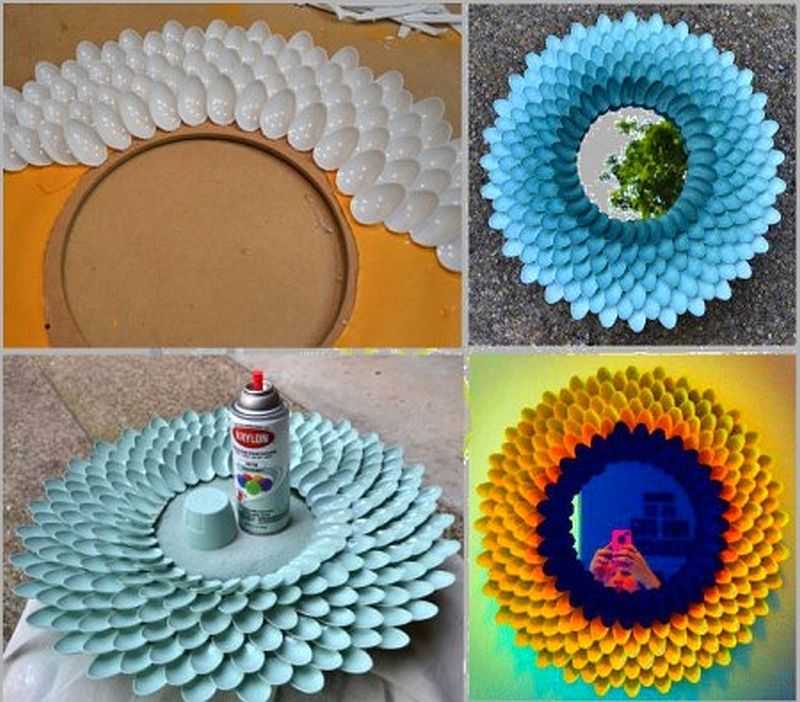
DIY mirror decor: use plastic spoons
After the frame is ready, glue the mirror to the center on the same silicone and admire it. Once dry, can be hung on the wall.
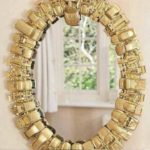
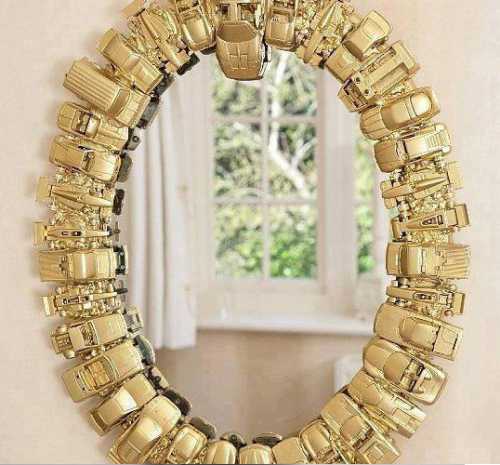
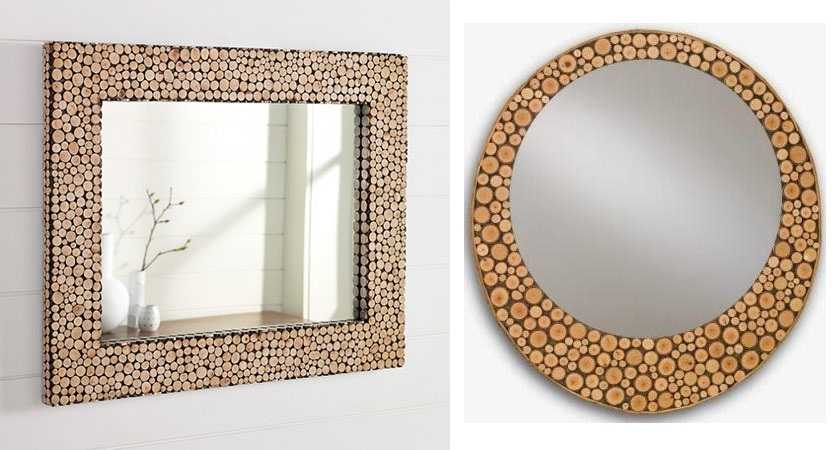
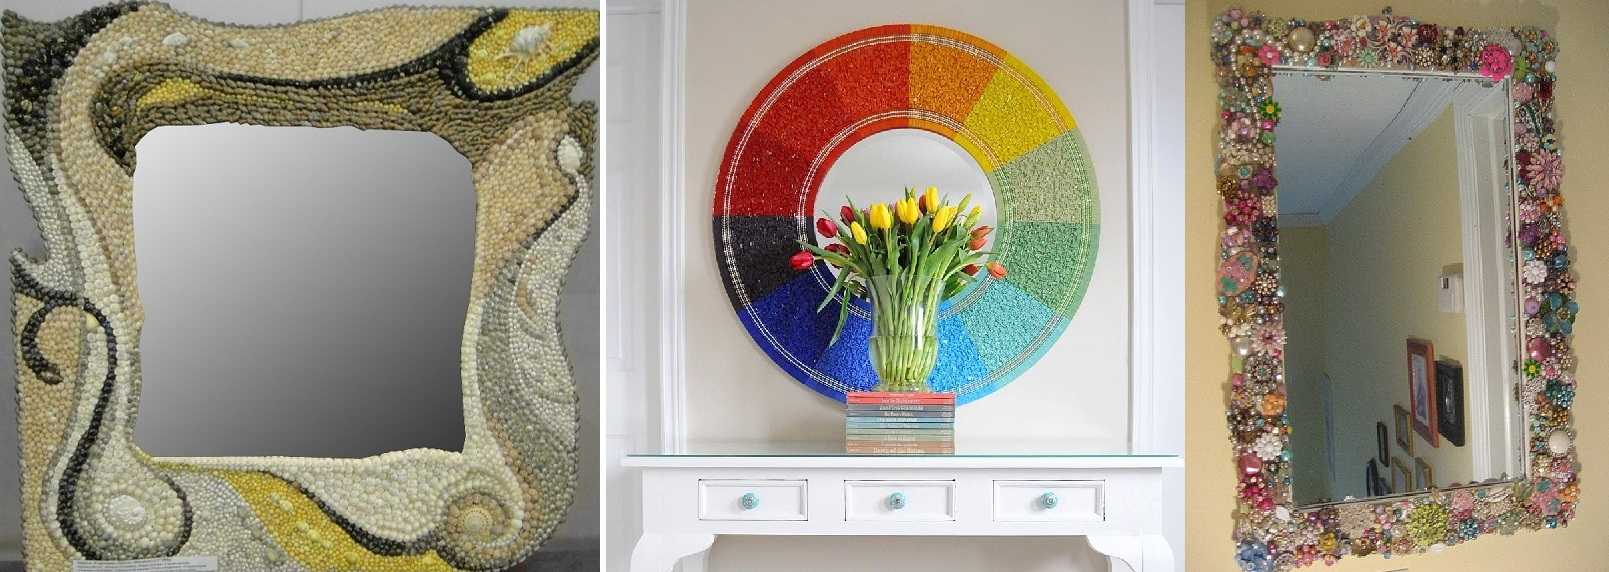
Using the same technique, you can decorate the mirror with buttons, shells, branches of different diameters cut into circles. They even use trailers and model cars. They are painted in some unusual color and are also placed in a circle.
-
- The decoration of this mirror is toy cars
-
- You will not immediately understand that the decor is made of wooden clothespins

-
- Different versions of the two techniques described
You can do something similar with a rectangular mirror. In any case, it will look good with branches and buttons cut into circles. The rest of the options are hardly suitable.
Variations on a theme
From plastic or cardboard rings
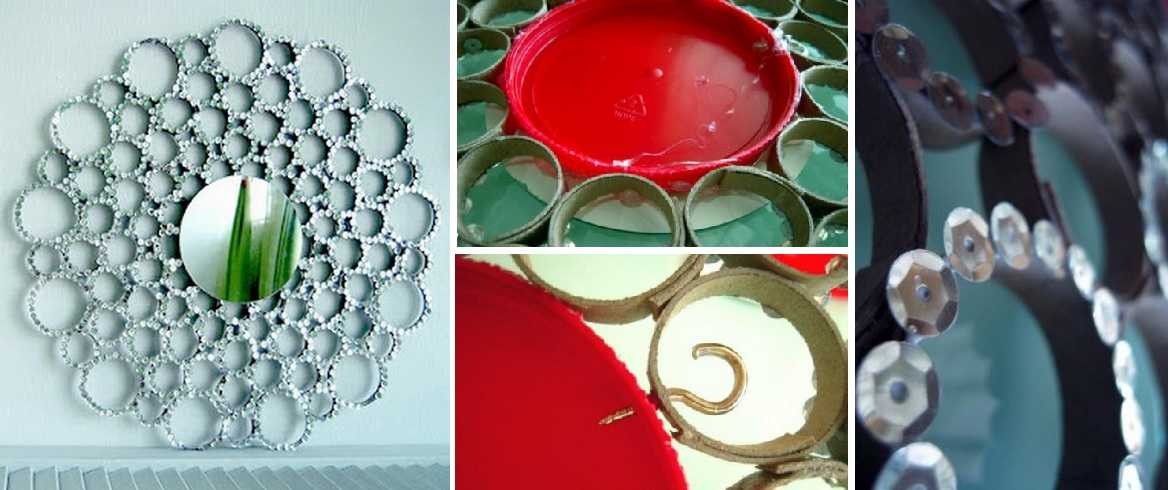
You can also decorate the mirror with the help of rings. They can be cut from plastic pipes or glued from cardboard. The sizes of the rings can be of the same diameter or different, their width is about a centimeter or slightly less.
Another way to decorate the mirror
If the rings are made of cardboard, you will need a base on which we will fix them. For these purposes, a plastic cover with a slightly smaller diameter than a mirror is suitable. We will glue the first row of rings to the sides of the lid. The second and all subsequent ones are attached to them. One of the rings of the first row is additionally fastened with a screw with a ring. Then we will hang our mirror on it.
After the whole structure is glued, we take sequins and glue them to the ends of the rings. The work is painstaking, takes time and patience. It is easier to hold and move sequins with tweezers and better with fine tips. This mirror decor is universal - in winter it is associated with a snowflake, in summer - with the sun.
Ring options
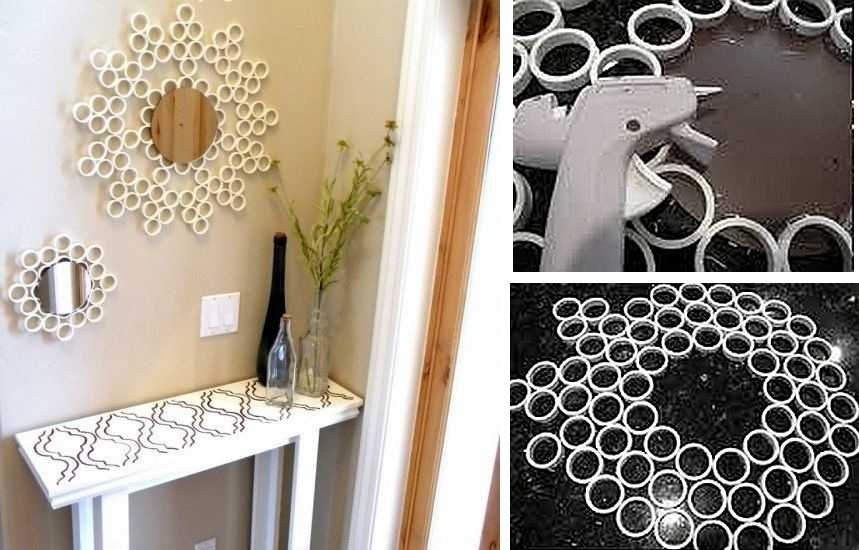
Rings from a plastic pipe are glued using the same technology. But they do not need a foundation, since they themselves are quite tough.From them we collect a ring of the required diameter, glue it. When choosing an adhesive, make sure it is designed for plastic. Actually, there is a special glue gun and glue in the rods for it. It is much more convenient for them to work, but you can adapt to ordinary silicone.
The edges of the rings do not have to be pasted over with something. They themselves look good. But in this case, they must first be processed from irregularities and burrs that remain from the saw. If they were cut with special scissors, there will be almost no irregularities, but the edge will still be straight, and the rounded one looks better. The ends are processed with fine-grain sandpaper. Then they are wiped from dust, degreased (wash in water in a detergent, wipe dry or dry). Only then can you start working with glue.
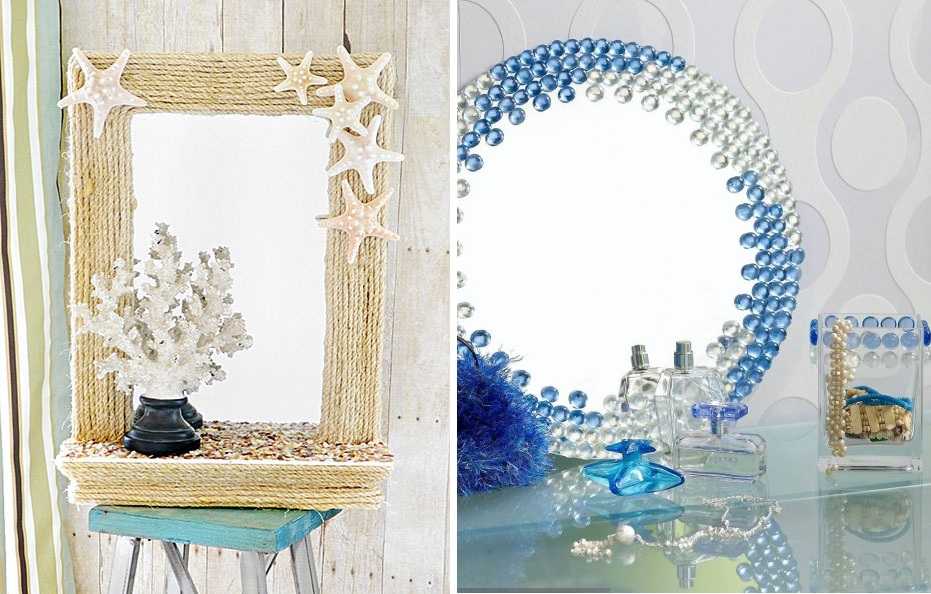
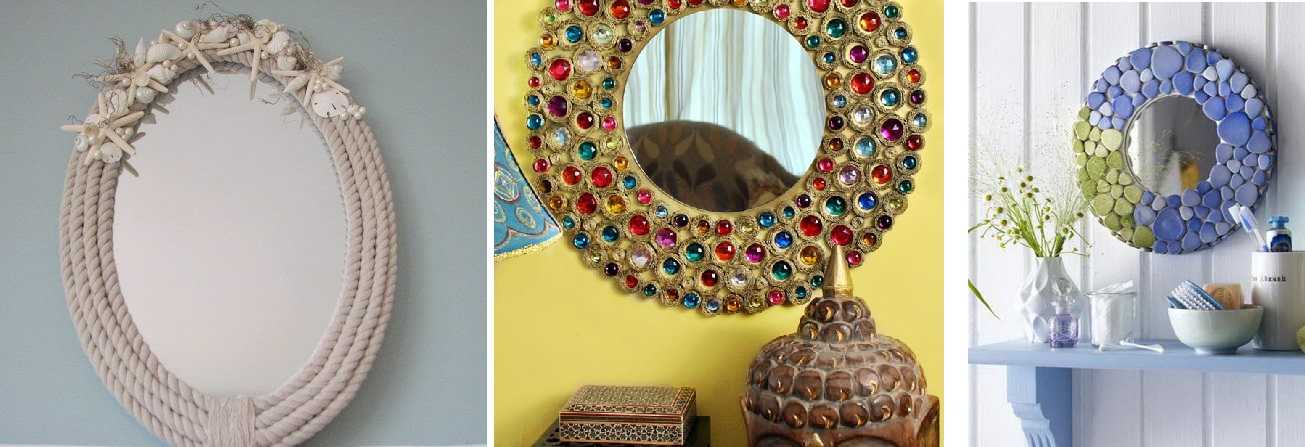
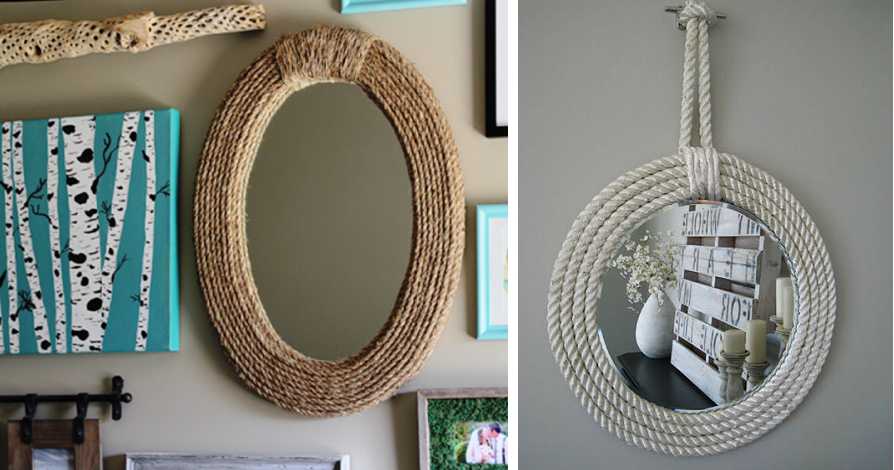
From the rope
We take a thick rope. It can be synthetic or hemp. For larger sizes, a rope can even be used. We also cut out a base from cardboard or fiberboard, which is larger than the size of the mirror. On this base, a thin layer of glue is applied, the rope is laid out coil by coil.
Rope mirror decor
In this case, it may be better to first glue the mirror in the center, and "wind" the ropes around it. So it turns out to be recessed in the frame.
Mirror decor
You don't always want to make a border around the mirror surface, and the decor that is applied to the mirror turns out to be more voluminous due to reflection. Therefore, basically another rule applies here - there should be free space between the decor elements. These techniques will allow you to make a square or round mirror decor - almost no difference. The main thing is to choose the right drawing or decoration method.
Frameless mirror decor
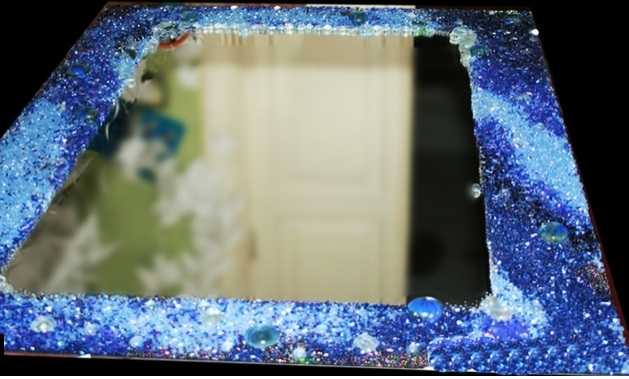
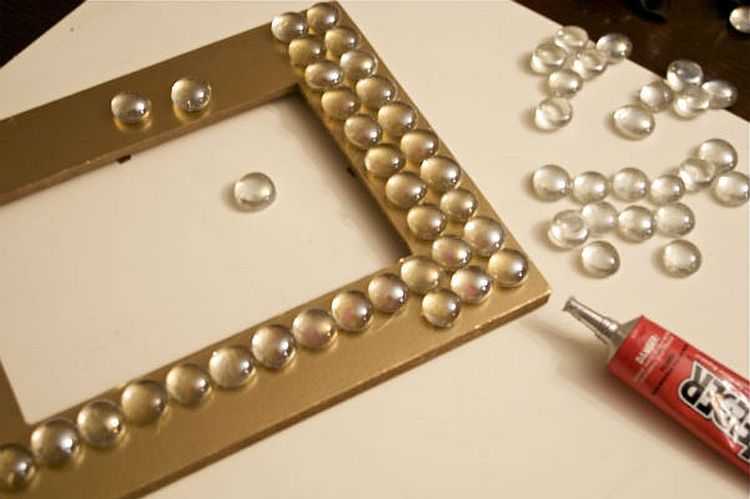
Transparent stones
The simplest technique is to type the decor you like and place it along the edge of the mirror. First, you can unfold it without gluing - so that there is an opportunity to correct something, move it. When you are satisfied with the result, apply a drop of transparent silicone to each fragment and return it to its place.
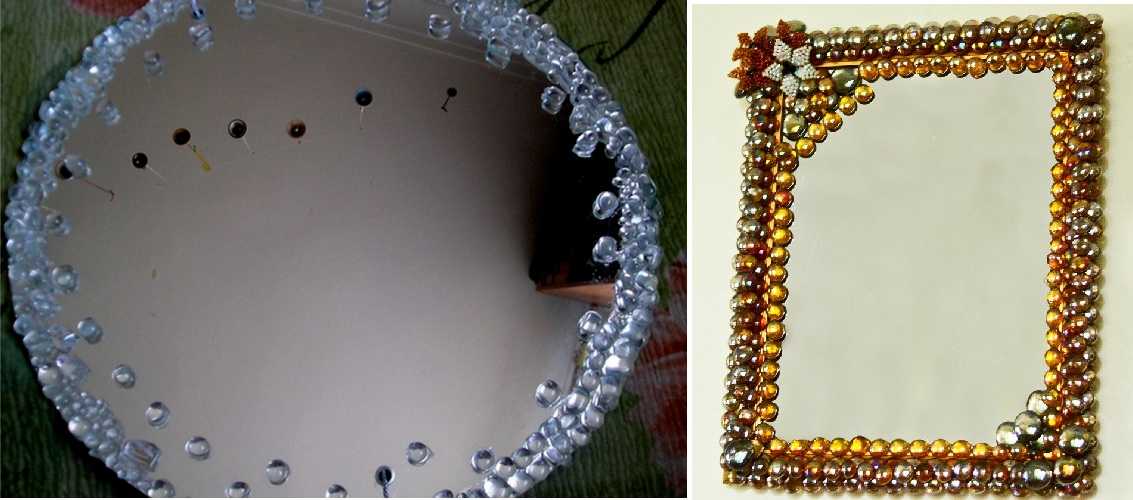
Bonding transparent and translucent stones
Best of all, with this design, the mirror looks using transparent and translucent stones. They can be colored, transparent, monochrome.
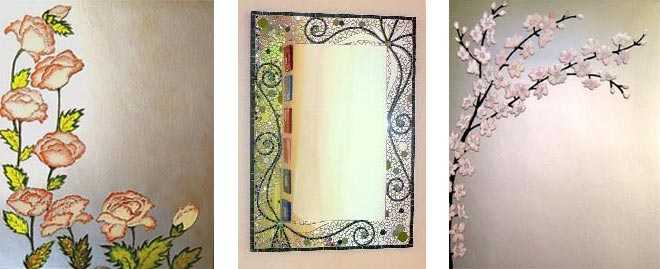
Hand-painted decoration
For this work, you will need special materials. You will need:
- Glass contour. It is a clear or colored compound in a tube with a sharp nose. It is applied to glass and mirror in the form of a thin strip. Usually it outlines the contours of the drawing, that's why it is called that. The glass contour can be fired or not. Naturally, at home, it is easier to use those without firing.
- Stained glass paints. They differ from ordinary ones in that after drying they become transparent. They are applied with brushes or squeezed out of the tube into the contour, after which they are distributed using the same brushes, tampons, cotton swabs.
- Glitters. These are shiny small fragments in the form of hexagons, stripes, circles, etc. used in decoration. Can be added to paints, varnishes (including for nails).
You will also need the usual materials: alcohol for degreasing, cotton wool, cotton swabs, brushes (preferably with artificial bristles), toothpicks. You will also need a drawing that you are going to transfer to a mirror, carbon copy, scotch tape.
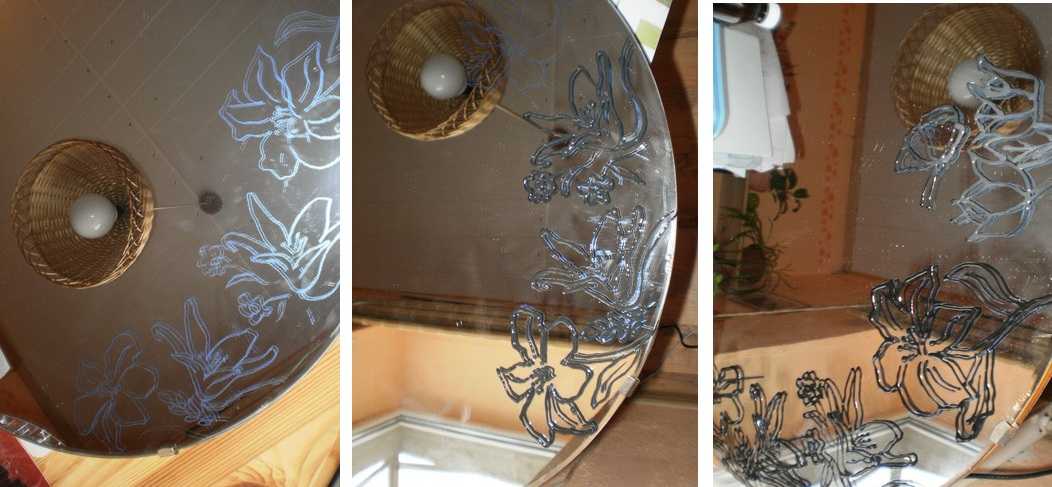
Apply a contour
We put a carbon copy on the mirror, put the drawing on top, fix it with adhesive tape, circle the drawing along the contour. Remove the paper and carbon paper carefully. We take a tube with a contour and outline the lines drawn. Nearby are solvent, cotton swabs, and toothpicks. They remove the flaws that appear during work.
Decorating a mirror with stained glass paints
Next, the contour should dry out. This requires several days, and you can speed up the process with a regular hair dryer (not a construction one).After the contour has dried, we take the stained-glass paints, pour it from a little into the contour, spread it with brushes, correct it with toothpicks - so that there are no unpainted places inside the contour. After the stained glass paints dry, they become transparent. If you wish, you can add glamor with the help of glitter - sparkles.
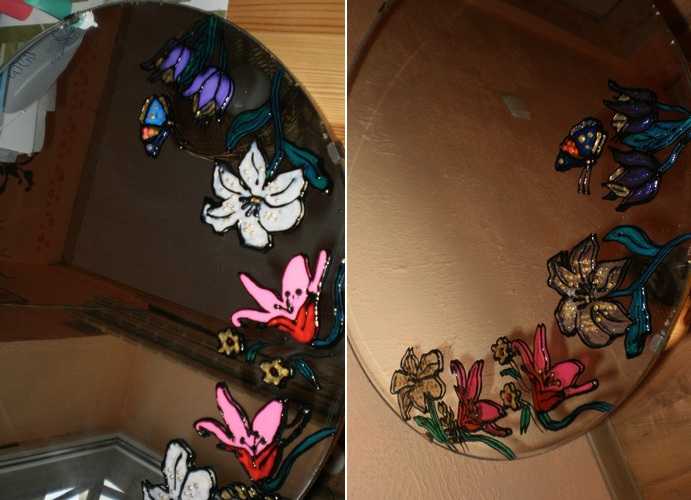
First, a drawing is applied, then stones are glued along the contour
The mixture of the two described technologies - painting and stones - looks very good. One of the examples is in the photo above. The work is painstaking, but it turns out very beautifully.
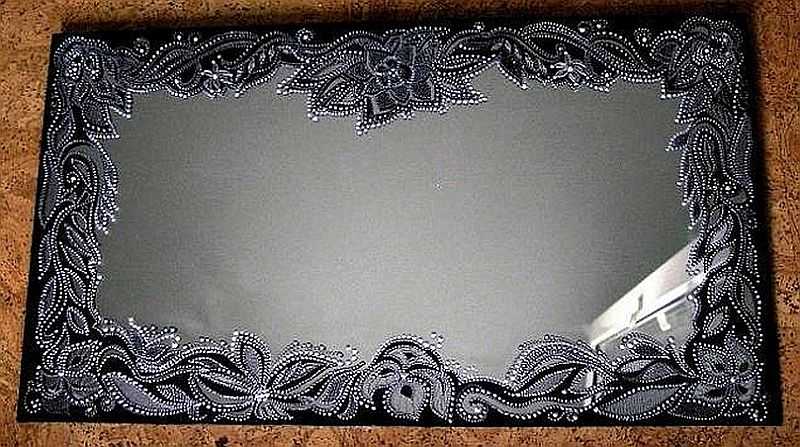
Beaded mirror edging
In this technique, it will not work to use ready-made drawings - there are a lot of accidents and it is not always possible to predict the result. But it's important to have a picture of what you are going to see in your head (or a photo of a prototype). For this work, you will need transparent glue (the same silicone), multi-colored beads, stones and other decor that you plan to use. You will also need masking tape and brushes, toothpicks.
Glue the tape on the mirror at some distance from the edge. It separates the finish from the rest of the surface. The border does not have to be exactly, it can be of any arbitrary shape. The width of the decorative border is usually not very large, since the wide one looks rough.

How to apply beads to a mirror
Apply silicone to the separated area of the mirror surface with a snake. We spread a small piece at a time - a strand of 5 cm. We quickly distribute the glue over the entire surface. You can do this with a piece of a plastic bottle. Pour beads on a sheet of paper, and scatter them over the glue. We spread it with a brush, toothpicks. Don't use your fingers - it's hard to wash. We apply the glue further, continuing the decoration. As soon as you walked around everything along the contour, remove the tape and leave to dry.
Example of decor with beads
The time it takes to dry completely depends on the silicone, but is usually 72 hours or more. Then nothing can spoil your work, and you can neatly hang it in a day.
A few examples
A few practical tips. If you want to get diagonally offset stripes of different colors (as in the photo), apply the glue in the same areas. This will give you a clearer separation of colors and the work will progress faster. If the borders should be blurred - with a smooth transition of color - put different colors of beads on different pieces of paper, pour it lightly shaking from side to side. Well, right after application, you can fix everything with a brush or toothpick.
Beautiful mirror frame
This way of decorating a mirror has already been described - take the decor and glue it. But not on the mirror surface itself, but on the frame. The frame can be made from the same piece of fiberboard, or you can buy a mirror in a plastic (for example) frame.
Decorating the mirror frame
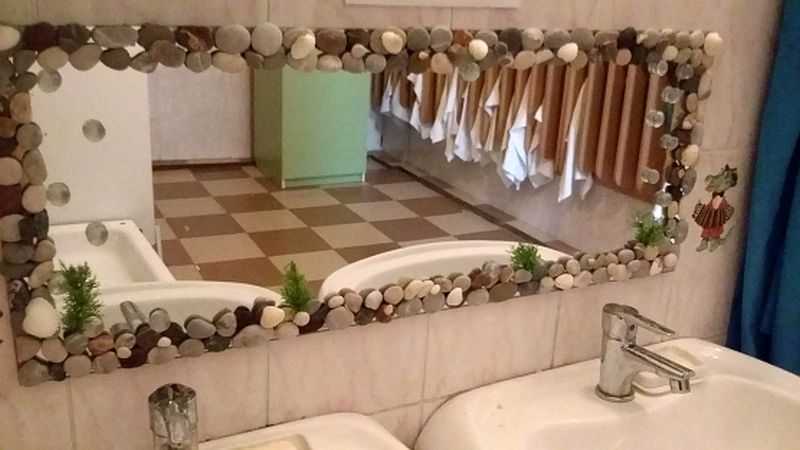
From the mosaic
To create a mosaic, you will need pieces of mosaic, you can use fragments of ceramics or colored glass, mirrors. You will also need glue (silicone) and ceramic tile grout (maybe white, colored).
From fiberboard (cardboard will not work, since the decor will turn out to be heavy) cut out a frame for the mirror, place it in the center, draw a contour. Next, we apply strips of glue to the frame, lay out mosaic tiles or pieces of glass on it.
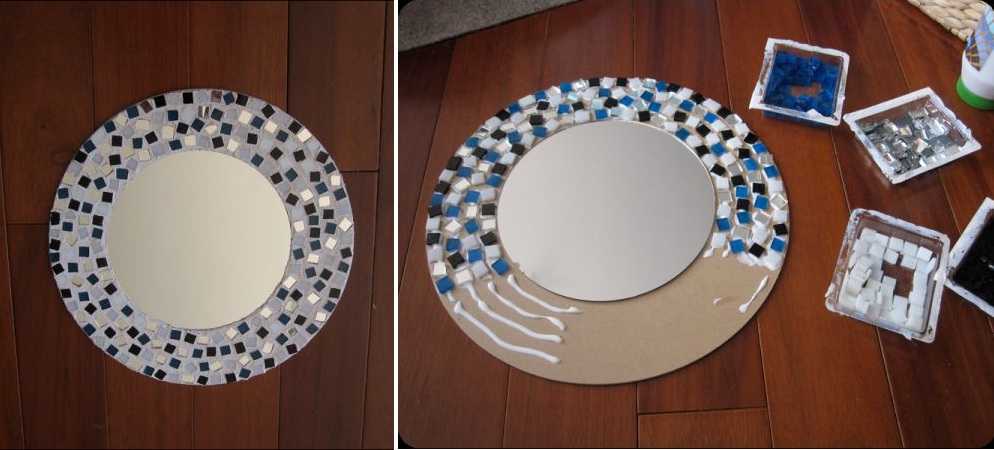
Mosaic mirror frame
After everything is laid out and the glue has dried (three days), they take the grout, dilute it to the state of thick sour cream (the proportions are written on the package) With this composition, the gaps between the tiles are filled. When all the gaps are filled, the excess is removed with a damp cloth. To prevent the mosaic from looking dull, all grout must be removed to keep the tiles clean. And this must be done before the grout dries.
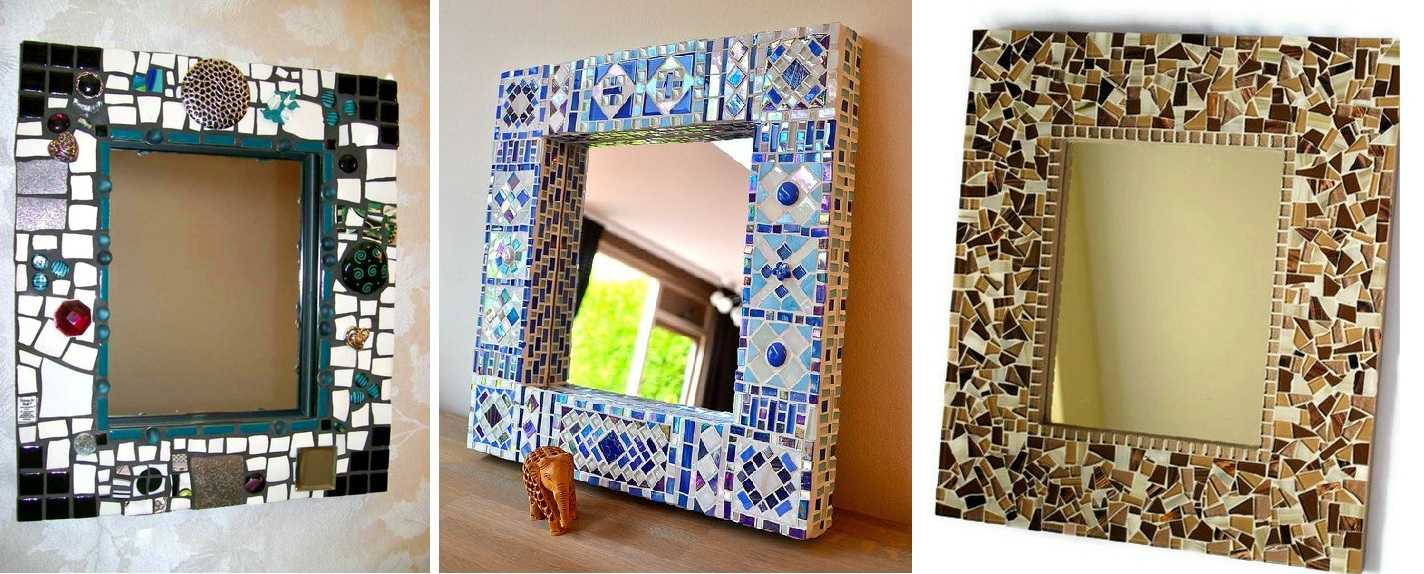
Homemade mosaic mirror frames
This mirror decor is perfect for the bathroom. The décor is washable and fits well with the bathroom design concept.Such a mirror will look especially decorative if the mosaic is matched to the tile.
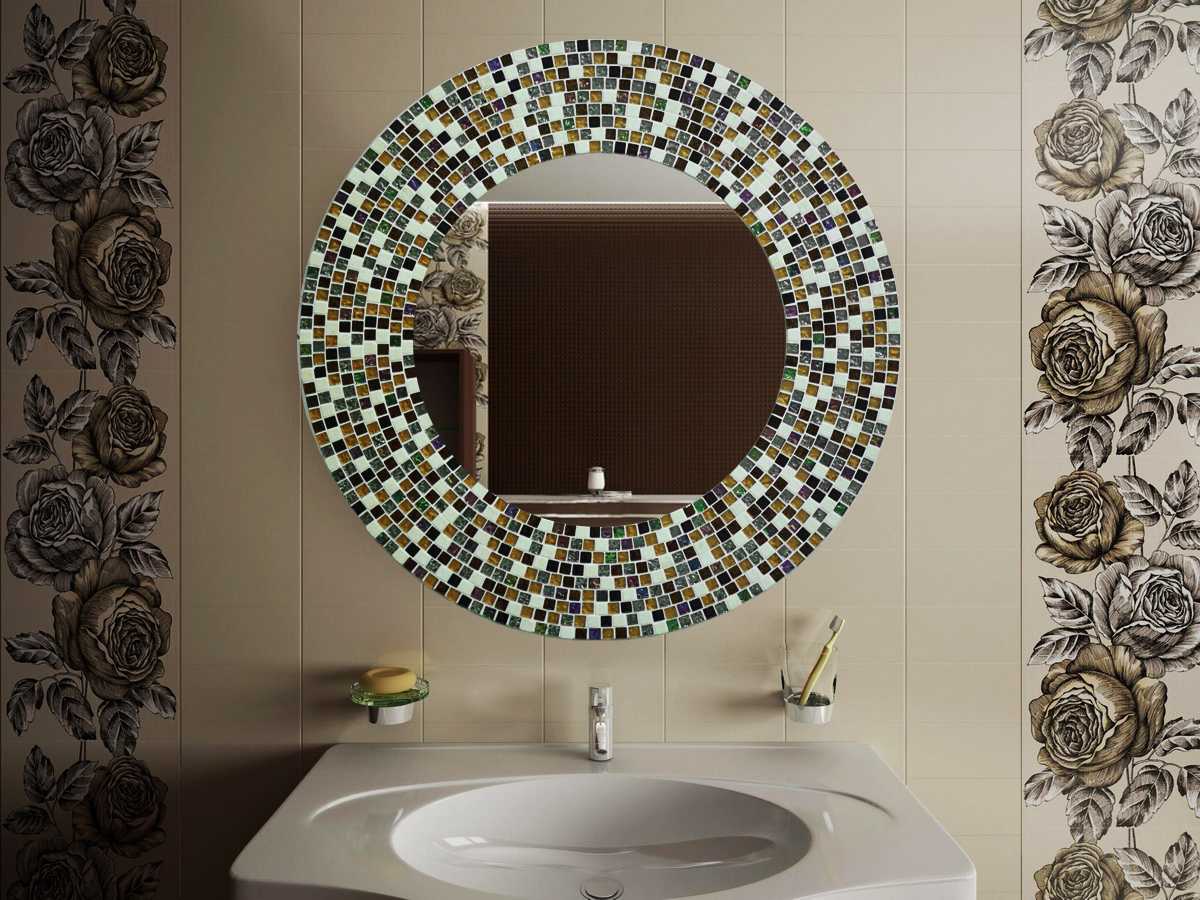
Looks organic in the bathroom
-
 Buying an apartment: what documents are required, their verification
-
 How to deal with cockroaches in an apartment, the best remedy for cockroaches
-
 How many square meters in a hundred square meters of land: measurement, calculation
-
 Conversion of inches to cm and mm, centimeters to inches, tables, applications, formulas
-
 Floor stands for flowers


