How to hang a mirror on a wall, wardrobe
Sometimes even seemingly simple tasks are confusing. For example: hang a mirror on the wall of a bathroom, hallway, dressing room, on a cabinet door. How if there is no frame or any other fasteners? In fact, attaching a mirror to a wall is not a difficult task. If you know the ways and methods.
The content of the article
Ways of attaching mirrors to the wall
During the repair or arrangement of an apartment or house, sometimes it is necessary to fix a mirror on which there is no frame. Recently, this is the most popular design method. In general, there are five mounting methods. They are chosen depending on the type of base on which the installation will be carried out, and the area of the mirror surface. You can hang the mirror in the following ways:
- Glue to the surface with a special glue or adhesive sealant.
- Install special holders on the wall.
- Drill holes in the mirror, fix through them to the wall or furniture door. You can use ordinary self-tapping screws, but there are special fasteners with plastic expansion joints, which do not allow the fasteners to be "pulled over" and prevent cracks.
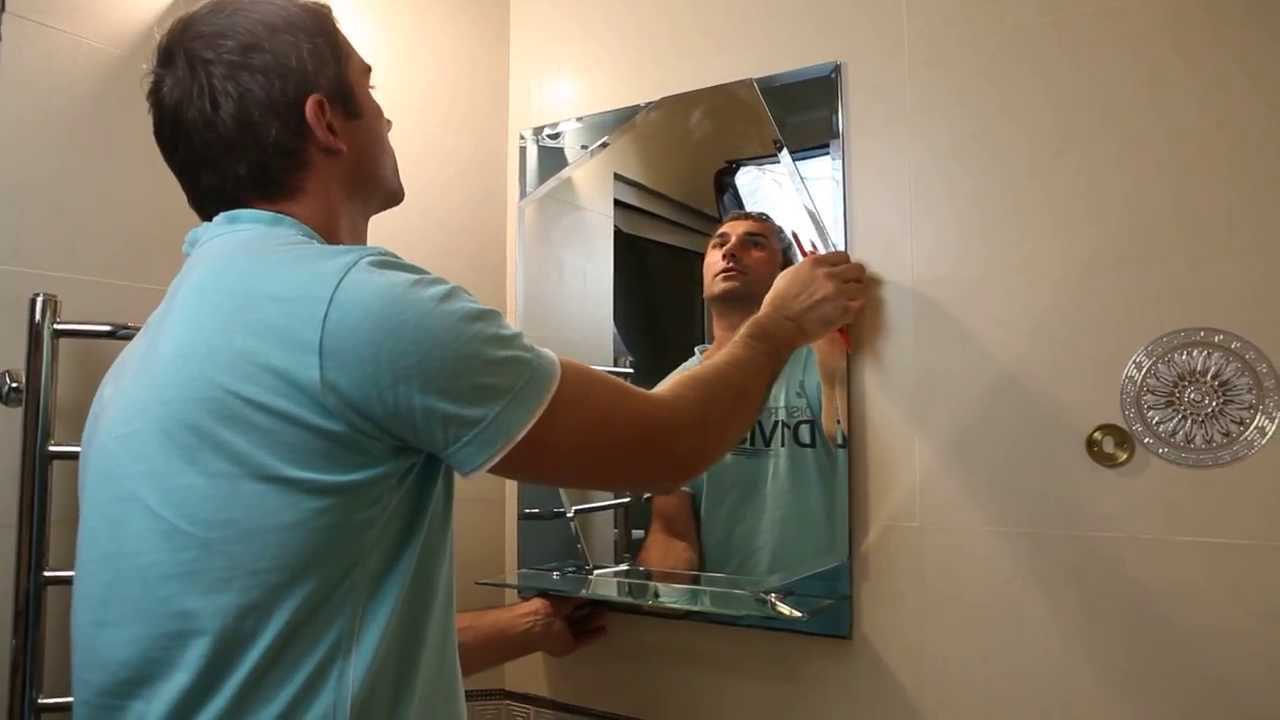
You can hang a mirror on the wall of the bathroom, corridor, hallway using fasteners, glue, mounting tape
- Install a decorative profile on the wall, lower the lower edge of the mirror into it, fix the upper one in one of the ways described above.
- Hanging on a special tape (3M mounting tape).
- Mounting the mirror to the wall without drilling is possible only with glue or special double-sided tape. This may be required when installing on a plasterboard wall, foam block partitions, and other materials with a low bearing capacity. This method will come in handy if you do not want to spoil the tiles, furniture door, etc. All other methods are related to hole drilling.
At what height
The installation height of the mirrors depends on the installation location and its purpose. In the bathroom, it is hung so that the middle of the mirror surface is at eye level. The height of residents may be different, but on average, the center is located at a height of 160-165 cm from the floor.
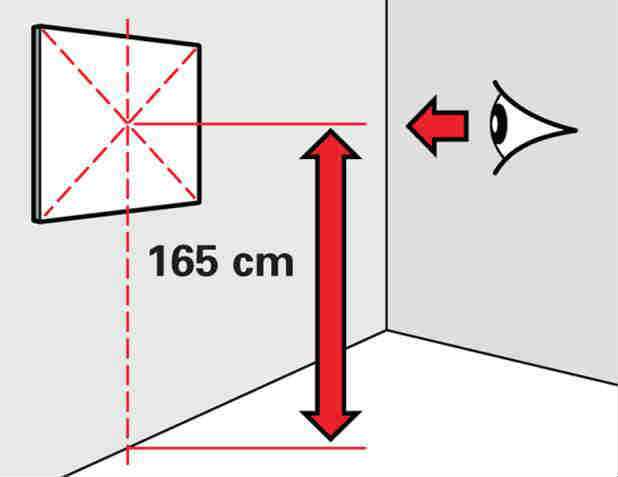
Installation height of the bathroom mirror
When hung in the hallway, dressing room mirrors are usually long and narrow. In them, a person should be displayed at full height. To do this, its upper edge should be slightly higher than the head - 3-5 cm. When hanging on cabinet doors, its upper edge is used as a guide. If the cabinet is tall, the mirror is also fixed a few centimeters above the head.
Mirror holders and installation methods
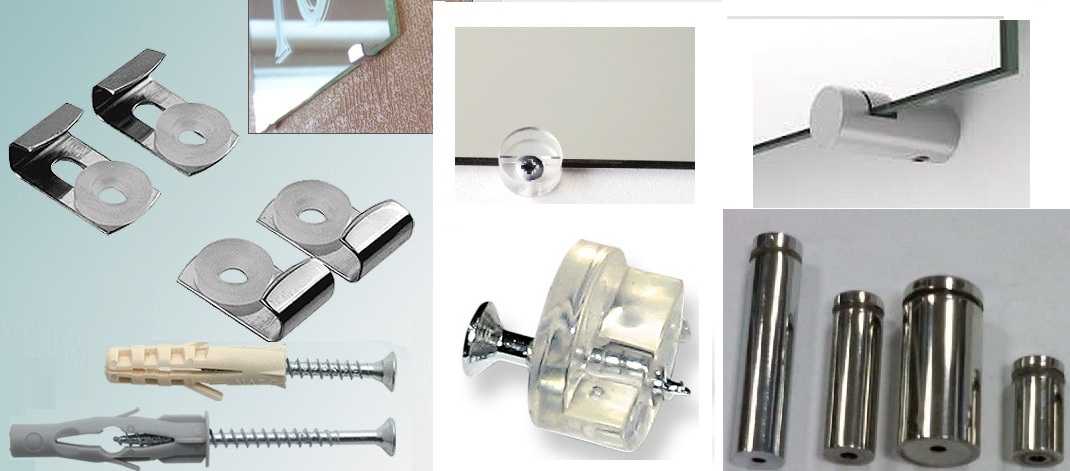
If after a while the mirror has to be removed / replaced, it is more convenient to install it on the holders. They are of two types:
- through;
- blind (ordinary).
Non-pass-through mirror holders are mounted on a wall or door. Then the edge of the mirror is inserted into them. They can be mounted almost close to the plane of the wall / door, or they can be carried out. In the second version, a gap from 5 mm to several centimeters remains between the wall and the mirror. This saves when it is necessary to install on uneven walls.
Mirror Wall Mounts
When using conventional holders, they are placed two at the bottom (if the mirror is small, you can put one at the bottom - in the center), two on the sides. When installing, you must carefully measure and set aside the dimensions. The lower holders are located strictly horizontally at an equal distance from the edge, and the side holders are placed on so that the edge of the mirror passes easily into their grooves.Moreover, it should not fall out even with the maximum shift to one side. Usually, the mounting distance of the holders should be 2-3 mm wider than the mirror, but there may be options depending on the design of the holders.
Another option is two at the top and two at the bottom. In this case, the distance between the fasteners is also a couple of millimeters greater than the height of the mirror.
Through holders are used if there are holes for fasteners in the mirror surface. They can be made in a glass workshop. The holders themselves are ordinary screws or dowel-nails with plastic overlays and decorative caps of various shapes and diameters.
They are installed as usual dowels. First, holes are marked for installation (attach a mirror to the wall, make marks with a pencil or a marker), holes are drilled, plastic plugs are installed for dowels. Then the fastener with the plastic plug put on is threaded through the hole in the mirror surface and installed in place. The final stage is the installation of decorative overlays.
Mounting the mirror to the wall with glue
It is not easy to install fasteners in every wall. For example, to hang something on plasterboard partitions or walls, you must either install fasteners in the place where the profile passes, or use special butterfly dowels. Each of these mounts can hold about 20 kg. This is enough for mounting a mirror, but not everyone wants to punch a wall. If the walls are flat or the mirror needs to be installed on the door of a cabinet or other piece of furniture, it can be glued.
Mirror surfaces can be glued
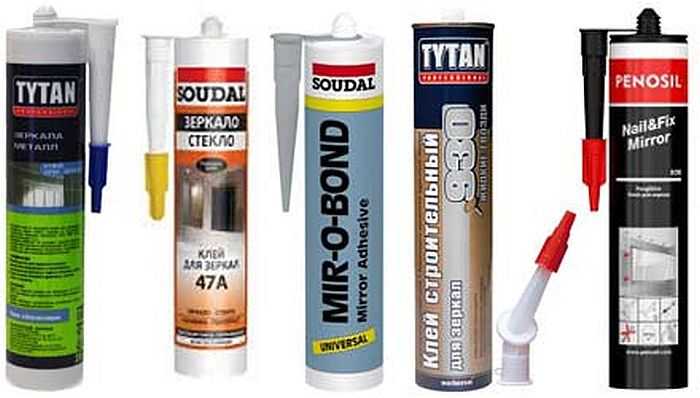
Which glue to choose
For installation, use a special glue, which is called “mirror glue”. They differ from conventional ones in that they do not damage the amalgam coating. An important point is that the composition must have good adhesion (adhesion) to the surface on which you are going to glue the mirror.
Here are some of the names of popular formulations:
- Moment Installation Liquid Nails. Made on the basis of synthetic rubber, after drying does not harden, remains elastic. Suitable for use on wood, plaster, painted surfaces, metals. A cartridge for a 310 ml construction gun costs 160 rubles.
- SOUDAL 47A. Composition - synthetic rubber, suitable for gluing on concrete, brick, ceramic, plastered surfaces. Differs in a short curing time, has a good adhesive ability. Contains a weak solvent that can damage poor quality amalgam. If in doubt about the quality of the coating, a test should be performed before use. A 310 ml tube costs 190 rubles.

Mounting the mirror to the wall is possible with special glue
- Tytan for mirrors. Based on synthetic rubber and resins. Suitable for bonding to porous surfaces (concrete, plaster, brick, wood and wood-based materials, drywall). Grips in 10-20 minutes, beige color. A 300 ml cartridge costs 170 rubles.
- Penosil MirrorFix Н1296. The base is synthetic rubber, can be glued to stone, wood, glass, metal, concrete, painted surfaces, gypsum. Suitable for mounting mirrors up to 6 mm thick (except those coated with epoxy powder). The color is beige, the setting time is 10-15 minutes. A 310 ml tube costs 260 rubles.
There can still be many compositions, the most common ones have been described. They "set" quickly, but the final drying takes place only after 72 hours or more.
What else can you glue on
A neutral silicone sealant is suitable for bonding mirrors. It has excellent adhesion and does not damage the amalgam. The cost of mirror glue and silicone sealant is about the same, the setting time is also about the same. When choosing, be careful: acidic (acetic) silicone sealants destroy the amalgam. Therefore, carefully read the composition and scope.
Silicone neutral sealant works great
Any composition is suitable, but for attaching the mirror to the bathroom wall, it is better to take it with anti-fungal additives. This will prevent the development of fungi and mold. Aquarium silicone can also be used in wet areas. It is always made on the basis of silicone, neutral, fungi and mold do not appear on it. It can be slightly more expensive than conventional sanitary silicone.
Bonding technology
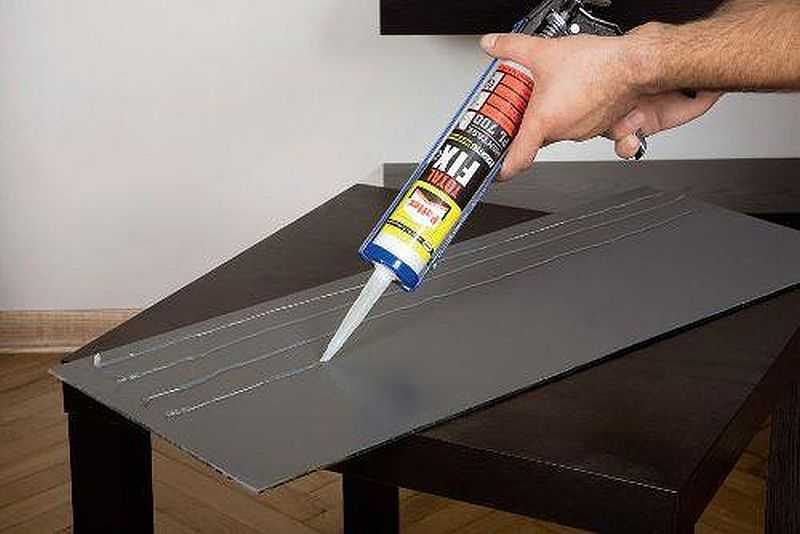
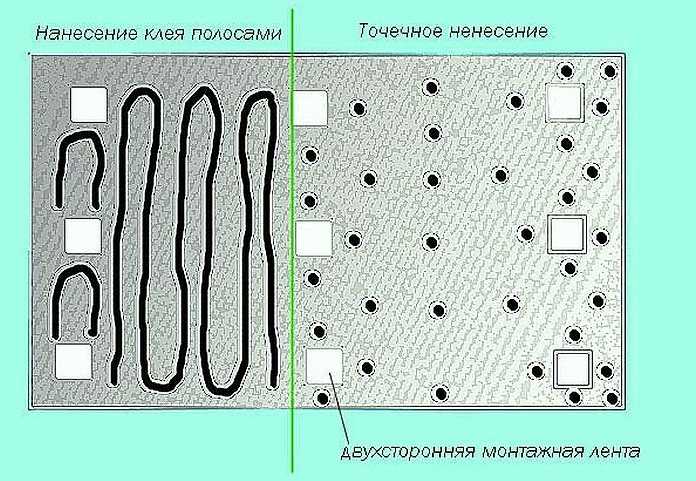
Attaching the mirror to the wall with glue is a simple procedure, but there are some points you need to know. Before gluing, the surface on which the mirror will be glued and its back side are cleaned of dirt, dust, degreased (wipe with alcohol, wash with soapy water and dry). A strip of glue is applied to the mirror with a "snake" and pressed against the wall at the installation site. The adhesive can also be applied pointwise - in a checkerboard pattern on all surfaces. Such fastening of the mirror to the wall is reliable, but if it is necessary to replace it, it will need to be broken, the glue should be cleaned off with a spatula, and a new one should be installed.
To hang it straight, you can first draw a line on the wall along which to level the bottom or side edge.
Applying glue to the back of the mirror
When gluing large area mirrors, the technology changes slightly. Glue is applied to the leveled, primed and dried wall, spread over the entire surface with a spatula with a very fine tooth. Such spatulas are used for gluing cork... They should not be confused with those that apply glue to tiles. They have too much distance between the teeth. A mirror is glued to the prepared surface. It is carried and held using special handles with suction cups.
Bonding procedure
Mounting the mirror to the wall with glue is considered reliable. This method is used in the bathroom if it is necessary that all the finishing is in one plane. In this case, the tiles are laid out first, then the mirror is installed. At the same time, when installing the lower edge on the tile, you must put a gasket several millimeters thick. The same gap remains on the sides and bottom. After the glue dries, it is filled with silicone sealant or grout, which was used to join the joints. This gap will compensate for the difference in thermal expansion of materials - it is different for ceramics and glass. Also, this gap will prevent cracks from shrinking and moving the house.
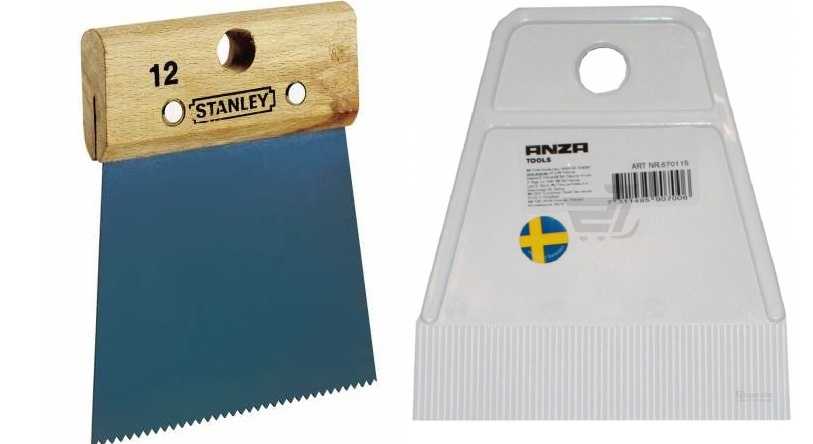
Spatulas for applying glue
Since the glue does not freeze immediately, the mirror may start to slide down the wall. I don't really want to keep it for 15-20 minutes, therefore, measures are being taken to pre-fix it. To do this, before applying the glue, several pieces of double-sided tape are glued to the back side. He will hold the mirror until the glue dries.
Second option
The second option is to glue a bar on the wall, which will serve as an emphasis. Choose a glue that can be easily removed from the surface. If possible, you can tighten some screws, etc. In general, any stop that will hold a heavy piece of glass (1 square meter 4 mm thick weighs 10 kg) in place.
How to glue a mirror onto double-sided tape
Small in size and weight, mirrors can be glued on special double-sided tape 3M. Foamed polyethylene or polyurethane is coated with adhesive on both sides. The foam base compensates for some of the unevenness of the base, and also serves to cushion the movement of the base. The thickness of the base (adhesive tape) can be from 0.8 mm to 1.6 mm, the width of the tape is 6-25 mm.
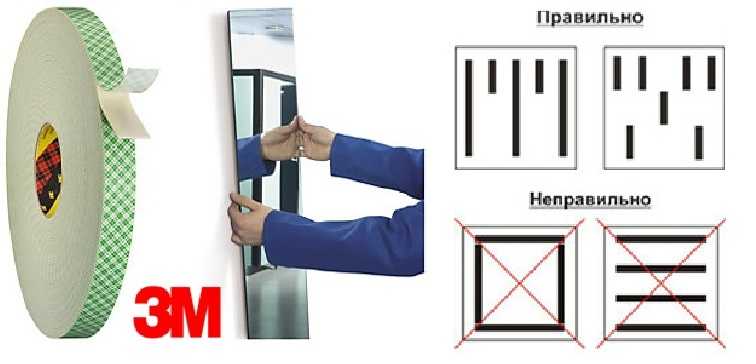
Glue on special mounting double-sided tape 3M quickly and reliably
Pieces of tape are glued to a clean, fat-free base. It is distributed evenly over the entire surface. It is not worth sticking around the perimeter, it is better to glue all the pieces vertically in a checkerboard pattern at a distance of about 10-12 cm from each other. The consumption of the tape depends on the area of the mirror; the experimental data are given in the table.
Consumption of double-sided foam tape for gluing mirrors
| Mirror area cm2 | Mirror 3 mm thick | Mirror thickness 4 mm | Mirror 5 mm thick | |||
|---|---|---|---|---|---|---|
| belt width 19 mm | belt width 25 mm | belt width 19 mm | belt width 25 mm | belt width 19 mm | belt width 25 mm | |
| 600 | 14 cm | 11 cm | 19 cm | 14 cm | 24 cm | 18 cm |
| 800 | 19 cm | 14 cm | 25 cm | 19 cm | 32 cm | 24 cm |
| 1000 | 24 cm | 18 cm | 32 cm | 24 cm | 39 cm | 30 cm |
| 1200 | 28 cm | 22 cm | 38 cm | 29 cm | 47 cm | 36 cm |
| 1400 | 33 cm | 25 cm | 44 cm | 34 cm | 55 cm | 42 cm |
| 1600 | 38 cm | 29 cm | 51 cm | 38 cm | 63 cm | 48 cm |
| 1800 | 43 cm | 32 cm | 57 cm | 43 cm | 71 cm | 64 cm |
| 2000 | 47 cm | 36 cm | 63 cm | 48 cm | 79 cm | 60 cm |
| 2200 | 52 cm | 40 cm | 69 cm | 53 cm | 87 cm | 66 cm |
| 2400 | 57 cm | 43 cm | 76 cm | 58 cm | 95 cm | 72 cm |
| 2600 | 62 cm | 47 cm | 82 cm | 62 cm | 103 cm | 78 cm |
| 2800 | 66 cm | 50 cm | 88 cm | 67 cm | 111 cm | 84 cm |
| 3000 | 71 cm | 54 cm | 95 cm | 72 cm | 118 cm | 90 cm |
The final touch is to remove the protective film from the glued pieces and install the mirror in its intended place. The manufacturers of this type of tape give a guarantee for 10,000 adhesions, so if you install it incorrectly, you can fix it.
Fastening the mirror to the wall with 3M adhesive tape is reliable - this material is used in industry for gluing smooth fragments. This compound is not afraid of ultraviolet radiation, has a wide temperature range of use (from -40 ° C to + 90 ° C). The adhesive has excellent water resistance. The only limitation is that this tape sticks much worse on porous surfaces. But with ceramic tiles, laminated MDF or Chipboard adhesion is excellent. If in doubt, you can conduct an experiment - stick something heavy, then try to tear it off. Based on the results, you will draw a conclusion yourself.
-
 Buying an apartment: what documents are required, their verification
-
 How to deal with cockroaches in an apartment, the best remedy for cockroaches
-
 How many square meters in a hundred square meters of land: measurement, calculation
-
 Conversion of inches to cm and mm, centimeters to inches, tables, applications, formulas
-
 Floor stands for flowers


And how to remove fasteners glued to the back of the mirror. I want to hang it on the holders, but the fasteners on the back do not allow the mirror to be tightly attached to the wall
If the fastener is silicone, you can try to cut. If there is glue, then try to crush / cut the fasteners and remove in parts.