Correct connection of the heated towel rail
Bathroom - a room where a higher temperature is required. Firstly, it feels so more comfortable, and secondly, warm air will quickly take away excess moisture after taking a shower or bath. Heating in the bathroom is done infrequently - not accepted. A more common way is to install a heated towel rail, which we will talk about further. For everything to work without problems, you need to choose the right connection scheme, and even implement it correctly. And you will have to figure it out on your own. After all, even if you do not do everything yourself, you will have to keep an eye on the plumbers. This is the only way to be sure that you will be left with a normally working dryer.
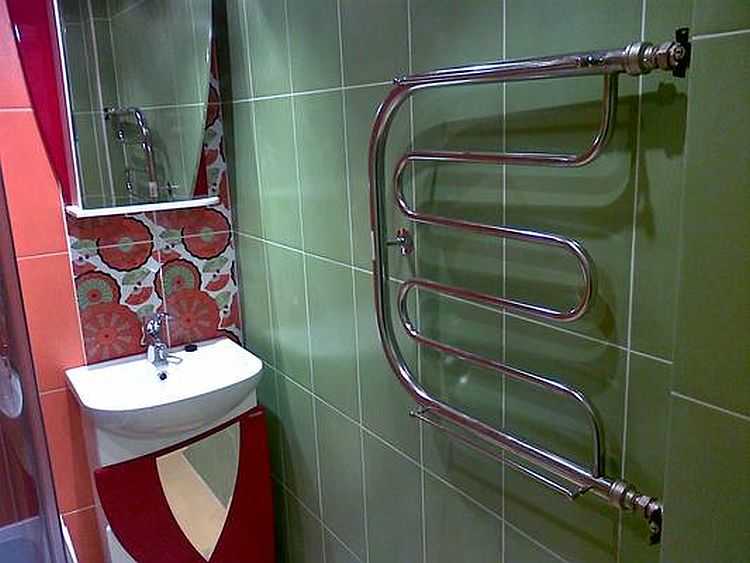
To make everything not only look good, but also work without problems, you need to correctly lay the eyeliner
The content of the article
What designs are
Heated towel rails come in different shapes. When choosing them, people are often guided solely by aesthetics, which is not entirely justified. These devices work normally with good water circulation, but not all models provide such circulation. With some, you have to be smart for a long time, looking for the correct connection scheme, otherwise they simply refuse to work.
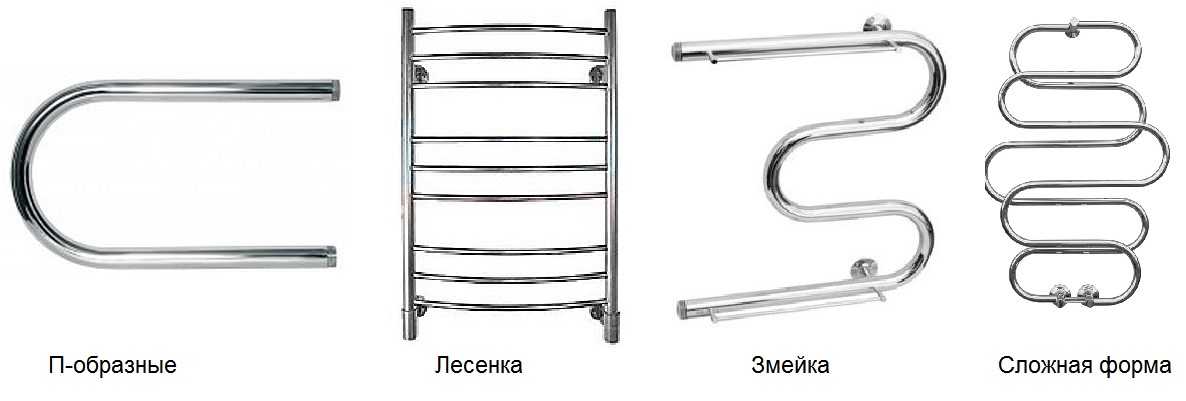
So, all heated towel rails can be divided into four groups:
- U-shaped or U-shaped. The simplest models, elementary connection (lateral). Ideally, when replacing an old one, you find a model with the same center distance. Then, if you're lucky, you don't even need to redo the bends.
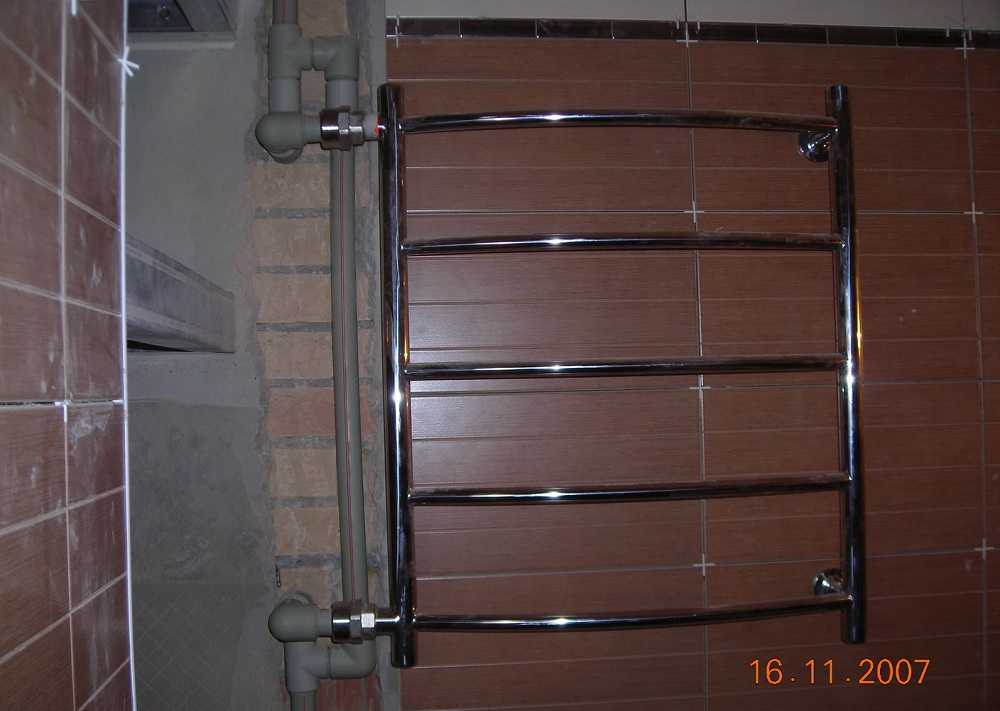
- Ladder. Modern designs with some crossbeams. Also a good option in terms of hydraulics. The connection can be bottom, side or diagonal. But it is not chosen arbitrarily, but according to a set of conditions (whence the supply, location relative to the riser).
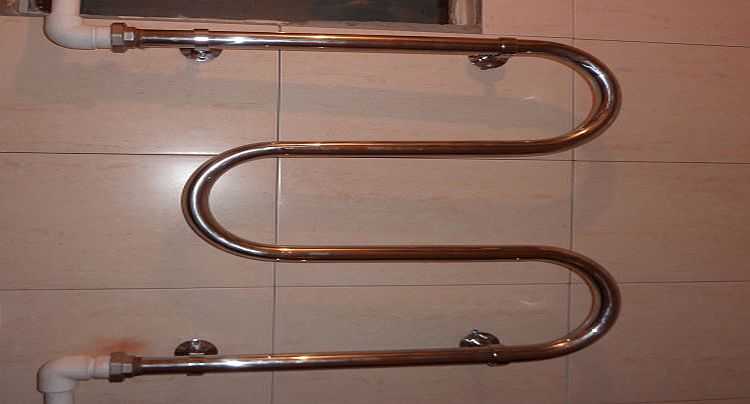
- Snake. Another classic side-connected model. Installation of a heated towel rail of this type, as a rule, does not present any problems.
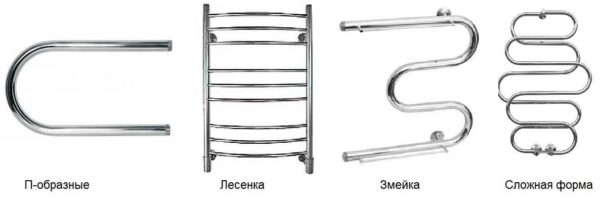
Types of heated towel rails
- Complex shape. There are very unusual heated towel rails. They can even be an interior decoration, but their competent connection is a problem. As a rule, consultation of a competent specialist, a plumber, who is well versed in hydraulics, is required. As you can imagine, finding such a person is not an easy task.
It often happens that after installing a heated towel rail, it simply does not work. If the error is serious, the riser to which it is connected also stops working. Therefore, you need to know and follow the connection rules.
Where to connect and where to hang
You can connect a water heated towel rail to both the hot water riser and the heating. If both of these options are available, DHW is usually selected. There are three reasons for this: less hassle with a connection permit, you can connect at any time of the year (agree with the management company about disconnecting the riser and that's it) and, most importantly, such a heated towel rail is heated all year round.
If there is no hot water supply in the house, you will have to connect to the heating riser. This requires a UK permit and a project. Buy a heated towel rail (preferably of a simple design), go to the housing office with his passport (copy), write a statement.If permission is given, you order a project (you will also need a copy of the passport with connecting dimensions). Then, according to the project, you do it yourself or hire performers (plumbers from the housing office, as an option). Call the representatives of the housing office for acceptance.
To keep the “towel” warm always and without any problems, all carts are straight, without arcs and pockets
When determining the installation location of the heated towel rail, questions may still arise about at what height it should be hung. If you have a choice, it is most convenient to position it so that it is at head level and below. This is if you put a U-shaped or snake. If we are talking about "ladders" of great height, the upper bar is not placed at the glow level of the raised hand (about 190-200 cm).
When choosing a place for installing a heated towel rail, you must also take into account the distance from the riser. In principle, the closer to the riser, the better - the more chances it will work. But, it can be attributed to a meter or so, only if the conditions are met:
- low hydraulic resistance of the heated towel rail (simple shape and section 1 ″ or 3/4 ″),
- sufficient pressure (2 atm or more)
- outlet with pipes of normal diameter (one step less than the riser).
In this case, it is imperative to follow other connection rules. Then there will be chances that such a "remote" device will work normally.
How to make bends and how to change the riser
If the riser is metal and you are not going to change it, then the installation of a heated towel rail is possible with steel or polypropylene pipes... If you change the riser (the best option) and install polypropylene, there is no choice - PPR pipes also go to the bends. Take polypropylene for hot water, better - reinforced with fiberglass.
Why is metal-plastic not suitable? Because his fittings are with a strong narrowing of the lumen. This is very bad for circulation. As a result, even 100% efficient circuits do not provide normal heating.
Installation of a heated towel rail with polypropylene piping
A little about why to change the riser. It makes sense to do this in old houses when renovating a bathroom or a toilet (depending on where your riser is located). First, the pipes are usually old and worn out. Even a branch can be problematic to weld to them, the metal is so worn out. Secondly, modern renovation involves the hidden laying of communications and you also want riser close... Hiding the old pipe and tearing it down again after a few years ... is not a good decision.
A little about how to change. You need to negotiate with your neighbors from below and above, as well as with the housing office (DEZ, UK). With the neighbors that you will cut off the riser from them and install a new one on the thread. Why do they have? Because leaving the old pipe in the ceiling is dangerous: it will collapse and flow. Will flood you or your neighbors below. Therefore, it is better to pass through the ceilings with a new pipe.
With this connection, the dryer is part of the riser and there can be no taps
Having agreed or not with the neighbors (they may have the riser already closed), go to the housing office and agree on the replacement date and the time for which the riser will be turned off. Work can be "local" locksmith, you yourself (if you have qualifications of a welder) or people you hire. After the tie-in, the water is turned on, you check the operation of the heated towel rail and the system as a whole. If in 30 minutes it does not start to cool down, then it is set correctly. This completes the replacement or installation of a heated towel rail.
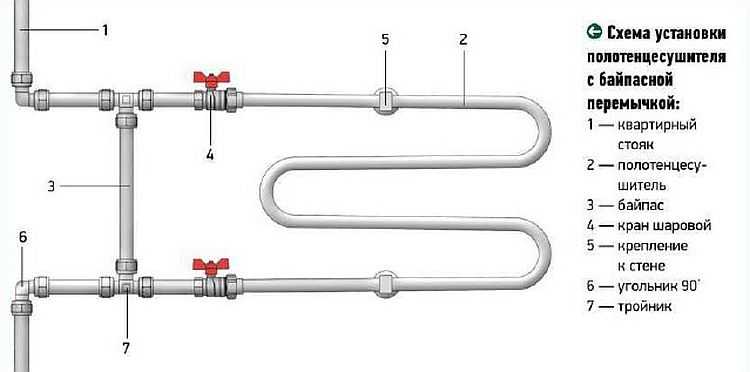
With or without bypass
Let's start with what a bypass is. This is a jumper between the inlet and outlet of the device, which ensures the circulation of water when the device fails or is turned off.
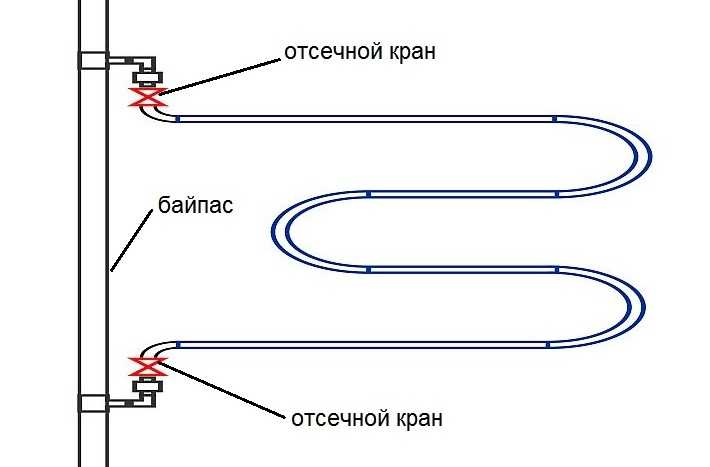
The jumper between the inlet and outlet of the heated towel rail is the bypass
If the circuit has a bypass, shut-off ball valves can be installed at the inlet and outlet of the device. This is convenient - you can turn it off if necessary (during repair or replacement) and not block the entire riser.
If there is no such jumper, no taps can be installed.In this case, the heated towel rail is part of the riser, by closing the taps you completely block the riser.
When connected without a bypass, no taps
The bypass can be straight (as in the first photo in the chapter) or offset (in the photo below). The offset jumper is placed at the top supply of the heating medium for better performance (circulation is improved). With a bottom feed, the offset only interferes. If you do not know where the water is coming from, it is better to do a direct bypass.
Offset bypass for upper heating medium flow improves circulation
Still bypasses (straight or offset) are made narrower. Narrowing as well as displacement improves circulation, but only in the case of top feed. The narrowing is done with a pipe that is one step less than the main one (if the riser is an inch, the bottleneck is 3/4 ″). You can't do less. Insert size - at least 10 cm.
Once again, the offset and / or narrowed bypass only works with the upper water supply. At the bottom, it interferes with circulation. If unsure, make the bypass straight and unconstrained.
It is strictly forbidden to put taps on the bypass. Each tap is a loss of pressure, which means that it worsens the circulation of the entire riser, the water is no longer flowing so hot. All neighbors above or below (depending on the direction of supply) noticeably deteriorate the pressure. Sometimes it also falls at the owner of the bypass with a tap. In addition, this is an absolutely unnecessary detail that only brings harm, and there is no noticeable improvement in circulation in the heated towel rail. Well, and in addition, this is a violation of SNiP 31-01-2003 (clause 10.6) - interference with common house communications, for which a fine (considerable) can be issued.
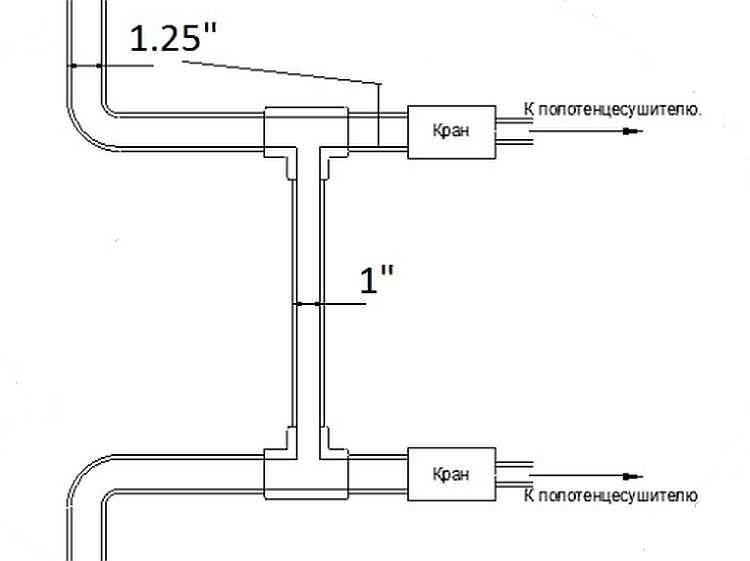
How to arrange taps (connection methods)
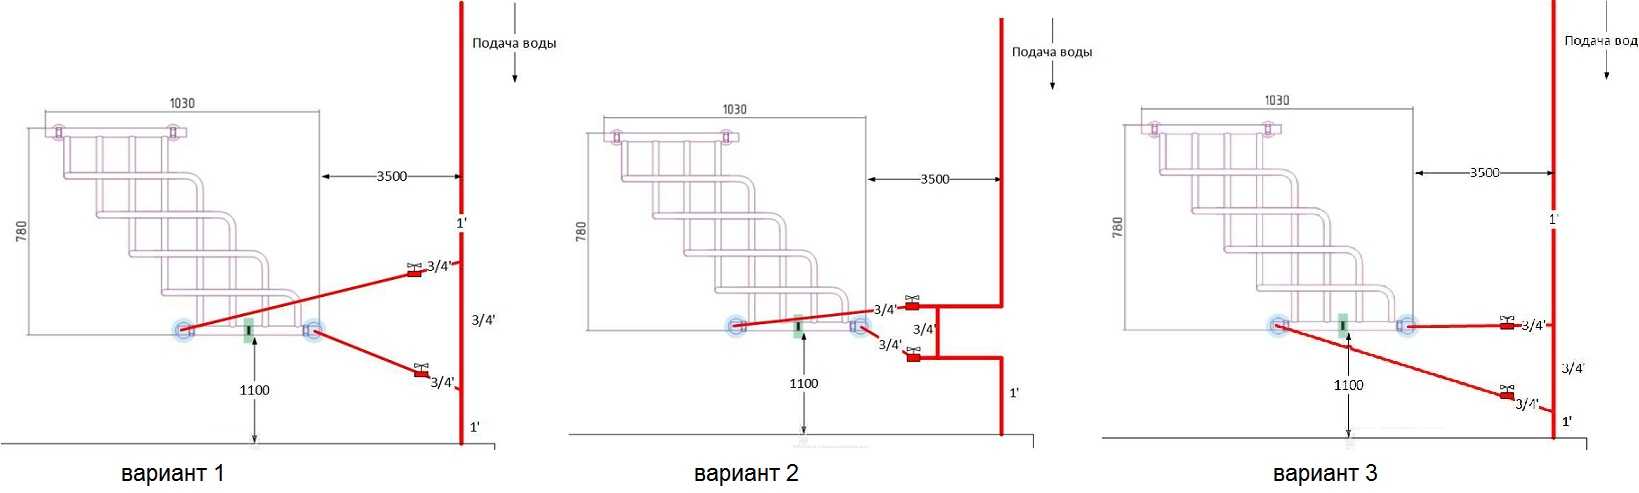
With lateral and diagonal connection, the outlets should be located at the same level with the inlets of the heated towel rail or slightly above / below. What will definitely not work is installing a heated towel rail if the outlets are located at a distance less than the distance between the entrances. The photo below is an example of a non-working diagonal connection with closely spaced taps. Black indicates the option to correct it (top feed).
When connected to the side, the heated towel rail will only work if the outlets are slightly higher and slightly lower than its inputs, or at least at the same level
When connecting, the taps must be placed strictly horizontally or slightly at an angle. Slightly at an angle - this is from 2 cm per meter (2%) or a little more. The direction of the slope depends on the connection diagram and on which end this branch will be connected. To make it a little clearer, consider several typical connection diagrams for heated towel rails.
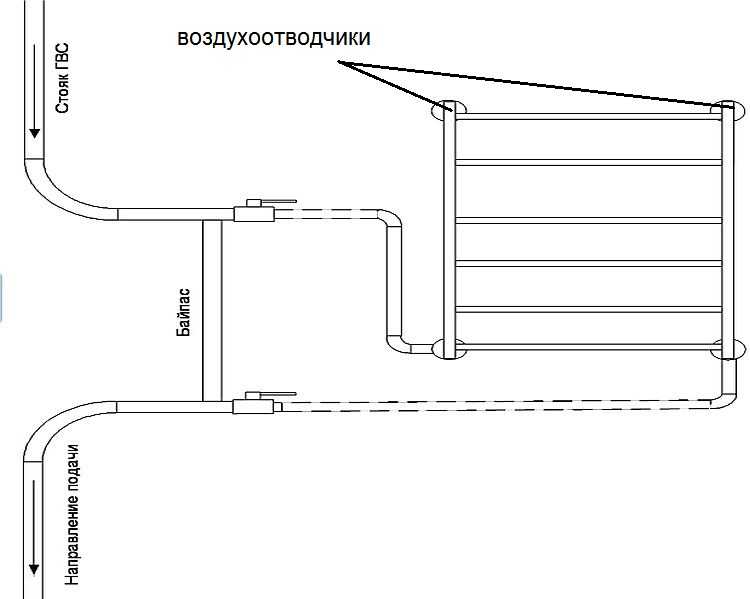
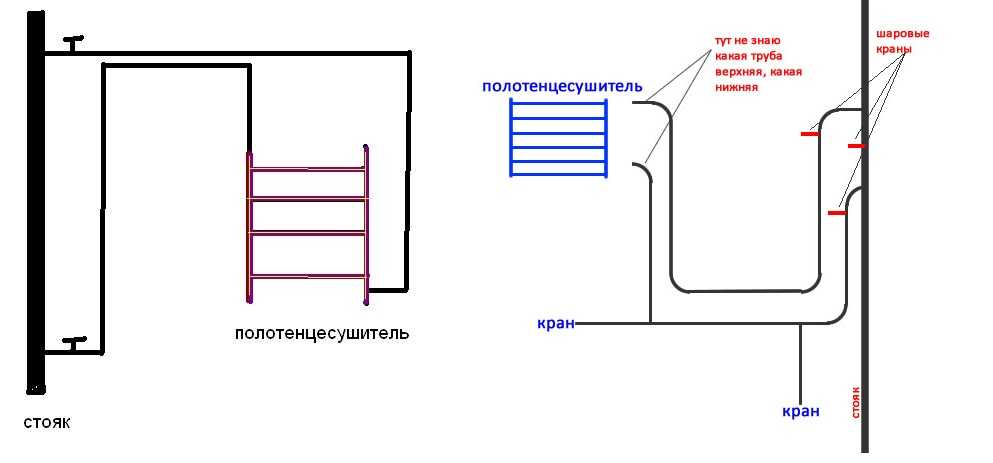
Universal bottom connection for a ladder heated towel rail
This circuit works regardless of the direction of hot water supply. Connection type - bottom, both outlets must be located lower than the bottom edge of the dryer. With the top feed, an option is acceptable when the edge is between the taps, but the work may no longer be so effective (it may heat up worse).
Universal connection for a heated towel rail (bottom)
In this scheme, shut-off valves can be installed. For its normal operation, you need:
- Mayevsky taps (air vents) installed on the upper outlets for the release of air accumulating in the upper part. They will need to be periodically opened and the air deflated (as it starts to warm up worse). There is an option - to supply automatic air vents. They are also compact. This will simplify operation.
- Straight bypass with constriction. The size of the constriction is with the pipe one step smaller in diameter.
- The bends are made with a pipe with a smaller diameter than the main riser.
If you have this option in height, do it. The scheme works in any conditions, with any kind of "ladder" heated towel rails.
Possible bottom connection for top feed
When pouring hot water from above, the upper outlet can be made higher than the lower edge of the dryer.With an offset bypass and its narrowing, it should warm up normally. This method is not the best, but it works.
Working version with top pouring hot water
The presence of air vents and air bleeding after stopping the system are mandatory.
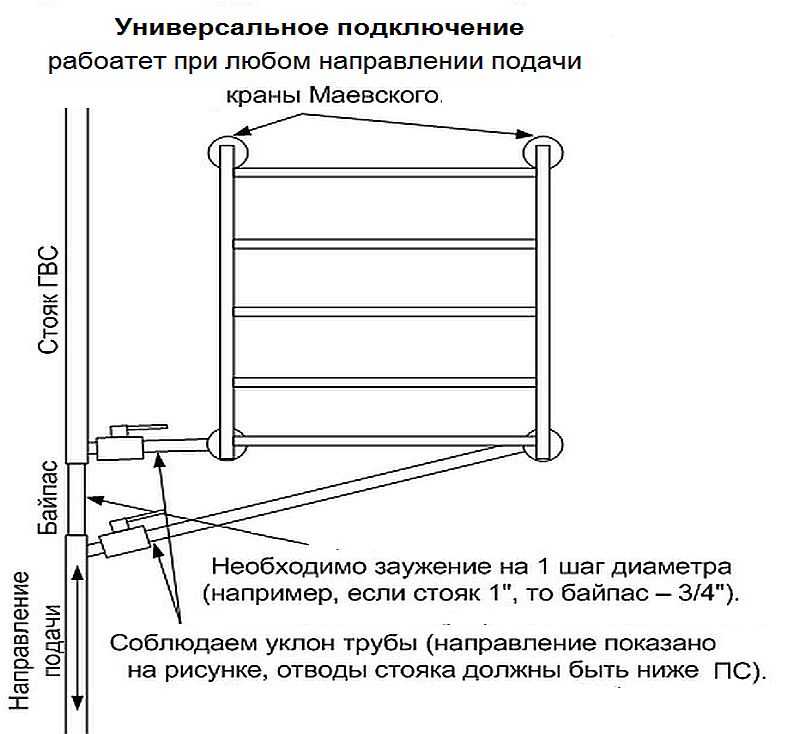
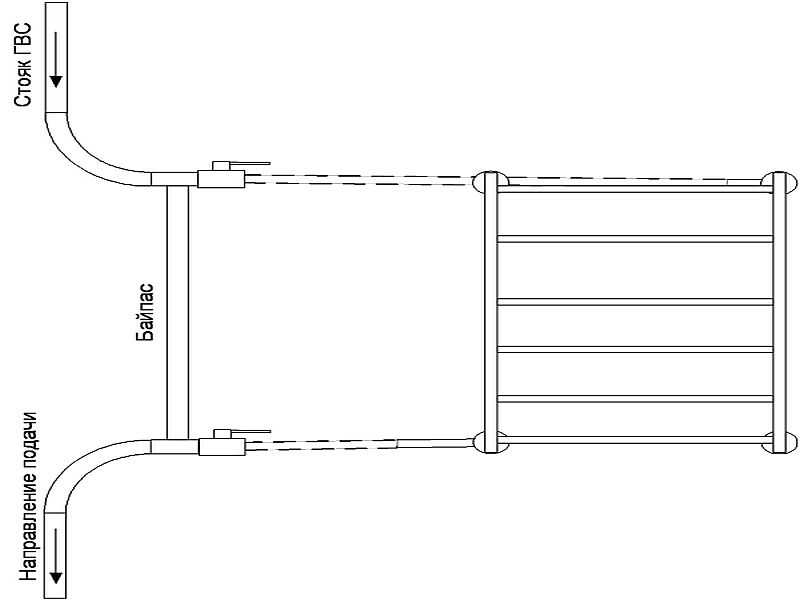
Universal side connection
You can bring the pipes from the side to the heated towel rail of any of the standard shapes - U-shaped, snake and ladder. The connection itself does not depend on the form. The standard version comes with a direct, unrestricted bypass. Bends are either strictly horizontal or with a slight slope. The slope is shown in the figure: the end of the upper branch is inclined slightly downward (2 cm by 1 meter), the lower one is lifted up slightly. The diameter of the bends is not less than the diameter of the heated towel rail.
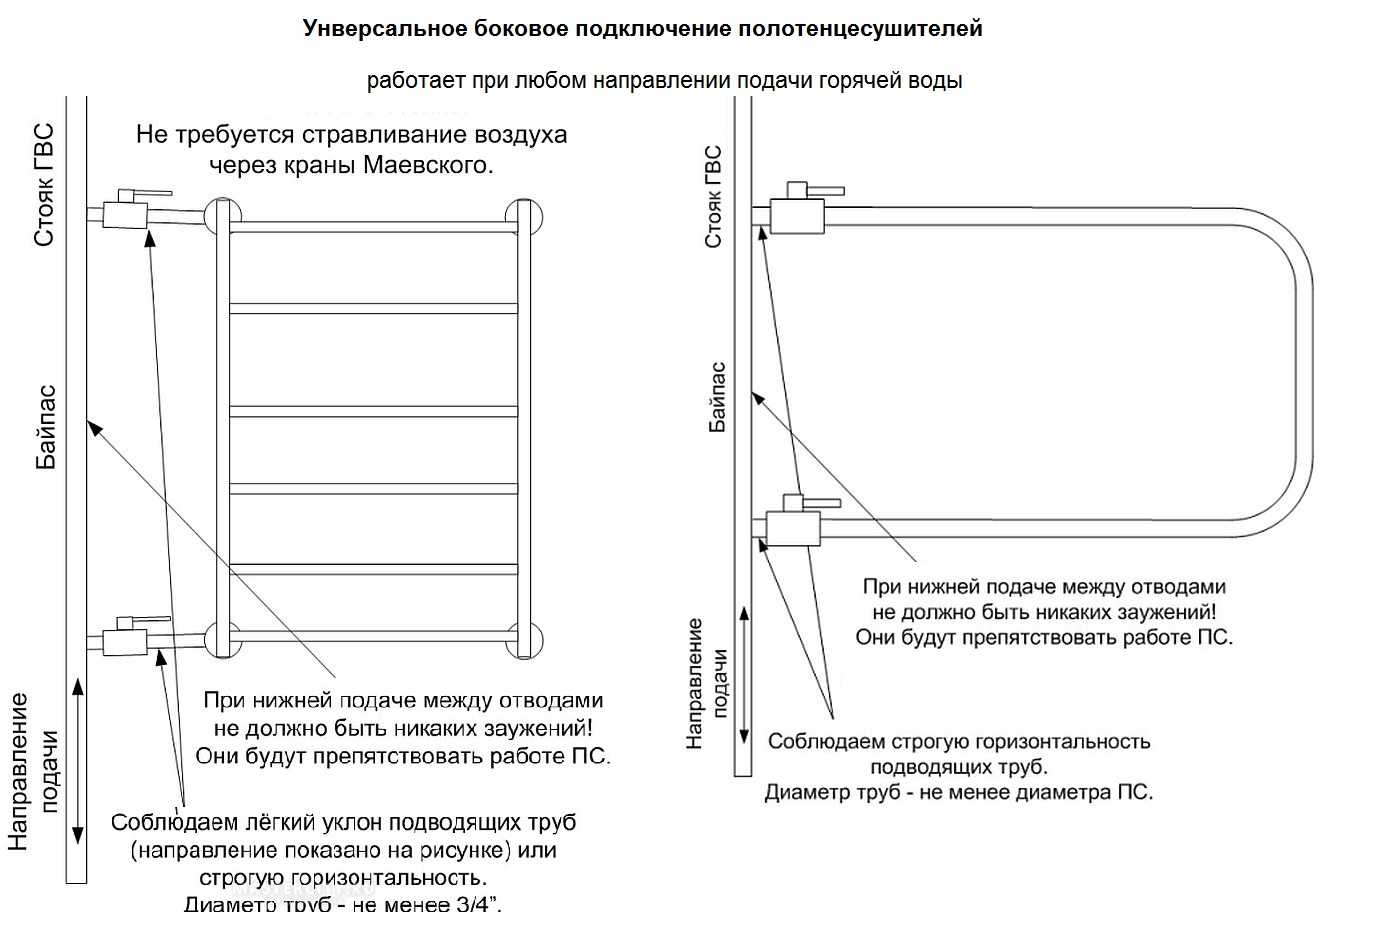
Side universal connection for heated towel rails
Such a connection scheme is good in that it is not necessary to install air vents on the "ladder" (they put plugs), since the air simply goes into the riser.
With the upper supply on the bypass, you can make a narrowing and / or move the jumper towards the heated towel rail. This will improve circulation and the dryer will heat better. But again: this scheme will only work with the upper water supply.
When water is supplied from above, the bypass can be displaced and made into a pipe one step of a smaller diameter
With this scheme, bends can also be made at a slight slope or strictly horizontally.
Possible side connection (not the best)
A side connection scheme with the location of the upper outlet below the upper edge of the heated towel rail is acceptable. But with such a connection, Mayevsky taps are needed, through which you will have to bleed air after turning off the hot water supply for repair / prevention. Periodic bleeding may also be required during the process.

Not the best, but quite workable option
Diagonal connection
There is no special sense in the diagonal connection of most heated towel rails: their efficiency is no different from the lateral one (in any case, there is no significant improvement), and the pipe flow is larger, the grooves are required longer, and this is laborious. Although the circuit is functional.
The diagonal works fine if the water supply is from the top. Then the upper branch is connected to the far edge of the "ladder", and the lower - to the near.
Diagonal connection at top feed
In this case, you can also make a narrowed and offset bypass, but even without this, everything should work "with a bang." At bottom flow, bypass without constriction, exactly along the riser, connection
Heated towel rails of complex shape: how to connect
In the case of connecting heated towel rails of complex shape, in addition to the usual means, it is also necessary to take into account the structural features of each specific model. They must be considered from the point of view of hydrodynamics - where the water will flow better, there and supply water. For example, the popular model "Elegy" by Sunerzha. This is not a ladder or a zig-zag.
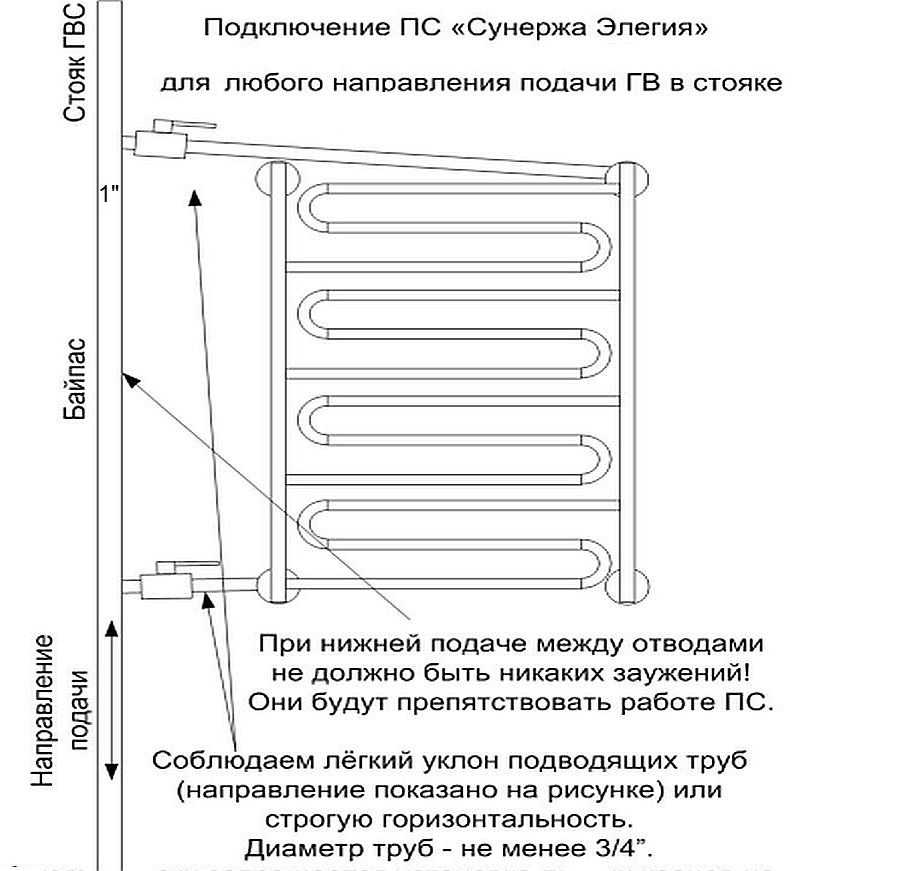
A diagonal connection is selected here, because the other simply will not work
The installation of the Sunerzhi Elegy heated towel rail was chosen lateral, since any other circulation will be disrupted. There are no options at all.
Another model - with bottom connection and complex design, has three installation options. Provided that water is supplied from above, the second will work best, the first will work a little worse, the third will be the least effective.
Bottom connection options with top spillage
When feeding from below, options 1 and 3 remain, but only without narrowing the bypasses - it will interfere, and not help. We exclude the second option completely.
How not to do
All the schemes presented above work stably. As you can see, all elbows are straight, without arcs or rings. This is not accidental - air accumulates in all irregularities, which interferes, and sometimes completely blocks the circulation.
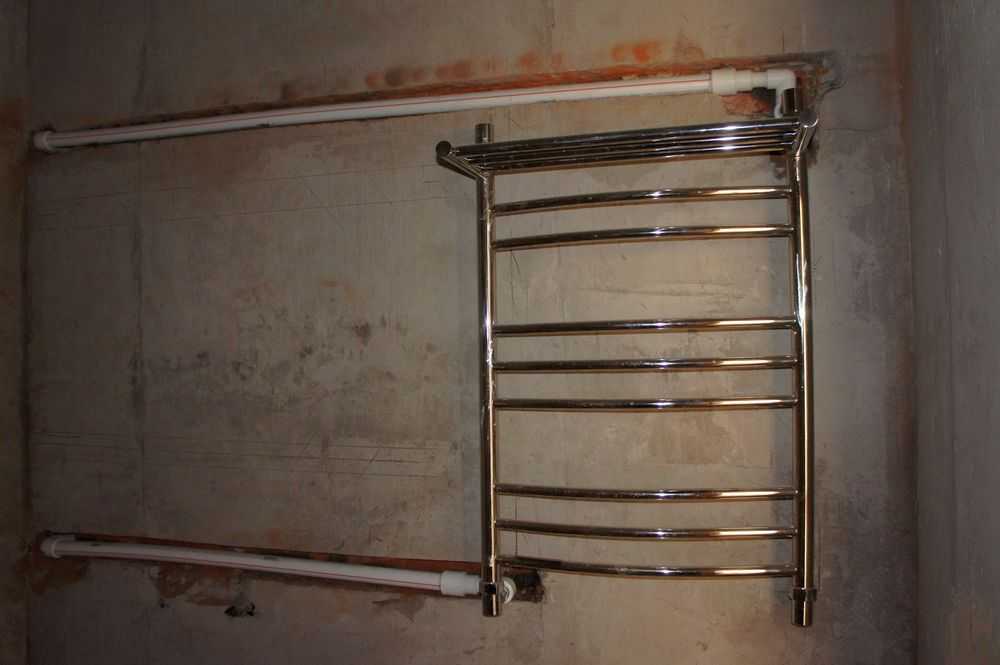
This circuit does not work
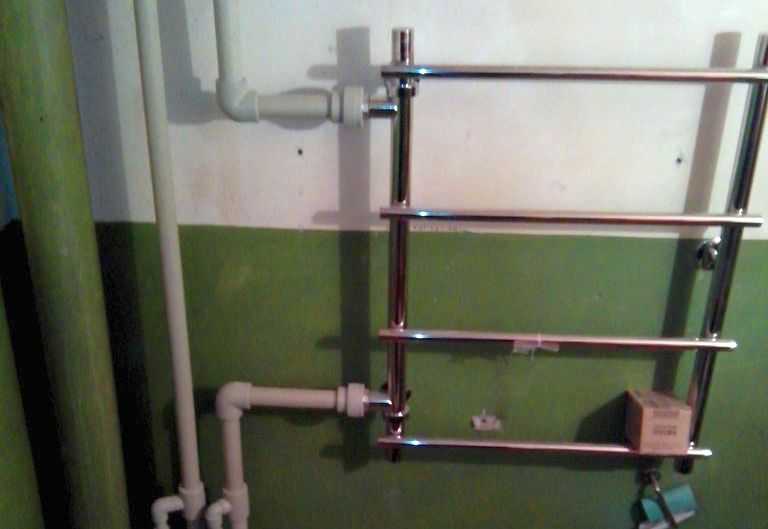
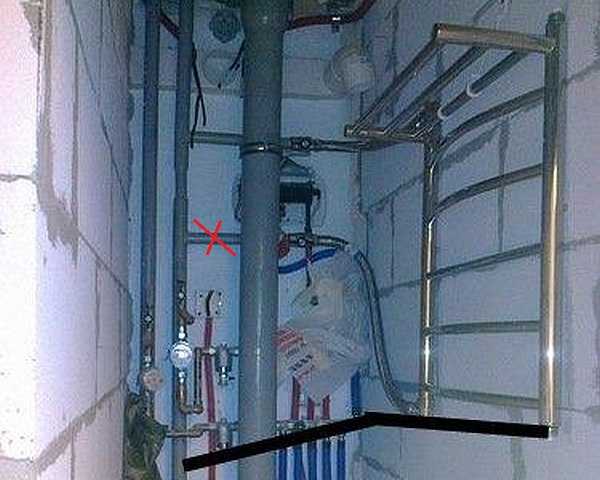
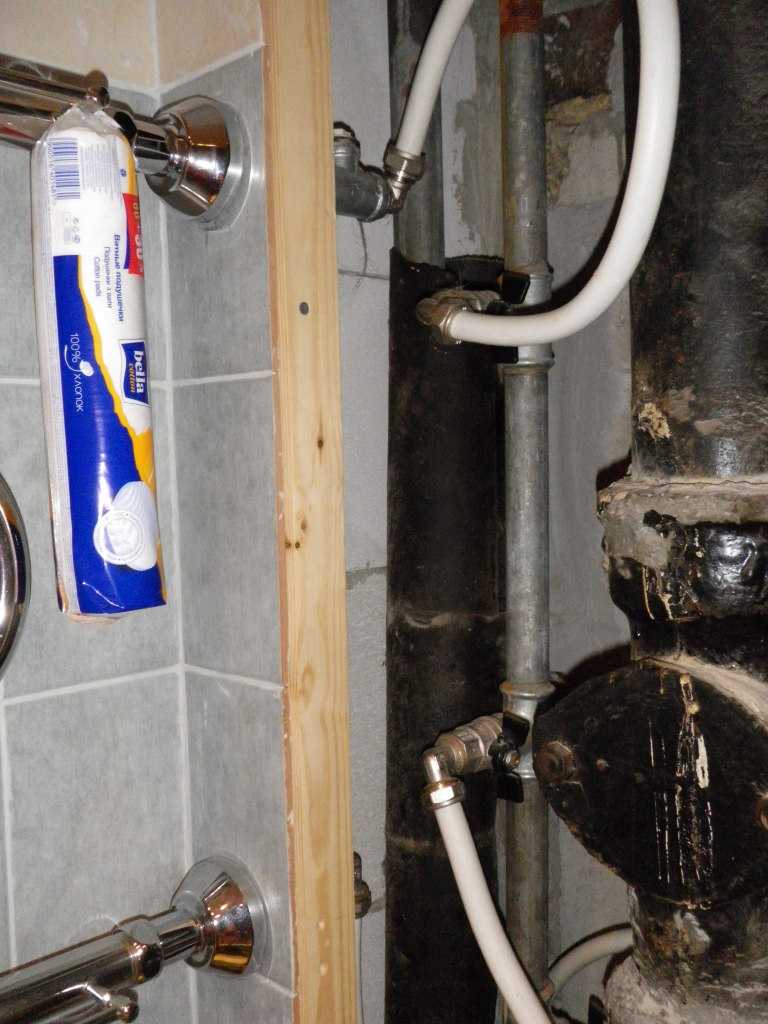
In the photo, the installation of a heated towel rail is incorrect. At least two mistakes were made:
- bends are made narrower than the center distance of the heated towel rail;
- they are made with a metal-plastic pipe with loops.
Such a connection simply cannot work. Reinforced plastic pipes are an excellent material, but not for connecting heated towel rails. Their fittings have a very narrow lumen, which is bad for circulation. Plus, air accumulates in the loops, and the flow along the upper loop, even when fed from above, will not work - too much hydraulic resistance to water must be overcome.
Unstable circuits
The following two schemes may work, but not always. In the lower part of the heated towel rail, water stagnates and, with some height difference, cannot rise. Nobody can say specifically when it will work and when not. Depends on the pressure in the riser, on the diameter of the pipes and the design of the dryer itself.
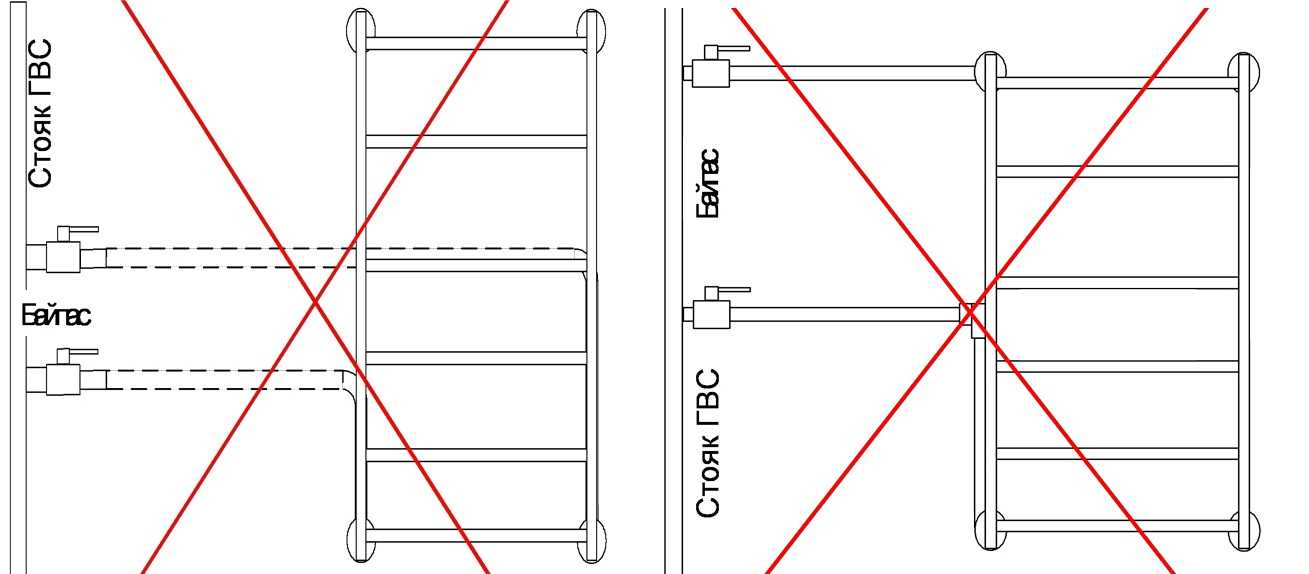
Unstable wiring diagrams
With such a connection, even a working connection may suddenly (usually after stopping) stop working. Everything is simple: the pressure has changed, the pipes are clogged, the water from below is not "pressed through", the heated towel rail does not heat.
Another option for an unstable circuit is with a loop on top. Again, it will work under some conditions. But sooner or later the highest point will be airborne and cut off the circulation. The trouble can be helped by installing an automatic air vent at the highest point, but if the pressure drops, it will not help either.
With a loop on top
Completely wrong
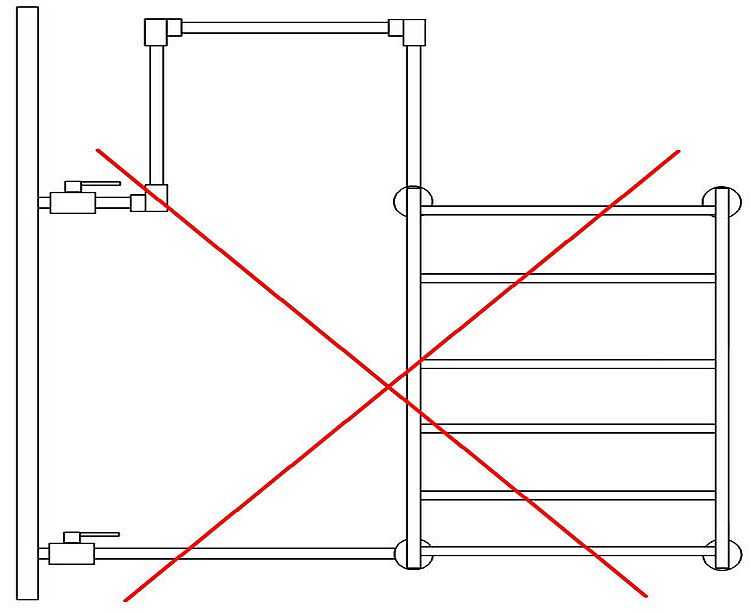
The photo below shows examples of how not to do it. Circuits without a valve on the bypass are inoperative. What this threatens is known. In addition, after several years of operation, they will cease to function altogether. Most likely this will happen after the next shutdown - the system will get clogged with dirt. This is because the entire stream of hot water is sent through the heated towel rail. After repairs, the water carries a huge amount of dirt, which safely settles in the bends (in the lowest areas in the first place). For several years, everything is completely clogged. On the good, everything needs to be redone and connected correctly, but only flushing can help the grief.
A very bad idea
It is necessary to rinse both the heated towel rail and the supply lines to it. To do this, we remove the dryer and wash it in the bathroom, and wash the taps one by one by connecting a hose to the vacated outlets, the other end of which is brought into the sewer. By manipulating the taps, pass the flow of hot water through one outlet, then through another. After flushing, everything is set in place. It may be possible to start the system after that.
Installation process
The very connection of the heated towel rail to the ready-made outlet bends is standard for plumbing - suitable fittings, linen and packing paste or fum tape. For wall mounting, there are brackets or special clamps, into which the pipe is pressed. The process is shown in detail in the video.