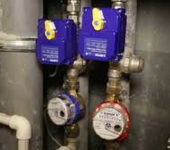
Check valve for water
In order for modern household appliances to work, there was a normal pressure in the tap and in the shower, it is necessary to create a certain level of pressure in the water supply system. One of the components that is responsible for this is a water check valve. What is this device, how does it work, where to install it. We read about this and many other things further.
The content of the article
What is a water check valve, its purpose and scope
A check valve is one of the types of shut-off valves. The essence of its work is to block the flow in the opposite direction. Its second task is to prevent pressure drop.
Applied to the water supply, it blocks the return movement of water. In private water supply systems (from wells or wells), the check valve is installed so that after the pump is turned off, it retains water in the suction pipe. If the system is based on pump station, then, most likely, it contains a check valve. But this must be looked at in the passport. Do you need a second one in this case? Depends on the length of the supply line, the cross-section of the pipeline, pump performance and several other factors. But more often they put it.
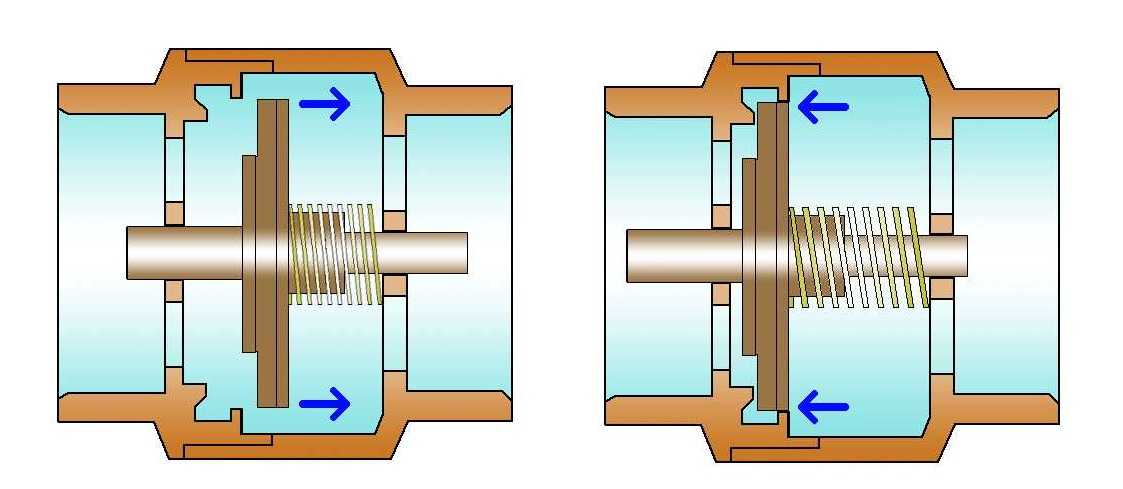
Illustration of the principle of the shut-off valve
In apartments or with central water supply in the house, it is placed in front of the meter. But here his task is different - to prevent the possibility of "unwinding" the testimony. The presence or absence of a check valve in this case does not affect the performance. But its installation is a prerequisite for the operating organization. The seal is placed so as not to exclude unauthorized analysis of water.
Where else can a water check valve be required? In the heating system. Not centralized, but private. It may contain circuits in which, under certain conditions, reverse flow may occur. A check valve is also installed on such circuits. In the piping of the boiler, with a hygienic shower. These devices can also reverse flow. So shut-off valves are needed.
Types of check valves, its structure and principle of operation
The check valve device is simple. There is a saddle with some narrowing and a locking element. With "correct" flow, the shut-off element is pushed back from the bottleneck. As soon as the direction changes, it presses against the saddle, blocking the passage. By the way, there should be an arrow on the body, which indicates the "correct" direction of water movement.

How the water check valve works and how it works
Basically, check valves are distinguished by the type of shut-off element. He can be:
- ball type (ball);
- disc-shaped;
- disk;
- petal or bivalve.
In the ball valve, the ball is "in free float". It is not attached to anything, it is carried by water. A completely reliable system. However, it does not always cover the saddle tightly enough, so it is rarely used.
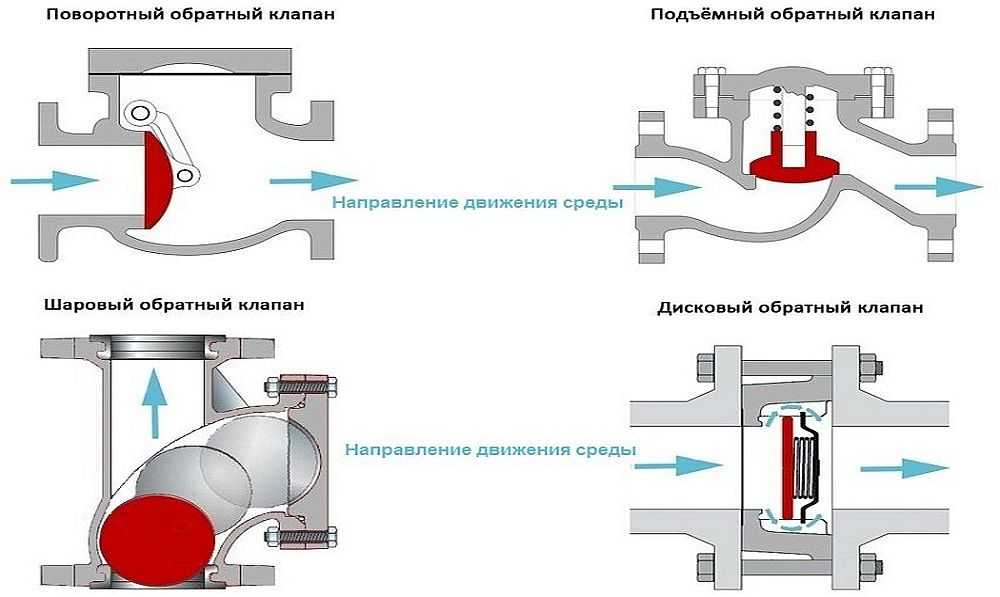
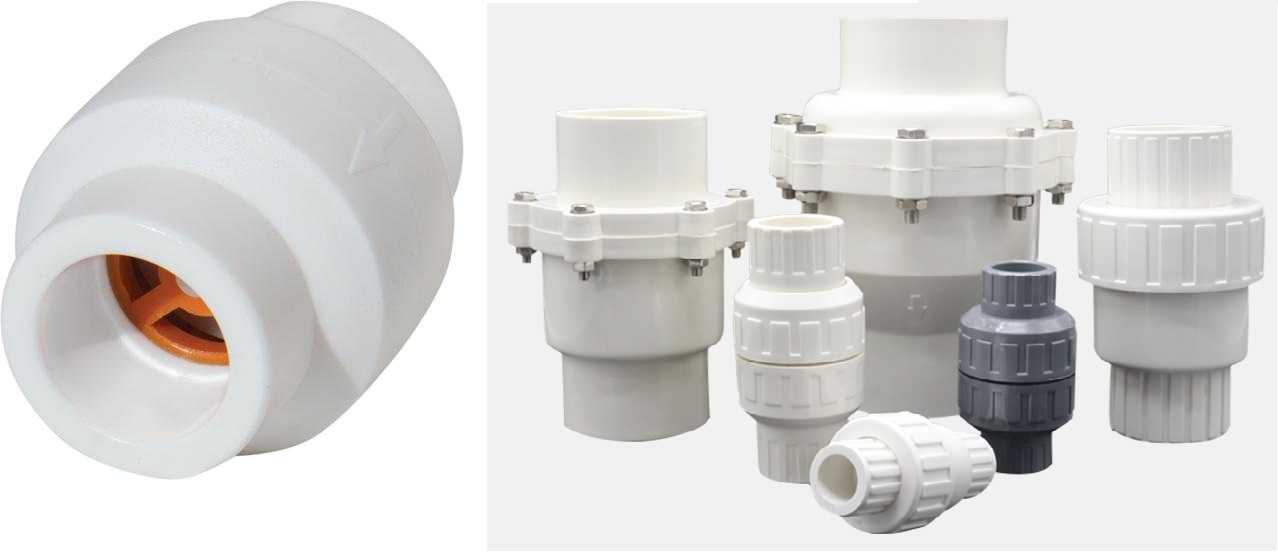
Types of water check valves
Poppet can be lifting or swivel. Swivel, as well as ball, open and close under the influence of water flow. The lifting ones have a spring-loaded stem. In the "normal position" the passage is closed, when the water pressure appears, it presses the spring, pushing the closing element up.
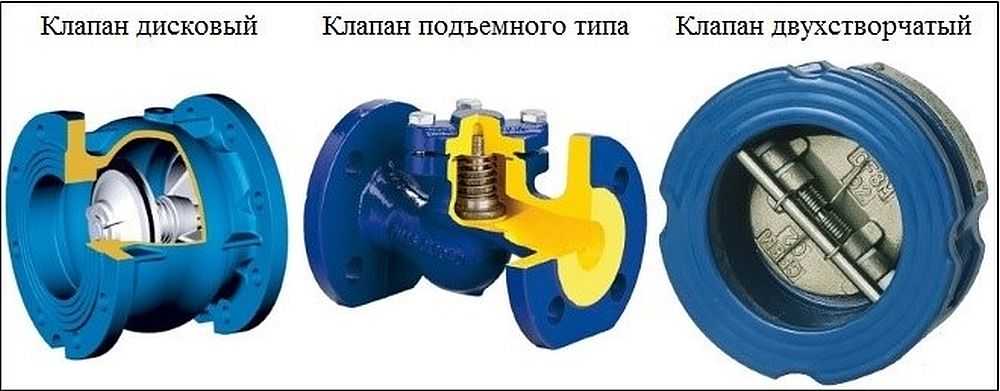
The most common in domestic water systems is the disc check valve. It differs in that fittings of this type can be small in size. And the design is simple and reliable.The shut-off disc is placed across the flow, it is pressed against the seat by a spring. The water squeezes the spring, freeing its way.
A non-return valve is a device to prevent back movement of the transported medium
There is also a two-piece valve for water. Its locking element consists of two halves of the disc (petals), which are fixed on the axis. Hence another name for this model - petal. They are held closed by springs. The water entering the water supply pushes them back, folding and pressing them together. This type has the lowest hydraulic resistance. In some cases (with a long suction line) this can be important.
Materials, marking, dimensions
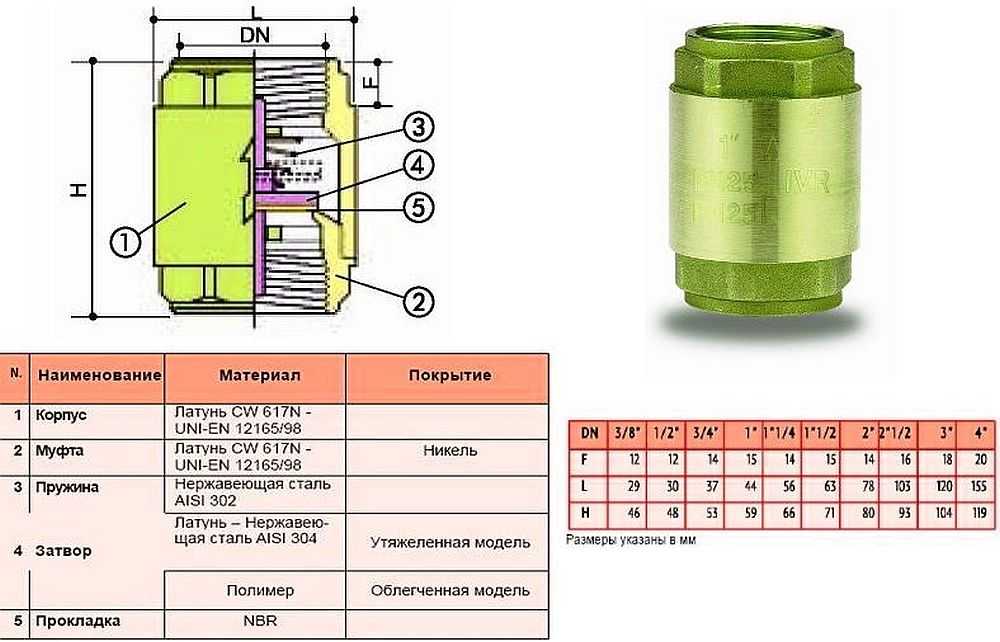
The water check valve is made of stainless steel, brass, large sizes of cast iron. For household networks, brass is usually taken - not too expensive and durable. Stainless steel is certainly better, but it is usually not the case that fails, but the locking element. Here is his choice and should be approached carefully.
For plastic plumbing systems, check valves are made of the same material. They are polypropylene, plastic (for HDPE and LDPE). The latter can be welded / glued or threaded. You can, of course, solder the adapters to brass, put a brass valve, then again the adapter from brass to PPR or plastic. But such a node is more expensive. And the more connection points, the lower the system reliability.
For plastic and polypropylene systems, there are check valves made of the same material
The shut-off element material is brass, stainless steel or plastic. Here, by the way, it's hard to say which is better. Steel and brass are more durable, but if a grain of sand gets between the edge of the disc and the body, the valve gets jammed and it is not always possible to return it to work. Plastic wears out faster, but it does not wedge. In this regard, it is more reliable. It is not for nothing that some manufacturers of pumping stations install check valves with plastic discs. And as a rule, everything works for 5-8 years without failures. Then the non-return valve starts to “poison” and is changed.
What is indicated in the marking
A few words about the check valve marking. It states:
- A type
- Conditional pass
- Nominal pressure
- GOST according to which it is made. For Russia, this is GOST 27477-87, but not only domestic products are on the market.
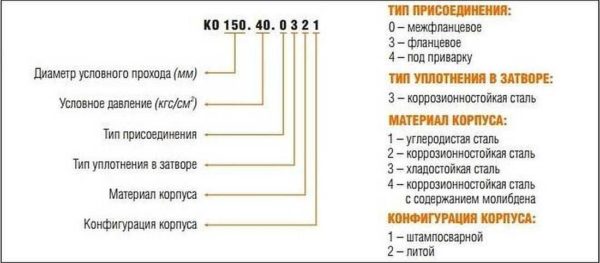
Return valve for water: marking according to GOST

The conditional passage is designated as DN or DN. When choosing this parameter, you must be guided by another fittings or pipeline diameter. They must match. For example, you will install a water check valve after a submersible pump, and a filter to it. All three components must have the same nominal size. For example, all should be written DN 32 or DN 32.
A few words about the conditional pressure. This is the pressure in the system at which the shut-off valves remain operational. You should take it exactly no less than your working pressure. In the case of apartments - no less than a test one. It exceeds the working standard by 50%, but in real conditions it can be much higher. The pressure for your home can be obtained from the management company or plumbers.
What else to pay attention to
Each product must have a passport or description. It indicates the temperature of the working environment. Not all valves can work with hot water or heating systems. In addition, it is indicated in which position they can work. Some should only stand horizontally, others only vertically. There are also universal ones, for example, disk ones. Therefore, they are popular.
The opening pressure characterizes the "sensitivity" of the valve. For private networks it rarely matters. Is that on the service lines close to the critical length.
Also pay attention to the connecting thread - it can be internal or external. Choose based on ease of installation. Do not forget about the arrow that indicates the direction of movement of the water.
Sizes of check valves for water
The size of the check valve for water is considered according to the nominal bore and they are released for all - even the smallest or largest diameters of pipelines. The smallest DN 10 (10 mm nominal bore), the largest - DN 400. They are the same dimensions as all other shut-off valves: taps, valves, squeegees, etc. Another "size" can be attributed to the conditional pressure. The lowest is 0.25 MPa, the highest is 250 MPa.
Each company produces water check valves in several sizes
This does not mean that any of the valves will be in any variant. The most common sizes are up to DN 40. Then there are trunk lines, and they are usually purchased by enterprises. You won't find them in retail.
And yet, please note that for different companies with the same nominal bore, the outer dimensions of the device may differ. The length is understandable. Here the chamber in which the locking plate is located can be larger or smaller. The diameters of the chambers also differ. But the difference in the area of the connecting thread can only be due to the thickness of the walls. For private houses, this is not so scary. Here the maximum working pressure is 4-6 atm. And for high-rise buildings it can be critical.
How to check
The easiest way to test a check valve is to blow it in the direction that locks it. Air should not pass through. At all. No way. Try pressing the cymbal again. The stem should move smoothly. No clicks, friction, distortions.
How to check a check valve: blow into it and check for smoothness
Also inspect the seat and disc. Especially in the place where they are adjacent to each other. Everything should be smooth / smooth. The tightness of this type of fittings depends on how accurately everything is fitted. In the more expensive models, a rubber / polymer / plastic O-ring is installed on the plate. Needless to say, it should lie flat, without waves, there should be no scratches or burrs.
Where to install the check valve
To begin with, a few words about how the water check valve is indicated in the diagrams. There is a special icon for it. These are two triangles with their vertices turned towards each other. One of the triangles is painted over, one is not. The direction of movement of the working medium is indicated by an arrow. In the opposite direction, the flow is closed.
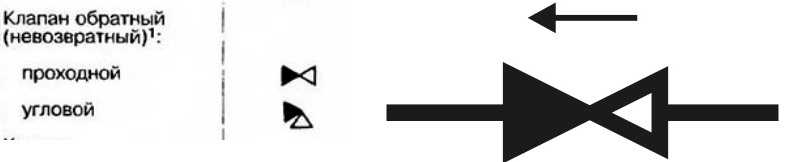
Graphic designation of the check valve in the diagrams
In general, there is no clear indication of exactly where the check valve should be installed. It is important that it performs its functions, and the place of its installation is a secondary matter. It is necessary that the water supply or heating system is working correctly. And its specific place is determined by the parameters of the system and by the ease of maintenance. An exception is the introduction of water in the apartment. Here they will tell you clearly, we put a check valve in front of the meter and nothing else.
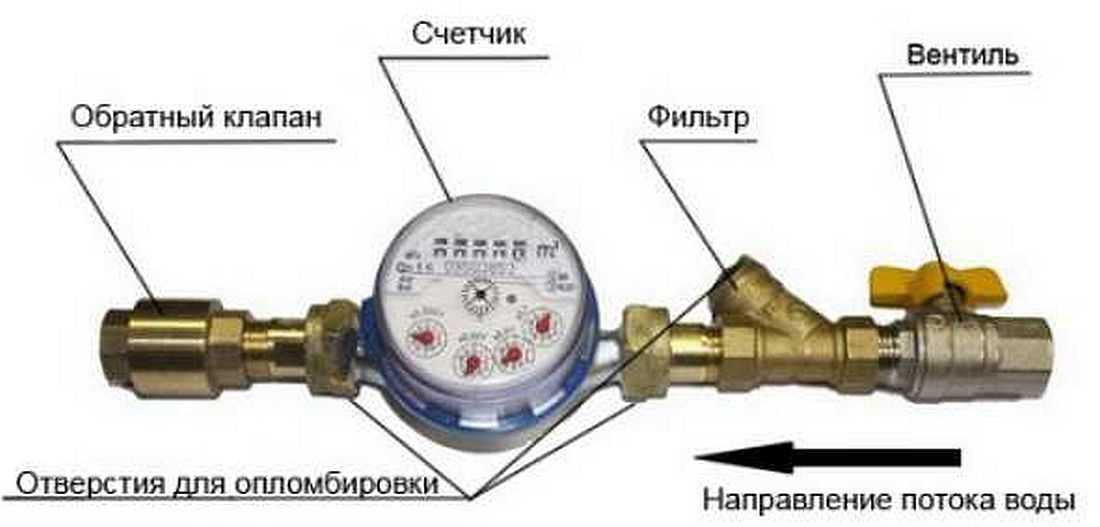
Where to put a check valve on the water when entering it into the apartment - after the meter
For example, in the piping of the boiler, there must be a check (shut-off) valve on the supply pipeline. It prevents hot water from entering the system, which can occur when the water heats up and thus creates an increased pressure that can "transfer" the tap. In this case, it is better to put the return pipe closer to the hot water source so as not to subject other piping elements and cold water pipes to heat load, which are far from always made of metal today.
On a well or in a well with a submersible pump
If you are looking for information on where to put a check valve on a submersible pump, the information may be conflicting. Some advise to put it immediately at the pump outlet, others - at the entrance to the house or in the pit, if we are talking about a well. Oddly enough, all three options work. Just for different occasions.

The place of installation of the check valve in the water supply system is selected depending on the parameters of the system and equipment
It is possible to install a check valve in a house or in a pit above a well if the vertical section of the pipeline does not exceed 7 meters.The length of the horizontal section (if it is without slope) does not matter. With this length of the pipeline, water will not flow back into the well or well.

Place of installation of the check valve in a water supply system with a submersible pump
If the water mirror is below seven meters (the pump draws water from a depth of more than 7 meters), we put a check valve after the pump. You can immediately (as in the photo above), or you can put a filter, then a check valve. It is permissible to install the valve a couple of meters above the water level. It doesn't matter much anymore. But this method of installation - at a depth - is inconvenient for maintenance. Sooner or later, the valve will either have to be cleaned or changed. If it is in a well or in a well, everything must be taken out to the surface. The replacement itself takes a matter of minutes. It takes about five minutes to unscrew the thread, remove the old one, check / clean or put a new one. But all the preparatory work is hard, wet and unpleasant. So, if possible, we transfer the non-return valve to the house or pit.
With pumping station
As already mentioned, some models of pumping stations have a check valve. Do I need to install a second one on the suction line? Again, if the water rises less than 7 meters, you can do without it or put it at the entrance to the house.

For a pumping station, a check valve with a filter is better
If the vertical rise is greater, it should be placed at the entrance. What for? But because when the pump is off, the water will flow back. And when you turn it on, air will be pumped, and only then water. And let's say right away that not all stations normally tolerate such a regime. Therefore, if you hear that the water returns to the well or well after the pump is turned off, it is better to redo the system.

Check valve with filter for installation with a pumping station
As you can see, in this diagram, the check valve is installed at the end of the pipe. Since it is sensitive to dirt, it is better to pre-purify the water. You can wind up standard filters, or you can supply it with a built-in mesh. Which option is better? Probably, after all, the first one. First, you can collect as many filters in series as needed to supply relatively purified water. Secondly, it is cheaper to change one filter or one valve than a filter with a valve. Fuss during the installation more, but not critical.
Why the valve does not work
A sign that the check valve has broken is that the system cannot hold the accumulated pressure. Rather, a broken valve is only one of the reasons. The second is a leak in the supply pipeline. So you have to check both options.
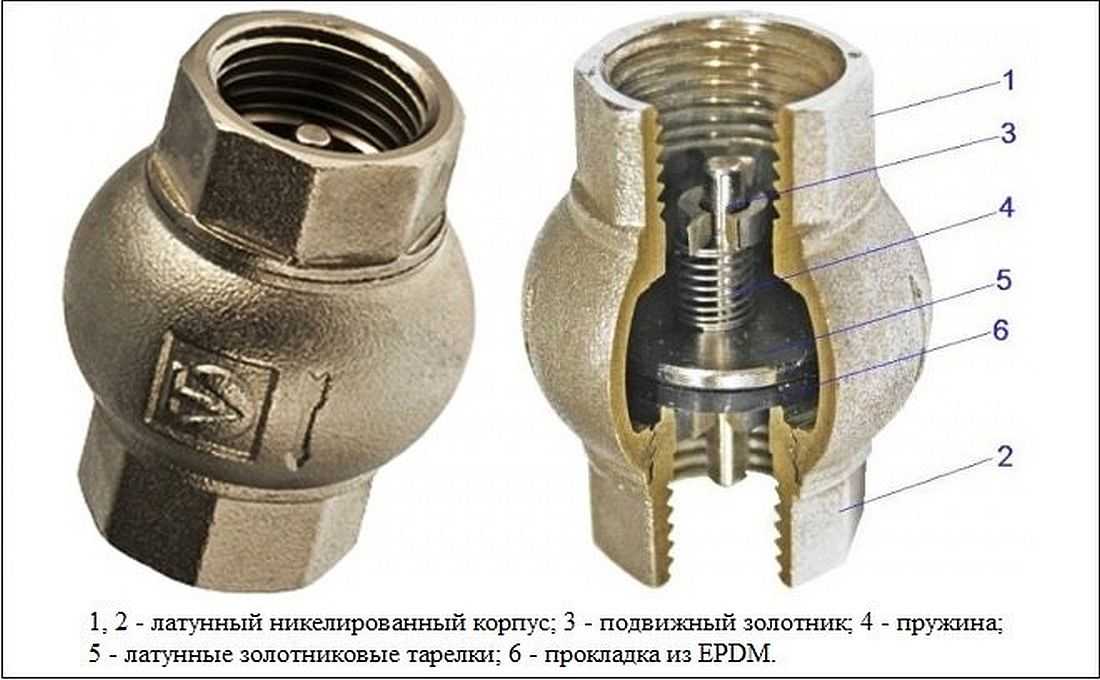
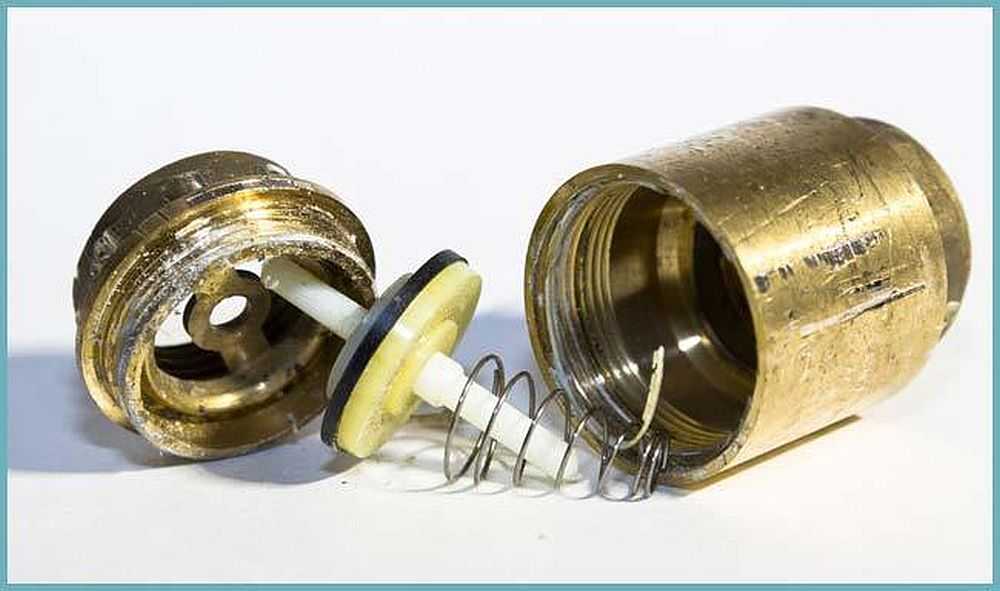
What a cross-sectional view of a water check valve looks like
If you look closely at the check valve device, you will understand that there is nothing to break. Possible breakdowns are a wedge on the stem and debris that prevents the disc from pressing tightly. There may still be wear on the striker plate. The latter is incurable, we can immediately change it. The wear is also the squeezed grooves from the seat on the O-ring. So having a seal is a controversial advantage. The rubber is pushed through and the valve starts to "poison".

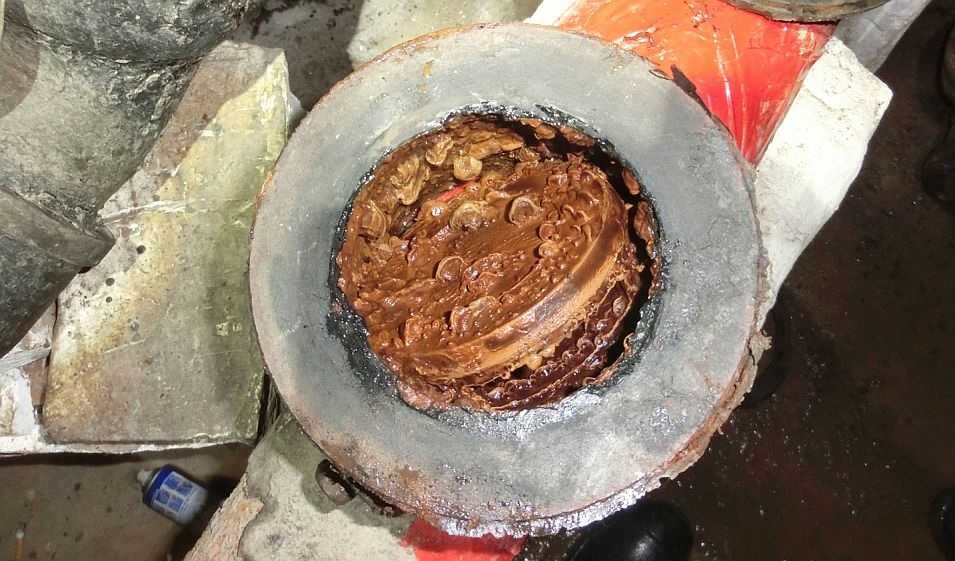
This is what a blockage looks like on a small diameter OK
If the stock is slanted or jammed, in some cases you can correct it. It usually doesn't last long, and it'll jam again pretty soon. If the striker plate has been clogged, it can usually be cleaned. And so that this situation does not repeat itself, put a filter in front of the check valve. If it is already there, and the water is still too dirty, there are several options:
- put a second - smaller filter;
- or lift the end of the pipeline from the bottom level;
- clean or deepen a well or borehole.
If speech about the submersible pump type "Kid“Damping vibrations that occur during its operation will help to reduce the amount of turbidity. The methods are different - from the use of springs in the suspension, to rubberized suspension. It really helps.Another option is to put a barrel with a wide neck into the well at the bottom, and a pump into it. Silt and sand will rise less.
You can see this picture
Next note. If, after a long period of operation without breakdowns, the check valves began to "fly" one after another, the water level may have changed and you need to move the suction point. The second option is that the pipes are clogged with sand or silt and the pipeline needs to be flushed out. Well, and check it for leaks. By the way, if the station is not gaining pressure, then the point is most likely not in the check valve, but in the pear, its fastening, nipple, etc.