How to repair a 220V LED light bulb
In an effort to reduce energy costs, we are replacing incandescent bulbs with more efficient ones. LEDs are considered the best, since with low current consumption they give a bright light. And the manufacturer claims that they should work for at least 30 years, but in fact, after six months of operation, they simply do not light up. Given the high cost of LED lamps, this is not fun at all. The good news is that repairing an LED light bulb isn't too difficult. The problem can be solved with a minimal set of tools. In some cases, you can even do without a soldering iron.
The content of the article
The device of a LED bulb for 220 V
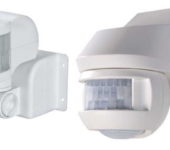
Self-repair of an LED light bulb is possible only if you imagine what parts it consists of and how it all works. This will allow you to find faults yourself. The device of the LED light bulb is not too complicated. Seen from the outside, three parts can be distinguished:
- plastic or glass diffuser,
- metal, plastic or ceramic radiator for heat dissipation,
- base of one of the standards.
To repair an LED light bulb with your own hands, you will need to get to the insides - all problems are concentrated here.
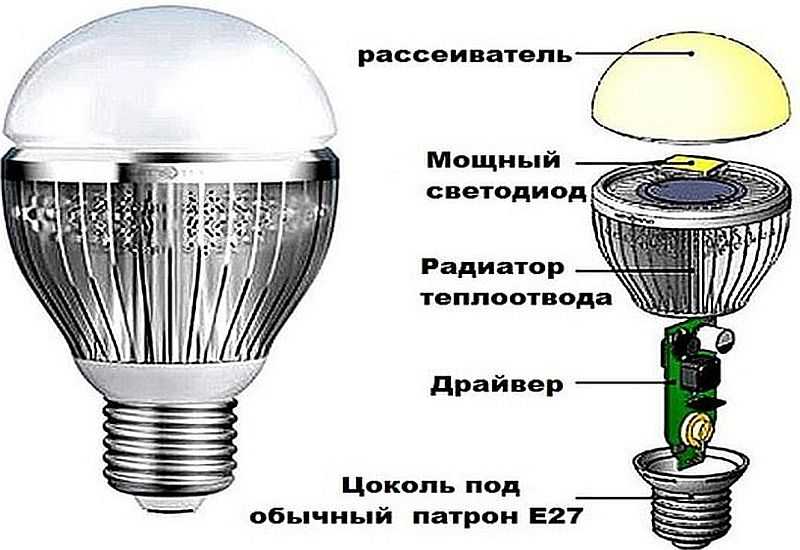
What parts does an LED lamp consist of?
If we disassemble the LED lamp, we will find the electrical part inside, where we will look for damage. It:
- Voltage converter / regulator or driver. It is located half in the base, half in the heatsink of the heat sink.
- Board with LEDs.
As you can see, not too difficult, although there are a lot of variations. For example, in some models, the driver is soldered on the same board where the LEDs are attached. This is an "economy" solution and is usually found in cheap light bulbs. Others have one LED. On the contrary, these are expensive models, since one large and powerful LED costs significantly more than a bunch of small ones with the same (or more) luminescence power.
LED light circuits
LEDs are powered from low voltage - about 3 V, consume very little current - from 20 to 50 μA, they can be connected to a 220 V network only through a converter. It can be seen at the bottom of the lamp. The circuit of a 220 V LED light bulb is also simple, but it is easy to identify possible problems from it.
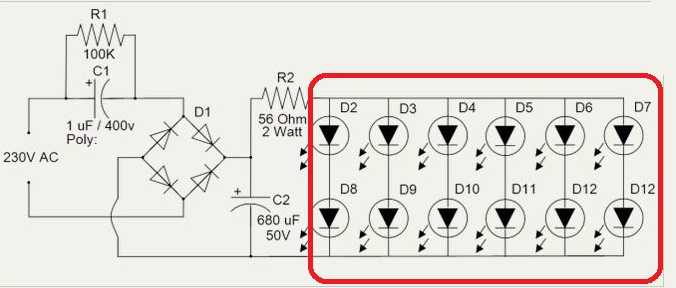
Diagram of a 220 V LED lamp
The figure above shows a circuit with a diode bridge. It converts and stabilizes the voltage. This is one of the most common options as these lamps are not very expensive. As you can see, in this version, the diodes are connected in parallel, but this is a rare option. Most often they are connected in series - one after the other.
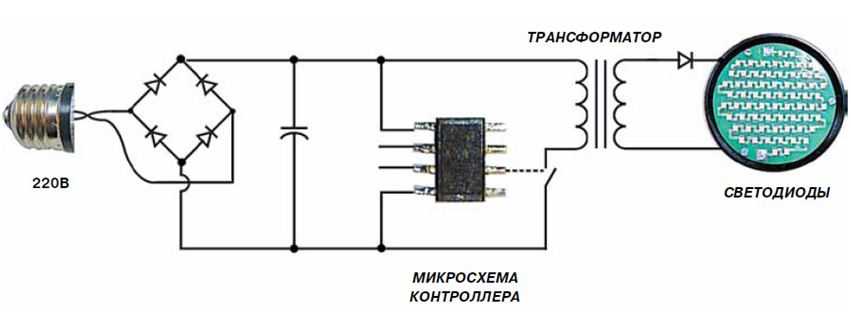
With microcircuit
There are other LED bulbs as well. They contain a microcircuit. Such lamps are more expensive, but usually more durable, since the operating parameters are controlled by a microcontroller, which provides a more stable power. And poor-quality food is equal to a rapid decrease in the brightness of the glow. Sudden voltage surges generally lead to breakdown of the LED. Since they are connected in series - one after the other - the failure of one LED means the breakdown of the entire lamp. It just doesn't light up. Although not working, say one LED out of 80.
How to disassemble
Repair of an LED light bulb begins with the fact that it must be disassembled. There is no vacuum in it, so it is possible. The diffuser and the base can usually be separated without problems. They are connected by means of notches on different parts.
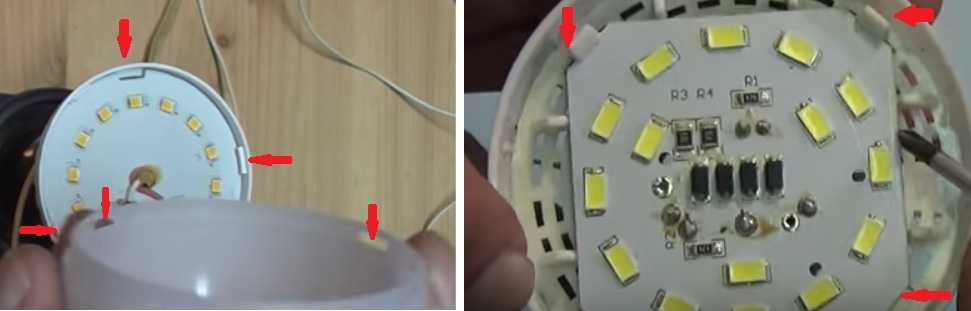
Most of the parts of the LED lamp are held by snaps
There are two options.Easier to disassemble and more complex. In a simple way, the lamp parts are connected only by mechanical latches. In the more complex, in addition to the latches, there is also silicone, which ensures the waterproofing of the lamp. Such specimens can be operated at high humidity. You need to disassemble the LED lamp like this:
- Clamp the base in your hands and turn the radiator counterclockwise. The diffuser can be removed in the same way.
- In some LED bulbs, the connections are filled with silicone. In this case, turn, don't turn, nothing moves. A closer look reveals the sealant. In this case, a solvent is needed. You type it into a syringe (without a needle or with a thick needle), gently inject the liquid around the perimeter. You need to withstand it for 5-10 minutes, and then try again. The first time it is usually impossible to disassemble the LED light bulb, but three or four passes help.
The boards inside the lamp are either inserted into grooves, or also held on latches. It is easier to push them aside with a flat screwdriver, while simultaneously pushing the board up. The force should not be excessive, as the latches are plastic and may break.
Typical breakdowns
Since you decided to repair the LED light bulb with your own hands, it is assumed that you have a tester or multimeter and you will be able to carry out elementary measurements... A soldering iron will also be needed, but with a thin tip and low power. You can do without it, but you will have to look for a replacement.Soldering with a soldering iron you also need to be able to at least a little. And you should also have tweezers, wire cutters and ducks. Duckbills or platypuses are hand tools, similar to miniature pliers with long grips - they are convenient for holding small parts, but tweezers can be enough. And also spare parts. They will have to be purchased as a malfunction is identified. It is good if there is a second non-working lamp. It can be used as a donor - to take the necessary parts from there.

The declared service life of LED lamps is almost half a century, and after six months, several pieces of non-working ones accumulate
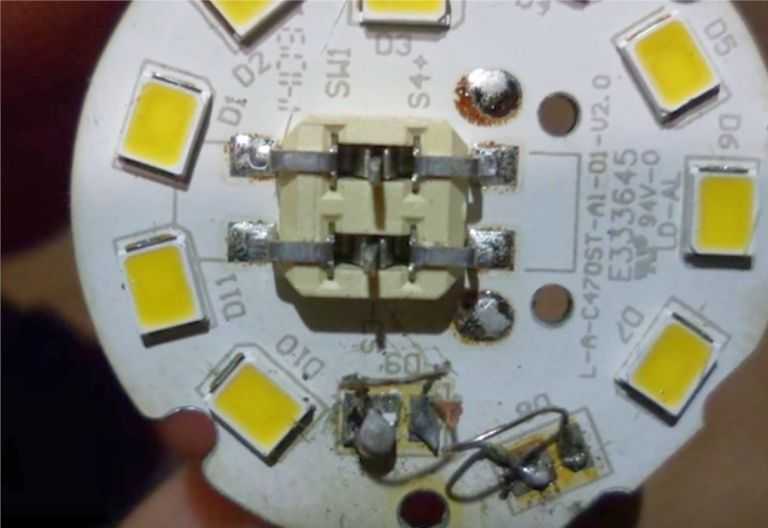
LED breakdown
As already mentioned, the crystals are connected in series in the LED light bulb. From the output of one, the wire goes to the input of the other and so runs around all the elements. The circuit is very simple. But if at least one crystal is not working, the lamp will not light. Crystals often fail, so the first thing we do is check them. Moreover, they are easy to find in any model. A circuit is not needed for verification.
To begin with, carefully examine all the crystals. Those who “feel” normally have a light, even color. Dark spots should alert you. If the crystals have dark, almost black dots, these LEDs are most likely punctured. We change them unambiguously. If the surface is a little darker, the crystals are still shining, but already "in their last breath" and will soon burn out, then it is also better to replace them now.

Burnt out LED has a dark spot on the surface
You can use a multimeter to check if the LEDs are working or malfunctioning. It is switched to the dialing mode, the probes are applied to the LED contacts. If the current for the LED to work is small, the serviceable LEDs light up. The second test option is a 3-4 Volt battery, to the contacts of which wires are soldered. We apply these wires (observing the polarity) to the crystals. Serviceable ones light up, and defective ones remain dark.
How to remove damaged LEDs
Until this moment, everything is simple and clear, the repair of an LED light bulb does not present any difficulties yet. Now we need to decide how to solder the small LEDs. The point is that they are soldered onto a substrate that conducts heat well. That is, by warming up the contact of one LED, you simultaneously heat the entire board. If you work with a low-power soldering iron it will take too long. Powerful is not an option either, as it is very easy to overheat. The maximum temperature that crystals can tolerate without consequences is 80 ° C.With further heating, destruction occurs quickly, therefore, when repairing an LED light bulb, the main task is to harm the rest of the elements as little as possible.
Spot heating will still not work, but you can try to inflict minimal damage on neighboring crystals. To do this, first we bite out / break out the crystal plate, and heat the remaining metal legs with a low-power (20 W) soldering iron and remove.

Soldering damaged LEDs
If you don't have a low-power soldering iron, you can use an iron. It must be rigidly fixed (for example, with a clamp) and set to medium mode. It is better to use the iron spout to minimize the heating field. In this case, we will heat the entire board. Rather, we will warm up the edge on which the damaged LED is located, but the whole board will warm up. And this is the minus of this method - from overheating the crystals become cloudy and quickly fail. Therefore, the trick is to quickly remove the damaged crystal as soon as possible.
Before starting work, paint all faulty crystals with a marker. We turn the board so that the place with the burned-out elements is on the iron platform. We constantly pull the damaged element upward, holding it with forceps. As soon as it comes off, we try the damaged ones located nearby. If they come off, great. No - we turn the board so that the damaged element heats up more. Then immediately remove the board and leave to cool. No special tools for fast cooling! Just put it on, let it cool itself.
How to solder new LEDs
Contact pads remain in place of the soldered LEDs. We put a drop of flux on them for soldering, lay out the serviceable ones on top (observing the polarity) and warm up again, but this time we press on the crystal. When its legs "enter" the solder, remove or turn over the board. If there is no LED, you can solder a piece of wire instead. The lamp will shine a little dimmer, but it will work. Yes! This trick works only if there are ten or more crystals on the board.
In some cases, wire jumpers can be used instead of burnt out LEDs
The video shows another replacement method. You need to find a similar LED on the tape, cut it out and, together with the substrate, solder it to the place of the remote one.
Another way to solder small LEDs. It seems to be the most real without the use of special equipment. You can evaporate the diodes with a small gas burner.
Damage to the driver
If all the LEDs are visually normal or have already been changed, we continue to repair the LED bulb by examining the driver. Some damage is easy to identify visually. Blackened or cracked resistors, swollen capacities. If you look closely, you can see it all. If nothing is visually determined, we take a tester and check the integrity of the components.
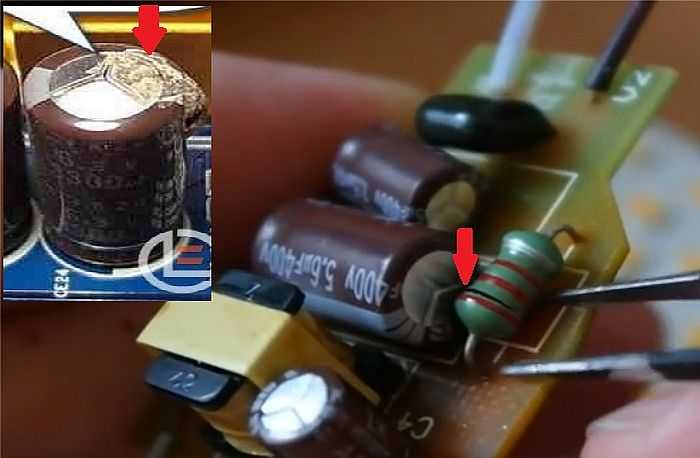
There may be burnt resistances and leaking / swollen capacitors
It also happens that all the elements are absolutely normal, and the LED light is still off. This is most likely a bad build. It is necessary to check all the soldering points. If it is not enough to warm up the soldering point, after time from constant temperature changes, the contact will deteriorate or disappear completely. In the first case, the light is on and off. In the second, it just stops working. We bring all the soldering points to the light and look carefully. If we find a crack in the solder, that's it. Cold soldering. Then we just warm up this place well with a soldering iron.
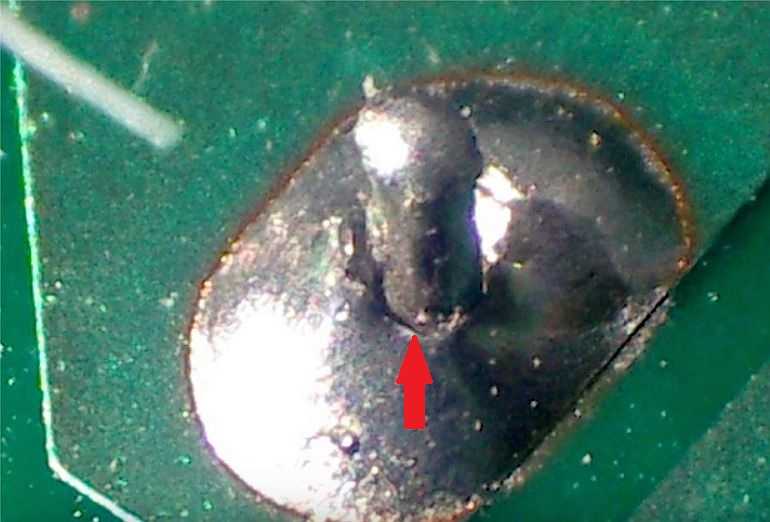
Cold soldering is one of the reasons for LED lamp breakage
It is very rare for diode bridges to fail, so we check them last. If the diode is still broken, we solder it, re-check it (in theory, it is only necessary to check them by soldering), if the damage is confirmed, we put a similar one. Do not mix up the connection, otherwise nothing will work. In general, repairing an LED light bulb is not too difficult a task.It will cost significantly less than a new light bulb. And you, along the way, can improve the design. As a result, LED bulbs will burn out less often. In any case, you don't (almost) lose anything.