How to chisel walls for wiring
One of the most common ways of installing electrical wiring is hidden. This is when the wires and cables are laid with grooves made in the wall, floor. The process of making grooves is called grooving, and these grooves are called "grooves" or "shraba". How to correctly do wall chasing for wiring, according to what rules, which tool to use, and let's talk further.
The content of the article
Strobing rules
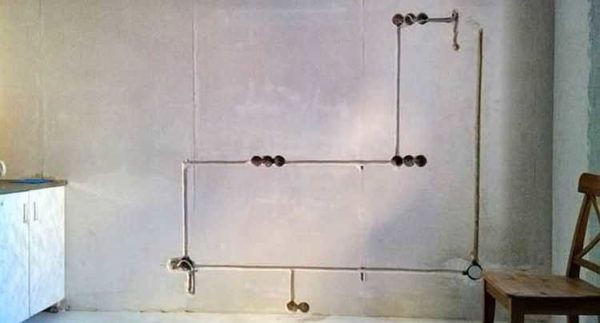
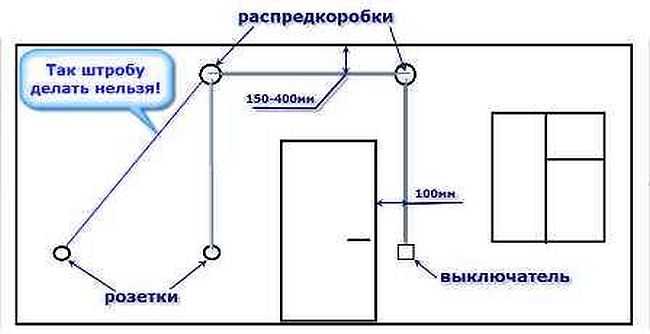
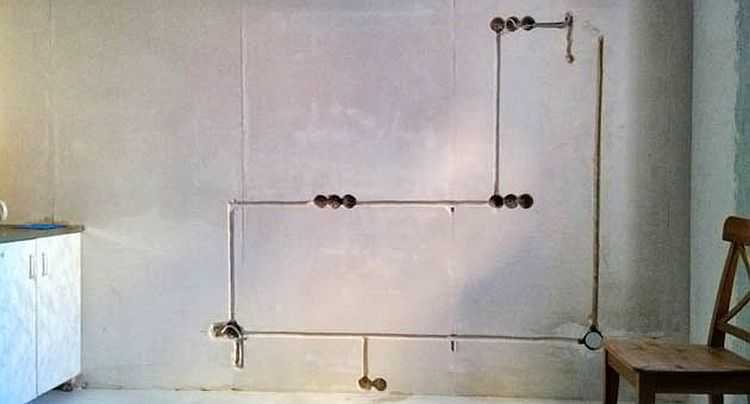
Laying wiring in a gate refers to a closed installation method. The remaining hole is then sealed flush with the wall, after which finishing materials are applied. That is, then it is difficult to determine exactly where the wiring goes. From the point of view of aesthetics, this is good, but from a practical point of view it carries obvious inconveniences: when working with drilling holes in the walls, one has to take into account that there is a wiring somewhere there. You can find it using special wiring detectorsbut the gasket itself must be predictable. For this, a number of rules have been developed, which must be adhered to both in apartments and in houses:
- The strobes are made only vertically and horizontally. Inclined lines are possible only when laid in visits with beveled walls - in attics, residential attics, on stairs. In this case, the grooves are made parallel to the inclined surface.
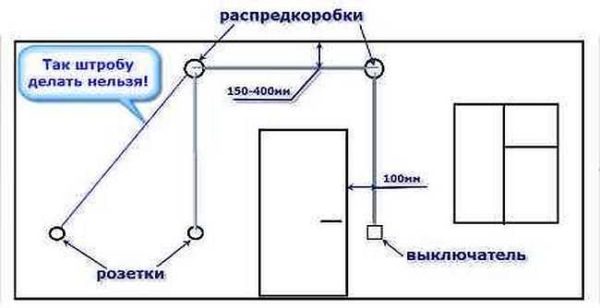
Walls for wiring can only be channeled vertically or horizontally
- From engineering networks - gas pipes and heating pipes - the grooves for laying the wiring must be at a distance of at least 50 cm.
- When laying grooves under the ceiling, 15-20 cm recede from the corner downwards.If during the modernization of the wiring it is necessary to lay another branch, it is also lowered by 15-20 cm.
- From corners and openings (window and door) it is necessary to retreat at least 10 cm.
- The depth and width of the groove depends on the dimensions of the mounted wiring, but usually up to 20 mm is enough. The maximum allowed is 25 * 25 mm. This depth may not be enough if the wire is laid in a corrugated sleeve or metal tray. In this case, the groove can be slightly deepened. But, if there is a layer of plaster on top, you don't need to deepen - a few millimeters will easily close.
Only at right angles and nothing else
- If there is a metal frame in the wall, it cannot be cut categorically. These are usually reinforced concrete structures. In them, the frame is a steel wire, which is at a depth of 4-5 cm.So 2 cm is normal, but even when laying large-diameter cables, the metal cannot be broken
- If there is a sufficiently large layer of plaster on the wall, the wires can be laid in the thickness of the mortar. This is easier than making a groove in the base material.
- When connected to an outlet or switch, the depth of the groove can be slightly increased so that the wire goes well into the junction box. But in this case, it is impossible to break the metal frame.
These are general rules that apply to wall chasing for wiring.
Slitting tool and execution technique
There is an old-fashioned method - a chisel and a hammer, which does not require electricity, but takes a lot of time and effort. With blows on a chisel, its tip is driven into the wall, picking out some of the material. Then the process is repeated many times. The speed of laying a groove in this way is very low. It can be more or less successfully used when plastering. There will be big problems with any other materials.
Work will go faster with a power tool:
- The best option is a wall chaser. This is a special tool with two saw blades, setting which sets the parameters of the groove.That is, in one pass you get two parallel lines in the wall. A certain amount of material remains between them, but it is then quite easily knocked out by a perforator with a special attachment - a spatula. The advantage of working with a wall chaser is a smooth strobe, no dust, since it is possible to connect an industrial vacuum cleaner. The disadvantage is that the equipment is very expensive, so you should not buy it for one-time work. The way out is to rent it in a specialized store.

A wall chaser is an expensive but effective device that makes it easier and faster to chase walls for wiring
- Hand-held circular saw, angle grinder (angle grinder) or grinder. You can also make cuts in the wall with this tool, but working with it on a concrete or brick wall is very dangerous. Any discontinuity in the material being cut - stone, metal, voids - can cause the tool to break. This is very likely to cause serious injury. When working with wood surfaces, it is best to use a hand-held circular saw.
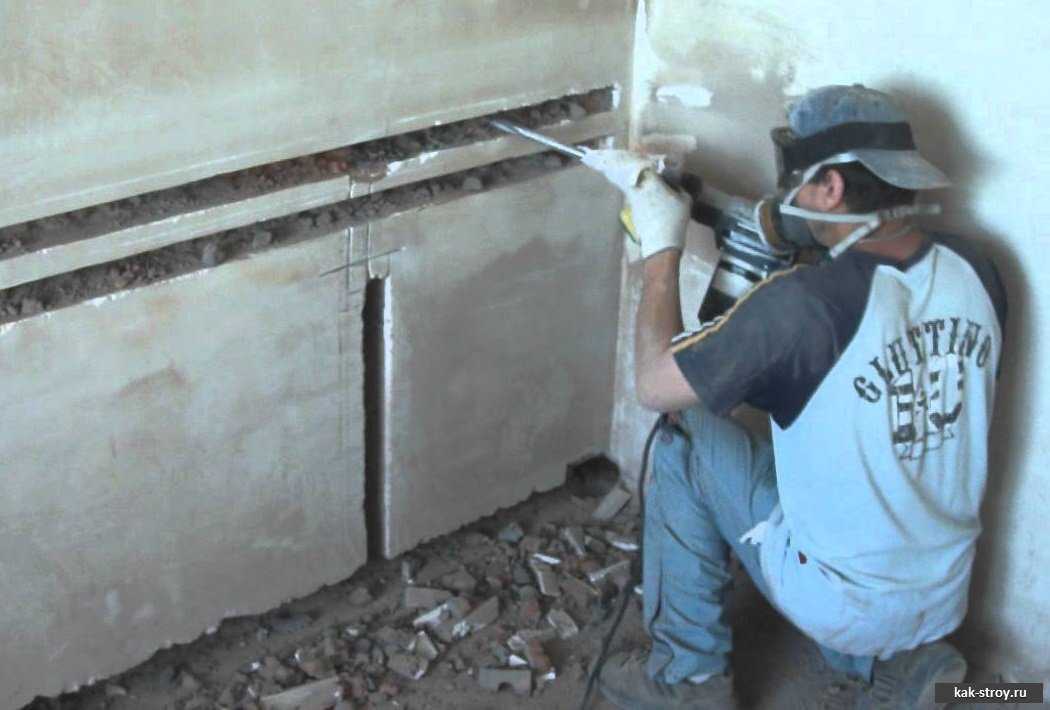
- Perforator. This tool is usually used at the final stage - between two laid grooves, the material is removed either with a chisel or a perforator with a shovel. You can, of course, immediately break off pieces of the wall along the outlined line, but the groove will turn out to be a curve. If it doesn't scare you, you can work like this.

First, parallel grooves are made, then the middle is removed
- Drill. This is not the best way, but better than chiseling by hand with a chisel. Along the marked line, a row of large-diameter holes is drilled close to each other. Great depth is not required here - no more than 20 mm, so it does not take much time. The resulting chain of holes is turned into a groove using a perforator or chisel and hammer.

These are all the methods that are used to slit walls for wiring in concrete or brick walls. If it is necessary to make grooves in wood or foam concrete, there are certain differences.
How to make grooves in wood
In principle, you can work with all the tools described above, except for the punch. The main difference is that chisels are used instead of chisels, but the very essence of the work remains the same. First, two parallel cuts are made, and the wood between them is removed with a chisel. But besides these tools, there are several more specific ones:
- A circular saw. With a sufficient level of proficiency with this tool, a strobe in a wooden wall can only be made with a circular - in two or three passes, gradually expanding the cut to the required size.
- Fraser. You can also make a neat strobe with a hand router. To do this, you can fix a flat bar on the wall as a guide and make a recess along it, which is then expanded to the required size. (You can read about working with a hand router here.) There is even a special cutter (in the photo on the left), but you can also work with the usual one to form a groove or a side one (on the right, but it is not very convenient for it to work in this case).
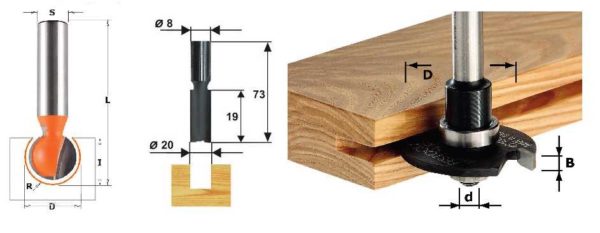
Chisels for chipping in wooden walls

So there are more opportunities for chipping in wood. In this case, if there is one of these tools, it is better to work with it - they are designed for wood and are most convenient.
How to make grooves for wiring in aerated concrete
When laying walls made of aerated concrete or foam concrete, they have to be reinforced. The fittings are placed in the cut grooves - grooves. For this, there is a special aerated concrete strobroez. It is a metal pipe with a handle and a ledge at the other end.
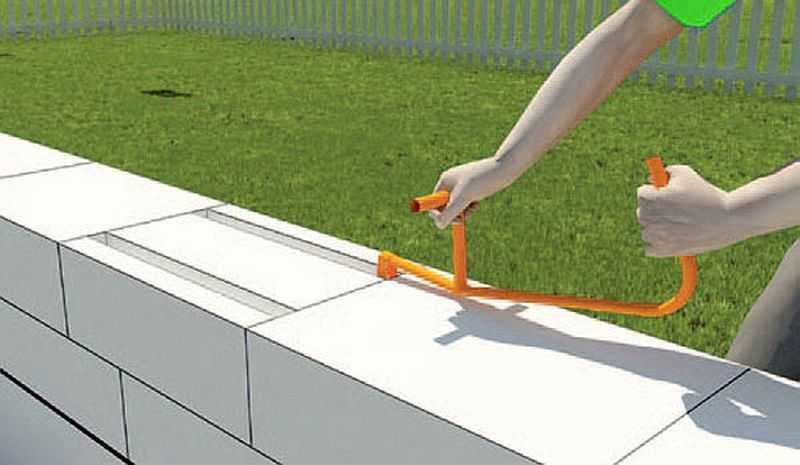
Wall chaser for gas blocks
The process is very simple - you need to pull the tool, pressing it to the surface. Foam-aerated concrete is easy to process, so there are no difficulties. You can, of course, use a circular or angle grinder, but there will be many times more dust, which does not please the room.
Slitting brick walls
If we are talking about laying wiring in a house where finishing work has not yet been carried out, then usually no strobe is made on brick walls. A flat cable with conductors of the required section is fixed on top of the wall, which is then covered with plaster. It is usually at least 3 cm thick, which is more than enough for 3 * 2.5 or 3 * 4 cables. Large ones are rarely used anyway.
Stakes in brick are easier to make
If, for some reason, this option does not suit you or you want to lay cables in a corrugated hose, the walls for wiring are channeled in exactly the same way with the same tools as for concrete. The only difference is that the brick is cut easier and faster.
Is it possible to gouge load-bearing walls
In theory, when repairing electrical wiring in an apartment, it is necessary to order a project. When developing it, the presence and location of load-bearing walls, and the possibility of laying a shtab in them, are taken into account. As a result, a plan is issued, which indicates exactly where and what should be laid, what width and depth each groove should be. It remains only to do everything exactly.
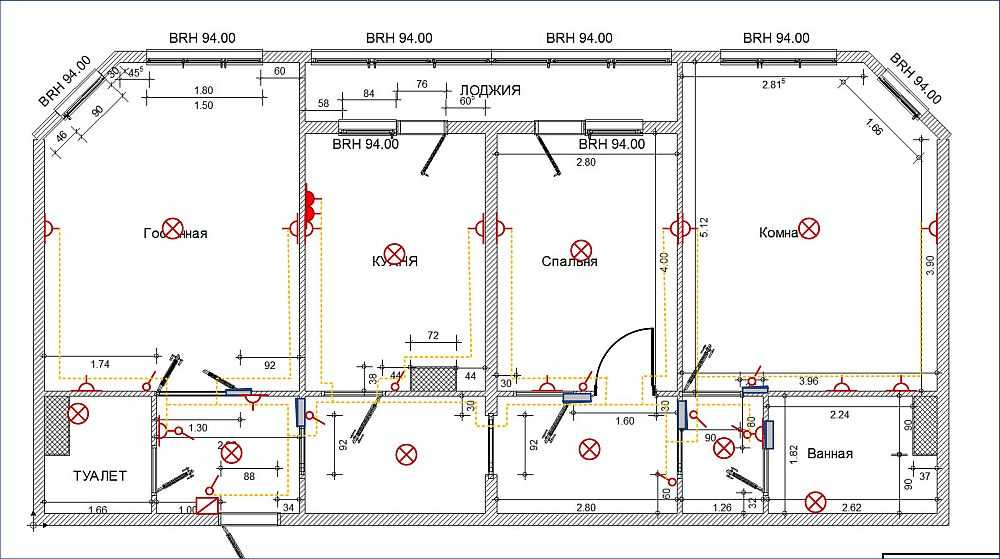
According to the finished project, it is safe to do wall chasing for wiring
If you are worried about not damaging the load-bearing walls during work, apply for a permit with the UK. They have to pick up the papers and see how big the safety margin is in your home. Most likely, permission will be given.
But so few people do. Basically, they draw a plan (if they do), then they transfer it to the walls, and work begins. If the chasing of the walls for wiring is carried out in this order, grooves of more than 20 mm depth and width are not made in the load-bearing walls, and they just hope that nothing will be damaged.
Slitting walls for wiring: order and safety
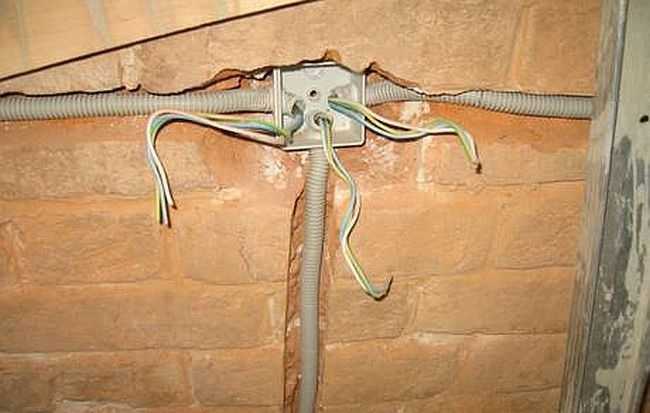
Since the wiring must be carried out according to certain rules (described above), then first you should draw a plan, think over the placement of all sockets, switches. It is advisable to draw the plan to scale, this can be done in special programs for drawing diagrams, but you can - on paper. Then the points are transferred to the walls where sockets, switches, chandeliers, sconces, junction boxes are installed. After that, they are connected into a single system by a system of lines, along which strobes are then laid. After that, using detector wiring check if there is already existing wiring under the laid routes (if you are doing repairs), make adjustments if necessary. Only after this does the wall chasing for wiring actually begin.
First, you can use a drill and a special nozzle - a crown of a suitable diameter - to drill holes for the installation of subprojectors and mounting boxes. Then you can start chipping.
But it is worth remembering that making grooves for wiring in walls made of brick, concrete, wood is dusty and noisy. Therefore, it is necessary to work during the hours allotted for noisy work - during the day, on weekdays, with a break for lunch - small children can rest.

It is necessary to gouge walls in a respirator and protective clothing
Before starting work in a particular room, it is advisable to hang the entrance with a wet cloth - less dust will fly. You need to work in a respirator and goggles, or better, put on a protective shield that covers your entire face (but do not refuse a respirator). It is also worth putting on tight clothes that cover your arms and legs - during work, particles of wall material fly off, and the smallest ones quite noticeably cut the skin, and eyes can seriously damage.
These are the basic safety rules for chipping walls for wiring, but do not forget about the rules for working with power tools, especially such as angle grinders and hand-held circular saws.
Another tip: after you have spread the wiring, carefully measure all the distances and plot them on the plan. It will be useful to you during repairs or if you need to nail / hang something in those places where the wiring can pass.