How to make a water-heated floor
In rooms heated using underfloor heating technology, the sensations are much more comfortable than with a traditional radiator system. When the floor is heated, the temperature will be distributed in an optimal way: it is warmer for the legs, and it is already cooler at head level. There are two heating methods: water and electric. Water is more expensive to install, but cheaper to operate, so that it is more often done. You can slightly reduce installation costs if you make a water-heated floor with your own hands. The technology is not the simplest one, but it does not require encyclopedic knowledge either.
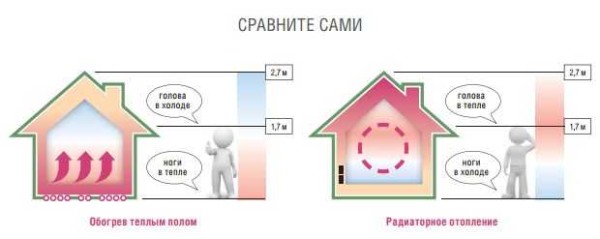
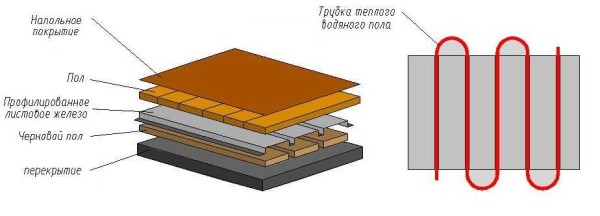
Distribution of heat fluxes for different heating systems
The content of the article
Device and principle of operation
For water heating of the warm floor, a system of pipes is used through which the coolant circulates. Most often, pipes are poured into a screed, but there are dry installation systems - wood or polystyrene. In any case, there is a large number of small cross-section pipes laid under the floor covering.
Where can you mount
Due to the large number of pipes, water heating is done mainly in private houses. The fact is that the heating system of high-rise buildings of early construction is not designed for this heating method. It is possible to make a warm floor from heating, but there is a high probability that either it will be too cold for you, or with the neighbors above or below, depending on the type of power supply to the system. Sometimes the entire riser becomes cold: the hydraulic resistance of the water floor is several times higher than that of the radiator heating system and it can clog the movement of the coolant. For this reason, it is very difficult to obtain permission from the management company to install a warm floor (installation without permission is an administrative offense).
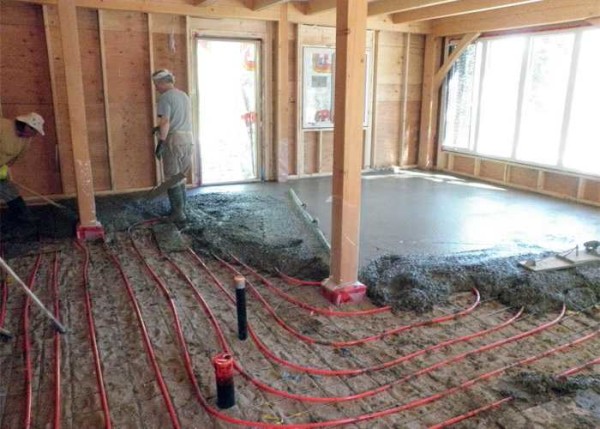
Underfloor heating implies a large number of small diameter pipes
The good news is that in new buildings they began to make two systems: one for radiator heating, the second for a water-heated floor. In such houses and permission is not required: the corresponding system was developed taking into account the higher hydraulic resistance.
Organization principles
In order to understand what you need in order to make a water-heated floor with your own hands, you need to understand what the system consists of and how it works.
Heating medium temperature control
To make your feet comfortable on the floor, the temperature of the coolant should not exceed 40-45 ° C. Then the floor heats up to comfortable values - about 28 ° C. Most of the heating equipment cannot produce such a temperature: at least 60-65 ° C. An exception is condensing gas boilers. They show maximum efficiency precisely at low temperatures. From their outlet, the heated coolant can be fed directly into the pipes of the underfloor heating.
When using any other type of boiler, a mixing unit is required. In it, the cooled coolant from the return pipe is added to the hot water from the boiler. You can see the composition of this bond on the connection diagram of the warm floor to the boiler.
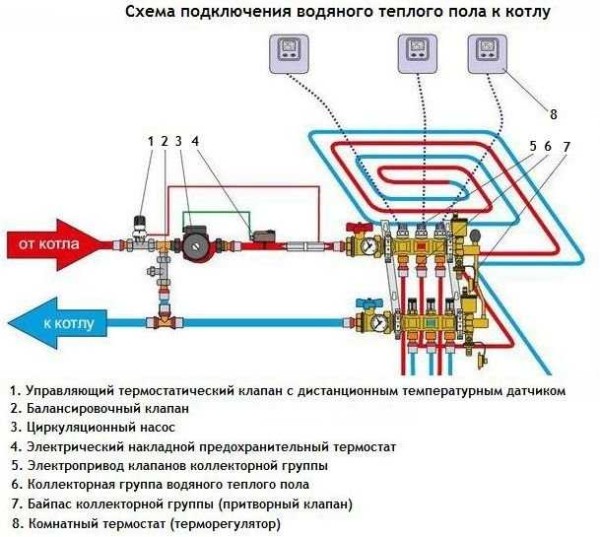
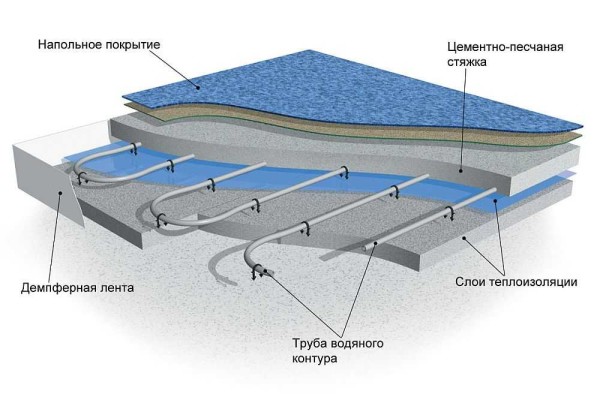
Diagram of a water-heated floor
The principle of operation is as follows. The heated coolant is supplied from the boiler. It goes to the thermostatic valve, which, when the temperature threshold is exceeded, opens the water admixture from the return pipe. There is a jumper in front of the circulation pump in the photo. A two-way or three-way valve is installed in it. Opening it and mix in the cooled coolant.
The mixed flow through the circulation pump enters the thermostat, which controls the operation of the thermostatic valve. When the set temperature is reached, the flow from the return flow stops, if it is exceeded, it opens again. This is how the temperature of the coolant of the water heated floor is regulated.
Contour distribution
Then the coolant enters the distribution manifold. If a water heat-insulated floor is made in one small room (bathroom, for example), in which only one loop of pipes is laid, this unit may not exist. If there are several loops, then between them it is necessary to distribute the coolant in some way, and then somehow collect it and send it to the return pipeline. This task is performed by the distribution comb or, as it is also called, the underfloor heating collector. In fact, these are two pipes - on the supply and return, to which the inputs and outputs of all underfloor heating circuits are connected. This is the easiest option.
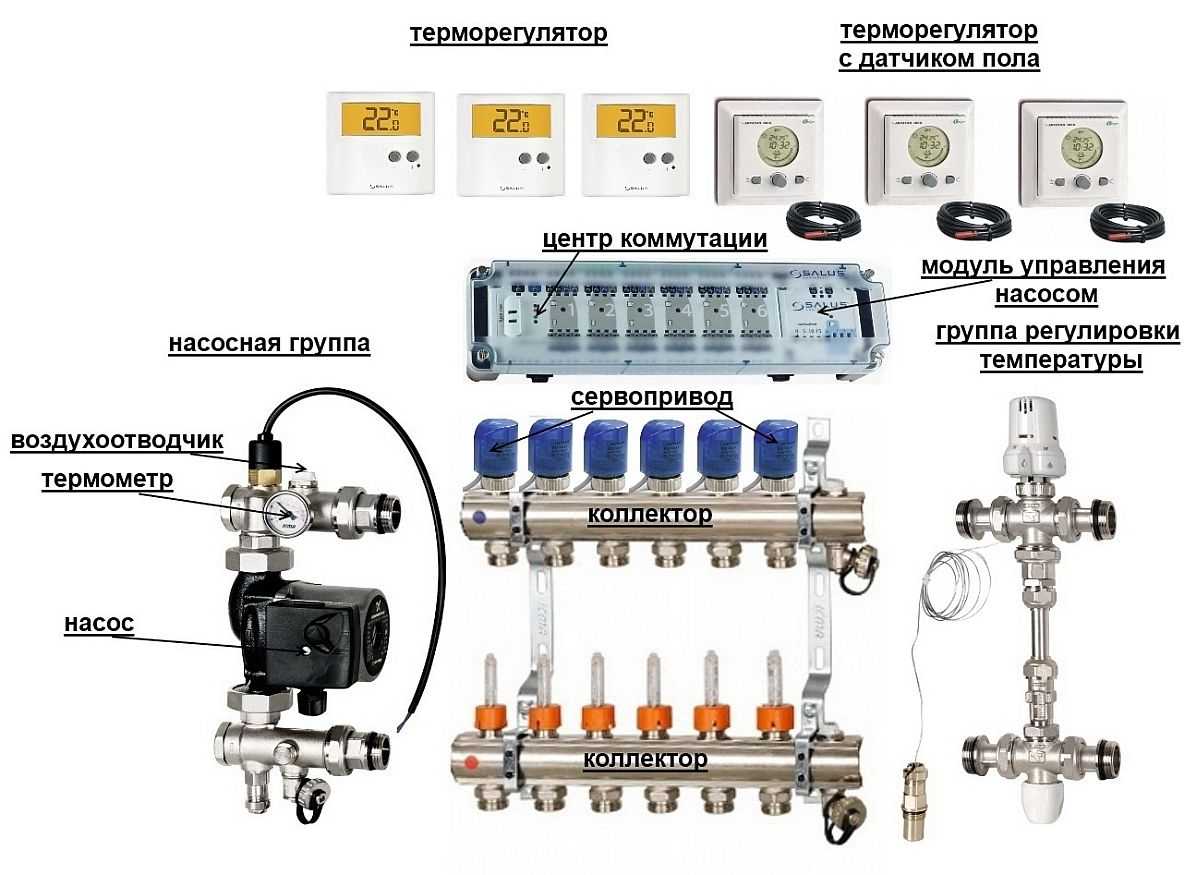
Mixing unit for underfloor heating with automatic temperature maintenance
If the underfloor heating is made in several rooms, then it is better to install a collector with the ability to adjust the temperature. Firstly, different rooms require different temperatures: someone prefers + 18 ° C in the bedroom, someone needs + 25 ° C. Secondly, most often, the circuits have different lengths, and different amounts of heat can transfer. Thirdly, there are “internal” premises - in which one wall faces the street, and there are corner ones - with two or even three external walls. Naturally, the amount of heat in them should be different. Combs with thermostats provide this. The equipment is not cheap, the circuit is more complicated, but such an installation allows you to maintain a given temperature in the room.
There are different thermostats. Some control the room temperature, the second - the floor temperature. You choose the type yourself. Regardless of this, they control the servo motors mounted on the feed comb. The servomotors, depending on the command, increase or decrease the flow area, adjusting the flow rate of the coolant.
Theoretically (and practically it happens) situations may arise when the supply to all circuits is blocked. In this case, circulation will stop, the boiler may boil and fail. To prevent this from happening, be sure to make a bypass through which part of the coolant passes. With this construction of the system, the boiler is safe.
You can watch one of the system options in the video.
Laying a warm water floor
One of the key components of the system is pipes and their fixing system. There are two technologies:
- Dry - polystyrene and wood. Metal strips with molded pipe-laying channels are laid on the system of expanded polystyrene mats or wooden plates. They are needed to distribute heat more evenly. The pipes are inserted into the recesses. Rigid material is laid on top - plywood, OSB, gypsum board, etc. A soft flooring can be laid on this base. Laying of tiles on tile adhesive, parquet or laminate is possible.
Wooden water floor heating system
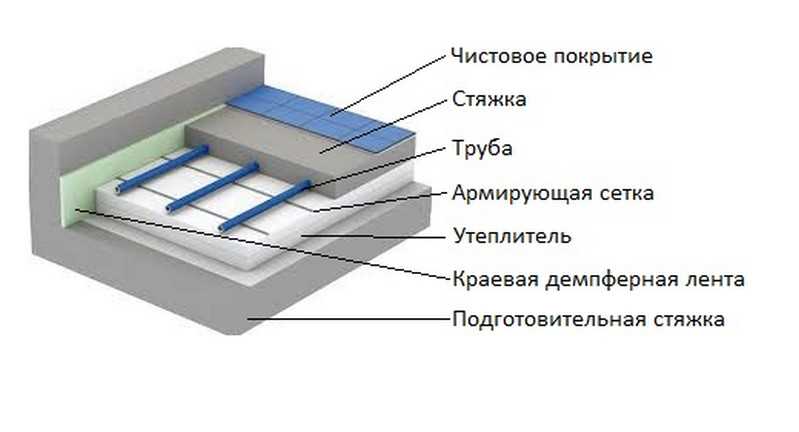
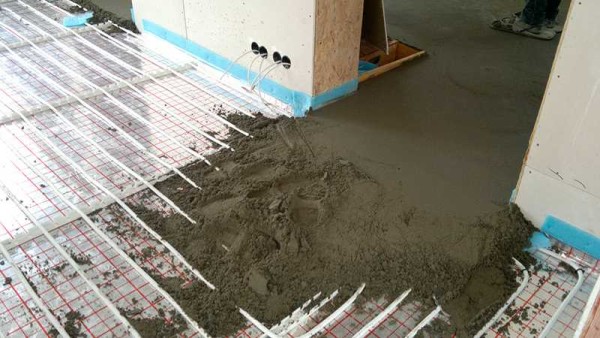
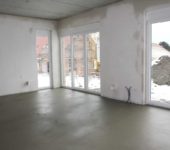
- Screed-laying or so-called "wet" technology. Consists of several layers: insulation, fixing system (tape or mesh), pipes, screed. On top of this "pie", after the screed has set, the floor covering is already laid. If necessary, a layer of waterproofing is laid under the insulation so as not to flood the neighbors. There may also be a reinforcing mesh that is laid over the floor heating pipes. It redistributes the load to prevent damage to the system. An obligatory element of the system is a damping tape, which is rolled out along the perimeter of the room and laid at the junction of two circuits.
Water heat-insulated floor in screed
Both systems are not ideal, but screed pipes are cheaper.Although it has a lot of disadvantages, it is it that is more popular due to its lower cost.
Which system to choose
In terms of cost, dry systems are more expensive: their components (if you take ready-made, factory-made) cost more. But they weigh much less and are quicker to put into service. There are several reasons why you should use them.
First: the heavy weight of the screed. Not all foundations and floors of houses are able to withstand the load created by a water-heated floor in a concrete screed. Above the surface of the pipes there must be a layer of concrete of at least 3 cm. Considering that the outer diameter of the pipe is also about 3 cm, then the total thickness of the screed is 6 cm. The weight is more than significant. And on top there is often a tile on a layer of glue. It's good if the foundation is designed with a margin - it will withstand, and if not, problems will begin. If there is a suspicion that the floor or foundation will not bear the load, it is better to make a wooden or polystyrene system.
Second: low maintainability of the screed system. Although it is recommended to lay only one-piece coils of pipes without connections when laying underfloor heating contours, the pipes are periodically damaged. Or, during the repair, they hit with a drill, or burst due to a marriage. The place of damage can be determined by a wet spot, but it is difficult to repair: you have to break the screed. In this case, adjacent hinges can be damaged, due to which the damage zone becomes larger. Even if it was possible to do it carefully, you have to make two seams, namely, they are potential places for the next damage.
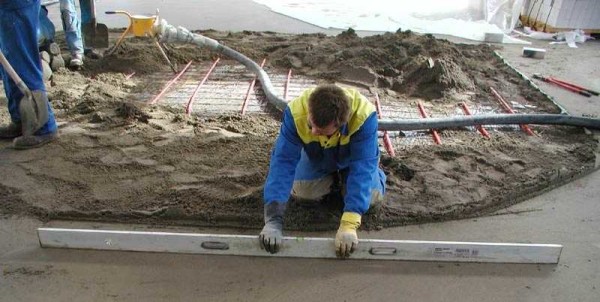
The process of installing a water-heated floor
Third: the commissioning of a heated floor in a screed is possible only after the concrete has gained 100% strength resource. This takes at least 28 days. Until this time, you cannot turn on the warm floor.
Fourth, you have a wooden floor. By itself, it is heavy on a wooden floor - not the best idea, but also a screed with a high temperature. The wood will quickly collapse, the entire system will collapse.
The reasons are serious. Therefore, in some cases, it is more expedient to use dry technologies. Moreover, a wooden water-heated floor with your own hands is not that expensive. The most expensive component is metal plates, but they can also be made from thin sheet metal and better aluminum. It is important to be able to bend, forming pipe grooves.
A variant of a polystyrene floor heating system without a screed is demonstrated in the video.
Materials for warm water floor
Most often they make a water-heated floor in a screed. Its structure and necessary materials will be discussed. A diagram of a warm water floor is shown in the photo below.
Scheme of a warm water floor with a screed
All work begins with leveling the base: without insulation, heating costs will be too high, and insulation can only be laid on a flat surface. Therefore, the first thing to do is prepare the base - make a rough screed. Next, we describe step by step the order of work and the materials used in the process:
- A damper tape is also rolled along the perimeter of the room. This is a strip of heat-insulating material, no more than 1 cm thick. It prevents heat loss for heating walls. Its second task is to compensate for the thermal expansion that occurs when materials are heated. The tape can be special, and you can also lay thin foam cut into strips (no more than 1 cm thick) or other insulation of the same thickness.
- A layer of heat-insulating materials is laid on the rough screed. For underfloor heating, the best choice is polystyrene foam. Best of all - extruded. Its density must be at least 35kg / m2... It is dense enough to withstand the weight of the screed and operational loads, has excellent performance and a long service life. Its disadvantage is that it is expensive. Other, cheaper materials (polystyrene, mineral wool, expanded clay) have a lot of disadvantages. If possible, use expanded polystyrene.The thickness of the insulation depends on many parameters - on the region, the characteristics of the foundation material and insulation, the method of organizing the subfloor. Therefore, it must be calculated in relation to each case.
- Next, they often put a reinforcing mesh with a step of 5 cm. Pipes are also tied to it - with wire or plastic clamps. If you used expanded polystyrene, you can do without reinforcement - you can fix it with special plastic brackets that are driven into the material. For other heaters, a reinforcing mesh is required.
- Beacons are installed on top, after which the screed is poured. Its thickness is less than 3 cm above the level of the pipes.
- Next, the finishing flooring is laid. Anything suitable for use in a heated floor system.
These are all the main layers that need to be laid when you make a water-heated floor with your own hands.
Underfloor heating pipes and laying patterns
The main element of the system is pipes. Most often they use polymeric ones - from cross-linked polyethylene or metal-plastic. They bend well and have a long service life. Their only obvious drawback is not too high thermal conductivity. The recently appeared corrugated stainless steel pipes do not have this minus. They bend better, cost no more, but due to their low popularity, they are not often used.
The diameter of pipes for underfloor heating depends on the material, but usually it is 16-20 mm. They fit in several schemes. The most common are a spiral and a snake, there are several modifications that take into account some of the features of the premises.
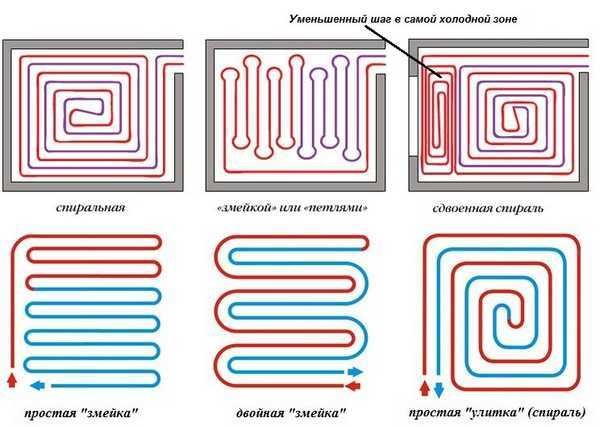
Schemes for laying pipes for a warm water floor
Laying with a snake is the simplest, but passing through the pipes the coolant gradually cools down and it reaches the end of the circuit that is much colder than it was at the beginning. Therefore, the zone where the coolant enters will be the warmest. This feature is used - the installation starts from the coldest zone - along the outer walls or under the window.
This drawback is almost devoid of a double snake and a spiral, but they are more difficult to install - you need to draw a diagram on paper so as not to get confused when laying.
Screed
You can use a conventional cement-sand mortar based on Portland cement for pouring a water-heated floor. The Portland cement brand should be high - M-400, or better M-500. Concrete grade - not lower than M-350.
Semi-dry screed for underfloor heating
But ordinary "wet" screeds take a very long time to gain their design strength: at least 28 days. All this time, you cannot turn on the warm floor: cracks will go, which can even break pipes. Therefore, more and more so-called semi-dry screeds are used - with additives that increase the plasticity of the solution, significantly reducing the amount of water and the time for "ripening". You can add them yourself or look for dry mixes with appropriate properties. They cost more, but there are less troubles with them: according to the instructions, add the required amount of water and mix.
It is possible to make a water-heated floor with your own hands, but it will take a decent period of time and considerable funds.


A water-heated floor is good in all respects. The only drawback is that you cannot make it in an apartment with central heating. Conclusion - the topic is relevant for private houses, and the apartment has an electric warm floor.
Why don't you do it? Place the multibox and play it!
need to make water floors