Greenhouses for summer cottages and vegetable gardens: structures, materials
In the country and in the garden, you cannot do without a greenhouse and a greenhouse in all regions: in the north, the summer is too cool and short, so you have to lengthen it. And in more southern regions, then grow seedlings, then get early / late vegetables, berries. Therefore, these structures are popular: the costs are not very large, but there are many benefits. Moreover, greenhouses and greenhouses with your own hands can be built of any design, from any material, for any task.
Let's make a reservation right away how a greenhouse differs from a greenhouse. The greenhouse is served outside. It is small in size and cannot be entered. A greenhouse is already a more solid structure in which you can stand at full height and work. The plants in it are served from the inside. That is, in fact, the whole difference.
The content of the article
- 1 Constructions of greenhouses and greenhouses
- 2 What to cover
- 3 How to quickly build a greenhouse with arcs (with photo explanations)
- 4 Greenhouse arches from profiles
- 5 Video on how to make arcs for a greenhouse with wood polycarbonate
- 6 Economical greenhouse with heating
Constructions of greenhouses and greenhouses
Despite the obvious difference in size, the structures are the same. There are several main ones, as well as many combinations and modifications.
The main design differences are in the shape of the roof. There are three of them:
- arcuate;
- single slope;
- gable.

Constructions of greenhouses and greenhouses
What is the frame for greenhouses and greenhouses made of?
The choice of materials is wide, and they are often combined. So, the frame of a greenhouse or greenhouse is made from:
- wood (timber or boards);
- metal:
- round and square pipes;
- corner;
- galvanized metal profiles;
- fittings.
- plastic:
- PVC;
- HDPE;
- metal-plastic;
- PPR - polypropylene foam.
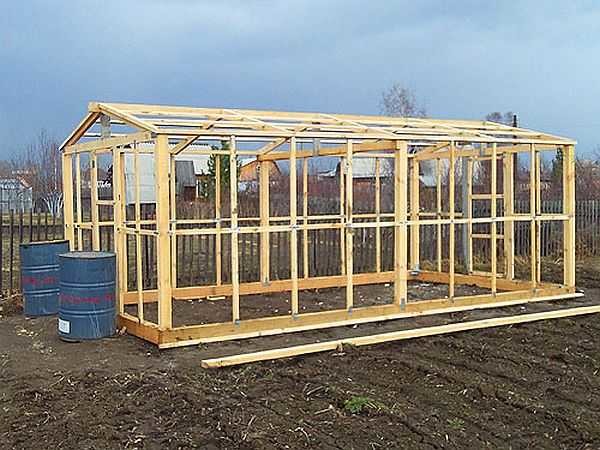
Timber-framed greenhouses are usually built as a house.
Probably everyone knows about the advantages and disadvantages of metal and wood. But what are good and bad plastics, probably, few. Plastics are good because they bend well, their outer surface is initially smooth and does not require processing, it does not tear the covering material. Plastic pipes are round, there are square ones, their wall is thick and strong enough to hold self-tapping screws. Their main advantage: they are chemically neutral, do not bloom, do not rust, do not rot. Another of their properties is lightness. With regard to building greenhouses, this is both an advantage and a disadvantage. On the one hand, the design is lightweight, it is easy to assemble and disassemble. But in strong winds, lightness is already a disadvantage. It is neutralized with a good base to which the frame is securely attached.
What to cover
The main covering material for greenhouses and greenhouses is a film. It is used on both small and solid structures. For year-round use, glass was previously used, but its high price and fragility led to the fact that it is used very rarely - an expensive shelter is obtained. And the large weight of the glazing requires a solid frame.
There are two new items. The more familiar polycarbonate used for gazebos and canopies, and relatively new - spunbond non-woven covering material.
Now about all in more detail.
Film for greenhouses and greenhouses
It is produced from different polymers and has different thicknesses. The most common are polyethylene, polyvinyl chloride. There are also reinforced ones.
Polyethylene films are the cheapest, but also the most short-lived. Even with the most careful attitude, they do not serve for more than a year: they become fragile under the influence of ultraviolet radiation, and finish off their cold. However, they are more often bought: cheap.
Available in sleeves. By cutting it on one side, we get double the width. It is not worth using uncut film: the service life will remain the same, and the consumption is exactly twice as much. There is only one peculiarity: the film breaks quickly along the fold. Then it is difficult and almost useless to glue it over: the adhesive tape sticks very badly on a dusty surface. Therefore, this fold is glued with tape before use. It turns out reliably.
Thickness and types
The optimum thickness of the polyethylene film for summer cottages and greenhouses is 150 microns. Taking a thicker one - all the same, its service life is one season, and characteristics and 150 will be enough.

Perennial films have different colors
When choosing a multi-year film, be sure to check its service life. It can be from two seasons to 3 years old. Note. If 2 seasons are written, this means that it needs to be removed for the winter. If 2 years old, then this is a film for year-round use. Sellers often manipulate these concepts, saying that two seasons are two years.
See photo reports on building greenhouses with your own hands here.
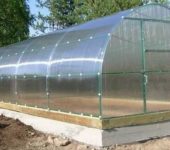
Polycarbonate
This cellular material has many advantages: it is light, transmits light well, retains heat, bends, and is easy to assemble. The disadvantage is the relatively high cost. Nevertheless, if the greenhouse is operated for more than one year, such investments will pay off: even without additional heating, the growing season increases significantly.
But polycarbonate is different in structure and thickness. The most commonly used types in the construction of greenhouses are in the table.
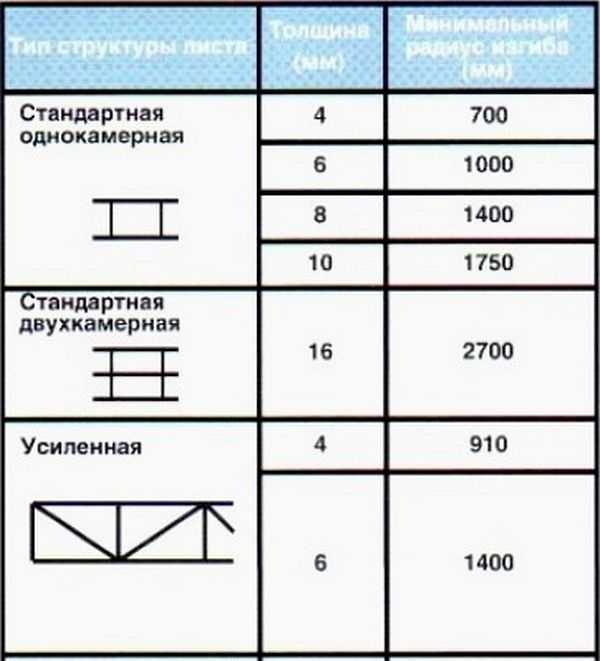
The structure of polycarbonate and its thickness
For normal conditions (average snow load and wind), single-chamber sheets are used to cover greenhouses. For regions with a lot of snow, it makes sense to take reinforced ones.
The optimum sheet thickness is 6 mm or 8 mm. You should not take less: the sheets are too fragile and their characteristics are not very good (see the table). 4mm thick polycarbonate can be placed on small greenhouses... It will not withstand heavy loads.

Characteristics of polycarbonate of different thickness
Polycarbonate still needs to be properly fastened: the cells must be oriented from top to bottom, open edges must be sealed with special tape or tape, fastened with special thermal washers or bolts with a large metal washer, under which a rubber or plastic lining must be placed.
Spunbond
This is more than one material for a long time. There are many brands: Agril, Lutrasil, Spantex, Agrospan, AgroSUF, etc. It's just that Spunbond appeared first and now all similar materials are called that way, as well as "non-woven covering material" or "agrofiber". It is a non-woven polypropylene fiber that has unique characteristics: it allows air, light and moisture to pass through, while saving plants from overheating or freezing. Feedback from the practitioner on the use of this material in the video.
Agrofibre is characterized by its density. The lowest - 17 kg / m3, the largest - 60 kg / m3... For seasonal greenhouses and greenhouses from spring to autumn, the optimal density is 30-40 kg / m3, for winter ones already 60 kg / m are needed3.
About, read how to organize drip irrigation here.
How to quickly build a greenhouse with arcs (with photo explanations)
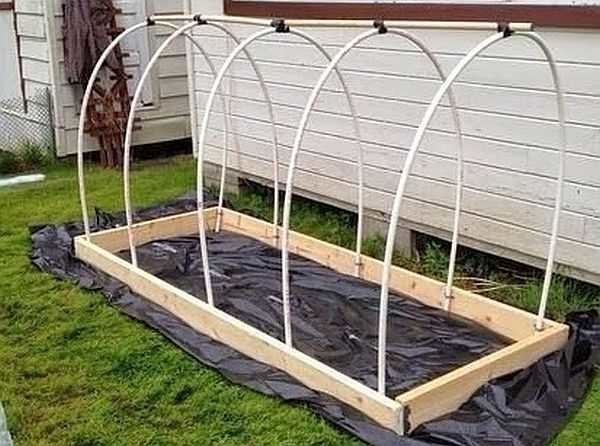
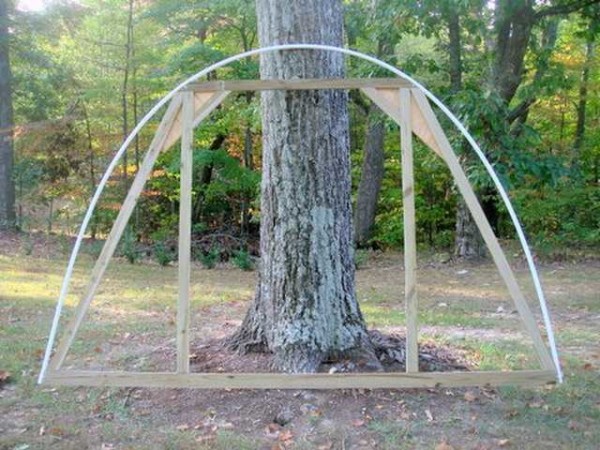
As a rule, the first greenhouse in the country or in the garden is made from inexpensive materials: you need to try what it is and evaluate how profitable the idea is. Hence the requirements: a simple, pre-fabricated structure from inexpensive, affordable materials. These requirements are fully met by frame greenhouses with arches made of PVC pipes (HDPE can also be used).
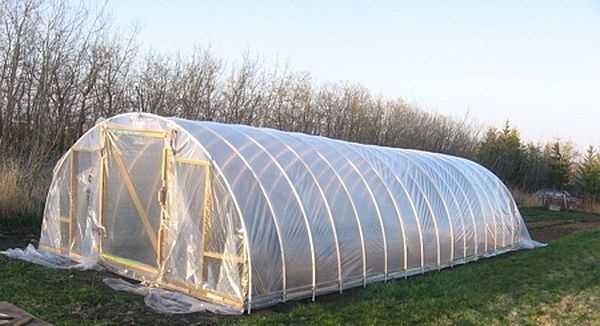
This greenhouse on arches made of PVC pipes is assembled by one person with his own hands in 3-4 hours
Materials
Such a greenhouse, as in the photo above, can be made in a few hours. You will need the following material:
- Base board, size not less than 75 * 40 mm, length depends on the size of your greenhouse. A frame is knocked down from a bar, which lies along the perimeter of the greenhouse. If the greenhouse is 6 * 3 meters, then the timber needs 18 meters, if 8 * 3 m, then 24 meters, etc.
- Board with a section of 50 * 20 mm for the organization of the front door.
- PVC pipes with a wall thickness of at least 2 mm. The length depends on the size of the greenhouse. If you are going to build a greenhouse, then at the top point its height should be at least 2.2 meters. Then you can work inside without difficulty.
- Rebar with a diameter of 14-16 mm. It should be slightly smaller than the inner diameter of PVC pipes.
- Covering material - film or agrofiber. Others will not work for this design.
- Perforated metal tape.
- Wood screws.
Before use, treat wood with anti-rot and insect repellent. If there are pieces of bark somewhere, you need to get rid of them. It is there that most of the larvae are. If there are any factory impregnations, you can use them. If you have used engine oil, it will do. If not, you can burn the wood with a blowtorch. This method is not reliable, but even this kind of processing is better than none.
Tools for work
To make a greenhouse for a summer residence with your own hands, you will need a tool:
- hammer, nails;
- saw on wood;
- grinder with a disc for metal;
- sledgehammer or heavy hammer (hammer in the reinforcement);
- screwdriver.
We build a greenhouse from polypropylene pipes (photo report)
First of all, the site is marked, then the site is leveled. It is leveled under the level. Then the actual construction of the seasonal greenhouse begins.
Preparatory work
A rectangle is knocked out of a wide board, which outlines the border of the greenhouse. If you know how, the bar can be connected in a paw, if not, just knock it through with a hammer and long nails (at least 10 cm). Strengthen the uly with metal plates or corners. We check the basis. To find out how smooth you get it, measure the diagonals. If they are equal, great. No - align. After that, we fix the base - in the inner corners we drive in the reinforcement rods. They will hold the base in place.
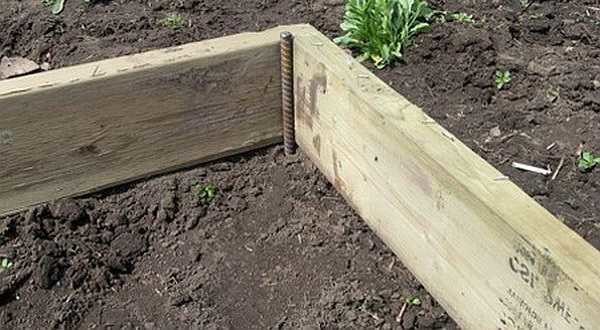
These rods prevent the greenhouse base from moving.
The armature is cut into pieces about 80 cm long. They are installed every 50 cm on both long sides of the greenhouse. 40 cm is driven into the ground and the same amount remains to stick out. The rods of opposite sides must stand strictly one opposite the other, otherwise the greenhouse will be skewed.
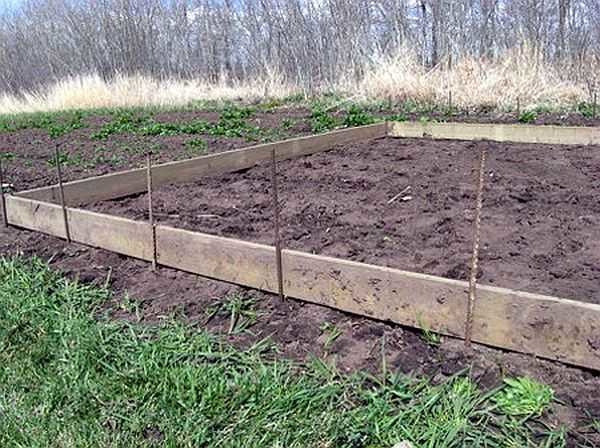
Pieces of reinforcement are driven in on both long sides
Putting on arcs
On one side of the reinforcement we put on a cut piece of polypropylene pipe, bend it and put it on the same bar from the opposite side. This is the first arc. We do the same with everyone else. We get arcs installed every 50 cm. This is a greenhouse frame made of polypropylene pipes.
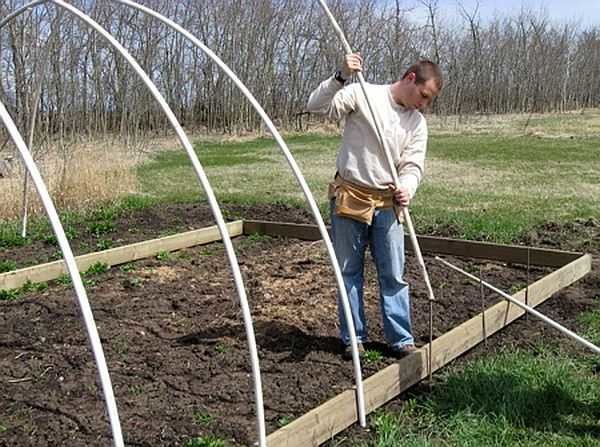
Pieces of PVC pipes are put on the fittings
Now the pipes must be fixed. Otherwise, they will be removed as easily as we put them.
We take a perforated metal tape, a screwdriver, wood screws. Cut off a piece of tape, attach it on one side to the frame near the pipe, then on the other. You can screw in one more - two self-tapping screws closer to the pipe so that the arc is held securely. To make the fastening stronger, it is better to take the reinforcement corrugated rather than smooth, you can also fix the PP pipe twice: almost at the ground and closer to the upper edge of the frame.
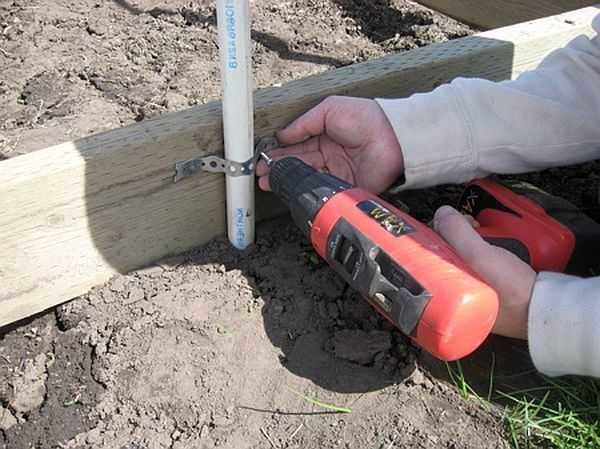
The pipe is attached to the base beam using a perforated metal tape
Now you need to connect all the arcs with longitudinal pipes. They will add rigidity to the structure. If the greenhouse is small, only one longitudinal rib is sufficient. But it is more convenient when they are also on the sidewalls.
A long piece of PVC pipe or a small section bar is tied at the top in the middle of the vault. It is attached with a plastic clamp to each arch.It will give the structure additional rigidity.
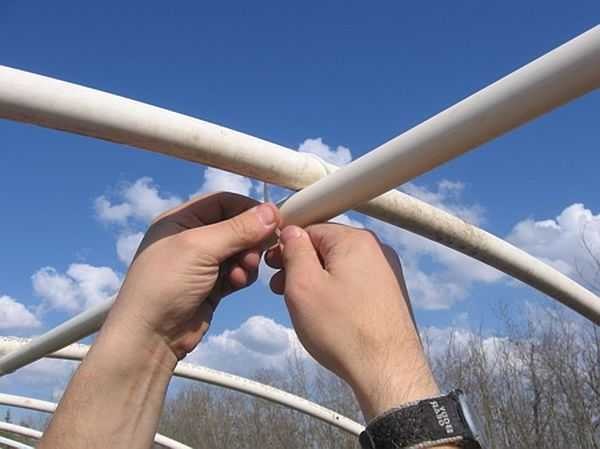
Plastic clamps - universal fasteners
Making doors
A doorway is made of a board narrower in the middle of the first arch. Its height and width depend on how tall your greenhouse is. But the width of the door should not be less than 80 cm: it will be inconvenient to walk.
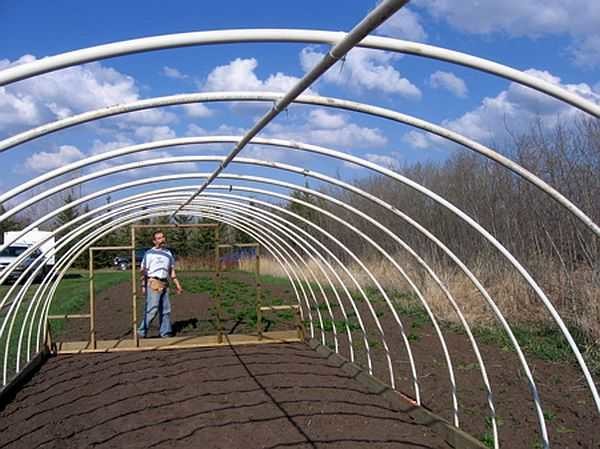
And this is what has already happened: the greenhouse is almost ready
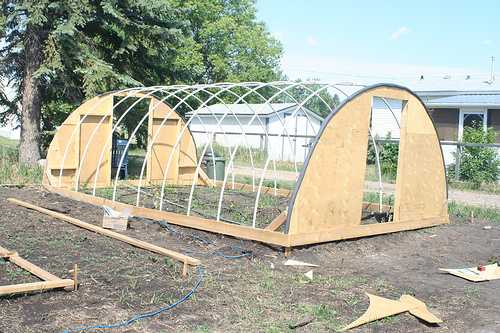
Now it's up to the little: choose what, cover the greenhouse. PVC pipes will be able to carry film (either) or non-woven material (or both). After the material is fixed, you can consider making a greenhouse with your own hands finished: you can plant seedlings. The height is sufficient to grow even tall varieties of tomatoes or cucumbers, and supports for tying can be easily made.
Greenhouse using the same technology
It is interesting that it is easy to build a greenhouse using the same technology. Only its dimensions will be smaller (the reinforcement can be thinner, its pieces are smaller), and the whole technology is similar.
A greenhouse made of PVC pipes according to the same technology with small changes: since it is small, the pipes are nailed directly to the wooden frame. And the upper pipe is also on top and is tied with electrical tape (you can replace it with tape).
The Snowdrop greenhouse has also been practically built. The only difference is that the covering material is stitched in it, drawstrings are made in it, into which PVC pipes are threaded. After they are installed in the required places of the agrofibre, they are stuck into the ground. How is such a greenhouse convenient? The fact that the shelter can be moved along the arch, opening or closing plants as needed.
About others types and types of greenhouses read here.
Improvements
Most of the questions arise when organizing the entrance: it turns out the most problematic part. Here are two options for solving it:
- Use thin plywood and timber frame.
The result is a lightweight yet reliable design
- Sheathe everything with plywood, and so that its edges do not tear the film, it is upholstered with felt, thin foam rubber, or just a strip of soft fabric.
How else to make an entrance to an arched greenhouse
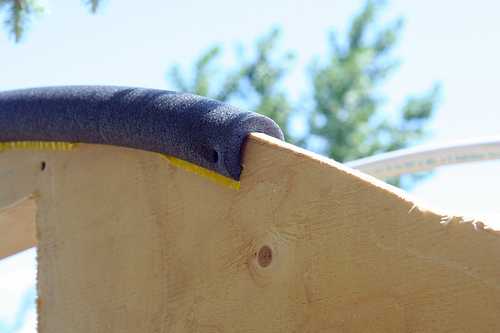
So that the edges of the plywood do not tear the film, they are knitted with something soft
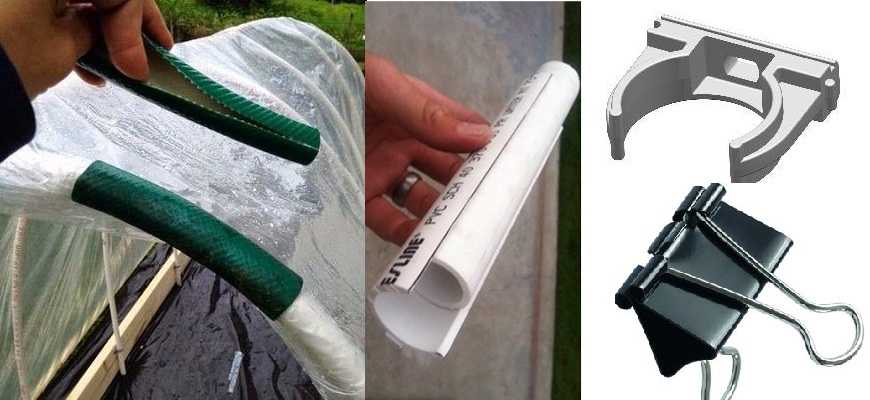
How to attach a film to pipes
Why are PVC pipe arcs good? They are smooth, film and spunbond does not tear on them. But how to attach the film to them? You cannot hammer a nail into them, you can screw a self-tapping screw, but only into one lying on the ground. In the frame, it "plays" and the screw is not screwed into it. There are special plastic clamps for fastening the film. They are put on top of the film, cover part of the pipe.
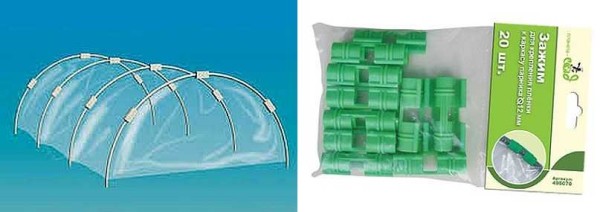
Special clips for plastic greenhouses for fixing on arches
From a hose, plastic pipe, other materials at hand
Such clamps can be made from scrap materials. For small arc greenhouses, a piece of old hose cut lengthwise is suitable. For greenhouses, its rigidity may not be enough: the windage is greater. Then the clamp can be made from a piece of the same plastic pipe. It is also cut lengthwise, but you will have to cut off some part of the width: PVC, and HDPE are still quite tough, and you just can't unfold them. You determine which part of the pipe to cut out empirically, then process the edges with emery: so that they do not tear the film.
Clamps for pipes, which are used when installing pipelines in houses, do a good job of holding the film. We'll have to break off his leg, but otherwise he's very good.
People also use stationery binders of a suitable size. This device holds well, but due to the fact that it is metal, it is possible to break the film in strong winds. To prevent this from happening, you can put a piece of cloth.
How else can you fix the film in the meadows of a greenhouse or greenhouse
And another way you can attach the film to the arc of the greenhouse is to take double-sided tape and stick it on one side of the pipe. Then, gradually removing the protective film, glue the film to it. This is an option for cheap plastic wrap: it will be impossible to remove it.Another point: you need to glue the film not to the very bottom: after all, you may need to ventilate the greenhouse.
For convenient airing, the film is cut off 20-30 centimeters longer than required on each side (if the length of the arc, for example, 2 meters, then the film will need at least 2.5). They take a block, wrap it with plastic and nail it down. Now, if the film needs to be lifted, it is wound on a block, and it is fixed (or simply thrown onto the roof, tying a rope so that you can pull it back). Only the block should be well processed, without sharp edges. This will prevent the film from tearing.
Read about autowatering systems in the article “Self-watering with your own hands "
Greenhouse arches from profiles
A greenhouse for a film can be not only from a polymer pipe. You can also use galvanized profiles for outdoor use. They are light, due to the ribs they have a sufficient degree of rigidity. A greenhouse with a galvanized profile can be covered with any material, except, perhaps, glass: it is too heavy.
To make an arc from the profile, its lateral parts are cut with a grinder every 20-30 cm, leaving the middle part intact. An arc is drawn on the ground that needs to be formed (a semicircle can be drawn with a piece of rope and a pencil tied to one side, if you are working on a concrete platform or a sharp peg with which to scratch the sod or the ground. Then they take a screwdriver and self-tapping screws (fleas), fasten them in places where the side parts intersect, first from one side, then from the other side.
How it looks live, see the video.
Polycarbonate can already be attached to such arcs. But the structure is still not rigid enough to walk on.
Video on how to make arcs for a greenhouse with wood polycarbonate
This method is available to experienced carpenters. But the result is excellent: not only reliable, but also beautiful. The fastening system was invented very interestingly: the polycarbonate is not firmly fixed, but moves along the guides, opening and closing the side edges. The design is more complex, but also more reliable.
Economical greenhouse with heating
How to make a year-round greenhouse and spend a little on heating it? One of the gardeners got the idea to bury the greenhouse in the ground. See the next video for one of the very rational options.
Do-it-yourself greenhouses are made from different materials and different designs, but the priority is the arched structure. It is easier to build, and does not interfere with work, allows you to ventilate if necessary.