How to make a polycarbonate greenhouse
Polycarbonate greenhouses in the trade network are widely represented - for every taste and size. But many people prefer to do them on their own. Because a polycarbonate greenhouse with your own hands turns out to be many times stronger and more reliable. Moreover, the costs are less or the same.
The content of the article
How to choose a design
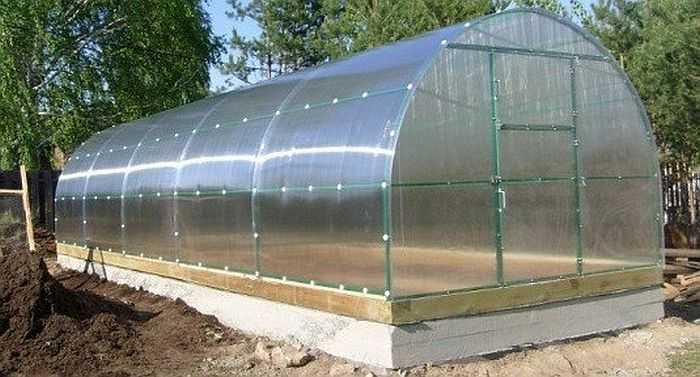
If you decide to build a polycarbonate greenhouse with your own hands, it is advisable to choose a design that allows you to use the main advantage of this material - its ability to bend. These are two types with curved roofs with arched supports.
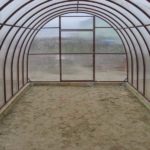
In one design, the arcs extend from the ground itself. If they are bent in the form of a radius, a lot of area is lost at the edges, since it is very inconvenient to work there due to the low height.
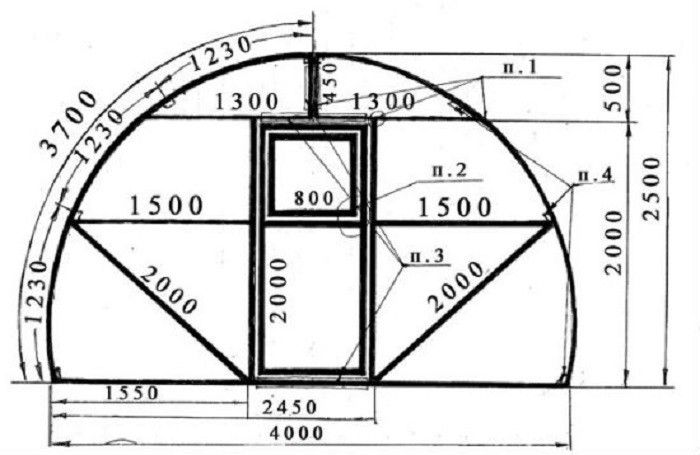
If a radial polycarbonate greenhouse is made according to such a drawing, it will be possible to work near the walls
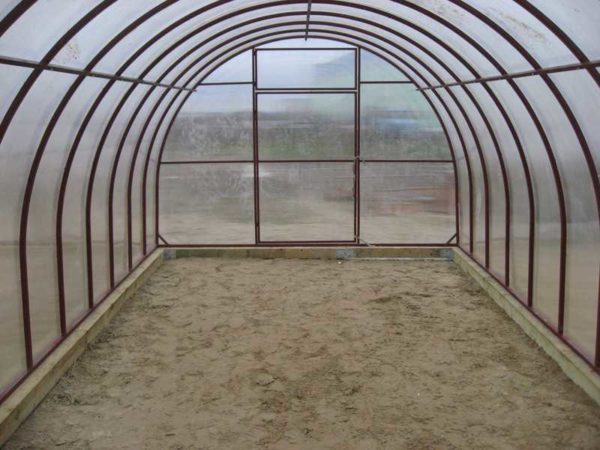
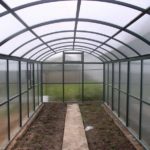
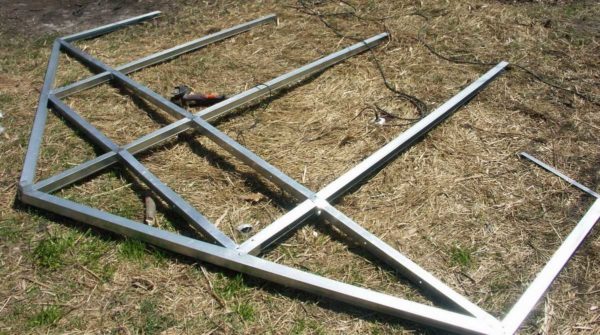
Another design solves this problem - with a composite frame welded from several pieces. Straight posts emerge from the ground / base, which rise to a height of at least one and a half meters. An arc is welded to them. With such a device, the roof is rounded, the walls are straight. Even along the walls, you can work without problems, standing upright.
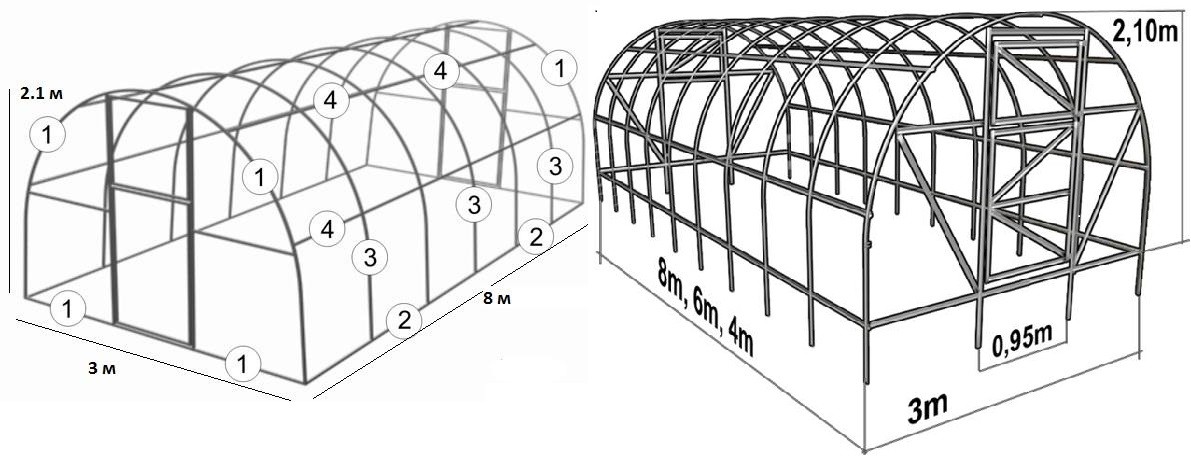
Composite frame option
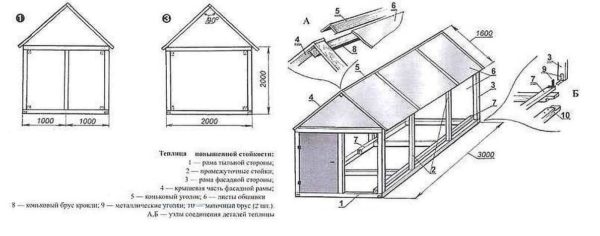
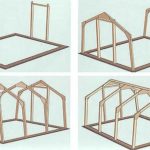
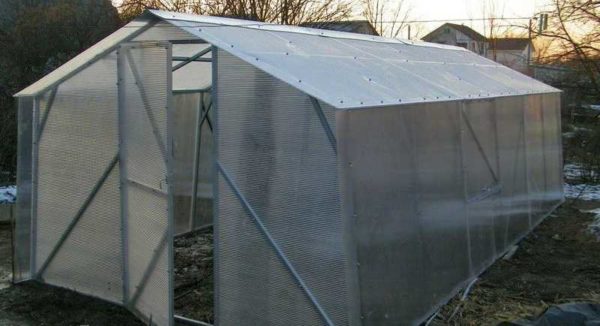
But the rounded greenhouse roof has several drawbacks. First, it is more difficult in it than in a straight line to make vents for ventilation. You can solve the problem if you make transoms in the walls, and not in the roof. The second minus of a rounded roof in a polycarbonate greenhouse is that the snow comes off it worse than from flat inclined surfaces. If you live in a region with snowy winters, or you have to make reinforced farms, or make a pitched roof - with one or two slopes.

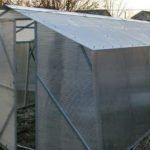
If you weld two half arcs at an angle, the snow will melt better.
There is a third solution - to make a rounded part of the roof from two arcs welded at an angle that forms a kind of ridge. With this structure, the snow melts well and the ridge can be protected with a wide strip of metal. This will both improve snow removal and protect the joint from leaks.
DIY polycarbonate greenhouse: material for the frame
The choice of materials for the frame is not very large. Profiled (rectangular) pipes, a metal corner and a wooden bar are suitable. They also use galvanized drywall profiles.
Wood
The beam is used for small greenhouses, and the design is chosen with a single-slope or dual-slope roof, since it is difficult and long to bend arcs from wood. The section of the bar depends on the size of the greenhouse and the snow / wind loads in the region. The most common size is 50 * 50 mm. Such supports are placed in the Middle Lane. For greater reliability, corner posts can be made of 100 * 100 mm timber.
Moreover, to save money, you can not buy a timber, but make a composite one - from boards. Take two boards 50 mm wide and 25 mm thick, three boards 15 mm thick. Fold up, knock down on both sides with nails. The resulting struts are stronger, better carry loads, and are less subject to torsion, since the wood fibers are directed in different directions.
-
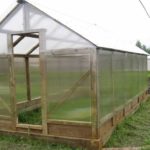
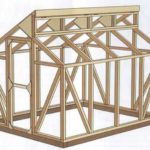
- A polycarbonate greenhouse is most often made from a bar as a house

-
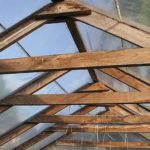
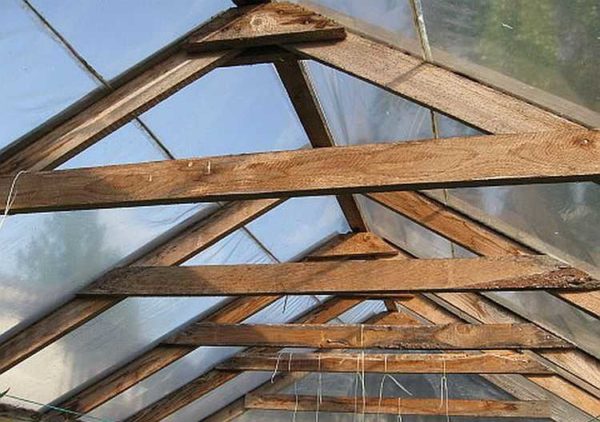
- Reinforcement of greenhouse roof rafters
-
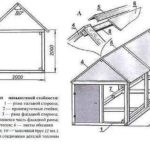
- General arrangement of the greenhouse with a house
-
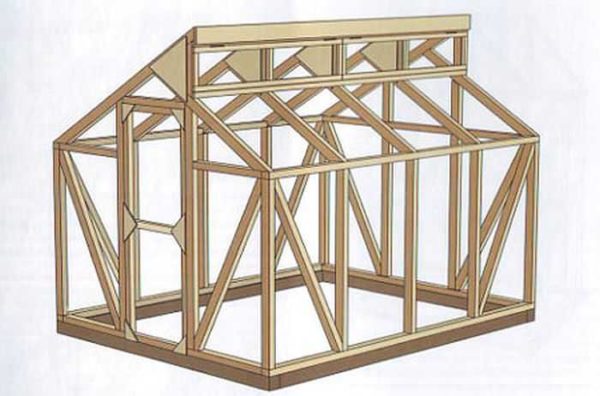
- Greenhouse version with timber frame and multi-level gable roof
-
- The procedure for assembling a wooden frame with your own hands for a polycarbonate greenhouse

-
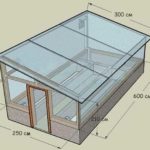
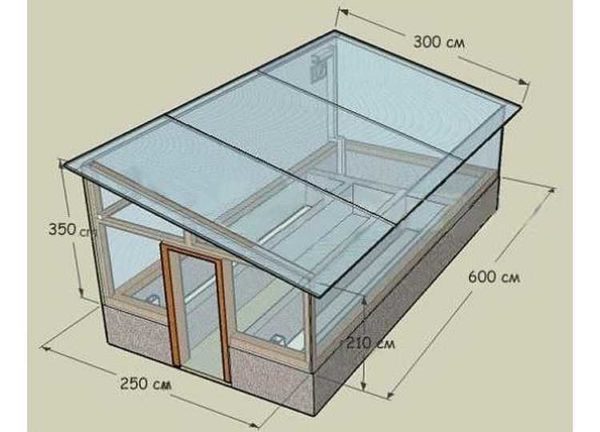
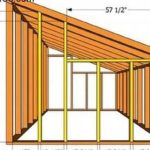
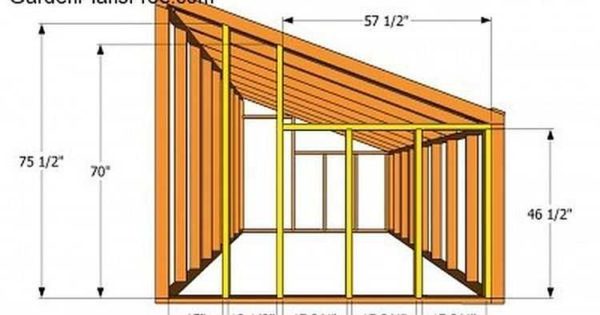
- Dimensional drawing: shed greenhouse
-
- Another option - larger
If you build a polycarbonate greenhouse with your own hands on a wooden frame, all boards / timber must be treated / impregnated with antiseptics, and those that are intended for the street. Treat the ends that are buried in the ground with compounds for direct contact with the ground. Without such treatment, the wood, firstly, will quickly deteriorate, and secondly, it can become a source of plant diseases.
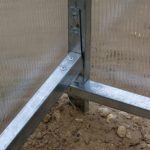
When joining the uprights to the harness (bottom bar), use steel reinforced mounting angles for greater rigidity and reliability. They are in hardware stores. To increase the bearing capacity of the roof, additional lintels are installed.
You can read more about gable roofs. here, about shed - here.
Profiled pipes and steel angle
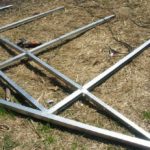
Most of the polycarbonate greenhouse frames are made of profiled pipes. If there's welding machine, skills in working with it, it's easy to do everything yourself - it's easier to cook a square or rectangle than round pipes. Another plus is with the help pipe bender it's easy to make arcs yourself.
-
- The profile pipe is good because it has high rigidity, but at the same time it can be bent into an arc
-
- Such a greenhouse is not afraid even of heavy snowfalls.
-
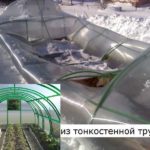
- Thin-walled pipes, even with double arches, often do not survive the winter

-
- Large cross-section racks are interspersed with less powerful

The section again depends on the size and natural conditions. Most often they are made from a rectangular pipe 20 * 40 mm. But there are also options. For that material, such a parameter as wall thickness is also important. It is desirable that the metal is 2-3 mm. Such a frame endures significant loads.
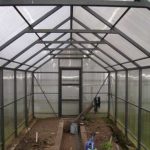
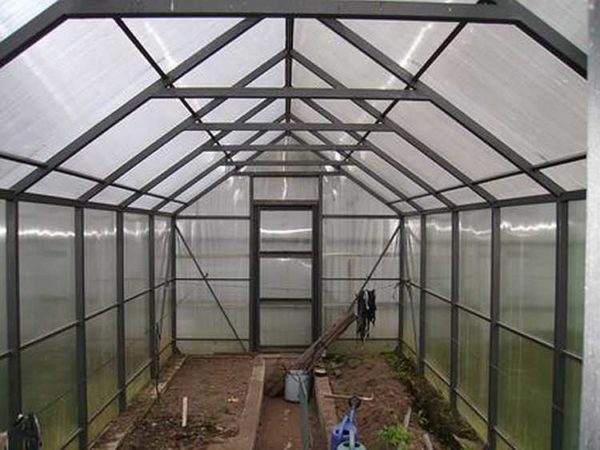
A steel corner is also a good option, but bending it is a difficult task, therefore greenhouses are assembled in the form of a house - with gable or single-pitched roofs. The dimensions of the shelves are 20-30 mm, the thickness of the metal is from 2 mm.
Galvanized profiles
A do-it-yourself polycarbonate greenhouse with a frame made of profiles is the most unreliable option. It is good in areas with little snowy winters, and even without strong winds. The advantage of this option is that no welding is needed. And the minus is not the greatest bearing capacity.
-
- Try to make connections as reliable as possible

-
- One of the frames
-
- Jibs and stops are not superfluous
The technology is used as standard - both for the construction of walls and partitions made of plasterboard. The only difference is that the frame is sheathed on one side and polycarbonate is attached. It is advisable to make the racks double - splicing two bearing profiles, deploying them "back to back" and twisting them with self-tapping screws. For greater rigidity of the frame, make bevels, connecting adjacent racks with inclined jumpers. It is advisable to make the roof sloping rather than rounded, to strengthen the trusses.
Foundation
If you are wondering whether or not you need a polycarbonate greenhouse foundation, there is only one answer - you need it. And reliable. They fly very well. Therefore, the base should "anchor" the building well.
For normal operation, it is better to put a polycarbonate greenhouse on a foundation
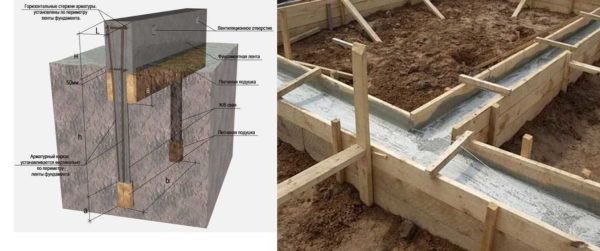
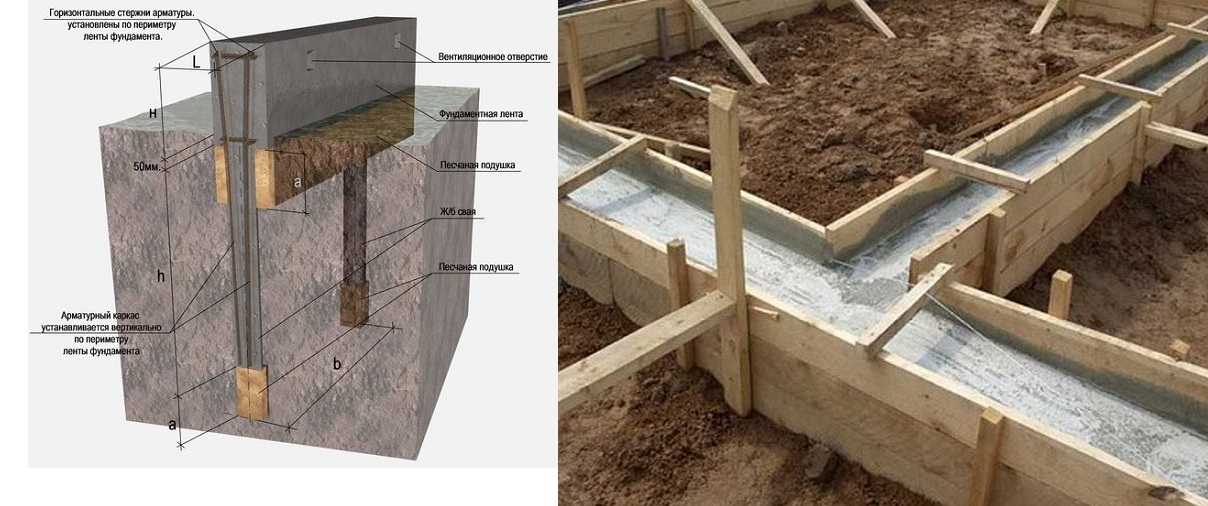
Belt type
This foundation is for buildings that are planned for more than one year. The most expensive, but also the most thorough option. If you plan to use the greenhouse all year round, the foundation is made deepened - to a depth just below the freezing of the soil. For seasonal use, concrete-brick or simply from a bar is suitable.

Concrete-brick is one of the most common
Concrete-brick (concrete-lumber)
Most often they make a concrete-brick version. It is optimal in terms of cost, complexity and duration. The work is carried out as follows:
- They dig a trench according to the size of the greenhouse. Its width is about 20 cm, the depth depends on the type of soil.
- On heaving soils (clay, loam, black soil), a trench is dug up to a depth of 50-60 cm. The edges of the trench are reinforced with formwork - hammered boards made of boards, plywood, OSB. On the leveled bottom, 15 cm of large and small crushed stone is poured, rammed. The same layer of sand is poured on top, leveled and tamped. This pillow will compensate for ground movements during frost heaving.
- The depth of the foundation on soils not prone to heaving is 25-30 cm. The bottom of the dug trench is cleaned of stones, roots and other objects, leveled and compacted.
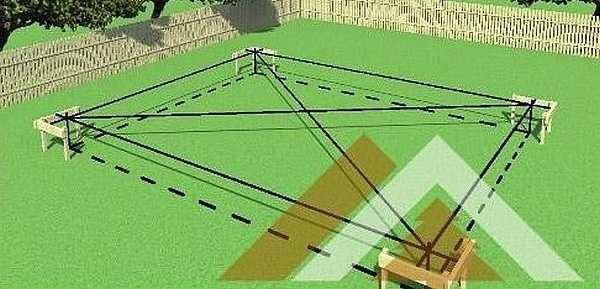
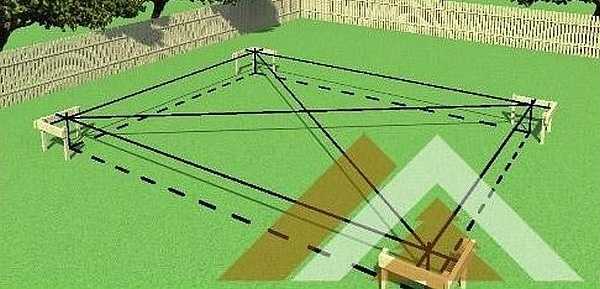
The markup is carried out as follows
- A dense oilcloth or roofing felt is spread on the prepared bottom. This is necessary so that moisture from the solution is not absorbed into the soil. It is also desirable to cover the sides, but there formwork panels partially solve this problem. Without this layer, concrete will not gain strength and will collapse.
- The solution is poured into the resulting ditch. The proportions are as follows: for 1 part of cement (M 400), take 3 parts of sand and 5 parts of aggregate. Aggregate - preferably fine and medium crushed stone. It is not worth using expanded clay - it absorbs moisture and can cause high humidity.
- The surface is leveled "under the level". You can smooth it down with a wooden block.
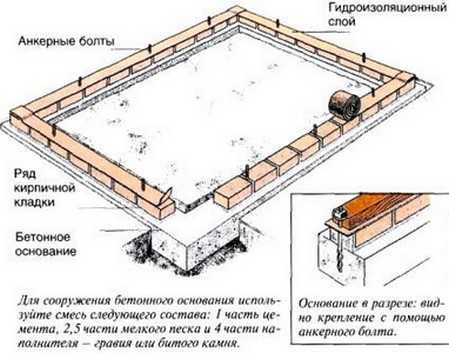
Construction of a concrete-brick foundation
- In the foundation, at the corners and with a distance of 1 meter, embedded inserts are installed - studs or pieces of reinforcement with a diameter of at least 12 mm. Studs are placed if it will be necessary to attach a beam to them, reinforcement - if a brick is laid. They stick out above the level of the foundation by at least 15 cm.
- The poured foundation is covered with a film, it stands for at least a week (at temperatures below 17 ° C, two weeks should pass). If the weather is hot, it is watered a couple of times a day. To retain moisture in this case, it is better to cover it with a coarse cloth (burlap) under the film.
- If the lower strapping is a timber, waterproofing is rolled out over the concrete base. It is possible - roofing material in two layers, but now it is quickly destroyed, so it is better to take "Hydroizol" or something similar. You can smear the concrete with bitumen mastic a couple of times. The result will be more reliable.
- A number of strapping fits:
- If it is a 100 * 100 bar, it is impregnated with a compound for direct contact with the ground. They drill holes in it for the installed pins, put them on, tighten the pins with bolts. To prevent the bolts from sticking out, recesses are made using a drill of a suitable size.
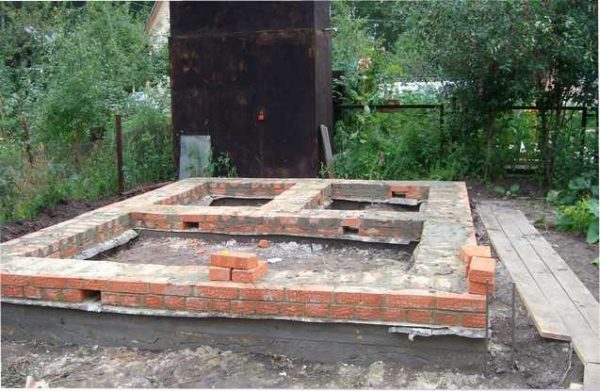
Brick laid on concrete
- If the base is concrete-brick, one or two rows of bricks are laid. You can also use hollow, since the mass is small. The masonry is carried out so that the mortgages fall into the seam between the bricks.
- If it is a 100 * 100 bar, it is impregnated with a compound for direct contact with the ground. They drill holes in it for the installed pins, put them on, tighten the pins with bolts. To prevent the bolts from sticking out, recesses are made using a drill of a suitable size.
- Next comes the assembly of the frame.

There are options for this type of foundation. Can be installed in a prepared trench foundation concrete blocks small sizes, fill the space between them with a solution. They must be installed so that their edge is below ground level. A layer of concrete is poured on top, leveled. The embeds are fixed at the seams.
Empty bottles can be used as a building material. They are laid in rows, poured with concrete. It turns out a very economical and warm foundation. Its bearing capacity is quite enough for a more serious building.
Polycarbonate greenhouse lumber foundation
This option is suitable as a temporary solution - it can last two to three years. It depends on the humidity in the area, the quality of the wood and the processing. A beam is used with a large section - 100 * 100 or more (can be made composite, from several boards). It is treated with compounds for wood in contact with the ground. The order of work is as follows:
- They mark the site, dig a trench. Its dimensions should be 7-10 cm deeper and wider than the used timber.
- The bottom and walls are covered with rolled waterproofing material (it is better to use "Gidroizol", it will last for a longer period).
- They lay the processed timber, connect it in the corners.

It is easy to make a do-it-yourself strip foundation for a polycarbonate greenhouse, but it will not last long
- The waterproofing is wrapped around the timber.
- With the help of corners driven in from both sides, the timber is fixed in place.
- The free space remaining between the waterproofing and the walls of the trench is covered with crushed stone if the soil is heaving and the earth removed earlier, if not. The soil is well compacted.
- Further, a strapping bar is attached to this bar. Between them it is worth laying another layer of waterproofing.
This option is only suitable for dry areas with low groundwater levels. In this case, one can hope that the foundation will live at least for several years.
Pile-grillage
Another type of foundation that will not protect against frost. But it is reliable and will serve for a long time. Complete a description of the technology for making a pile-grillage foundation read here, and we will give a short list of works.
- They mark the perimeter of the greenhouse, dig a trench 20 centimeters wide and about the same depth.
- In the corners, holes are drilled with a diameter of 30-40 cm and a depth below the depths of soil freezing (use Boer). Then the same holes are drilled along the perimeter. The distance between them should be somewhere 2-2.5 meters.
- Sand is poured into the holes - approximately in a bucket, then roofing material rolled into cylinders is placed inside.
- They are equipped with three rods of reinforcement with a diameter of 10-12 mm, connected into a single structure. The rods should stick out above the ground - a harness will be attached to them later.
- Concrete is poured into the holes (1 part of cement M 400, 3 parts of sand, 5 parts of crushed stone). We must make sure that there are no voids.
- At the bottom of the trench, a layer of sand, 5-5 cm thick, is poured, leveled and rammed.
Pile-grillage foundation - a reliable option for a polycarbonate greenhouse with your own hands
- Waterproofing (roofing material, Gidroizol) is spread on it.
- Formwork is assembled on the sides, fixed. It may be above ground level. If the soil is not free-flowing, you can do without formwork by covering the walls with waterproofing. But in this case, the foundation will be level with the ground, and it will also be uneven.
- Concrete of the same composition is poured into the formwork as for the pillars. The surface is leveled, covered with a film, concrete is waiting for the setting.
Then you can fix the harness, or you can build on a couple of rows of bricks and only then install the frame. After that, we can say that the do-it-yourself polycarbonate greenhouse is almost ready. It remains to fix the polycarbonate.
Which polycarbonate to choose
How long a polycarbonate greenhouse, bought or built with your own hands, will last, how well it will "work" depends on the parameters and quality of the polycarbonate. His choice must be taken responsibly - the amount is considerable.

Such a polycarbonate greenhouse with your own hands is the easiest to do. But this is a seasonal option
Types of polycarbonate
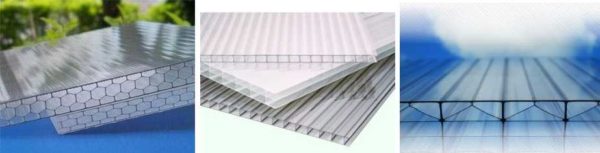
There are three types of this material:
- Monolithic. It looks like glass, but it transmits light better, is two to four times lighter, several times (100-200) stronger. Thickness - from 0.75 mm to 40 mm. The disadvantage is the high price. This material is used if there is a risk of damage - hail often occurs, the greenhouse is located so that icicles can fall on it, snow can melt. There is a multi-layer monolithic polycarbonate. Sheets can be up to 3-5 pieces, they can have different properties. For example, for greenhouses, a double layer is usually used - the first layer is highly durable, the second one does not transmit ultraviolet light.

Monolithic and profiled are good for seasonal greenhouses
- Corrugated (profiled). Appeared relatively recently. It is formed from a monolithic sheet, on which a relief is formed. There are types similar to corrugated board, slate. The thickness of this type of polycarbonate is 0.8-1.2 mm. With such a small thickness, it withstands hail blows up to 20 mm in diameter, bends well, and normally tolerates frosts down to -50 ° C.
Cellular (honeycomb) suitable for year-round greenhouses
- Cellular (cellular, structured). Consists of two (or more) bridging polycarbonate sheets. The shape, size, thickness of the lintels - all this affects the quality and performance. The thickness of cellular polycarbonate is 4, 6, 8, 10, 16, 20, 24 and 32 mm. For greenhouses, it is better to take no thinner than 10 mm, multi-layer.


What type of polycarbonate is better to use for greenhouse construction? Depends on the operating mode of the greenhouse. If it is heated, you need a cell phone. If this is an option exclusively for the warm season, corrugated (or monolithic) is more suitable. Monolithic is also not bad, but corrugated has great rigidity. For greenhouses, which are planned to be used from early spring or throughout the winter, cellular polycarbonate is installed. Due to its structure, it has more than% against its high thermal insulation characteristics - it retains heat better, although it transmits light worse (86% versus 95%).
Choosing cellular polycarbonate
It is not difficult to choose corrugated or monolithic - we are guided by the declared characteristics. It is only important that there is protection from ultraviolet radiation. There are no other pitfalls. But with a cell phone there are many nuances. Pay attention to the following:
- The thickness of the outer layers and their number. The sheets should be of the same thickness without sagging or thinner spots.
- The location of the jumpers and their thickness.
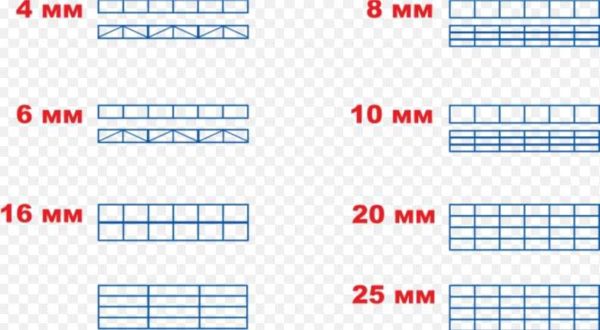
These types of cellular polycarbonate can be
- The presence of a layer that protects against ultraviolet radiation.

The easiest way to check the quality of cellular polycarbonate is by squeezing it between your fingers. If it does not push through, even if you make considerable efforts, you can take it. If it's easy to squeeze, look for another.
Installation features
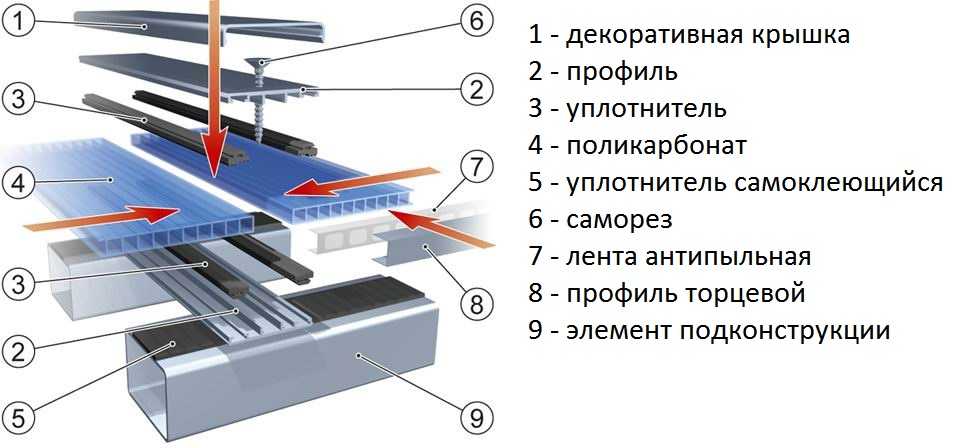
According to the technology, polycarbonate is mounted using starting and connecting profiles. First, profiles are installed on the frame, a sheet of cellular polycarbonate is inserted into them, which is fixed to self-tapping screws with special press washers, which simultaneously protect the attachment point from leaks. The profiles, in addition to holding the sheets in place, also protect the cuts from dust and dirt getting into the bottom. The system looks neat, works well, but all the components cost decent money.
This is the correct mounting system
Aesthetics for a greenhouse is not the most necessary property, therefore, if you need to save money, they prefer to fix it in a simple way, without profiles and press washers. Here's how they do it:
- The edges of each sheet are covered with silicone. They must be closed, otherwise condensation will accumulate inside, in which mold and fungi will develop over time, polycarbonate will lose its transparency. So it is necessary to close the edges carefully, leaving no room for air and moisture to penetrate.
- The sheets are laid with an overlap of several centimeters, pressed on top with a strip of tin. Fasteners are installed in the "overlap", through the tin strip.

This is how they fix it wrong, but cheap. Tin strip can be added for added security
- Under the caps of the screws, you can put ordinary wide washers.
- The UV protection layer must be facing outward during installation. It is important. Otherwise it doesn't work.

This is what concerns the fixing of cellular polycarbonate directly. There is one more point that became clear during the operation of polycarbonate greenhouses. Polycarbonate should not be placed close to the ground. It is desirable that it starts at least half a meter from the surface. Why? Because, firstly, it still gets dirty and almost no light passes through it, so it does not affect the overall illumination. Secondly, it begins to deteriorate - to blacken to exfoliate. It is unclear what triggers this reaction, but it is common. So, when developing a layout of a polycarbonate greenhouse with your own hands, provide for half-meter walls made of another material - brick, building blocks. Not important.