How to assemble and install a shower stall
In order to save space, showers are installed in small bathrooms. They are available in different configurations, depending on which they are called a shower enclosure, a cabin or a hydrobox. However, all manufacturers are guilty of one thing: useless instructions. It contains a list of parts and general instructions: put the pallet, fasten the walls ... and everything else in the same spirit. No details. This makes assembling the shower enclosure a do-it-yourself task. There are many different models, it is impossible to describe all of them, but we will describe and demonstrate general problems and ways to solve them.
The content of the article
Types and types
First of all, shower cabins differ in shape: angular and straight. In our country, corner ones are more common, because they are easier to fit into small rooms.
Direct shower
But the corner can be of different shapes. More common with a rounded front part - in the form of a sector of a circle, but there are also beveled and rectangular bases.
The shape of the front wall can be not only round
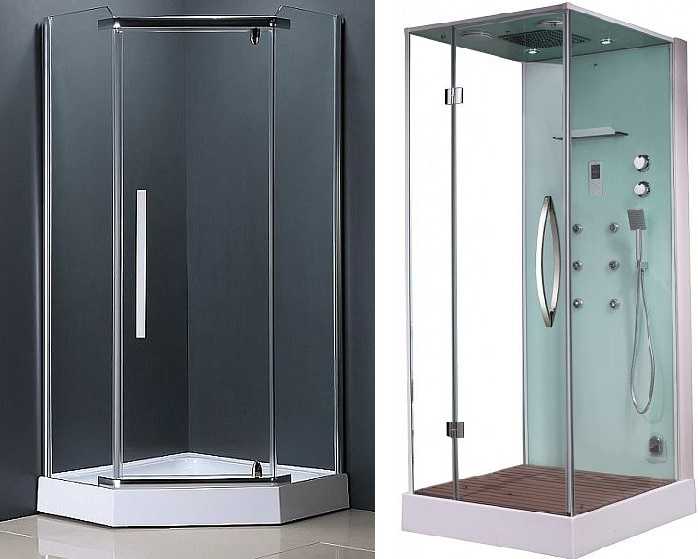
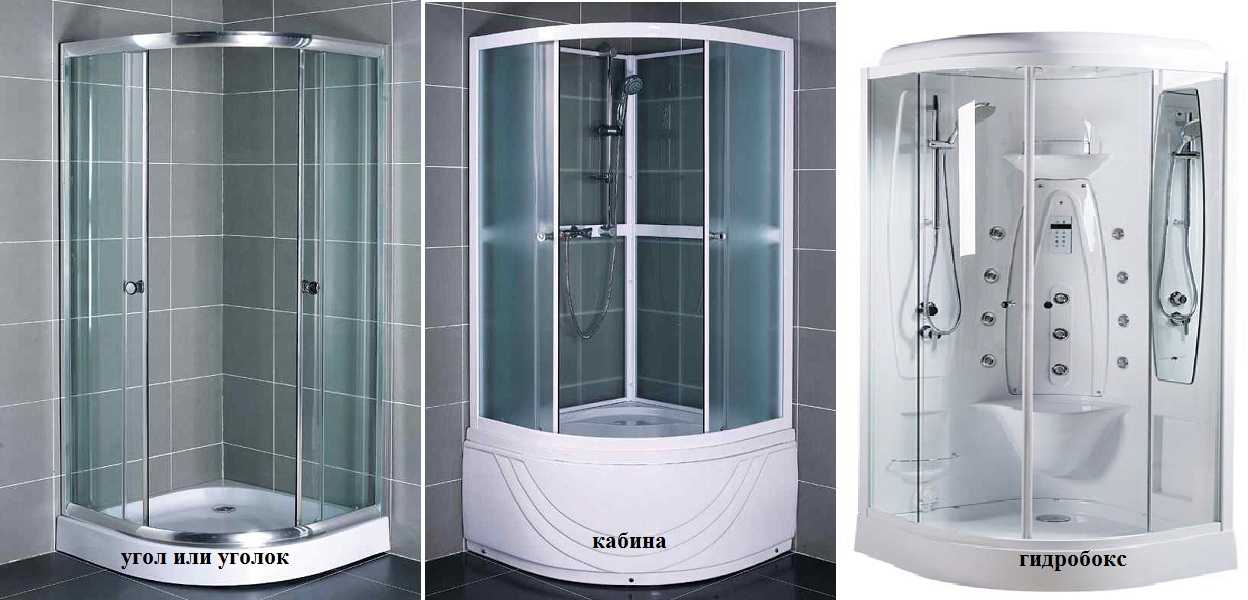
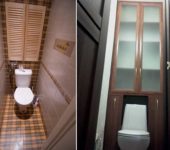
Now about the actual configuration. On this basis, shower cabins are divided into closed and open. In the open, there is no top panel, as well as side walls. They are in closed ones. Open shower enclosures are most often referred to as a “shower enclosure” or corner. Its equipment can also be different - with or without a pallet.
Different equipment
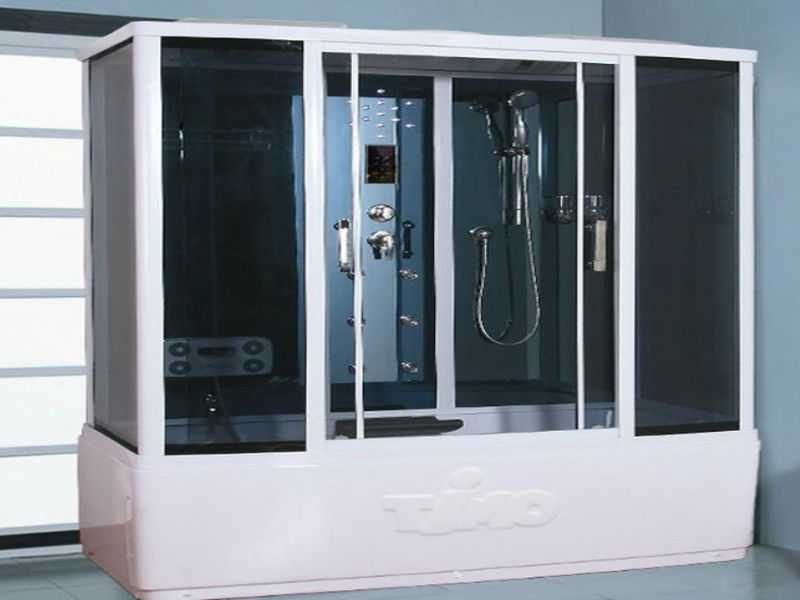
Some closed shower cabins have many additional functions - various types of jet massage, shower - normal, tropical, etc., built-in sauna or steam generator for hamam. Such multifunctional devices are correctly called "hydromassage cabins", or simply - hydrobox.
It is clear that the more complex the "filling", the more laborious the assembly will be. But hydromassage cabins are assembled at the very beginning in the same way as a shower enclosure with a tray. If you understand how to assemble the main things, it will be easier to install the walls and roof. The main thing, as usual, is the base, and the assembly of a shower cabin of any complexity begins with the installation of a pallet and guides for the doors.
How to assemble a shower cubicle - corner
Most often, it is a corner with a pallet that is bought. Without a pallet, you have to spend a long time with the floor and drain. Putting a finished trough is easier. Therefore, first of all, we will describe the installation procedure for such a shower cabin. How to make a shower tray from tiles read here.
Let's say right away that models with a bottom require a margin of at least 15 cm: at the bottom there is a siphon and water drainage hoses. So for the installation of a 215 cm cabin, the ceiling height must be at least 230 cm, and it will be difficult to work. If your ceilings are low, you will have to put a booth without a pallet - only the walls, and make the drain in the floor.
Pallet installation
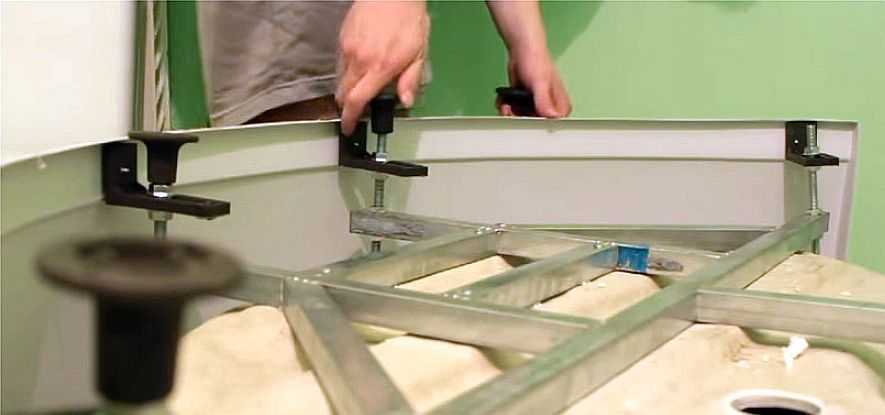
The shower tray in modern shower stalls is made of plastic. It is reinforced with several layers of fiberglass, which increases its strength, but it is still impossible to stand on it normally without support. The kit includes several square metal pipes that are assembled into a structure that supports the bottom.

Pallet support structure
But not everyone decides to install a shower stall on several pieces of iron. Some people prefer to make the base from bricks or timber.
Assembly of a shower cabin on a metal frame
On some models, the first step is to attach a decorative protective cover to the pallet. It is simply inserted into the groove and screwed on with metal plates. Further, the installation process is already underway.What's wrong with this method? How to change or repair a drain if necessary? You cannot remove the cover - it is attached from the inside. The only way is to make the door yourself first, and then put the modified panel in place.
The procedure for assembling a shower tray is as follows:
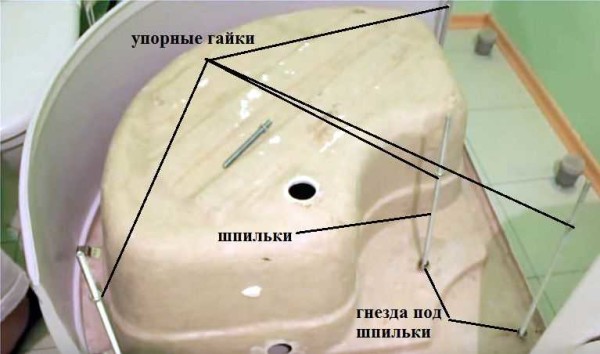
- The studs are screwed into the existing sockets. Some designs have fewer nests than reference beams. Then there are short hairpins included. They simply slide in and bolt on, redistributing some of the load.
- Nuts are screwed onto the installed studs, which will lock the metal support frame, preventing it from resting on the pallet.
The beginning of the assembly of the shower tray
- A frame is put on the studs with nuts, holes are drilled in it for this.
- Nuts are screwed onto the protruding ends of the studs, only now they are on the other side of the pipe.

There are lock nuts on both sides
- There are holes in the supporting structure, in which we tighten the bolts that come with the kit. In theory, they should fall into the corresponding holes on the pallet. There is reinforcement under these holes, otherwise the screw will simply pierce the plastic.

We attach the metal frame to the pallet
- After checking how even the frame lies, and correcting if necessary, we tighten all the double bolts on the studs. The result will be a rather rigid fixation (everything was staggering before).
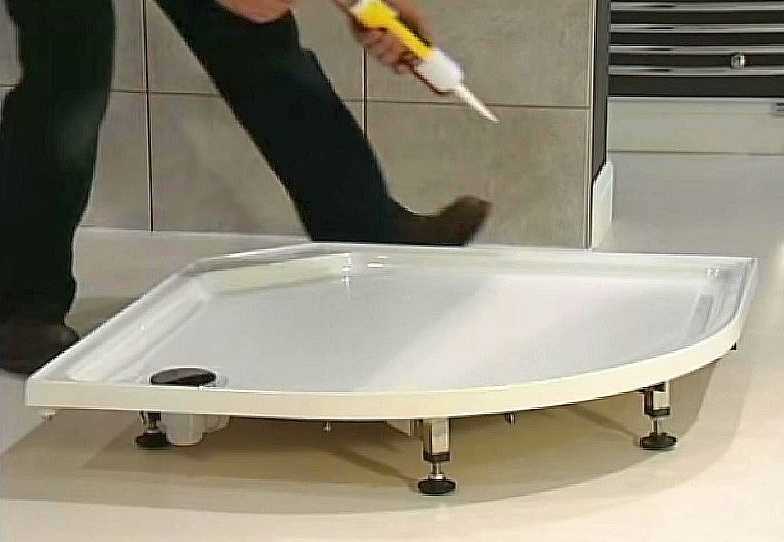
- Let's start assembling the legs.
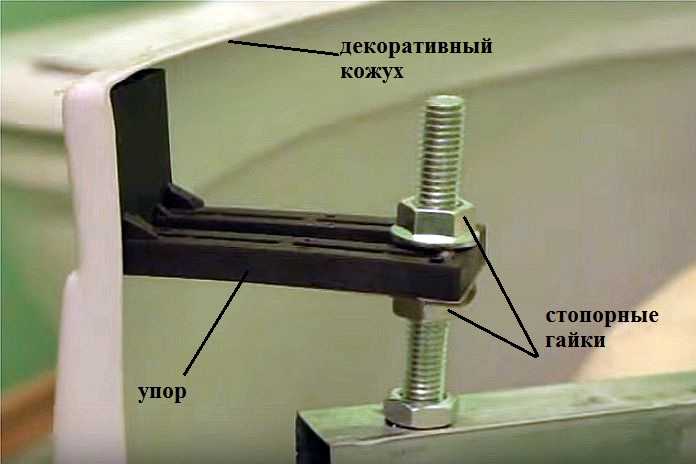
- We install stops. They also fit on two nuts.

Installing stops
- Having corrected the shape of the front surface of the decorative casing, we fasten the stops. There are screws and washers for this. Decorative overlays are put on the washers.
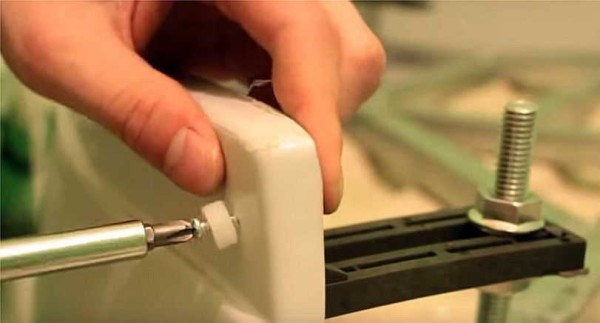
We fasten the stops to the casing
- We wind the legs. It remains to align the legs. There are two ways. If the pallet is small and shallow, it is easier to turn it over, put it in place and, controlling the plane in level, set it by twisting the legs. If the pallet is massive and deep, and there is also a decorative casing, it is unrealistic to get to all the legs. In this case, twist the legs setting them to the same height. You can check how smoothly they are set using a regular building level - laying it in pairs on different legs, or using a laser plane builder (read how to use it here).
Installing the legs
- We install stops. They also fit on two nuts.
- Turn the pallet over. If all legs are level and the floor is level, the pallet should be level and tight.


The assembly of the shower stall is already half done. It remains to assemble the doors.
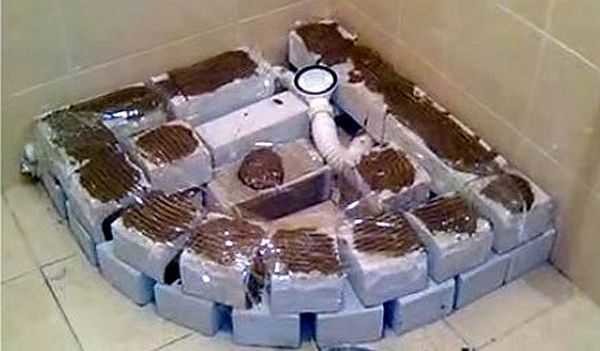
Assembling a pallet based on bricks or foam blocks
Everything is incomparably simpler here, although it largely depends on the shape of the pallet. Most often, the base is folded from bricks or foam blocks. It is more convenient to work with high density foam blocks. They have sufficient load-bearing capacity to support the required weight, but are easy to cut with a saw and easy to shape.
First, the entire structure is folded dry, without mortar or glue for foam blocks. Just do not forget that the solution / glue will slightly lift the structure. And this is the second plus of foam blocks: for their installation, a layer of glue of a couple of millimeters is enough, and for a brick, at least 6-8 mm is required.
Example of a shower tray installed on bricks
You can also try on how the shower tray will become with glue or mortar: suddenly, you didn't put enough somewhere. To do this, spread the solution, more or less level it with a trowel, cover it with a film, and put a pallet on the film. By removing it, you will absolutely see if there is enough glue everywhere.
Submitting a solution, if necessary, put the pallet in place. It is a matter of technique to align it: we take the building level, and focusing on its readings, we tap in different places. Note! You can install the shower tray on the foil without removing it from the solution. In this version, dismantling without destruction is possible.
The brick base is covered with foil
When folding a brick base, do not forget that you need a place to install a drain, pipes from it. It is also necessary to provide for the possibility of replacing the siphon. To do this, make a window on one of the sides, providing access to the necessary parts. It can then be closed with a decorative door or lid.
Before the final installation of the pallet, a drain is connected. For those who have put a sink or a bathtub at least once, this is not a problem. More on this in the next video. One moment: when installing the siphon, do not forget to coat the drain hole with sealant. There is, of course, an elastic band, but it will be more reliable with a sealant.
You can read how to make a tile shower tray here and a shower stall to it.
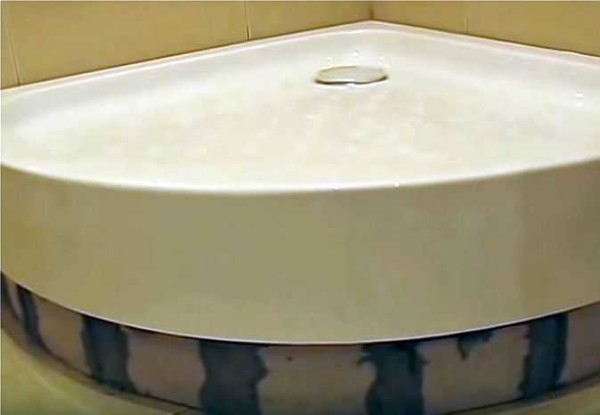
Pallet sealing
After the pallet is in place, the joint needs to be sealed. Usually a transparent sealant is used. Just note that acrylic sealants turn yellow over time (after a couple of months), so it is better to look for silicone.
The pallet must be well sealed
Fill all the gaps and gaps well, you can twice. In order not to work by eye, you can put a pallet on, draw a line with a marker, then move it back and apply one or two continuous strips of sealant a couple of millimeters below the mark. Push the pallet into place, press down well. Fill in the voids above.
There is a second way. It is more aesthetic. Close the joint with a plumbing corner. He himself has a sealing gum, but you can also coat it with a sealant. With this corner, you can close a small gap that forms if the angle in the bathroom is not exactly 90 °.
The ventilation organization in the bathroom is described here.
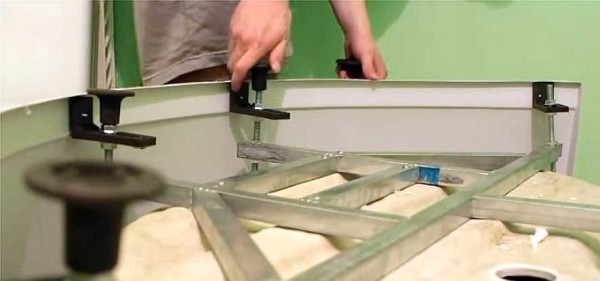
Installing door rails
Further, the assembly of the shower stall continues with the installation of guides for the doors. Even if the car does not have side panels, you first need to assemble the guide frame for the doors, install it on a pallet, and then mark the installation locations of the fasteners. To assemble the frame is to fasten the side posts and two rounded rails together. Fixed glass sides can be installed to stiffen the structure.
Why can't you fix door racks to the wall right away? Because the walls in the bathroom are rarely perfectly flat. By attaching the racks in this way, you will get skewed doors that will not close / open well. To understand the whole difference, you can mark out strictly vertically, as expected by setting the side guides vertically. Then assemble the supporting frame, put it in place and look at the available deviations. In 99% they are available, and significant.
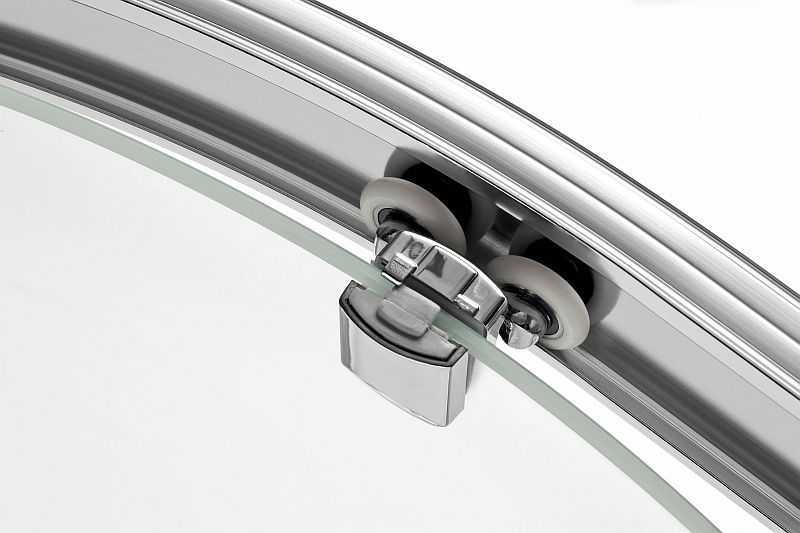
One of the design of the rollers for the shower
When assembling the frame of the shower stall, there can be no discrepancies. There are two arcs, there are two posts. Align the grooves and holes, tighten with screws. Then you install the glass sides. They are fixed with stopper brackets. After that, don't forget to install the shower casters. They can have a different design, but, most often, to install them, you need to remove the side stoppers from the guides, drive two rollers into the profile on both sides, and put the stopper in place.
In some models, you have to not only install the rollers, but also hang the glass, otherwise you will not transfer it. But then it is better to work together. One is difficult.
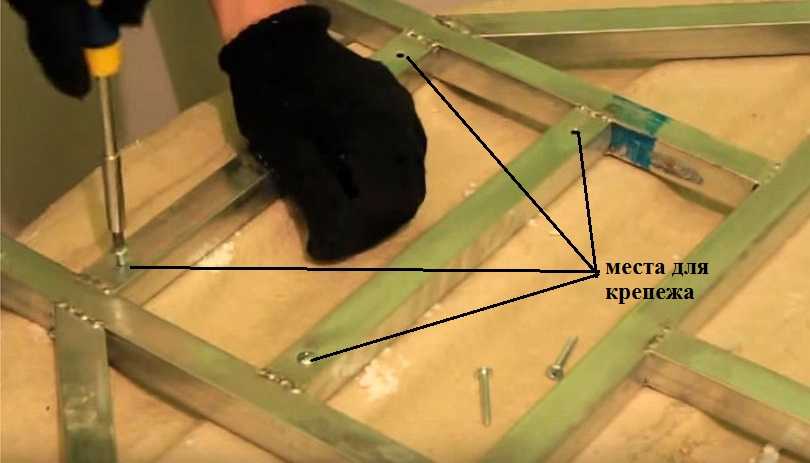
Putting the assembled frame on a pallet and checking if it has become correctly, mark the location of the fasteners with a marker. After removing the cabin, drill holes, install dowels.
The joints of the frame to the walls are coated with a sealant. Apply the strip generously - it is better to wipe off the excess afterwards. Then they put the guides in place and screw them onto the bolts. The remaining slots are re-filled with sealant. The installation of the shower enclosure is almost complete: it remains to hang the doors and install the seals.

Assembly of the shower cabin: we hang the doors
If the doors have not been installed, they are hung. They start from the top. In most models, there are holes in the door leaf: at the top and bottom. This is where the rollers are attached.Some showers have two holes, some have four. Their number depends on the design of the rollers.
Take a screw, put on a plastic gasket (from the kit). After inserting the screw into the hole, put on a second gasket. Further: there is a thread inside the roller, and you need to get into it with a screw, then supporting the roller outside with your fingers, screw the screw inside. This acrobatic element is repeated with all rollers. Until all the screws are in place, do not tighten them. Just bait so that the door holds and does not fall.
After the doors are hung, tighten all fasteners. There is one last moment: installation of seals on the door. They simply snap into place (press with your finger) on the side edges of two mating door halves. In the same way, they are attached on the other side - on the racks against the walls.
For details of hanging shower doors in one of the models, see the video.
You can read about the installation and connection of the boiler here.
Features of installation of a shower cabin-hydrobox
In closed shower stalls and hydroboxes, after installing the pallet, it is necessary to assemble a panel that covers the wall. It has mounting holes in which all the "gadgets" are pre-installed - nozzles, holders, soap dishes, seats, speakers, lamps, etc. the shape and size of the bottom are different for everyone, so it's hard to make a mistake. It is advisable to coat all the "landing holes" with a sealant: less dripping will be subsequently.
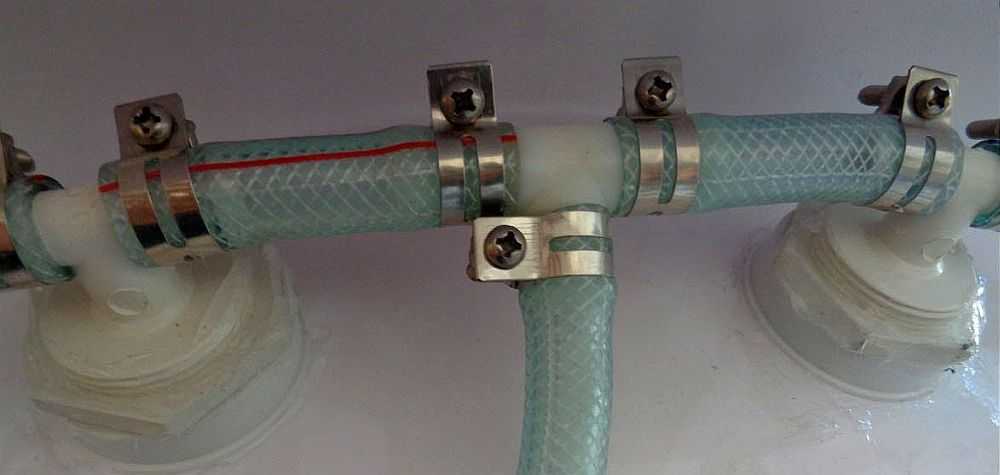
It is especially worthwhile to dwell on the installation of nozzles. In addition to installing the nozzles themselves, they must be connected to each other with hose sections. It is put on the nozzles of the nozzles, tightened with clamps. All this is assembled according to the scheme available in the instructions. Pay particular attention to ensure that the nozzle tips are intact and that the clamps are tight. It will not be superfluous here to lubricate each seat with a sealant (both under the nozzle and under the hoses).
Rear shower connection
The wall with the connected accessories is placed in a special groove. The junction is also pre-coated with sealant. Cold, hot water is connected, you can check the performance of the system.
After installing the walls, the cover is assembled. There is usually a rain shower, maybe a lamp. When installing them, you can also use a sealant - you never know where the water gets ... A hose is put on the shower branch pipe, which is tightened with clamps. Conductors are connected to the terminals of the lamp, the junction is carefully insulated, it is possible to use several heat-shrinkable tubes in series.
The assembled cover is installed on the wall. The joint is again lubricated with a sealant. Until the sealant has solidified, the assembled door frame is installed. When the doors are installed depends on the model. In some cases they need to be hung before installation, in some after. All joints are sealed.
The assembly of the hydrobox shower cabin is shown in sufficient detail in this video. There are no comments, but the sequence is clear.
How to assemble a shower cabin, we hope, is clear. There are a lot of models and modifications, but we tried to describe the main problem nodes. If you missed something, write in the comments - we will add the article))


Solid instruction. It would be nice to write more about the electrical connection.
Good idea for an article ... Thank you!
Hello.Tell me please. I bought a shower cabin River Desna 100/26. I began to collect and faced such a problem. The width of the rear (side) glass walls is less than the side boards on the pallet, and when you attach them to the side vertical profiles assembled with the upper and lower guide profiles, a gap is formed between them and the front edge of the pallet. And the instructions say to align the cab frame with the front side of the pallet. The gap is about 6 cm. Should this be so or were we given smaller side walls? What width should be the rear walls of the River Desna 100/26 cab?
How to collect top and bottom arcs, doors fall out