Do-it-yourself water heater installation photo + video
Buying a water heater is not all. It still needs to be installed, and then connected. Moreover, connect it to the water supply and to the electricity. How to install a water heater depends on its type: instantaneous or storage. The installation site is selected depending on the size and shape. The requirements for the power supply line depend on the power, and the connection diagram to the water supply depends on the internal device of the water heater.
The content of the article
Types of electric water heaters
There are two large groups: flow-through and storage. Instantaneous water heaters heat the water that passes through them. In this regard, they have relatively small dimensions, but very high power - up to 24 kW, but this is the maximum. For washing dishes and taking a shower, a power of 4-6 kW is enough, for taking a bath - 10-12 kW. So to connect such equipment, a dedicated power line with an RCD is required.
Water heaters of different types
Accumulative water heaters are also called "boilers", they have a reservoir and a small, compared to flow-through, power - from 0.8 kW to 4 kW. However, a separate power line is also desirable for them. The sizes of the boilers depend on the volume of water contained in the tank. Their shape is cylindrical, and the cylinder can be placed vertically (cheaper option) and horizontally (more expensive).
The place for installing the water heater is chosen mainly depending on the existing connection conditions. Most often it is either a bathroom or a kitchen: water is supplied in both rooms. Secondly, the location is chosen for aesthetic reasons: so that the equipment is not very "conspicuous". From this point of view, the toilet or bathroom is usually chosen. If space is available, this choice is optimal.
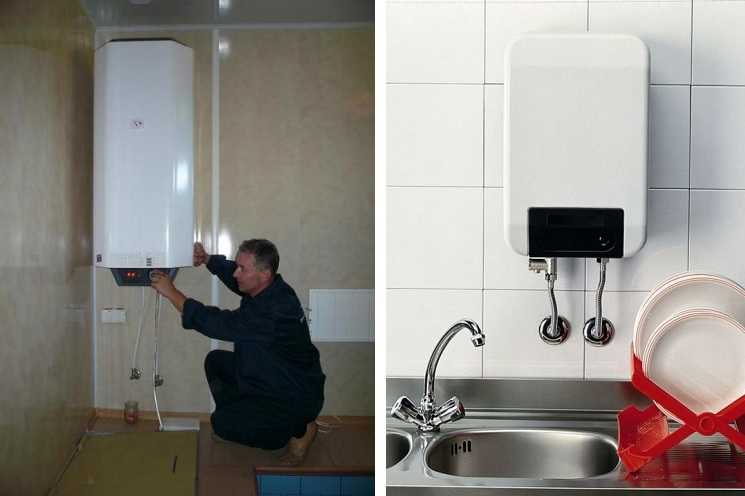
How to install a boiler (storage type water heater)
Let's start with wall mounting, because this is where it is usually attached. Empty boilers are heavy and contain up to 150 liters of water. Therefore, strict requirements are imposed on the mount: they must withstand double the weight equal to double the capacity. That is, if your boiler is 80 liters, the fasteners must withstand 160 kg. In this regard, it is mounted only on bases with good load-bearing capacity for anchors with hooks.
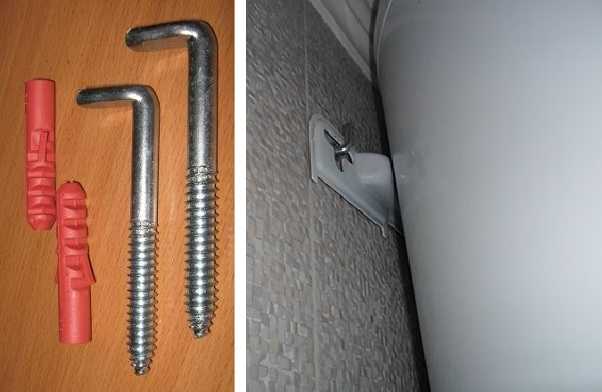
Hanging the boiler on the wall
On the back wall of the water heater, there is a mounting plate at the top (sometimes there are two of them - above and below). It has slots into which hooks are threaded. Thus, the boiler is hung on the wall. There are two different ways to mark where to drive fasteners:
- If there are assistants and space allows you to move relatively freely, you can lean the boiler in the right place against the wall, and then circle the slots.
- Measure the distance at which the bar is located from the top of the heater, also measure the distance between the centers of the mounting holes. Put all these parameters on the wall, finding the necessary points.
One caveat: if you are going to hang the water heater under the ceiling, it is necessary that there is a gap of at least 5 cm from its top to the ceiling. This is necessary so that it can be lifted by placing it on hooks. Otherwise, you will not be able to hang the boiler.
How to connect a boiler to the water supply
We will proceed from the fact that the cold water supply point already exists, as well as the hot water distribution comb is assembled.A little about how to connect the outlets of the boiler with the hot and cold water pipe. It is more convenient to use flexible hoses, but not those that are just an elastic band in a braid, but flexible ones made of corrugated stainless steel. They are also of different lengths, have union nuts with gaskets at the ends, but their service life and reliability are many times higher. If the boiler hangs over the bathroom and all the connections are in the same place, then even if the hoses burst, you will not be in danger: the water will end up in the bathroom. If not, you can flood your neighbors.
Another option is the use of plastic (polypropylene or metal-plastic) pipes. This option is used if hot water distribution is made at the same time to distribution points. Otherwise, it is more convenient to use flexible connectors. Only when using pipes, please note that special pipes are placed on hot water, which are usually marked in red, on pipes for cold water it may not be at all, or it has a blue / blue color.
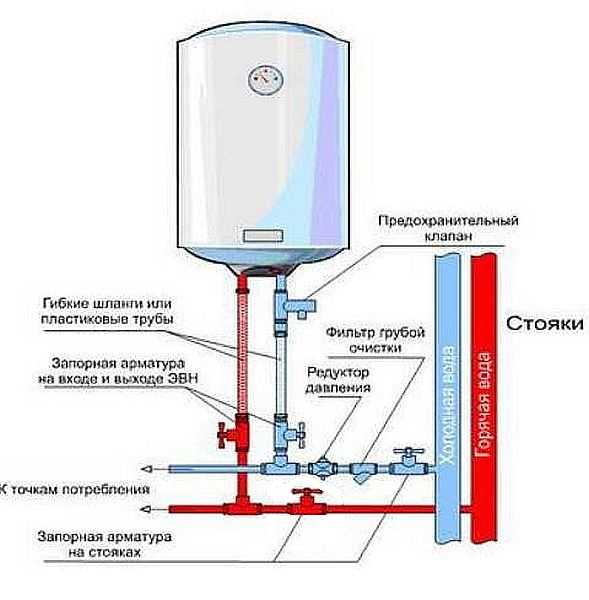
Diagram of connecting the water heater to the water supply
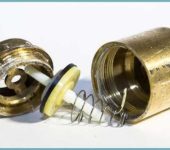
Now directly about the connection diagram of the boiler to the water supply. Although modern water heaters are often equipped with automation, periodically, when heated, there is a sharp jump in pressure, which can lead to a leakage of the container. To avoid surges, the cold water inlet is fitted with a safety valve... When the threshold value is exceeded, a tap opens in it and some of the water is released, equalizing the pressure. Therefore, when installing the tap, make sure that the drain outlet (small bell) is directed downward. If you want your boiler to work for a long time, put this valve on.
It is convenient if it also has a second function - it also works as a check valve, blocking the outflow of water in the absence of pressure in the system.
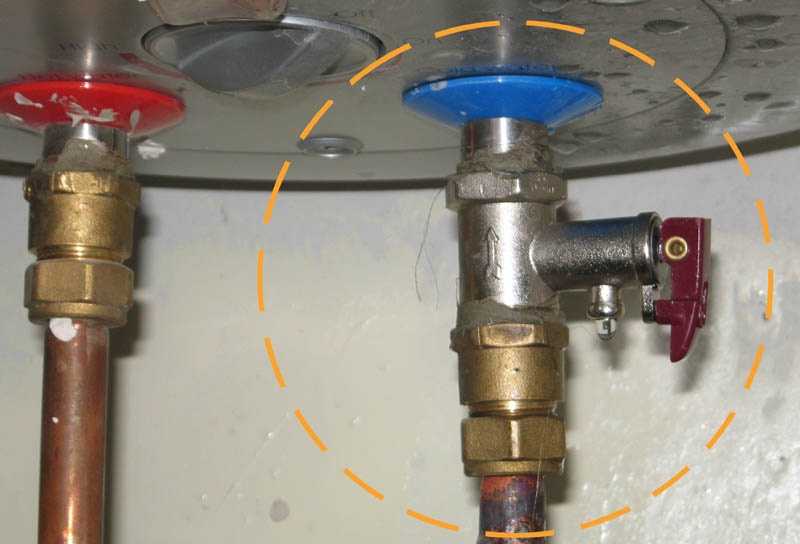
Boiler safety valve
If you look at the photo, there is an arrow on the body that shows the direction of movement of the water. If there is such an arrow, the device also works as a check valve, preventing water from pouring out. If there is no arrow, you will also have to install a check valve (above the safety valve).
For information on what functions the safety valve performs, and how best to install it if it is not above the bathroom, see the video.
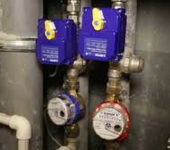
Another required detail of the scheme is cut-off valves. They are usually placed on a branch from a hot and cold water riser. These taps are required. Sometimes they are still put in front of a security group, but they are no longer mandatory, but only serve for more convenient repairs.
The safety group is a coarse filter and pressure reducer. If these devices are not present at the entrance to the house or apartment, it is very desirable to install them: they extend the life of the water heater.
For explanations of the boiler connection diagram, see the video, here are also discussed the typical errors of connecting to the water supply.
Connecting the boiler to electricity
All manufacturers of water heaters recommend connecting boilers to electricity on a separate line from electrical panel, on which a double automatic machine and an RCD are installed, Please note that the automatic machine is necessarily double - that is, one that breaks both phase and zero at the same time. Grounding is also required. These measures provide safety, so they should not be neglected.
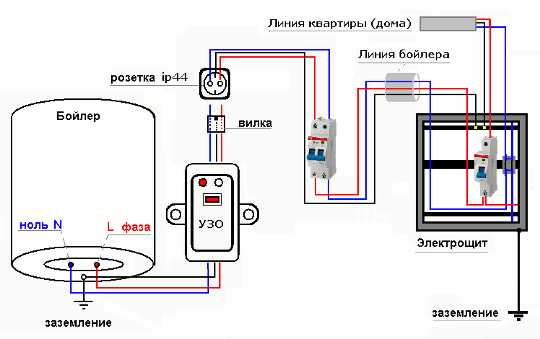
How to install a water heater: electrical diagram
Instead of a bundle of RCD + machine, you can put a difavtmat. It will also monitor both leakage and short-circuit currents, but in one package. For an average power boiler, a 16 A machine is enough, and an RCD leakage current is 10 mA. The cross-section of a copper wire (mono-core) is 2.5 mm.
How to install a flow type water heater
As already mentioned, the instantaneous water heater has smaller dimensions, therefore it is easier to find a place for it. It can be hung on the wall next to it, or you can hide it in a cabinet. Its dimensions are usually 15 * 20 cm * 7 cm or so.In general, they are small. Weight - 3-4 kg at most, so the requirements for fasteners are minimal. Usually it is either hung on two small diameter dowels screwed into the wall, or has a mounting plate that is screwed to the wall, and not the water heater is already hung on it. We figured out how to install a flow-type water heater, now about the connection.
Connecting an instantaneous water heater to the water supply
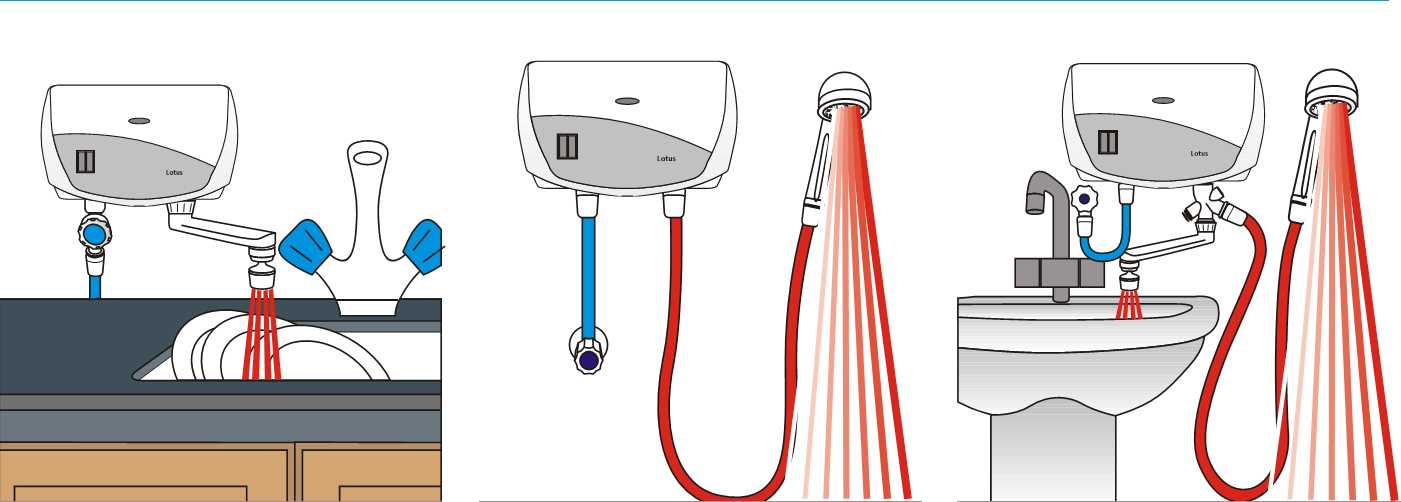
From this side, everything is simple. But the disadvantage is that it can only supply water to one point at a time. Depending on the place of installation, either a shower head with a flexible hose, or a gander - for washing dishes, is placed at the outlet of warm water. It is possible to put both a "gander" and a watering can through the tee (as in the picture on the far right).
How to connect an instantaneous electric water heater
In order to be able, if necessary, to remove the water heater and not cut off the water in the entire apartment or house, ball valves are placed at the entrance and exit. They are required equipment. The connection from the branch pipes to the tapping point into the cold water supply line is carried out in the same way as when connecting the boiler: corrugated stainless steel hoses or plastic pipes. Hot water to the point, if necessary, is supplied with a flexible hose: here temperatures are not too high, in principle, so it must withstand.
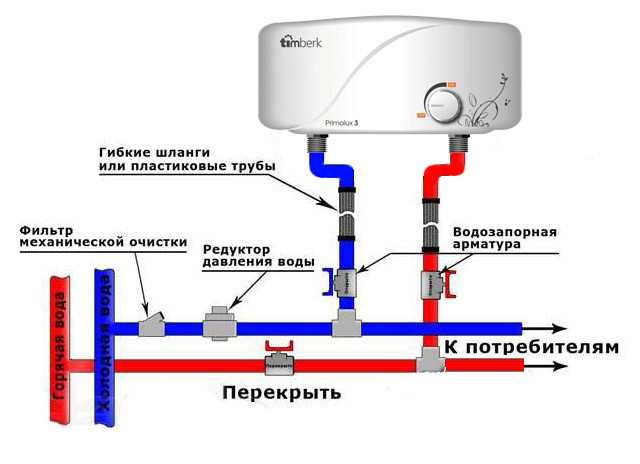
Connection diagram of instantaneous water heater to the water supply
Another feature of instantaneous water heaters is that they can normally heat only a certain amount of water. With an increase in flow or too low temperature at the inlet, they do not cope with the task. Therefore, most often such a water heater is used as a temporary one - in the country or when the hot water supply is turned off for preventive maintenance (for the summer).
It is not difficult to resolve the issue with an excessive amount of water (when the pressure rises above the standard): either put a reducer at the inlet or a flow restrictor. The reducer is a more serious device and is recommended to be installed at the entrance to the apartment, and the flow restrictor is a small cylinder with a valve. It is screwed onto the cold water inlet. An example of how to install a flow-type water heater and where to screw the flow limiter is in the video.
Electrical connection
With the electrical part of the connection, everything is the same as with the boiler: dedicated line, RCD + automatic machine. Others are only ratings and cross-sections of wires. Rated at power up to 5 kW - 25 A, up to 7 kW - 32 A, from 7 to 9 kW - 40 A. Cross-section of liquid copper wire - 4-6 mm (mono-core).