Plasterboard walls and partitions: do it yourself
The main task of repairs in most houses and apartments is to bring the walls back to normal condition. After all, a couple of decades ago, almost no one even thought about perfectly flat walls. They were aligned according to the principle "somehow". You can correct the situation according to all the rules: knock down the old plaster and completely plaster on the lighthouses. This is correct and reliable. But long, dirty, expensive. It is easier to use the so-called dry methods: level the surface of the wall with plasterboard (GKL). The second task that often has to be solved during the renovation process: redevelopment. We are removing old partitions, installing new ones. New interior and decorative partitions are also made using drywall. How to align and install drywall walls with your own hands and we will tell you in the article.
The content of the article
How to sheathe walls with plasterboard
First, consider the case when you need to level the surface of existing walls. There are three options for attaching drywall to walls:
-
- On a frame made of galvanized profiles. Allows you to get a perfect surface for any curvature. The profiles are attached to special clips. A frame is assembled from them - racks and lintels - the front part of which lies in the same plane. Since drywall is located at a decent distance from the main wall, communications and electrical wiring can be laid between it and the wall. Another plus of this option is the possibility of laying insulation or sound insulation. The minus of the frame from the profile is that without insulation it conducts sounds very well: if you hit the wall sheathing, the sound is like a drum.
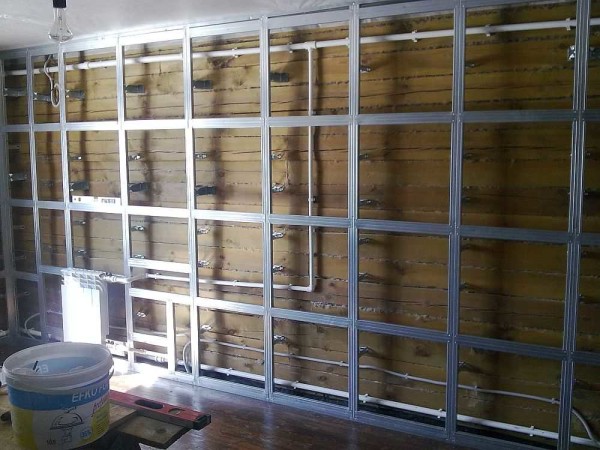
Frame made of profiles for plasterboard
- On a frame made of wooden blocks. It is assembled according to a similar principle - from racks and lintels, but attached directly to the wall. Too large differences are more difficult to compensate: you will first have to look for the most protruding parts of the wall. Then there are two options: the first is to be guided by them, placing additional bars everywhere, the second is to try to reduce the difference by cutting off the most protruding parts. The main disadvantage of fastening to wooden blocks is that if you use insufficiently dry ones (with a moisture content of above 15-20%), they may "lead" when they dry, which will distort the whole structure. There is also a possibility of damage to wood by pests or fungi. Despite this, in some regions this method is more popular, since their prices for sawn timber are lower than for profiles.
Frame for plasterboard made of timber
- Installation of sheets directly on the wall. This is the installation of drywall with glue. Use special mixtures or something like "liquid nails". This method is available if the walls are relatively even - with a difference of no more than 2-3 cm.Glue is applied to the surface of the sheet or wall (in strips if the wall is almost even and in piles, if there are drops), then the sheet is set in place, set at a level, fixed with wedges and supports.
- On a frame made of galvanized profiles. Allows you to get a perfect surface for any curvature. The profiles are attached to special clips. A frame is assembled from them - racks and lintels - the front part of which lies in the same plane. Since drywall is located at a decent distance from the main wall, communications and electrical wiring can be laid between it and the wall. Another plus of this option is the possibility of laying insulation or sound insulation. The minus of the frame from the profile is that without insulation it conducts sounds very well: if you hit the wall sheathing, the sound is like a drum.
We sew up the walls with plasterboard: we glue on a special compound
The latest technology - installing drywall on glue - is the fastest, but it also has disadvantages. The first - not everywhere under the finish there is glue, therefore it is problematic to hang cabinets on such a wall. If you plan to fasten something to the wall in advance, lay a continuous layer of glue at this height or install a foundation beam, which will also be an additional beacon when setting the sheet level. Then the problem will be solved. Another disadvantage is that there are small differences.That is, the surface is imperfect. The difference is 2-3 mm. The sheet bends slightly between the "pieces" of glue. However, this is a good way to quickly level a wall.
For more information on how to glue drywall on the wall, see the video.
Fastening to the frame
Since when gluing drywall to the wall, no fasteners are needed, then we will talk about the frame and mainly about the metal one. The rules for attaching to a wooden one are the same, just screws for wood are used.
GKL dimensions and purpose
A few words about what sizes the sheets are and how to put drywall on the walls. The standard dimensions are as follows: the width is always 1.2 m, the height is 2.5 and 3 meters. Sometimes there is a "non-standard" of shorter length: it is easier to work with small ones, but more seams are obtained, which then have to be repaired. GKL thickness:
- 12.5 mm - universal material for walls and ceilings;
- 6 mm and 9 mm for curved surfaces.
It is often said that 9 mm sheets are ceiling sheets. But manufacturers do not have such recommendations. Any of the manufacturing plants positions the thin sheets as those used for finishing curved surfaces.
Bevels are made along the long edges of the sheet. They are needed so that the joint can be glued with reinforcing tape and sealed with putty. It is the side where there is a bevel that is the front. It is deployed inside the room.
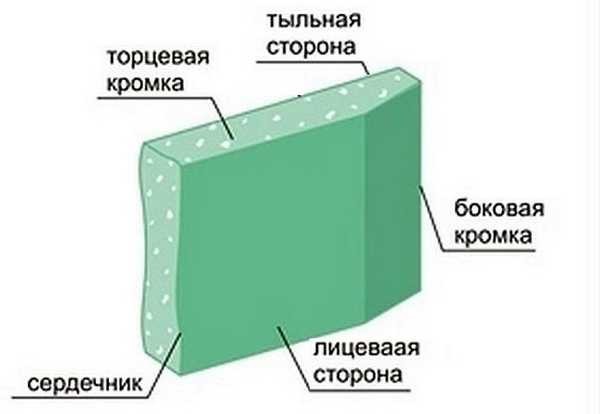
Drywall sheet: components and their name
How to dock
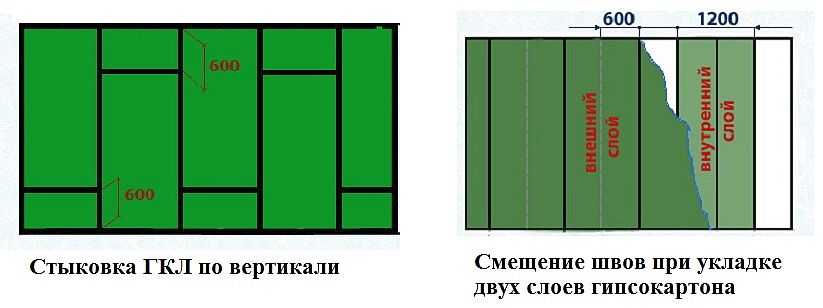
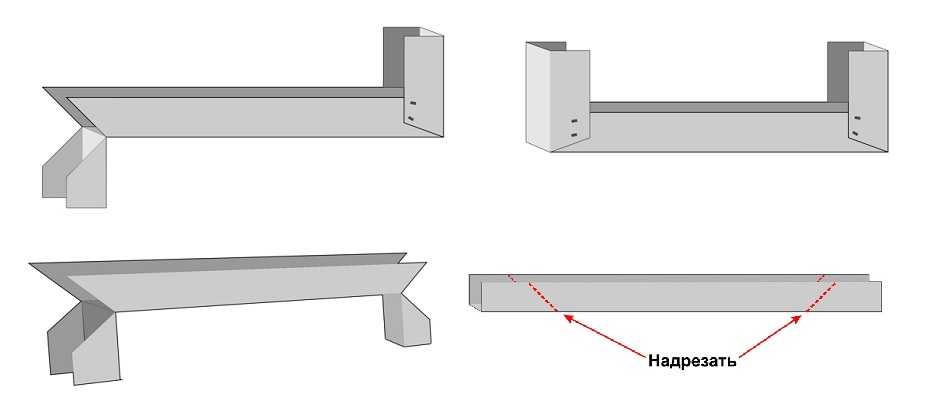
If it is necessary to join sheets in height, arrange the joints so that a long longitudinal line is not obtained. They say that the sheets are stacked at random or with a shift. At the same time, it is desirable that the displacement is at least 40-60 cm. Long joints are the most likely places for cracks to appear. By shifting the seam, you will get rid of cracks with almost 100% probability (see the figure for an example of laying sheets).
If the wall is sheathed with two layers of plasterboard, then the vertical seams are also shifted. The sheet on top should be installed so that the joint of the bottom one falls in its middle (shift by half the width - 60 cm).
Rules for laying drywall sheets
How to fasten and with what step
During installation, the sheet is pressed against the frame and fixed with a screwdriver and special self-tapping screws with flat heads. If the frame is assembled from metal, take the TN25 screws (3.5x25 mm). In stores, they are called "for drywall". Length - 25 mm, color - black (more likely to break) or white. For a frame made of wood, select those close in size with the flattest head: there will be less putty.
It is important to tighten the fasteners to the required depth during installation: the cap should be recessed into the sheet, but the cardboard should not tear. It is also necessary that the self-tapping screw be installed strictly perpendicular to the plane of the sheet: so there is less chance of damaging the cardboard layer, which in this design is responsible for rigidity.
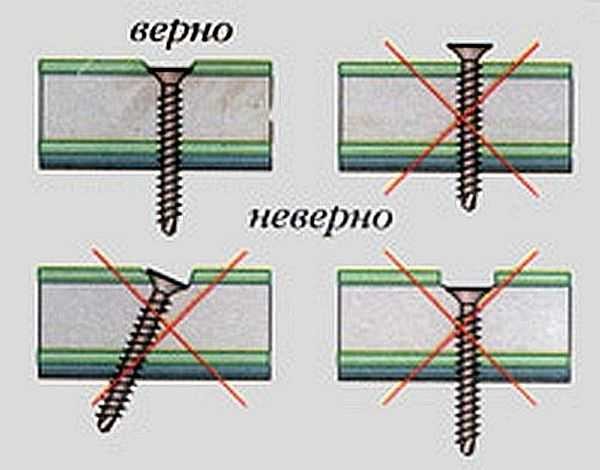
How to properly fix drywall
To learn how you can simplify the work and make the self-tapping screw go to the required depth, watch the video.
When assembling the frame on a solid wall, the distance between the posts should be at least 60 cm. Then it turns out that each sheet is attached to three vertical profiles: two at the edges and one in the middle. In this case, the edge of the sheet falls in the middle of the profile.
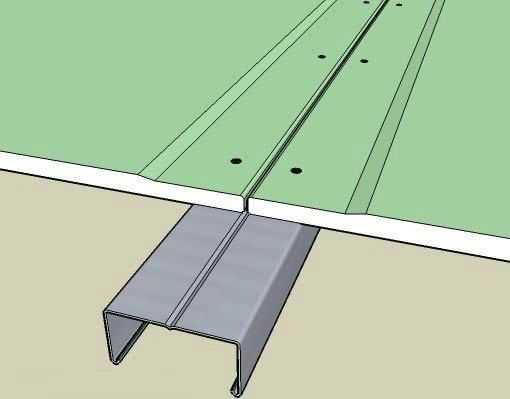
Two sheets are joined exactly in the middle of the profile
Having stepped back from the edge 10-12 mm, screws are screwed in. They can be placed, as in the figure above, one opposite the other, or they can be offset, as in the figure below. Installation step - 250-300 mm. Fastened along the perimeter and along the middle profile.
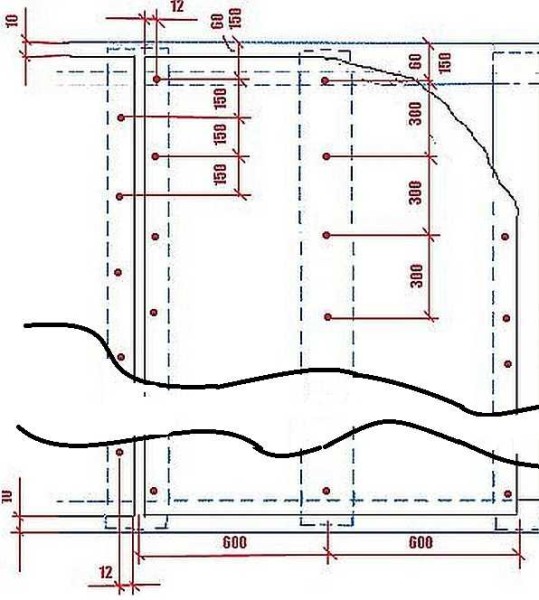
Where, how and with what step to install self-tapping screws on drywall
Another important point: when cutting out sheets, keep in mind that its height should be 10-12 mm shorter than the height from floor to ceiling. This is necessary in case of shrinkage: so that the wall or partition has the ability to compensate for the change in height without cracks (especially important for wooden and panel houses).
These are, perhaps, all the main points of working with drywall (excluding the peculiarities of mounting profiles).
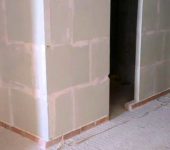
Plasterboard partition
Installing the partition is somewhat more difficult, therefore we will describe the process in steps from the photo.
Markup
First, mark the installation site of the partition. The easiest way to do this is with a laser plane builder (laser level). This line is applied to walls, floors and ceilings.
If there is no laser level, you will have to use a regular construction (good quality) and plumb bob. First, mark a line on the floor - this is easiest. Then, using a level, transfer it to the walls. If both lines on the walls are vertical, the line connecting them must be exactly above the line on the floor. Whether this is true or not, you can check with a plumb line, lowering it from the mark on the ceiling to the floor line.
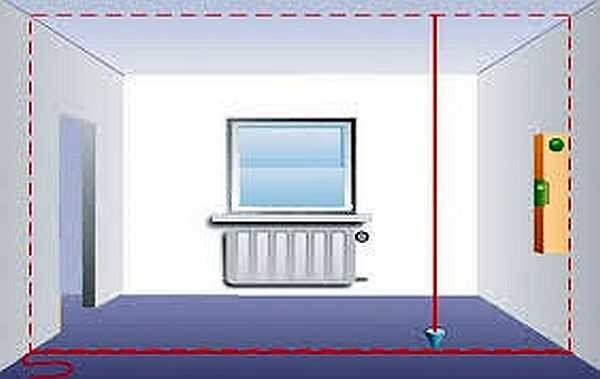
Partition marking using a level and a plumb line
It is necessary to achieve a perfect match - the quality of all work depends on it.
Assembling the frame
We will consider the assembly of the frame from galvanized profiles. Guide profiles are installed along the marked line on the floor and ceiling. It is marked UW or PN - bearing profile. They are usually fastened with dowels - 6 * 40 mm or 6 * 60 mm, the distance between two dowels is 30-40 cm.
PN-profile has a standard depth (wall height) - 40 mm, but it can be of different widths 50 mm, 75 mm or 100 mm. The thickness of the partition depends on the width of the supporting profile, as well as the thickness of the insulation and / or soundproofing material that can be laid there.
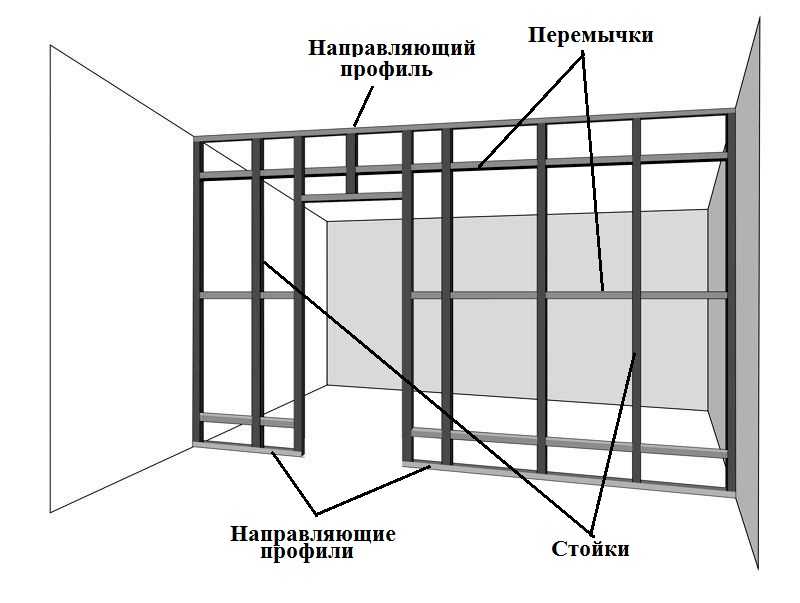
General structure of the frame for the partition
Bearing racks are inserted into the guide profiles. They are labeled CW or PS - rack-mount profile. It differs from the guide by the presence of additional shelves on the walls. These shelves make it more rigid, increasing its load-bearing capacity. The width of the rack profiles depends on the width of the carriers: they must be the same. That is, the posts must be the same width. It is between them that the insulation is then installed.
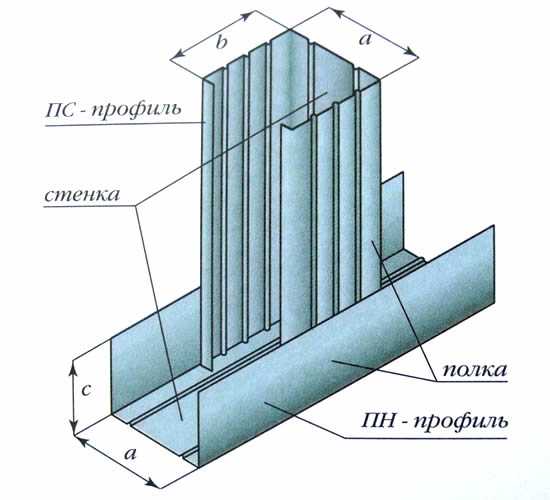
Joint of guide and bearing profiles
The racks are attached to the guides in two ways. The first is used mainly by professional builders. They work with a cutter - a special tool that breaks through and bends metal to the sides, holding two parts together. Amateur builders, when working independently with drywall, attach to "fleas" (also called bugs and seeds) - small self-tapping screws with a screw in the lower part - TEX 9.5 (3.5 * 9.5 mm). They drill the metal themselves, speeding up the assembly process (no need to drill holes). Racks are fixed on each side with at least two self-tapping screws.
One point: if you are installing a partition in a high-rise building or on the first floor of your house, then together with the joint of the rack and the ceiling guide, put a special film or some kind of material that will prevent the appearance of a squeak. When people walk, vibrations occur, transmitted to the profiles, because of which they rub and creak. The second option is to make the racks 1 cm shorter. It is more correct: the house will shrink and there are no unpleasant sounds.
The pitch of the racks is 60 cm or less. This distance is due to the width of the gypsum plasterboard (gypsum board), which is standardly 120 cm. As we said earlier, it turns out that each sheet is attached to three racks. So it turns out that there should be 60 cm between the verticals.
If the gap between two racks is more than 60 cm, but less than 120 cm, a vertical profile is still placed between them in the middle, otherwise this section will "bunch" - the sheet will stagger and sag. One more point: the first rack is attached to the wall a little closer - the first sheet will be attached to the entire plane of the extreme profile, therefore the distance should be slightly less - 57.5 cm.
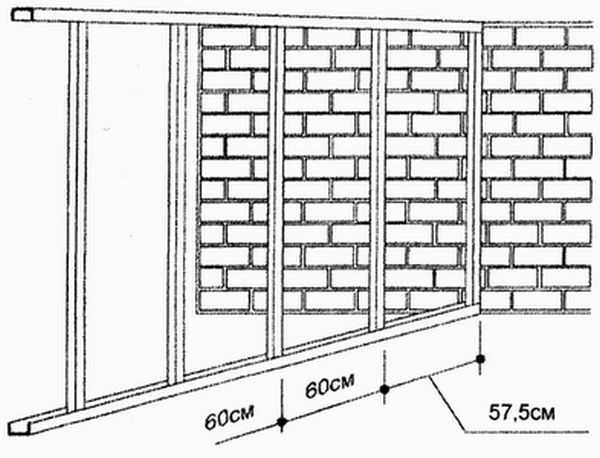
The distance between the uprights of the plasterboard partition frame
It is desirable to strengthen the profiles to which the doors or windows will be attached.The easiest way to do this is with a piece of wood of a suitable size. It is inserted inside, and attached to a pair of self-tapping screws. You need to use dry wood so that the timber does not twist.
After all the racks are exposed and secured, the structures are given greater rigidity using jumpers - horizontally installed pieces of rack-mount profiles. They are made in one of the three ways suggested in the photo. The third option is the easiest to manufacture and easy to assemble.
How to make jumpers from a profile for a frame
Jumpers are usually placed at the height where two sheets will join. Their edges must be fixed, so jumpers are needed there. For the rest - in increments of 60-80 cm. If the wall is large, place it every 60 cm, if it is small, 80 cm is enough. Crossbars above the doorway are required: at the height of the door frame. It is also advisable to strengthen them by putting a wooden block inside.
Laying of communications
After installing all the crossbars, you can start laying communications and wiring. It is advisable to mount all electrical wires in a corrugated hose. If you place the partition in a wooden house or on a wooden frame, it must be metal. In houses made of non-combustible materials, in walls made of plasterboard on a frame made of galvanized steel, it is allowed to use plastic corrugated hoses made of non-combustible raw materials (there is a mark "NG").
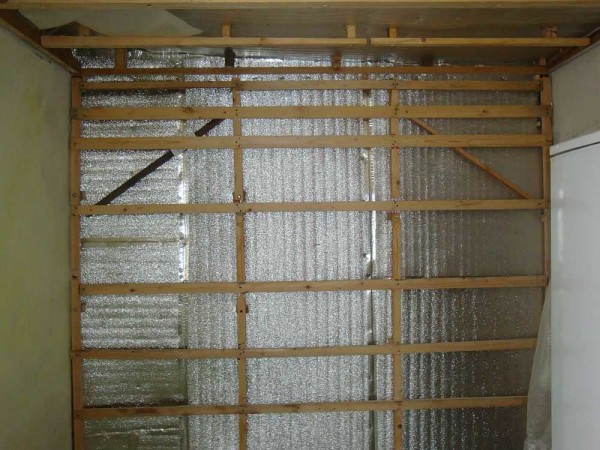
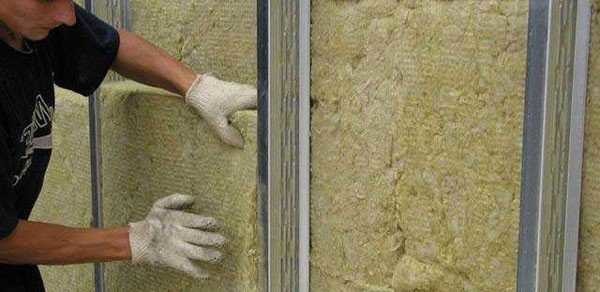
Plasterboard cladding and heat / sound insulation
After laying the communications, proceed to the installation of plasterboard sheets. They are mounted in the same way as for cladding. Do-it-yourself plasterboard wall cladding begins on one side. Then, on the other hand, between the profiles (bars) of the frame, an insulation and / or sound insulator is installed. After its installation, the plasterboard wall is sewn up on the other side.
Insulation for walls and drywall partitions is used as usual:
- Mineral wool. This is glass wool, slag wool or stone wool (better - basalt). The most environmentally friendly - formaldehyde-free - bsalt mats. It is easier to work with them than with glass wool - you do not need protective equipment for the skin and respiratory tract, they are less afraid of moisture than slag wool, they are easy to cut and hold well, without additional fasteners due to their high density. Their disadvantage is the high price. The cheapest of these heaters is slag wool, the average price is glass wool, and stone is the most expensive.
Basalt mineral wool slabs are easy to install
- Styrofoam. To obtain good characteristics for sound and heat insulation, a layer of 5-7 cm is sufficient (density from 35 kg / m3). It is cheap, easy to install, retains heat well and does not conduct sound well. The disadvantage is that rodents love it and when it burns, it releases toxic substances.
- Expanded polystyrene. One type of foam. It differs in the closed shape of the cells, due to which it has even better characteristics: it is denser, has excellent heat-insulating properties and dampens sounds well, rodents do not like it, fungi do not develop on it. It is cut with a hacksaw, can be installed by a rasp. Does not support combustion. The downside is the high price.
In principle, it is possible to use other heaters, but the listed ones are the most popular.
How to cut drywall
When making drywall walls with your own hands, you will have to cut sheets: they do not always become whole. To do this, you will only need a sharp clerical knife (for paper), a long, even object - a ruler, board, bar, level, rule, etc. And a wooden block a couple of meters long, but it's not necessary, it's just easier with it. That's all. A jigsaw may be needed when cutting curved lines, but there will be a lot of dust.
The sequence of actions is as follows:
- draw a line on the front side with a pencil along which you need to cut off the drywall;
- we apply a ruler along the line (bar, board) and cut the cardboard with a clerical knife;
- put a bar under the cut line;
- tap on the shorter side with the palm of your hand, which causes the plaster to break along the cut line;
- break the sheet along the entire length of the cut;
- bend the broken piece, cut the remaining whole cardboard.
It's really very simple. The main task: to mark correctly. There are no further problems (unless the sheet is broken).
Video lessons
Not all subtleties can be described, some are better to see. We have selected videos in which there are features of working with drywall. Basically, they relate to the assembly of the frame from profiles. This is really the most time consuming part. And on how correctly the frame will be made, it depends how flat the wall or partition will be.
How to make a plasterboard false wall
How to make reinforced racks in the partition. This method of assembling the frame is non-standard, but that does not mean that it is wrong. The racks are really stiffer. This is necessary if you are building a full-fledged interior partition from drywall. Amplification will not hurt here. The disadvantages are that it will take more time, and the cost of such a frame is higher.
Which profile is better: smooth or corrugated. There are different models of profiles on the market, including those with uneven and rough walls and sides. With the same metal thickness, it is more rigid, which seems to be good. But how good is he at work? Watch the video.
Plasterboard partition from start to finish. Here the installation of the partition is filmed step by step. Everything is quite accessible, you can take it as a basis and build walls from drywall with your own hands.


I put a partition between the kitchen and the living room (I have a studio), took a gypsum board Giprok aquaoptima moisture resistant. I was pleased with the new size 1950x1200, now they can be transported in an elevator calmly and there is no need to cut them. And then earlier or cut at the entrance or pay big money to the loaders for climbing the 16th floor on the stairs. Yes, and it is more convenient to mount - the stove is smaller, easier, you can even handle it alone. Quartz wool was laid inside for sound insulation. It turned out fine.
10 years ago, I did everything in a simple way - a frame made of 100 * 50 timber, drywall on both sides, inside foam 50 mm thick. I will clarify right away that the walls are on the second floor of a private house and are adjacent to the staircase. It's clear that nothing hangs on the walls. Soundproofing suits me, although there are no small children in the house yet.