How to cook with inverter welding: tips for beginners
In a private house and in the country, there is always a need to cook something. In order not to go to the pros on trifles (and not pay them), you can buy an inexpensive welding machine and learn it yourself. To acquire these skills, it is recommended to purchase DC welding machines, and in particular, welding inverters. They have small dimensions, weigh little, with their help you can get a high-quality seam even without a lot of experience. Equally important, this category has good devices at a low price (5-10 thousand rubles). Therefore, inverter welding for beginners is the best that the market can offer today.
The content of the article
What is a welding inverter and how does it work
This device was called an inverter because it converts the alternating current of the 220 V network with a frequency of 50 Hz into high-frequency oscillations, and then into direct current. At the same time, the device has a high efficiency: about 85-90%, and even at rather heavy loads, the counter "shakes" a little. In any case, you won't have to pay crazy bills. Consumption will be slightly higher than without welding, but not much.
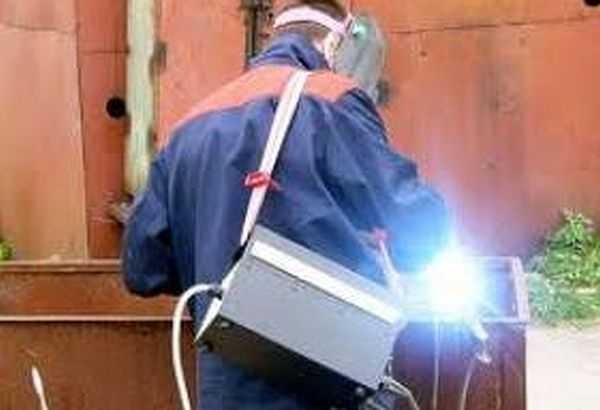
This small box is the inverter welding machine.
Most inverter welding machines operate on a 220 V household network (there are machines from 380 V). And this is one of their advantages. Moreover, they practically do not affect it in any way, i.e. do not "sit down" tension. As for your neighbors, be calm: they will not even know that you are welding. The second important plus is that they can work more or less normally even at reduced voltage. Of course, you need to look at the characteristics, but at 170 V, most of them still allow you to work with a 3 mm electrode. This is very important especially in rural areas where low voltage is the norm rather than the exception.
What's also good for beginners is that the arc in inverter welding is easier to get and hold. And in general, according to many, it cooks from "softer" and his arc is "lighter". So if you want to learn how to cook - try inverter welding first.
Read about the choice of welding inverters for home and summer cottages here.
Inverter Welding Basics
First, let's look at the design of the welding inverter. We will not consider the "filling", we will examine what is on top and what will have to be used.

What an inverter welding machine consists of (To enlarge the picture, right-click on it)
This device is a small metal box, which, depending on the power, weighs from 3 kg to 6-7 kg. The case is usually metal, some manufacturers make ventilation holes in it - for better cooling of the "filling" (mostly the transformer). For carrying there is a strap, sometimes there is also a handle: the strap is put on the shoulder if the work requires movement.
One of the panels has a power on key or toggle switch. On the front there are power and overheating indicators. There are also knobs for setting voltage and welding current. Also on the front panel there are two outputs - "+" and "-" to which work cables are connected. One cable ends with a clip-clothespin, which clings to the workpiece, the second with an electrode holder. The power cable connector is usually located on the back. That's all.
When buying an inverter, make sure that the cables are long and flexible enough to work more comfortably. It is the insufficiently long and rigid working cables that most of the complaints from users of the popular brand welding inverter machines "Resanta".
The general principles of working with an inverter welding machine are described in this video.
Inverter welding for beginners
As with any electric welding, the metal is melted due to the heat of the electric arc. It occurs between the welding electrode and the metal to be welded. To create an arc, they are connected to opposite poles: one is fed "+", the second is "-".
When the electrode is connected to "minus" and the parts to "plus", the connection is called "direct". If "plus" is applied to the electrode, the connection is reversed. Both options are used in welding, but only for metals of different thicknesses: the opposite is for welding of thin metals; straight line - for welding thick metals (more than 3 mm thick). But this is not an immutable rule; sometimes they do the opposite.
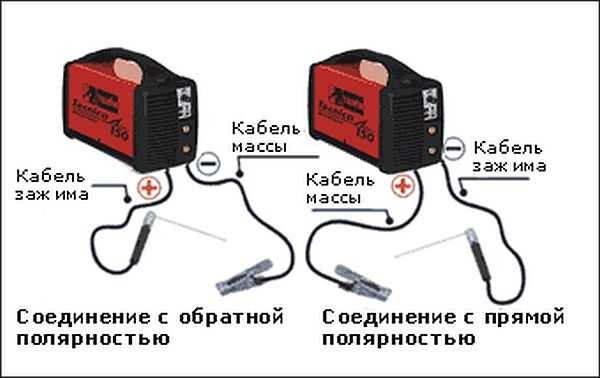
Forward and reverse polarity of connection on the welding inverter
What caused this division in practice? Physics of the process. When an arc occurs, the electrodes move from minus to plus. And they also transfer their energy to the positively charged surface, increasing its temperature. Therefore, the element that is connected to the positive output heats up more. When welding metals of sufficient thickness, they need to be well heated so that they fuse and the seam is of high quality. Therefore, they are served "+". Thin metal, on the contrary, can burn out from overheating and a "minus" clings to it, heating the electrode more strongly, from which more molten metal enters the seam.
It is possible to properly cook metal with an inverter only if the electrode is well controlled by you. To do this, you need to take the grip correctly. How to do this, see the video.
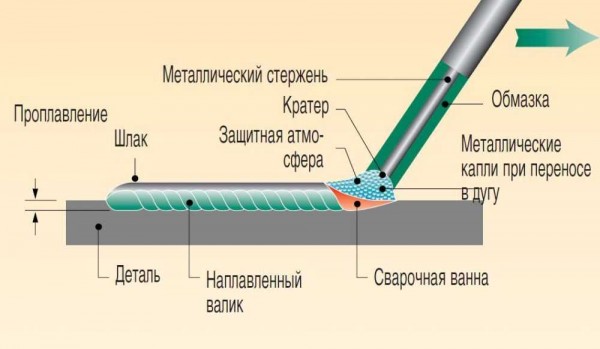
How a seam is formed during welding
To make the basics of inverter welding clearer, consider what happens when a seam is formed. To begin with, let's clarify that a welding electrode for welding metals consists of a metal core and a coating - a special coating that closes the welding area from contact with oxygen contained in the air. More details read about electrodes for inverters here.
Now about the actual welding process. An electric arc is formed when the core of the electrode and metal come into contact (read below how to ignite an arc). At the same time, the coating starts to burn. It partially melts, passing into a liquid state, and partially turns into gases. These gases surround the welding area - the weld pool. They do not allow oxygen from the air to "break through" to the molten metal. The part of the coating that has passed into a liquid state covers the molten metal, creating a second layer of protection. After cooling it turns into slag, which covers the seam with a crust. And at this stage, the slag protects the still hot metal from oxygen.
How does inverter welding
But slag and protection are far from the only process that occurs in this case, and which must be controlled. When welding, it is necessary to ensure that the junction of the two pieces of metal warms up evenly and sufficiently. Both parts should melt at the same distance from the edge. In order for the heating to be uniform, you need to keep the same distance from the tip of the electrode to the part. It is not very easy to do this: the electrode melts during welding, and particles of its molten metal are transferred by the arc into the seam. Therefore, you have to gradually move the electrode holder closer to the part. But this is not the end of the electrode welding technique. It is also necessary to "write out" some figures with its tip - zigzags, circles, Christmas trees, etc. They allow you to make the seam wider and fuse the two pieces together. The most common electrode movements are shown in the photo below.
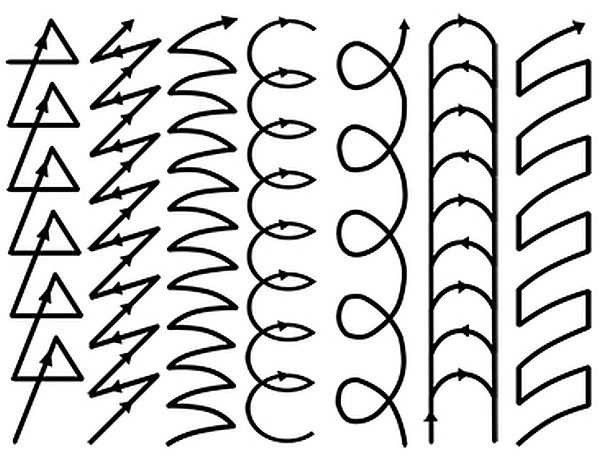
Electrode movements when welding with an inverter: for novice welders, you need to work out several movements to automatism
That is, you need to move the electrode from side to side by the width of the seam along one of these trajectories, while monitoring the state of the welded pool, and lowering the electrode as it burns out, keeping the distance to the part constant. This is such a difficult task for those who want to learn how to cook metal. It is easier with a welding inverter - the arc is constant and does not jump, but at first you may not succeed.
This very slow motion video shows the transfer of metal particles from the electrode to the weld pool and how it forms.
How to learn to weld metal with an inverter
Start learning by lighting the arc. To do this, you will need, in addition to the apparatus, metal (5-6 mm thick) and the electrode, a mask and leggings (thick leather gloves) of the welder, as well as thick clothing and boots made of thick leather to protect against sparks and dross.
They start by connecting the welding cables. Then the selected electrode is inserted into the holder (for a start, take an MP 3 with a diameter of 3 mm - they are easy to ignite and boil well). Then turn on the power, set the welding current (see table). For an electrode 3 mm in diameter, a current of 90-120 A is set. The current during the welding process can be adjusted. If you see that the result is not a roller, but just some kind of incoherent stripes, increase it. If, on the contrary, the metal is very liquid and it is difficult to move the weld pool, reduce it. The settings are very dependent on the device and the selected electrode. So try, change. By setting the current, put on a welder's mask (it will be easier for beginners to work in chameleon mask), you can work.
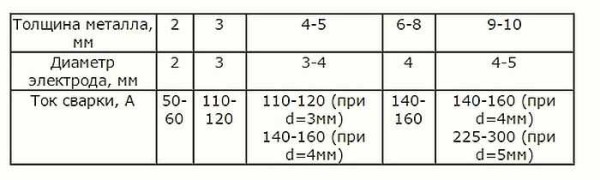
General recommendations for choosing the diameter of the electrode depending on the thickness of the metal
Inverter welding for beginners starts with learning how to light the arc. There are two methods: hitting the part with the tip of the electrode several times, or striking it like a match. Both methods work. Use whichever is more convenient for you. But for the future, keep in mind that you need to strike along the seam line - so that there are no marks on the product. You will have to practice for a while and burn a few electrodes to sustainably strike the arc.
When the arc ignites without any problems, you can move on - master the movements. This is done by padding cushions on thick metal. On a metal plate, draw a line with chalk that will replace your seam. Then strike the arc. In the place where it rested, the metal melts and becomes covered with a film of liquid slag. This place is called the welding bath. So you have to move it along the drawn line. Do this with one of the movements shown in the figure above.
In order for the bath to move, the electrode must be tilted slightly, approximately at an angle of 50-45 °. Someone has a larger angle, someone less. In general, by tilting the electrode, you change the dimensions (width) of the weld pool. You can experiment: there are a lot of different techniques in welding and it is only important that the seam is of high quality, and how you achieve this is up to you, especially since you will work for yourself and for yourself.
There are two main working positions for the electrode: forward and backward. When welding with an angle forward, we get less heat, the seam will be wider. This technique is used when welding thin metals.. Thick ones are usually welded backward.
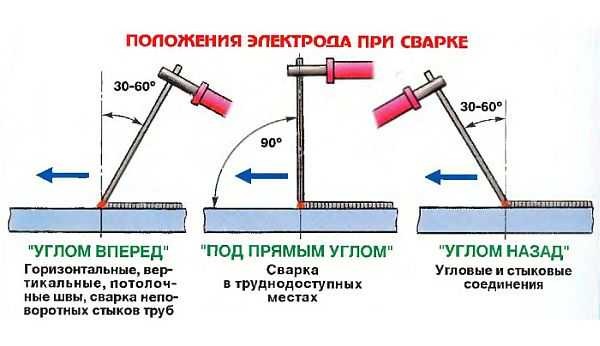
Welding electrode positions and their use
But the angle of inclination is not all the parameters that will have to be maintained. There is also the length of the arc. This is the distance from the tip of the electrode to the surface of the part. The middle arc is 2-3 mm, the short one is 1 mm or generally end-to-end, the long one is 5 mm or more until it comes off. Practice begins by working on a medium arc. Maintain 2-3 mm to metal. Then the seam will be smoother and of better quality: if the gap is too large, the arc starts to jump, the heating of the metal is insufficient, the seam is smeared, the connection is unreliable. With a short arc, another problem arises - the seam is too convex due to the fact that the hot zone is too small.This is also not good, since undercuts remain - grooves along the seam on the part - which reduce the strength of the connection.

Arc length and its effect on weld quality
After practicing for some time on laying the rollers in different movements, after the rollers are of the same width, the surfacing flakes have approximately the same dimensions, you can try to weld the seams. You can read about the types of seams and joints, as well as their preparation here, or you can watch another lesson "Welding for Dummies".
The basics of inverter welding for beginners everything. You just have to practice: you need to lime more than one electrode per workout. Even, maybe, not one kilogram. When the hand makes all the movements by itself, everything will seem completely simple to you.
To consolidate the knowledge gained, first try to train your hand a little without an electrode, practicing the movements with a pencil in your hand. It's also a good option, maybe it will seem more acceptable to you. In this video tutorial on welding with an inverter for beginners, everything is very sensible, simple and accessible. If there are any ambiguities, please review. You will understand how to properly cook with inverter welding. A lot of useful things for novice welders.
And finally, about some of the features of the operation of welding inverters. They are very afraid of dust, especially metal. Therefore, it is advisable not to use a grinder next to them and to carry out regular cleaning with a vacuum cleaner inside (after the warranty period is over). It is not recommended to work with them in the rain or in wet rooms. This is especially true for inexpensive household models. Although they have protection against electric shock, it is better to play it safe.
When choosing electrodes, pay attention to the area of their use: they must be suitable for direct current operation. When welding at the highest current or voltage, the operating mode is intermittent. It is indicated for each device in the passport.


Very clear and understandable.
Is it possible to hold the part to be welded with the hand during inverter welding
On TB with a bare hand is clearly impossible. I have Resant 160, I sometimes hold it with my hand, but I don’t work without cloth gloves. In general, if you think about it, the inverter cooks with direct current, which is less dangerous than alternating current, but still it is better not to risk it again, especially if there is high humidity.