We repair a single-lever mixer ourselves
Single-lever mixers attract with their laconic design and easy water flow control. Turning on the water, changing its temperature and pressure - all this with one turn of the knob. These devices are reliable, have a solid service life - some brand ones give a 5-year warranty. However, repairs to the single-lever mixer are periodically necessary.
The content of the article
Types of single-lever mixers and their device
Despite the external similarity, there are two types of rotary or single-lever mixers - with a cartridge (cartridge) and ball - with a ball inside. You can repair any of them, but for this you need to disassemble them first. And so that you can not only disassemble, but also assemble, it is advisable to familiarize yourself with the internal structure of each.

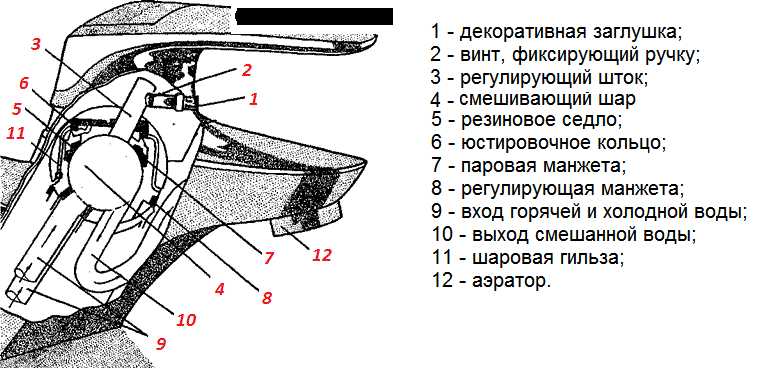
The design can be different, the structure remains the same
Cartridge mixer: structure
Cartridge mixers are so named because their locking and regulating mechanism is hidden in a special cartridge flask. In the more expensive faucet models, the cartridge body is made of ceramic, in the cheaper ones it is made of plastic. What are good about these models is the ease of repair, but with them it is not always easy to achieve the required pressure - you need a tighter control of the handle. But changing the water temperature is very easy - with a slight movement of the hand.
The structure of a single-lever valve with a cartridge is simple. If you go from top to bottom:
- Switch with retaining screw.
- Locking (clamping) nut.
- Cartridge. It mixes streams of water, the same device shuts off the water.
- The body of the mixer, which has a seat for the cartridge.
- Fasteners, studs and gaskets to ensure tightness.
- Spout (gander). It can be a separate part - in swivel models for the kitchen or part of the body - for sinks in the bathroom.
- If the spout is separate, gaskets are still installed from below and there is still a part of the body.
What does a single-lever mixer cartridge consist of?
The cartridge itself contains several (usually 4) specially shaped ceramic or metal discs. A stem is welded to the upper disc. By changing the position of the rod, we change the position of the plates relative to each other, changing the amount of water passing through the holes in the plates.
For the faucet / mixer to work properly, the plates are ground very tightly. For this reason, single-lever cartridge mixers are very demanding on water quality. If foreign fragments enter between the plates, the valve leaks or stops working altogether. To avoid this, some manufacturers put filters on the inlet pipes. But, it's better to put filters on the water supply and get clean water that can be safely supplied to household appliances.
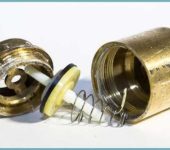
Single Lever Ball Mixer
It got its name from the element in which water is mixed - a ball with cavities. The ball is usually metal, hollow inside. The outer part is polished to a high shine. The ball has three holes - two for the inlet of cold and hot water, one for the outlet of the already mixed. A rod is attached to the ball, which goes into the cavity on the handle. This rod with a rigidly attached ball also changes the temperature of the water, its pressure.
The structure of a single-lever mixer with a ball-type water mixing mechanism
It is easier to adjust the parameters with such a device - the parts are well ground in, the handle moves easily.Mixers with a ball mechanism are less critical to the presence of mechanical impurities, but they do not respond very well to the presence of hardness salts and excess iron. So for normal operation, pre-filtration is also required here.
How to disassemble and repair a faucet with a cartridge
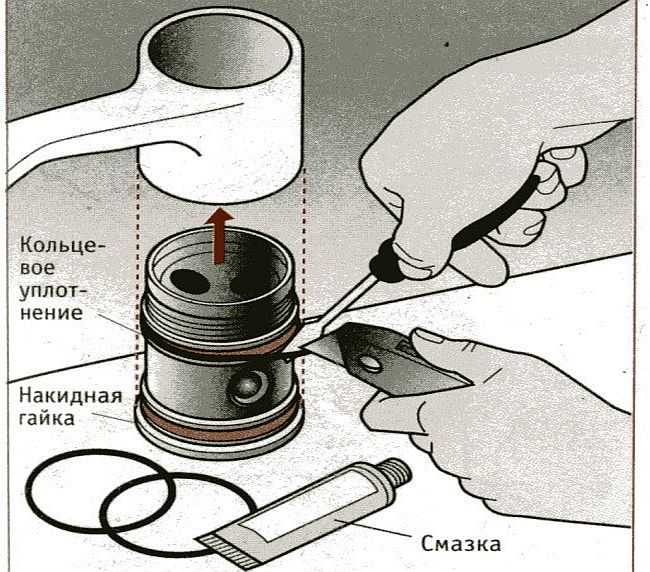
Repairs to single lever cartridge faucets often involve overhauling and cleaning the O-rings. Salts are deposited on them, debris and dirt accumulate, which causes the tap to leak. To eliminate this nuisance, the mixer is disassembled, all parts are wiped from contamination (soapy warm water), rinsed, dried, and put in place.

The sequence of installation of parts in a cartridge single-lever mixer
Let's figure out how to disassemble a faucet with a cartridge. First, turn off the water, and then the procedure is as follows:
- Remove the decorative cover on the handle. Just pick it up with a screwdriver.
- A mounting screw is hidden behind it. We unscrew it with a hex wrench and take it out.
First, unscrew the fixing screw
- Now pull up the shift lever.
- Further, a decorative washer is screwed onto the body or simply installed. We remove it.
- We unscrew the clamping nut. It has a large diameter, so an adjustable wrench or open-end set may be needed.
- We take out the cartridge. We examine it.
- Below are the gaskets, fasteners and studs. It is necessary to remember exactly the order of their laying. Sometimes it even matters which side they are laid. Therefore, be careful when disassembling.

That's all. The single lever mixer with cartridge was disassembled. As you can see, there are not very many details. The main working part is a cartridge. It is in him, inside, that mixing takes place.
Replacing the cartridge
The cartridge itself has a gasket - a rubber seat at the bottom, which ensures a snug fit to the body. Over time, rubber loses its elasticity, water begins to ooze. If this is the problem, you can first try to clean this ring of salts and deposits that have formed on it. Put the cleaned part in place, check the work. If the leak does not stop, the cartridge will have to be replaced.
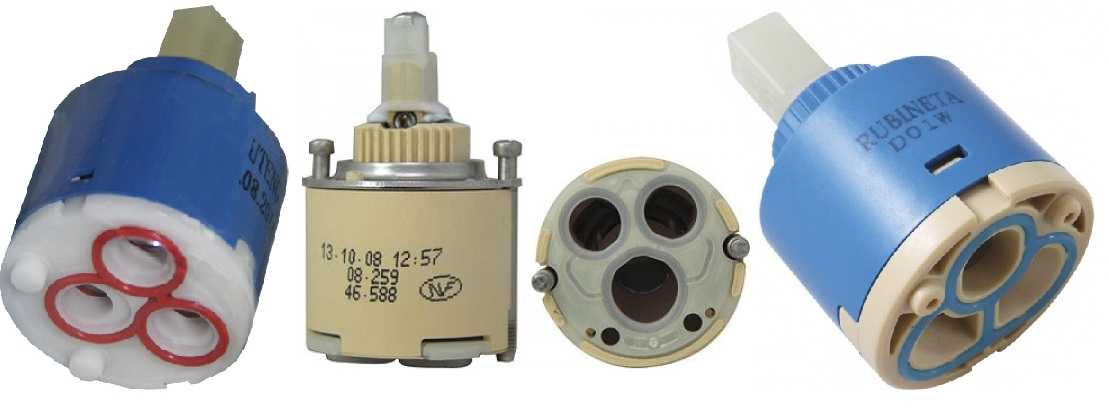
Cartridges for "one-armed" mixers
Mixer cartridges have different diameters, inlets and outlets in the lower part are located in different ways. Therefore, if you need to replace it, first you disassemble the mixer, get the treasured part and go with it to the store or to the market. You need to choose exactly the same model without any deviations. At home, you install the cartridge into the case, turn it slightly, until you feel that it has "sat down" in place. Next - the assembly, it goes in the reverse order.
Install the compression nut first. Actually, at this stage you can check how the new cartridge works. Turn on the water, adjust the temperature and pressure with the rod. To make it more convenient, you can put a handle on the stem. If everything is ok, continue building.
We disassemble and repair a single-lever ball mixer
The single-lever ball mixer was invented a little over 40 years ago. Its design is simple and reliable - there is actually nothing to break. If problems arise, it is only because of poor-quality water - dirt particles settle on the rubber seats on which the ball rests. Contact deteriorates, water seeps out and the faucet starts to leak.
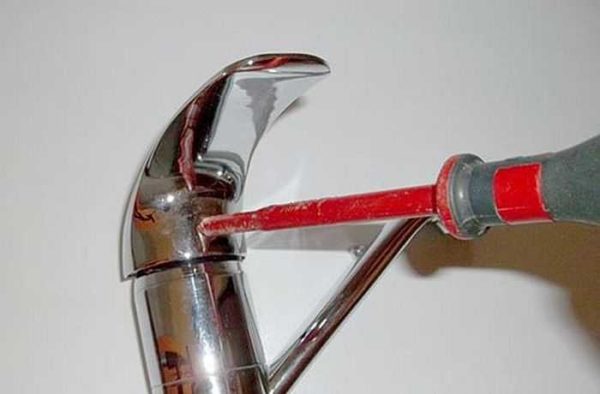
Repair of a single lever mixer with a movable spout
In this case, disassemble the mixer as described above, then remove by pulling up the spout. Remove all old gaskets. If they are stuck, you can use a flathead screwdriver or even a knife blade. You need to remove them, but they still need to be replaced. Select new ones from the removed gaskets. It is desirable that they be made of silicone, not rubber. Silicone is more elastic, retains its properties longer, better tolerates contact with water.
Lubricate new gaskets with plumbing silicone grease, install in place.Replace the spout. It must be well pressed down so that it rests on the union nut on the mixer body. Next is the assembly of the rest of the mechanism.