Connecting an RJ-45 internet socket and crimping the connector
In many families, several devices are connected to the Internet: we cannot imagine our life without the World Wide Web, so everyone needs their own line. They work mainly via the wireless protocol - Wi-Fi, but the wire is still available, since the wired Internet is still more stable than the wireless one. During the repair, all wires are hidden in the walls and "Internet" ones are no exception. They, like electrical ones, are put on sockets, only of a different standard: they are called computer or informational. They can be with different connectors, but the most common is RJ 45. Installation and connection can be done independently, but since the connector looks unusual, there are more than two or three wires in it, and the connection is not provided by soldering or twisting, you need to know how to connect an Internet outlet and the connector that must be inserted into it.
The content of the article
RJ-45 connector crimp
An Internet cable entering an apartment or house, which is most often called a twisted pair, often ends with a small plastic connector. This plastic device is the connector, usually RJ45. In professional jargon, they are also called "Jack".
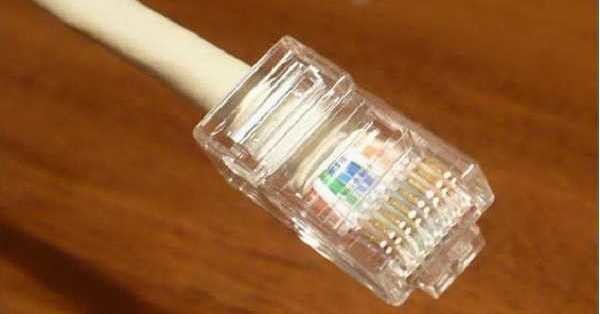
This is what an RJ-45 connector looks like
Its body is transparent, due to which wires of different colors are visible. The same devices are used on connecting wires that connect computers to each other or to a modem. Only the order of arrangement (or, as computer scientists say, pinouts) of wires can differ. The same connector plugs into a computer outlet. If you understand how the wires are distributed in the connector, there will be no problems connecting the Internet outlet.
Internet cable connection diagram by color
There are two connection schemes: T568A and T568B. The first option - "A" is practically not used in our country, and everywhere the wires are arranged according to the "B" scheme. It is also necessary to remember it, since it is it that is required in most cases.
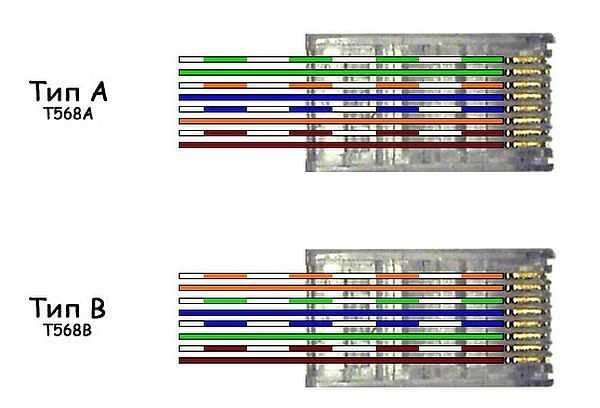
Internet cable connection diagrams by color (use option B)
To finally clarify all the questions, let's talk more about the number of wires in a twisted pair. This internet cable comes in 2-pair and 4-pair. To transfer data at speeds up to 1 Gb / s, 2-pair cables are used, from 1 to 10 Gb / s - 4-pair cables. In apartments and private houses today, basically, streams up to 100 Mb / s are brought. But with the current pace of development of Internet technology, it is quite possible that in a couple of years the speed will be calculated in Megabits. It is for this reason that it is better to immediately expand the network of eight, and not of 4 conductors. Then when you change the speed, you do not have to redo anything. The equipment will simply use more conductors. The difference in the price of the cable is small, and sockets and connectors for the Internet still use eight-pin.
If the network is already wired in two-pair, use the same connectors, only after the first three conductors laid according to scheme B, skip two contacts and put the green conductor in the place of the sixth one (see photo).
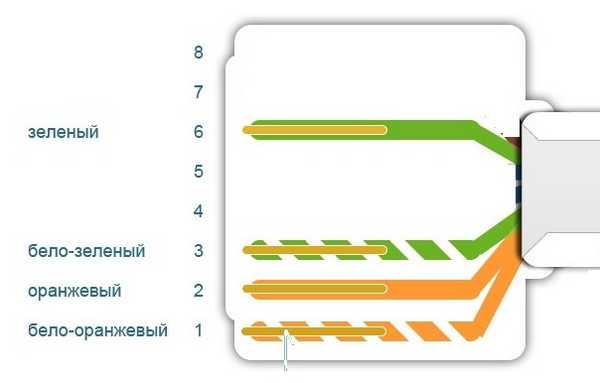
Connection diagram for 4-wire internet cable by color
Crimping a twisted pair in a connector
There are special pliers for crimping wires in the connector. They cost about $ 6-10, depending on the manufacturer. It is more convenient to work with them, although you can get by with an ordinary screwdriver and wire cutters.
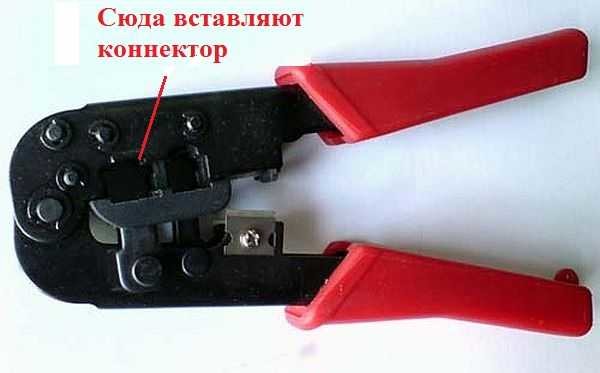
Crimping pliers for connectors (one of the options)
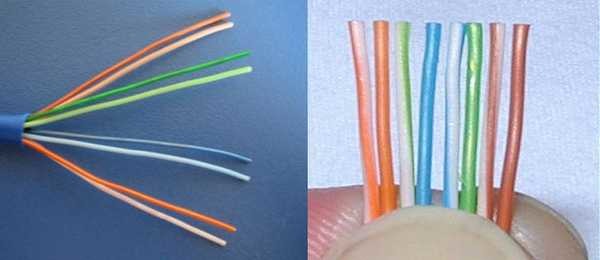
First, the insulation is removed from the twisted pair. It is removed at a distance of 7-8 cm from the end of the cable.Under it there are four pairs of conductors of different colors, twisted in twos. Sometimes there is also a thin shielding wire, just bend it to the side - we don't need it. We untwist the pairs, align the wires, spreading them in different directions. Then we add it according to the "B" scheme.
The procedure for terminating the RJ-45 connector in the connector
We clamp the wires in the right order between the thumb and forefinger, lay out the wires evenly, tightly to each other. Having aligned everything, we take the wire cutters and cut off the excess length of the wires laid out in order: 10-12 mm should remain. If you attach the connector as in the photo, the insulation of the twisted pair should start above the latch.
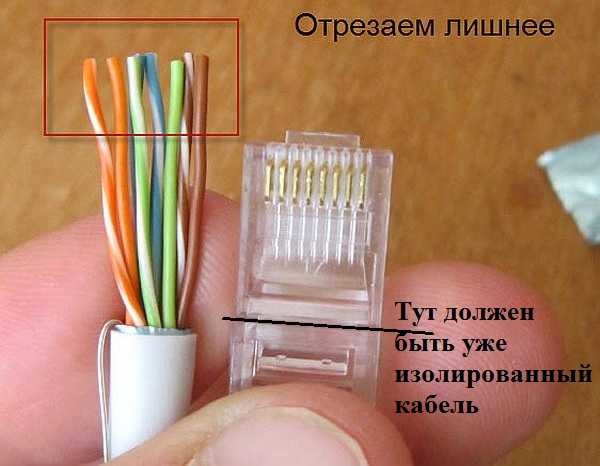
Cut off so that there are 10-12 mm wires
We put a twisted pair with cut wires into the connector. Please note that you need to take it with the latch (tab on the cover) down.
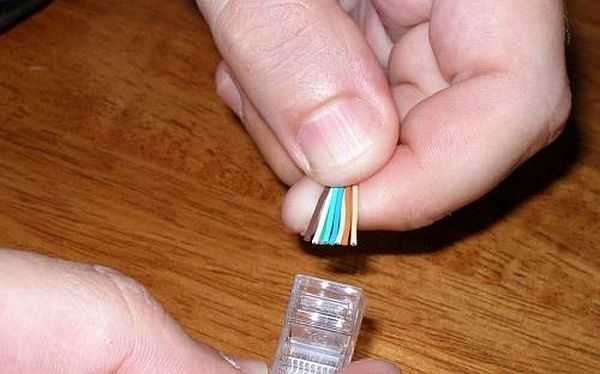
We put the wires into the connector
Each conductor must get into a special path. Insert the wires all the way - they should reach the edge of the connector. Hold the cable against the edge of the connector and insert it into the pliers. The handles of the pincers are brought together smoothly. If the body is normal, no special effort is required. If you feel that "does not go" double-check that the RJ45 is correctly seated in the socket. If everything is ok, try again.
When pressed, the protrusions in the pliers will move the conductors to the microknives, which will cut through the protective sheath and provide contact.
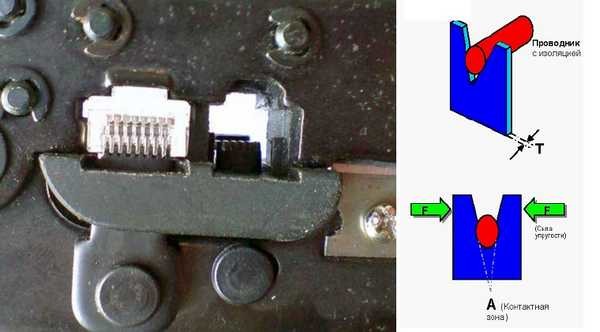
How connector crimping pliers work
Such a connection is reliable and rarely problems with it. And if something happens, it is easy to reseal the cable: cut off and repeat the process with a different jack.
You can read about connecting a chandelier here.
Video tutorial: crimping an RJ-45 connector with pliers and a screwdriver
The procedure is simple and easy to repeat. You may find it easier to do everything after the video. It shows how to work with pliers, as well as how to do without them, and do everything with a regular straight screwdriver.
How to connect an internet cable to an outlet
Now we got to just before connecting the Internet socket. Let's start with the varieties. Like ordinary electrical outlets, information outlets come in two versions:
- For indoor installation. A plastic mounting box is embedded in the wall. The contact part of the socket is then inserted into it and fixed, and everything is closed on top with a plastic decorative panel.
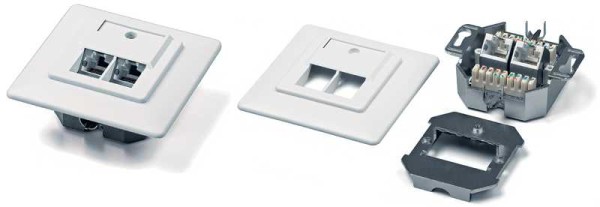
Computer socket RJ45 internal
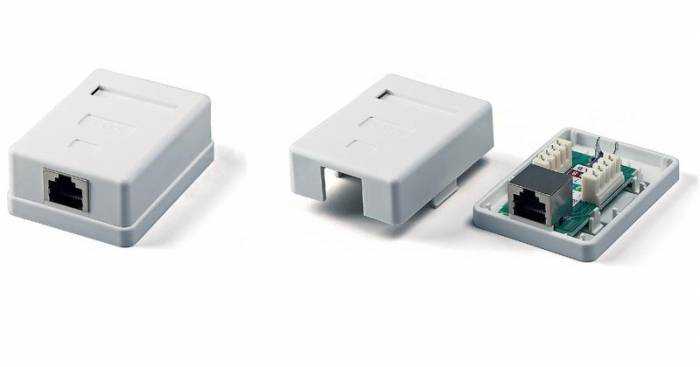
- For outdoor installation. This type of socket is very similar in appearance to the usual telephone sockets: a small plastic case that is attached to the wall. It also consists of several parts. First, the housing is mounted with a contact plate, then the wires are connected, and then everything is closed with a protective cap.

Outdoor RJ-45 Computer Socket - Wall

According to the number of connection points, there are single and double computer sockets.
Although outwardly computer sockets are different, the principle of connecting the conductors is the same. There are special contacts equipped with microknives. The protective sheath is cut through the inserted conductor. As a result, the metal of the microknife contacts adheres tightly to the metal of the conductor.
How to connect a computer wall socket
Inside each socket there is a hint on how to place the wires when connecting the internet cable. Manufacturers stick on the color scheme that we saw when crimping the connector. There are also two options - "A" and "B", and in the same way we use option "B".
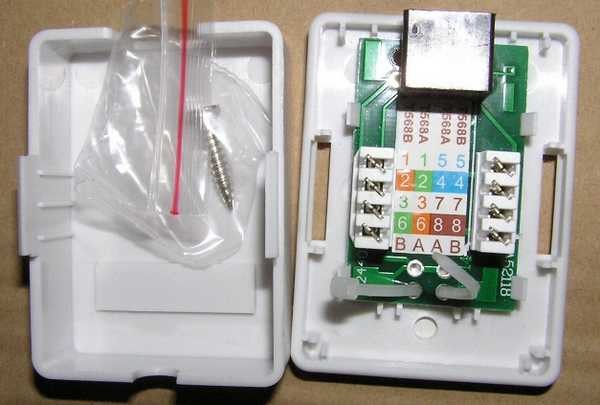
An example of applying color coding on a computer socket
The case is mounted to the wall, usually with the cable entry hole up, the computer connector down. Further actions are simple:
- Remove the protective insulation from the twisted pair by about 5-7 cm. This must be done carefully so as not to damage the insulation of the conductors.
- In the photo you can see that there is a small plastic clamp on the board. A conductor is brought into it, and fixed so that the piece stripped of insulation is below the clamp.
Connecting a 4-wire wall outlet
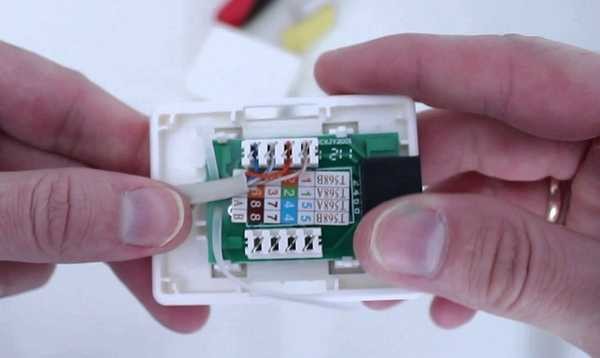
- On the case you can see the microknife contacts.Lead a wire of the desired color to them and insert it, trying to stretch it to the very bottom of the contact group. When the guide passes the knives, a click is heard. This means that it is in place and the insulation is cut through. If it is not possible to achieve a click, after everything has been divorced according to the colors on the contacts, take an ordinary straight screwdriver with a thin blade and forcibly lower the wires down. The same can be done with the back (non-sharp) side of the knife.
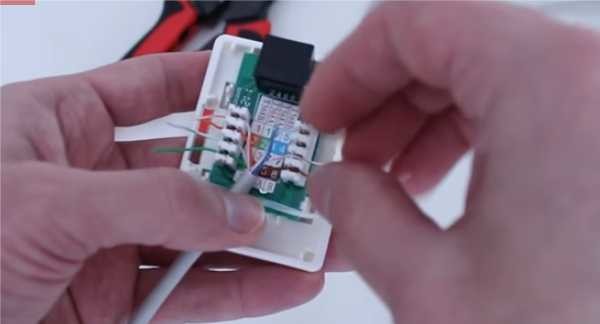
Eight conductors are connected according to the "B" scheme
- After all the conductors have reached their place, the excess (protruding pieces) are cut off.
- Put on the lid.
Connecting a twisted pair cable to an outlet is really a simple procedure. Even the first time, it will take a few minutes. You can see what and how they are doing in the video again. It first shows the Internet cable connection with 4 wires, then - with 8.
Sometimes you have to get up in bed to turn off the light. But you can do lighting control from several points. How - read in the article about connection of pass-through switches.
How to connect an internal internet socket
We will not describe the installation of the plastic box - that's another topic. Let's understand the features of connection and assembly. The main catch here is how to disassemble computer sockets. When connecting conductors to them, it is necessary to reach the contact part: a small ceramic or plastic case with built-in microknife contacts. Conductors are connected to this mounting plate, and then the case is assembled again. And the whole problem is that they are assembled / disassembled in different ways by different manufacturers.
For example, from the popular manufacturer of computer sockets Legrand (Legrand) in order to get to the connectors in the Legrand Valena RJ45 computer outlet, you need to remove the front cover. Under it you will find a white plastic impeller (as in the photo) with an arrow on it.
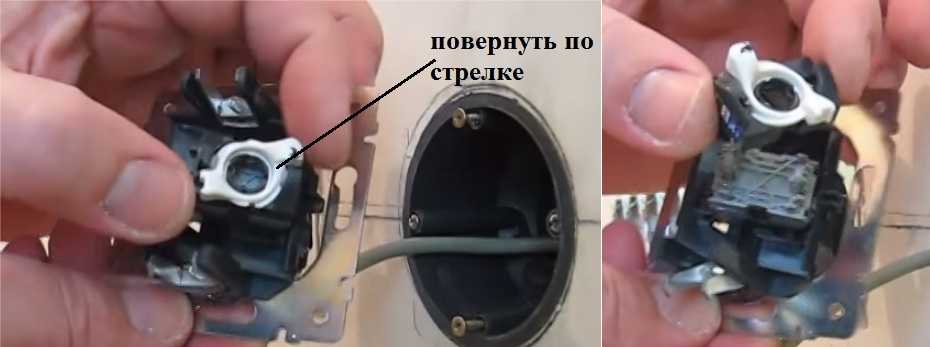
How to disassemble the Internet socket RJ-45 Legrand (Legrand)
It is necessary to turn the impeller in the direction of the arrow, after which you will have the housing and the contact plate in your hands. It is color-coded for the conductors. The connection is no different, except that - first, you need to thread a twisted pair into the hole on the plate, and then wire the wires.
For clarity, watch the video.
Another popular manufacturer of such equipment is Lezard (Lezard). His system is different. The bezel and metal frame are fixed with small screws. It is easy to unscrew them, but the inner contact plate keeps everything on the clips. When assembling and disassembling Lezard computer sockets in the right places, it is necessary to squeeze the contacts with a screwdriver.
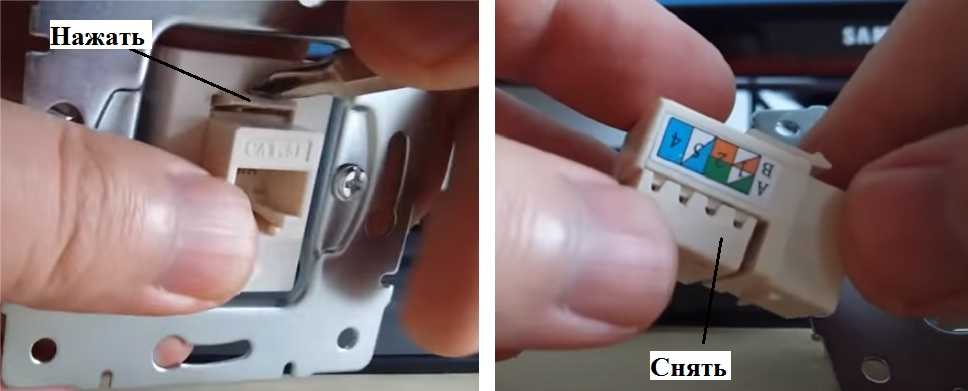
How to disassemble an Internet outlet Lezard (Lesard)
To remove the plastic contact block from the housing, it is necessary to push down on the latch on the top. After that, you will have a small box in your hands. But that's not all. It is necessary to remove the plastic cover that covers and presses the conductors. They remove it by prying the side petals with a screwdriver. The plastic is elastic and the effort required is pretty decent. Just don't overdo it: it's still plastic. After that, the wiring is standard: according to the markings on the sides (do not forget that we are using the "B" scheme).
And again, to consolidate the material, we recommend watching the video.
If you know how to connect an Internet outlet, even with an unfamiliar model is easy to figure out. And now you can upgrade your network yourself (increase the length of the twisted pair, move the computer to another place, make another connection point, etc.), without the involvement of specialists. There is one more question left: how to connect dual sockets. Two cables are brought to them and then the jointing is carried out according to the color scheme. This is possible when your network is formed by a modem or two Internet lines come in. Is it possible to expand both inputs with one cable? It is possible, but you need not to get confused in the color coding of the wires in the further wiring of the network (remember which color you used instead of which one).


somehow a screwdriver flies from the contacts, goes to the side
Take a larger screwdriver.
Sorry, can you tell me which cable is better to use in the apartment for wiring the Internet? So far I have decided on one: SPECLAN S / FTP Cat 7A PUR 4x2x0,48
Taking into account - for the future. Please tell me which cable is preferable, taking into account laying in walls and a maximum distance of 23-25 meters. I would also like to know suggestions and examples of installing a low-current cabinet with a router, and routing cables - connecting them LAN and WAN to an ADSL router. Appreciated in advance.
The cable you choose is good, but it's for outdoor routing. If you need very high reliability, take it. And in fact, you can take a shielded twisted pair. The screen is in pairs and common. For laying in a wall, you can take a flat one. Then the strobe will generally be of minimum depth.
what is this nonsense with the order of flowers ?! the main thing is that the jointing on both ends matches the colors and that's it, no matter in what order they are, you even start with blue and end with green, the main thing is that the other end would be the same.
Don't muddy the water! Coloring in random order will roll with a short cable, but if it is long, then it is not at all a fact that everything will work fine. The cable is called twisted pair for a reason - the wires are twisted into pigtails to reduce the influence of interference. It is imperative to observe the colors!
These are the ones like you and they crimp, and then if you need to re-crimp the cable (according to scheme B), you have to not throw out the old connector, but look at how it was, and if there are ten of them, how we had to shift the cable here, while everyone who worked before us in different ways, they were crimped, so they sat later, each cable looked like it was crimped, there is a standard for it and we must adhere to it. Sorry if you were rude.
You're wrong, just a standard crimp provides the maximum range of stable communication. In the Type B standard, for example, to reduce the influence of interference, the blue and green wires are specially interchanged.
The twisted-pair signal is transmitted differential - that is, it travels in antiphase along two conductors, and in the receiver the signals are subtracted from each other, - therefore, the main signal is amplified, and common-mode noise is subtracted
People Help me out, Broke my whole head, collided with such a socket abb zenit rj45
Task: you need to connect several TVs through the Tplink 105 HUB.
That is, the scheme is as follows: Tplink router into it Rostel Internet over LAN
further from the router, the cable of its own factory, inserted into the HUB to the cable hub is crimped according to standard B, and at the other end of the cables, the abb zenit rj45 sockets
to connect tv to the internet
I tried the standard no signal ????????
By what type should the sockets be connected if on both sides of the cable? From the router to the outlet, it is crimped as type B, on the other side of the cable from the outlet to the computer, also as type B.
Internet is carried out with noodles - 2 cores, how to connect REXANT 1-port RJ-45 (8P8C)?