How to repair an iron yourself
If the iron stops heating, you can buy a new one, but often the damage is not very serious and you can fix it yourself. If you know how to work with a screwdriver and a multimeter, you can do it. How to repair the iron with your own hands and we will talk in this article.
The content of the article
General device
Since irons are produced by very different companies, they differ slightly - in shape, heating speed, quality of spare parts, etc. But the overall structure remains the same. Available:
- Sole with heating element built into it. If there is a steamer function, the soleplate has a number of holes for steam to escape.
- A thermostat with a handle that allows you to set the required heating temperature of the sole.
- Container / tank for water used for steaming.
- There is a nozzle for spraying water, forced steam. There is also a steam regulator. With its help, the frequency of the automatic supply of evaporated water is set.
- The iron is connected to the network using an electric cord, which is attached to the terminal block located in the back under the plastic cover.
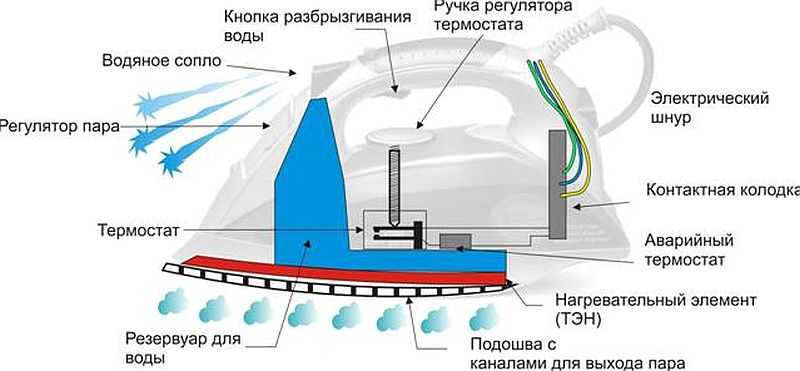
General device of the electric iron
After you have familiarized yourself in general terms with what is where, you can start repairing the iron with your own hands.
What will be needed for work
To work, you need a set of screwdrivers - cross and flat. You will need a wide knife or an unnecessary plastic card - pry off parts of the iron with snaps. To check the integrity of the parts, you will need a multimeter (how to use it read here). You may also need soldering iron - this is if you have to change any parts.
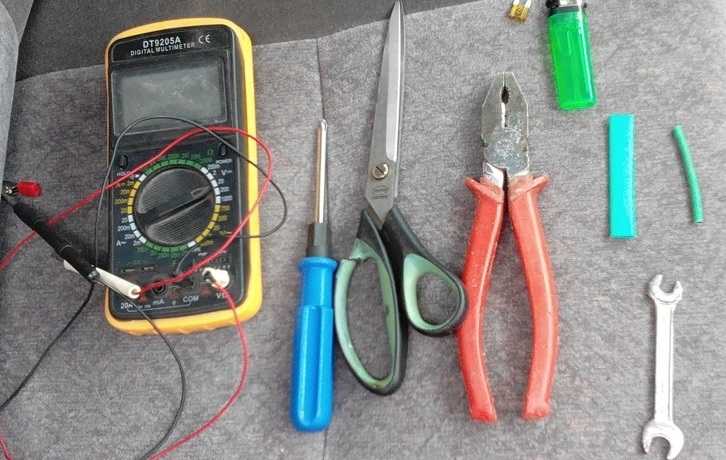
Tools you may need when repairing your iron
All of the tools, but in the process of work sometimes you need electrical tape or heat shrink tubes, you may need sandpaper, pliers.
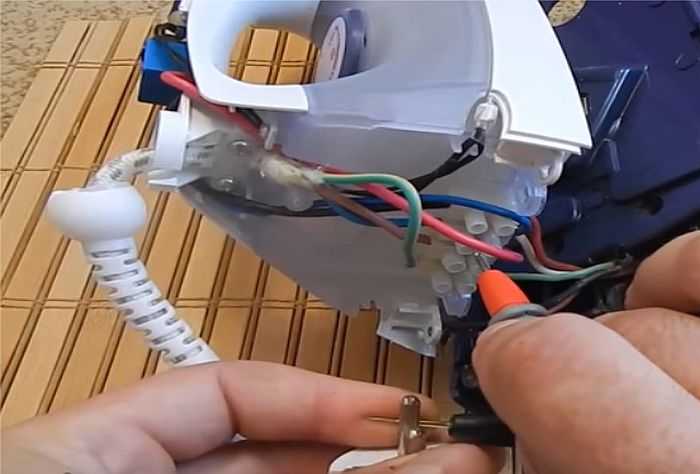
How to disassemble the iron
The first difficulty faced by those wishing to repair the iron on their own is disassembly. This is far from simple and obvious. The easiest way is to remove the back panel. There are several screws that are visible and which are difficult to unscrew. In addition to screws, there may be latches. So, having unscrewed all the visible fasteners, we pry the cover with the tip of a screwdriver or an old plastic card, separate the cover from the case.
Under it, a terminal block is found to which the cord is attached. If there are problems with the cord, you can not disassemble the iron further. But if everything is fine with the cord, you will have to disassemble further, and problems may arise with this.
In some irons - Philips (Philips), Tefal (Tefal) there are also bolts under the lid. We unscrew them too. In general, if we see fasteners, we remove them.
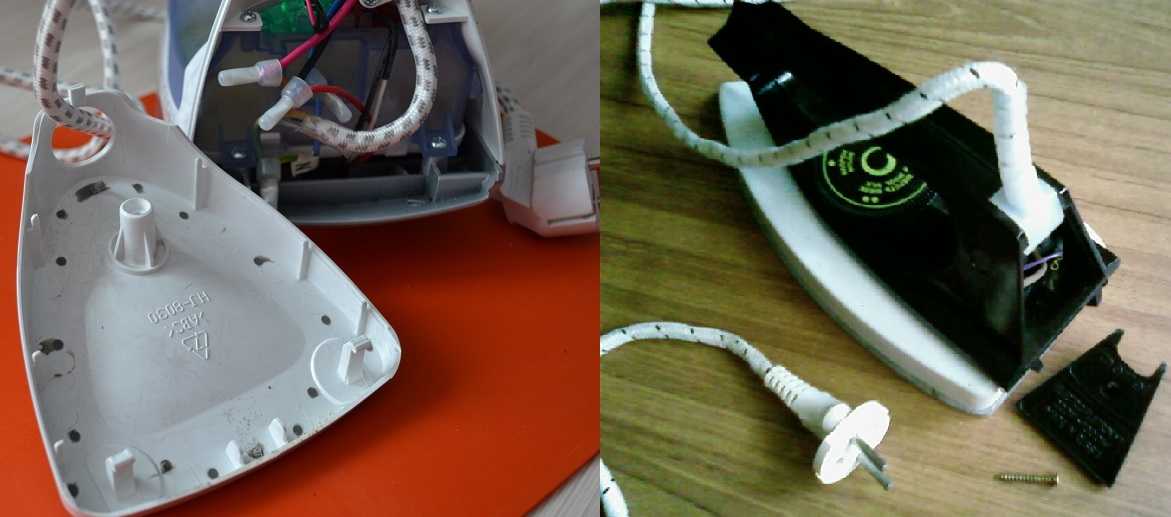
Removing the back cover is the first thing to do when disassembling the iron
Each manufacturer develops its own design, and it often changes from model to model. Therefore, difficulties arise. But there are several points that are found in almost any manufacturer.
Immediately you need to remove the temperature regulator dial and the steam supply buttons for which you need to hold them in your fingers and pull them up. The buttons may have latches, so you may need something thin to squeeze them out a little - you can pry them off with a screwdriver.
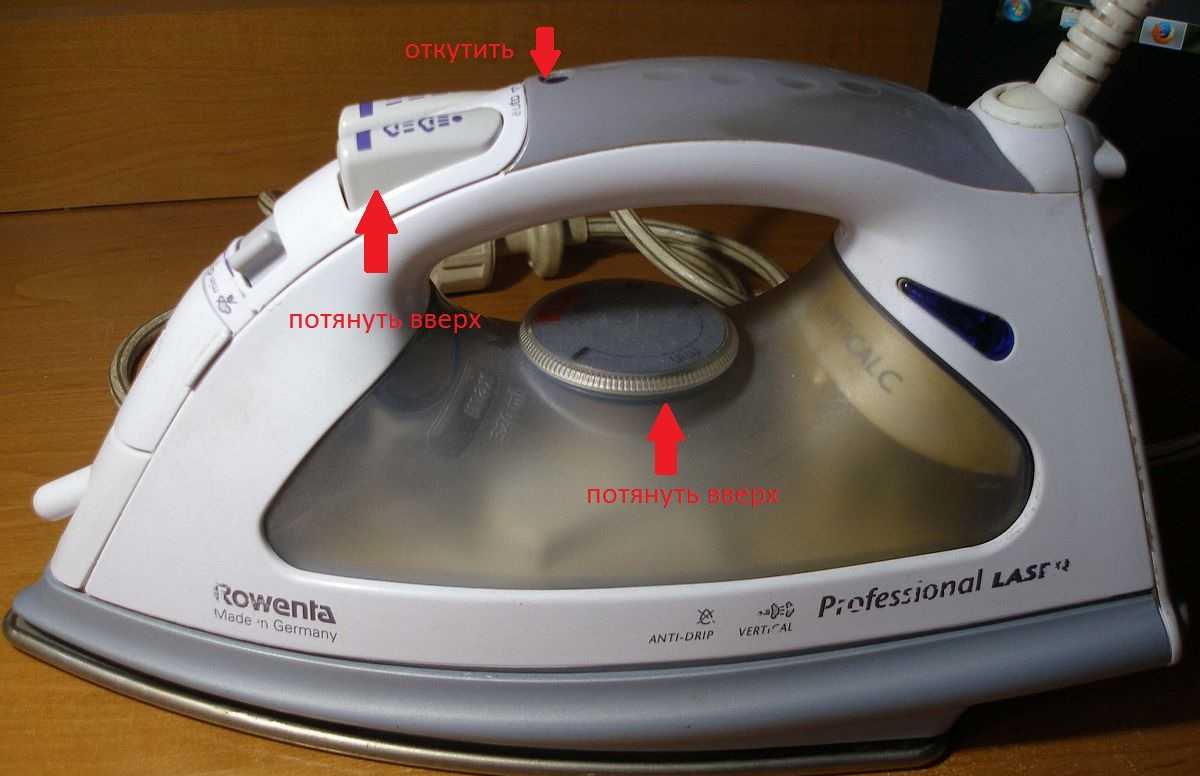
To disassemble the iron you need to remove the buttons
Some irons, such as the Rowenta, as in the photo, have bolts on the handle (found in some Scarlet models). If there are any, we unscrew them. A screw is also hidden under the removed buttons, we also unscrew it. Then remove the upper plastic parts. They are usually fastened with latches.To make it easier to remove them, you can put a knife blade or a piece of plastic (plastic card) into the lock.
There are usually some bolts under the covers. Having unscrewed them, we continue disassembling until the body and sole are separated. Unfortunately, it is impossible to give more precise recommendations - there are too different designs. What can be advised - to act slowly and carefully. And a few videos on how to disassemble irons of different brands.
Power cord
Failure of the electrical cord is a fairly common type of breakdown. With such damage, the iron may not turn on at all or work in fits and starts, the sole may not heat well. The cord can bend, curl, insulation is damaged at the bend, some wires can be frayed completely or partially. If there is such damage, it is better to replace the cord, regardless of whether it is the cause or not. In any case, all places with damaged insulation must be insulated.
In case of any damage, any repair of the iron begins with an inspection of the cord. To accurately determine whether it is normal or not, you need to ring it. To do this, simply remove the back cover. The terminal block will become available, to which the cord is connected. You will need a tester or multimeter. We put it in the dialing mode, we press one probe to one contact of the plug, with the second we touch one of the wires on the block. When you touch the "correct" wire, the multimeter should squeak. This means that the wire is intact.
Checking the integrity of the power cord
The color of the insulation of the conductors can be any, but yellow-green is necessarily grounding (it must be checked by installing the probe on a small metal plate at the bottom of the plug). The other two are connected to the pins of the plug. Here one of these two wires should ring with the pin to which you pressed the multimeter probe. We repeat the same operation with another pin.
For complete confidence in the serviceability of the cord, you need to wrinkle / twist it during the dialing. Especially in places where there are insulation problems. If the squeak from such actions is interrupted, it is better to replace the cord. It also needs to be replaced if one or both pins do not ring. You may be lucky and you will not need further repair of the iron.
Checking the performance of the heating element
If the iron does not heat up at all, the heating element may have burned out. If so, then it is worth buying a new iron, as replacement will cost almost the same amount. But first of all, you need to make sure that it is the heating element that is to blame.

These are the outputs of the heating element of the iron
In order to check the heating element, we get to the very sole of the iron. On it, closer to the back, there are two outputs of the heating element. We transfer the multimeter to the position of resistance measurement (up to 1000 Ohm), we take measurements. If the numbers on the display are of the order of 25 ° Ohm, then the heating element is normal, if more, it is burned out. As already mentioned, if the heating element burns out, it is not worth repairing the iron - it is more profitable to buy a new one.
Checking the thermostat
The thermostat looks like a plate with a group of contacts and a protruding plastic pin, on which the disc is then put on.
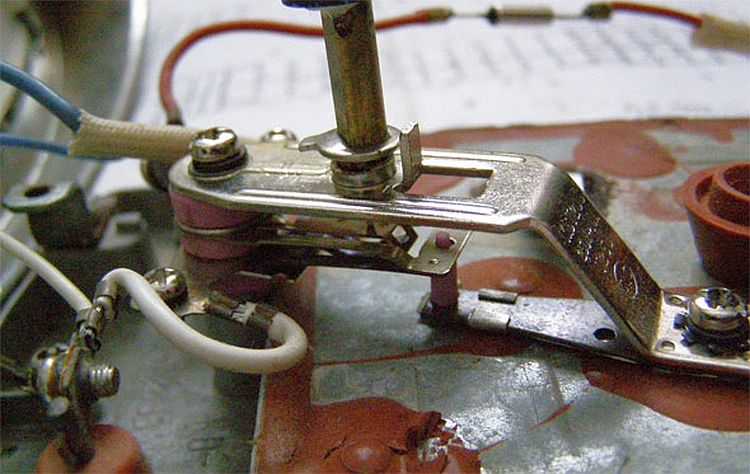
This is the thermostat on the iron
Two contacts fit the plate. We install the multimeter probes on them and check the operability (we ring). In the "off" position, the sound of the multimeter should disappear; when turned on and turned to any position, it should continue to sound.
The damage may consist in the fact that in the "on" position there is still no contact - then the iron does not heat at all. The situation may be different - it is not switched off by the regulator and / or does not respond to the regulator position. Both reasons are in contacts. And, most likely, they are burnt.
In the first case, carbon deposits can interfere, which can be cleaned off by thrusting a piece of sandpaper with a fine grain between the contacts and a couple of times and "sliding" along the contacts.If there is no sandpaper, you can use a nail file, but you must act carefully - the temperature settings depend on the bending of the plates. So you can't bend them too much.
In the second case - if the iron does not turn off - the contacts may have burnt - melted. Repairing the iron in this case consists in trying to separate them. But this trick rarely succeeds. The way out is to replace it.

Thermostat from a different angle
There may be another point: when falling, the contacts could somehow interlock. When the soleplate of the iron is heated, the bending thermoplate presses on the contact groups, but the contacts cannot open. The result is the same - the iron does not turn off when heated. Repairing the iron is also similar - we are trying to return mobility to the plates, trying not to bend them. If it doesn't work, we change it.
Fuse check
A thermal fuse is installed in approximately the same area as the thermostat. It stands in case of overheating of the sole of the iron - it burns out if the iron heats up to dangerous temperatures. Usually a protective tube is put on this fuse and most often it is white.

Iron repair: fuse and its continuity
Find contacts, call. In the normal state, the fuse "rings", if it is blown out - silence. If desired, you can move the tube, ring it directly - there may be a break / burnout of the connecting wire. If the fuse is blown, you solder it, look for a similar one and install it in place.
It is not worth excluding the thermal fuse from the circuit - it will save you from fire in case of problems with the thermostat: it will simply burn out and the iron will not work. And even though the iron will require repair, your home will be safe.
Steam spray system
If almost no steam comes out of the iron, and there is water in the container, the holes are most likely clogged with salts. You can restore your performance with a simple technique. In a bowl with low sides (a frying pan or baking sheet is suitable), pour water and vinegar (ordinary, table vinegar without dyes). One glass of vinegar per liter of water. The second recipe - 2 teaspoons of citric acid for 250 ml of boiling water. In the dishes with the prepared liquid, lower the disconnected iron. The liquid should cover the sole.
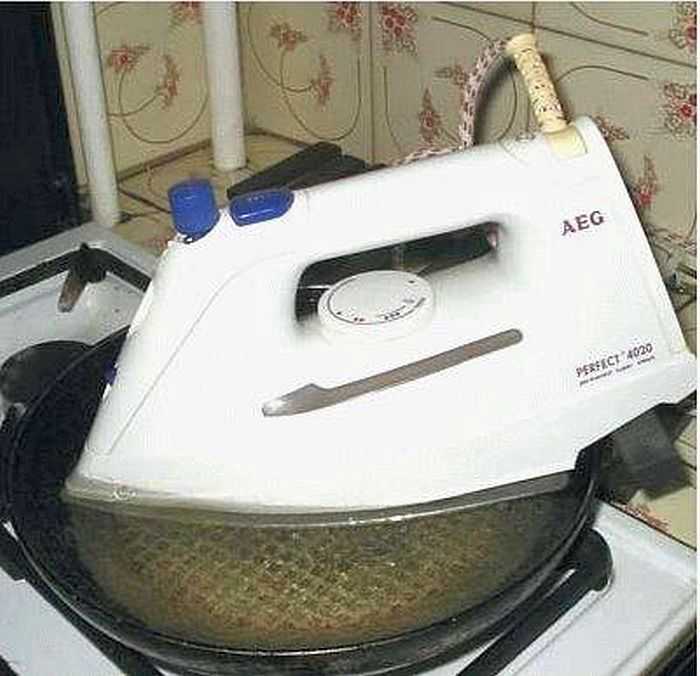
Cleaning the steam vents on the iron
Put the container with the iron on fire, bring to a boil, turn it off. Wait until it cools down. Warm up again. This can be repeated 3-4 times. Until the salts dissolve.
Sometimes water stops coming out of the spray arm. Most likely, this is due to the fact that the tube is disconnected. In this case, the repair of the iron consists in the fact that it is necessary to disassemble the panel on which the injection buttons are fixed and reinstall all the tubes and wires.
The second way to descale the iron is to disassemble it completely so that one sole remains. Cover the sole with tape so that no water seeps out, but you can also put it in a dish. Pour hot water with vinegar or citric acid inside the sole, let it cool, drain, pour over again. Continue this way until you are satisfied with the result. Then rinse with water and collect.


Thank you!
Simple, clear, fast! The author is well done for the 21st century!
Thank you very much, now I will know what the iron master was doing