How to install a split system (air conditioner) yourself
Climate technology and, in particular, split systems, which are habitually called air conditioners, help to survive the summer heat and stuffiness. The equipment is not cheap, but worst of all, it costs a little less to install it than the equipment. Therefore, many people think about self-installation. Do-it-yourself installation of the air conditioner is possible, but there are many little things and features, ignorance of which leads to rapid wear of the equipment. Detailed step-by-step instructions will help you get it right.
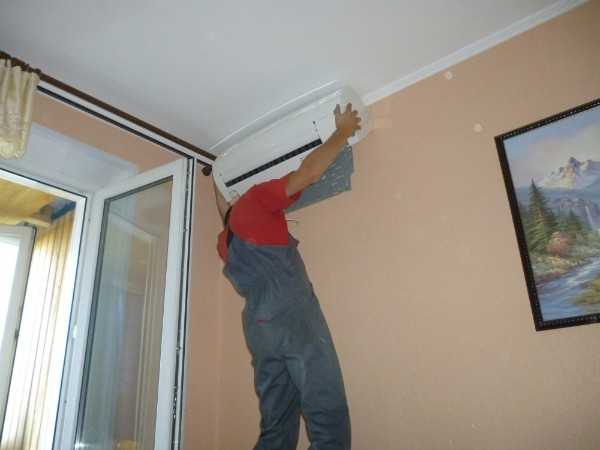
Installing an air conditioner with your own hands will save a decent amount
The content of the article
Seat selection
Do-it-yourself air conditioner installation begins with determining the location of the equipment. Since split systems consist of two or more units, you will have to choose a place for both. In this case, it is necessary to take into account how the cold air will spread in the house or apartment, and also take into account the technical requirements.
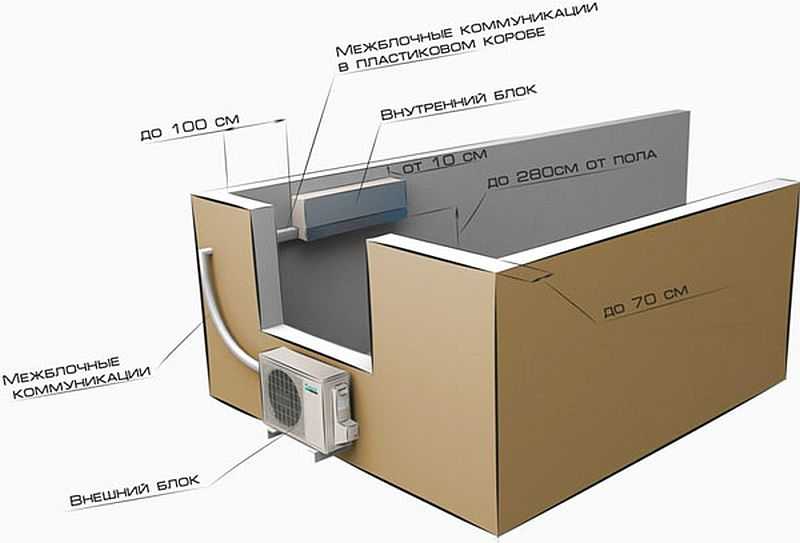
Let's start with the technical requirements. When choosing the location of the indoor unit, we take into account the following requirements:
- from the block to the ceiling - at least 15 cm (for some manufacturers, at least 20-30 cm);
- to the side wall - at least 30 cm;
- to an obstacle against which the flow of cold air will break - at least 150 cm.
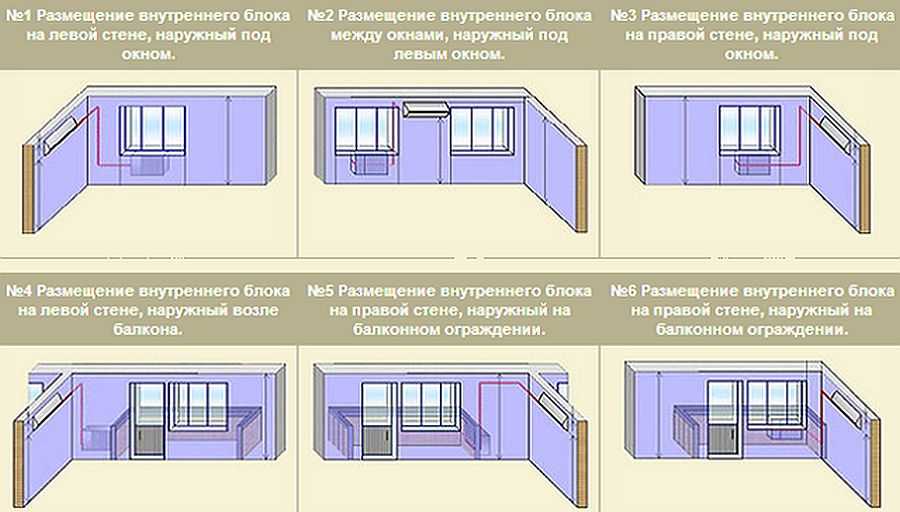
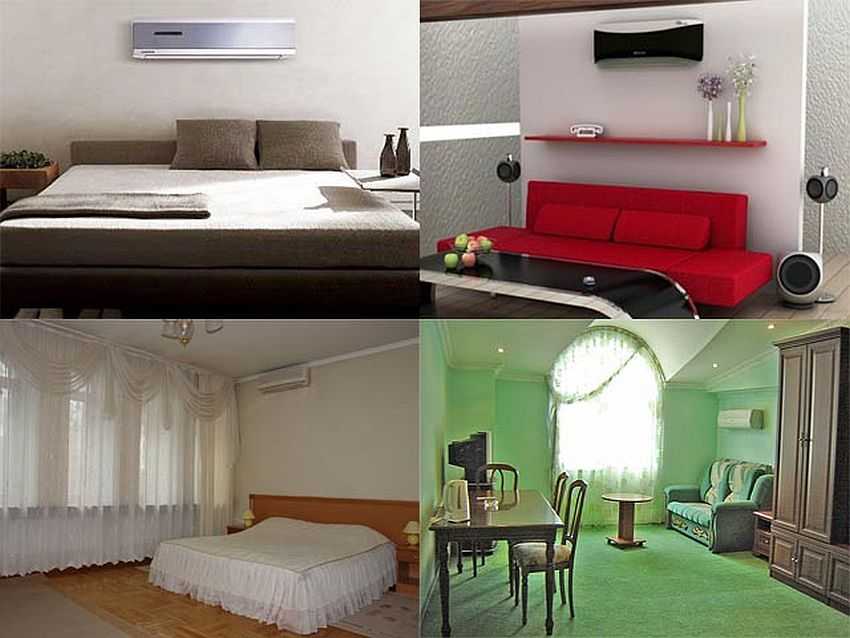
Common options for installing air conditioners
The outdoor unit is usually placed near a window or on an open balcony, if available. On a glazed balcony / loggia, installation on a fence (if it has sufficient bearing capacity) or next to it on the wall is possible. If you live on the first or second floor of a high-rise building, they try to put the outdoor unit above the window level - away from passers-by. On higher floors, it can be placed under a window or to the side.
If the installation of an air conditioner with your own hands is planned in a private house, a place is usually chosen based on the bearing capacity of the walls. If you have a ventilated facade, you can use a special mount or hang the unit on the base, if any.
When choosing the location of the split-system blocks, you must also remember that in most cases the minimum and maximum distance between the blocks is normalized. Specific figures depend on the manufacturer. For example, the minimum distance could be 1.5m, 2.5m (different Daikin models) and even 3m (Panasonic). For some manufacturers, the minimum length is not regulated, that is, it can be any. In this case, you can install back-to-back blocks. Installers call this method of installation "sandwich".
Do-it-yourself installation of the air conditioner begins with the choice of its location
The situation with the maximum distance between the two blocks is a little simpler. It is usually 6 meters. There may be more, but then additional refueling of the system with freon will be required, and this is an additional cost, and considerable. Therefore, they are trying to invest in the required 6 meters.
What is required for self-installation
You probably know how much it costs to install an air conditioner by specialists. When asked where these prices come from, because the work only takes 3 hours, they answer that the equipment is very expensive and its depreciation makes up a significant part of the cost. This may be true, but most of this equipment may already be on the farm.An exception is a vacuum pump, but many crews do without it, since a normal one really costs a lot, and a bad one is of no use.
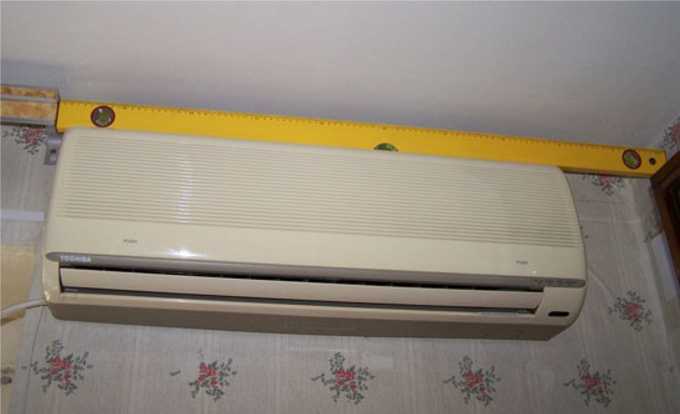
When installing, it is important to keep the blocks horizontally. This requires a good building level.
Equipment
So, to install the air conditioner with your own hands, you will need the following equipment:
- A puncher to make a hole in the outer wall, into which the communications connecting the indoor and outdoor blocks are laid.
- Drill for installing fasteners with a set of drills of different diameters.
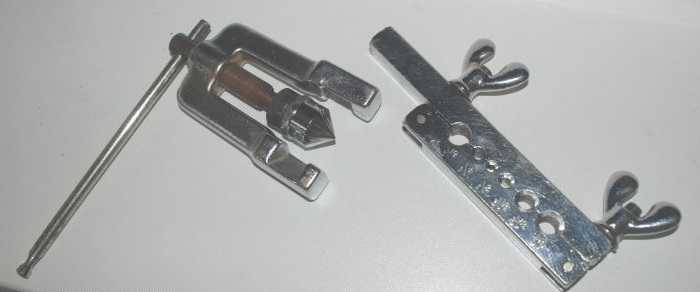
- A pipe cutter for cutting copper pipes and a rimmer for deburring (you can do it with a file / natfil and sandpaper).
- Flare tool for copper pipes.
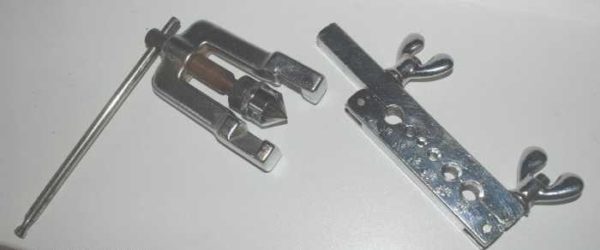
Pipe expanding device
A vacuum pump is required for an ideal installation, but usually there is nowhere to take it and on routes up to 6 meters they do without it.
Materials
To connect and install two blocks of split systems, you will need the following consumables:
- Cable for power connection and for connecting blocks. The brand and parameters of the cable depend on the manufacturers and are usually indicated in the passport in the installation instructions. Usually this is a 4-core cable with a cross section of 2 mm2 or 2.5 mm2. The cable length is equal to the route length with a small margin.
- Copper thick-walled seamless pipes (not plumbing, but special for cooling and air conditioning systems). Pipes will be required in two diameters - larger and smaller. Specific figures will be indicated in the manual, the length of each segment is equal to the length of the track plus 20-30 cm for the reserve. Once again, we draw your attention to the fact that copper pipes are not water pipes, but for the refrigeration industry. They have other copper - softer, which expands well and can provide the required tightness. Copper tubes should be transported and stored with muffled edges to prevent dust from entering there. It is very important.
Copper pipes need special, thick-walled, seamless soft copper
- Insulation for pipes made of technical rubber. Available in dark gray or black. The color does not affect the quality, it is supplied in sections of two meters. The required length is equal to the route length. We need insulation for both pipe diameters - larger and smaller.
- Drainage tube. Experts advise installing a special corrugated hose with a plastic spiral inside. When self-installing, it is often replaced with a polypropylene pipe. Drainage tube length - route length plus 80 cm.
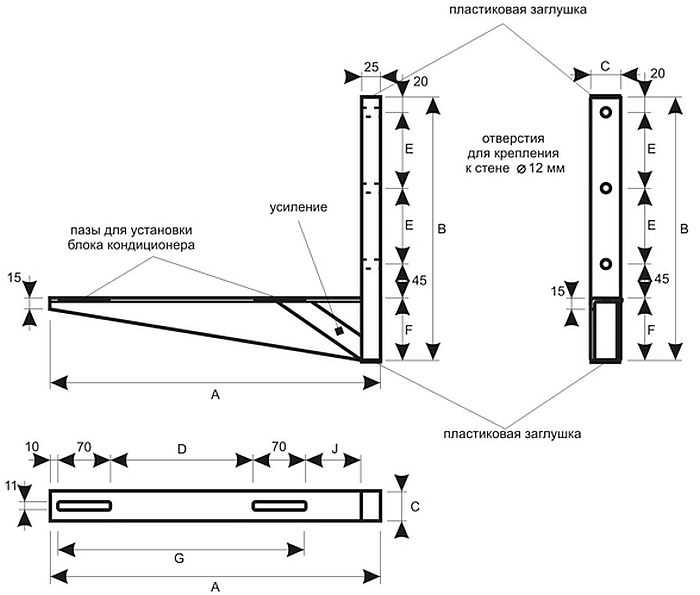
- Two L-shaped brackets for fixing the outdoor unit. Their size should correspond to the dimensions of the block, and the bearing capacity should exceed its mass by 4-5 times. This margin is necessary to compensate for wind and snow loads. It is advisable to buy them from firms that sell components for air conditioners. Conventional brackets can be unreliable.

Brackets for air conditioners must withstand a heavy load - 3-4 times the weight of the outdoor unit
- Bolts, anchors, dowels. The type, size and quantity depend on the type of brackets and mounting plate for the indoor unit, and the type of walls on which the air conditioner is mounted.
- Plastic box 60 * 80 cm - so that you can close the laid communications.
This is all you need to install the air conditioner yourself.
Installation procedure and features of work
There is nothing super-complicated in self-installation of a split-system, but there are a lot of nuances that can affect the durability and quality of the equipment. First of all, before starting work, you should carefully read the installation and operating instructions that come with the equipment. You compensate for the time spent by knowing exactly what and how to do with your air conditioner, because there are some nuances.
To make hanging the indoor unit easier, practice hooking it to the plate before installation.
Start - assembling blocks
Before starting all work, it is worth looking for hidden wiring or heating pipes in the proposed installation site. Getting into them while working is very sad. Next comes the actual installation of the air conditioner with your own hands. You need to start with the installation of the indoor unit. At the selected place we place a plate for fastening it. The block should hang strictly horizontally without the slightest deviation. Therefore, we carefully approach the marking and fastening.
We apply the plate, set it in level, mark the places for the fasteners. We drill holes, insert plastic plugs under the dowels, hang the plate and fix it with dowels. We especially carefully fasten the lower part of the plate - there are latches that hold the block, therefore they must be rigidly fixed. No backlash. Then we check the horizontal position again.
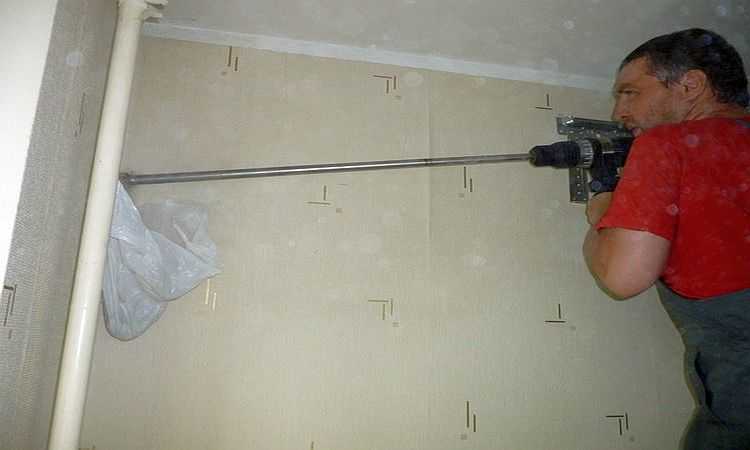
We drill a hole for the track to install the air conditioner with our own hands
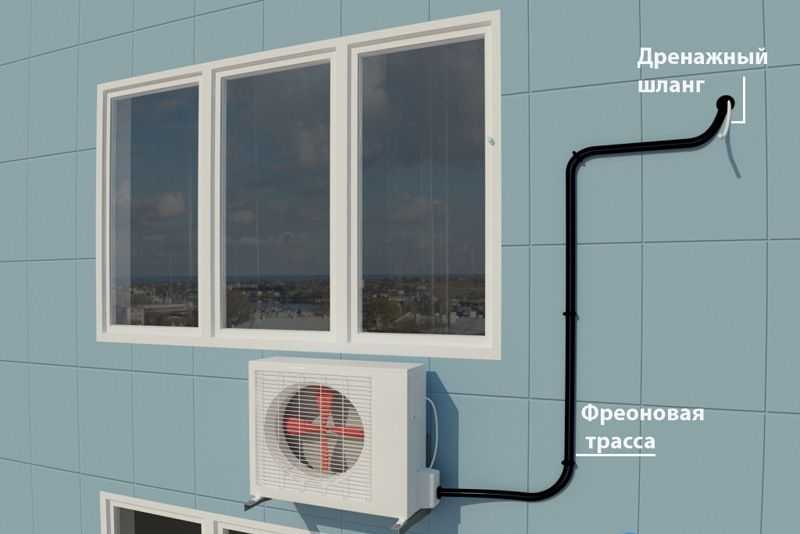
Having estimated where the track will be located (it should go at an inclination of at least 1 cm per meter - for normal drainage laying), we begin to drill a hole in the outer wall. The hole is also drilled with a slope - again, so that the condensate flows out normally (the angle may be greater than that of the track).
The minimum hole diameter is 5 cm.If there is no drill of this size, you can make several holes of a smaller diameter, not bring out the general bundle of communications, but separately each tube / cable. In any case, it is best to drill two holes - one for the copper and electrical cable, the other for the drain tube. It must be laid lower than the rest - so as not to flow into communications in an emergency.
If two units are mounted "back to back", the hole must be strictly aligned (measure on your own unit where the connection ports are)
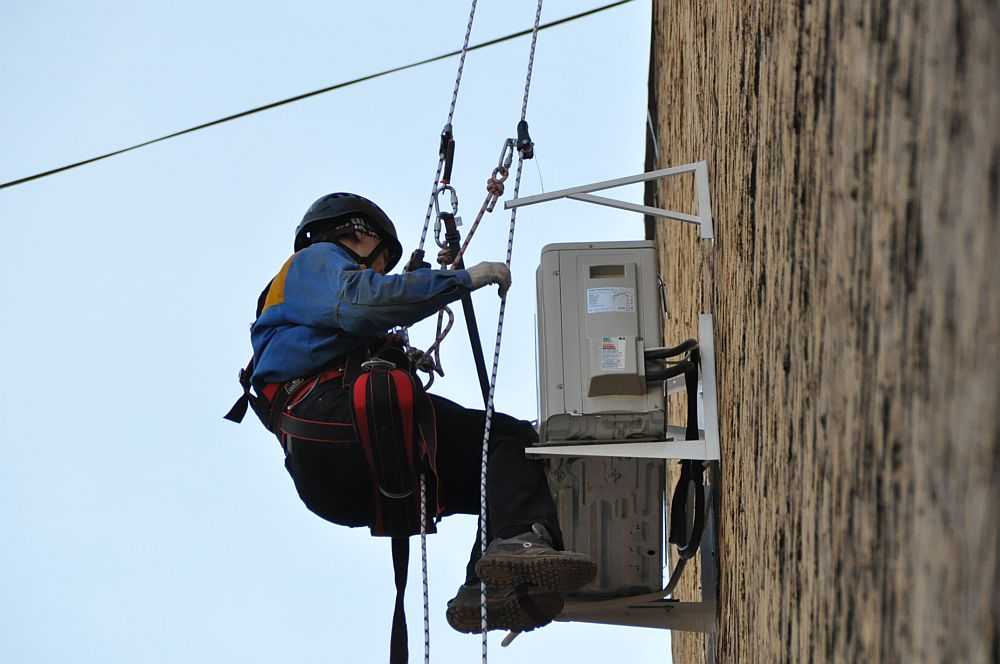
Then we install the brackets for the outdoor unit. If we are talking about a high-rise building, you will need climbing equipment and skills to work at height. This block should also hang strictly horizontally, so when marking holes we also use a level. When installing brackets, we install fasteners in each hole, no matter how many of them there are - this is a prerequisite. Standard fasteners - anchor 10 * 100 mm. More is possible, less is highly undesirable.
Sometimes you can't do without misses
After the brackets are fixed, the outdoor unit is exposed. We also fix the block in all the fasteners that are. This is the only way to ensure that it will stand in place under any conditions.
Laying of communications
Two blocks are connected by an electric wire, two copper pipes. Also, a drainage tube is led out through the wall. All these communications must be correctly selected, connected, laid and secured.
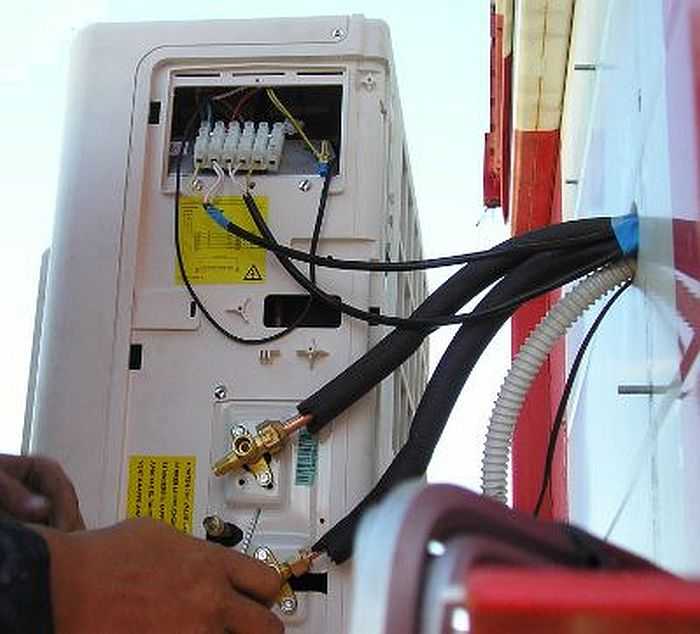
This is what the connected outdoor unit looks like.
Copper tubes
We start with copper pipes. One of a larger diameter, the other of a smaller one. The dimensions are indicated in the instructions for the air conditioner. Cut off a piece of the desired length with a pipe cutter, process the edges from the burr with a special tool, straightening and leveling the cut. It is undesirable to use a regular saw, as well as a file for removing burrs - there will be sawdust inside the pipe, which will enter the system and quickly destroy the compressor.
Heat-insulating tubes are put on the prepared pipes. Moreover, the thermal insulation should be continuous and pass inside the wall as well. The joints of the pieces of thermal insulation must be glued with metallized tape, achieving a very tight fit of the edges. The quality of thermal insulation is important, since condensation will form on the non-insulated sections of the pipes, and it can drain inside the wall, causing frozen streaks, destroying the wall.
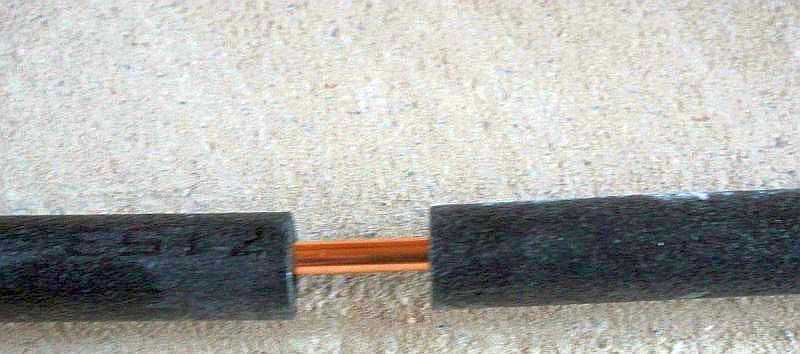
Heat insulation is put on the copper pipes, they are joined very tightly and the joint is glued with metallized (aluminum) tape
Copper tubes wrapped in thermal insulation must be passed through a hole in the wall.Before this, it is imperative that the edge that will be inserted into the wall be carefully sealed so that dust does not get inside the pipe (or it is better to securely plug both ends immediately after cutting and leave the plugs before starting the connection). This is a very important point, as dust will quickly damage the compressor.
Cable and drainage
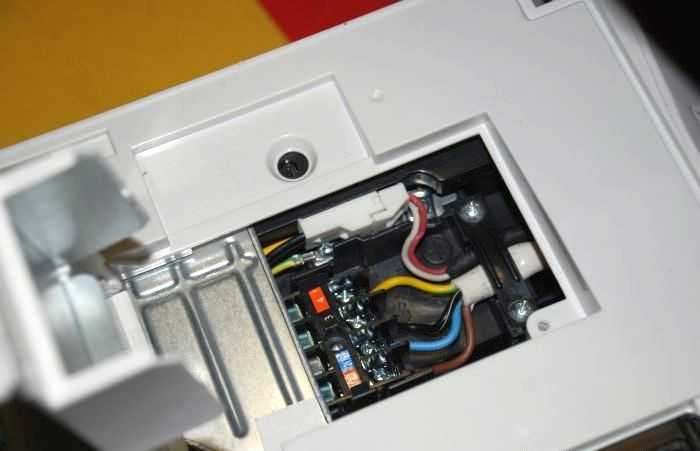
The situation is simpler with an electric cable. Each wire is terminated with special lugs, installing them on conductors stripped of insulation and crimping with pliers. The prepared cable is connected according to the diagram that is in the instructions.
There is a removable plate on the indoor and outdoor unit above the copper pipe ports, under which are the cable connectors. Before starting the independent installation of the split system, remove the plates, consider what and where you will need to connect - it will be easier to work later. Especially with an external unit.
It looks like a port for connecting an electrical cable
The connection of the drain tube is generally simple: it is connected to the corresponding outlet on the indoor unit and out through the wall. The length of this tube should be such that it ends at a distance of 60-80 cm from the wall. The drain pipe should be laid with a slope towards the outside. The slope is at least 1 cm per meter long. More is possible, less is not.
The tube should be fixed every meter so that no sagging occurs in it. Condensation then accumulates in them, which may end up on your floor or furniture. When passing the pipe through a hole in the wall, it is also better to drown it with something.
What the track looks like from the street side (the pipes are insulated in the wall too)
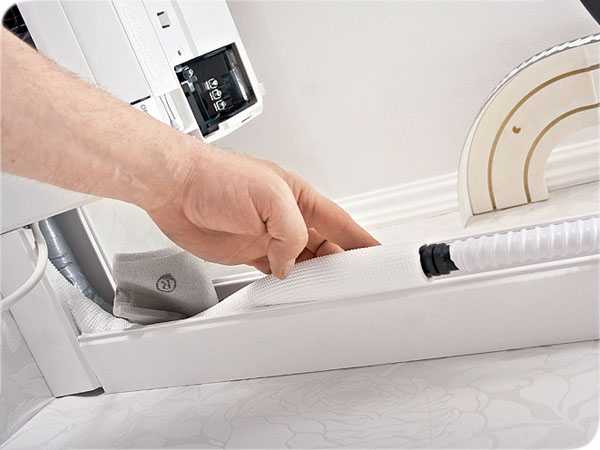
Indoors, pipes and cables are usually wrapped with metallized tape in a single bundle. Then they are fixed to the wall in several places, a plastic box is attached on top. Usually it is taken in white or a color that matches the finish.
If you wish, you can hide all the pipes in the wall - grind the track in the wall, put it there and, after checking the functionality, brick it up. But this is a rather risky option, since in order to repair something you will need to dismantle the wall.
Connecting blocks
Here, in general, there are no special secrets. We connect the communications stretched through the hole in the wall to the corresponding connectors. There are no problems with connecting the cable - connect the wires of the same color to the terminals that are already connected to them. In this case, you definitely can't go wrong.
If the difference in height in the installation of the blocks exceeds 5 meters, it is necessary to make a loop to catch the oil (we put copper pipes in this way) dissolved in freon. If the drop is lower, we do not make any loops.
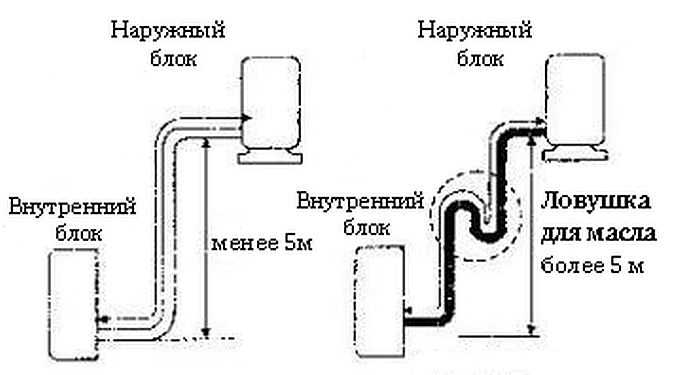
Laying the route between the indoor and outdoor unit of the split system
Drainage
There are two ways to drain the drainage from the split system - into the sewer or just outside, outside the window. The second method is more common in our country, although it is not very correct.
This is the indoor unit drain outlet (at hand)
Connecting the drain tube is also straightforward. A corrugated hose can be easily pulled onto the outlet of the drainage system of the indoor unit (a tube with a plastic tip at the bottom of the unit). To keep it securely, you can tighten the connection with a clamp.
The same is the case with the drainage from the outdoor unit. Exit it at the bottom. Often they leave everything as it is, and the water just drips down, but it is probably better to also put on a drain hose and remove moisture from the walls.
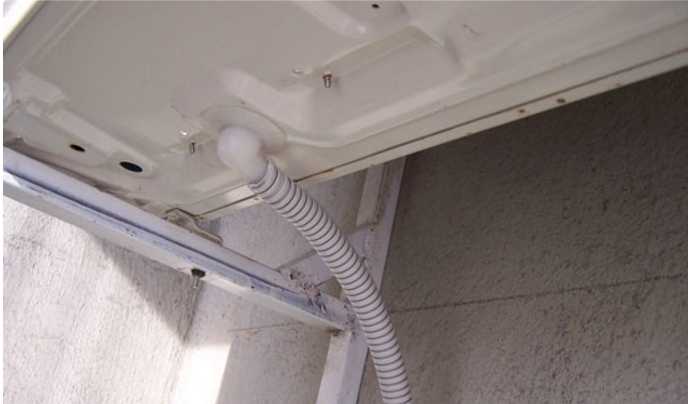
Drainage of the outdoor unit
If you use not a hose, but a polymer pipe, you will need to choose an adapter that will allow you to connect the outlet of the air conditioner and the tube. You will have to watch on the spot, because situations are different.
When laying the drainage pipe, it is better to avoid sharp turns and certainly not allow sagging - condensation will accumulate in these places, which is not good at all. As has been said more than once, the pipe is laid out with a bias.The optimum is 3 mm per 1 meter, the minimum is 1 mm per meter. Throughout it is fixed to the wall, at least every meter.
Freon circulation system
It is somewhat more difficult to connect copper pipes. They are carefully laid out on the walls, avoiding bends and creases. For bending, it is better to use a pipe bender, but you can get by with a spring one. In this case, too, sharp turns should be avoided, but in order not to bend the tubes.
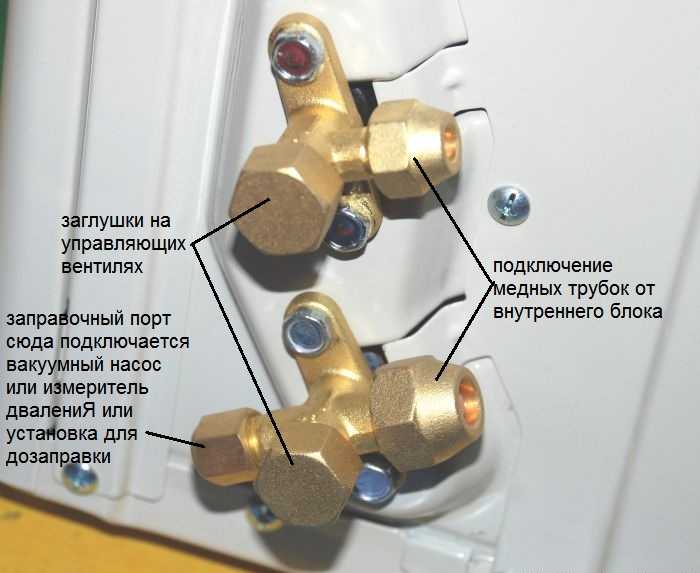
The ports on the outdoor unit look like this. On the inside it is the same.
From the beginning, we connect the tubes to the indoor unit. We twist the nuts from the ports on it. A hiss is heard as the nuts are loosened. It comes out with nitrogen. This is normal - nitrogen is pumped in at the factory so that the insides do not oxidize. When the hissing stops, take out the plugs, remove the nut, put it on the tube, and then start rolling.
Rolling
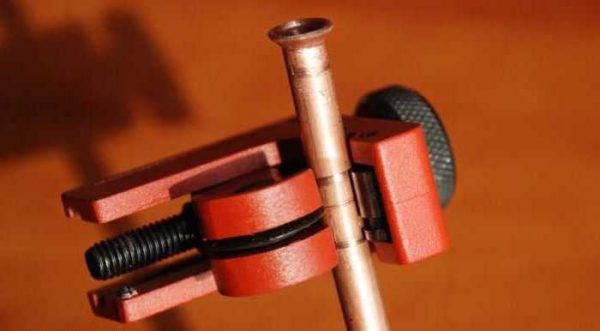
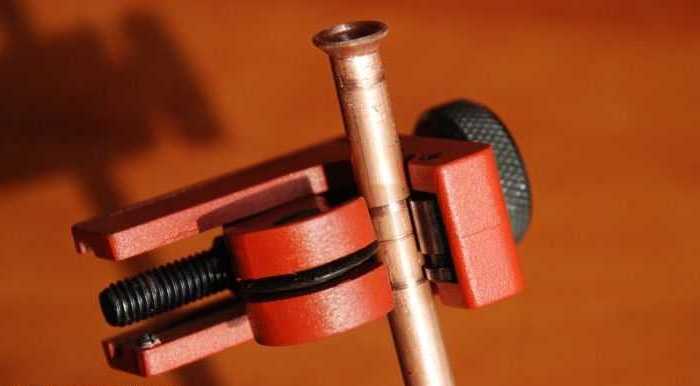
First remove the plugs from the pipes and check the edge. It should be smooth, round, and free of burrs. If the section is not round when cutting, use a calibrator. It is a small device that can be found in the forehead shop. It is inserted into the pipe, scrolled, leveling the section.
The edges of the tubes are carefully leveled for 5 cm, after the edges are expanded so that they can be connected to the input / output of the blocks, creating a closed system. The correctness of this part of the installation is very important, since the freon circulation system must be sealed. Then it will take a long time to refuel the air conditioner.
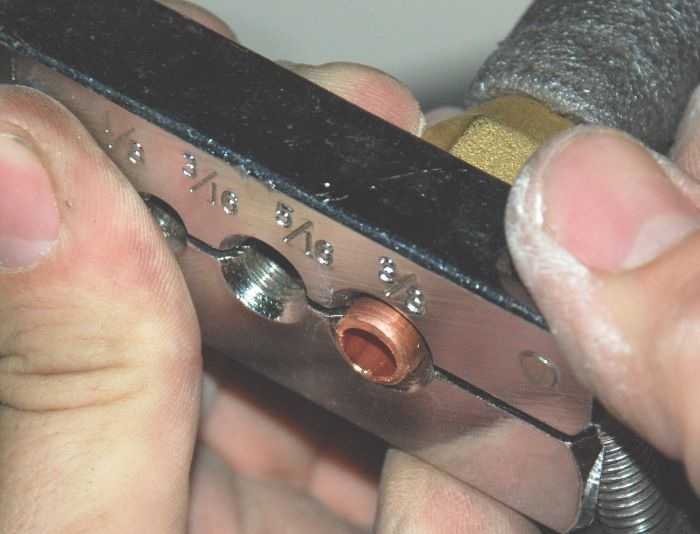
Flaring copper pipes for air conditioning installation
When expanding the pipe, keep the hole down. Again, so that copper particles do not get inside, but spill out onto the floor. In the holder, it is clamped so that it sticks out 2 mm. That's right, no more, no less. We clamp the tube, put a flaring cone, twist, applying solid efforts (thick-walled tube). The flaring is complete when the cone does not go any further. We repeat the operation on the other side, then on the other tube.
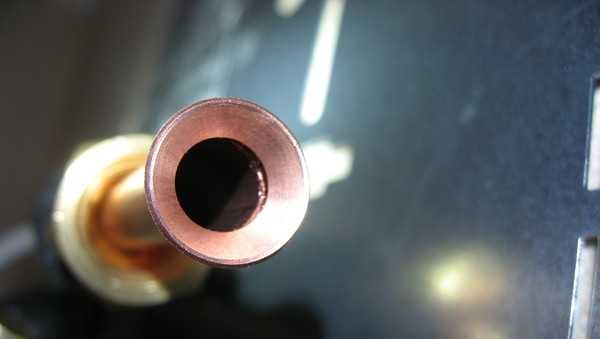
This is how the result should be
If you have not rolled pipes before, it is better to practice on unnecessary pieces. The edge should be flat, with a clear continuous border.
Port connection
We connect the flared edge of the pipe with the corresponding outlet, tighten the nut. It is not necessary to use any additional gaskets, sealants and the like (prohibited). For this, they take special tubes made of high-quality copper so that they provide sealing without additional means.
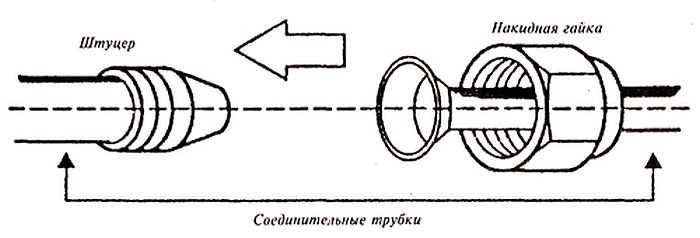
The principle of connecting the copper tube to the air conditioner port
You need to make a serious effort - about 60-70 kg. Only in this case, the copper will flatten, squeeze the fitting, the connection will become practically monolithic and precisely tight.
The same operation is repeated with all four outputs.
Vacuuming - why and how to do it
The last stage, which ends with the installation of the air conditioner with your own hands - removing air and moisture, argon residues from the system. During installation, humid air from the room or from the outside fills the copper pipes. If not removed, it will enter the system. As a result, the compressor will work with a higher load, it will heat up more.
To make the track look neat, it can be wrapped with aluminum tape
The presence of moisture also negatively affects the performance of the system. The fact is that the freon used to fill the air conditioners contains a certain amount of oil to lubricate the elements from the inside. This oil is hygroscopic, but being saturated with water, it lubricates the insides less efficiently, and this leads to their premature wear.
It follows from all this that the system will work without air removal, but not for very long and with possible shutdown due to overheating (if there is such an automation).
There are two ways to remove air from the system: using a vacuum pump or a certain amount of freon released from the outdoor unit (it is refueled at the factory and has some excess freon - just in case).
Zilch method
On the ports of the external unit, unscrew the valve plugs (in the photo they are indicated by arrows).
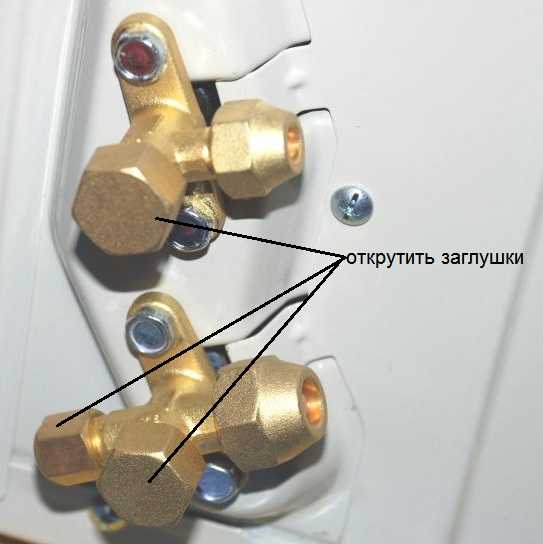
Unscrew the valve covers
The operations will be carried out with the lower port (larger diameter), which sticks out perpendicular to the body. Under the cover there is a socket for a hexagon, we select a suitable wrench.
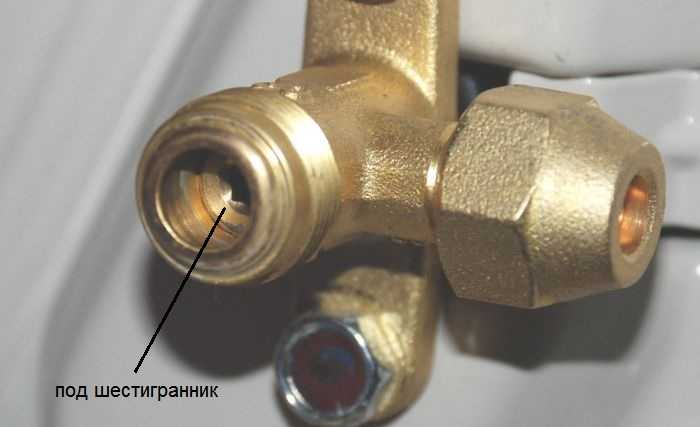
There is a valve with a hexagon socket under the cover
Next, with this key, turn the valve 90 ° for one second, return it to its previous position. We let some freon into the system, there was an excess pressure there. Press with your finger on the spool located on the same port. With this we release a mixture of freon and gases located there. We press literally for seconds. Part of the mixture should remain so as not to start a new portion of air inside.
You can repeat 2-3 times, no more, the second time you can turn the valve located above. With a track of 2-3 meters - it is possible 3 times, with a length of 4 meters - only two. There won't be enough freon reserves for more.
When the air is almost removed, we screw the plug on the outlet with the valve (filling), open the control valves (under the hexagon) completely, launching the freon into the system. We coat all joints with soapy foam to make sure they are sealed. You can run.
Vacuum pump
This operation requires a vacuum pump, a high pressure tube, a group of two pressure gauges - high and low pressure.
Without opening the valves on the control valves, connect the hose from the vacuum pump to the inlet with the spool, turn on the equipment. It should work for 15-30 minutes. During this time, all air, vapors, nitrogen residues are drawn out.
Then the pump is turned off, the pump valve is closed, but not disconnected, and left for another 15-20 minutes. All this time it is necessary to observe the readings of the manometers. If the system is hermetically sealed, there is no pressure change, the gauge arrows froze in place. If the arrows change their position, there is a leak somewhere and it must be eliminated. You can find it with the help of soap foam and tighten the connection (usually the problem is in the place where the copper pipes are connected to the block outputs).
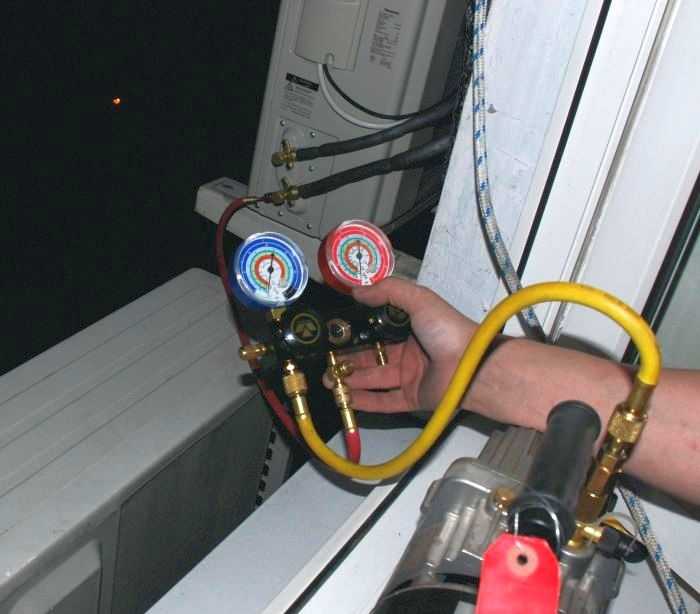
Vacuuming the air conditioner using a pump
If everything is fine, without disconnecting the pump hose, fully open the valve located below. Some sounds are heard inside the system - freon fills the system. Now, wearing gloves, quickly twist the vacuum pump hose - a certain amount of ice freon can escape from the valve, and you don't need frostbite. Now we completely unscrew the valve at the top (where the thinner tube is connected).
Why in this order? Because when filling with freon, the system is under pressure, which quickly closes the filling port when the pump is disconnected. That's all, the installation of the air conditioner with your own hands is completed, you can turn it on.
For the sake of fairness, it must be said that such an operation - vacuumization - is carried out only in Russia and neighboring countries. In Israel, where air conditioners operate all year round, they do nothing of the kind. Why is a question for thought.