Reinforced concrete slab foundation
When choosing a foundation, they are guided, firstly, by reliability, and secondly by cost. It would be nice if both qualities were combined, but this is not always possible. One of the most reliable bases for building a house is a monolithic slab foundation. In some cases - on normal soils for light houses, it is relatively inexpensive, in difficult cases it can be expensive.
The content of the article
Scope and types
A monolithic slab for a house belongs to floating unburied foundations, there are also shallow foundations. It got its name due to the fact that the reinforced concrete base is poured under the entire area of the house, forming a large slab.
A prerequisite is the presence of a sand and gravel cushion, which redistributes the load from the house to the ground, and serves as a damper in case of frost heaving. Such a foundation is often the only possible solution. For example, on unstable, loose soils or on clays with a large freezing depth.
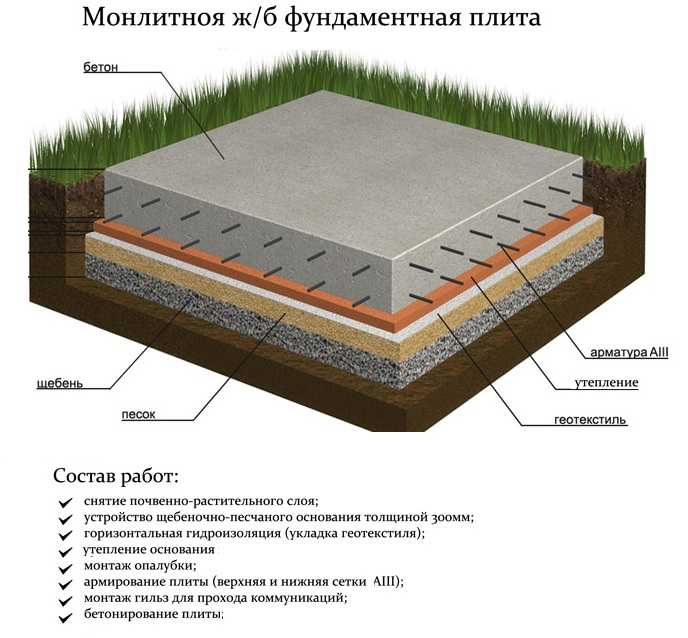
Classic insulated basement slab for the house
The construction of a monolithic slab foundation is simple and reliable, but its production requires a large amount of reinforcement and large volumes of high grade concrete (at least B30), because the entire area occupied by the building is reinforced and concreted, and even with a margin - for greater stability. Therefore, such a foundation is considered expensive. In principle, this is so, but it must be considered. In some cases, its cost is lower than that of a deep belt laying - due to less land work and less concrete.
The depth of the monolithic slab is determined depending on the mass of the house and the type of soil. With a shallow depth on heaving soils in winter, the house, together with the base, can rise and fall. With the correct calculation of the reinforcement and plate thickness, this does not affect the integrity of the building. The slab compensates for all changes due to the elastic force. In the spring, after the soil has melted, the house "sits down" in place.
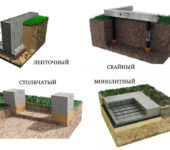
There are four types of slab foundations:
- Classical. A reinforced concrete slab is placed on a sand and gravel cushion with or without insulation. The thickness of the concrete layer is 20-50 cm, depending on the soil and the mass of the building. The thickness of the layers of the pillow depends on the depth of the fertile layer - it must be completely removed. The resulting foundation pit can be filled with sand and gravel by 2/3.

The classic version of the foundation is a monolithic slab without insulation
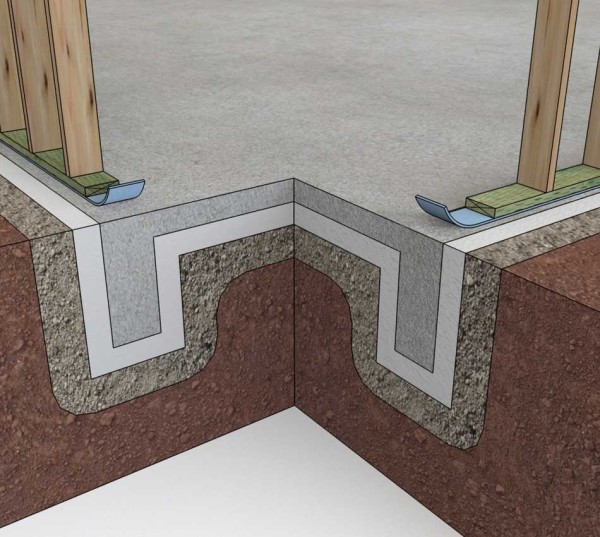
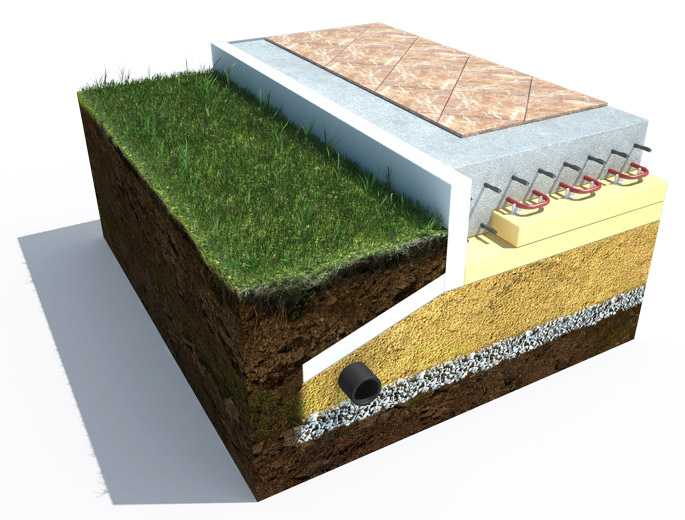
- Insulated Swedish plate (USHP) with built-in underfloor heating. Firstly, it differs in that the slab formwork is non-removable - from L-shaped polystyrene foam blocks. This significantly reduces heating costs - heat loss is minimal. Also, underfloor heating pipes are laid on top of the insulation, reinforcement is laid on them (sometimes under them) and everything is poured with concrete, the thickness of the concrete layer is 10 cm. All communications, including water supply and sewerage, are laid even at the stage of foundation preparation - in a sand cushion. That is, after the foundation is made, the heating system is ready and the engineering systems are installed. This approach allows you to speed up construction, but the foundation itself is expensive. This type of foundation requires a competent engineering calculation and the same execution: when calculating and laying communications, you cannot make mistakes, since alterations are impossible. Also, questions arise regarding the repair of systems embedded in the foundation. It is impossible, therefore expensive materials are laid with a long warranty.

USHP - insulated Swedish plate with built-in warm floor
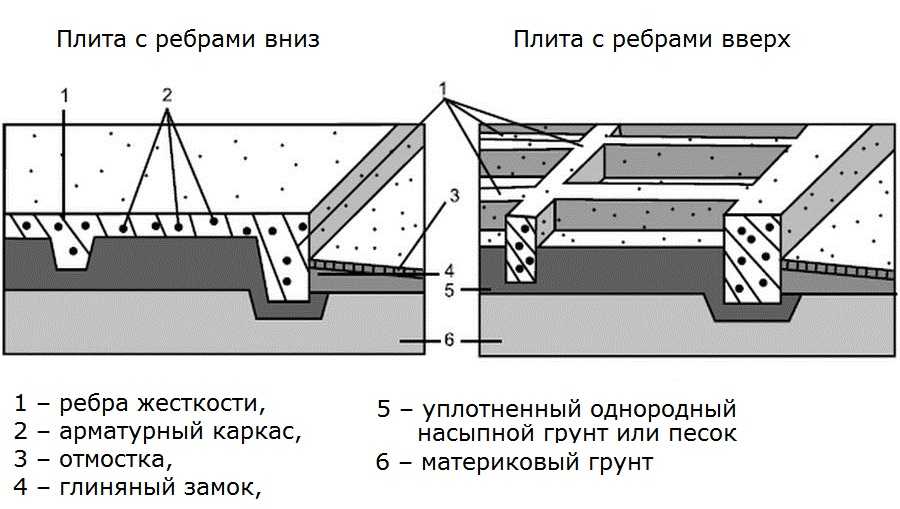
- Russian - plate with stiffeners. To strengthen the structure for heavy houses and in difficult operating conditions (strong frost heaving), Russian scientists came up with the idea of making more massive stiffeners. They are usually arranged under load-bearing walls. At the same time, the complexity of the work increases - stiffening ribs are separately arranged, separately - a slab. But the bearing capacity of such a foundation is much higher, which makes it possible to reduce the thickness of the slab - up to 10-15 cm.
This is how the Russian slab foundation looks in section
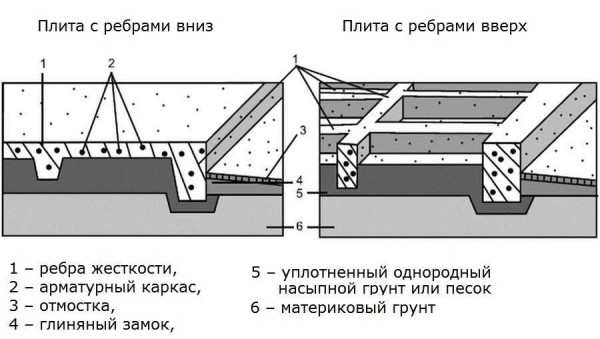
Foundation slab structure with up and down ribs
Insulated slab construction technology
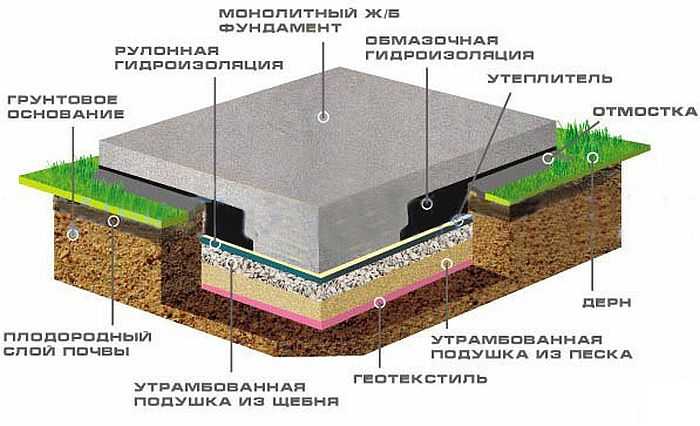
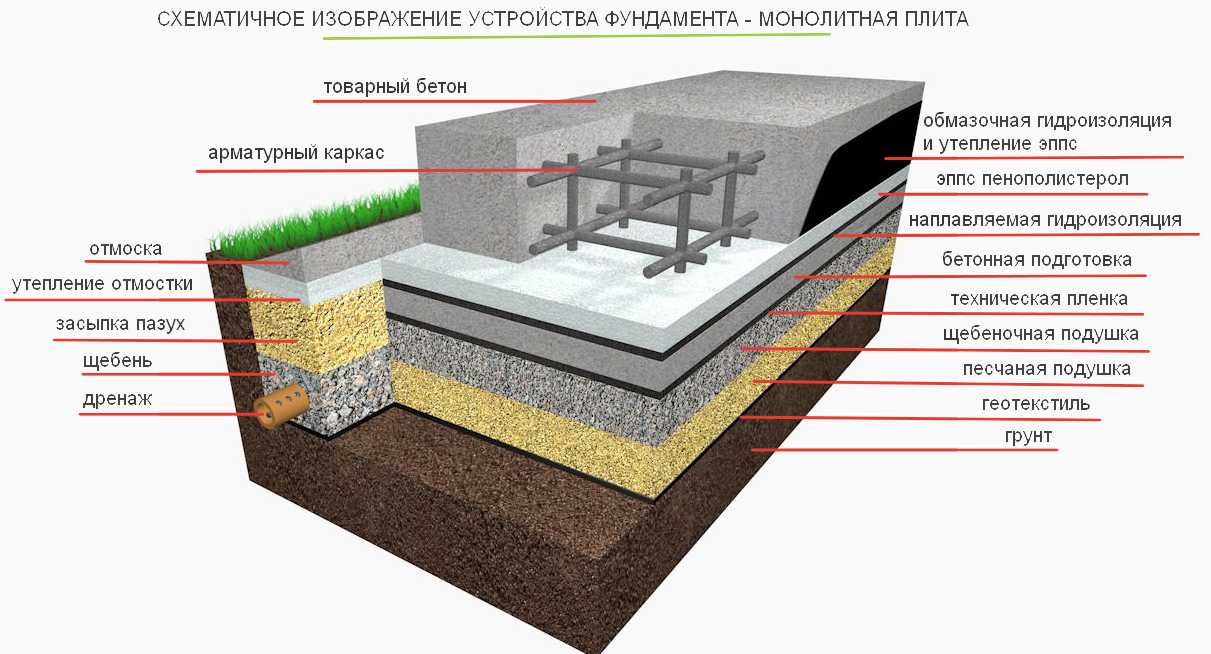
Saving energy is becoming a really relevant topic, so few people build a foundation without insulation. Any slab foundation is a multi-layer structure, and in the case of insulation of layers, even more. To achieve the desired quality level, each level must be met carefully. Let's dwell on each in more detail.
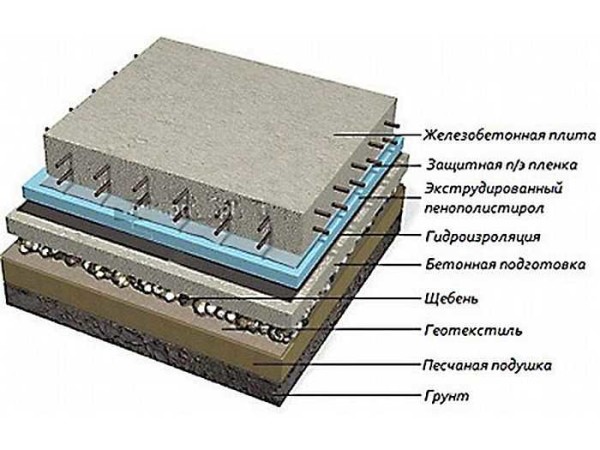
Monolithic slab foundation structure
Foundation preparation
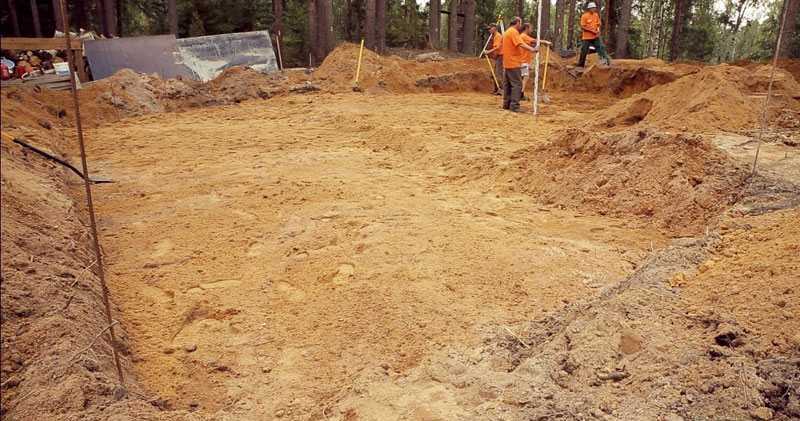
The dimensions of the pit for a monolithic slab should be larger than the building itself, at least by 1 meter. In this area, fertile soil is completely removed. Its thickness is different in different regions - from 20-30 cm to 50 cm and more. In any case, they remove everything.
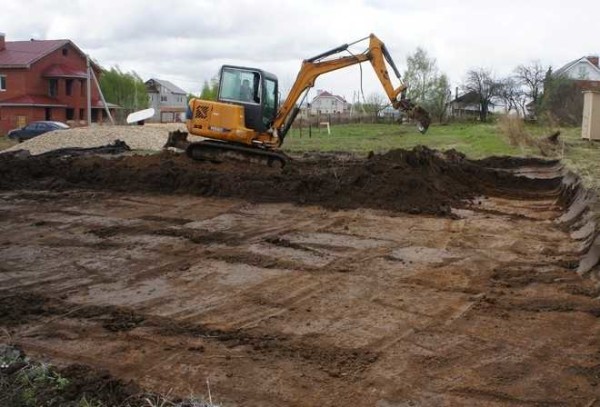
Dig a pit with a margin of 1 meter in all directions
Drainage pipes are laid along the edge of the pit, just below the general level of the bottom, which drain surface water into drainage wells. This measure is necessary so that the walls and the foundation itself do not get wet.
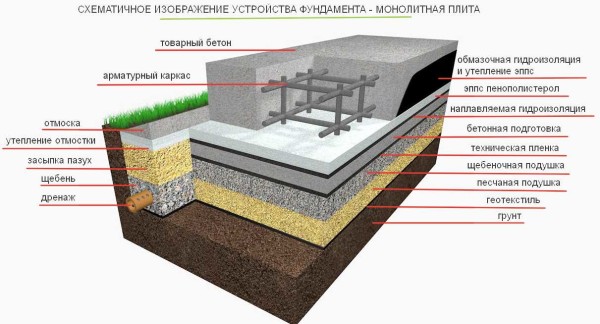
Complete foundation diagram monolithic slab
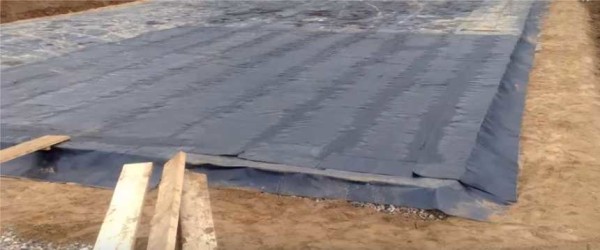
The bottom is leveled, the pits are filled up, the humps are removed, everything is carefully leveled to the level of the horizon and compacted. Rolls out onto the leveled bottom geotextile... It should cover not only the bottom, but also the walls. The canvases are spread overlapping, the edges are glued together with reinforced tape. Geotextile prevents plant roots from germinating, and also prevents the washout of sand, which serves as a damper cushion.

Leveling the bottom into a level
Clean sand of medium grain size is poured onto the laid geotextile. Sand layer - 20-30 cm. It is poured in thin layers, evenly distributed and tamped in layers. A layer of sand that can be tamped with a manual vibrating plate is 8-10 cm. These are the layers that sand is laid. It must also be laid in a level, in the same layer throughout the excavation.
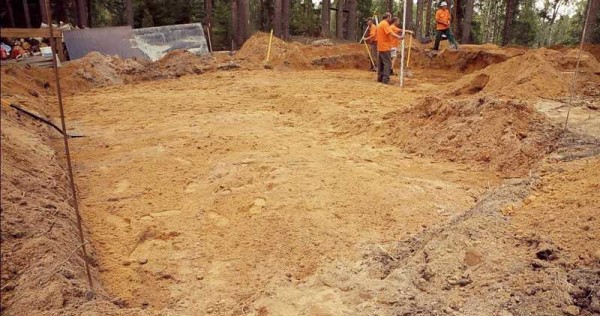
The sand is poured, it must be spilled and tamped
The thickness of the layer can be controlled with the stretched cords. They are tied to hammered stakes, specially made supports - benches, to the formwork installed in the level (see the photo below). All cords must be in a horizontal plane. Knowing the initial distance from the bottom of the pit to the stretched threads, you can determine the height of the poured layer.
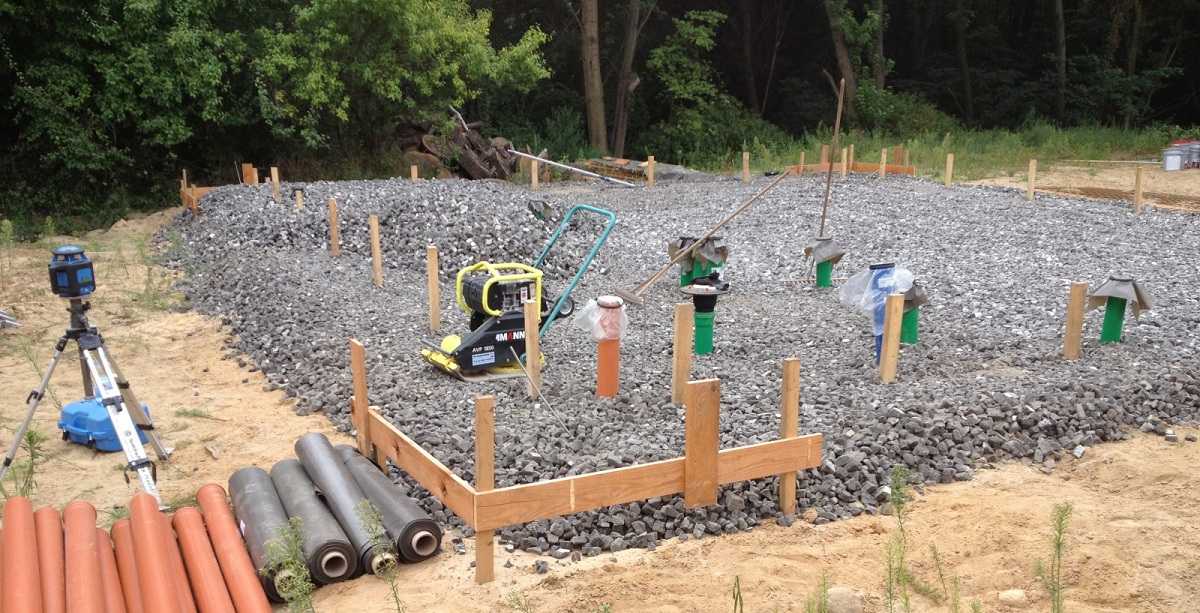
Crushed stone is poured onto the compacted sand. The entire volume is poured at once, evenly distributing it over the site. The leveled crushed stone is rammed to a high density.

Crushed stone was filled up, embedded elements of the sewerage and water supply were installed
At this stage, sewer and water pipes are laid. In the already rammed rubble, ditches of the required depth are dug. They should be such that there is some space around the embedded elements. Pipes are laid in the ditches, filled with sand, leveled, sand is compacted with a shovel or board. More severe compaction can lead to cracks. Therefore, pipes are laid after ramming.
Concrete preparation
Formwork is placed around the perimeter of the pit. It is usually assembled from a 40 mm thick board or 18-21 mm plywood. The height of the formwork for a monolithic slab is the total thickness of the remaining layers. Along its edge, it is convenient to control the level of concrete when pouring, therefore the board must be edged. To save material, you can set the formwork only for preparation.After the concrete has set, it is dismantled and placed higher, using it again to pour the main slab. But the loss of time with this approach is significant, so this is not always done.
In any case, the formwork is supported from the outside with stops and jibs. The structure must be rigid to support the weight of the concrete.
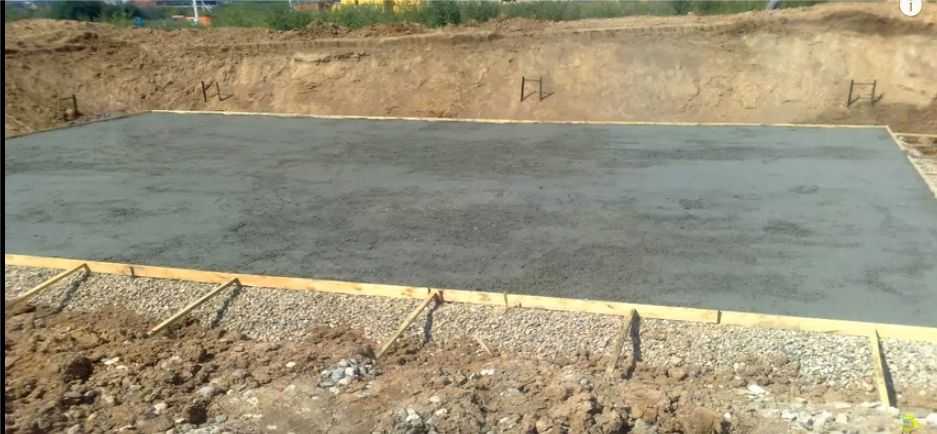
A 100 mm layer of concrete is poured onto the compacted gravel. It can be concrete of low grades - B7.5 - B10. Concrete preparation will be a reliable basis for laying waterproofing and insulation, and also serves to distribute the load from the house more evenly.
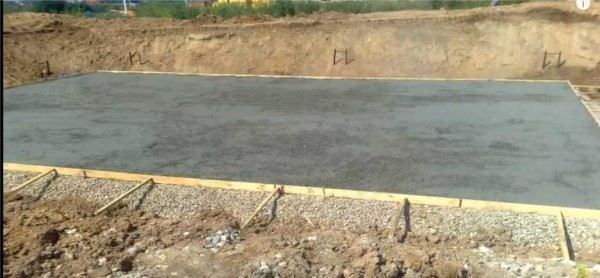
Concrete preparation poured
Waterproofing
Since the monolithic foundation slab is completely in the ground, it needs careful waterproofing. Therefore, two types of materials are usually used: coating and roll. The base is first thoroughly dedusted, then impregnated with a diluted kerosene or solvent primer (and the sides of the concrete preparation are also coated). It is sold very thick and does not adhere well to concrete. As a result, rolled waterproofing does not adhere well and the foundation will get wet. When diluted, it becomes more fluid and penetrates deeper into the concrete. At the same time, it hardly loses its properties.
When laying roll waterproofing, it is released outside the foundation by 10-15 cm. The sheets are rolled out with an overlap, the connecting edges must be coated with bituminous mastic and pressed well. When laying out, you must ensure that there are no creases and waves.
If the water table is high, you may need two layers of roll-up waterproofing. It is then rolled across, and glued to a primer (bituminous waterproofing), but you can no longer dilute it.
Waterproofing of a monolithic foundation slab is double - coating and roll
Among roll waterproofing materials, Gidroizol, TechnoNIKOL Technoelast EPP-4 on high density polystyrene showed themselves the best. Technolynicol of this brand has a high tensile strength of about 60 kg, which increases the chances that it will not be damaged during further work. You should not use roofing material, no matter how much you want to save money. In modern design, it is too thin and brittle, quickly loses its properties. You cannot replace the waterproofing in the slab, therefore, lay the best material.
It is also possible to reduce the capillary suction of moisture through the slab with the help of liquid impregnations such as Betonit. It significantly reduces moisture absorption. It penetrates to a depth of 50-60 cm, so that it will saturate the concrete preparation through and through. The downside of this material is its high price, but the material has excellent properties.
Warming
For insulation of the slab foundation, extruded high-density polystyrene foam is used. The thickness of the insulation layer is 10-15 cm, depending on the region (10 cm is enough for the Middle Strip). Laying is carried out in at least two layers, overlapping the seams, which form cold bridges. It takes more time, but heating costs will be lower. If the slabs have an L-shaped lock, they can be laid in one layer.

Insulation is laid
Since expanded polystyrene is "not friendly" with oil products, a dense polyethylene film is spread on it, and then heat-insulating material is laid.
Reinforcement
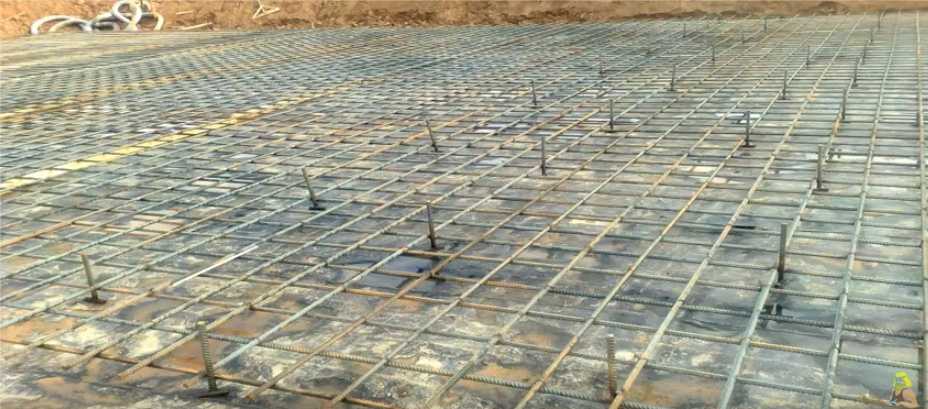
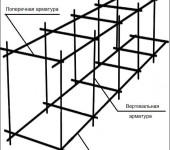
For the reinforcing frame, ribbed reinforcement of class AIII with a diameter of 12-14 mm is used. It is laid up and down, with a step of 15-30 cm, it can have one or two layers. It all depends on the type of soil and the mass of the building. All reinforcement parameters are counted separately.
The reinforcement should be at a distance of at least 5 cm from the edge of the slab. Therefore, it is placed on special supports that provide the required gap.

The first row of reinforcement is connected, some racks are exposed for tying the second belt
When reinforcing, a cage is obtained; at each intersection, the rods are tied together with a special soft steel wire. There are also connection techniques - using plastic clamps or welding.Tying with plastic clamps is quick, but not everyone trusts them. Welding is not recommended, because the weld is the most vulnerable place for rust, and the connection is too rigid. When using wire and clamps, the whole structure can play a little without breaking the bond, and when welding, such movements lead to the fact that the seam bursts. As a result, the reliability of such reinforcement is low.
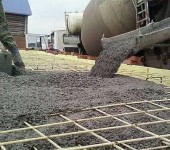
Pouring the foundation slab with concrete
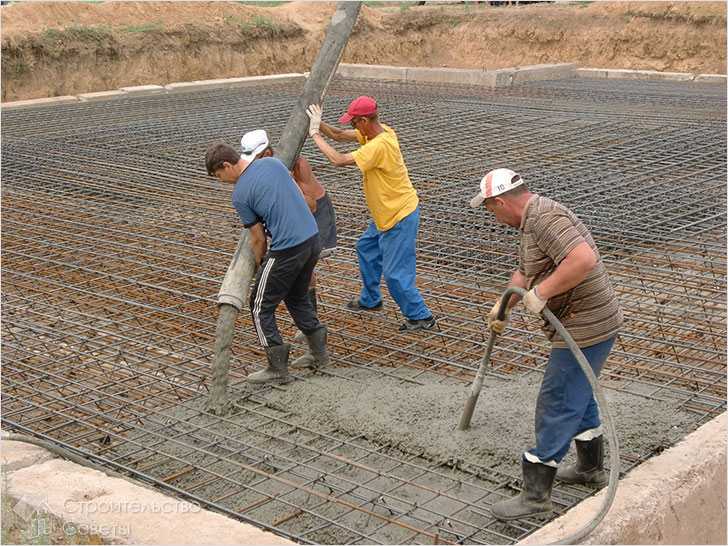
The thickness of the slab is calculated for each specific case and can be from 20 cm to 50 cm. When pouring, concrete is used not lower than the B30 grade. The entire perimeter should be poured in one day, avoiding the appearance of vertical seams. Therefore, for concreting a slab foundation, concrete is most often brought ready-made: large volumes are required at a certain time.
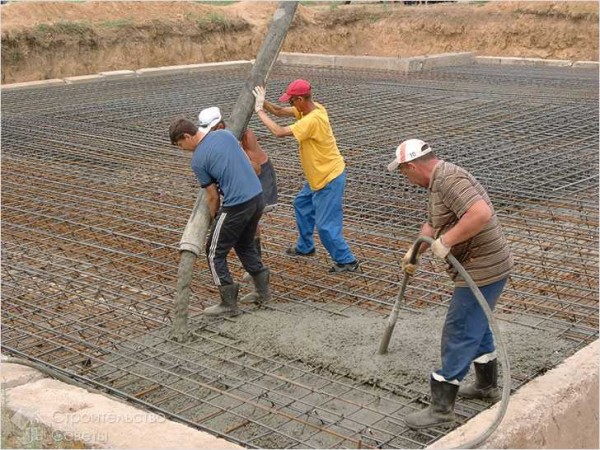
Simultaneously with the distribution of concrete, it vibrates
The schedule for the arrival of the machines should be calculated so that you have time to distribute the first portion and compact it. Construction vibrators are used for compaction, which create high-frequency vibrations. As a result, all air is removed, the concrete mixes better, becomes more fluid and plastic. The result of this treatment is not only a flat concrete surface, but also a higher hygroscopicity class.
As a last resort, you can fill the slab with horizontal layers. Vertical division in this case is unacceptable, since cracks are likely to go at the joints.
Curing
For the normal process of concrete hardening, a sufficient humidity level of 90-100% and temperatures above + 5 ° C are required. It is advisable to fill the stove in warm weather with a temperature of about + 20 ° C. This temperature regime is optimal for the hardening process. Caring for the concrete of a monolithic slab consists in preventing mechanical damage and maintaining moisture.
Immediately after laying, the concrete is covered with a diaper or tarp. This prevents it from heating up from the sun, it is not affected by the wind. The film is glued into large panels. The strips are laid with an approach of 10-15 cm, glued with tape. It is advisable that there are as few unscrewed joints as possible, that is, the shelter should consist of one or two pieces, if one is too inconvenient. In this case, individual pieces of film overlap one another at least half a meter.
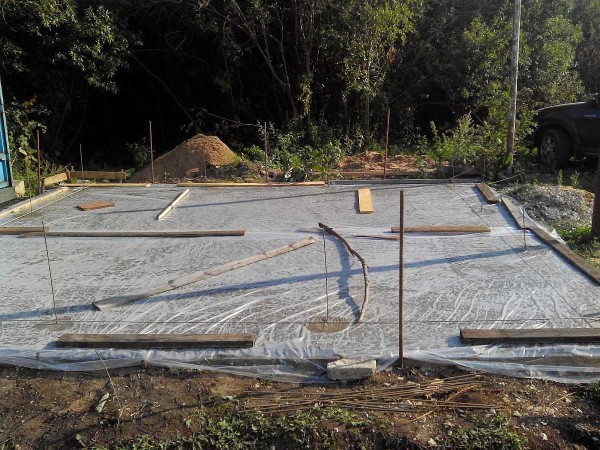
After pouring, the monolithic slab is covered with a film
The dimensions of the film are such that the side surface of the formwork is also closed, and a load could be placed on the edges of the film, which will not allow the wind to lift it. Also, with a load - boards - they press the place of the overlap of two panels in order to reduce the windage, they can be spread over the surface.
If the air temperature is above + 5 ° C, approximately 8 hours after pouring, the concrete is poured with water for the first time. Irrigation should be drip, not jet. In order not to damage the surface with drops, you can lay burlap on it or sprinkle a layer of sawdust on it, and cover it with a film on top. The covering material is watered, and it maintains the moisture content of the concrete. In any case, watering is carried out only at temperatures above + 5 ° C.
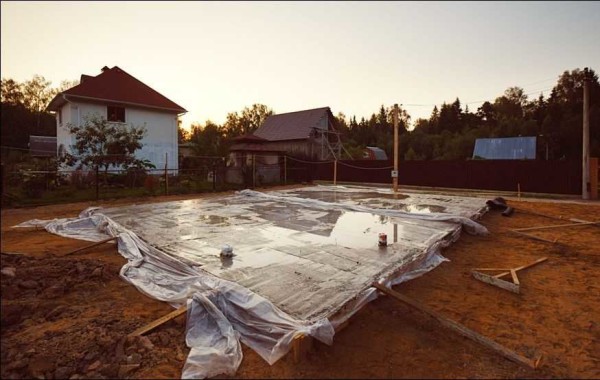
Watered surface
If there is a threat of frost, the slab and formwork are additionally insulated. You can use any heat-insulating materials, both prepared for building a house, and sawdust, straw and other improvised means.
When to remove the formwork
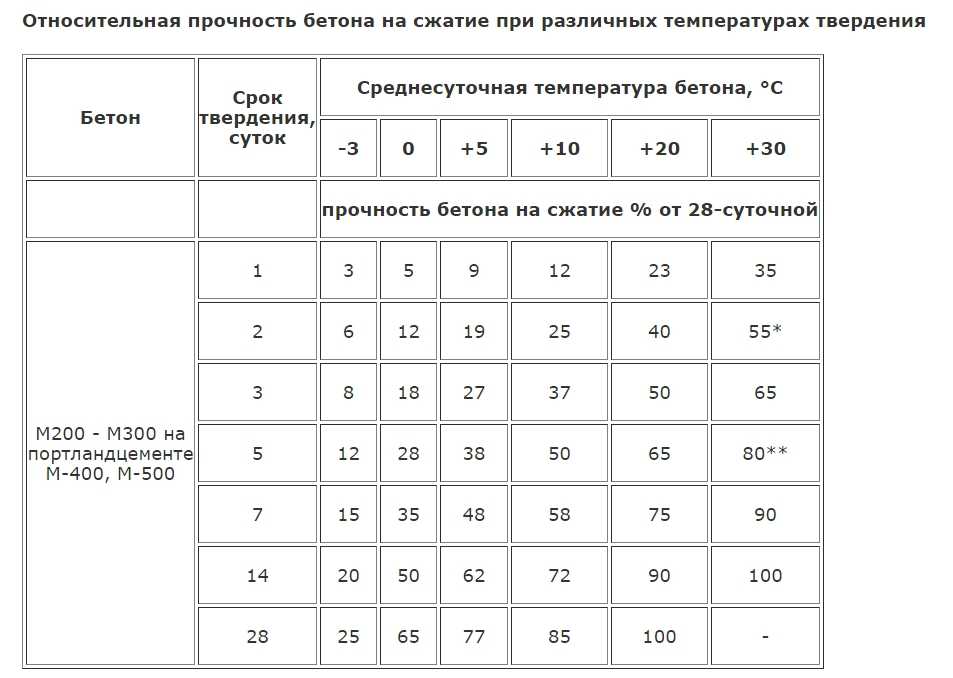
For a monolithic slab, it is recommended to remove the formwork after the concrete has reached 70% of the design strength. This period depends on the temperature at which hardening occurs. This dependence is shown in the table.
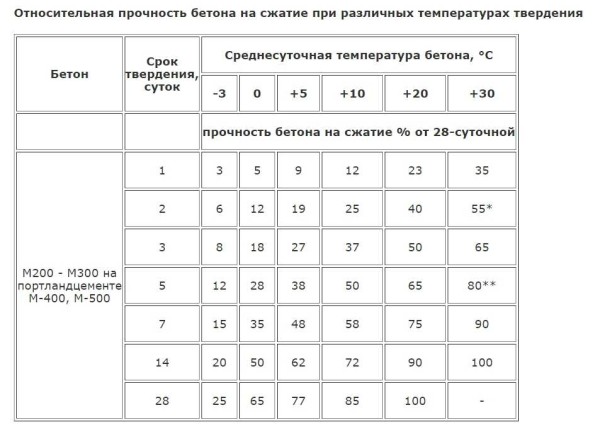
Strength table of concrete depending on temperature
Differences between insulated monolithic Swedish slab and video about its construction
As mentioned earlier, the insulated slab under the house developed by Swedish builders is energy-saving. During its construction, a permanent formwork made of extruded polystyrene foam is used. As a result, heat leakage into the ground is minimal.The second fundamental difference is the underfloor heating system built into the slab.
Since engineering systems are poured into the thickness of concrete, it requires an accurate and competent calculation. High demands are also placed on execution. Even small mistakes are critical. You can do UWB yourself, but it is better to order the project. For an approximate cost breakdown, see the next photo. The amounts are no longer relevant, but the percentages are fair. The cost of the foundation project is about 1%.
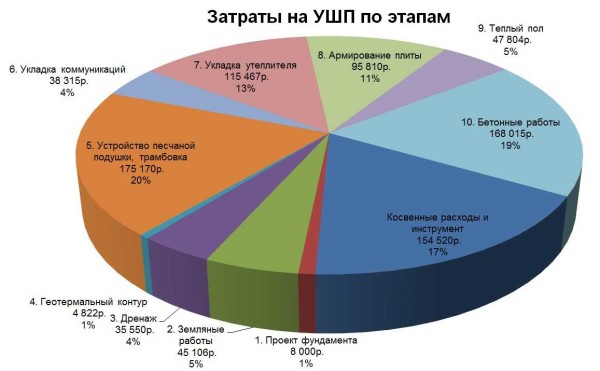
Approximate percentage of the cost of a monolithic slab foundation
In the following videos, you will see the stages of making a Swedish slab for a specific house. Many useful devices are described that will facilitate the work, explanations are given on some of the features.
And also look at how the Germans are pouring such a plate. There are also many useful nuances.


-
 What is the best foundation for a two-story house, calculation of depth and its thickness
-
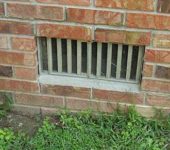 Air vents (vents) for ventilation of the foundation - are they needed or not?
-
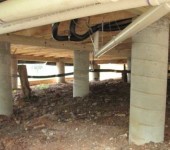 Types and stages of construction of columnar foundations
-
 Concrete mark for the foundation of a private house
-
 Arrangement and calculation of reinforcement in a strip foundation


Good day! Please tell me, for a pillow under the stove, first fill in sand, as in the first figure, or crushed stone, as in the following diagrams? Thank you!
I suspect that the properties of the soil must be taken into account. He took part in the construction of a school boiler room. According to the project, the first layer was crushed stone. The soil is clay, i.e. heaving.
You have a discrepancy on the diagrams:
then lay the geotextile after the sand cushion, then first, and on top of the sand and gravel. Certainty is needed.
For me, this is how the canvas goes at the beginning.
It is also interesting - the topic has not been disclosed - in the case of the USP foundation - is a blind area needed and how best to perform it (taking into account that the edges of the slab are protected with insulation). Will the blind area "float away" from the foundation?