Types and stages of construction of columnar foundations
One of the popular foundations for small houses and outbuildings is columnar. It is attractive for its low cost, simplicity of execution and the fact that even a person who is not particularly experienced in construction can build it with his own hands. A good columnar foundation is also the fact that it can be designed for most buildings and conditions.
The content of the article
Device and types
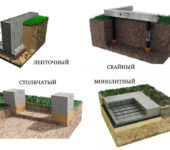
A columnar foundation consists of a number of supporting pillars that transfer the load from the building to the ground. The pillars can have a rectangular or circular cross-section, they can be made from:
- monolithic reinforced concrete;
- bricks (solid ceramic, well fired);
- concrete (from heavy concrete grade not lower than B15) and reinforced concrete blocks;
- rubble and rubble concrete.
The most reliable ones are made of monolithic reinforced concrete. They can be used on soils prone to heaving with high groundwater levels. All the rest consist of elements fastened with concrete mortar and are inferior in strength to a monolith. They are recommended for use on normal soils.
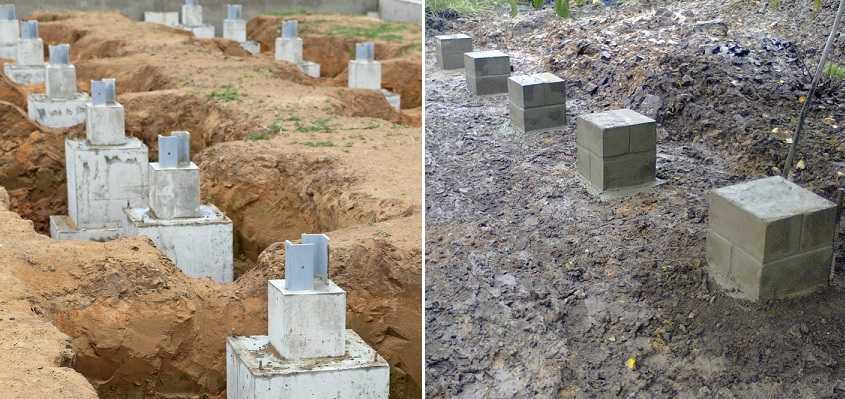
Two types of columnar foundations made of different materials, for buildings of different weights
Pillars are necessarily supplied in the corners of the building, at the junction of walls and piers. If at the same time the distance between the supports exceeds 3 m, additional ones are placed. The installation step is on average 1.5-2.5 m. The heavier the building will stand, the smaller the step, but more often than 1 m it makes no sense to put it: the foundation will turn out to be too expensive.
Types of grillage
In order for the load from the building to be evenly transmitted to the pillars, they are tied with a transverse beam - a grillage or a shallow tape. This eliminates one of the main disadvantages of columnar bases - the possible uneven shrinkage of the supports.
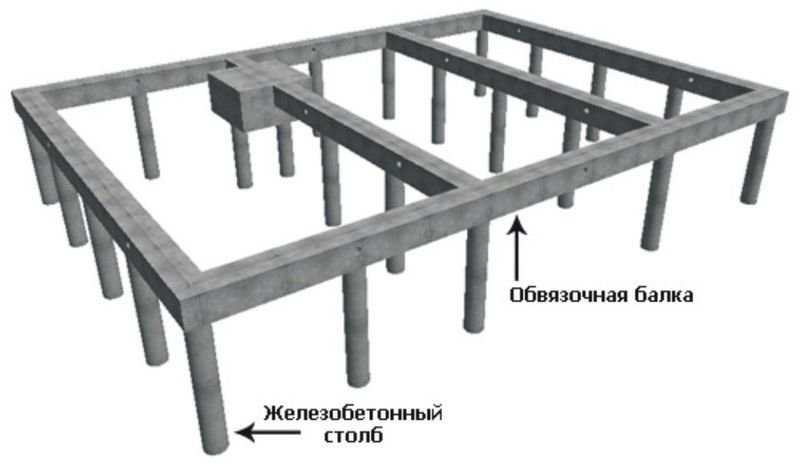
An example of a columnar foundation with a grillage
In the construction of wooden houses or frame frames, a wooden beam of a large section is often used as a grillage, sometimes metal is used - a profiled pipe of a large section or T / I-beams. To connect the beams and strapping during the construction of pillars, studs, special fasteners are laid in them, or reinforcement is released. The form of mortgages is selected based on the planned type of grillage.
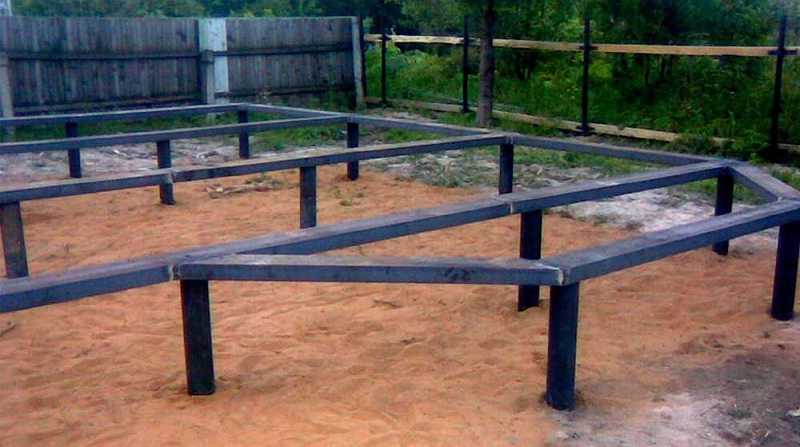
Tying posts with metal

Timber is often laid under wooden houses
For heavy houses, a concrete beam is made. It can be composite - from ready-made reinforced concrete beams, or it can be monolithic. Although composite ones are easier to implement (buy, deliver, tie), monolithic is cheaper, and even more reliable. Therefore, a monolithic grillage is used more often. It is more suitable for houses made of bricks and other heavy materials.
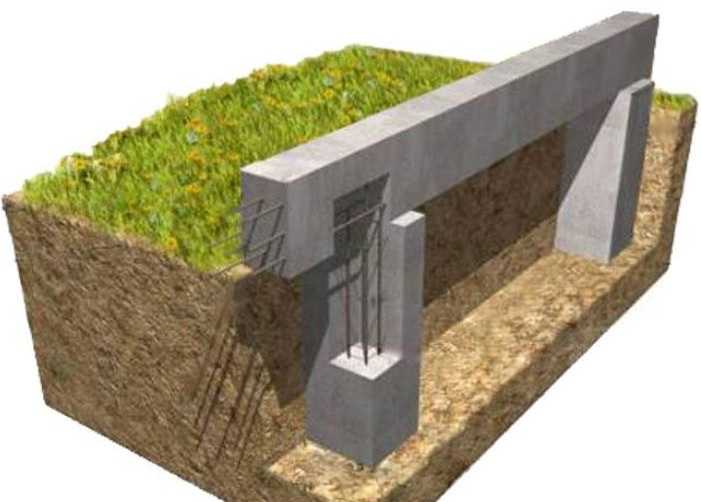
An example of a columnar foundation with a monolithic grillage
In the manufacture of a columnar foundation with a monolithic grillage, the reinforcement of the pillars is done with a release of at least 70 cm. Then I connect these issues with the reinforcement of the grillage frame.
Annexes and their foundations
If there are lighter extensions to the house - a porch, a veranda, a track - the foundations are made separate and disconnected. This means that they make their own contour for the house, and their own for the porch. And they should not have points of contact with each other.Since the grillages (beams passing along the top of the supports) are located side by side, a damper layer is laid between them. For example, roofing material in two layers, mineral wool cardboard and other similar materials.
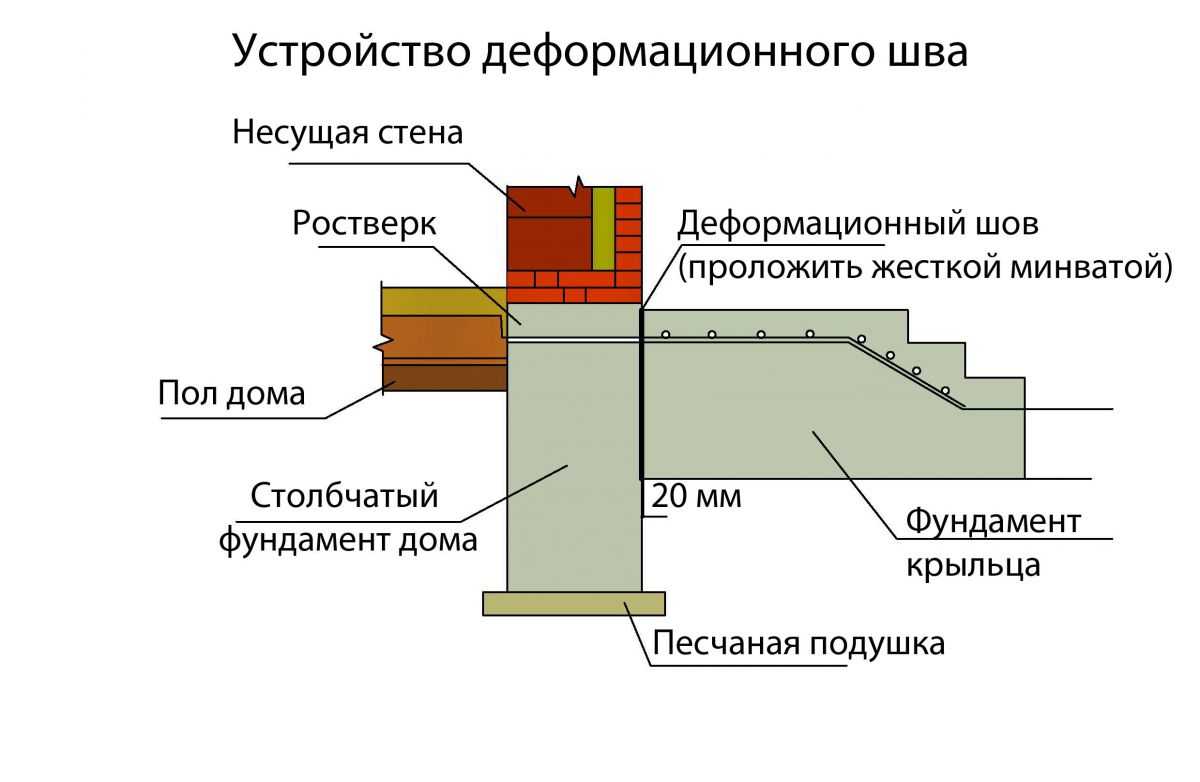
An example of organizing a porch junction node
This is necessary since the weight of these elements is very different, respectively, the magnitude of the load on the foundation is different. If you make it coherent, a big difference will cause distortion, and possibly destruction of the building.
How to close the gaps between the pillars
When installing a columnar foundation, the building turns out to be raised above the ground and a draft is walking under the rough floor. This is good for maintaining normal moisture content in the wood, but bad for heating: the floor is too cold. One more point: all living creatures like to settle under the house. And home and not so ... For these reasons, they try to close the space between the posts. This can be done in two ways:
- a pick-up device - stone or brickwork between the posts;
- by attaching pieces of sheet material or finishing materials.
Easier, of course, to attach sheet material. It is then cut off so that it does not rest against the ground. The remaining gap is useful for both ventilation and heaving compensation.
Zabirka is done if they plan to make an insulated blind area around the house. At the same time, it is installed so that it does not support the grillage or the lower strapping - they are made on the same level with the outer edge of the posts (they should be at least 10 cm wider than the wall).
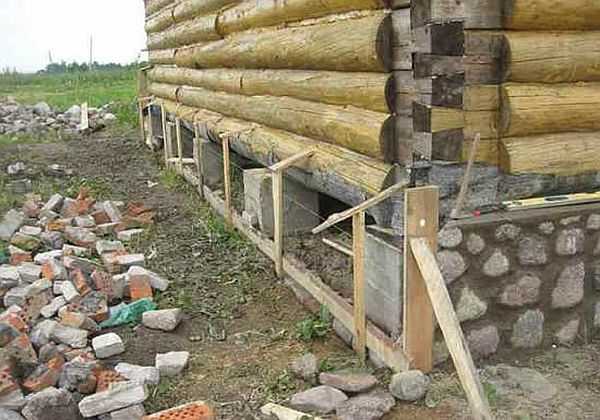
An example of a pickup device from buta
It is advisable to prepare the base for the pick-up: dig a trench at least 20-30 cm deep, pour and tamp a layer of sand, on it - rubble, which is also tamped. Then a decorative wall is placed on this compacted base.
Support-column foundation
On normal soils, small lightweight buildings with an area of no more than 30 square meters - such as a shed, a gazebo and other similar buildings - can be made on a lightweight foundation. It is called columnar support. Usually it is one or more concrete blocks laid on a sand and gravel bed.
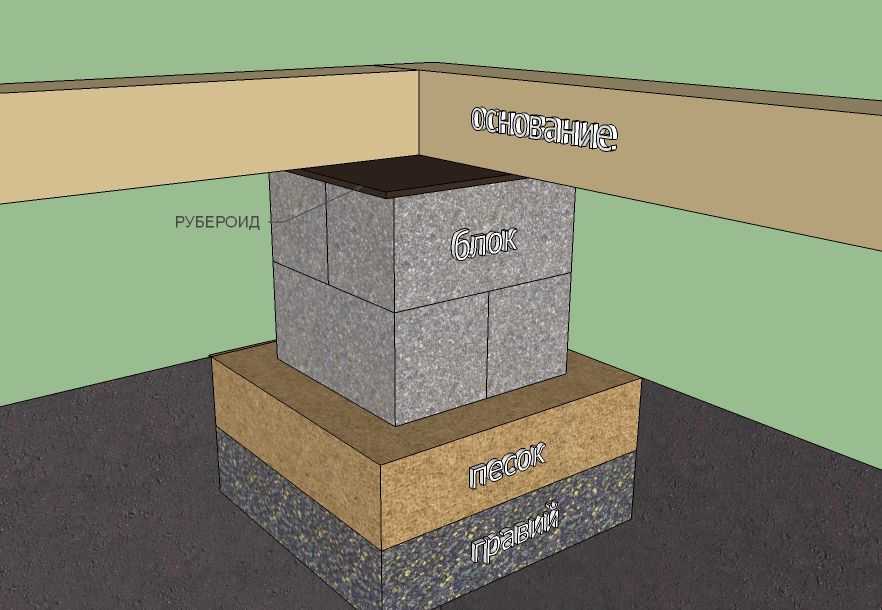
Support-column foundation
The planning of the pillars is the same: at corners, at the junction of the walls and intermediate, if necessary. With this type, it is important to compact the pillow well, thereby increasing the bearing capacity of the soil. And one more thing: do not use this type of base on loose or clayey water-saturated soils. Even under shower or barn... It will be completely unreliable.
What is the difference between pile and columnar foundation
If you look at the columnar foundation with round pillars and the pile foundation, at first glance there is no difference. But it is there. These are the soils on which they are placed and the depth to which they are buried. Pile foundations are placed on soils with a weak bearing capacity and their task is to pass unstable soils and transfer the load from the house to denser layers. Columnar are placed on soils with normal bearing capacity and their depth is determined by the type of soil, climatic zone and groundwater level. Structurally, they are similar, but the tasks are different, as well as different areas of application.
What is soil heave and how does it affect the choice of foundation
The most difficult to build are clay soils. They do not drain water well, and it accumulates in small cavities. When frozen, it significantly increases the volume of the soil. Increasing in volume, the soil presses on everything that is in it, including the foundation. This phenomenon is called heaving (the soil swells), and the soils, and which they are clearly expressed, are heaving.
Heaving forces are applied both from below, trying to push the column out, and from the sides, trying to move the support to the side. It is for this reason that in clay - heaving - soils it is better to make the pillars monolithic with reinforcement.
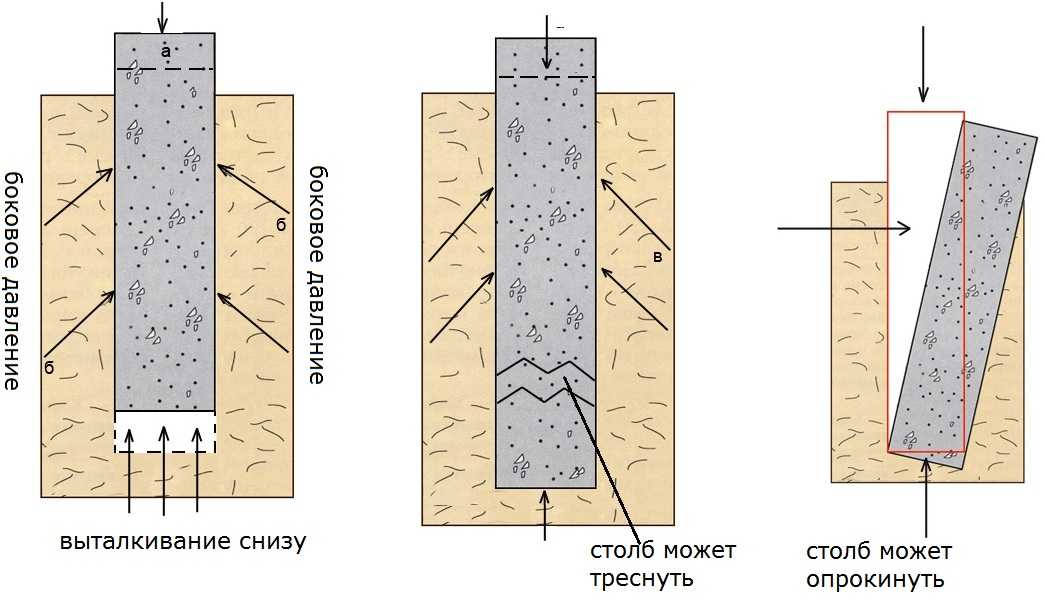
How heaving forces act on a columnar foundation
Also, so that the pillars are not pushed upwards, the lower part is made expanded.This area is called the heel and in size it is usually twice the size of the column itself, and its height is equal to 1/3 of the column section. For example, under a 40 cm post, make a heel 80 * 80 cm, 13 cm high or so.
Seams between blocks / bricks / stones in prefabricated pillars are far from always able to withstand lateral loads, therefore, to reduce the effect of heaving forces on prefabricated pillar foundations, they are made with beveled walls. This increases their reliability in heaving soils. On normal soils, the pillars are folded with even walls.

Prefabricated columnar foundation is made with beveled walls
Application area
As already mentioned, the columnar foundation is also called pillar or on pillars) behaves normally on soils with normal bearing capacity. They are not used on loose sands, peat bogs and other unstable substrates. Its main features are that it is impossible to organize a basement and a blown gap between the ground level and the subfloor. They also need to be borne in mind when choosing.
They are suitable for the following cases:
- for houses made of light materials - wooden, frame, panel board;
- under heavy walls, if you need to bury the foundation deeper than 1.8-2 meters and the tape becomes very expensive;
- on very heaving soils - less forces act on the pillars than on the tape.
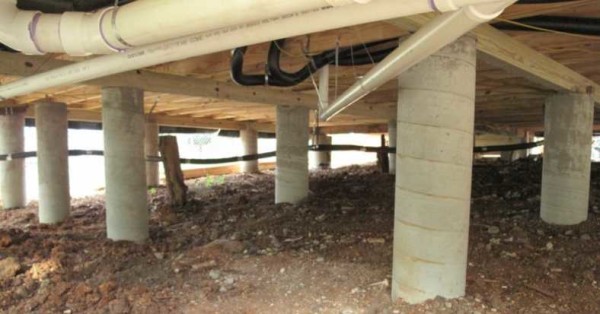
One of the columnar foundations - bottom view

At the same time, there are a number of situations (except for weak soils) when it is not recommended to use foundations on poles:
- with a large height difference on the building site - more than 2 m;
- with complex geology with possible displacement of layers.
Otherwise, they can be used.
Depth of laying
The main criterion for choosing the parameters of the foundation is to ensure its integrity. Therefore, when planning, a safety margin of the order of 20-40% is always laid. It compensates (to some extent) for unforeseen changes in conditions (water table, unexpectedly low winter temperatures) or loads. This is especially clearly manifested precisely when planning foundations: both the depth of the foundation is taken with a margin and the bearing capacity is usually underestimated. It is understandable: to add something to an already finished foundation is an undertaking either very expensive or unrealistic.
The greatest margin of safety is laid on heaving soils: it is impossible to calculate their manifestation, therefore they try to do it as reliably as possible. To do this, for private houses, foundations are buried below the depth of soil freezing. You will find out the average data for your region, and add about 15-25 cm to this figure. So you get the depth of the foundation. For example, in the region, the soil freezes by 1.5 m, which means the depth of the foundation is 1.65-1.75 m.
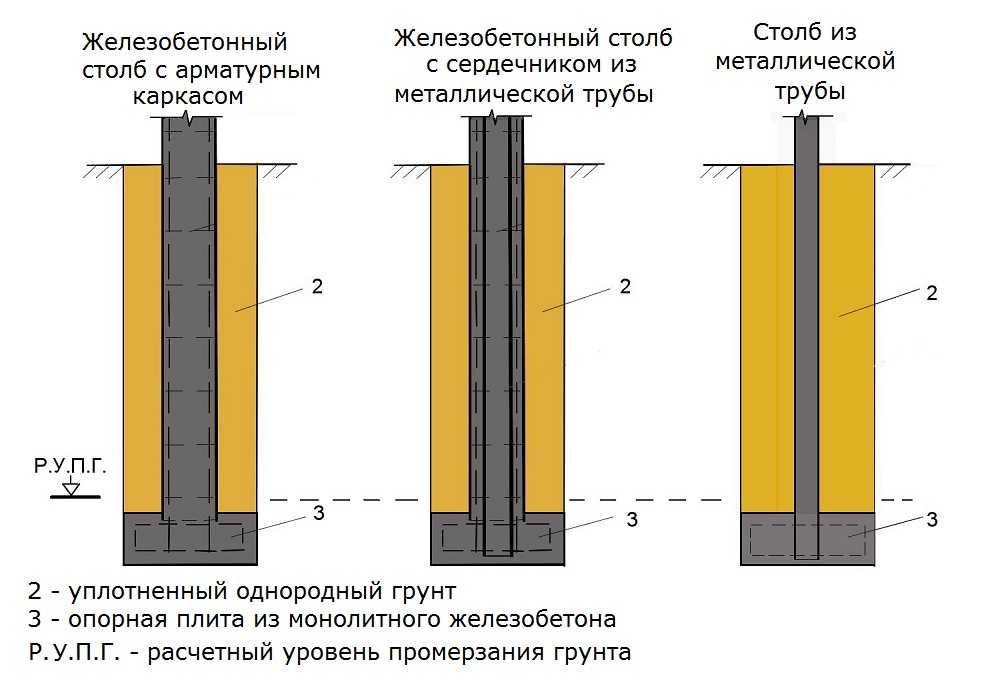
A few examples of monolithic pillars
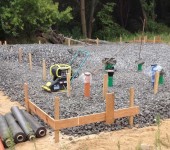
As you understand, if you make prefabricated poles - from bricks, rubble, blocks - you will have to dig a decent-sized hole for each. The bottom must be 20 cm lower than the laying depth to make the backfill. Also, the pit should be decently wider - you will have to work in it, folding the supports. This is another reason why monolithic pillars are made: holes are drilled under them, gravel or sand is poured onto the bottom and formwork is inserted (most often pipes of the required diameter). Inside of which a reinforcing element is installed - a frame made of reinforcement or a metal pipe.
This rule works for heavy buildings. But for them, columnar foundations are rarely made. They are mainly placed under light buildings: wooden or frame houses or farm buildings. If a basement is not planned in such a building, it is more expedient to make the foundation shallow (depth of laying from 0.5 to 0.7 of the level of freezing) or not deep (from 0.3 to 0.5 of the depth of freezing).
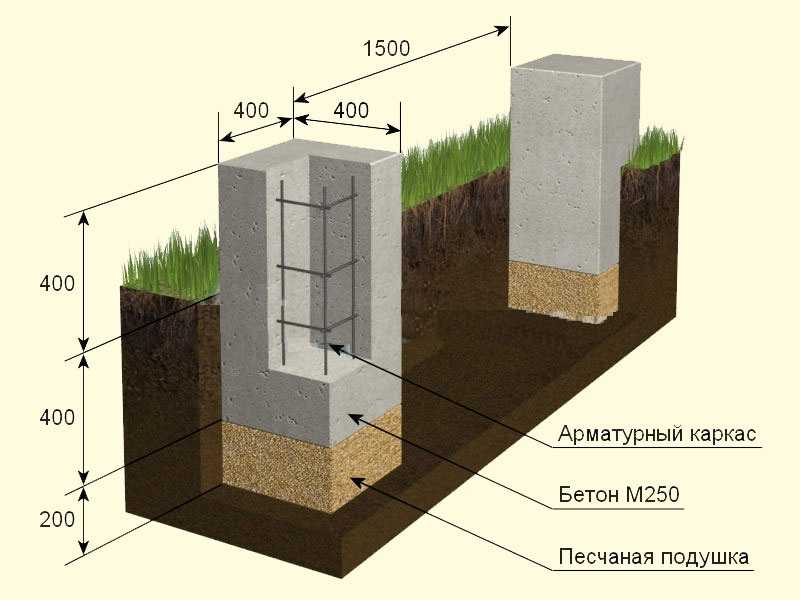
An example of a non-buried columnar foundation device with a freezing depth of 1.2 m (1/3 of 120 cm is 40 cm)
With this choice, the heaving forces will act on the pillars, but since their area is less than that of the tape, the effect will not be so strong.These effects are successfully compensated by the construction of a frame or wooden house. Moreover, additional measures are being taken to reduce the impact of heaving forces:
- at the bottom of the pit, a gravel cushion is made under the post, which takes on part of the load;
- make the side surfaces smooth and additionally lubricate them with grease, bitumen mastic, epoxy resin, etc.
- make insulated blind area around the house.
As a result, in most cases, the owners do not even notice that the foundation is "swollen". Some of the supports rose slightly, the grillage and strapping compensated for them. After thawing the ground, everything returned to its place.
In soils that drain water well, the columnar foundation is made shallow or not buried. Here it is only important to choose the right area of the columns in order to evenly transfer the load.
Pole sizes
There are minimum dimensions for the supports of a columnar foundation. They depend on the materials:
- Monolithic reinforced concrete 30 cm.
- Fired brick posts - 38 cm;
- Booth, concrete blocks and rubble concrete - 40 cm;
- Masonry - 60 cm
But at the same time, the size of the pillar should be 10 cm larger than the width of the wall. For normal operation of the foundation, it is necessary that the wall falls in the middle of the support and on the sides it protrudes at least 5 cm.
Construction stages
As usual, it all starts with cleaning the site and marking. Sod is removed from the entire site, the fertile layer is removed. It is not considered a carrier and is taken out. At the same time, alignment is done - they cut off the hillocks, fall asleep and tamp pits and depressions. They control horizontality using a two-three-meter board with a building level installed on it.
Markup
Around the perimeter of the building, cast-off is installed - pillars or pillars with nailed planks - benches. They are placed at a distance of about a meter from the perimeter of the future house. With the help of cords stretched between them, they designate the perimeter and width of the future pillars.

How to mark the foundation
When setting up, make sure that the corners are strictly at 90 °, measure the diagonals of the rectangles. They must be equal. At the intersection of the stretched cords, the perpendicular is lowered down (using a plumb line), marking the dimensions of the pillars on the ground.
This way you can make them all the same, as well as monitor the height when setting up the formwork for monolithic posts or when laying prefabricated ones.
Digging holes for posts
For prefabricated foundations, holes are dug manually or with the help of an excavator. If the depth is required up to 1 m and the soil is not loose, you can dig them with straight walls. If the depth is greater or there are signs of crumbling, the slopes are made inclined.
When we reached the design depth of the foundation, they dig another 20-30 cm below. The bottom is leveled, its dimensions should be 10-20 cm larger than the planned dimensions of the heel or post.
Easier with round posts. Wells are drilled for them with a manual or automated drill. If you plan to expand at the bottom - the heel, you can either make the hole wider - by the size of the heel, or use a drill with a folding blade. It is called the TISE drill. The additional blade opens after reaching the set depth.
Sand and gravel cushion device
A layer of crushed stone of about 10-15 cm is poured onto the bottom and rammed well. Coarse sand is poured onto the compacted crushed stone. It is spilled and rammed. The general layer of sand and gravel cushion must be such that it reaches the specified depth of the foundation.

An example of a sand and gravel cushion under a monolithic pillar
In the case of round posts, a pillow is made as well, tamping is done whenever possible. Take a long pole with which the bedding is compacted.
Heel device
If the pillars are made prefabricated - from blocks, bricks, rubble, it is easier to make a heel from a ready-made concrete block. Placed on the sand, leveled in a level, block cushion. It has a trapezoidal section, which is convenient.

Two types of heels - one-piece made of concrete block
For monolithic ones, it makes sense to make a half of a monolith.They put the formwork according to the specified dimensions (twice the column in section and at least 1/3 of the section in height). Reinforcement is laid in two tiers. Use a rod 12-14 mm in diameter. Also, reinforcement is installed in the heel, which will then go to the pole. The result is a single reinforced concrete structure.
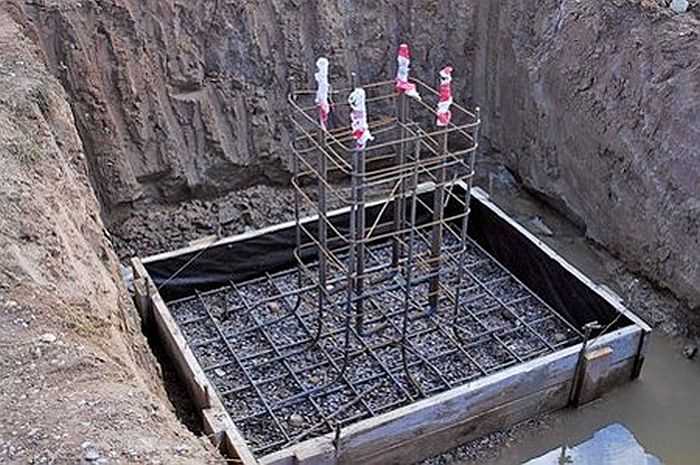
Example of Heel Reinforcement and Post Releases
Building pillars
If we are talking about a monolithic pillar, then formwork is placed, reinforcement is installed inside. Formwork for square pillars is knocked out of boards; for round pillars, plastic pipes of a suitable diameter can be used. There is an economical formwork option - a roll of roofing felt of the required length. It is twisted into a pipe of the required diameter, screwed onto the standard. Having made two or three layers, fasten it with tape. It turns out a reliable formwork, which, even in the part protruding above the ground, normally holds the mortar.
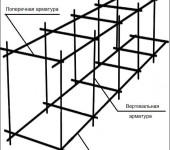
For reinforcement, three to four rods of class A III reinforcement with a diameter of 12-14 mm are usually used (for square, 4 is required, for round, 3 is possible). They are interconnected into a single structure with transverse dressings installed every 20-25 cm. They can be made from class A I smooth reinforcement, with a diameter of 6-8 mm. It is better to knit the frame, rather than weld it - the higher the strength.
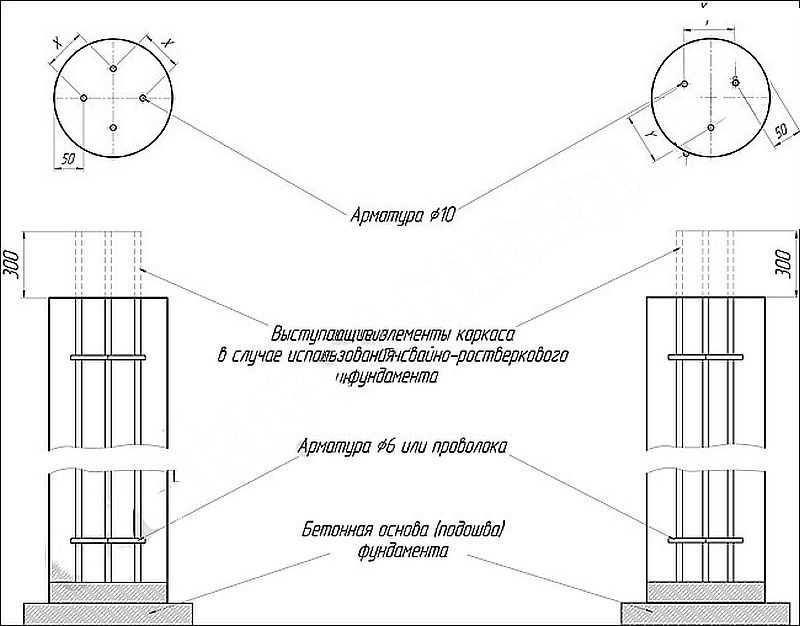
Reinforcement of circular pillars
Please note that there must be a distance of at least 50 mm from the edge of the formwork to the reinforcement bar. It is necessary so that the metal does not rust. The photo below is an example of improper reinforcement: reinforcement close to the formwork. It will rust quickly and the pole may break.

There must be a distance of at least 50 mm from the reinforcement to the edges of the formwork
If the pillars are made of bricks, then it must be taken at marks of at least 100, corpulent, well-fired. If there is a high level of groundwater on the site, brick pillars will not go: they will quickly collapse. The mortar for laying brick pillars is made on Portland cement not lower than M 300, and preferably 400 or 500. There are several mortar options:
- 1 part cement, 3 sand;
- 1 cement, 2 lime paste, 10 sand;
- 1 part cement, 1 part clay adze, 10 parts sand.
Laying is carried out with bandaging, carefully checking the verticality. Even small deviations can then lead to the destruction of the foundation, and maybe the building.
When laying a rubble columnar foundation, stones are chosen flat with smooth edges. When laying, the vertical load should be transmitted to the entire plane of the stone, and not to its individual sections. They also lay stones with bandaging, placing the largest fragments in the corners, filling the gaps with smaller ones.
The thickness of the stones should not be more than 30 cm. They are placed on the mortar, tightly fitting to each other. The gaps are filled with rubble, ramming it well. To increase strength, such pillars can be reinforced both vertically and horizontally. Horizontal reinforcement is done every 25-40 cm, rods of at least 6 mm in diameter are inserted vertically, you can use a reinforcing mesh made of wire of the same diameter.
Important: the pillars must all be driven out to the same level. To do this, during construction or pouring, constantly beat off the vertical plane: cutting off the tops is long and difficult.
Grillage device
As mentioned earlier, when pouring monolithic pillars, embedded parts are installed in the tops:
- studs for connecting a wooden or metal strapping with a bar;
- reinforcement outlets of at least 70 cm in length for connection with the reinforcement cage of a monolithic grillage.
The strapping device is considered in the description construction of houses from a bar... You can read about the device of a monolithic grillage in the article about pile-grillage foundations. Everything is the same, up to the calculation of the bearing capacity.
Waterproofing
To prevent moisture suction from the soil between the foundation / grillage and the strapping or the first row of masonry, a waterproofing layer is required.You can use a coating (the most common is bituminous mastic) or roll or a combination of both.

Waterproofing is installed on the post
There is no point in isolating the pillars. For concrete pillars, the presence of moisture is not a minus, as well as for rubble. And brick is best placed on dry soils. Here is their surface, maybe it is worth soaking with some kind of deep penetration impregnation, which at times reduces hygroscopicity. The only problem is that they are expensive.
-
 What is the best foundation for a two-story house, calculation of depth and its thickness
-
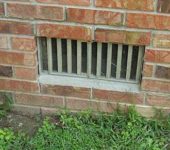 Air vents (vents) for ventilation of the foundation - are they needed or not?
-
 Reinforced concrete slab foundation
-
 Concrete mark for the foundation of a private house
-
 Arrangement and calculation of reinforcement in a strip foundation


I liked the foundation of the tower on piles more. It can be quickly installed under the house. What is there, screw in the piles, and pour concrete.