Self-made beehive
Both novice and experienced beekeepers come to the conclusion that it is better to make a hive with their own hands. You are sure of the quality of your own product, if you need to develop it, you can quickly make the missing parts. How to make hives on your own will be discussed.
The content of the article
Popular hive designs
Before building a hive with your own hands, you need to choose its design. Basically, novice beekeepers use two types of hives:
- Dadanovsky on 12 frames. It has a vertical design and is built up. If necessary, either another standard case or a magazine (an additional case half the height of the main one, into which the half-frames are installed) is placed on top.
- Lounger - 20 frames or more. It differs in size - it has a greater width than depth. The number of frames used by the bee family is regulated by rearranging the partition.
Both of these designs use standard 470 * 300mm frames, which are widespread. These two types are the most common among beginner (and experienced) beekeepers. Sometimes hives "Ruta" are used, but they have frames of a different format - 470 * 230 mm and it is not so easy to find them. Also, it is more difficult to work with Roots than with Dadanovsky or loungers, more experience in beekeeping is required. Therefore, choose from two options - Dadanovsky or lounger. Which one is specific - it is better to ask the beekeepers of your area.
Beehive drawings
Since standard frames are used in the Dadanov hive and the lounger, they differ only in width: one should fit 12 pieces of frames, in the other - 20 or 24 pieces. The rest of the parameters remain the same.
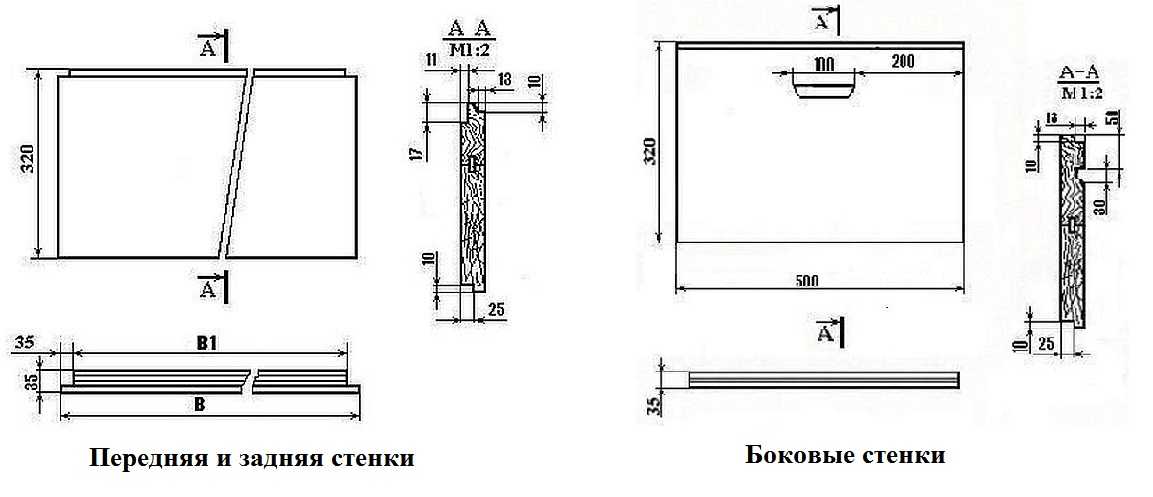
Side and front (back and front) walls of the hive
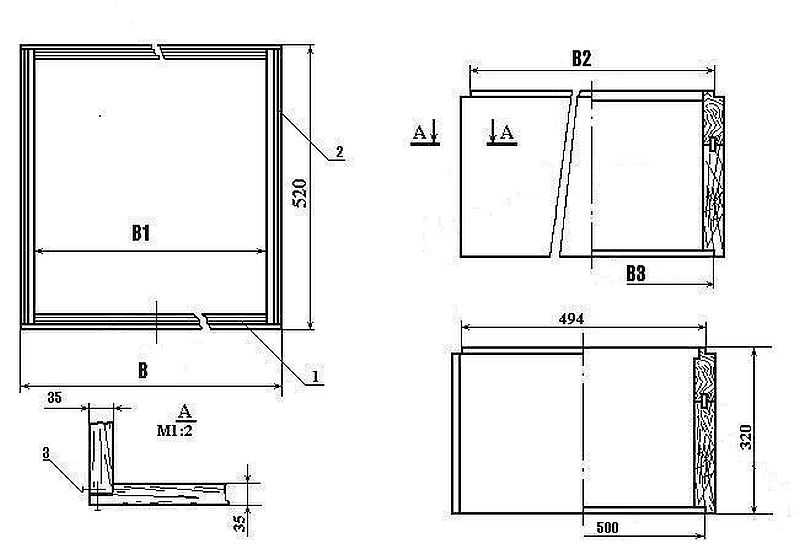
Case assembly diagram
Variable parameters for hives with a different number of frames are shown in the table. Substitute them in the drawing and get the option that you need.
| Number of frames in the case, pcs | Body width B, mm | Width of the internal opening of the B1 body, mm | External installation dimension of the body fold B2, mm | Internal installation size of the rebate B3, mm |
|---|---|---|---|---|
| 10 | 455 | 375 | 419 | 425 |
| 12 | 520 | 450 | 494 | 400 |
| 14 | 595 | 525 | 569 | 575 |
| 16 | 685 | 615 | 659 | 665 |
| 20 | 880 | 810 | 854 | 860 |
What you need to know before you start making your own beehive
Even before you start making your own beehives, you need to know the requirements for materials and technology for building evidence for bees. A lot of them. Let's start with the material requirements.
What are they made of
The most common material is wood. It can be used as non-porous coniferous wood (spruce, fir, de-resinated pine), and loose deciduous species - poplar, linden, etc. Do not use dense wood - the hive will be heavy and cold.
The requirements for wood are tough. It should be dry - no more than 16% moisture, no knots falling out, rot, wormholes, redness. Blue discoloration is acceptable (it does not affect the quality indicators). If there are knots, they can be removed, sealed with corks from the same wood species and putty. Do not use wood with other defects.
Today hives are also made of plywood, better - birch. In this case, the walls are made double with a gasket between the layers of insulation - foam. In such hives it is warm in winter and not hot in summer. Their disadvantage is that the walls are vapor-tight, moisture does not come out through them. Therefore, the ventilation system of the hive must be given special attention (make an additional entrance at the top, and, if necessary, open it for ventilation).
Sometimes hives are collected from polystyrene foam, polyurethane foam and expanded polystyrene. The most successful option is expanded polystyrene. Even some kind of fastener can be installed in it, neither bees nor other insects gnaw it. The remaining two materials are collected on glue, and the bees also sharpen them, and ants and other neighbors unwanted for bees can settle.
Processing and assembly requirements
When assembling a hive with your own hands, you must strictly maintain the internal dimensions of the body and extensions. Then the increase in volumes will not cause difficulties. Parts of the hive - hulls, extensions, shops, roof - must be connected to a lock and the locking parts must also match. This is necessary for a reliable connection without gaps and drafts, which bees do not like very much. Therefore, the maximum machining tolerances are 1–2 mm.
There are also requirements for the quality of materials processing. Most of them relate to wood, but they can also be applied to other materials:
- Boards and bars should be smooth, free of burrs, scuffs and chips.
- Sawing materials must be strictly at an angle of 90 °, avoiding deviations.
- The hive bodies must be knocked down from solid boards with a thickness of 40-45 mm or using a tongue-and-groove connection, glued for reliability.
- To mate the parts of the hive in detail, choose a quarter - for a reliable gapless connection.
- On the front and back walls of the hive, folds are made - for hanging the frames. The rebate depth should be such that there is a distance of at least 8-10 mm from the top edge of the strip to the cover or extension. If the distance is less, the frames can stick to the cover, which creates problems during maintenance.
- If the walls are made two-layer (with insufficient thickness of the boards), the outer ones are connected in a quarter, making sure that the seams in the layers do not coincide. It is better to connect the inner parts and the bottom into a tongue or groove.
Structural elements and their features
Most often, the hive has a modular structure - it consists of several detachable parts. This is convenient as it allows you to increase the volume as needed. Each of these parts is manufactured separately and the manufacturing precision must be high - all parts must be interchangeable.
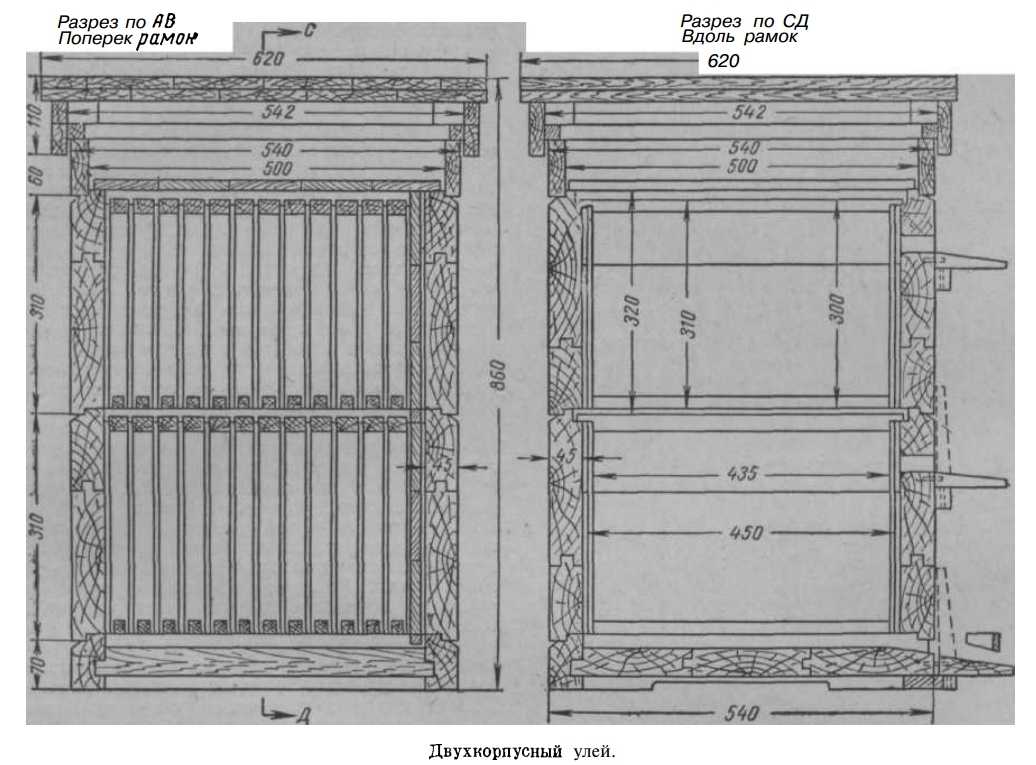
Dadanovsky hive of two buildings, placed one on top of the other
Housing
This is the central part of the hive, which usually contains the nest of bees. By the number of hives, hives can be single, double-hull or multi-hull (3 or more). Corps are mentored as the family grows.
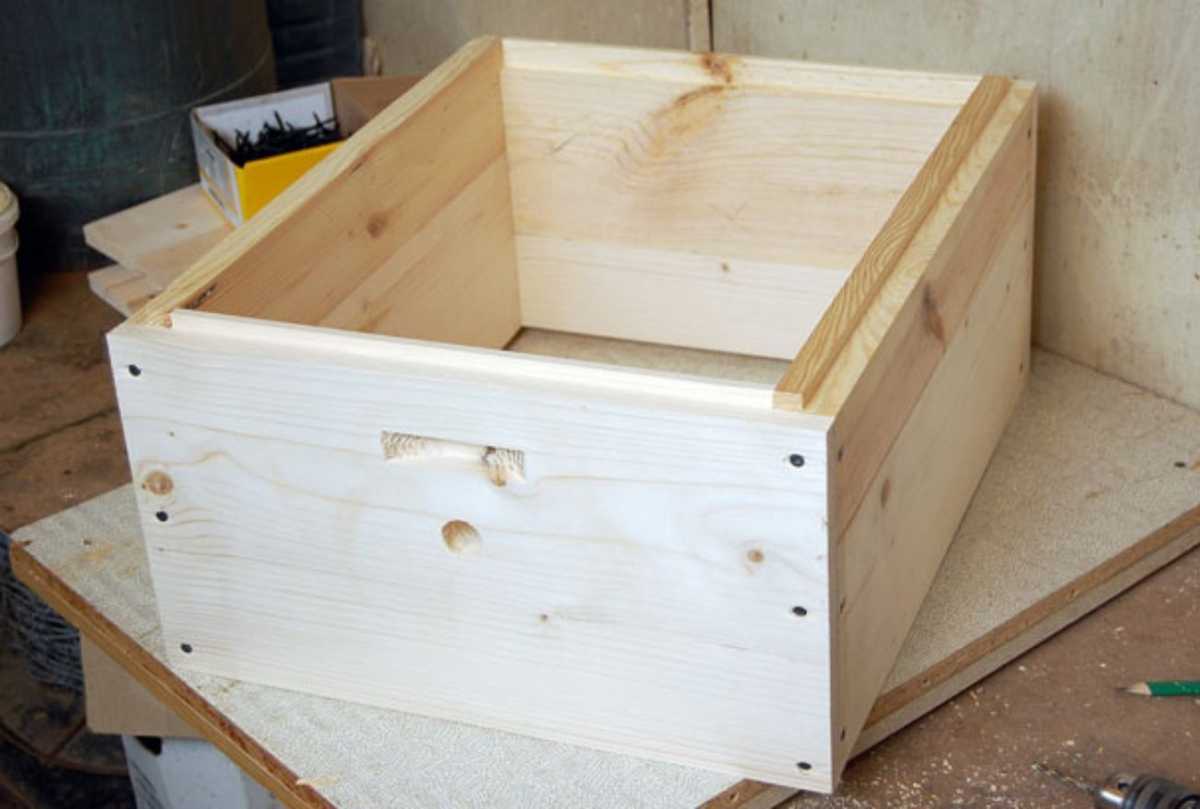
Hive body for 12 frames
Roof
The roof of the hive can be single-pitched (tilted back) or gable. In the forehead case, it should be with overhangs - protrude beyond the geometric dimensions of the hive and protect the walls from the effects of bad weather.

Roof structures for beehives
The roof consists of a roof plate - a flat body for placing insulation or feeders for feeding bees - and the actual roof planks nailed to the roof plate with nails or screwed on with self-tapping screws. The height of the pad depends on the thickness of the insulation, and this value depends on the region. Usually the height of the roof liner is 80-140 mm. Ventilation holes are often made in the under-roof to remove moist air from the hive.
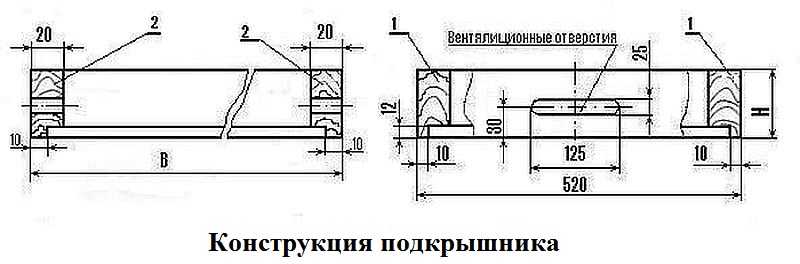
Liner construction
When making a roof, the planks are stacked either in two layers with overlapping seams, or from thicker boards in one layer, but the seams are necessarily closed with thin strips. On top of the wooden roof of the hive, you can lay roofing iron, roofing felt or roofing material.
When making a roof, pay attention to the fact that it "sits down" tightly, without cracks. To seal the joint around the perimeter of the body, you can fill a felt strip or nail a plinth outside the body to overlap the joint.
Bottom
The bottom of the hive can be nailed to the body (deaf) or it can be pulled out or extended, that is, it can be detachable. The split bottom makes it easier to maintain the hives - it allows you to clean the bottom without disassembling the entire hive. Structurally, the bottom is:
- cold - from a single board;
- warm - of two layers with insulating backing.
Also, the bottom is double-sided - with protrusions of different heights on both sides, which allows you to adjust the internal volume. They knock it down tightly, without gaps, connect the boards in a quarter or in a groove with additional gluing of the joint with moisture-resistant wood glue. The cracks must be carefully repaired (with putty on wood), since wax crumbs are poured into them, and then a wax moth starts up. Therefore, from time to time they prefer to replace the bottom, making a new one.
Video about making beehives from different materials