Self-assembly of the ceiling curtain rod
Floor-to-ceiling curtains are the latest trend in interior design. It is realized with the help of ceiling cornices, which just allow you to close the entire space. We will discuss how to fix the ceiling cornice and how to hang curtains on it.
The content of the article
At what distance from the wall to mount
The first question that arises when you start installing the cornice over the window is at what distance from the corner it should be fixed. Close? Stepping back 10 cm? 20 cm?

It is necessary to place the curtain rod so that they hang freely, without touching the window sill and heating radiators
In fact, the distance can be from 8 to 15-20 cm. It is determined depending on the location of the heating radiators and / or the window sill. The cornice should be placed so that the tulle and curtains hang freely, without touching either one or the other. Firstly, this is how the drapery lies perfectly, secondly, it is better for fabrics, and thirdly, air circulation is better, which is important during the heating season.
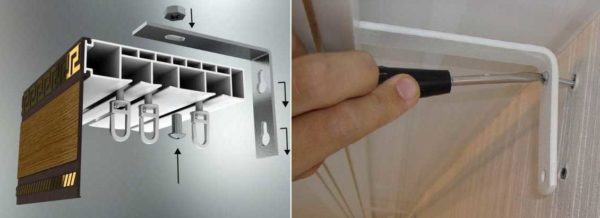
Fastener installation step
Some plastic ceiling moldings have pre-assembled mounting holes. In this case, the manufacturer has provided for the load, you just need to install fasteners in each hole. Fasteners are sometimes included. If it is not there, when choosing a dowel, do not forget about the shape and size of the screw head. The cap should be larger than the hole diameter. Moreover, the difference should be substantial - not less than 2 mm, but better - more. If the cap is too small, there is a chance that the cornice (especially with heavy blackout curtains) could fall off. An alternative solution in this case is the use of washers of a larger diameter.
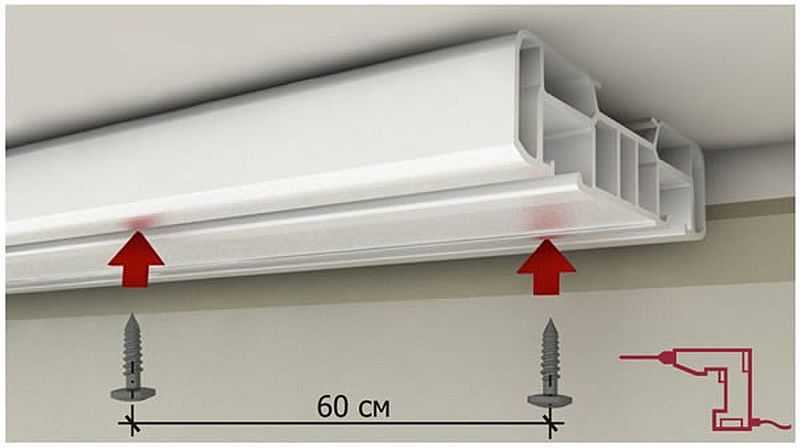
Step of installation of fasteners for ceiling cornice
If there are no holes in the eaves profile, you need to drill them yourself. The optimal distance is 50-60 cm. If the profile has two tracks where you can install fasteners, we make the holes in a checkerboard pattern. This way the load is distributed more evenly and the reliability is higher.
When you drill holes in the eaves strip, take a drill equal to the diameter of the dowel body or self-tapping screw. The hat on the bottom side should be straight - this way the body will be well pressed against the plane of the ceiling.
Installation of a ceiling cornice to a concrete floor
The procedure for attaching the ceiling cornice is not too complicated, but if the length of the product is more than two meters, you will need an assistant. In addition to the fasteners, you only need a drill and a screwdriver with a suitable slot.

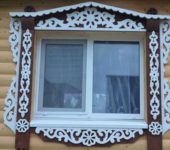
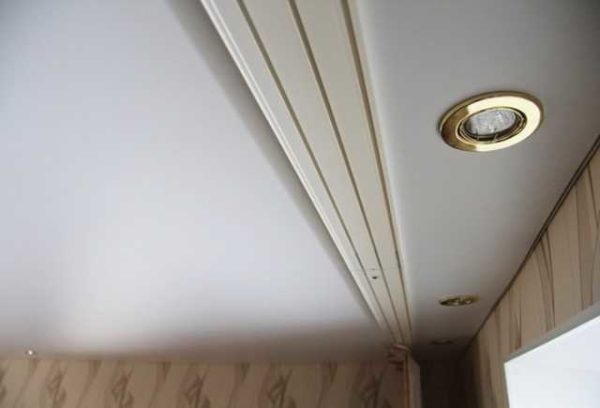
This is how the installed ceiling cornice with curtains should look like
Preparation
Before you can fix the ceiling cornice, you need to do some preparatory work. The first thing we do is adjust the length. If everything suits you, great. If you need to cut off the excess, you will need a hacksaw. The canvas is desirable for plastic, but for metal, too. If the cornice is assembled, remove the plugs and turns (if any), cut off the excess, then put everything back in place - turn, plug.
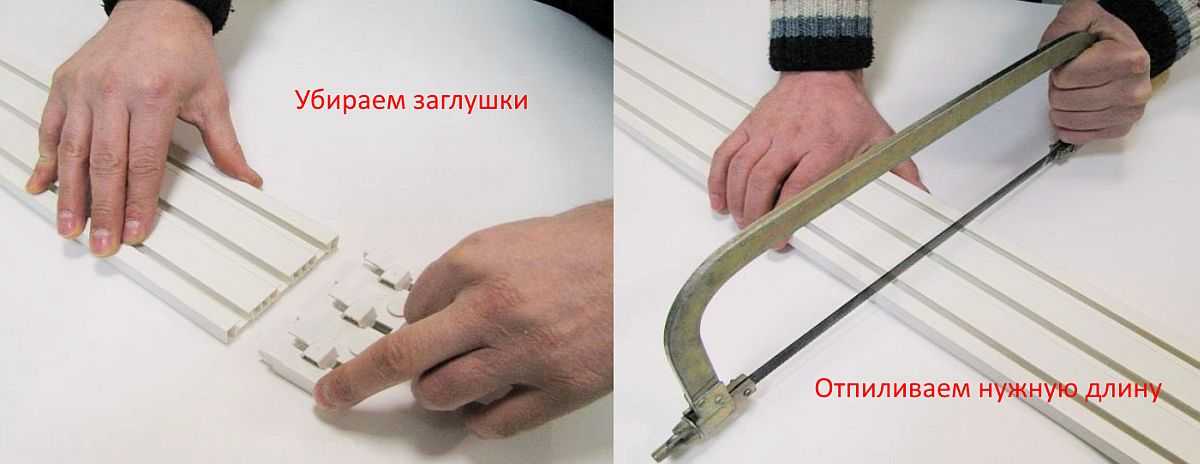
Adjusting the length
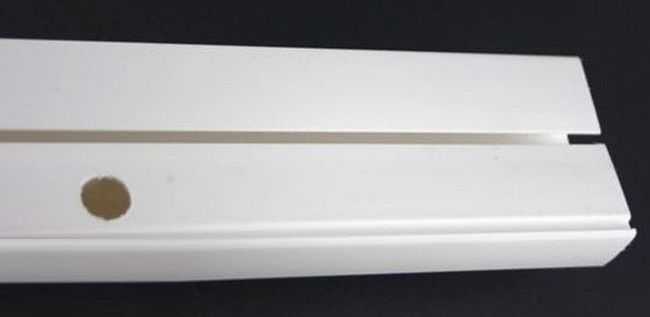
If the holes for the fasteners are not drilled at the factory, you will have to make them yourself. We start with the markup. Mark it so that the distance between adjacent screws is no more than 50-60 cm. If there are joints, then retreat from the joint 5-10 cm on both sides. For better load distribution, it is best to stagger the mounting holes.
After the marks are set, we drill mounting holes in the plastic. Use a drill that is equal in diameter to the dimensions of the fastener.More is undesirable, but less is also not good - when twisting, the plastic can crack.
Even for a single-row cornice, it is better to arrange the holes in a checkerboard pattern.
After all the holes are ready, if the curtain rod is prefabricated, collect all the parts. It is possible not to install the decorative strip (if any). For now, it will only interfere.
How to fix
In most apartments and in many private houses, the ceiling is a concrete slab. Accordingly, we take the drill on concrete. The drill diameter should be taken according to the size of the dowel. Then we act according to the plan:
- We apply the assembled cornice to the ceiling, align.
- Using a simple pencil or marker, mark the attachment points.
- We drill holes, trying to get exactly according to the marks. The depth is equal to the length of the plastic insert. To make it easier to control, you can stick a strip of electrical tape on the drill.
Already fixed, but without curtains
- Insert the plastic part of the dowel into the hole. It should be flush with the ceiling. The protruding parts will interfere with installation, so either we deepen the hole or cut off the excess plastic.
- After all the plastic parts of the dowels are installed, if the decorative strip is attached to the grooves (not with Velcro), install it. It is not always possible to “snap” it, so you shouldn't hope that you will install it later. Most often, you have to put on this bar gradually, moving along the grooves like on rails. You can't do this on the ceiling, you have to remove the already mounted cornice. As you can imagine, this does not improve the mood.
- Put the cornice assembly to the marks. First, we install the fasteners along the edges and in the center. If the cornice is long, we fasten the two halves additionally with one or two dowels. So that the plastic does not sag. Further, the installation order is arbitrary.

That, in fact, is all. You know how to attach the ceiling cornice to the concrete slab. If the floor is made of wood, it is even easier: there is no need to pre-install the dowels. After all, self-tapping screws are usually used for wood. In this case, the cornice is leveled and self-tapping screws are immediately placed in the mounting holes. It is more convenient to follow the same order: along the edges and in the center, and then - as it turns out.
If the ceiling is plasterboard
If it was decided to install the ceiling cornice at the repair stage, most likely there is a special niche into which it is installed. In this case, it is attached to the ceiling, and how to attach the ceiling cornice to concrete and wooden floors is described above. It will be a little more difficult, since freedom of action is limited, but not critical.
Fastening the cornice in a niche is a little more inconvenient
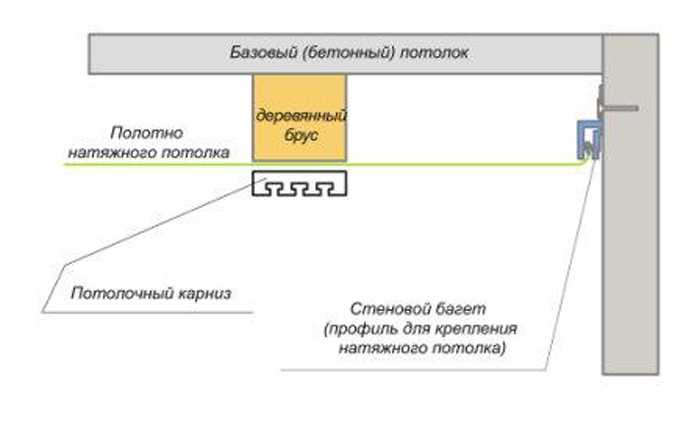
Maybe the second option is without a niche. In the place where the cornice is installed, a embedded wooden beam is fixed. It is located between the drywall and the main floor. In this case, the ceiling cornice is attached to the timber through drywall. It is necessary to use self-tapping screws for wood of sufficient length so that in the body of the beam there is at least 2/3 of the length (better - more).
But if you decide to replace the cornice with a ceiling after repair, you will have to look for special fasteners. These are the so-called butterfly dowels and snails. Both are characterized by an increased contact area with the material, due to which the load is distributed over a large surface. But still, it is better not to use heavy fabrics.

Using special drywall hardware
Both types of fasteners for drywall - dowel-butterfly and dowel-snail - are made of plastic and metal. Stronger, understandably metal. But the trick is that, most likely, not a dowel, but drywall will not withstand a high load. And to prevent this from happening, reduce the step of installing the fasteners. For example, you can make 40-45 cm. This will increase the labor intensity, but give at least some hope that the structure will not collapse.
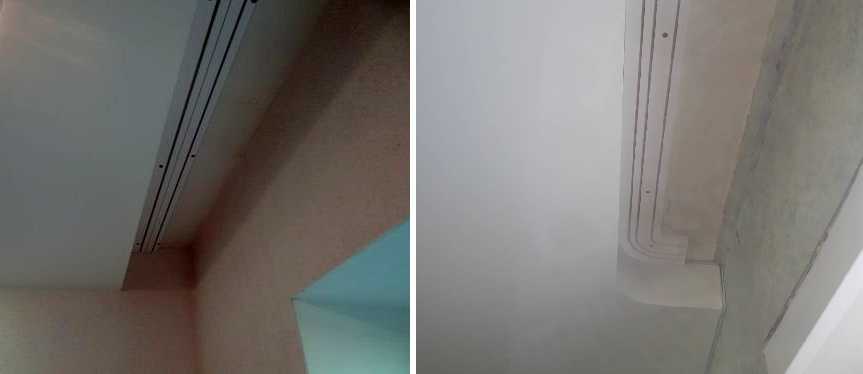
Stretch ceiling mounting
In case of stretch ceiling it is possible to fix the ceiling cornice only to a pre-installed embedded beam. It is fixed before pulling the canvas.When fastening, self-tapping screws are used for wood, they are attached directly to the beam through the ceiling sheet.
How to attach a ceiling cornice to a stretch ceiling
The second option is a niche for installing a cornice, but it is also made during the installation of the ceiling and not later. In this case, a wooden bar is also present, but a stretch ceiling guide is attached to it.
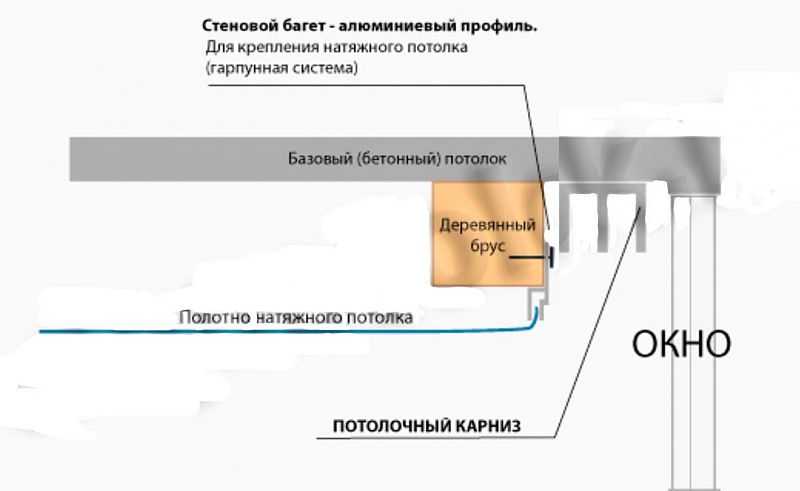
Fastening the ceiling cornice in the stretch ceiling niche
There are no options for installation on a ready-made stretch ceiling. There is a real compromise - wall mounting with brackets just below the ceiling. There is a gap to the ceiling, but it is small and not too noticeable.
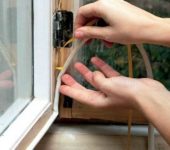
Fastening the ceiling cornice to the wall
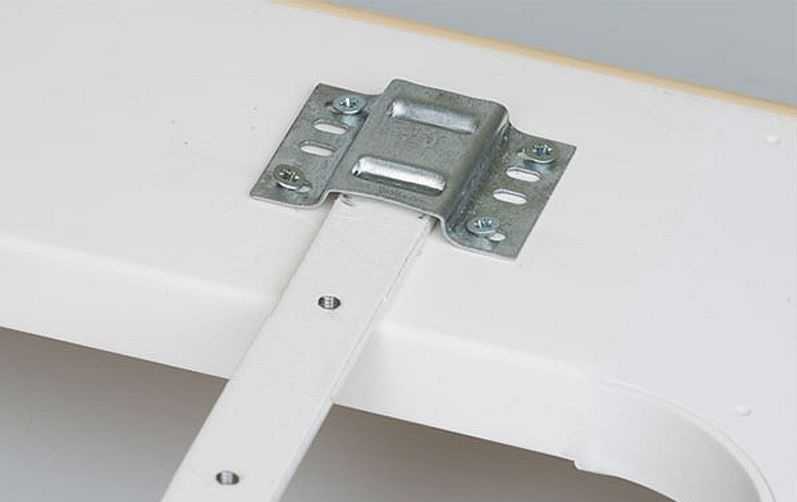
For cases with a stretch or plasterboard ceiling, there is another installation option - on special brackets that are attached to the wall. In this case, the distance from the corner is determined by the bracket parameters. They have longitudinal slits that allow you to adjust the length to your liking. There are several holes at a distance of 5-6 cm from each other. Wall-mounting brackets usually come with mounting plates that are attached to the plastic case with four small self-tapping screws. The step of installing the fasteners for wall mounting is the same - 50-60 cm, two stops are placed at the joints, stepping back 10-15 cm from the joint.

Types of brackets for wall mounting of ceiling curtain rod
How to fix the ceiling cornice to the wall? The installation procedure is the same as in the case of installation on a concrete ceiling ceiling: marking the mounting holes, installing dowels, then fastening the cornice itself to the wall on the brackets. But with different brackets, the procedure is different.
Here's what comes together
Option with long cuts in the bracket body:
- The plates are fixed, the brackets are inserted into the grooves.
- We attach the cornice to the installation site, mark the holes on the wall (circle it). We circle all the holes, how many there are in the cornice.
- We make holes in the wall, insert the dowels.
- We remove the brackets and fix them on the wall.
- We put on the plates attached to the cornice on the brackets.
- We expose exactly, at the same distance from the wall.
- Tighten the fixing bolts.
Mounting on brackets

This option is good, because if you wish, you can move the cornice closer and further within the cut length. You can also level out imperfect wall geometry. When using the option with several holes, it is easier to first attach the brackets to the eaves, then lift the entire structure, make markings. After installing the plastic part of the dowels, fasten the eaves assembly to the wall again. As you can see, it is very difficult to do without an assistant: you need someone to hold the cornice.
How to hang curtains on a ceiling cornice
The ceiling cornice has hooks or runners for hanging curtains. For each type of profiles - their own, but they are of different heights.
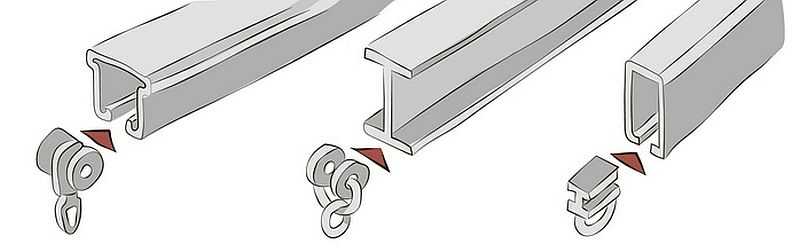
It is necessary to select hooks / runners according to the type of profile
Now about the difference between hooks and sliders. The sliders have small wheels. They are more expensive, but the curtains are much easier to move. In order to save money, you can take hooks for tulle (we move it very rarely) and runners for curtains (curtains).
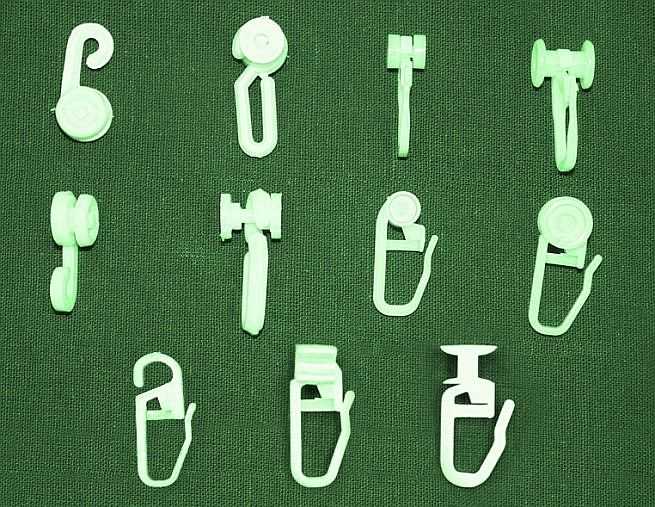
Types of hooks for ceiling cornices
To hang curtains on the ceiling cornice, a special tape is sewn to the top of the canvas. It helps to form folds of the required size. This tape has a strip that can be used as eyelets. Here hooks are attached to it.
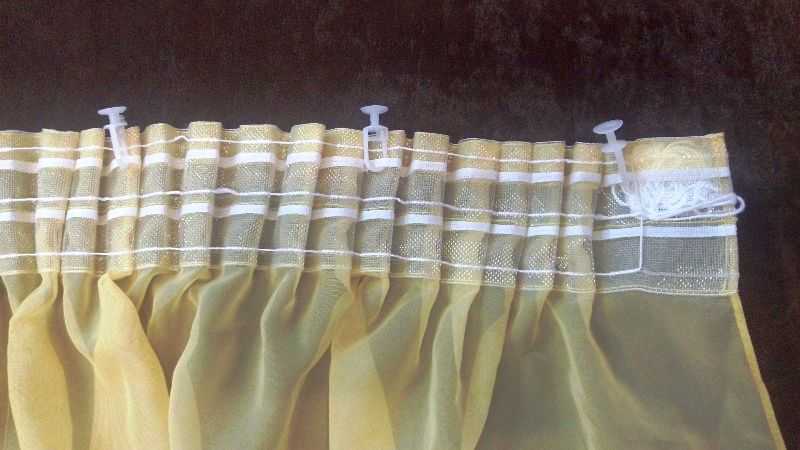
Curtain tape and hooks on it
There is another option - to make the loops by hand, but then the folds will have to be laid and sewn up by hand. This option will have to be used if you need to lay not standard folds, but with some special pattern.
There are two ways to hang curtains on the ceiling cornice:
- Fasten the hooks to the tape and then thread them one by one into the desired groove on the profile. Then install the stopper, then - the plug.
- The second way is to first thread the required number of hooks / runners into the groove, install the stopper and plug. Then put loops on the hooks.
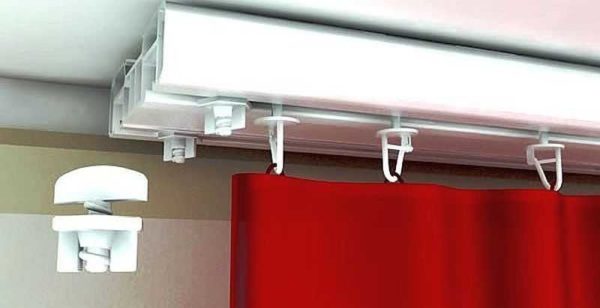
Installing the locking screw. Then you need to put a plug

Physically, the first option is easier, but more often they do it according to the second. When you remove the hooks for washing, they can get lost, you may be mistaken in the order of their installation. In general, it is not so important how exactly you will hang the curtains on the ceiling cornice. The choice is yours. And finally, a little life hack on how to easily put the eyelets on the hooks. This is a dreary and difficult task that annoys many.