We make a cellar from reinforced concrete rings
Not everyone wants to build the walls of the cellar - it takes a long time, and there is not always time. For storing vegetables in small quantities, you can make a cellar from concrete rings. The largest diameter of such products is 2 m and 2.5 m, so they can be used.
The content of the article
Vertical cellar made of concrete rings
If you find rings with a diameter of 2.5 m for the vertical version, it will be very good, but in the two-meter one it is cramped after the shelves are installed. There are already ready-made plastic cellars, but their price is several times higher than that of a homemade one made of reinforced concrete rings.
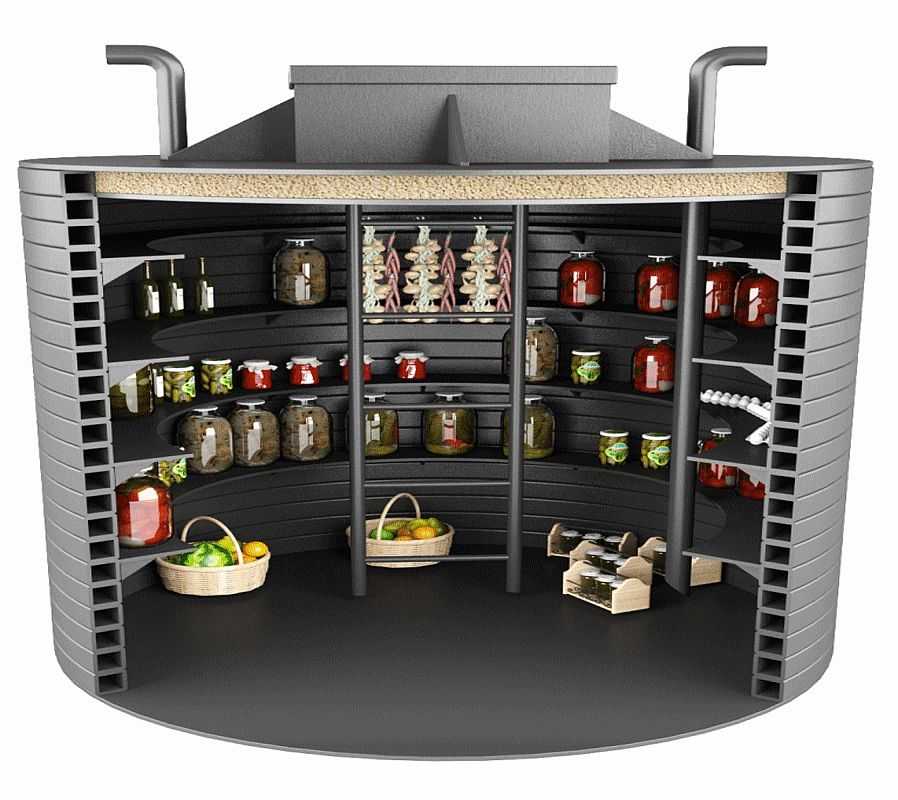
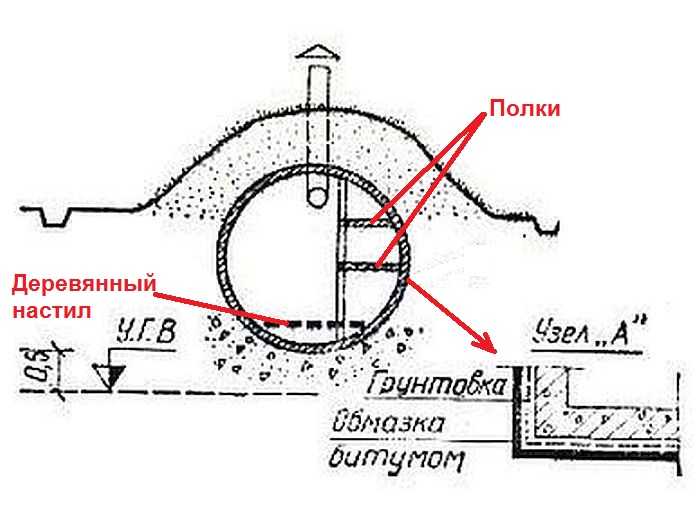
We make something similar to this cellar from concrete rings
Before installing the rings, it is advisable to treat them from the outside with a coating waterproofing. Even if the groundwater is low, the concrete will damp when it rains or when the snow melts, the humidity in the cellar will rise. To avoid this, it can be treated with bitumen mastic, molten tar, deep penetration impregnations such as "Penetron" or any suitable composition suitable for its properties.
Recessed
The way to build a vertical cellar from concrete rings is simple: you dig a cylindrical pit of a suitable size. You can immediately go to the full depth (this is about 2.5 meters), then install the rings with the help of a loader or friends, ropes and a winch on a tripod.

Digging a hole under a well
The second option is to use the technology that is used whenconstruction of wells - remove the soil inside the ring, gradually deepening. The ring will fall under its own weight. For wells, 8-10 rings are buried in this way; for a cellar, a maximum of two or three will be needed (depending on the height).
The number of rings - depending on your desire, but it is better to gain the height so that you can stand inside at full height. At the same time, add at least 15-20 cm for the arrangement of the floor, and 10 cm so that there is at least a minimum gap above your head. The height of the rings can be different - it is 40 cm, 60 cm, 80 cm and 1 m. Of these, they gain the required height.
When buying reinforced concrete rings for a cellar, see that they have a lock - a ledge and a recess at the ends. These locks make the structure more stable and easier to seal.
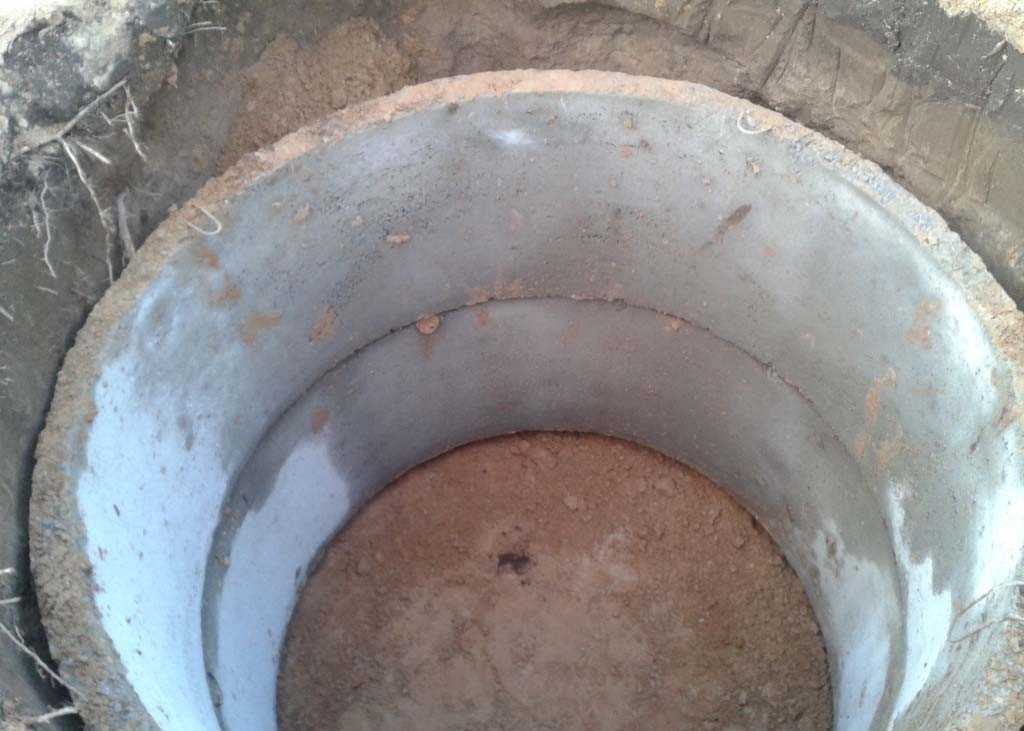
Rings set
Before installation, the ends of the lower rings are cleaned of dirt (with a brush), a layer of cement-sand mortar is applied. After that, a second ring is placed. After installing all, the seams and technological holes are well coated again.

Coat the joints with a cement-sand mortar
The cover can be bought ready-made - there are separate round plates with a hatch, but the hatch is round, and usually small in size - 70-80 cm. Not everyone can just climb into it, and it will be even difficult with a load. So this option is not for everyone.
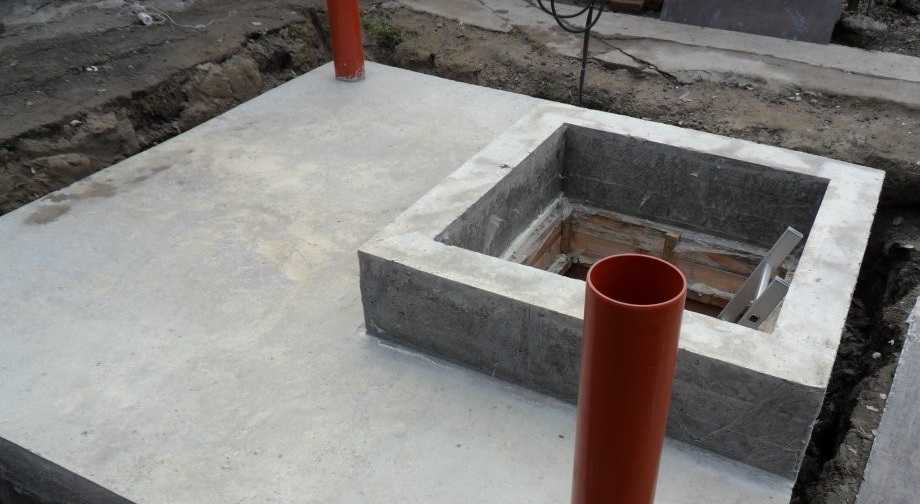
If you need a square hole, you can cast the floor slab (ceiling) of the cellar yourself. To do this, a frame is cooked from the corners, into which it will be convenient to lay formwork boards. Used corner 40 * 40 * 4 mm. The formwork will be fixed - it will also be the cellar ceiling - as in the photo. This version uses pieces laminated chipboard 21 mm thick, a 35-40 mm thick board is suitable.
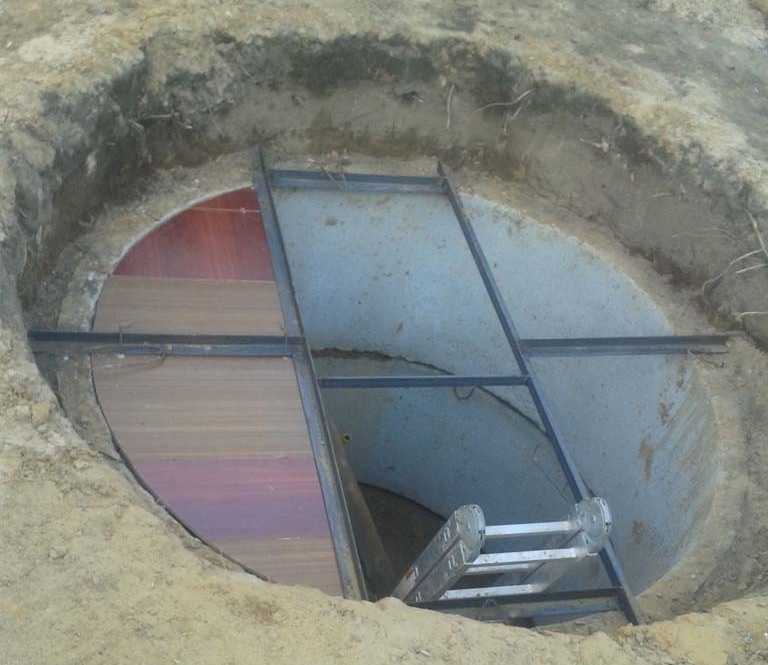
We make the cellar cover ourselves
A wire mesh is laid on the laid formwork. Since the dimensions of the concrete slab are small, the corner is a good shock absorber, you can take a bar of 8-10 mm. Tie a reinforcing frame from it - a step of 15 cm.
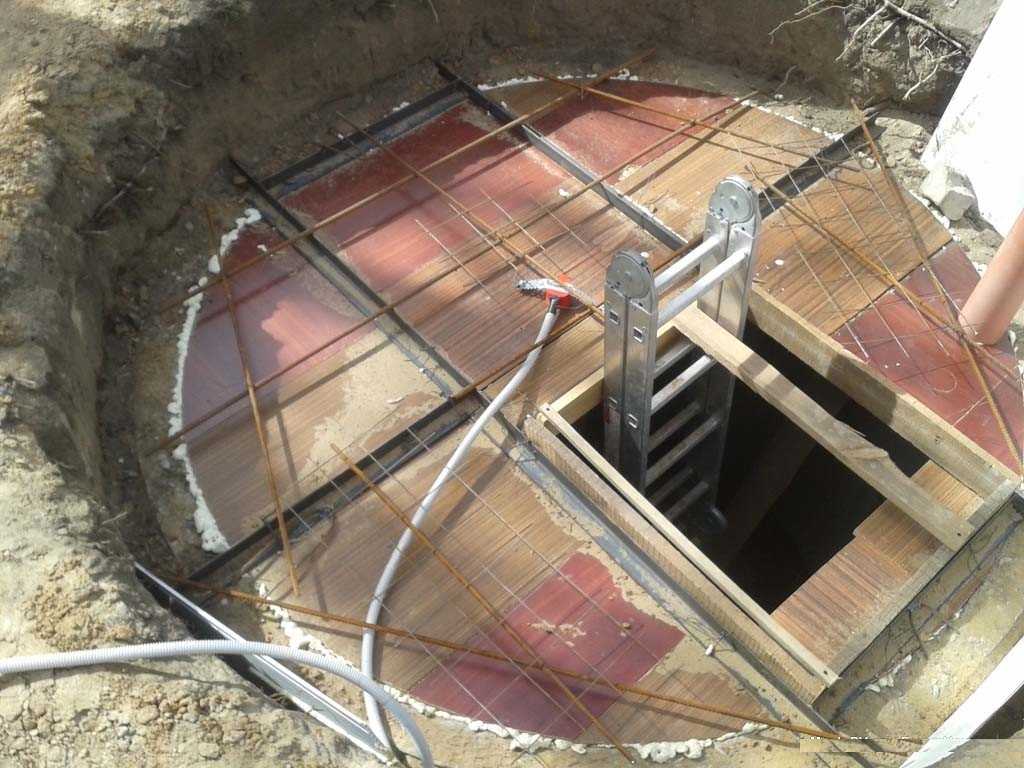
We collect the reinforcing frame
Pull the pipes for ventilation through the cover (in this case, it is one, since the volume is small), we start the wires for lighting, which we put in a corrugated hose or in a piece of pipe, for which we make holes in the formwork panel.We fix the mortgages well.
The next step is to make the formwork for the cellar floor slab. We expose flexible but durable material around the circumference. It is most convenient to use a strip of metal 10 cm wide (from 3 mm thick). The installed strip must be well fixed (weld the pins that drive into the ground), in addition, it can be supported around with bricks. Cut the strip exactly - we will level the solution along its upper edge. From the boards we make a formwork that encloses the entrance to the cellar, after which we fill concrete grade M 200 (this is a brand of concrete, not to be confused with cement).
Concrete is usually made by yourself, for this you need a good Portland cement grade M 400 (500). For 1 part of cement, take 3 parts of sand and 5 parts of crushed stone of medium and fine fraction, water - to a state of medium plasticity, but usually 0.6-0.75 of the volume of cement.
After the concrete gains 50% of the design strength (at a temperature of + 20 ° C a week should pass, at + 17 ° C - two), you can raise the entrance to the required level by building a brick manhole.
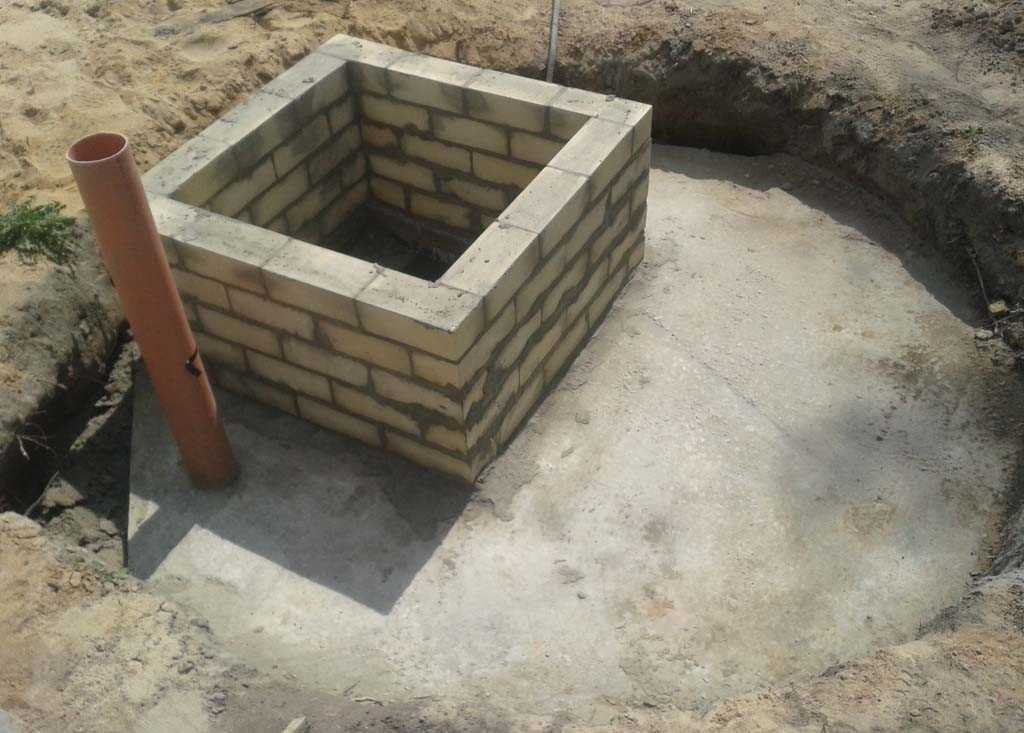
Make a hole out of bricks
Next, it's up to the waterproofing of the cellar lid. We coat the slab and the walls of the manhole twice with bituminous mastic. Now you can start arranging the cellar inside. The first step is to make the floor. It can be left earthen - this is if the water table is low. Broken brick mixed with clay is driven into the ground. All this is well rammed. It turns out a good floor.
The second option is to make a concrete floor. Pour and tamp crushed stone, on it - a layer of sand, spill, tamp (10 cm each), then lay the film (so that the water does not go into the sand). On the film - a reinforcing mesh and pour concrete over everything.
The third option is to put a ring with a bottom down. There are some. In this case, there are no problems with getting wet at the bottom.
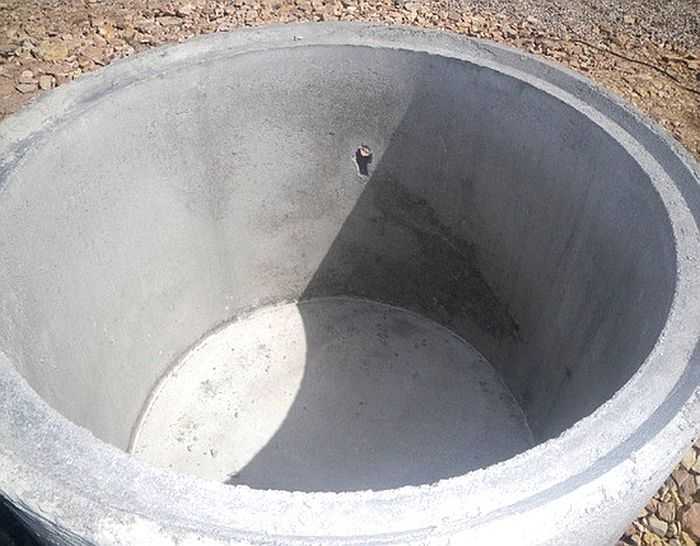
Bottom ring - handy when setting up a cellar
Another point: if the groundwater is close, before installing the rings in the pit, they must be covered twice from the outside with a coating waterproofing. The most commonly used bitumen mastic. Also, special attention should be paid to the sealing of joints. Then when buying rings, look with locks (as in the photo above). A little cement mortar is placed on the lock of the lower ring, when the upper ring becomes, the squeezed out mortar is removed. After a few weeks, the seam can also be coated with bituminous mastic for reliability.
For areas with high groundwater levels
It is not always possible to bury a cellar 2.5 meters deep and not find water. In some areas, water already stands at a depth of 60-80 cm. For such a case, you can make a cellar made of concrete rings shallow. Bury to the depth at which there is still no water, and cover the part protruding above the ground with heat-insulating material (the best EPS for this) and backfill with soil (make an embankment).
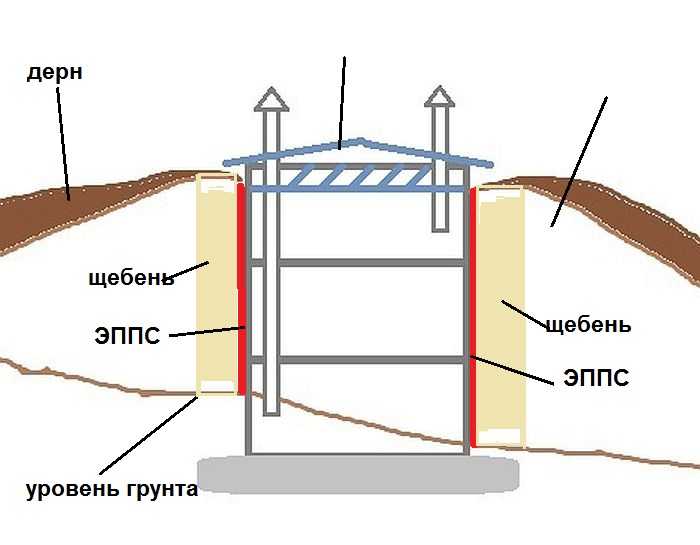
Construction of a cellar made of concrete rings with a high level of groundwater
To accurately divert water from the cellar, you can make a crushed stone sleeve around - sprinkle with a layer of at least 40 cm. On top of the embankment you need to spread the sod, which must be carefully cut off before filling the soil.
With such a device, the question arises: how to make a lid so that water does not seep through it, does not enter cold, and also so that it does not catch the eye. The way out is to make a double lid. To do this, a brick edging (option above) or monolithic concrete (pictured below) is laid above the entrance. At the same time, two covers are made - one light insulated (wooden, sheathed with EPS, expanded polystyrene), the second - metal with locks.
The edging of the entrance to the cellar made of in-situ concrete
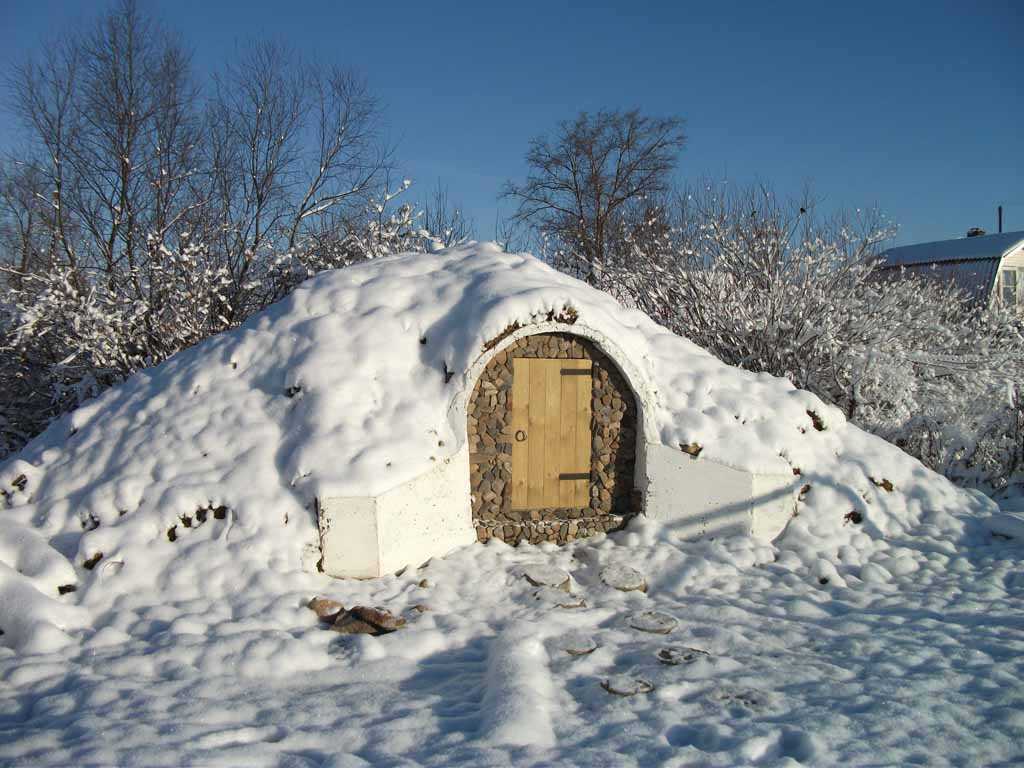
Another option is to make a small building above the entrance, such as a shed or hut. Not to say that it will be invisible, especially at the top of the hill, but it will close the entrance from precipitation.

Not necessarily, but you get the idea.
Some owners of such cellars arrange a flower garden on the embankment, alpine slidedo waterfallThen, by planting plants around the entrance, it can be made almost invisible.
Everything is not bad, but this option has too many disadvantages: it is inconvenient to get into such a cellar made of concrete rings, the amount of work is large. In this case, it is better to consider the next option - vertical. The volume of work is about the same, and the comfort of use is much higher.
Horizontal (not recessed)
There is one more cellar made of concrete rings - horizontal type. This is a shallow or aboveground cellar. This design is suitable if the water table is very high. They dig a shallow pit (at least 50 cm deep, but it can be deeper - as conditions permit).
How to make a cellar from concrete rings
In the pit they make slab foundation (10 cm thick and 20-30 cm larger than the dimensions of the future basement). 10-15 cm of crushed stone is poured onto the compacted bend. Pour in layers, 5 cm at a time, each layer is carefully tamped. Then, about 10 cm of sand is poured and tamped. A film is spread on it, a formwork is placed, a reinforcing frame is placed in it (one belt made of 10 mm reinforcement with a step of 20 cm). In the center, a "seat" is left for the rings laid on the side (make a model of the lower part from plywood and boards and use it as a formwork). When the concrete has set, you can roll it into place of the ring.
The rear ring can be with a bottom - then there is no need to invent a rear wall. If the ring is without a bottom, the wall is laid with a brick (one and a half bricks), not forgetting to remove the exhaust pipe for ventilation. Then the inlet is made in the opposite wall near the door.
By connecting the fragments with construction brackets and sealing the joints with mortar, an almost finished cellar is obtained. The laid rings are covered with soil, forming a hill.
Aboveground bulk cellar made of concrete rings
Now all that's left is to install the doors and fill in the remaining gaps. They put metal corners or a wooden beam treated with impregnation (working off), to which the doors are attached. It is most convenient to lay the remaining gaps with a brick or clog it up (with a natural stone in a solution). The front wall must either be insulated from the inside, or it must be made thick - this is the only wall going out.
Ventilation
In order for the supplies to be well stored, ventilation must be organized in the cellar. With the active movement of air, the humidity inside is naturally regulated. There are two ways to organize ventilation in the cellar:
- With two pipes located at different heights - supply and exhaust.
- With one pipe - supply and exhaust.
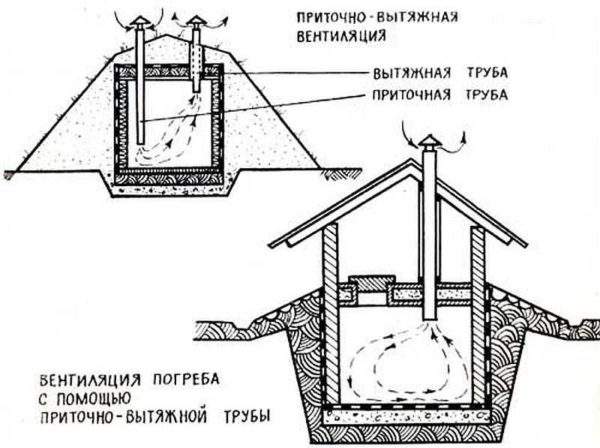
Cellar ventilation methods
In order for ventilation to function normally, two pipes are needed - supply and exhaust. They are carried in opposite corners of the room, placed diagonally. The supply pipe starts at a distance of 40-50 cm from the cellar floor. It can be led out through the wall or up to the level of the roof (cover). The chimney should remove as much exhaust air as possible, so it starts almost under the ceiling - 10-15 cm lower. It is displayed straight up, not less than a meter above the roof (cover). To prevent foliage from getting into the pipes, they are tightened with a net, umbrellas are put on, a deflector can be placed on the exhaust pipe to improve traction.
How does this ventilation work? Due to the difference in temperature, pressure and due to the strength of the wind. The autumn-winter period is warmer in the cellar than outside. Plus, due to the fact that the chimney is raised above the roof, a pressure drop is created. These reasons cause warm air from the ceiling to rush up the pipe. In place of the removed part of the air through the supply pipe, fresh air enters the cellar. This process occurs constantly at different rates. Sometimes in winter it is too active, it is necessary to reduce the cross-section of the ventilation pipes. To do this, you can put a damper like a gate or furnace view, but usually they do it easier - they close the pipe from above, with some kind of plate, partially blocking its lumen.
In small-sized cellars located on a hill, you can get by with one pipe. In this case, the air is alternately drawn out and in.