How to build a cellar on the site
Cellars and underground are best suited for storing crops. But the underground can be done not in every house, and you can make a cellar even in an area with a high groundwater level. It is important to know where and how.
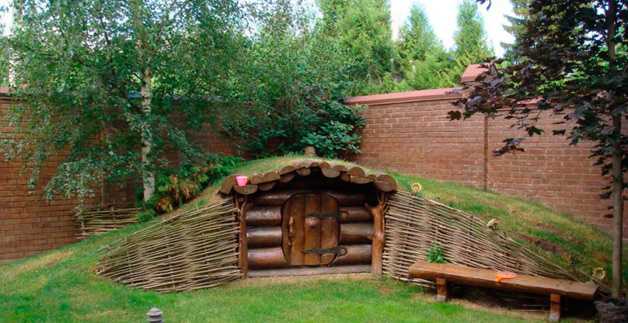
The cellar on the site can be an element of decor
The content of the article
Choosing a place for the cellar
The optimal place for a cellar is on a natural or man-made hill. If there are no differences on the site, you need to find the "driest" site with a low groundwater table. You can determine the vegetation - where it is the shortest, the water is far away.
Ideal if you have a geological study of the site (ordered when planning a house). There, the occurrence of aquifers is indicated with sufficient accuracy. If there is no such study, the approximate groundwater level can be determined by how deep the water mirror is in the wells.
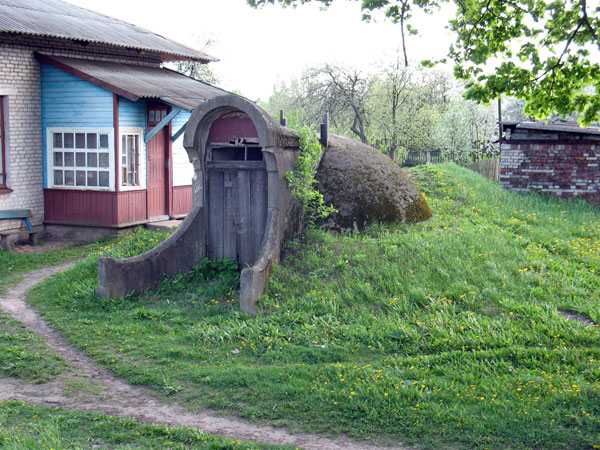
The best place to make a cellar is on a natural hill.
Another option is to drill a well with a depth of about 2.5 meters at the proposed location. If there is no water in it, you can make a cellar buried 2 meters or a little more. It is necessary to drill either in the spring, after the snow melts, or in the fall after heavy rains. At this time, the highest level of groundwater and surprises in the form of flooding, then you will not have to be afraid.
Based on the research results, they are determined with the type of cellar:
- If the groundwater level is below 1.5 meters from the surface, you can make a buried cellar.
- If the water is at a level of 80 cm, you can do it semi-submerged.
- A ground cellar is more of a vegetable store. It requires a lot of work and is rarely done on a private farm.
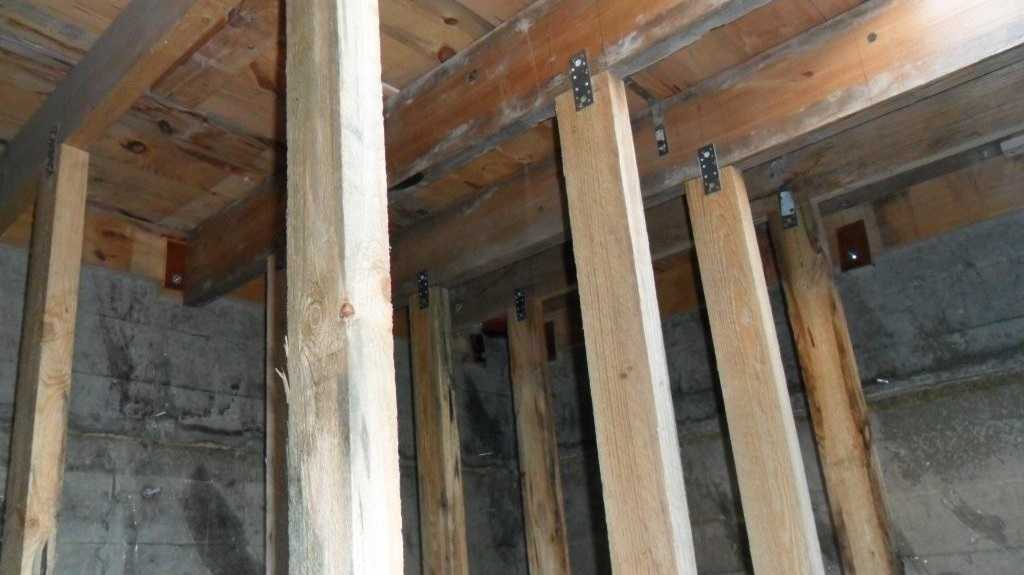
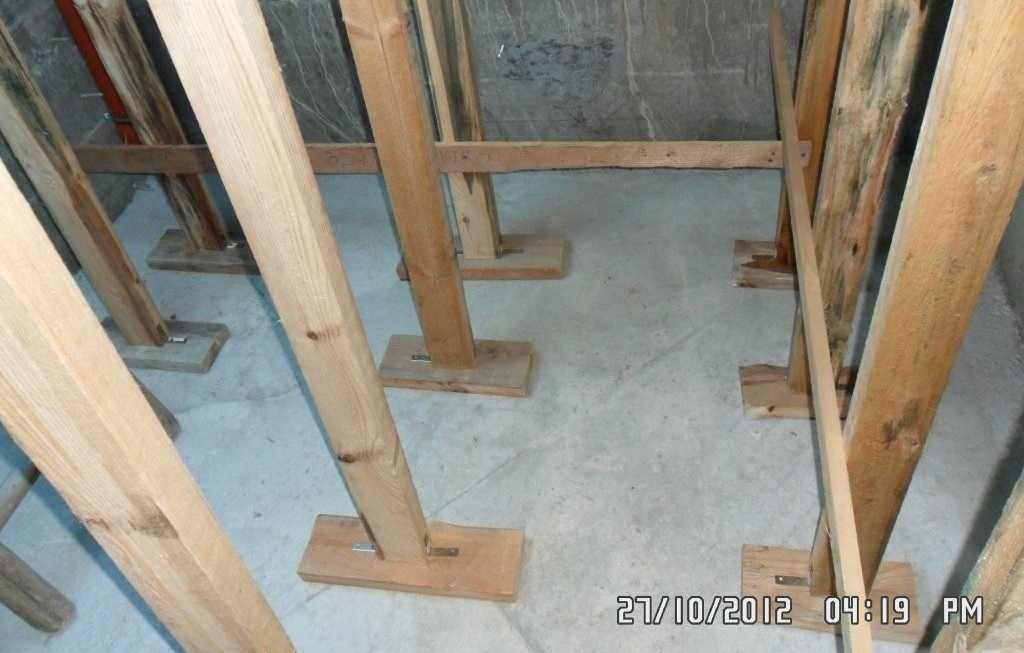
There is another type of cellar - an underground, which is arranged under the house if the house has a sufficiently high basement (1.5 meters and higher). Then they dig a small pit about 2 * 2 meters in size, deepening no more than a meter. At the bottom, with the entrance to the walls of the pit, waterproofing is laid, gravel (10-15 cm) is poured, a plank floor is laid. If the water is already close, it is better to pour the concrete slab using standard technology.
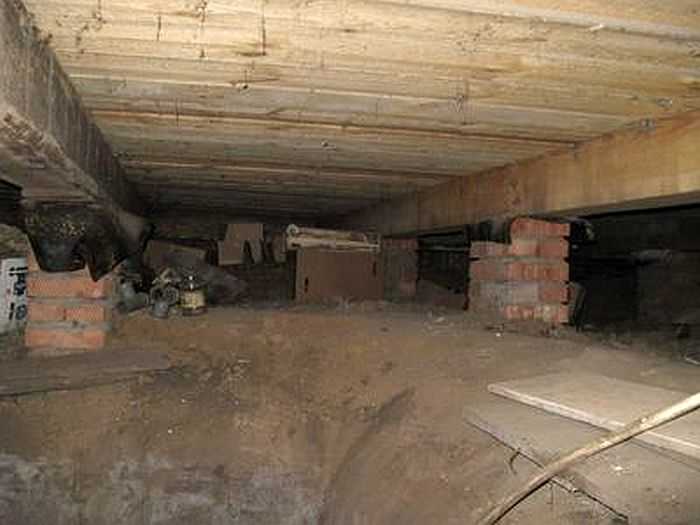
Slightly buried in the ground, you can make an underfloor for storing preserves and vegetables
The walls are laid out with bricks or made from impregnated timber, well insulated from the outside. The cover of the cellar under the house is made below the floor level, it is also insulated. A slightly larger cover is arranged in the floor. This completes the construction of the underground. This type of cellar makes sense only in a house of permanent residence - it will always have a positive temperature. In houses of seasonal residence without heating in winter, it will freeze, so it makes no sense to cost such a cellar in the country.
Materials
The choice of material for the cellar also depends on the water table. In a dry place, you can build from whatever you want - any material suitable for this purpose: impregnated wood, brick, concrete, building blocks.
You can make a concrete cellar on any soil
If the water is close to the surface, it is necessary that the material is not afraid of moisture, has a low hygroscopicity (preferably close to zero) or has the ability to significantly reduce it. But these requirements are met, in general, only by concrete and metal. Concrete is preferable - it is definitely not afraid of getting wet, it does not really absorb water, although it can conduct it through the capillaries. Concrete is good because there are various ways to make it practically impervious to water in any form:
- Additives are additives that give concrete certain properties.Including there are additives that make it practically non-conductive and does not absorb water.
- It is possible to reduce hygroscopicity by vibrating the concrete during installation (there are special vibrators for concrete). Due to the compaction of the structure, its density becomes much higher, hygroscopicity decreases.
- Deep penetration treatment. For concrete, cement-based compositions are used, which include polymers. Polymers block the capillaries through which water seeps. Double processing allows to reduce the amount of moisture seeping through concrete in 6-8 cuts.
- Rubber paint. It is used for swimming pools, but in extreme cases can help keep moisture out of the cellar.
All these funds in combination or one or two to choose from, will help to make the cellar dry, even in areas with a high level of groundwater.
You can also build a cellar on high groundwater from metal. A sealed box of the required size is cooked, spacers are welded to the bottom and walls. This metal box is treated from the outside with an anti-corrosion compound (several times) and buried in the ground. If the seams are made with good quality, water will not seep, but there is another problem - with a large amount of water, this box can be pushed to the surface. To prevent this from happening, the spacers are welded, but they only help up to a certain pressure created by water. It may well happen that such a cellar "floats up".
The metal cellar will not leak, but it can "float"
When building a cellar with a high level of groundwater, ceramic bricks are still acceptable. But over time, it crumbles from water, although there is an opportunity to significantly reduce its hygroscopicity - to process it several times with the same deep penetration impregnation. And yet brick in high water is only an extreme option.
How to make a concrete cellar with mobile formwork
The standard technology for building a concrete cellar has been described many times. It is not very good, because a large amount of material is needed for the formwork device, and digging a foundation pit does not please - it must be much larger than the dimensions of the cellar in order to be able to install this formwork. There is a more rational technology - with a concrete knife and a phased filling of the walls. This tactic is used in the construction of wells, but can be applied to the construction of a cellar.
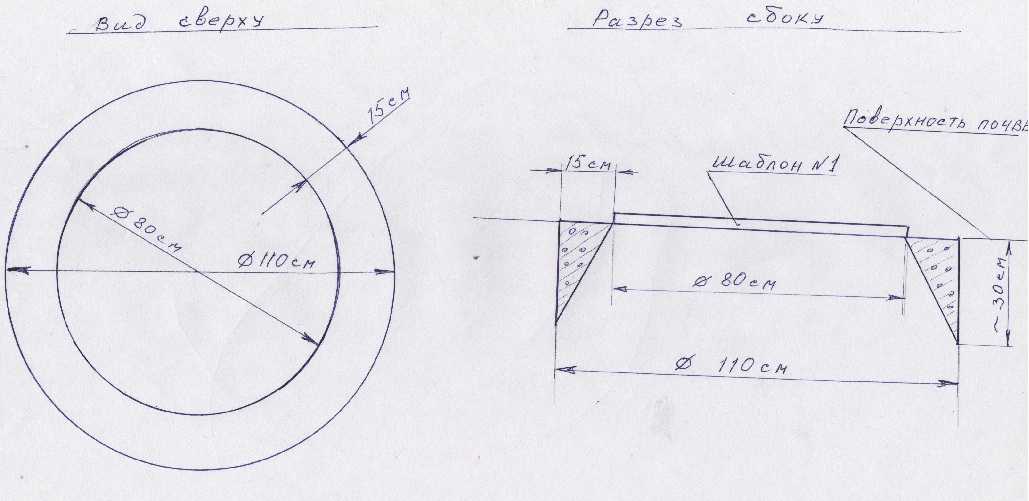
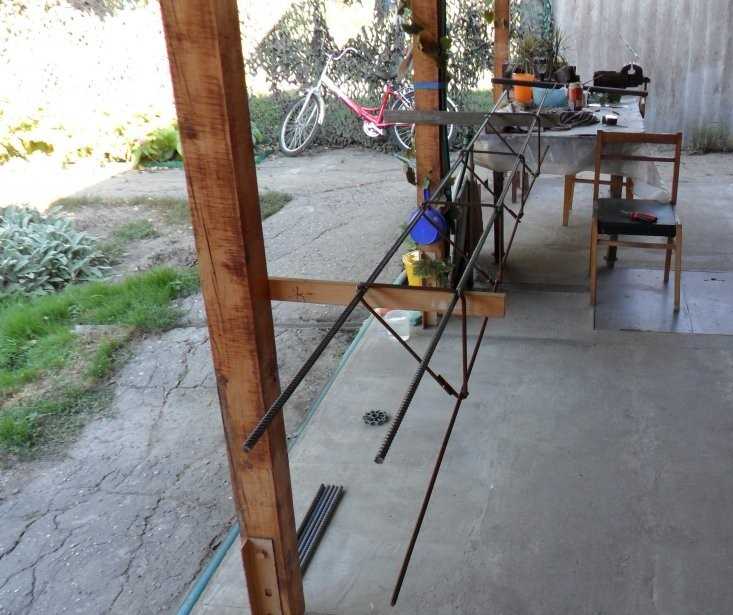
Formed a knife for a concrete well
Fill the knife
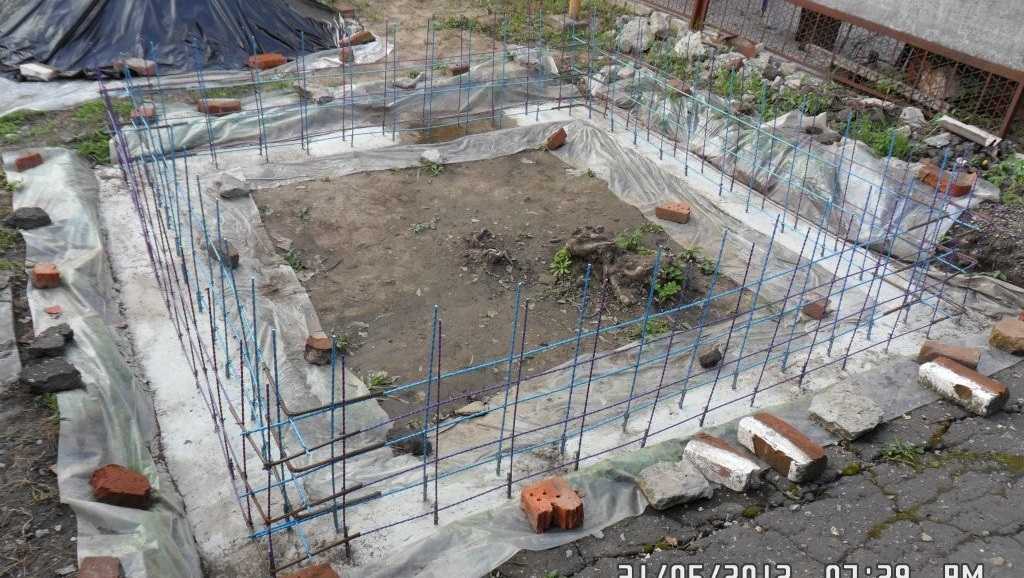
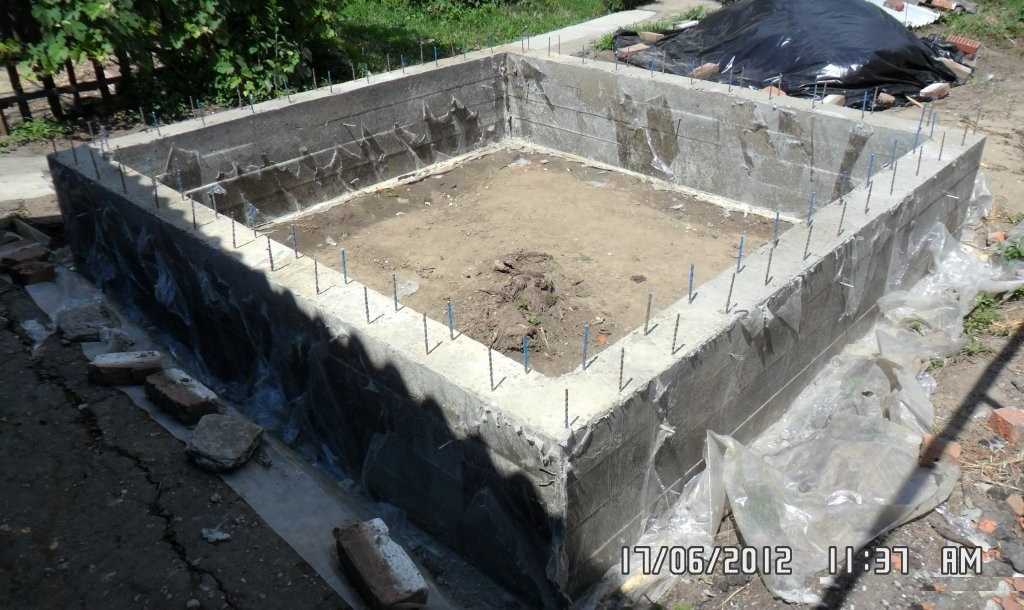
It all starts with filling the knife. Its profile is shown in the figure. In the figure, it is drawn round - under the well, but it is better to make the cellar rectangular. This concrete knife is poured on the spot. So, we dig a small pit around the perimeter of the future cellar. In cross-section, the foundation pit should be triangular, with a bevel directed towards the inside of the perimeter (as in the photo above).
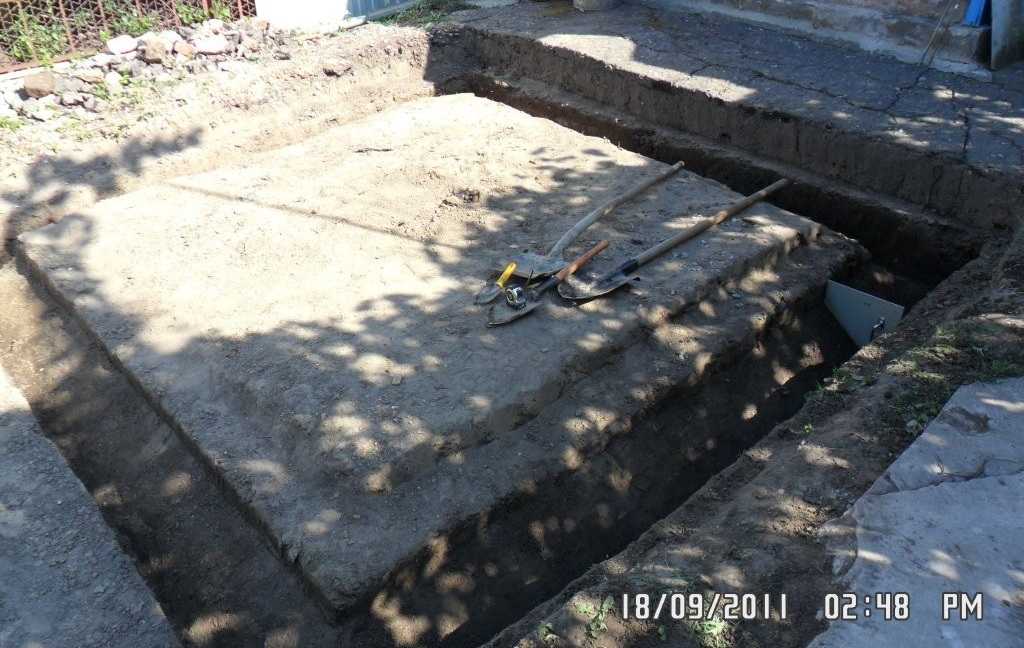
We dig a foundation pit along the perimeter of the future cellar, which has a triangular shape in section
We knit a frame made of reinforcement of the same shape. In this case, fiberglass reinforcement was used - it is cheaper, it is easier to deliver. Steel will be used for the ceiling and floor.
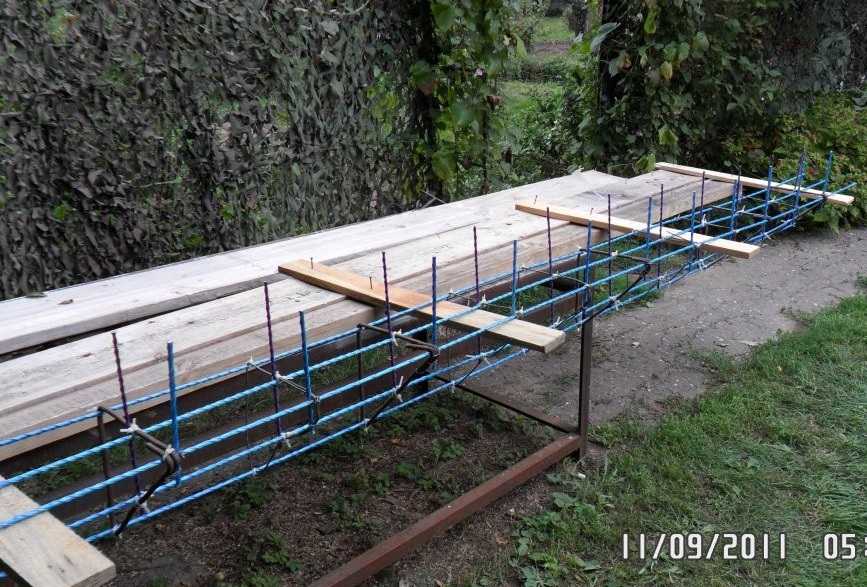
Knife frame linked
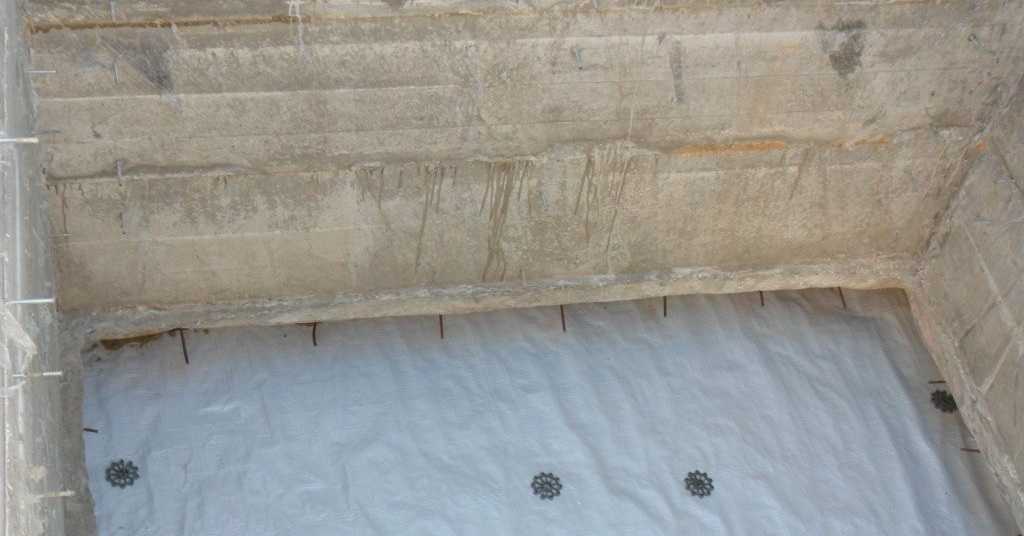
Making the frame, we leave the reinforcement outlets 15-20 cm long, directed upwards - the next reinforcement belt will be tied to them. The frame is installed in a ready-made pit covered with a foil. This is necessary so that the walls of the knife are smooth and pass the ground well.
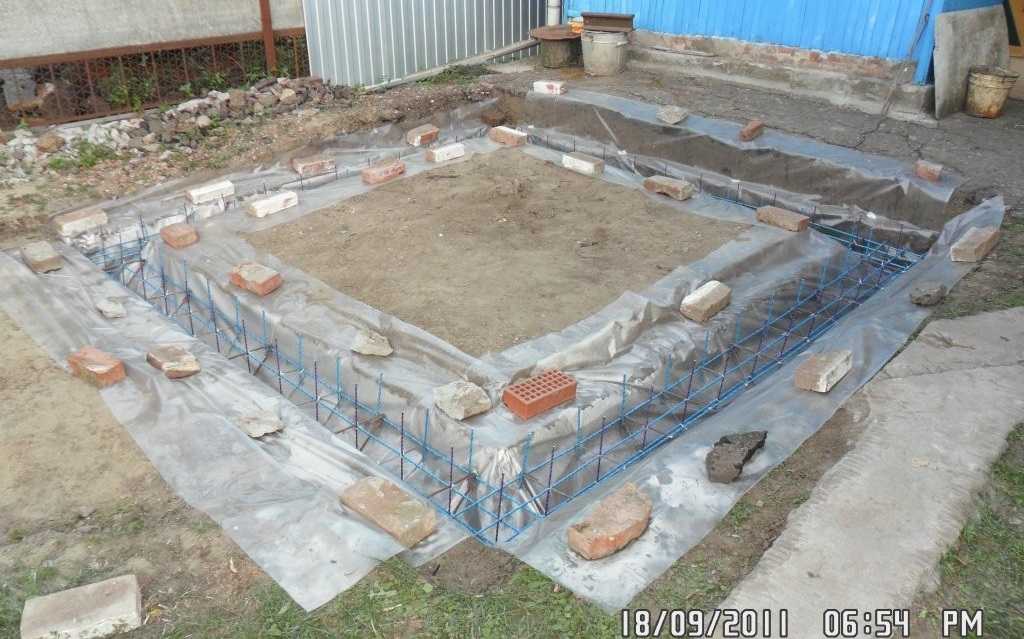
Cover the pit with a film
We make concrete in a concrete mixer - small volumes required for one pouring do not allow ordering at the factory. We make concrete of M 250 grade (1 part of M 500 cement requires 1.9 parts of sand and 3.1 parts of crushed stone, water - 0.75). To increase the strength, polypropylene fiber is added, and Penetron-Admix (an additive for greater strength) is dissolved in water.
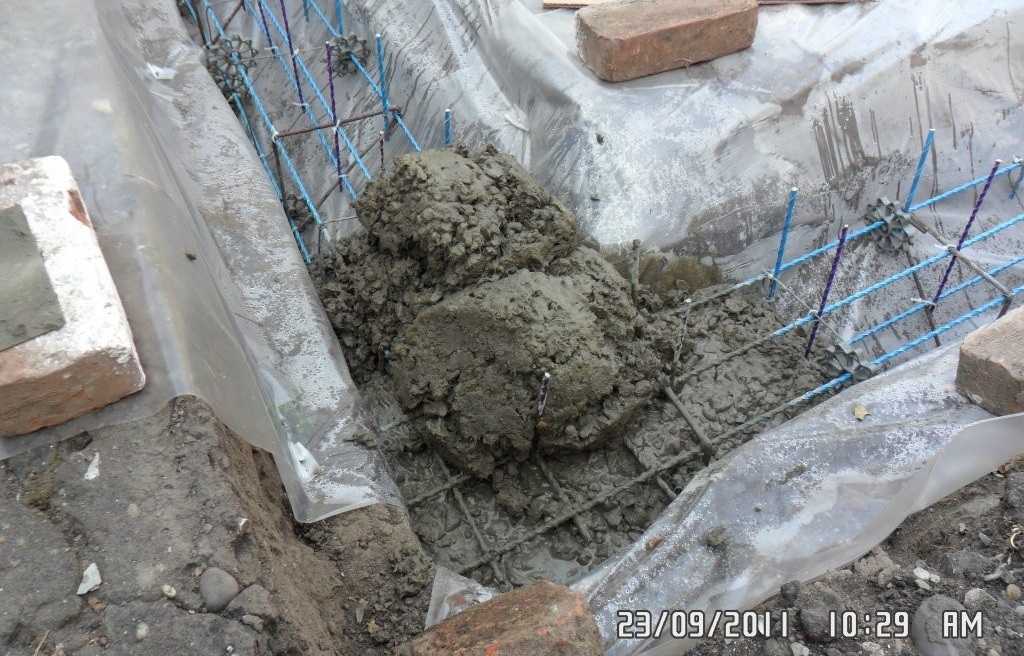
Concrete is poured
The concrete is made low-flow, as it will be processed by a vibrator. The sides were filled in stages, immediately processing with a submersible vibrator.
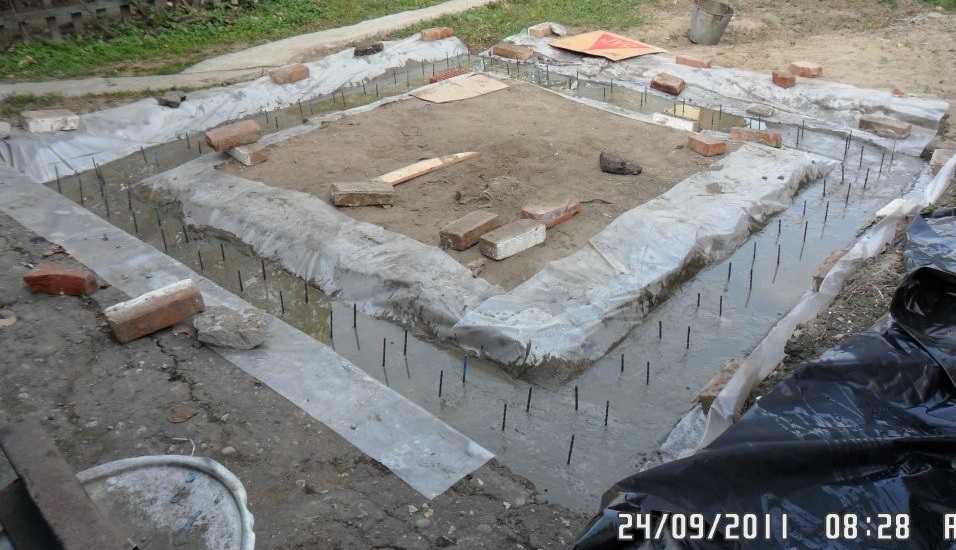
Cast knife
We make walls
Then the concrete was covered with a film, periodically moistened. While he was grasping, the formwork was assembled. The edged board 40 * 150 * 6000 mm was passed with a plane, the formwork panels of four boards were knocked down. In height, they turned out to be about 80 cm. When assembling, the boards were fitted tightly so that the solution flowed out less.
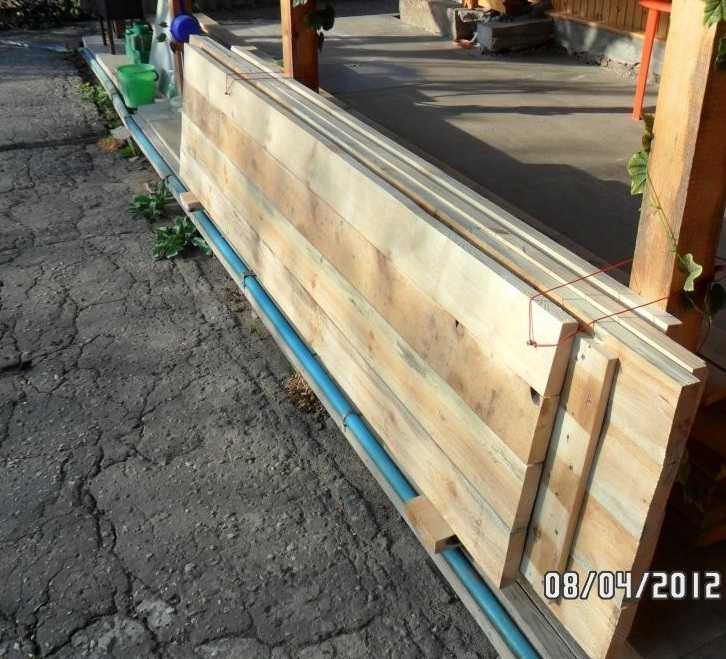
Formwork panels
We waited for the concrete to gain its design strength (more than a month has passed since the pouring). To make a cellar using this technology, the knife must be strong. The frame of the next row was tied to the reinforcement outlets left earlier. At the same time, we also leave releases of the order of 15-20 cm to "tie" the next belt.
Tied wireframe
To increase the rigidity of the frame, the corners are reinforced with a metal bar bent in the shape of the letter "L" (side length 40 cm).
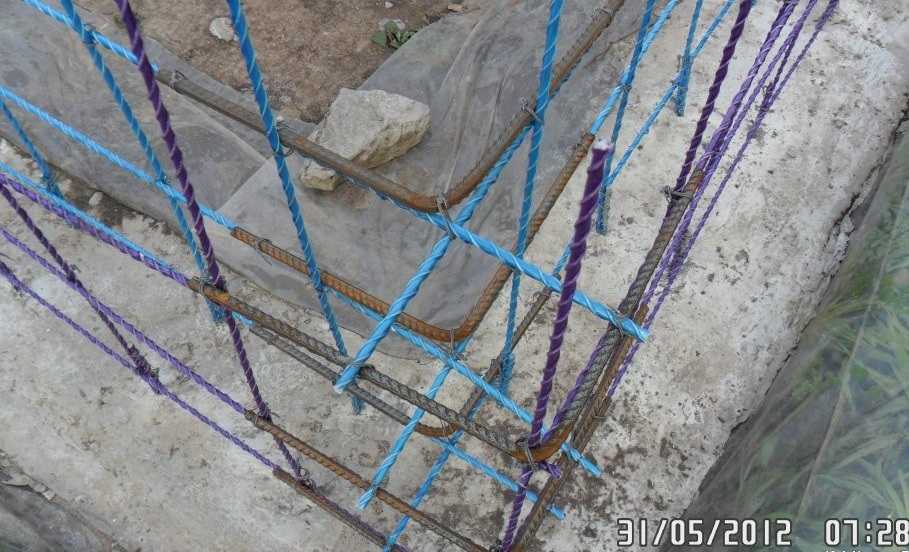
Reinforce the corners with metal reinforcement
We put formwork panels. So that they do not fall apart when pouring concrete, they are fastened with corners inside and outside. Inside there are 4 corners (for screws), outside - 2 each. The distance between the two shields is fixed with studs (they are visible in the photo below).
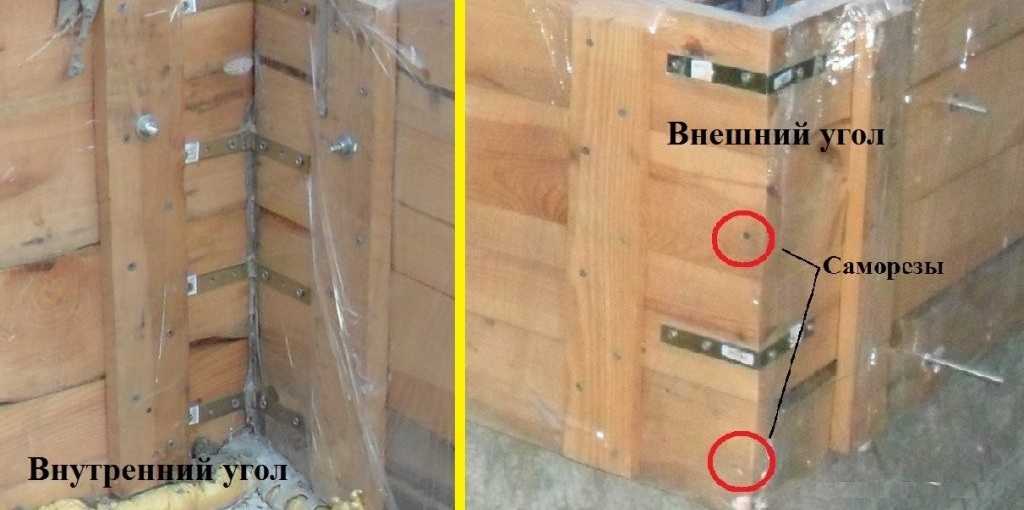
Reinforcement of the corners of the formwork
So that the walls of the cellar were smooth and water did not leave the concrete, the inner surface of the formwork was sheathed with polyethylene. The surface of the first standing concrete must be cleaned of accumulated dust. We do this with a high pressure washer (available on the farm). Next, we install the formwork, pour concrete, process it with a vibrator.
Concrete poured into formwork
Cover the poured concrete with polyethylene, periodically water it. After two to three days, the formwork can be removed. After a few more days, you can begin to lower the walls. To do this, take out the soil inside the perimeter. We dig in evenly so that the walls sit without distortions.
Formwork removed
For the first time, the walls sagged by about 60 cm. This is the height of the wall filling (about 20 cm of the formwork overlaps the previous fill.
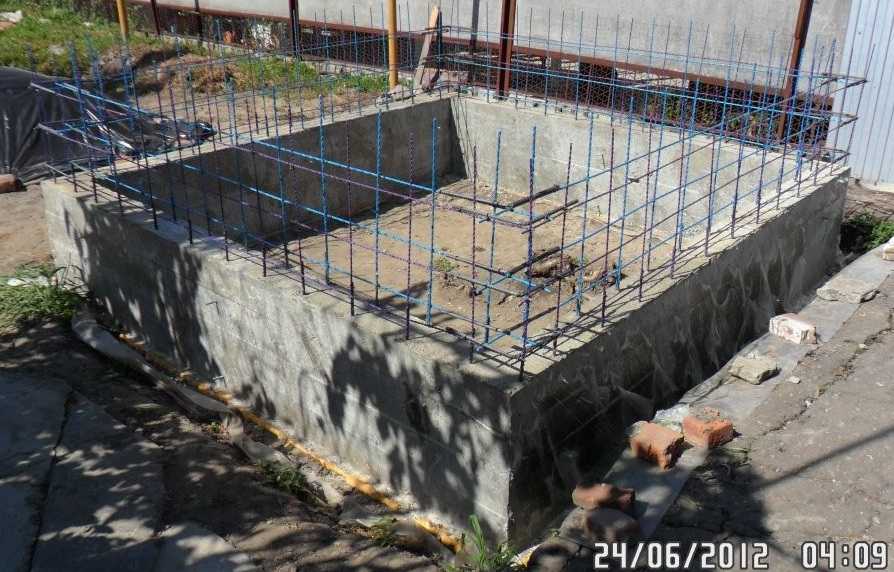
Next row of reinforcement
Further, according to the "knurled" technology - we tie the reinforcement, reinforce the corners, put the formwork. Only this time, to make it easier to put the shields, inside, below the edge by about 15 cm, pieces of boards are stuffed. The inner shield rests against them.

Pieces of boards are stuffed inside (their upper edge is aligned to the horizon)
Then the outer shields are installed. They "hang" on the lower hairpins threaded through both shields. The upper studs fix the required wall width. The shields are pulled together in the corners with metal corners.
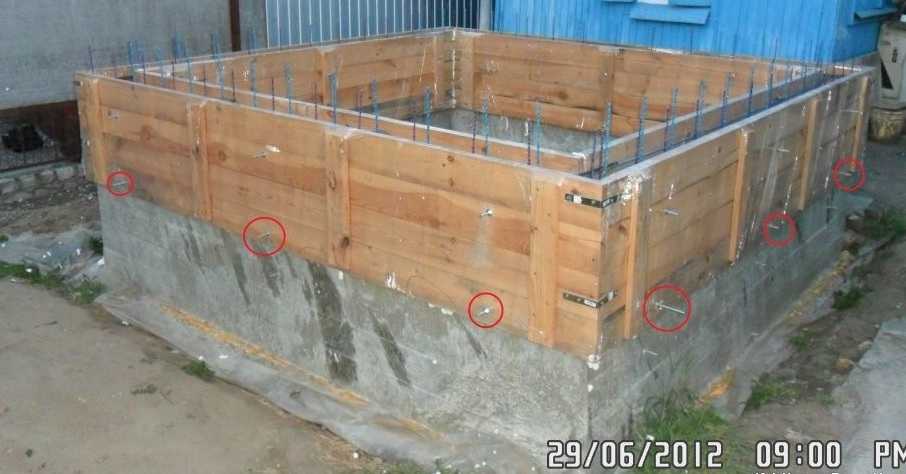
Studs on which the shield "hangs"
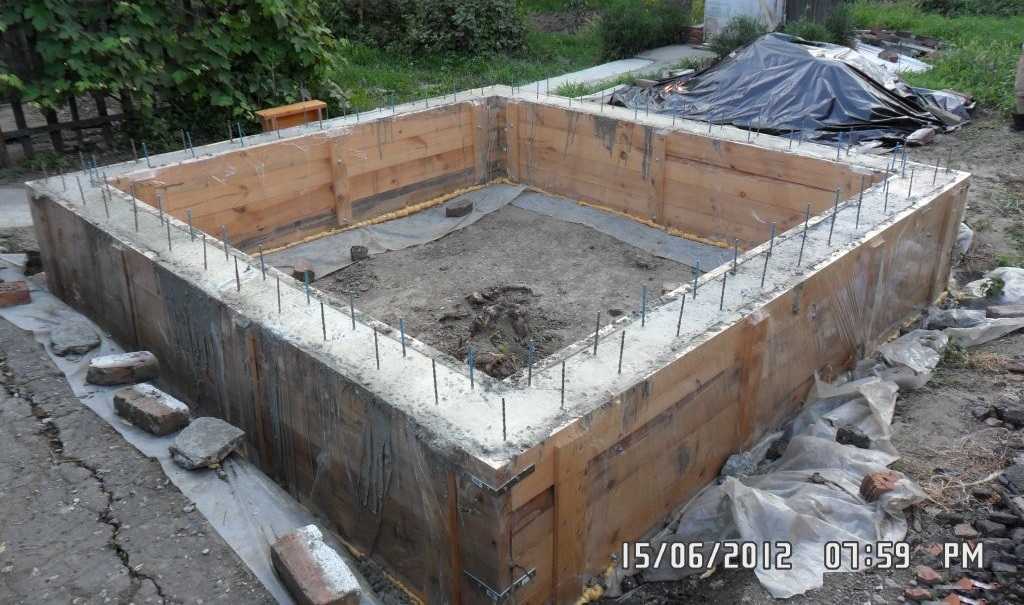
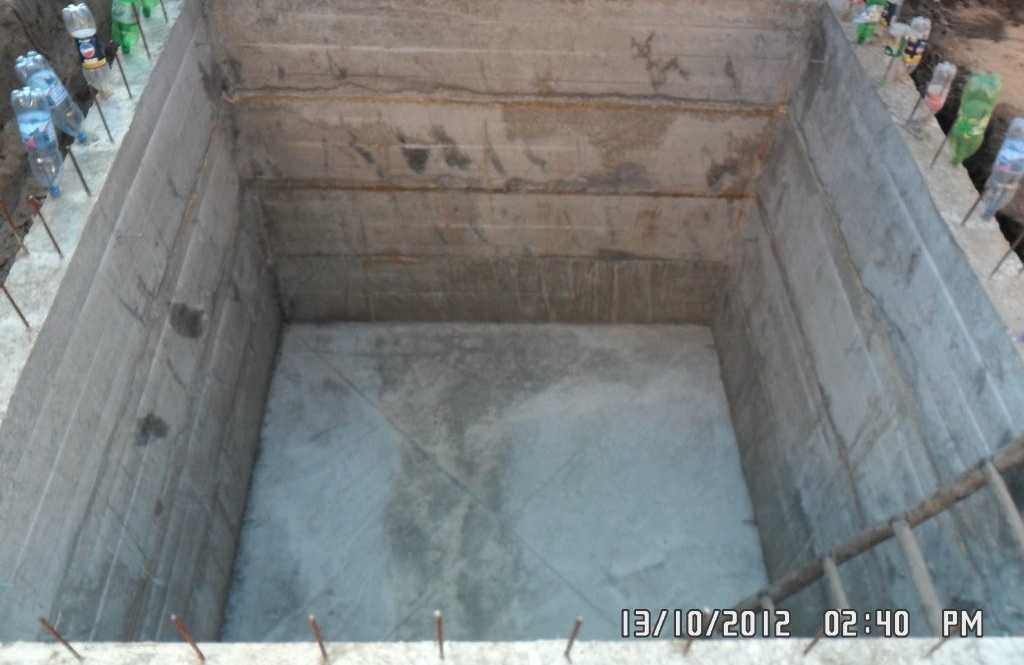
Next, fill, vibrate, cover, wait. After a week and a half, you can continue deepening. We do this until the walls are of the design height. In this case, it took 4 fillings of 60 cm each. The total height turned out to be 2.4 m. We dug it so that the upper cut was just below the ground level.
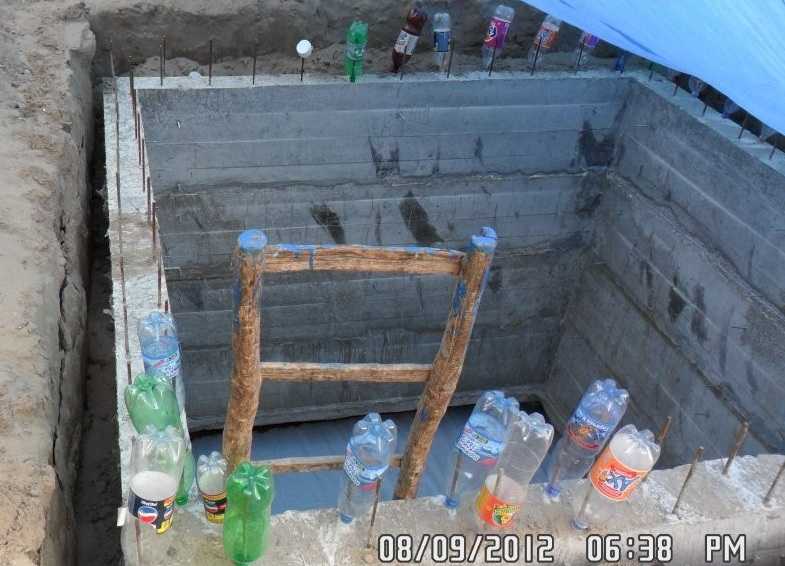
The walls of the cellar sank to the required depth
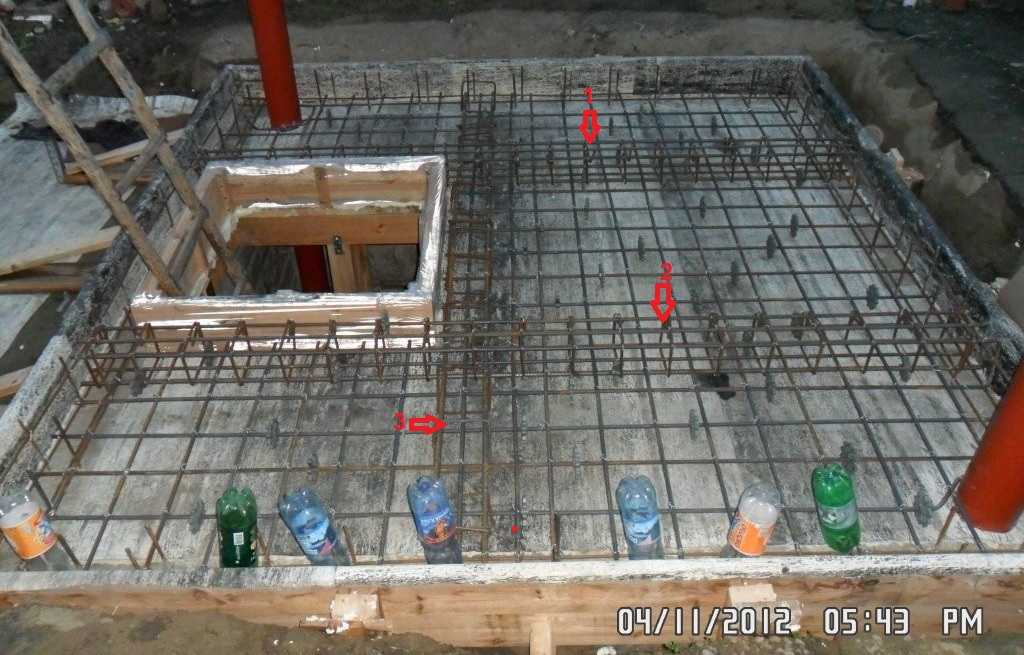
Those bottles that are put on the reinforcement are necessary so that the film covering the concrete does not break. The idea turned out to be very useful.
On the earthen floor was spread geotextile... It will compensate for uneven loads. It also serves as a “rug - there is a lot of work on the knees.
Stopper
To prevent the walls from sagging further, the knife must be "locked". To do this, we knit a frame from the reinforcement, similar to the one that was made for the knife.
The frame for the "stopper" of the knife is connected
To install it, we drill holes in the knife, into which we drive in reinforcing bars. We tie the connected frame to them, leaving the reinforcement outlets for connection with the floor reinforcement.
Hammered pieces of reinforcement
We put the formwork, fill the "stopper" with concrete.
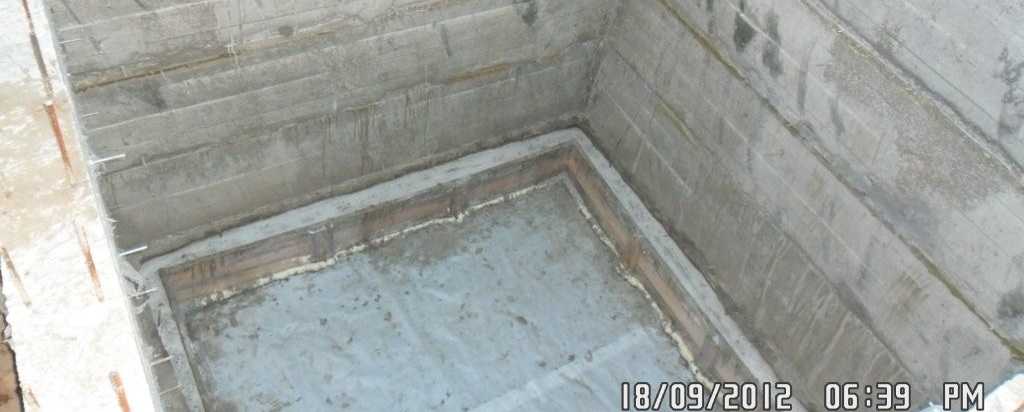
The former knife turned into an "anchor"
Concrete basement floor
After the concrete has set, we disassemble the formwork, it's time to make the floor. First, the foundation is made. Sand (about 10 cm) was poured onto the geotextile, leveled with a shovel, then with a rake, then with a roller. Two buckets of cement were poured over the entire surface, mixed with a rake with the top layer of sand, and compacted again with a roller.Spilled from a watering can with water with a dissolved additive Penetron-Admix, tamped with a manual rammer. After compaction, the sand is not crushed underfoot.
First sub-floor layer
This operation was repeated two more times. The top layer is flush with the edge of the stopper. The preparation was allowed to dry under the stove. After drying, the crust is very firm.
The base was washed and dried. A finished stack of 6 mm wire was laid in 10 mm increments. The mesh was tied to the knives outlets. She was put on pieces of boards, which were removed as they were poured.

The cellar floor is ready for pouring
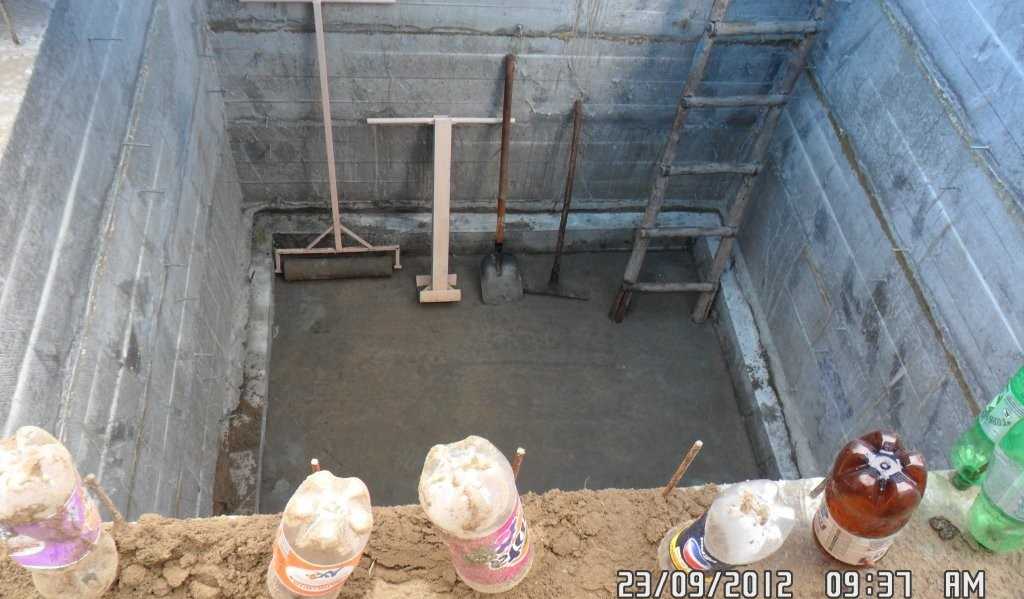
Beacons for pouring concrete were made from two twines stretched from corner to corner - the total height of the slab is 10 cm.
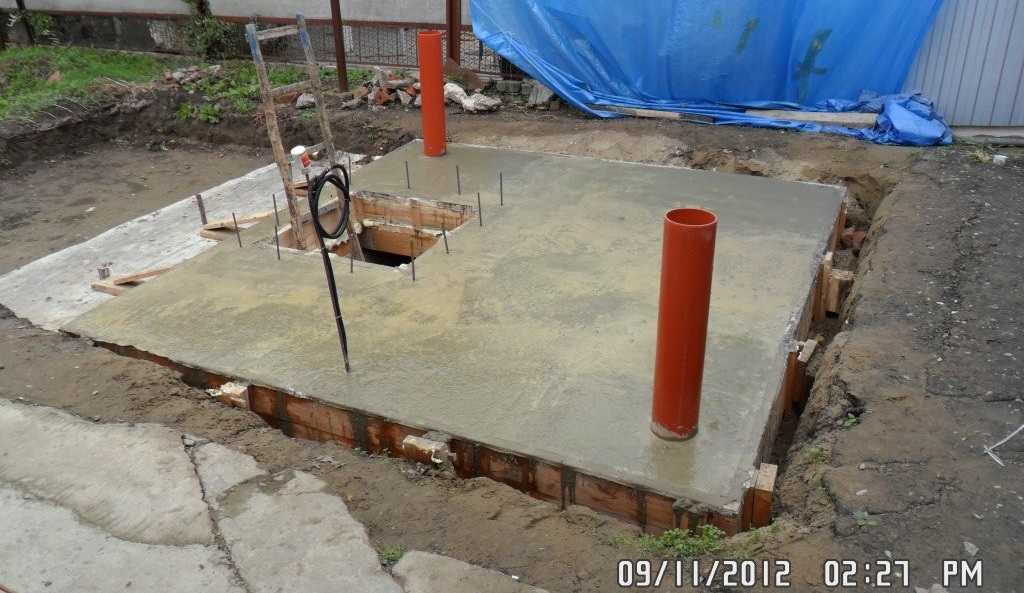
The concrete floor of the cellar is ready
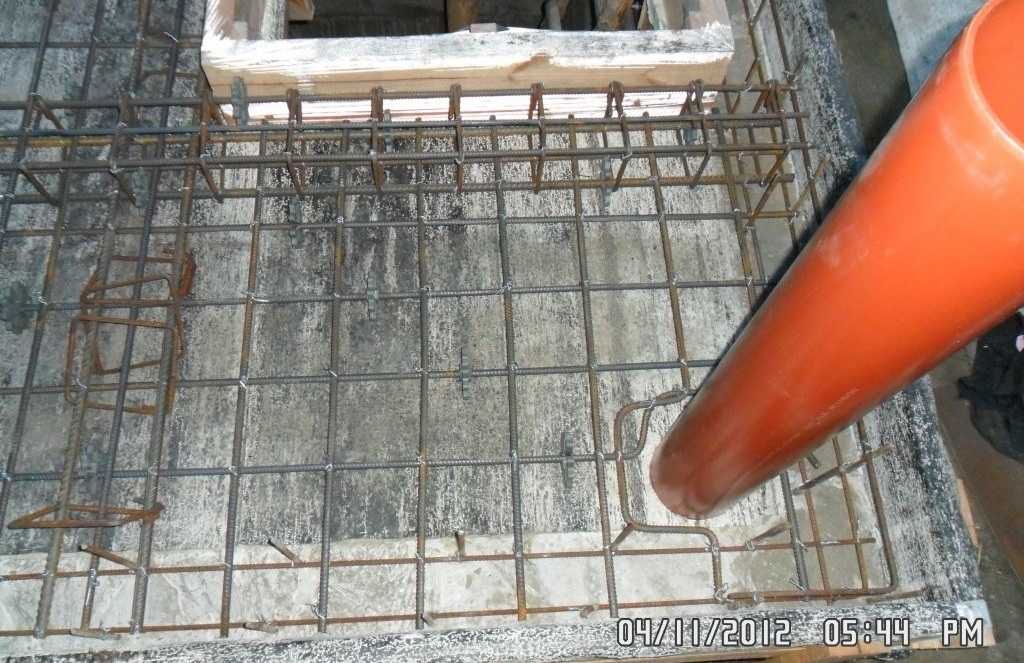
Overlapping and ventilation
We disassemble one formwork panel, nail down the docks, stepping back from the upper edge of the wall 40 mm - this is exactly the thickness of the boards. In one corner we install a one-meter pipe, fasten it with one clamp, in the opposite corner we put a three-meter pipe on three clamps.
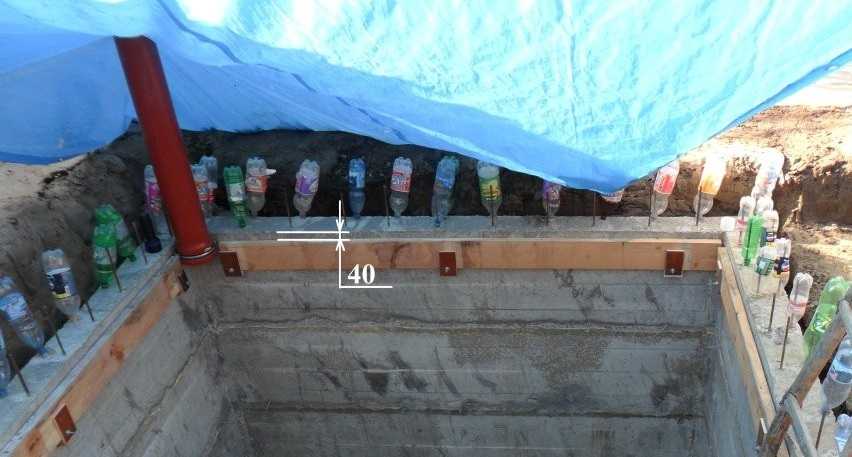
We nail the boards around the perimeter
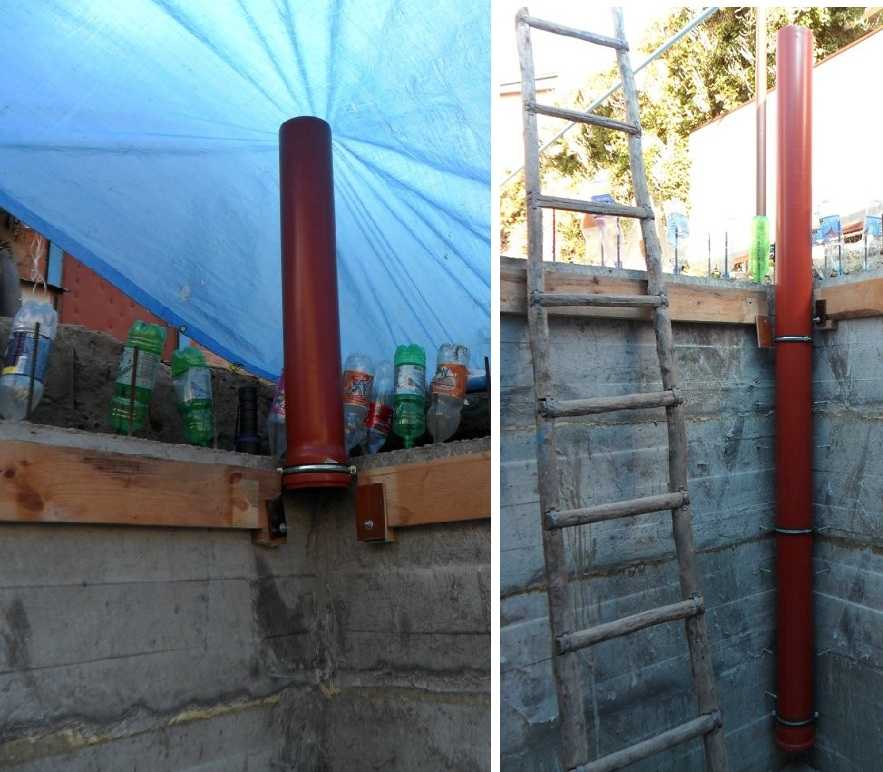
We install ventilation pipes
Three formwork panels fit perfectly on the attached boards. We disassemble the rest, cut it to leave a hatch for the entrance. The gaps between the boards are sealed with polyurethane foam, after polymerization, the excess is cut off flush with the boards.
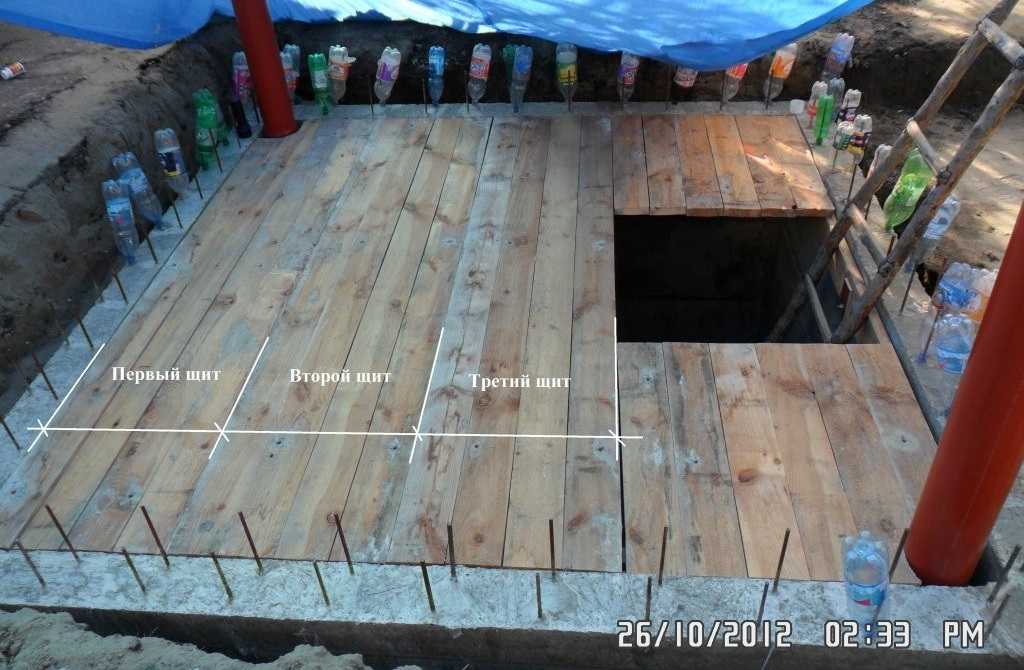
We form the formwork for pouring the cellar floor slab
Below, from the cellar, struts are installed. At the top, they are fixed with corners, at the bottom, under the boards, scraps are laid so as not to push through the not fully matured concrete.
Spacers for the cellar floor slab
Underlay installed
From above, the boards and the wall were washed with a high pressure washer and dried. Covered with a layer of roofing material, which was attached to the boards with staples from a construction stapler. The entrance to the cellar was chosen in the size of 1 * 1 meter, its edges are limited by formwork boards.
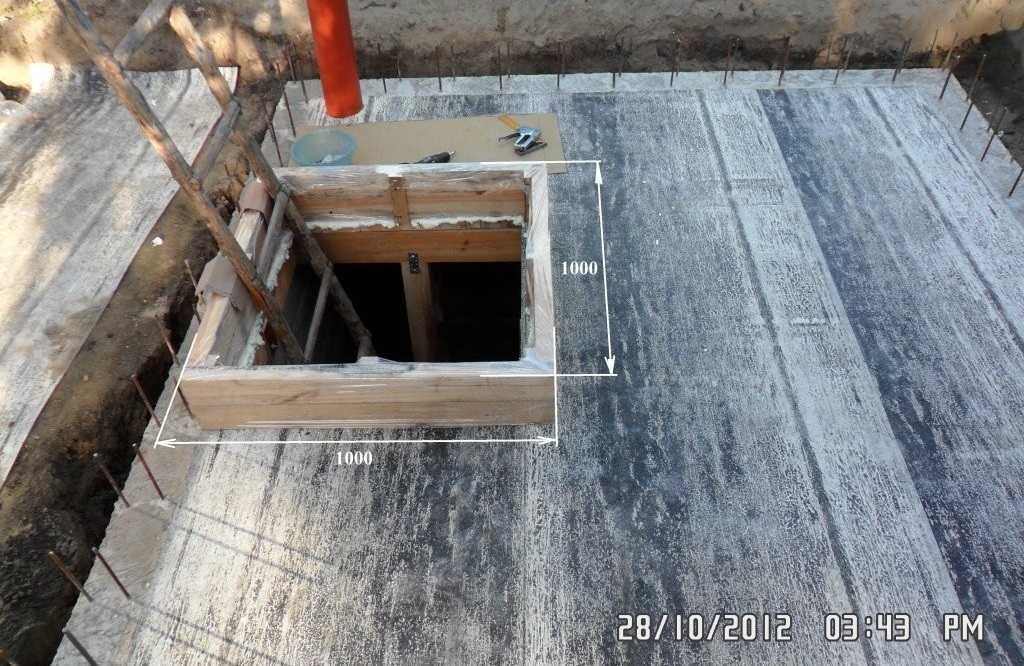
Entrance formwork installed
Next, the formwork is installed around the perimeter. We fasten the boards, tighten them in the corners with long nails. Then we wrap it with roofing material, install spacers that rest on the hammered stakes. Powerful spacers are needed - the weight will press considerable.
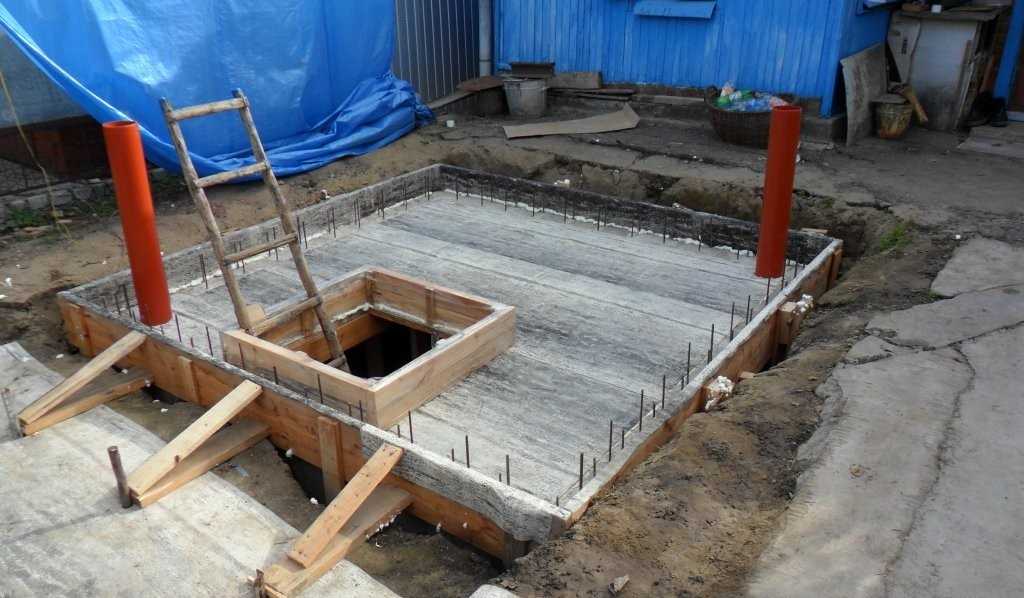
We fix the formwork with spacers
We also make three reinforcing beams - two bottom rods of 16 mm, two top rods of 14 mm, they are connected together with an 8 mm rod. Two beams were tied, ready to be laid in place, connected to the outlets of reinforcement from the walls. The third was assembled on the spot - its rods pass through the already finished beams.
Finished reinforcement cage
Then we knit a mesh with a step of 20 cm from the reinforcement 12 mm. We tie the rods to the outlets from the wall. Some difficulties arose when bypassing the ventilation pipes. I had to bend the reinforcement. The rods that ended near the entrance were bent 15-20 cm up. The reinforcement cage will then be attached to them for the entrance.
Ventilation pipe bypass
In order to conduct electricity into the cellar, two holes were drilled, wires in the corrugated pipe were passed through them. Next, everything was poured with concrete.
Filled cellar slab
A few days later, when he grabbed, a formwork was installed above the entrance. First, the inner box, then the reinforcement frame, then the outer one. They also poured concrete.
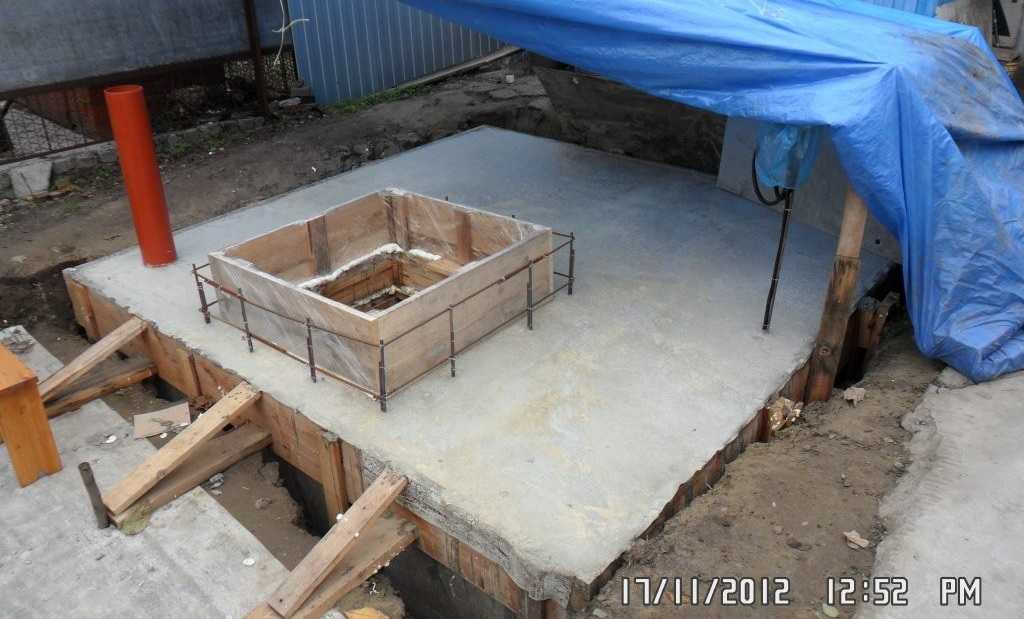
Entry formwork installation process
After the concrete gained its design strength (28 days from pouring), the wall half a meter down and the floor slab were sheathed with insulation - EPS (extruded polystyrene foam). He was "planted" on bituminous mastic - along with waterproofing.
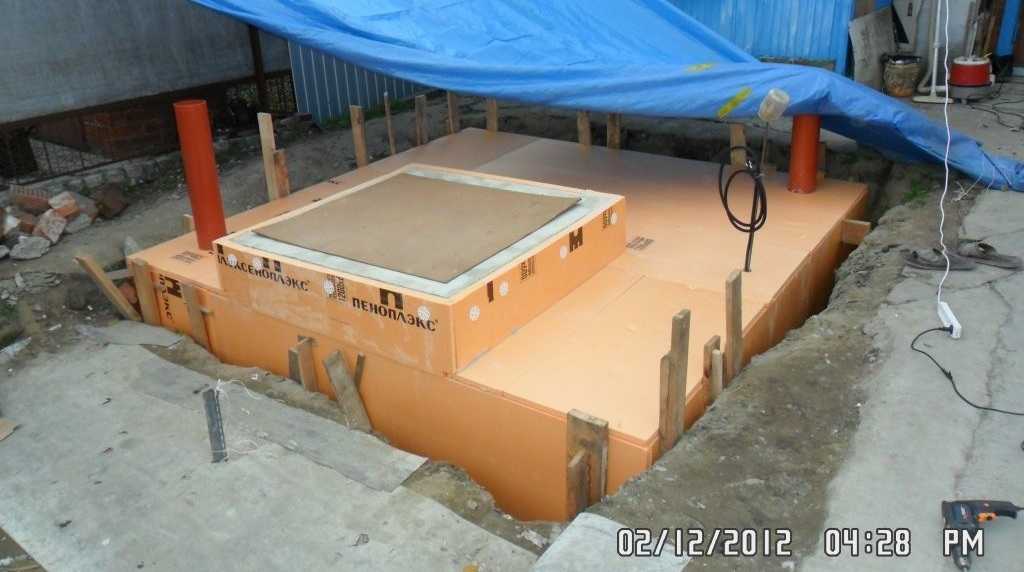
Sheathing the cellar with insulation
The props inside are left for two months. Then almost everything was removed, leaving only a couple, just in case. The first harvest has appeared in the cellar.

While there are two props left
Now you know how to make a concrete cellar with a phased fill of the walls. It took a lot of time, but the costs were stretched out in time.
How to make a cellar from concrete rings, see here.
Cellar in the country house made of brick (under household block)
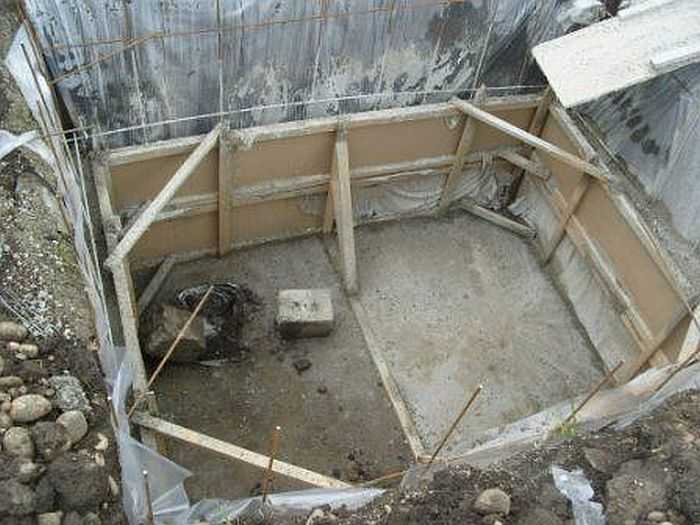
For the construction of a brick cellar, our summer cottage is 100% suitable - the groundwater is below 3 meters, the soils are dense, non-porous, so we dug a foundation pit 2.5 meters deep. The dimensions of the cellar are 2.2 * 3.5 m, the pit, respectively, is slightly larger. The entrance to the cellar will be from a viewing pit, and a utility block (metal container) will be installed over the entire "complex". To save money, the brick is used.
The floor was made as the old men advised: crushed stone and broken brick were poured onto the bottom in layers, all this was sprinkled with clay and rammed. The floor was leveled by pouring sand, it was also tamped, pre-moistened. Then they began to lay the walls in half a brick. The soil is not porous, so there is no need to worry about squeezing out the walls.
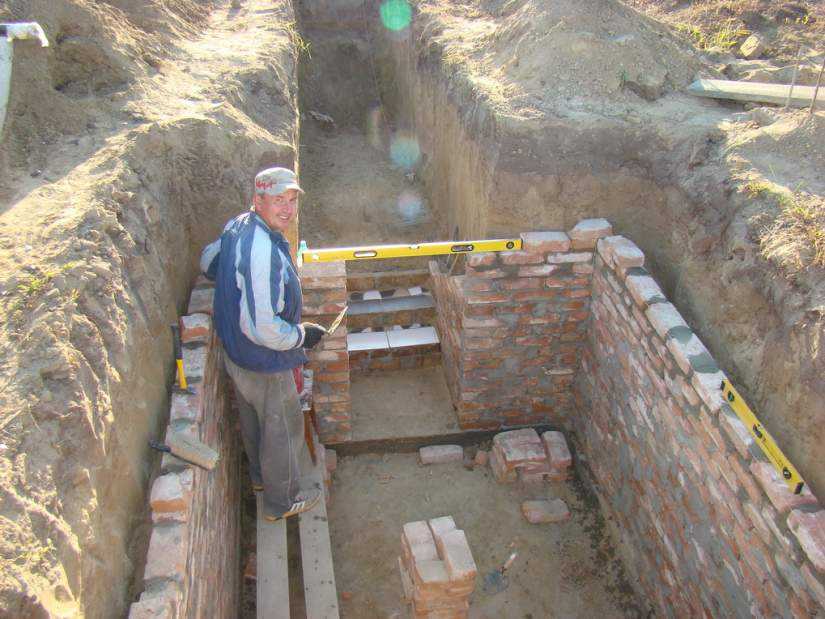
Bricklaying the walls of the cellar
The gap remaining between the brick and the wall of the pit is filled with clay, which was also well rammed - protection from the top water, which will look for where it can seep.
The walls were driven out just above the ground level, and an edged board was laid on them. They laid tightly - this will be the formwork for the cellar floor slab. From below, the boards were propped up with spacers, and a film was laid on top so that the concrete would not seep into the existing cracks. They put up boards from the boards, limiting the future plate. The boards in the corners were fastened with corner braces.
In the future ceiling, in opposite corners of the cellar, two plastic pipes are inserted. This is a ventilation system. The slab will be insulated - 5 cm of EPS (extruded polystyrene foam) will be laid.
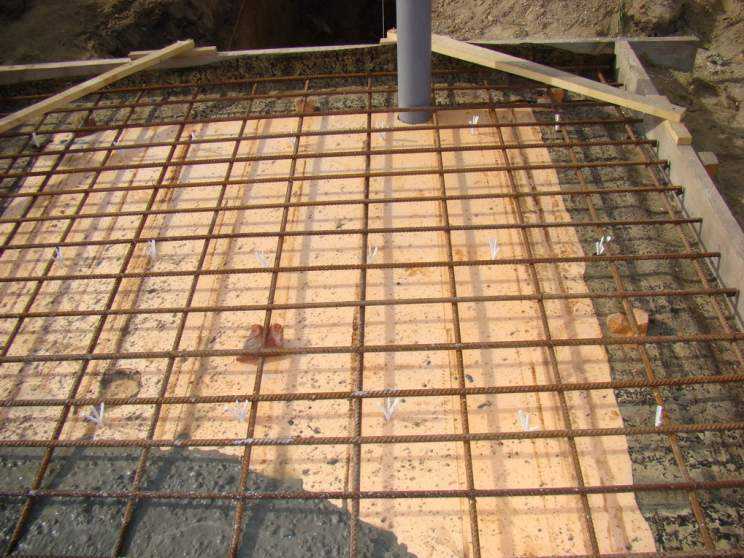
Formwork, insulation, reinforcement of the cellar floor slab
On top of the insulation made of reinforcement with a diameter of 10 mm, a mesh is connected with a step of 20 cm. The mesh rests on pieces of brick. It is raised above the EPS by 4 cm, the total thickness of the slab is about 10 cm.
The concrete was ordered at the plant - there is an entrance to the dacha. When pouring, bayonet was good.
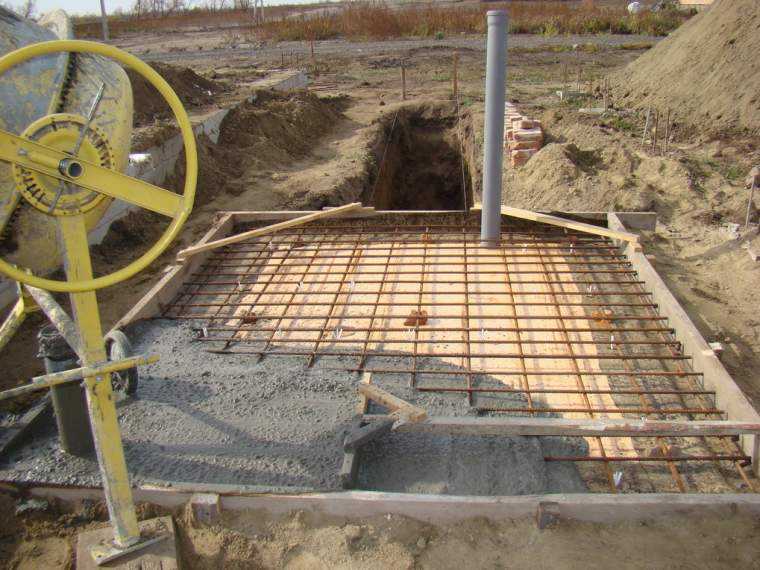
Concrete pouring started
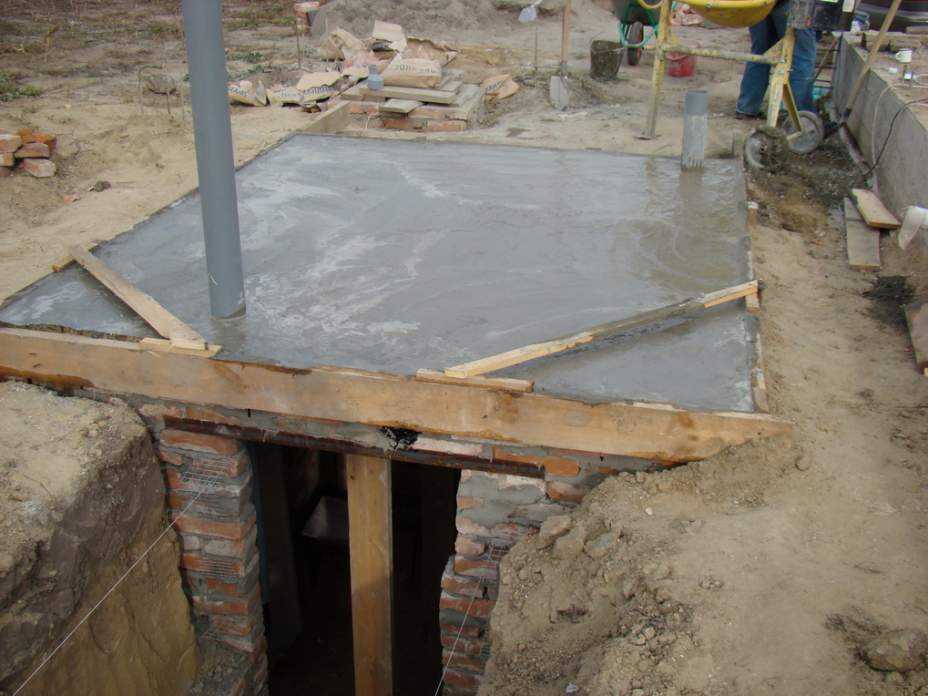
It looks like a flooded floor slab for a cellar
While the concrete “ripens”, the walls of the inspection pit and steps into it are laid out.
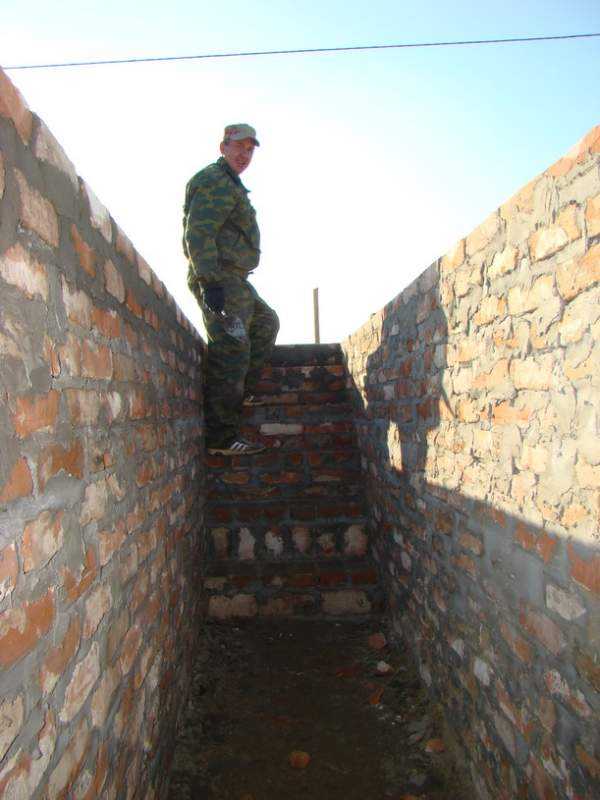
The pit is ready, through it we get into the cellar
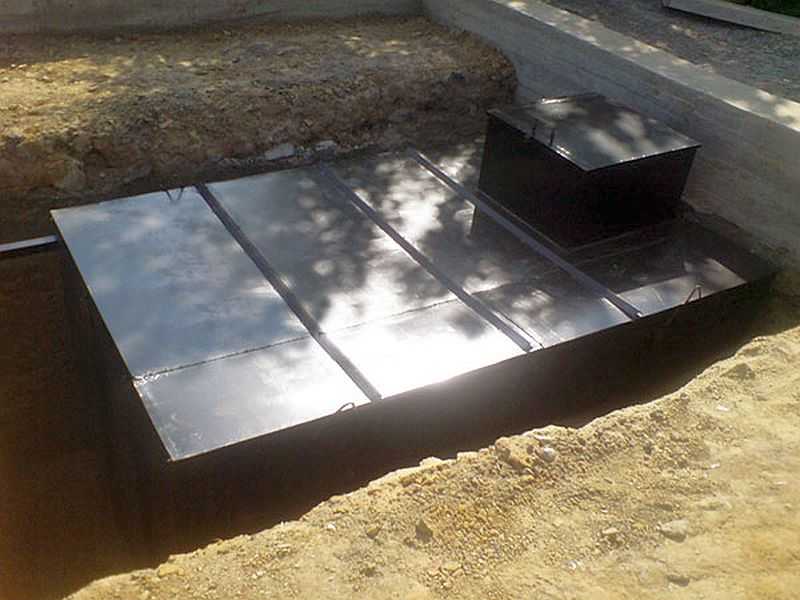
After removing the formwork, it will be possible to put a metal utility block on top.