How to lay laminate flooring with your own hands: methods and schemes
How to make the floor reliable, beautiful, easy to install and at the same time inexpensive? These seemingly incompatible qualities are combined in the laminate. This is why this flooring is being used more and more. Nevertheless, in order for the floor to serve for a long time, it is simply necessary to know the intricacies of the technology. For example, before laying the laminate, you need to check how even the base is. The maximum permissible deviation is no more than 1-2 mm per meter of surface. Only under this condition will it lie tightly, it will not bend and creak. If the differences are greater, the lock may even break or crack the board.
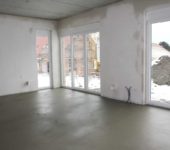
If the base has irregularities that exceed the permissible dimensions, it must be leveled. For cement floors, everything is simple - a leveling screed is poured. They begin to lay the laminate after the solution has gained at least 50% strength.
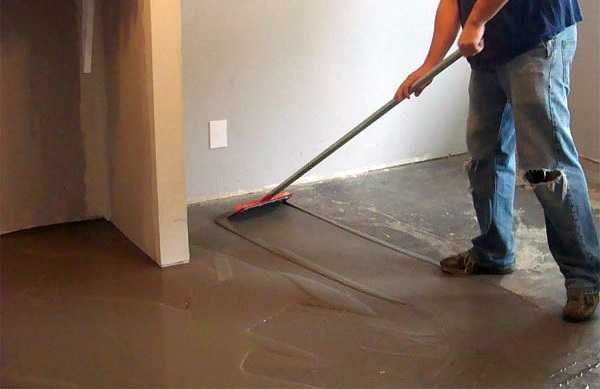
Laying the laminate is only possible on an even base
If an old wooden floor is used as a base, it must be removed according to technology, then a full-fledged cement floor should be made, with all the necessary layers (backfill, hydro and thermal insulation, a reinforcing belt and a screed). You can install a heating system in this floor, and lay the floor covering on the warm floor. Only in this case it is necessary to use special types of laminate that tolerate heat well. The cost of such a floor is high, and it takes a lot of time to install it. Therefore, this is not always done. If the logs and boards are not damaged, you can level the wooden floor with plywood, and lay the laminate on it.
When leveling a wooden floor, all strongly protruding fragments are cut off with a plane or with the help of scraping, the cracks are sealed with putty. Plywood sheets are laid on the prepared old wooden floor (it is used more often, although any sheet material with a flat surface can be laid). They are fastened to the floor with self-tapping screws: along the perimeter after 15 cm, in the middle in a checkerboard pattern.
The joints of the sheets are shifted - they should not match (see the photo below). This way the load is transferred more evenly. One more point - leave some gaps between the sheets - they should not be fitted closely to each other. Wood changes dimensions depending on humidity and temperature. And these gaps will give the necessary freedom to avoid "humps" and distortions.
Laying plywood on a wood floor under laminate flooring is a common way to prepare the substrate during renovations. If the wood has not been damaged, and the plywood is laid flat, does not "play" and does not bend, such a base will serve for years

This is how an old wooden floor looks like, prepared for laying laminate
.
The content of the article
Laminate underlay
On an even and clean surface, the substrate is first laid. It hides those irregularities of 1-2 mm, which are acceptable and makes the floor less "noisy". It also serves for cushioning and better load redistribution.
The substrate is made of several types:
- Cork. Made from cork chips. It has good thermal insulation properties, absorbs sounds. Disadvantages: afraid of moisture and does not like heating. Therefore, the area of its application is rooms without underfloor heating, with normal importance and minimal risk of "flood". That is, these are living rooms. Cork underlayment under the laminate is used infrequently: expensive. If it is put, then it is more under the parquet board - to preserve the floor covering.
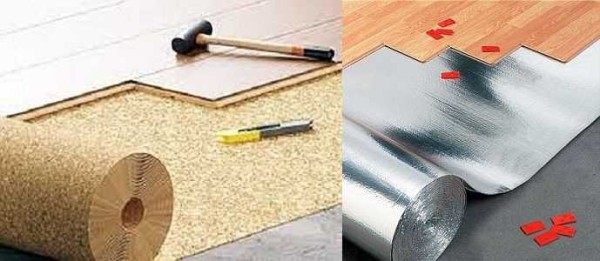
Cork is the best, but also the most expensive type of backing.Foil - a little cheaper, and its plus - it is suitable for heated floors
- Cellulose-based bituminous cork. Small fragments of cork were poured on the bitumen-impregnated cellulose layer. This underlay is a little cheaper than cork, but its main advantage is that it can be used for laying over a warm floor system.
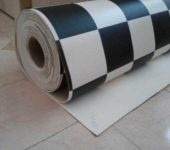
- Made of polyethylene foam. It tolerates high humidity well, does not conduct heat well, is chemically neutral, drain to bacteria, easy to use (produced in the form of rolls), has a low price. Disadvantages: sensitive to ultraviolet radiation, quickly loses its shape, has a short service life, poorly "dampens" sounds. Therefore, this substrate is used for a cheap laminate: their service life is comparable.
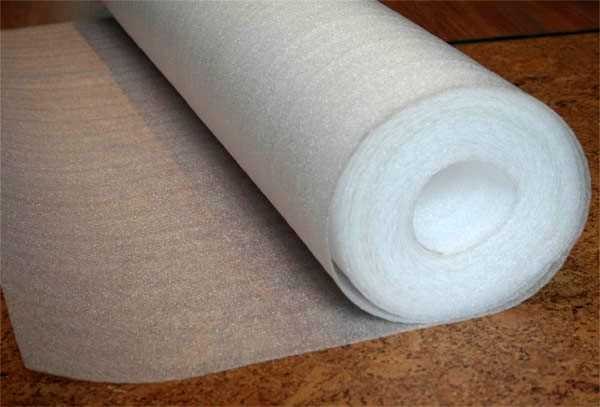
The most common polyethylene foam backing
- Made of expanded polystyrene. It has a rather high density, which is why it smoothes out irregularities, keeps its shape well, has good heat-insulating properties, drowns out sounds. Disadvantage: Cannot be used to lay laminate flooring on warm floors. The price is between cork and polyethylene, it is the most acceptable and is used most often. Produced more often in the form of plates, sometimes in rolls.
- Polyurethane on foil. This type of underlay can also be used for laying under a laminate on a warm floor. Has the best characteristics of all the above, as well as the best prices. But if you are going to lay an expensive laminate, then this is a justified expense: the life of this type of flooring largely depends on the quality of the substrate.

Expanded polystyrene - average quality and price
How to lay the underlay
The substrate for the laminate is rolled out (laid out) along the wall from which the installation will begin. In length, it should cover the entire floor from wall to wall. The lines of the joints are tightly combined, for convenience they are glued with tape. Sometimes the panels are fixed with staples from a construction stapler. It's faster, but the staples are not very good to use - they can rub against the boards and make an unpleasant sound. The next layer is spread as needed - it is not necessary to cover the entire floor at once: it is better not to walk on the substrate.
Laying schemes
In which direction to lay the laminate with your own hands? There are no strict rules, but there are guidelines. To make the joints along the boards less visible, the direction of the light should be along the board. It turns out beautifully if the covering is laid at an angle. But this method is more complicated and there is more waste. You can also lay across the world - this is also practiced, and does not threaten anything except more visual seams.
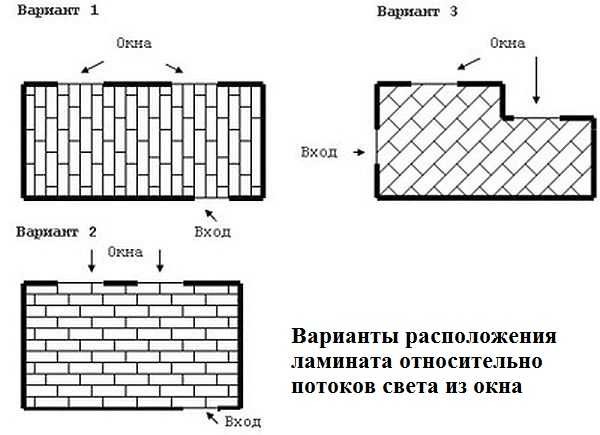
Laying the laminate relative to the window: layout of the elements
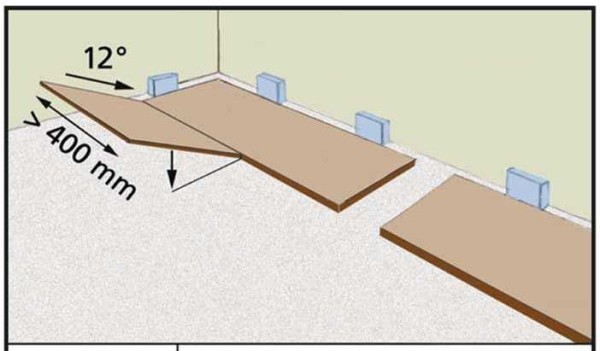
The main rule that must be observed when laying laminate is the offset of the seams. The minimum transverse seam should be at a distance of 40 cm from the other. So the durability of the flooring will be greater: the boards will not disperse under load.
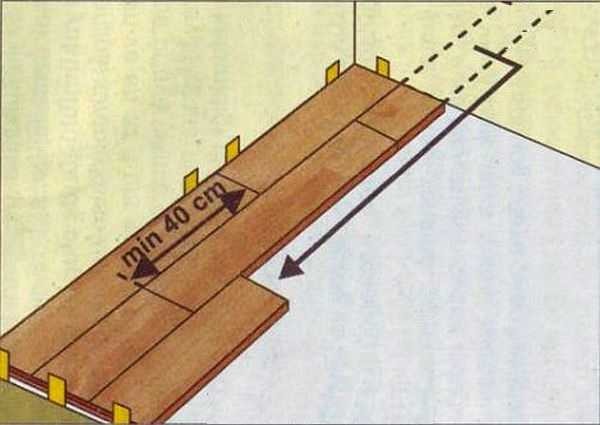
The minimum distance between seams in adjacent rows is 40 cm
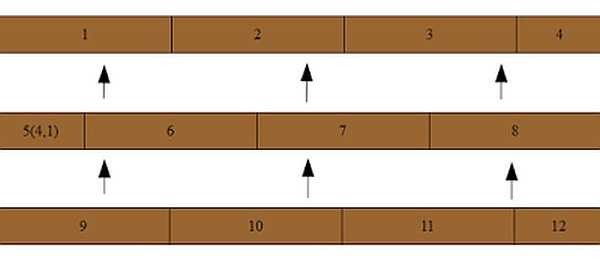
The layout of the laminate should be designed with this rule in mind. The easiest one for self-execution is offset by half the board. Then every odd row starts with a whole, and every even row starts with a half (or vice versa).
If the length of one element exceeds 1.2 m, then the second row can be shifted by 1/3, the third by 2/3 of the length (as in the photo above). It turns out a kind of "ladder". In some types of (expensive) laminate, the minimum offset of the rows is much less - maybe 15 cm. This is indicated on the packaging or in the accompanying instructions.
You can lay the laminate "ladder", but you need to observe the minimum allowable displacement of the seam. On the right is a stacking scheme with a long board length and low offset
You may be interested in reading about technical features of the design of a wooden house inside or about interior design in wooden houses.
How to lay laminate flooring with your own hands: step-by-step instructions
The laying technology is the same: there are only some peculiarities when connecting elements, depending on the locks. The procedure will be as follows:
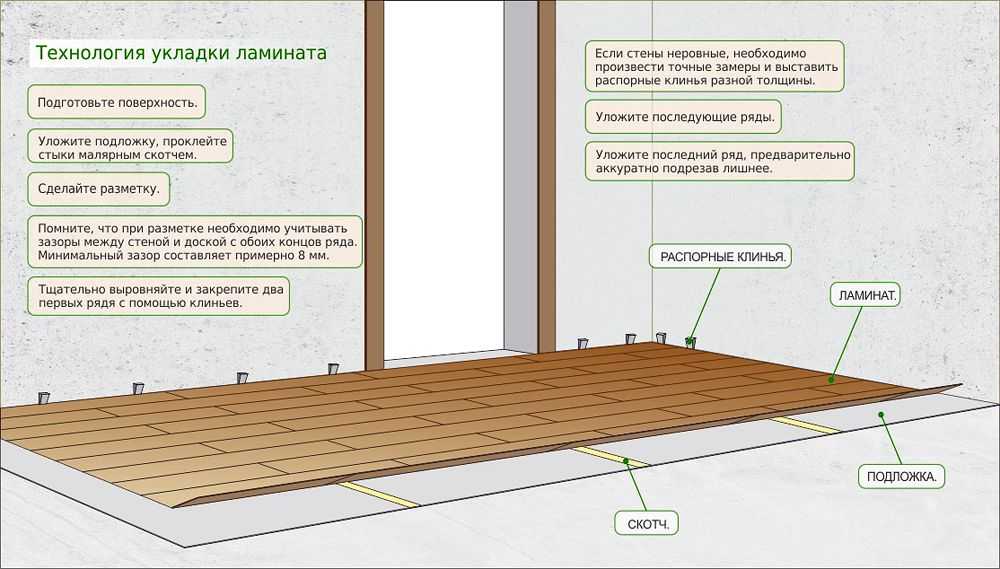
- The substrate is laid on the leveled base, its joints are glued with adhesive tape.
- Wedges or pieces of plywood 10-15 mm thick are installed along the perimeter of the room. Laminate boards will rest against them. In this way, an expansion gap is created around the entire perimeter of the room. It is needed so that the coating does not swell in heat or high humidity.
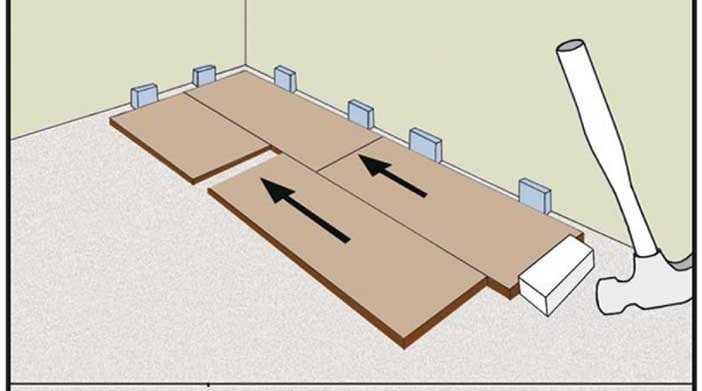
- Along one of the walls - usually opposite from the entrance - the first row is laid. The first row is placed with a spike against the wall (it can be cut off). The whole row rests against the wedges that measure the gap. The extreme one also rests against the wedge with a side lock (it can also be cut off).

Laminate laying technology in a graphic image
- All elements in a row are joined to each other.
- The last board often needs to be trimmed: not included in length. There should also be a wedge on this side, because the size is 10-15 mm less than the distance to the wall. We mark it for cutting as follows: turn the board "face" down so that the desired lateral spike is on the right. We join this edge with a wedge, draw a line with a square that continues the edge of the installed board. Saw off the desired piece along the drawn line and install.
- If the first row started from the whole board, then the second starts from half, third, etc. This is how all the rows gather. In this case, the developed laying scheme serves as a reference point.
- The last row often needs to be cut to width. Nothing complicated, the main thing is not to confuse which side we cut off: we leave the part on which the thorn is.
If the geometry of the room is correct, no problem. If there are distortions, you will have to trim. Questions may arise when finishing the threshold: the board near the jambs is not cut evenly, but in an arc, while maintaining a gap of 10-15 mm. Why in an arc? So there will be no hole under the door trim of any shape.
Laminate laying methods: two locks - two methods (video instructions)
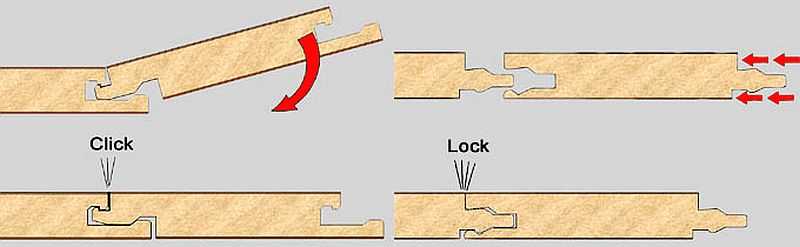
The technique used to lay laminate flooring depends on which of the locks on your flooring. They are made of two types - "click" (Click) and "lock" (Lock). You will not get confused, because the system is written on the packaging of each pack, and many have pictograms that explain the principle of stacking.
The way of laying depends on the system of laminate locks.
Hammerless method - Click lock
When using "click" locks, it is more convenient to collect the boards one by one. The system is named so because of the characteristic click that is heard when the spike enters the groove. With such a system, the side locks are first connected, then the longitudinal ones. It happens like this:
- the element to be installed is brought from the side to the mounted element at an angle of 45 °,
- lightly pressing the spike into the groove, tapping with the back of the hand;
- lower the board to the floor, it turns out to be connected to the side surface located to the left;
- this is how the entire first row is collected;
- in the second row, the first board is installed in the same way, only with a longitudinal groove: we bring it at an angle of 45 °, insert it into the groove and push it slightly until it clicks, lower it down;
- the next boards in the second row are first connected with a side lock;
- at the boards connected together by the sidewalls, the edge is raised by a couple of centimeters;
- insert a longitudinal spike into the groove of the previous ones;
- they snap into place with light effort, knock them out, if necessary, only with the palm of your hand.
Graphical representation of the process of laying a laminate with a click lock

How to lay a laminate with a click lock, see the video.
How to Deck with a Lock "Lock"
Here the lock must be inserted from the side and the assembly method is different. You will need a piece of laminate with a spike and a light hammer (rubber mallet). The boards are laid out on the floor, adjusted so that they lie exactly one relative to the other. Move it so that the spike is close to the groove, insert a piece of laminate on the other side and tap it with a hammer, achieving a connection.
How to lay down laminate with the "lock" system
The method is also simple, but requires caution: you can hit too hard with a hammer and break the lock. Then you have to use a different element.
With this method, it is more convenient to lay the laminate, first collecting individual rows, and then connecting them. This is shown schematically in the photo below.
So it is more convenient to lay the laminate with your own hands with the "lock" system
For more information on this method, see the video. There is no sound row, but everything is clear.
The methods described above for laying the laminate can be made almost airtight, in any case, the amount of water that can get into the inter-joint space can be significantly reduced. For this, use a special glue. They are coated with thorns of the laid boards. The composition retains its elasticity for 10 minutes, therefore, glue is applied immediately before installation.
The disadvantage of this technology is that the coating becomes almost monolithic. If you need to replace one or more boards, this will not work.
How to cut laminate flooring straight
You can cut laminate boards:
- jigsaw (most convenient);
- hacksaw;
- hand circular saw.
To prevent burrs from forming on the front surface when sawing, it should lie “face” up. In order for the cut to be even, guides are used - rulers (strips) made of metal or wood. When using a hacksaw, the ruler should not allow to "climb" on the desired half.
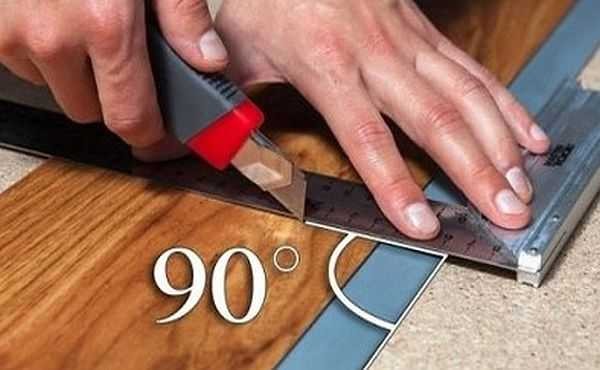
The square can not only be used to draw lines, but also be used as a guide when cutting
When cutting across, it is more convenient to use squares. It is pressed against the long side, the second serves as a guide.


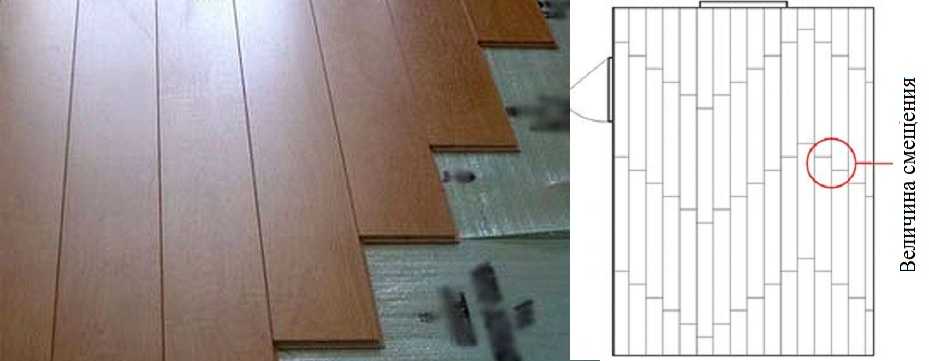
In order to evenly distribute the load and optimize the reliability of the joints, the laminated strips are displaced in each subsequent row, relative to the panels of the previous row. There should be no cruciform joints in the assembled coating. If you look at the plan, the picture of the correct laying of the laminate should resemble brickwork with a butt seam strictly above the center of the panels of the previous and next row. This is done by professionals, in contrast to them, home craftsmen shift the butt seam by the length of the segment remaining after laying the last die in the previous row. It's smart and economical, but not too pretty and less durable.
We need professional advice. Is it possible or not to lay the laminate continuously from one room to another without technological cuts under the threshold
As far as I know, it all depends on the area. Last year, the laminate was laid in the apartment in one contour: in the hall (15.3 m²), in the bedroom (13 m²) and half of the corridor (6 m²). Nothing has happened in the past nine months.
Quite the opposite, a ladder. Do not mislead people
And a ladder and a checkerboard - both options are correct if the transverse seams of the subsequent rows are offset by the minimum distance recommended by the laminate manufacturer. Usually this is 30-40 cm. And the fact that a new row starts with the remainder - it all depends on the length of the room, it is quite possible that the segment will allow you to observe the necessary offset, but this is not accurate.
I am just starting to farm. 02.06.2019. while there are more questions than answers. but also in the ending your "but it's not exactly" generally cornered. room 2.6 by 2.5. in fact, exactly 1.32m laminate plank comes in. but you can't put a cross? and how to cut then? stupidly in half ??
yes, and you get chess
Why is it impossible for the joint to be less than 30-40cm away from the other? After all, the click system, which means the thorn is held in the lock by a latch? And probably will not disperse
A very good instruction for those who want to do something useful at home. No one can do anything better for you than he can do himself.
Thank you. We try to be useful and provide complete information. And you're right, most often it's best to do it yourself.
Necessary thing