Laying tiles on the wall: in the bathroom, in the kitchen (photo, video)
Repair in the bathroom is rarely complete without replacing the tile, especially if it has already served for 10-20 years. But, as usual, the question arises: to hire a master or do everything yourself. If you have a proven, tried-and-true tiler in mind and a certain amount (usually they ask for the same amount of work as the materials cost), you can hire. If not, try laying the tiles yourself. If the walls are at least relatively even, everything should be done without any particular difficulties. But just before laying the tiles on the wall, carefully study the technology.
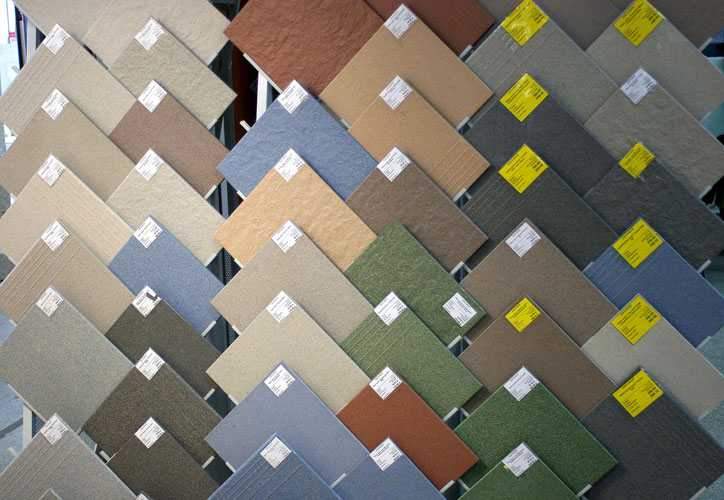
To lay tiles on the walls is easy, but it is boring to choose the right one
It starts as usual with the choice of tiles. Just pay attention not only to her external data. You will definitely need to check its geometry, otherwise it will be difficult to work with it. If you will be laying tiles for the first time, any curvature will greatly complicate the task. So, we check:
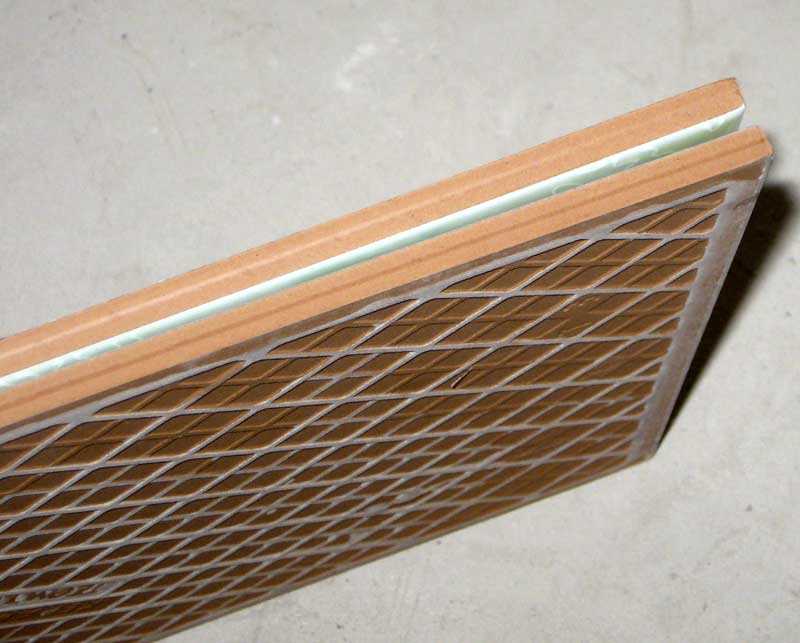
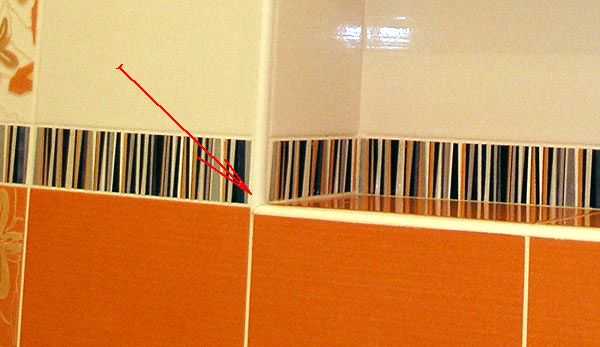
- How smooth is the front part. Often the tile has a concave or convex surface. If the discrepancy is small - in the region of 1 mm, this will not be noticeable, but when checking the vertical or horizontal position already on the wall it can become a problem. The choice is yours: search with the perfect surface (these are usually imported collections) or adapt to what is.

Uneven front surface - when folded up, see how tightly the two tiles fit together
- Checking the corners. They should be 90 °. If this is not the case, it is advisable to refuse the purchase: it will be very difficult to display it. But again, the choice is yours.
- Check how the same thickness is for different tiles. The difference will be for sure. These are the features of the technology, but it is desirable that the discrepancies are minimal. Certainly not more than 1 mm, although 2 mm is allowed by the standards. But with such a tile you will suffer.
- You need to check how much the height and width coincide. Take a few pieces and apply. There should be no discrepancies here. Otherwise, how do you get the same stitches?
From experience it is worth saying that the ideal parameters are extremely difficult to find. If you like it externally, there are no cobwebs of cracks, glaze defects on the surface, the edges are even, the dimensions are the same, you can take it despite some nonlinearity (first point). Otherwise, you get tired of running around the shops. What you shouldn't do - take the tiles "to order". How can you control its quality if you already pay for it? Take only what you hold in your hands.
The content of the article
What is the tile on
Previously, the tiles were laid on a cement-sand mixture, to which PVA or Bustilat glue was added. You can, of course, do this, but it will be more difficult to work. For more comfortable work, use ready-made compositions, they are also called "tile glue" for the fact that there are adhesive components in the composition, therefore sometimes they say that the tiles are "glued" to the walls. Compositions are of two types:
- in buckets - ready-to-use mastics;
- in bags - dry mixtures that require dilution with water.
Professionals mainly use dry mixes. If necessary, they can correct a non-ideal wall by making the layer a little thicker or thinner. Another plus: they retain their plasticity longer, which allows you to make adjustments some time later. They work with mastic on an ideal wall and there can be no deviations: the layer is too thin.

Any building materials store will offer several types of tile adhesive
When choosing a tile adhesive, you can choose it for specific tasks. So there are compounds in which there are additives that increase the water-repellent properties of the wall or floor. This is important in the kitchen and bathroom. There are frost-resistant ones, it will come in handy if you put them in an unheated room or on the street. You can find glue that has bactericidal properties: it will prevent fungi and mold from developing, which is in demand in damp rooms.
Preparatory work
Before laying tiles on the wall, a number of preparatory measures are carried out. This is a long and unpleasant process, but it is highly undesirable to skip it: not every master can normally lay tiles on uneven, unprepared walls, not to mention beginners.
Leveling the surface
The first step is to remove the old coating from the walls and what may fall off. If there are greasy spots, they are removed, or they are simply cut off part of the plaster along with the absorbed oil. The walls are tapped with a wooden hammer, by sound they determine if there are voids. They occur if the plaster has peeled off, but has not yet been blown out. If you stick tiles on such a site, everything will collapse under its weight. Therefore, you knock off all such places yourself.
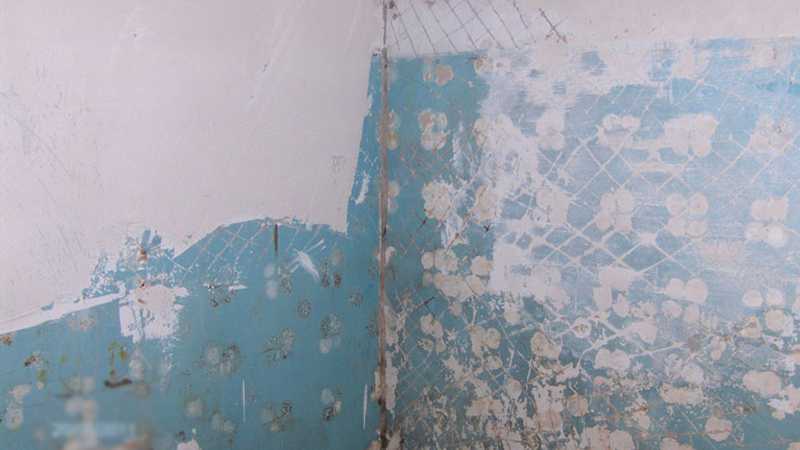
Align them before laying the tiles on the wall.
A flat bar is applied to the cleaned base and it is estimated how even or curved the walls are. If the surface of the wall is strongly convex or curved, it is better to correct everything with plaster in a level. Then laying the tiles on the wall will be very easy. If the walls are relatively flat, only too large indents are leveled: irregularities (protrusions or holes) that are more than 5 mm. The protrusions need to be cut off, the pits should be filled with a plaster mixture, the cracks should be widened, moistened and also covered with plaster.
We prime
It is advisable to treat the prepared wall with a primer. Best suited for these purposes is "Betonokontakt" or another compound with similar characteristics. It penetrates a sufficiently large thickness deep into the wall, binding all particles. After drying, the surface becomes rough, tile glue "sticks" to it very well.
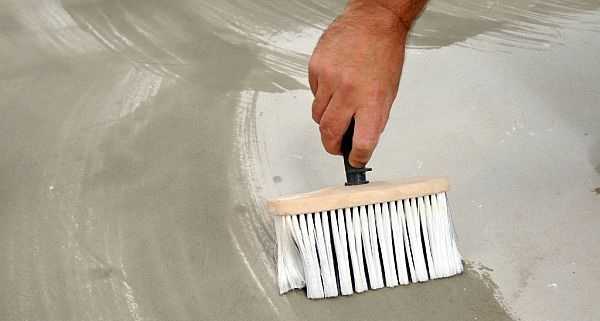
Apply the primer with a wide brush or roller
How to start
There are several possible starting points. In a very simple way, you can lay out the first row immediately from the corner, guided by the floor line. But the first row will become even and without problems only if the floor is perfectly flat, without any deviations. Otherwise, you will be trimming the tiles to somehow get vertical seams. As a result of these pruning, the second and all subsequent rows can also "walk". It will be very hard and unpleasant to work. Therefore, it is better to spend time and mark the wall, finding the "starting points".
Wall markings
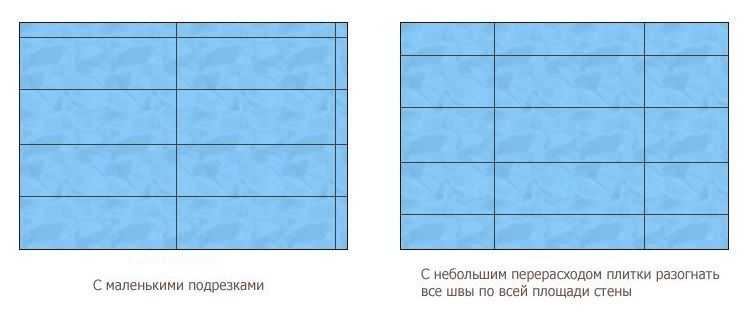
Options for placing tiles on the wall
If you are not very concerned about the small pieces of tiles that have to be placed in the corners and above, under the ceiling, you can skip this step. But if you want all the tiles to lie symmetrically, before putting tiles on the wall, you will have to do the layout:
- Find the middle of the wall. You can even draw a vertical line to some height.
- Lay out the tiles relative to it. In the middle there may be a seam or the middle of the tile. Depends on how many pieces (whole) fit on the wall. To find out, first add the seam thickness to the width of the tile, then divide the wall length by the resulting number. Find how many whole pieces will "fall" on the wall. If the number is odd, put the center of the tile in the middle of the wall, if it is odd, the seam will be located on the marked line.
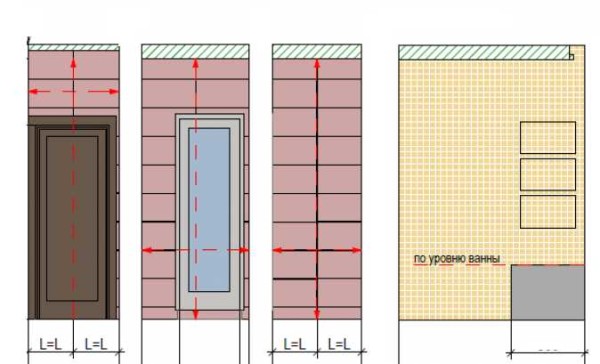
Multiple layouts in difficult places
- With respect to this center, place the tiles on both sides (lay them on the floor), placing crosses between adjacent ones, which will mark the width of the seam.
- Usually empty space remains at the edges. You measure it. To this size, you will need to cut off the outer tiles. In theory, both on the right and on the left, they should be the same.If the discrepancy is large, recheck the styling. After everything is aligned, you can mark these boundaries on the wall with a clear line. We carry out from one side and the other. A lighthouse tile is then installed using these marks.

If it turns out that only narrow strips remain at both ends, it is advisable to redo the layout. If the middle of the wall was in the middle, try spreading out from the seam, and vice versa. It should come out better.
With the placement of tiles in height, the situation is slightly different. In some cases, the seam is made at a certain level. In a bathroom, this is often the edge of an installed bath. If there are no such requirements, you can do the same: find the center, position (draw on the wall) the position of the tiles relative to it. Thus, you will find how to trim the tiles of the upper and lower rows.

Always check the flatness when laying
You can position it vertically in another way: mark the first tile from the ceiling, and so on - to the bottom. In this case, only the bottom row will have to be cut. This is not entirely correct, but the consumption of tiles is slightly less.
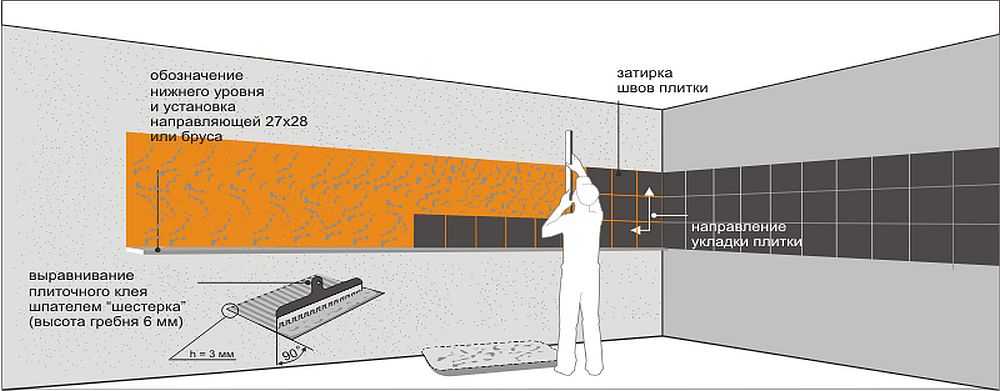
And in any case, when calculating how to put the tiles on the wall, mark the level where the first row ends. It usually serves as a starting point. It is from here that the laying of tiles begins.
Start line
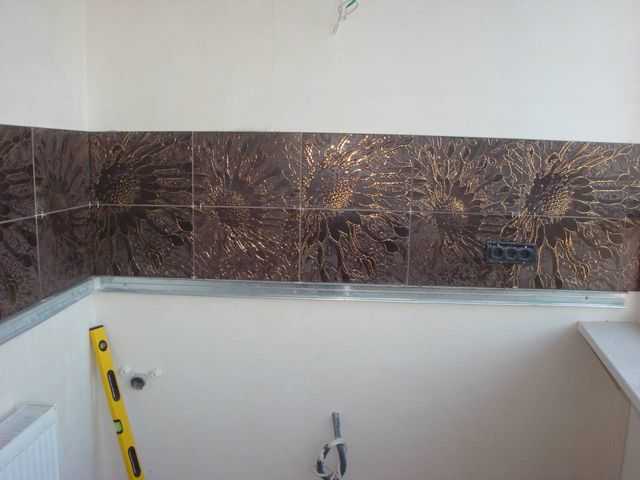
Based on the results of the layout, you have a line where the first row ends. At this height, a flat bar is nailed. Leaning on the tiles, they set the starting row, and all subsequent ones are placed on it. The first row is installed last, into which the tile will have to be cut.
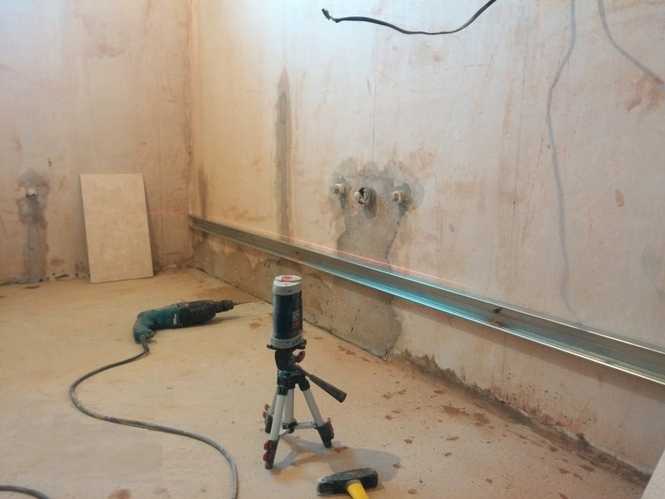
If you have a laser plane, it is much easier to work
Profiles for working with drywall are usually used as a support bar, but a flat dry bar is also possible. At a given height, it is attached to the wall with self-tapping screws or dowels (depending on the wall material). In order to lay the tiles on the wall with your own hands without problems, you need to fix it often enough: so that there are no sagging. Be sure to check the horizontal position of its installation. Even the slightest deviation should not be.
How to lay tiles on the wall
The technology for laying tiles on the wall is simple. It consists of a few simple steps:
- Tile glue is applied to the wall with a wide spatula, the excess is removed.
- A layer about 3 mm thick is applied to the tile, leveled more or less evenly, making sure that the edges are smeared.
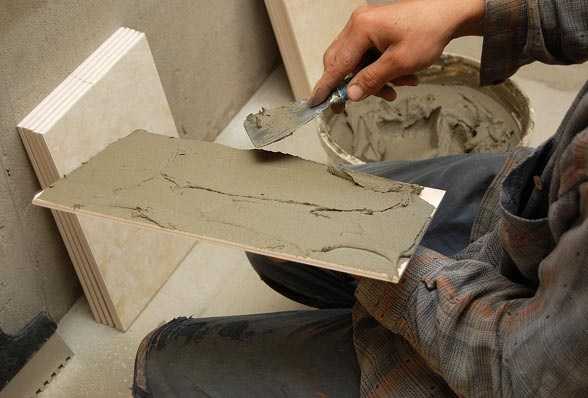
How to apply mortar to tiles
- Remove the excess with a notched trowel.
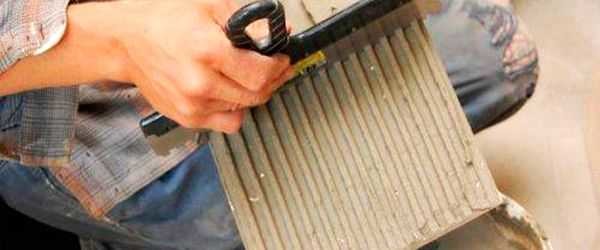
Remove excess with a notched trowel
- The tile with the applied glue is installed on the wall, slightly pressed.
- Aligns with level or beacon tiles.
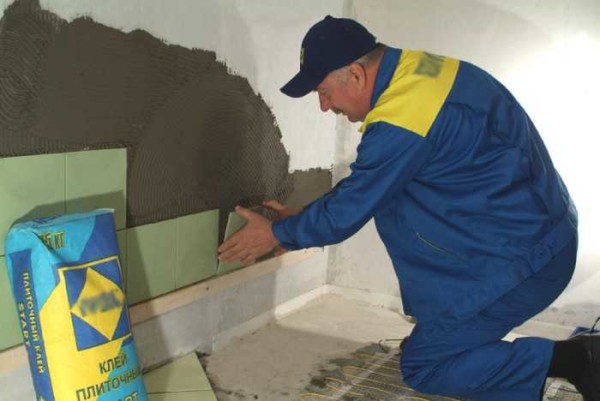
Installing tiles on the wall
- Excess glue is removed, the surface is wiped with a damp sponge (the dried composition is difficult to wash).
- Crosses are placed between the two tiles. As you can see in the photo, there are two ways, and sometimes they are also combined: five pieces are placed on one intersection: in the middle and in each seam. One moment. The crosses should not be in the seam for too long: they will stick and it will be difficult to pick them out. Half an hour after installation, they are taken out. By this time the glue will begin to set and the tiles will not "float".
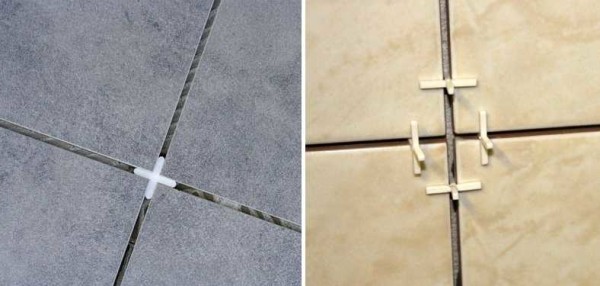
How to put crosses


It's all. Then all actions are repeated. There are, of course, different points that still need to be understood - how to cut the tiles, how to shape the corners, but the basic steps are described.
Several nuances in the complete process. First, in the marked places on the installed strip, the outermost whole tiles (those that do not need to be cut) are glued. When laying out, you marked their position. It is very important to set them correctly. To do this, each is checked with a level in the vertical and horizontal planes. If the geometry of the tiles is perfect, you can also check the vertical / horizontal at the edges. Then they take a long level or an even bar with a shorter level and check how exactly one lighthouse is set relative to the other.They must be in the same plane. Then, with the help of this strip, they control whether each subsequent tile is correctly set.
Description is one thing, but seeing everything with your own eyes is another. The video demonstrates the technology, after watching, you will definitely understand how to lay tiles on the wall.
Glue thickness on the wall
For those who have been laying tiles on the wall - the first experience of this kind of work, there may be questions about how thick a layer of glue is needed. This value depends on how flat the walls are. If they are ideal, you can apply the minimum layer allowed in the instructions for the composition. If the walls are only relatively flat, the "starting" layer can be 3-4 mm. Further, as necessary, it can slightly decrease or increase, correcting the unevenness of the wall.
There are several techniques for laying ceramic tiles. Glue is not always applied to both tiles and walls. Some masters apply the composition only on the wall, others only on the tiles, someone recommends dipping it in water before applying the glue, others do not. Choose the option that seems more correct to you. But for beginner tilers it is more convenient when the mortar is both on the wall and on the tile: it is easier to move and level it.
Manufacturers of tile adhesive advise to apply it to the wall, removing excess with a notched trowel, but they mean a perfectly flat base. Based on these recommendations, the consumption for laying one square is calculated.
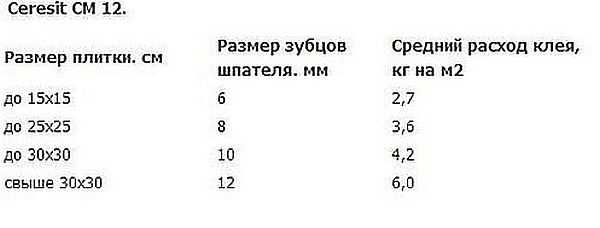
Adhesive consumption depending on tile size
With another technique, the consumption increases by 50% or even 100%, since the wall has to be corrected. But it is definitely worth listening to the prescribed sizes of the spatula teeth.
How to cut tiles
There are several ways. For small volumes and not very thick tiles, a manual tile cutter is suitable. It is a device consisting of a platform on which tiles are placed. Facing plates are attached to the platform, along which the cutter moves. The cutter is moved with a handle to rip through the hard surface. A stop is usually installed on the same handle, with which the tile breaks along the line drawn by the cutter.
Another way is with a grinder, but it is very noisy and dusty. In addition, it will not work to make a perfectly straight cut, but it will go in an emergency.
If necessary, round holes are cut out using a crown of a suitable diameter, which is put on the drill. During drilling, so that there is as little dust as possible, the place of work is constantly watered with water. The result is a perfect hole, everything looks decent.
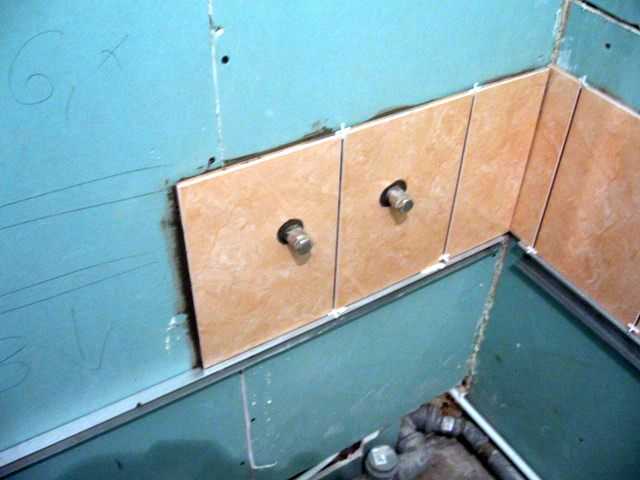
Finished round holes in ceramic tiles
If you need to cut a strip that is too thin, it will not work on the tile cutter: it simply will not break off. Then, drawing a line with a cutting disc or a rod (some companies have a cutting element made in the form of a rod), the thin edge is broken off. In general, there are special forceps for this, but pliers are also good at it.
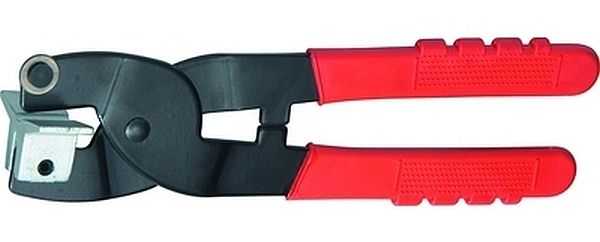
Tile tongs
If at the same time the edge turns out to be very uneven, it can be smoothed out a little with a file or sandpaper fixed to the bar.
Corner decoration
If the tiles are laid flat, the inner corners are not questionable. Difficulties may arise only with the installation of crosses. Just rotate them so they don't get in the way or break off any protruding parts. In general, they fit neatly in the corners, and finally the seam is formed using grout.
There are also profiles for inner corners. They are matched to the tone of the grout, installed in the corner, leveled to a level, and then attached to screws or dowels. When laying tiles in the corner, the tiles are supported on them. A finished fillet seam is obtained.
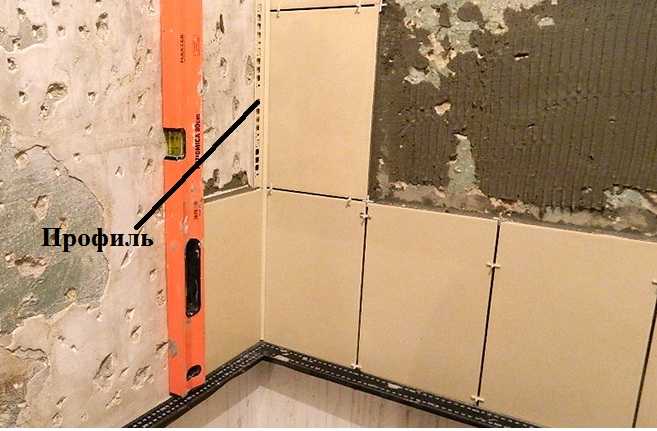
Internal corner profile
Outside corners are more difficult. If you just dock the tiles, overlapping edges, it turns out ugly. To properly shape the outer corner, you have to saw the edge at 45 °.
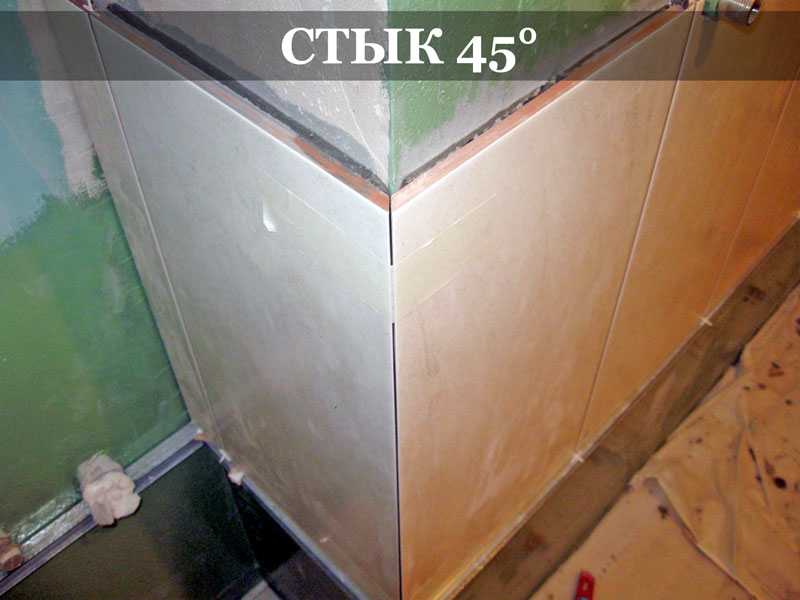
How to make an outside corner when laying tiles
This can be done using a professional tile cutter. But not everyone has such equipment.Then you will have to work with a grinder. The first cut, at approximately the desired angle, is made with a smooth diamond disc. There should be no slots or holes in it, the spraying should also be even.

These are discs for a grinder: for cutting and grinding
It turns out not very smoothly, and the outer edge is quite thick. But this is just a preprocessing. We bring the saw cut to the required parameters with a grinding attachment with the same disc. See the video for more details.
If you don't want to bother with such a trim, there is another opportunity - to arrange the corner with a special plastic corner.
Another way to decorate the outer corner
Another video on how you can arrange abutments and seams when laying tiles.
To make the laying of wall tiles with your own hands completely clear, watch another video tutorial.
How to tile an apron in the kitchen
When decorating a kitchen apron with ceramic tiles, the technology practically does not differ from that described above. There is simply no need to calculate the number of vertical rows. The "starting point" is determined by the height of the countertop: it should start 5-10 cm above the edge of the tile. Fasten the bar at the required level, align it exactly with the horizon, and you can start.
An example of a tiled apron on a working wall in a kitchen
An apron in the kitchen is usually made on a work wall. If it's not one wall, but two or three, you can start from one of the corners.
How to tile an apron in the kitchen
If it is laid out from small-sized tiles, the undercuts may not be very conspicuous. If you want to do everything symmetrically, repeat the layout and start from the center, as described above.


Important danke Donald with yet another remarkable resource that will aid the full sector.