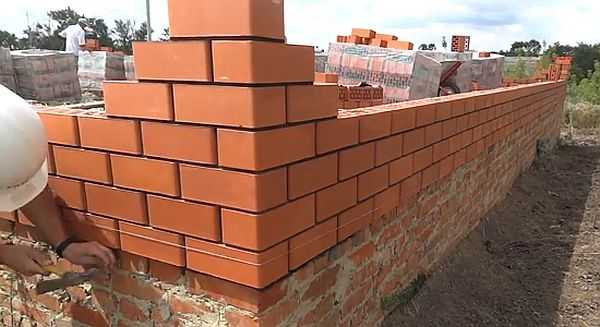
DIY bricklaying
Brick has existed for far from the first century. Houses were built from it in different countries and even parts of the world, having come up with many different methods and types of brickwork. And although there are a lot of secrets and features in the technology itself, you can understand everything. First, you need to familiarize yourself with the basic provisions and terminology, without which it will be impossible to understand what is at stake. Then, choose the laying technique and the type of dressing, and then begin the practical mastering of skills. Do-it-yourself brickwork can be done, at least, no worse than that of professionals. The only thing that an amateur will definitely yield is in speed. All other parameters, subject to the technology, will certainly not be worse.
The content of the article
Basic terms
Let's start with general concepts. Everyone knows exactly what a brick looks like, that it is ceramic, and that there is silicate, too. But here's how the facets of this material are correctly called, not many in the course. And in the description of masonry technology, they are very common.
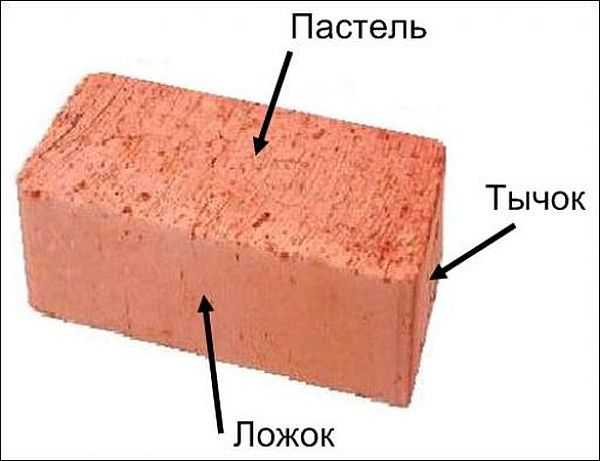
Brick face names: pastel, spoon, poke
The largest facet is called "pastel", Middle - side -"spoons", And the smallest -"jab«.
The dimensions of the brick, in principle, are standardized (250 * 125 * 66 mm - single and 250 * 125 * 88 mm - one and a half), but the technology of its production is such that they can differ significantly from different manufacturers: by 2-3 mm in each faces, and this is a rather significant difference when you consider the number of pieces in one row. Therefore, before ordering a batch, it is advisable to measure samples from several firing in order to determine how accurately the technology is maintained.
It is also important to pay attention to the geometry: the faces must be located strictly at 90 °. Otherwise, bursting loads will occur, and the wall may crumble.
Types of masonry
Brick walls can play different roles. In some cases, this is only decoration, in some - partitions, and sometimes - load-bearing walls. Based on the purpose, as well as the required thermal conductivity of the walls, the type of brickwork is selected:
- In half a brick. Most often, cladding is done this way. The thickness of such a wall is 125 mm. To save money, you can put the material on spoons, then you get a quarter-brick wall. When installing such (1/2 or 1/4), a reinforcing mesh is laid in each 4-5 row. It is necessary to increase the rigidity of the wall and create additional ties that increase the strength of the masonry.
- Into the brick. These can already be partitions or two load-bearing walls of small buildings. Wall thickness - 250 mm.
- One and a half, two and two and a half bricks are already bearing walls.
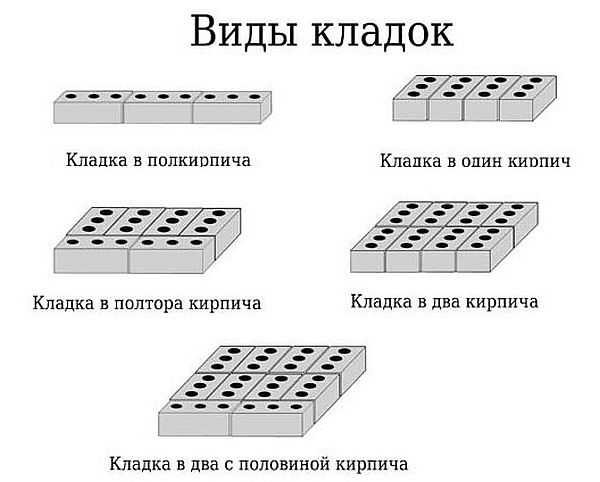
Types of brickwork: half-brick, brick, one and a half and two bricks
Bandage and row names
Although a brick wall is composed of many small elements, it should work like a monolith. To provide increased strength, the seams, which are a weak point in this system, are made with an offset. Experts call this technique "bandaging". It seems to connect different elements into a single whole, allowing the load to be redistributed over large surfaces.
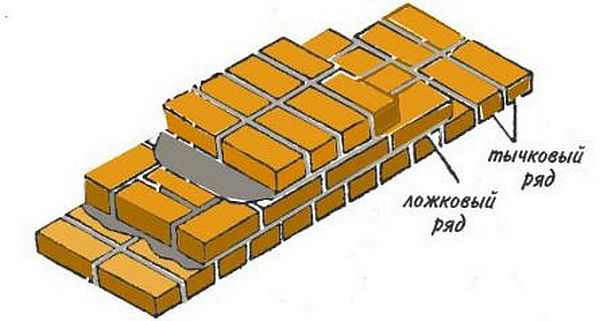
Spoon and butt rows in brickwork
To provide the necessary displacement of the seams, the bricks are positioned in different ways:
- if they are turned to the front side by the smallest part - a poke, such a row is called tychkov;
- if turned by the long side - with a spoon - the row is called spoon.
Moreover, the first one in the masonry - on the foundation - is butted, and the masonry is finished with it. Moreover, the use of solid bricks is mandatory for him.
Single row dressing
The alternating alternation of such rows gives a very good result. This method of dressing is called single-row or chain dressing. It is practiced on walls that are not planned to be finished: it looks neat. According to such a system, both external and load-bearing walls can be folded.
Wall masonry schemes
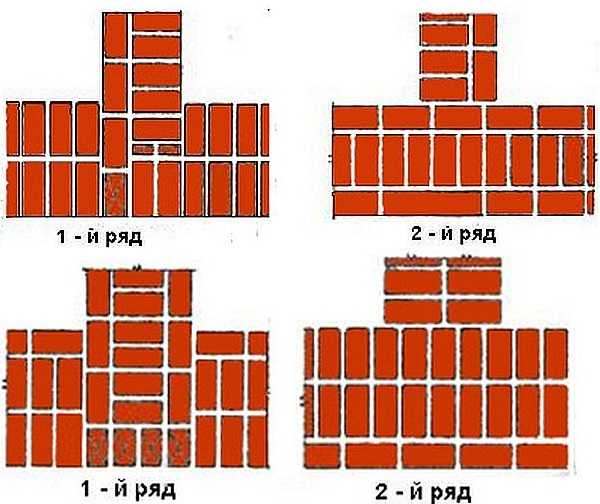
Examples of a single-row brick wall of 1.5 and 2 bricks are shown in the photo below.
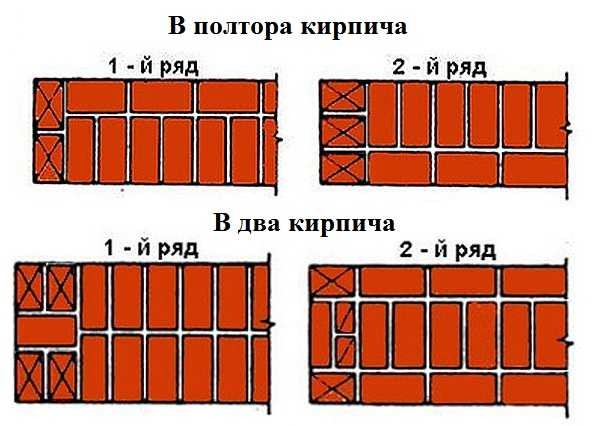
Single-row dressing in the wall of 1.5 and 2 creepers
In the case of laying a wall in two bricks, two more terms appear. The two outer rows of spoon are called versts - outer verst aimed at the street, inner verst - into the room. They use even, good material, especially carefully selecting those that are directed outward. The space between them is called zabutka... Since this element is closed on all sides, you can use lower-grade material, for example, used.
Please note that with such masonry, sawn bricks are also required: halves and three-quarter ones. The three-quarter ones on the diagram are crossed out with a cross on a cross, the halves - with one diagonal stripe. How to make the abutment of the partitions to the walls made using this technique is shown in the photo below.
Adjoining walls with single-row dressing
Angle diagrams
In this case, laying the corner is very important. According to the method, the corners are first driven out, a cord is pulled between them, and then the wall is laid according to the scheme. But the corners are put first, on how correctly and evenly they are driven out, how even the whole building will be depends. The scheme of laying a corner of 1 brick with a single-row dressing is located like that. The laying begins with the installation of two 3/4 pieces, then the whole ones follow.
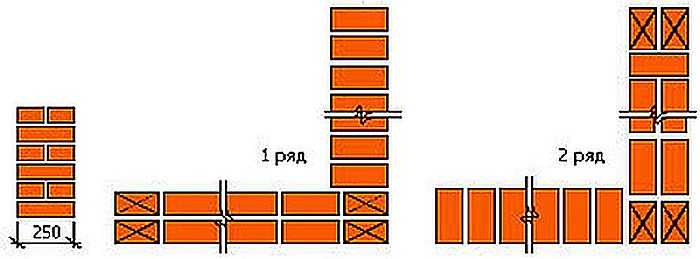
One brick angle for single-row dressing
See the video for the sequence of actions. A very detailed explanation with a step-by-step demonstration of the procedure.
The same system, but in the wall 1.5 bricks. In addition to whole pieces, 3/4 pieces and quarter pieces are required. The spoon row is alternately on the inner, then on the outer verst.
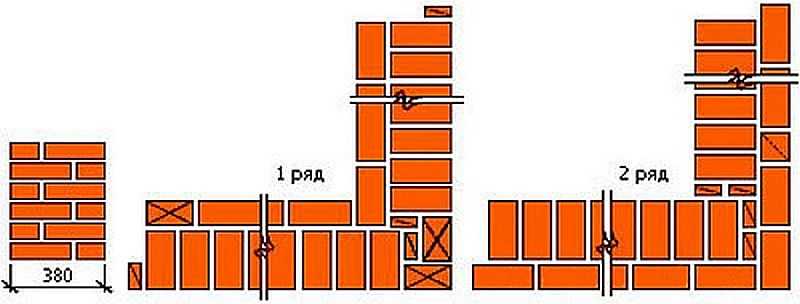
Scheme: an angle of one and a half bricks with a single-row dressing
How this scheme is put into practice, see the video.
When laying a corner of 2 bricks in the first row, all the same two three-quarter pieces are required, and another 6 quarters, or, as they say, chekushki. In the second, one for 3/4 and two checks are already required.
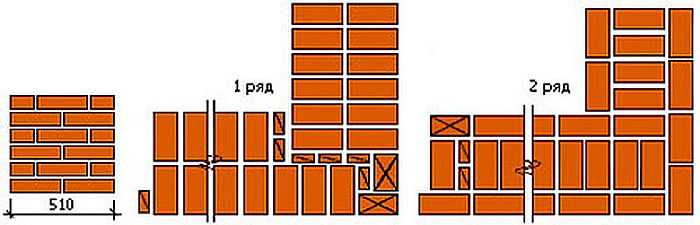
Scheme: a corner of two bricks with a single-row dressing
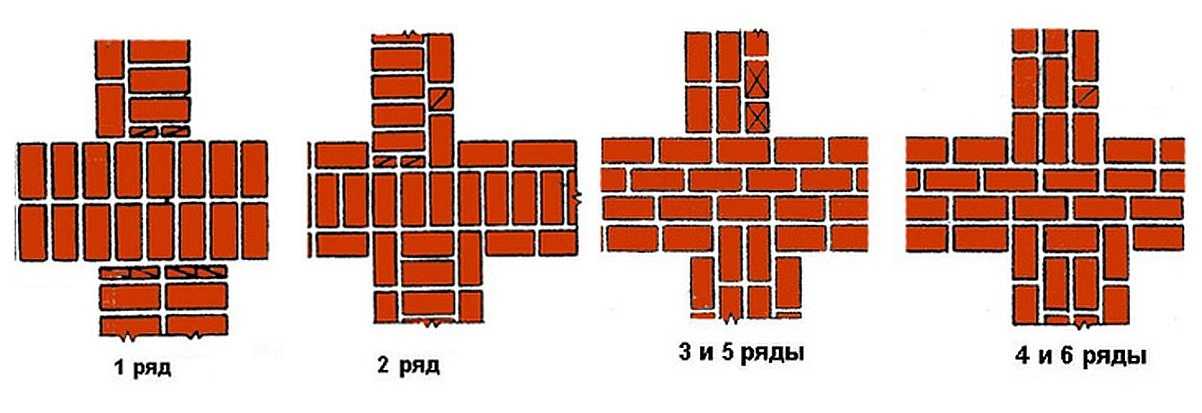
Multi-row dressing
With a multi-row dressing, several spoon rows - 6 (for a single brick) or 5 (for one and a half) - are interspersed with one butt. The first and last are also poked. This method is also suitable for both exterior and interior walls. Only they are usually planned for insulation or decoration.
Wall masonry schemes
To prevent free-standing columns with such a system, the spoon rows inside are also tied up. To ensure the displacement of the joints, crushed bricks are used.
DIY brickwork: a multi-row dressing scheme in 2 and 2.5 bricks
The joining of the walls with this method also occurs with a perch. This ensures increased strength of the abutment of the walls. Schemes - in the photo below.
Masonry schemes for adjoining walls
Corner laying schemes
And again about how to lay the corners, but already with a multi-row dressing. If the wall is one brick, the even and odd rows (except for the first one) are the same.
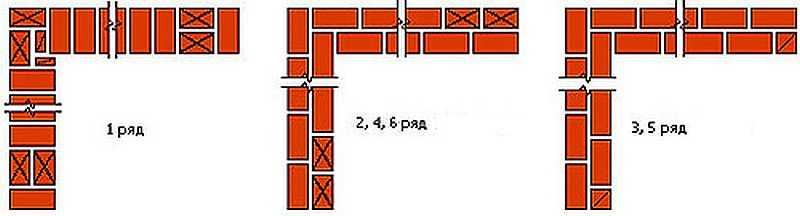
The scheme of laying a corner of 1 brick with multi-row dressing
You will see all this in the video.
If the wall is 1.5 bricks, in the first and second rows with bonded ones, but located either in the outer or in the inner verst. The third and fourth rows are exclusively placed on spoons.
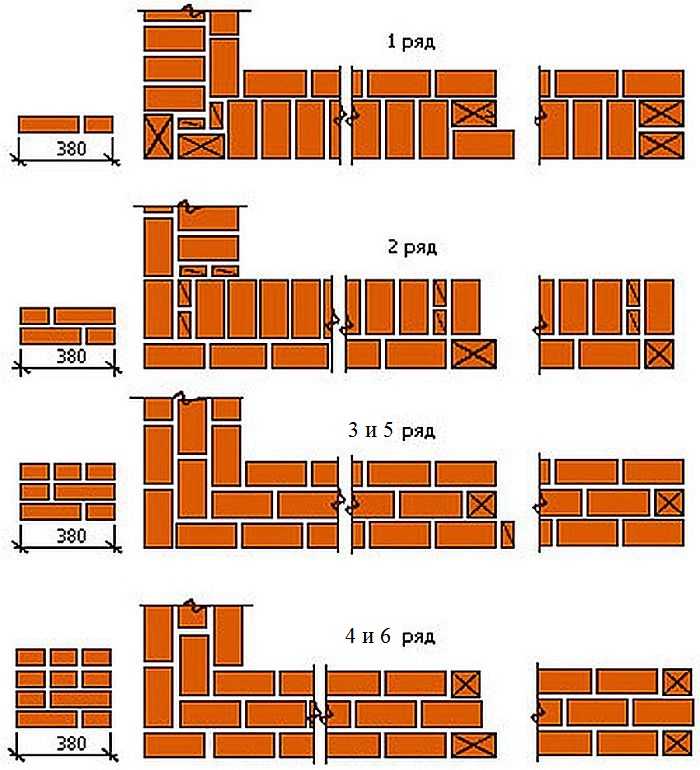
The scheme of laying a corner of 1.5 bricks with multi-row dressing
The fifth row is laid in the same way as the third, the sixth - the fourth. Then the system is repeated. At times, not a multi-row system (with 5 spoon poisons) is required, but a three-row system.Then the clack is repeated from the fifth row.
Masonry mortar
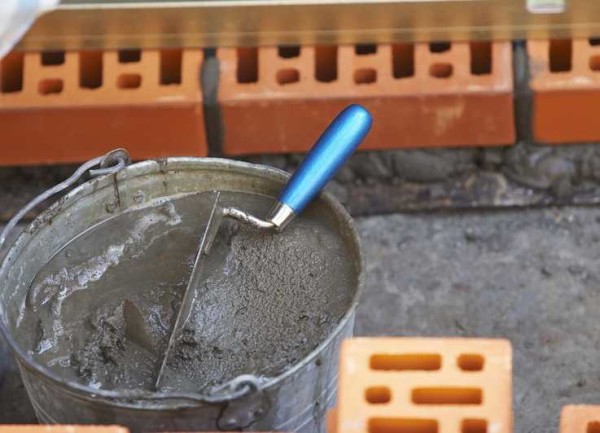
The brick is placed on a cement-sand mortar. Cement is used not lower than M400, sand is clean, ravine. The proportions for the specified brand are 1 to 4 (for m500 - 1: 5). Kneading is done manually or with a concrete mixer, but the order does not change.
First, sand is sieved, a binder is added to it, everything is mixed in a dry state until a uniform color is achieved. Then add water. Its amount is 0.4-0.6 parts, but look at the plasticity of the solution. It is more convenient to work with a plastic mortar than with a hard one, but when laying a hollow brick, in this case, the consumption of the mortar increases greatly: it fills the voids. In this case, it is more practical to make a hard solution.
The bricklaying technique depends on the consistency of the mortar
To improve plasticity and more convenient work, lime, clay or a liquid detergent are added to the composition (you can use hand soap, available in large flasks). The amount of additives is very small - no more than 0.1 parts, but the characteristics of the solution improve significantly: it is easier to lay, it does not stratify longer.
It is worth warning right away: do not mix large volumes at once. The batch must be used within two hours. And in the last half hour it can be difficult to work with it: water may start to separate, or it may start to set. It depends on the weather conditions and the quality of the cement, on the thoroughness of the batch. If laying bricks with your own hands is your first experience in this area, it will turn out slowly. Therefore, it is better to make small portions of the solution.
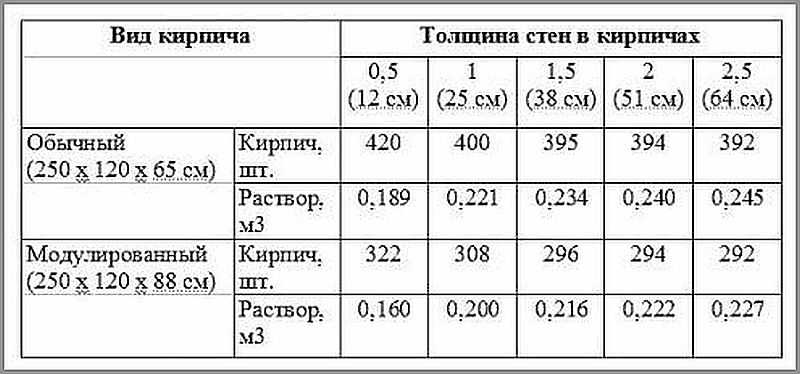
Approximate solution consumption
Often, beginners planning to lay bricks on their own have a question: at what temperature can you work. You can work at positive temperatures without special additives. In the best variant - not lower than + 7 ° C. This is the threshold at which the cement sets normally. At lower temperatures, the hardening process practically stops, as a result, the mortar can crumble, and the strength of the wall will be low. To lower the bar, there are special antifreeze additives, but the cost of such a solution is already high: the price of these additives is considerable.
Bricklaying technique
Stir the solution before use, as heavy particles can sink down and water rise up. The mixed solution is placed in buckets and transferred to the masonry site, where it is distributed. Immediately put a strip of mortar - bed - for one row. Under the butt row, the bed width is 200-220 mm, for the spoon row - 80-100 mm. If the seam is completely filled, about 10-15 mm recede from the edge, the height of the solution is 20-25 mm, which, when laying, provides a seam of 10-12 mm. Before installing the brick, the mortar is leveled with a trowel.
There are three masonry techniques. On a hard, low-plasticity solution, the "press-on" technique is used. In this case, the seams are completely filled. If the solution is plastic, use the "sprinkle" technique.
Bricklaying technique "interspersed"
As already mentioned, this method of laying bricks is used with a plastic mortar. It should be flexible, easy to apply and displace. This is achieved by adding additives. You can spread the mortar immediately on the entire surface of the wall: additives allow you to extend the time before the start of setting.
The bed is laid with a thickness of about 20 mm, an indent of about 15-20 mm remains from the edge. This indentation avoids squeezing the mortar onto the front surface, but the edges of the seams often remain unfilled. This significantly reduces the strength of the wall, therefore, in regions with seismic activity, the laying of verst rows (external and internal) is prohibited by this method.
When laying a spoon row, take a brick, holding it with a slight slope. Leading to the already laid, at a distance of 8-10 cm, they begin to rake the solution with the edge (poke). When joining, it turns out that the seam is already partially filled.The brick is pressed down a little (settles), pressing it to the bed. The surplus is removed with a trowel and sent either to a bucket or to a wall.
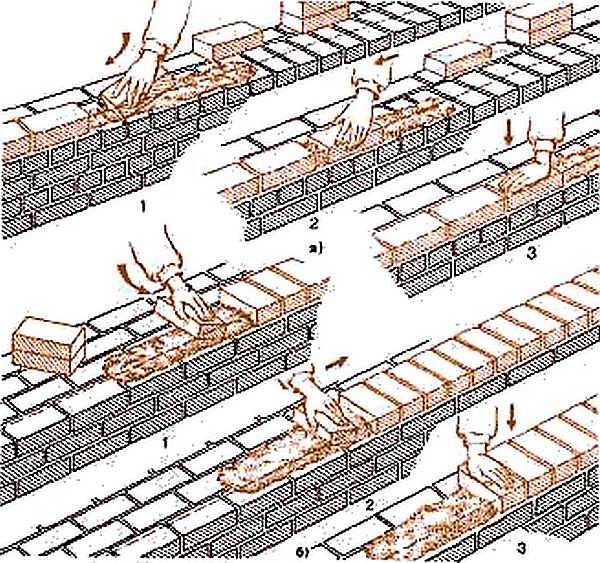
Bricklaying technique "adherent"
With this technique, it often happens that the vertical seams are only partially filled. Therefore, this method is also called "wasteland". They are filled in when laying the bed for the next row. If the technique is not yet very worked out, it is better to fill the seams before laying the next row: voids reduce strength and thermal insulation characteristics.
When laying the butt row, everything is exactly the same, only the solution is raked up with a spoon edge. The zabutka is laid, like the stitch rows, and then pressed with the palm of the hand. It is necessary to ensure that all stones are at the same level. This is done using a building level, and the verticality of the wall is checked with a plumb line every 3-4 rows.
Press-on technique
When working with hollow bricks, as a rule, hard mortars are used. In this case, a brick is used with the "press-on" technique. In this case, you also have to work with a trowel.
The bed is laid 10 mm from the edge, the thickness is still about 20 mm. Since such a composition does not stretch well, it is raked to the edge of the laid brick with the edge of the tool. They take a brick with their left hand and press it against the trowel, while pulling it up. At the same time, they continue to press with a brick, achieving the required seam thickness (10-12 mm).
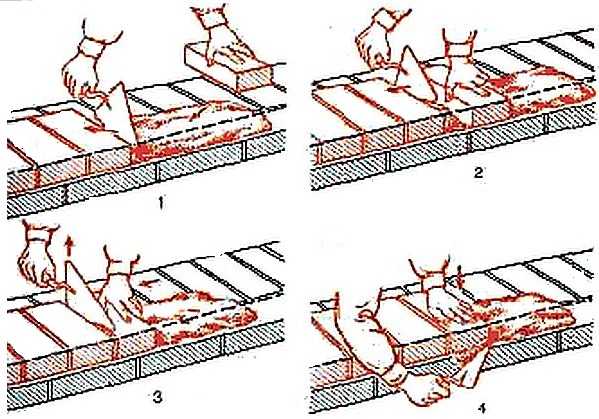
End-to-end technique
Excess mortar is picked up with a trowel. Having laid several fragments, they take a level, checking the horizontal row, by tapping the handle of the trowel, straightening the position. The solution squeezed out at the same time is selected. It turns out dense masonry, but the process takes longer: more movement is required.
Insertion with undercut
An average method in terms of productivity is a scuffing with undercutting of seams. With this method, the bed is laid out close to the edge (10 mm), as when laying it in a press, and the masonry technique is in place: they grabbed the mortar with a brick, put it down, pressed it down, removed the excess. If the wall is not subsequently planned to be finished with anything, after several rows it is necessary to take a jointing - a special tool and give the seams the required shape (convex, concave, flat).
As you can see, this is a kind of symbiosis. To make it more convenient to work, the solution is also made with "intermediate" plasticity. If it is too liquid, it will flow down the wall, leaving streaks, therefore it needs to be kneaded a little denser than when laying in a screed.
DIY brickwork: tools, order and features
Now, you have an idea of how to lay a brick with your own hands, you need to talk about the procedure as well as some technical nuances.
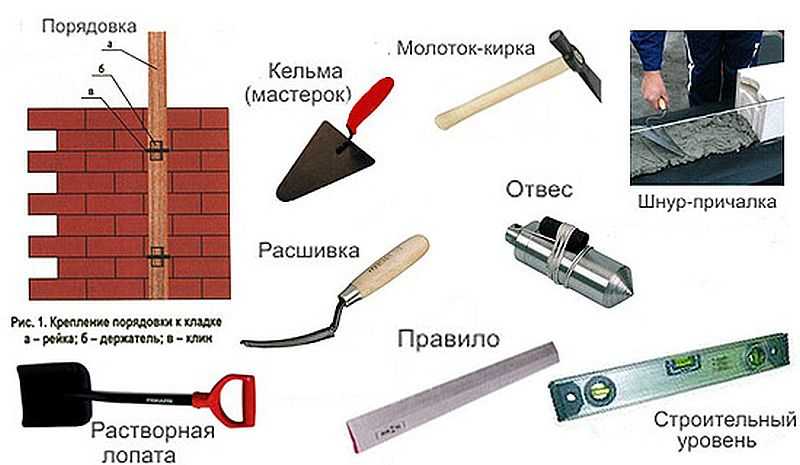
An indicative list of tools for masonry
Let's start with the tool. You will need:
- bricklayer's trowels - apply and level mortar on bricks;
- concrete mixer or container for mixing mortar;
- mortar shovel - for kneading and periodic mixing;
- two to three buckets for solution;
- plumb line - check the verticality of walls and corners,
- building level - to check the horizontal laying of the row;
- mooring cord - for breaking the rows;
- jointing (for forming seams);
- hammer-pickaxe for breaking off incomplete bricks (halves, 3/4 and checkers - 1/4);
- as a rule, a metal or wooden flat bar to check the plane of the wall.
Further we will talk about the features of the technology. First: it is advisable to soak the brick before use. This is especially true in hot dry weather. Then it will "pull" less moisture from the solution. If there is not enough moisture, the cement will not be able to gain the required strength, which will affect the strength of the building.
First, two corners are driven out, then they are tied with several rows of brickwork
Second, the corners are driven first. First, the first two. They are tied with 2-3 rows of bricks according to the chosen masonry scheme. Then the third corner is kicked out.The second and third are also connected by several full rows. Then the fourth corner is placed and the perimeter is closed. This is how the walls should be erected, bypassing them around the perimeter, and not being driven out by the walls in turn. This is one of the most common mistakes.
Third, there are two row control technologies. The first - nails are inserted into the seams of the corners, to which laces are tied. It needs to be pulled so that it marks the upper edge of the brick, and also limits the outer (and, if necessary, inner) surface of the wall.

Ordering for attaching the mooring cord
The second way is to use wooden or metal orders. This is a flat bar or corner, on which marks are applied every 77 mm - risks on wood or cuts on metal. They mark the required row thickness: brick height + joint. They are installed using flat mounting brackets that are inserted into the seam. If necessary, they are then simply taken out and rearranged higher.
There is another way - a mason's corner. It has a slot on one side, into which the dock is inserted. "Sits" on the corner on the solution.

Breaking a row with a bricklayer's corner
The disadvantage of this method is the same as that of a simple nail in the seam: the height of the row must be controlled "manually" when removing the corners. With a lack of experience (and where to get it, if brickwork is being done for the first time with your own hands), it is difficult. Having (having done it yourself) the order is easier.
Fourth: preparation of incomplete bricks. As you saw, halves are used for masonry, three-quarter bricks and 1/4 pieces are used. So that the work does not slow down, it is required to prepare them before laying. This is done with a hammer-pick. Preparation requires high dimensional accuracy, otherwise the dressing will fail. To make it easier to control the length, marks of the corresponding length are made on the handle. With a pen attached to a brick, marks are made on both sides of the spoon. Then, attaching the blade of a pickaxe to the mark, they beat on the back with a hammer, making notches. Having made notches on both spoons, the brick is broken with a strong blow.
-
 Modular houses from block containers: types, manufacturing features and layout options
-
 Houses from shipping containers: construction options, layout
-
 Types of wooden beams for floors, length calculation, installation
-
 Mobile homes for year-round use
-
 Polymer / composite decking (WPC decking): types, sizes, installation


Interestingly, can you tell us anything about colored masonry mixes, for example, about Perel, they told me that these are market leaders, who worked with them?