DIY brick fence posts
You can make a reliable and relatively inexpensive fence for a site using a combined fence - the pillars are made of brick, and the filling (spans) and any light material - wood, profiled sheet, forged fences. The view turns out to be solid, and the costs are much less than for a "pure" brick fence. Moreover, the laying of pillars is not the most difficult thing, but it is profitable. Two years ago, craftsmen asked from 2,000 rubles per pole, and today prices have more than doubled. You can fold brick posts for a fence with your own hands without the skills of a bricklayer. It is important to follow the technology and everything will work out.
The content of the article
Fence foundation with brick pillars
The choice of the type of foundation for brick pillars depends on what material the filling will be from and also on the type of soil. If the span of the fence is made of light material (corrugated board, wood), you can make a pile foundation for each post. The depth to which the pile must be driven / twisted depends on the type of soil and the height of the groundwater. If the soil is prone to winter heaving (clay or loam) with high groundwater, it is necessary to bury it 15-20 cm below the depth of soil freezing. On well-drained soils (sands and sandy loams), it is enough to bury 80 cm.
Pile foundation for a brick fence post with easy filling
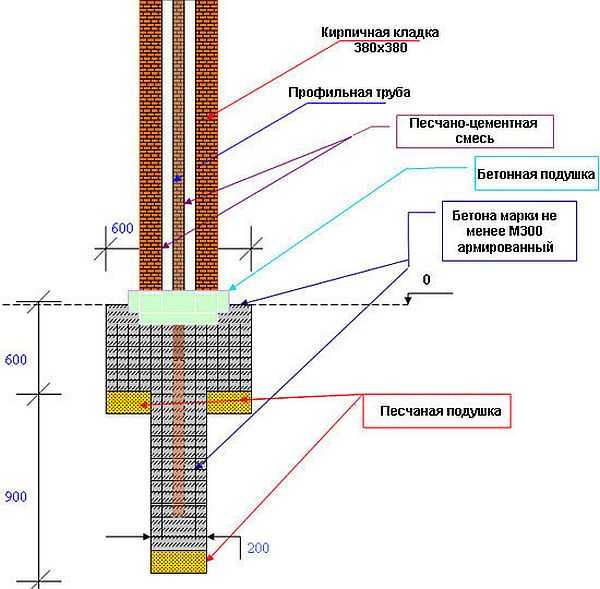
The pile foundation for a brick pillar is made according to standard technology:
- drill a hole of the required depth (diameter 25-35 cm);
- a bucket or two rubble is poured to the bottom;
- compact;
- a pipe is placed around which they will subsequently lay the pillar (on heaving soils, several pieces of metal rods, tapes, corners are often welded to the buried part - for greater stability);
- the pipe is exposed strictly vertically, fixed;
- for heaving soils, if metal pieces have not been welded to the pipe, you can stick several reinforcing bars into the hole; for very difficult soils, you can tie a frame;
- high grade concrete is poured - M300 or higher (for brands and composition, read here).
The length of the pipes consists of two quantities: from the part that is walled up in concrete and the part that will stick out from above. Moreover, the upper section of the pipe does not necessarily have to be up to the very top of the pillar in this case. It can be 40-50 cm shorter. An exception is the pillars on which the gate and / or wicket will be hung. Here, the inner reinforcement should be almost to the very top.
If the fence is planned to be completely brick or there are large wind loads in the region, most likely you will need to make a full-fledged strip foundation. Another option is piles tied with a shallow tape.
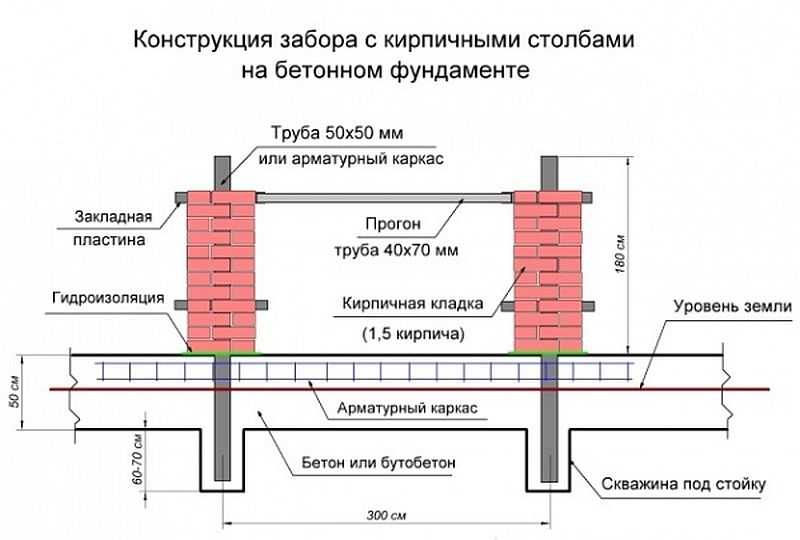
Fence construction with brick pillars on a monolithic reinforced concrete foundation
Read more about the types of foundations for various kinds of fences in the article "Fence foundation: how not to bury extra money«.
Mortar and brick for posts
The mortar is made of cement-sand with a ratio of 1: 5 (or 1: 6). It is better to take sand of a fine fraction, cement of a high grade - not lower than M400. For plasticity, you can add a little liquid hand soap or dish detergent (20-30 grams for a standard batch - 1 bucket).
It is important to obtain the desired fluidity when drawing up a solution. It should not be dry, but it is inconvenient to work with liquid either, therefore water is added gradually, monitoring the consistency of the solution.The desired state can be controlled as follows: spread a certain amount of the solution on some surface, apply a cross on it with a trowel. Then take the marked area onto a trowel and watch the cross: it should not "float".
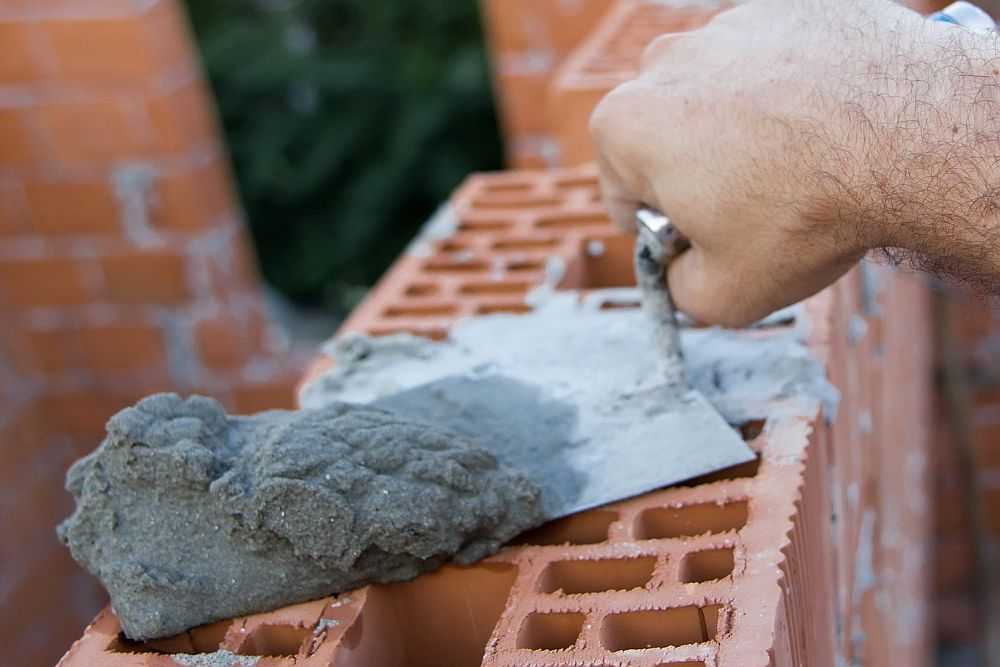
Optimal consistency of mortar for laying brick pillars
You can, if desired, get a black solution: add soot to it. It is sold in bags at home improvement stores. Add a small amount of carbon black and you get decorative seams without painting.
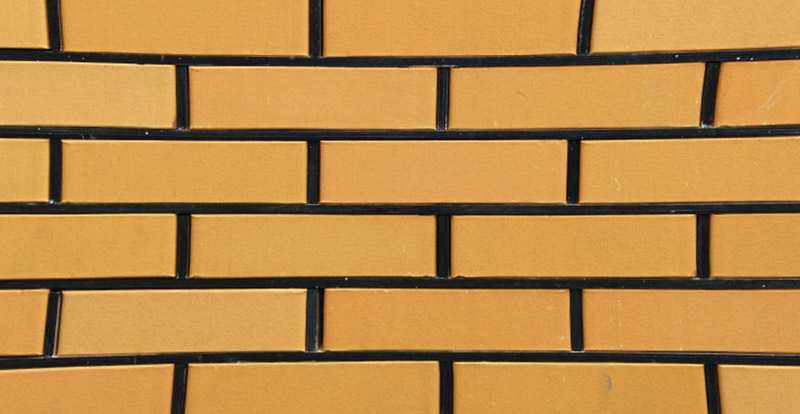
Black solution adds decorative effect
Any brick for pillars is used, just pay attention to the number of defrost-freeze cycles (the more the better) and the geometry. Ideally, the deviations in size should not exceed a couple of millimeters. Then it will be easy for you to work. If the batch is of different sizes, carefully sort by size so that in one column the bricks have a minimum discrepancy.
Fence masonry: technology
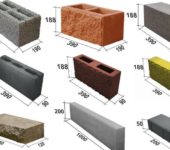
In most cases, the posts for the fence are made in 1.5 or 2 bricks, the section is 380 * 380 mm and 510 * 510 mm, respectively, the height is up to 3 meters.
The masonry is carried out with a bandage (offset) - the seam of the lower row is overlapped by the "body" of the brick lying on top. The seam is standard - 8-10 mm. The scheme of laying posts in one and a half and two bricks in the photo below.
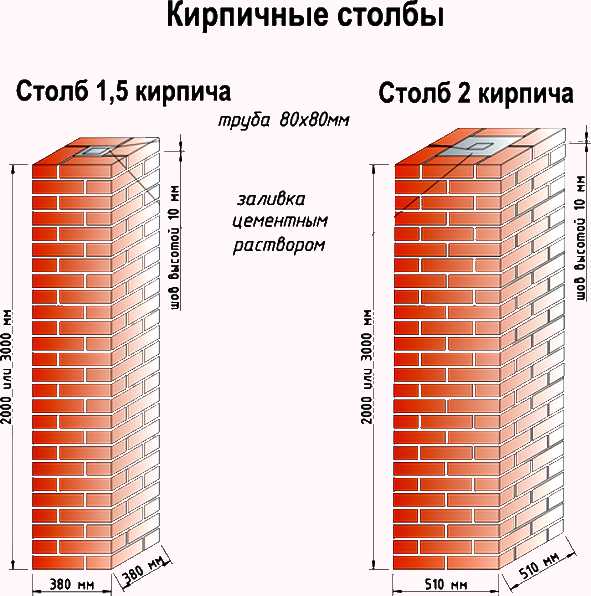
Brick pillars in 1.5 and 2 bricks
Masonry pillars: work order
Cut-off waterproofing is spread on the finished foundation. It can be roofing material in two layers, but waterproofing on bituminous mastic is better. This layer is necessary so that the brick does not "pull" moisture from the soil. If wet brick freezes, it quickly begins to crack and crumble. Therefore, waterproofing is necessary. Rolled waterproofing can be replaced - twice smear the foundation with bituminous mastic, and in areas with high humidity it is better to make a double waterproofing - smear with mastic, and then lay also "Gidroizol".
According to the dimensions of the pillar, a solution is applied to the waterproofing with a layer of a little more than 1 cm.According to the diagram, bricks are laid on it. They are leveled vertically and horizontally by tapping with a special rubber mallet. Craftsmen can use the handle of the trowel, but, in this case, the remains of the mortar can fly off the plane of the trowel, staining the hands and brick, and it is not wiped off the cement well.
Ceramic brick absorbs moisture very quickly, so if you hesitate a little, it will be difficult for you to "put" it in place. To keep the mortar plastic longer, the brick is dipped in water for a few seconds before laying. The same maneuver makes it easier to wipe the solution off the surface (it is removed immediately, with a dry cloth).
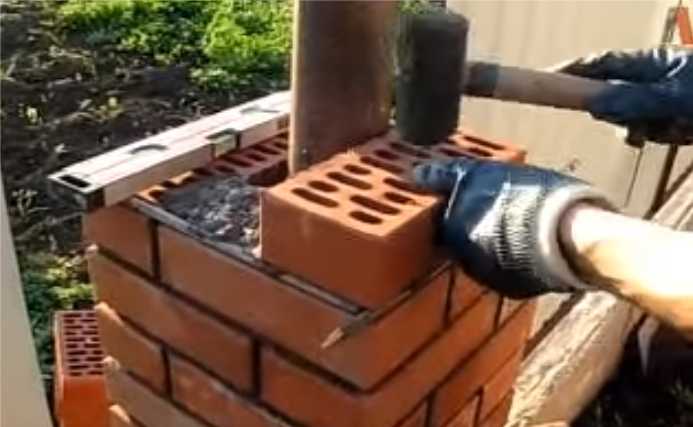
Hammer down
The second row is also placed: the mortar is spread on the bricks, bricks are placed on it, but with a dressing - unfolding so that the seam is blocked. Level again. Then they take a tape measure and check the dimensions of the stacked rows. Even a small offset of 1-2 mm is eliminated. They tap on the end of the brick (called "poke"), moving the bricks closer. Then, if the side edges were not coated, the vertical seams are filled. All subsequent rows are laid in the same way.
If there is a void between the inner reinforcement pipe and the brickwork, it is filled. If the distance is short, you can use a masonry mortar, if the void is significant, to save space, you can fill it up with crushed stone, tamp it, then spill it with a liquid cement-sand mortar.
Bar masonry
The laying of the pillars described above has long been tested, but for beginners, when making their own, it is difficult to maintain an even seam. Another problem - the solution crawls out of the seam, staining the surface. It turns out not very nice. To facilitate the work, they came up with a masonry for a bar. Take a square metal bar with a side of 8-10 mm, cut it into pieces, 10-15 cm longer than the size of the post.

Bar layout
Having laid the first row, a bar is laid on it along the edge of the brick.The site is filled with a solution with a small margin, and closer to the pipe, the layer is made larger. Then, driving a trowel along the bar, remove the excess, cleaning the bar from the solution. But at the same time, the slope of the solution remains. They put a brick, level it up. At the same time, the bar does not allow it to settle strongly, and the position of the other end is controlled by the level.

Apply the solution under the bar to the side face
Then they take a short piece of a bar of about 10 cm (for a vertical seam), put it along the butt, apply the mortar with a trowel to the side of the laid brick, also removing the excess along the bar. The second brick is placed and leveled. After the level is set, the seam is pressed from above with a trowel, and the vertical bar is removed.

We take out the bar, holding the seam with a trowel
This is how all the bricks in the row are laid out. Then the rods are taken out, proceed to the next row. This technology of laying brick posts allows you to control the seams and make them neat. Even a novice amateur bricklayer can do this with his own hands. It is only important in the process to control the parameters of each row (so that the column in the section is of the same size).
Video lessons
A more complex version of a brick pillar - twisted with a screw
Features of working with ceramic bricks
Potential problems and solutions
The main problems that can arise when laying pillars with your own hands are resizing and "twisting". Both defects are due to insufficient control.
When laying pillars with your own hands, often the upper rows become much wider than the lower ones. This happens gradually, adding a millimeter or even less, but in almost every row. As a result, at a height of 2 m, the column width is 400 mm and even more. This is instead of 380 mm. The fix for this error is to control the size of each row.
It is not enough to control the dimensions of the pillar only with the building level. Mostly, a household instrument (yellow) is used, but it has a rather large error. And if the level is 60-80 cm long, you simply will not see slight vertical deviations. Therefore, they additionally use a tape measure - measuring each row. To reduce the time spent on control, you can make a template according to the size of the post (for example, from flat strips) to check for deviations.
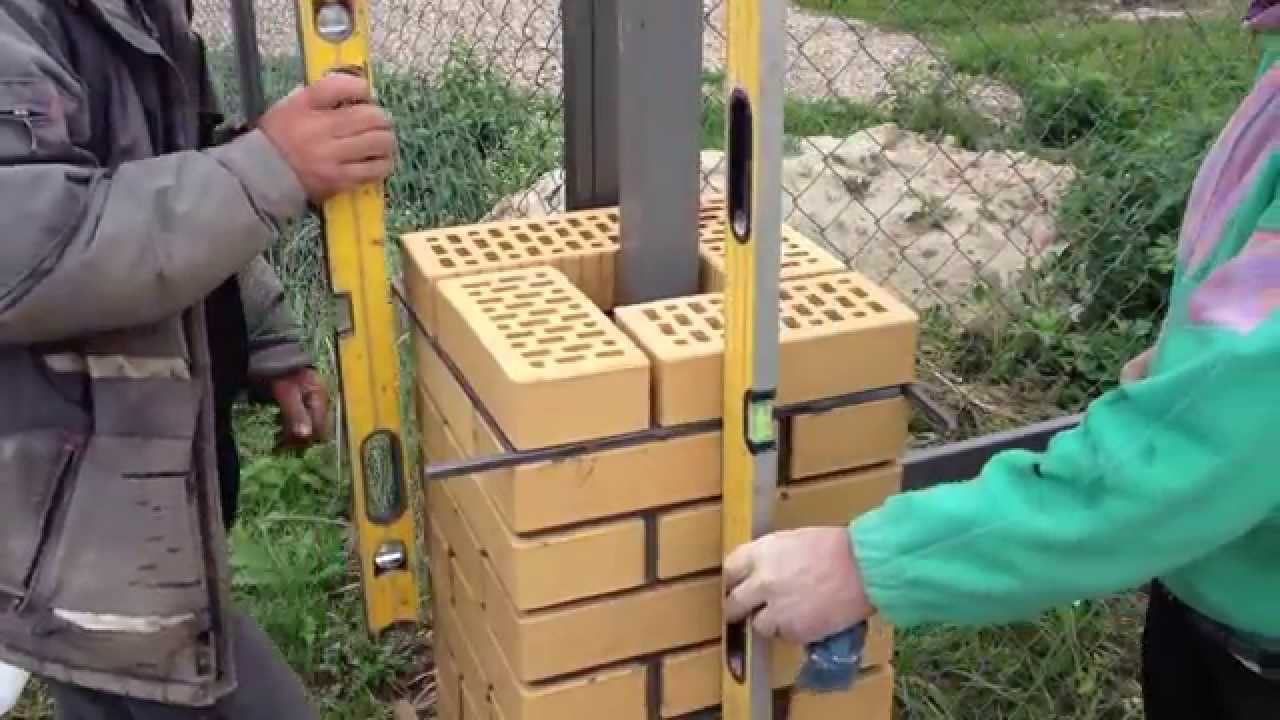
Fence posts are laid around a metal reinforcing pipe, verticality is checked after each row is laid
Self-laying pillars without experience of such work can lead to another error: the edges of the pillar can shift, while the pillar is twisted around its axis. This disadvantage is much more unpleasant: try to attach spans to such posts. There will be many problems. Therefore, when laying each row, it is necessary to strictly ensure that the corners are located strictly one above the other.
You can make it easier with two corners screwed to opposite corners. They are temporarily attached to the lower rows (with bolts or self-tapping screws into the seam) and then used as a guide, placing the bricks strictly in the corner.
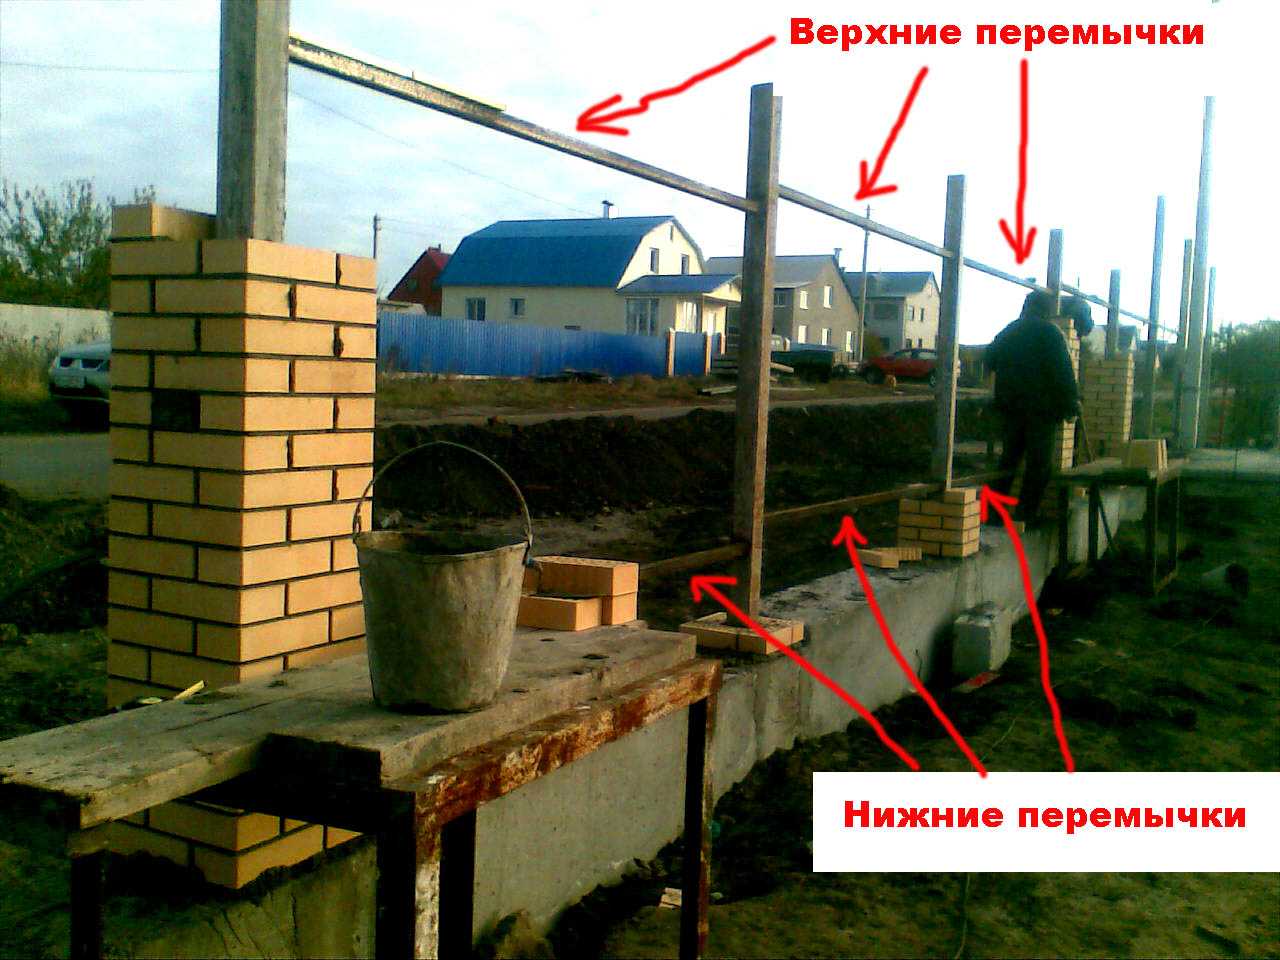
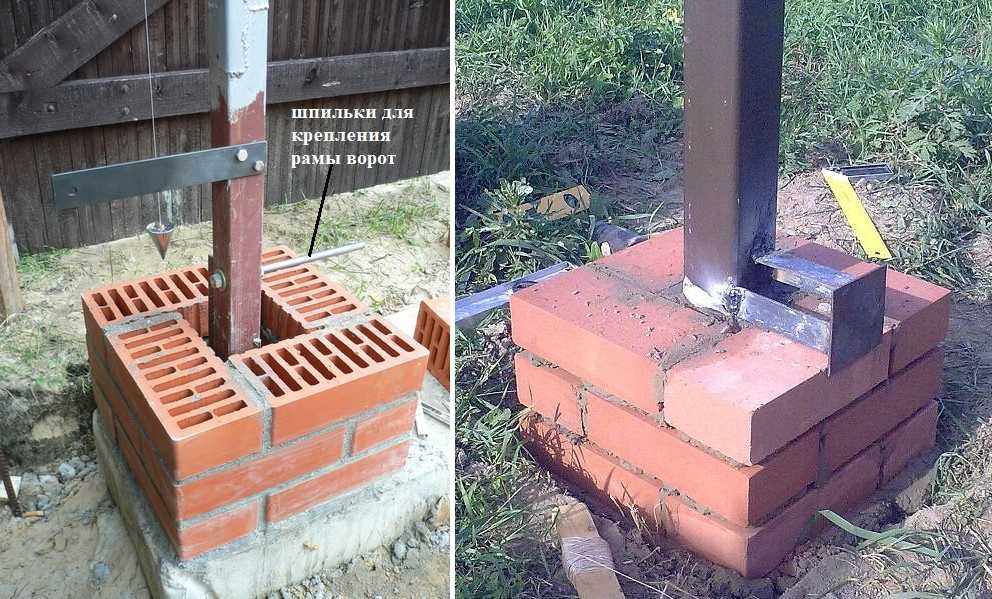
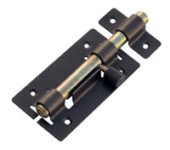
Embedded elements and gate fastening
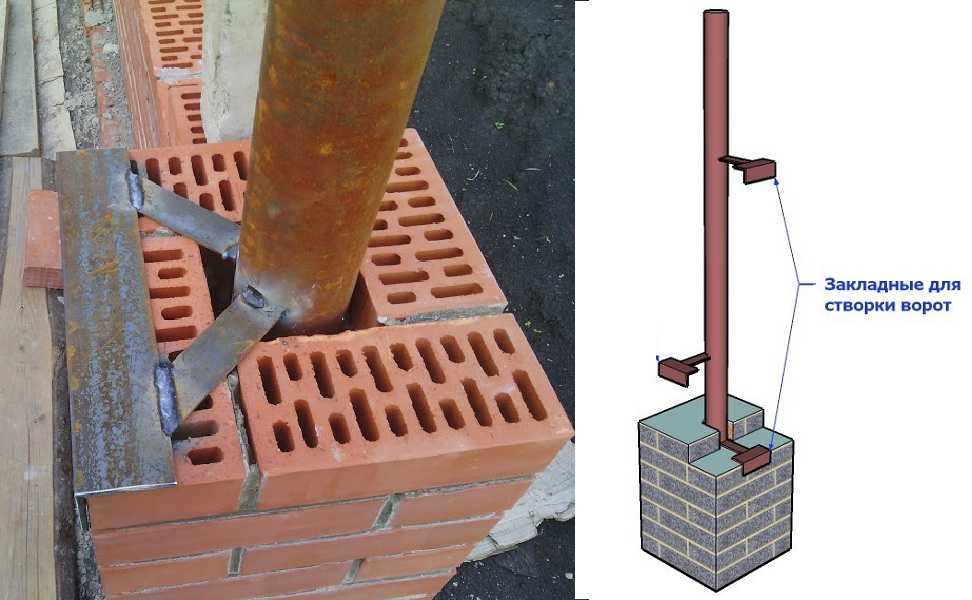
When laying brick pillars, you need to think about how you will attach the span to them. In order to be able to fix the horizontal guides for filling the fence, mortgages are pre-welded to the pipes located in the middle of the pillar. These can be corners, pins, "ears" for fastening wooden planks, etc. They are welded at the same height so that the attached crossbars are strictly horizontal.
One of the options is suitable for fixing corrugated board, picket fence
Mortgage options vary. Someone makes from the corner, someone has enough pins. It all depends on the type of filling the fence (from which the spans will be made) or the mass gate leaves.
Options for mortgages in brick pillars
Different weights require different power elements
At least three metal parts with a metal thickness of at least 3 mm (preferably 4 mm or even more) are required for gates or wickets.
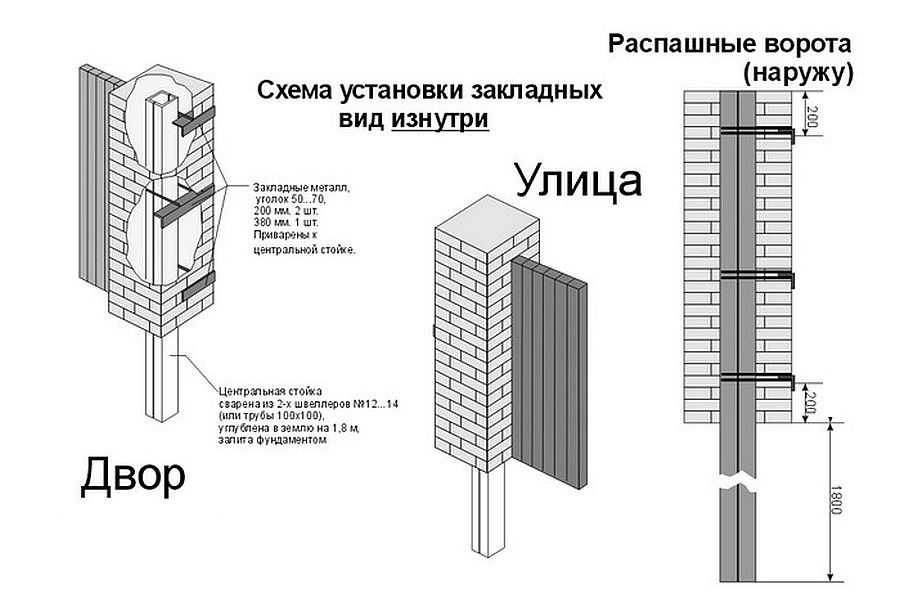
An example of the location of mortgages for swing gates
The device and installation of sliding gates with their own hands are described here... About, how to automate swing gates read here.
Making a cap on a brick pillar
To protect the brick from moisture, the top of the pillar is covered with a cap. They are sold in large quantities, there are metal, concrete or composite. If desired, a cap on a roofing iron post can be made by hand. Below is a diagram. You just have to substitute the dimensions, and then bend by bending machine along the outlined lines. They fasten the product with special rivets, but self-tapping screws can also be used. Only you will need to pre-drill the holes, coat them with anti-rust, then paint.
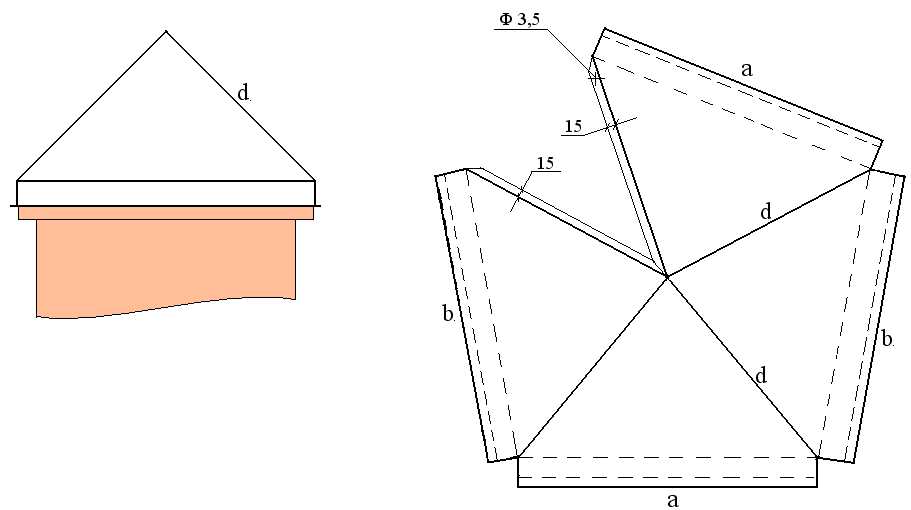
Drawing of a cap on a brick pillar
Photo ideas for fences with brick posts
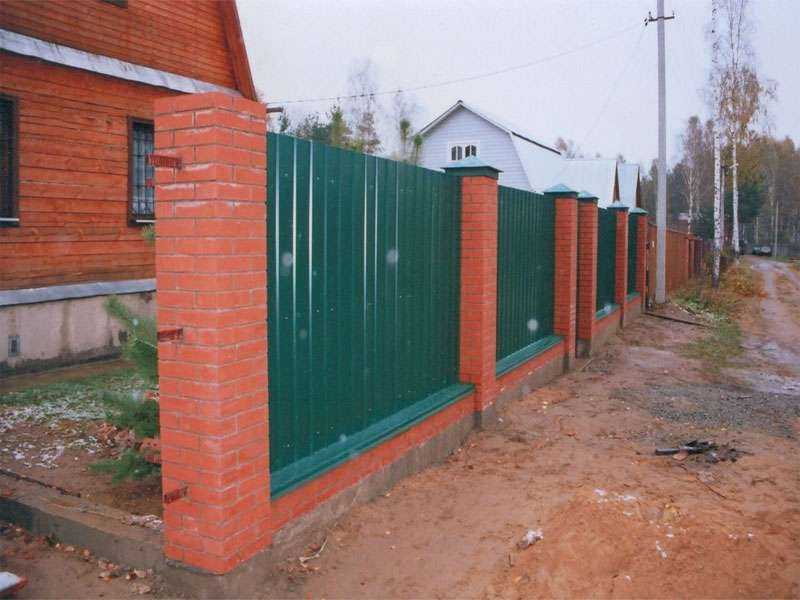
The most popular option is a corrugated fence with brick posts
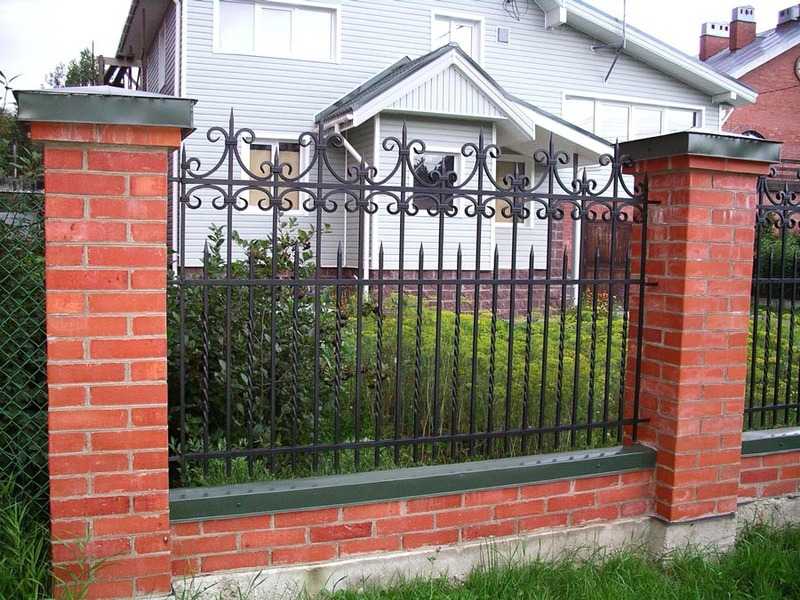
Forging always looks good
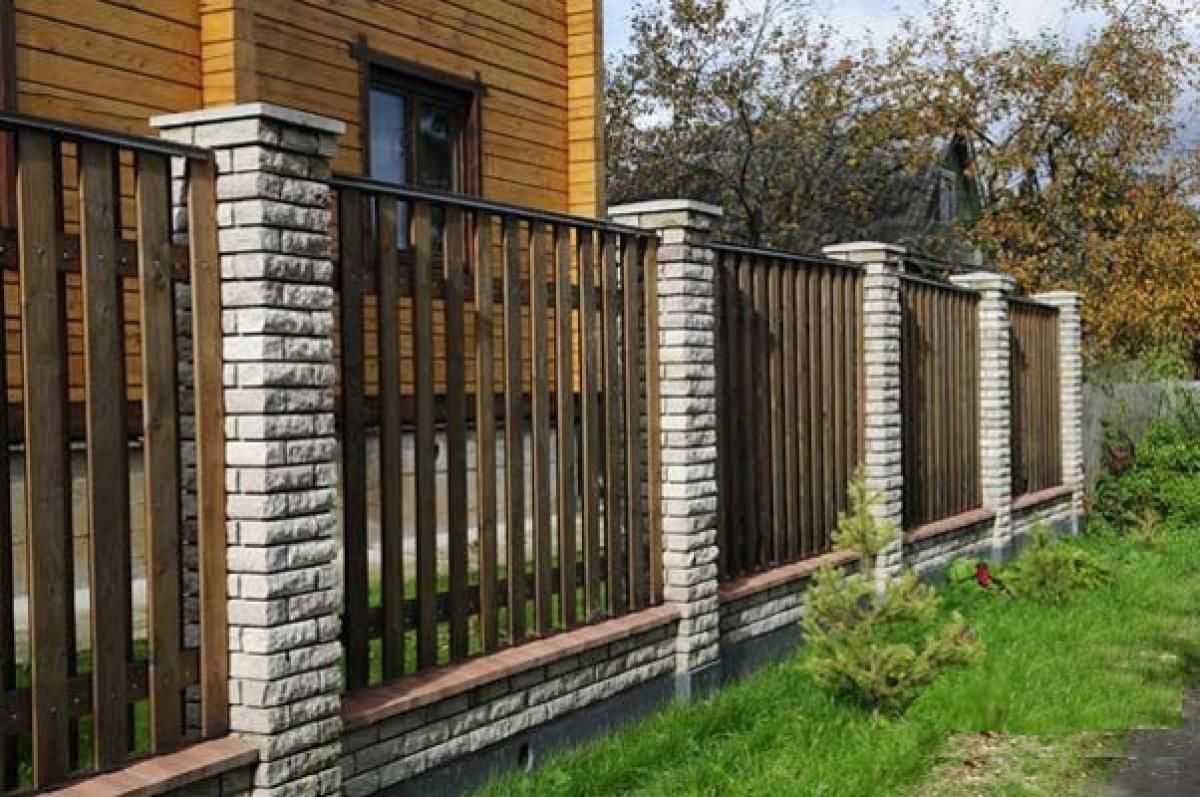
Torn stone and picket fence - combined fence

Wood filling can be solid
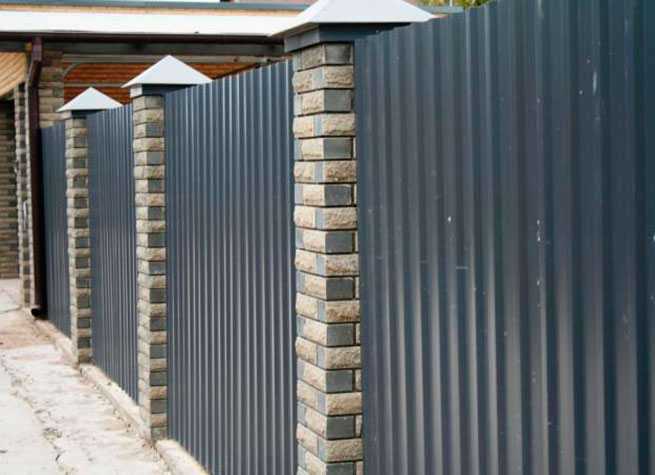
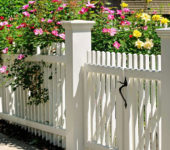
Decorative brick pillars decorate the fence
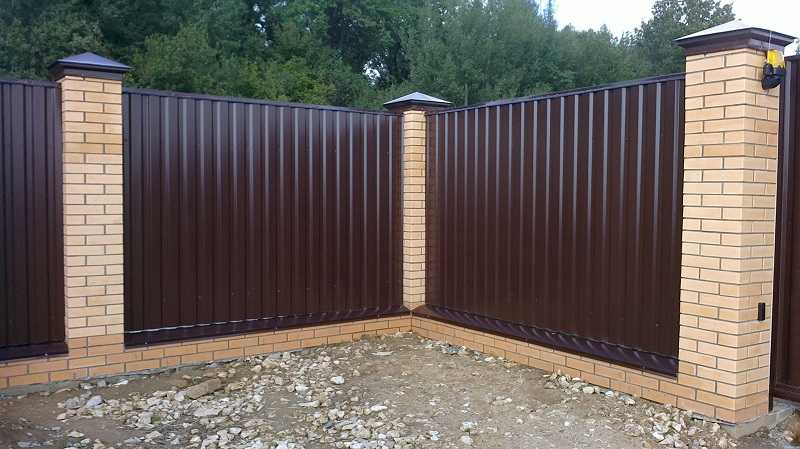
The most popular burgundy color of corrugated board on the fence
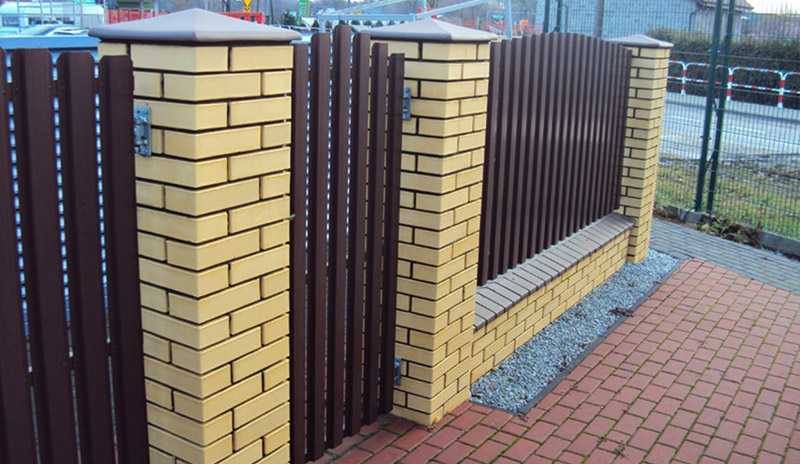
In combination with a Euro-type shtaketnik
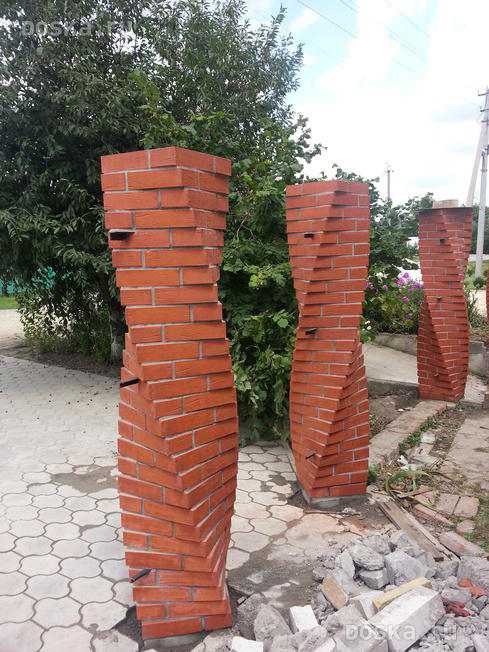
Twisted pillars for advanced bricklayers


Good day. Do you have a cut of 2 bricks? And then I can't understand how this is done, is a brick cut out for a post?
There is a scheme for laying a pillar in two bricks. As you can see in the picture, there are 2 stones only on the face, the wall thickness is half a brick. The masonry is laid around a pre-installed metal post and the empty space is filled with concrete. In practice, they often fall asleep here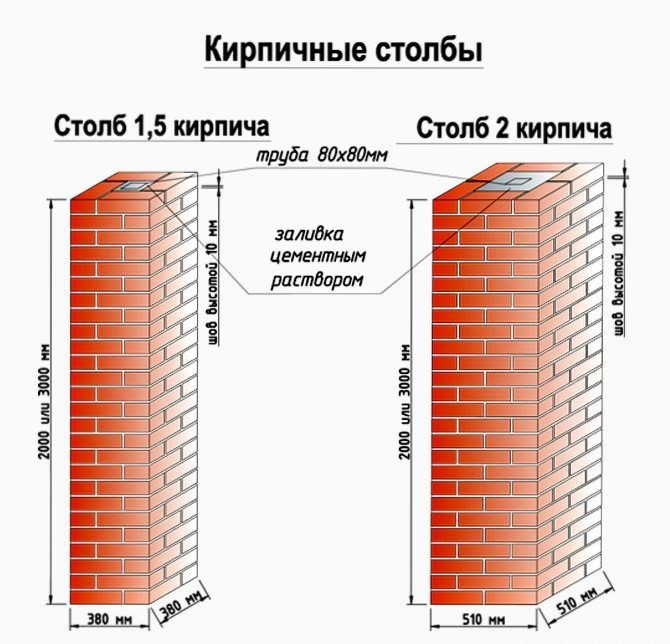 brick fight, and then everything is filled with concrete.
Damn, I didn't put it right, apparently. There should be 2 bricks in a row, that is, the pillar should not be 380 but 190 wide, is it generally possible to do it? Preferably with a pillar in the center. Somewhere I saw someone had such pillars
Oh, more precisely, not 190 but 250 or how much it turns out with a brick width of 120
You need to cut each brick from the inside. Or without a pillar.
Good day! Can the upper mortgage be done in front of the last row of the pillar or not? need below?
I advise you to pay attention to the PICS panels. They imitate a brick pillar on a fence. It turns out beautifully, quickly and economically.