Light sensor (photo relay) for street lighting
Owners of private houses, when landscaping a site, are concerned about how to automatically turn on the light at dusk and turn it off at dawn. There are two devices for this - a photo relay and an astrotimer. The first device is simpler and cheaper, the second one is more complicated and more expensive. Let's talk in more detail about a photo relay for street lighting.
The content of the article
Device and principle of operation
This device has many names. The most common is a photo relay, but they also call a photocell, a light and twilight sensor, a photosensor, a photosensor, a twilight or light control switch, a light sensor or day-night. In general, there are many names, but the essence of this does not change - the device allows you to automatically turn on the light at dusk and turn it off at dawn.
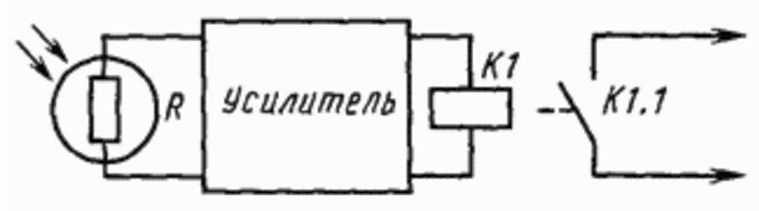
Photo relay circuit for street lighting on a photoresistor
The operation of the device is based on the ability of some elements to change their parameters under the influence of sunlight. The most commonly used are photoresistors, phototransistors and photodiodes. In the evening, with a decrease in illumination, the parameters of the photosensitive elements begin to change. When the change reaches a certain value, the relay contacts close, supplying power to the connected load. At dawn, the changes go in the opposite direction, the contacts open, the light goes out.
Characteristics and selection
First of all, choose the voltage with which the light sensor will work: 220 V or 12 V. The next parameter is the protection class. Since the device is installed outdoors, it must be at least IP44 (numbers can be higher, less - undesirable). This means that objects larger than 1 mm cannot get inside the device, and also that water splashes are not afraid of it. The second thing you should pay attention to is the temperature regime of operation. Look for options that overlap with a margin the averages in your area for both positive and negative temperatures.
It is also necessary to select a photo relay model according to the power of the lamps connected to it (output power) and the load current. It, of course, can "pull" the load a little more, but there can be problems. So it is better to take even with some margin. These were the mandatory parameters for choosing a photo relay for street lighting. There are a few more additional ones.
Example of characteristics of a photo relay for street lighting
In some models it is possible to adjust the response threshold - to make the photosensor more or less sensitive. Decrease the sensitivity when snow falls. In this case, the light reflected from the snow can be perceived as dawn. As a result, the light will turn on and off. Such a performance is unlikely to please.
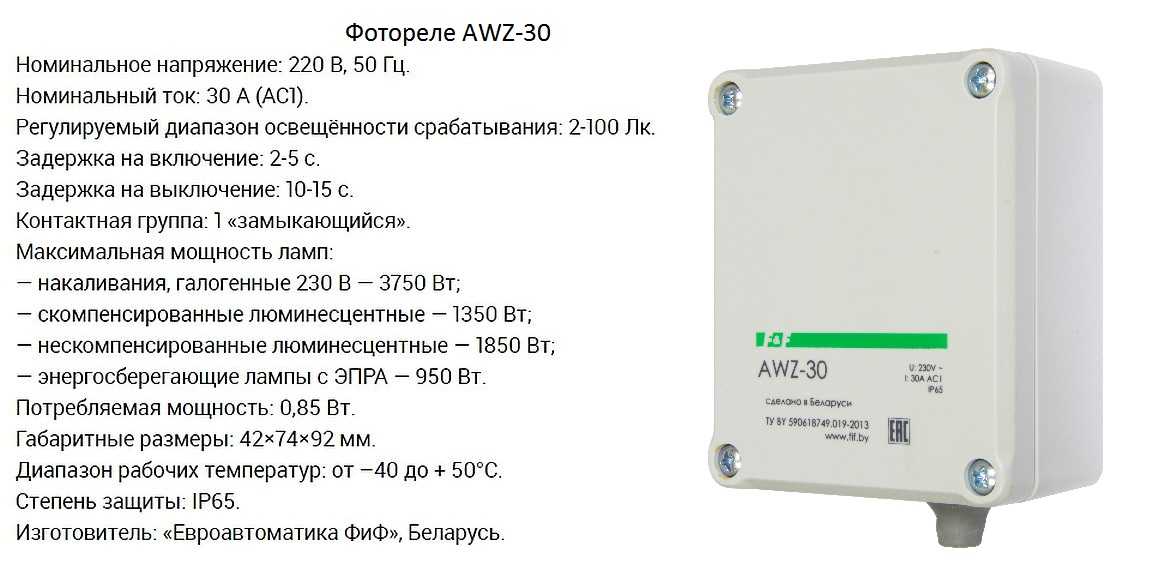
Pay attention to the range of sensitivity adjustment. They can be more or less. For example, for the Belarusian-made AWZ-30 photo relay this parameter is 2-100 Lx, for the P02 photocell the adjustment range is 10-100 Lx.
Response delay. What is the delay for? To exclude false switching on / off the light. For example, at night the headlights of a passing car hit the photo relay. If the trigger delay is short, the light will turn off. If it is sufficient - at least 5-10 seconds, then this will not happen.
Choosing a location
For the photo relay to work correctly, it is important to choose its location correctly. There are several factors to consider:
- Sunlight should fall on it, that is, it should be under the open sky.
- The nearest sources of artificial light (windows, lamps, lamps, etc.) should be located as far away as possible.
- It is not desirable that headlights fall on it.
- It is advisable to place it not very high - for ease of maintenance (it is necessary to periodically wipe the surface from dust and brush away snow).
In order for the photosensitive machines to work correctly, you must choose the right location

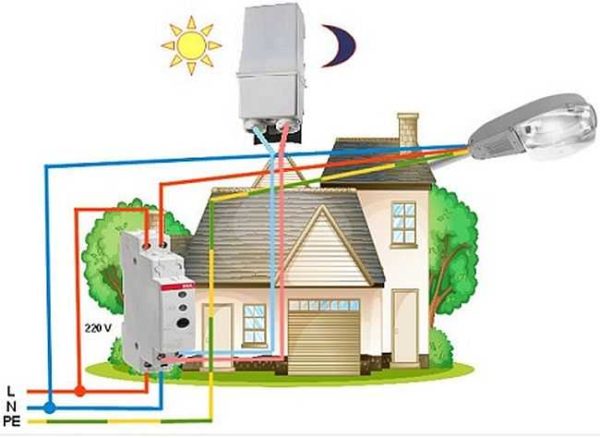
As you can see, when organizing automatic lighting on the street, choosing a place to install a photo relay is not an easy task. Sometimes you have to carry it over several times until you find an acceptable position. Often, if a light sensor is used to turn on a lamp on a pole, they try to place the photo relay in the same place. This is completely unnecessary and very inconvenient - you have to clean off the dust or snow quite often and climb up the pole every time is not very fun. The photo relay itself can be placed on the wall of the house, for example, and the power cable can be pulled to the lamp. This is the most convenient option.
Connection diagrams
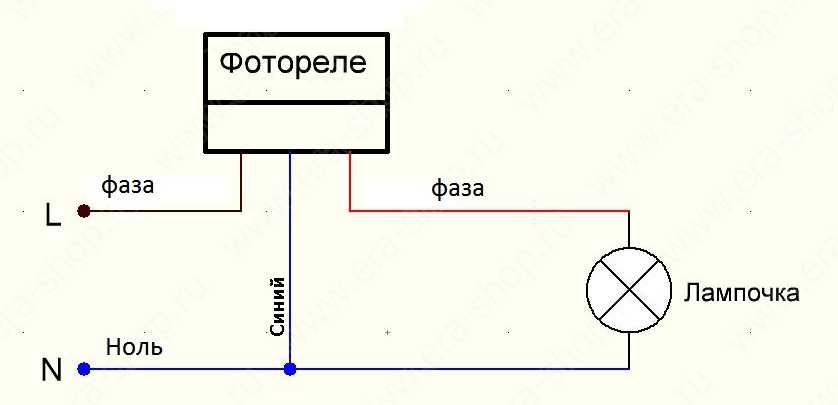
The connection diagram for a photo relay for street lighting is simple: a phase and a zero are started at the input of the device, from the output the phase is fed to the load (lights), and zero (minus) to the load goes from the machine or from the bus.
Connection diagram of a photo relay for lighting (lantern)
If you do everything according to the rules, the connection of the wires must be done in the junction (junction box). Choose a sealed model for outdoor use, mount it in an accessible place. How to connect the photo relay to street lighting in this case - in the diagram below.
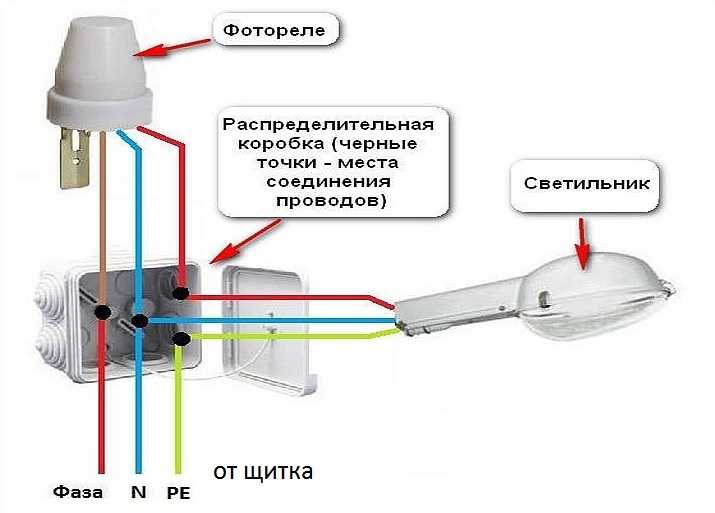
Photo sensor connection via junction box
If you need to enable / disable a powerful lamp on a pole, in the design of which there is a choke, it is better to add to the circuitstarter (contactor)... It is designed for frequent switching on and off, it tolerates inrush currents normally.
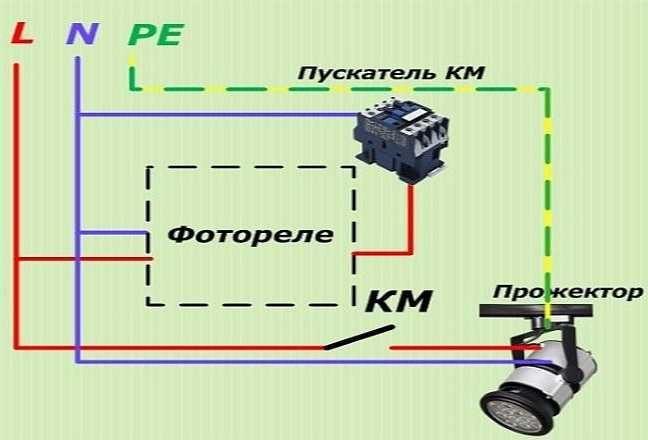
Wiring diagram for day-night sensor with starter
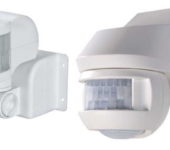
If the light should be turned on only for the duration of a person's stay (in a street toilet, near the gate), add to the photo relay Motion Sensor... In such a bundle, it is better to first put a light-sensitive switch, and then a motion sensor. With this arrangement, the motion sensor will be triggered only in the dark.

Connection diagram of a photo relay with a motion sensor
As you can see, the schemes are simple, you can do it yourself.
Features of connecting wires
Photo relay of any manufacturer has three wires. One is red, the other is blue (may be dark green) and the third may be any color, but usually black or brown. When connecting, it is worth remembering:
- the red wire always goes to the lamps:
- zero (neutral) is connected to blue (green) from the supply cable;
- the phase is fed to black or brown.
If you look at all the above schemes, you will see that they are drawn in compliance with these rules. That's it, no more complications. By connecting the wires in this way (do not forget that the neutral wire must also be connected to the lamp), you will get a working circuit.
How to set up a photo relay for street lighting
It is necessary to configure the light sensor after installation and connection to the network. There is a small plastic rotary disc at the bottom of the housing to adjust the response limits. Its rotation sets the sensitivity.
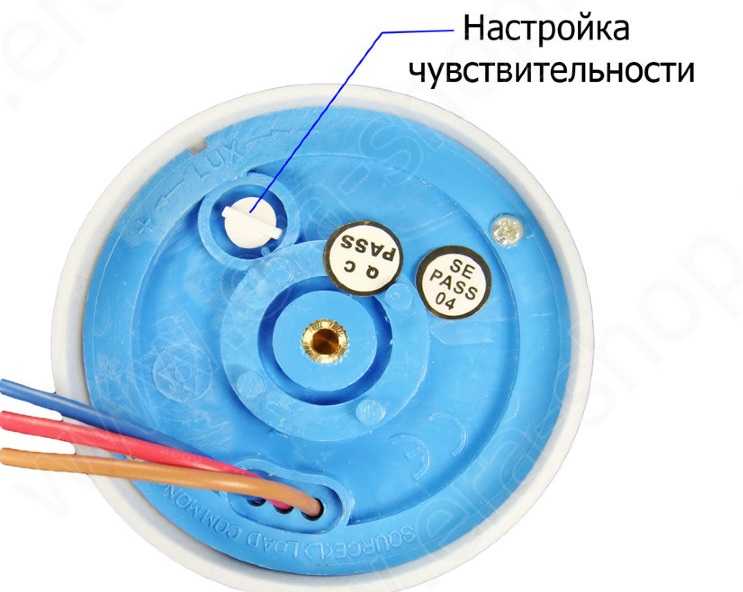
Find a similar regulator on the body - it adjusts the sensitivity of the photo relay
Slightly higher on the case there are arrows, which indicate which direction to turn to increase and decrease the sensitivity of the photo relay (to the left - decrease, to the right - increase).
To begin with, set the lowest sensitivity - drive the regulator to the extreme right position. In the evening, when the illumination is such that you decide that you should already turn on the light, start adjusting. It is necessary to smoothly turn the regulator to the left until the light turns on.On this we can assume that the setting of the photo relay for street lighting is completed.
Astrotimer
An astronomical timer (astrotimer) is another way to automate street lighting. The principle of its operation differs from the photo relay, but it also turns on the light in the evening and turns it off in the morning. Light control on the street takes place in time. This device has data about what time it gets dark / dawn in each region in each season / day. When setting up the astrotimer, the GPS coordinates of its installation are entered, the date and current time are set. The device works according to the program.
Astrotimer - the second way to automate the light on the site
How is it more convenient?
- It doesn't depend on the weather. In the case of installing a photo relay, there is a high probability of a false alarm - in cloudy weather, the light can turn on in the early evening. When light hits the photo relay, it can extinguish the light in the middle of the night.
- The astrotimer can be installed in the house, in the dashboard, anywhere. He doesn't need light.
- It is possible to shift the on / off time by 120-240 minutes (depending on the model) relative to the set time. That is, you yourself can set the time as you like.
The disadvantage is the high price. In any case, the models available in the retail network cost quite a lot of money. But you can buy in China much cheaper, however, how it will work is a question.