Independent connection of the electric stove to the 220 V, 380 V network
Electricity is a serious and dangerous business, but many jobs do not require high qualifications and can be done independently without the involvement of specialists. For example, you can connect an electric stove with only a distant idea of electricity. Especially if the socket is already installed. All that remains is to install the plug on the cord and connect it correctly to the plate connectors. The situation is worse if it is necessary to pull the line from the shield, but here you can cope without help. Just remember that all work is performed with the power supply disconnected.
The content of the article
Scheme and connection methods
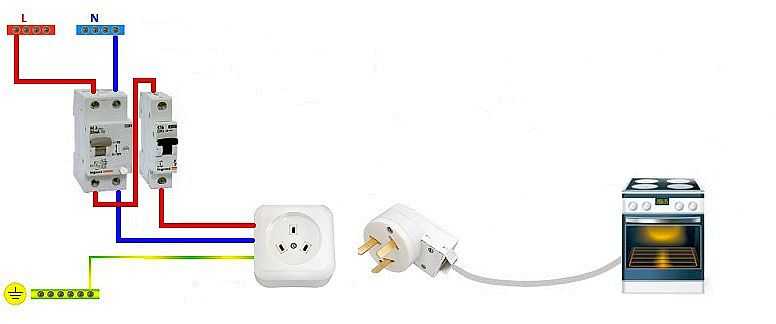
Electric household stoves are powerful equipment, their current consumption is about 40-50 A. This means that it is necessary to connect the electric stove to a dedicated power line. It must be powered directly from the apartment or house panel. Power is supplied through an RCD and a circuit breaker. The stove itself can be connected via a socket and a plug (special power), a terminal box. Also, the line from the machine can be directly connected to the input terminals on the rear wall.
Electric stove connection diagram
More reliable connection - directly to the input terminals of the plate. In this case, there is a minimum number of points of contact, which increases reliability. But this method is not entirely convenient: you can only turn off the power supply automatically. The problem is approximately the same when using a terminal box, with the only difference that there are more connection points.
Most often, they use a connection using an outlet and a plug. It is more convenient and familiar. Since the equipment is powerful, they use not ordinary household devices, but special ones, which are also called power ones - for their ability to withstand significant current loads.
Please note that when connecting powerful electrical equipment, grounding is required. Without it, you will be denied warranty repairs, and its absence is life-threatening, so it's better not to risk it.
Electrical parameters and ratings of circuit breakers
As it turned out, in switchboard there must be separate RCDs and a circuit breaker. Through them, the phase is supplied to the outlet. This pair can be replaced with a difavtomat. These are the same two devices, but in the same case. Minus is taken from the common bus, passes through the RCD, grounding is taken from the corresponding bus.
Machine denomination is selected according to the maximum consumed current. These data are in the passport of the electric stove and are usually in the range of 40-50 A. In this range, the ratings go with a large step - 40 A, 50 A, 63 A. It is better to choose the nearest larger one - so there is less chance of a false shutdown when operating at full power ... That is, if the declared maximum current consumption is 42-43 A, you still take a 50 A.

Electric stove connection diagram
On the other hand, you may never turn on all the burners and the oven completely, and even at full power, and more powerful machines are decently more expensive. It's up to you to choose.
RCD rating take a step higher than the machine. If you decide to install the machine for 50 A, then the RCD is required for 63 A, the leakage current is 30 mA.
Wire and its parameters
In recent years, copper conductors are most often used when laying electrical wiring and connecting household appliances. Although they cost much more, it is more convenient to work with them, in addition, copper requires a much smaller core diameter than when using aluminum conductors.
The cross-section of the conductors is selected depending on the type of network - 220 V or 380 V, the type of wiring (open / closed), as well as the current consumed or the power of the equipment. Usually, copper conductors with a core of 4 mm (with a line length of up to 12 m) or 6 mm are used.
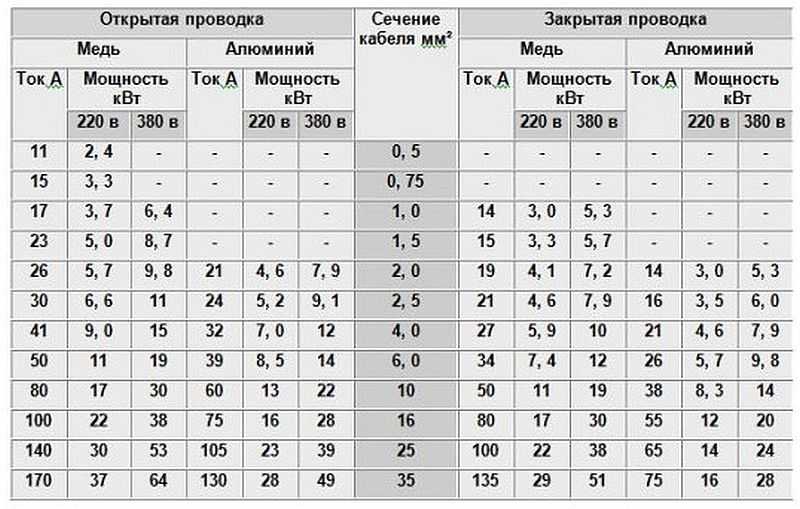
Conductor cross-section selection table
When choosing the type of cable for laying from the shield to the outlet, it is better to stop at single-core conductors. Although they are more rigid, they are more reliable. To connect the stove itself (to which you will need to connect a power plug), you can choose a flexible stranded wire: single-core in this case will be too inconvenient.
The hob connection is described here.
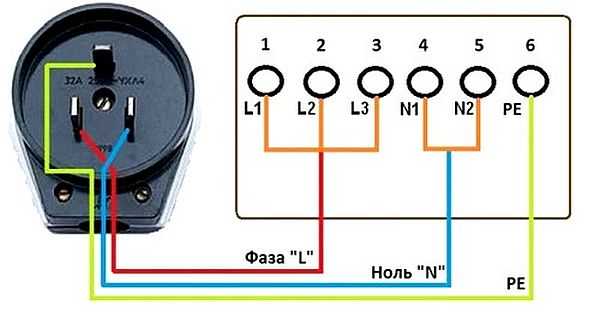
How to connect an electric stove to a 220 V network
All the above diagrams were specifically for a single-phase 220 V. To connect, you need a three-core cable, a three-pin power outlet and a plug with a rated current of at least 32 A. We must say right away that the connection of equipment of different brands is fundamentally no different. It doesn't matter which stove you purchased - Electrolux, Gorenje, Bosh, Beko. No difference. All the difference is the different design of the covers that cover the terminal box on the case and different ways of fixing it. Everything else is the same.
Connecting the cable to the electric stove
First, the cable selected for connection must be connected to the electric stove. On the rear panel, usually at the bottom left there is a terminal block to which the conductors are brought out.
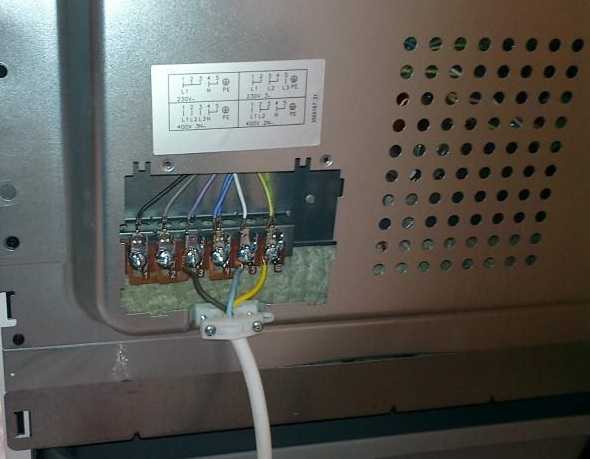
Terminal block to which you need to connect the electrical cord
Nearby are the connection diagrams for different networks.
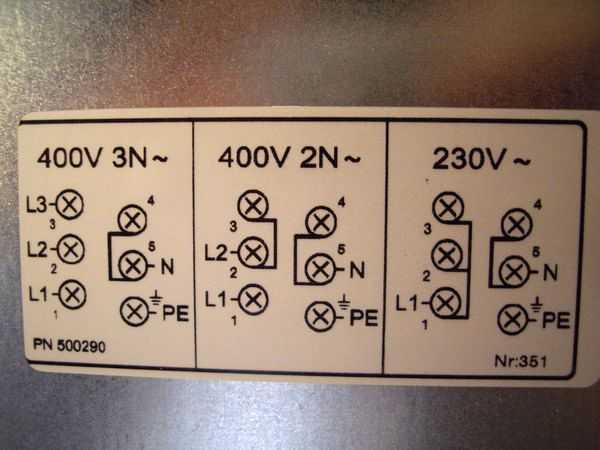
Schematic diagram of the connection for different networks
With a 220 V network, the circuit is on the far right. On the plate, contacts 1,2,3 must be connected with one jumper - this will be the phase (red or brown conductors), the second - contacts 4 and 5 - this is neutral or zero (blue or blue), the sixth contact is ground (green or yellow -green). Electric plates usually come from the store with jumpers already installed, but it does not bother to check.

Connecting the cable to the electric stove
It is more correct and more reliable to compress the conductors with contact plates, and then connect them. Such a connection is more reliable, but often the conductors are simply twisted around the pressure screw and then tightened. In any case, it is better to follow the color coding - this way there is less chance of making a mistake.
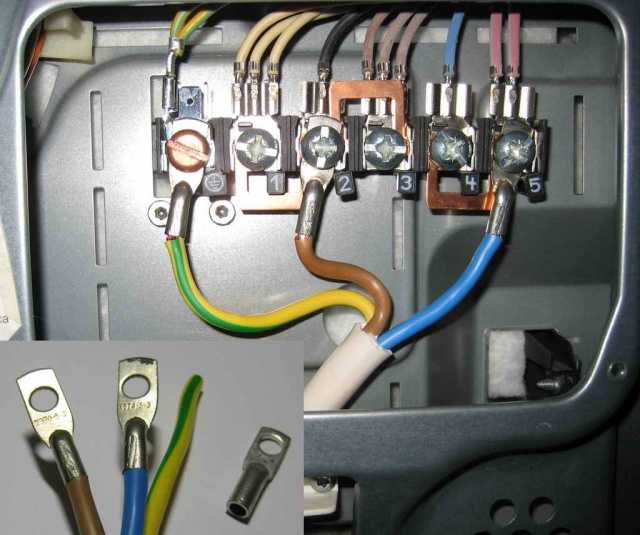
Better to terminate the conductors with contact plates
Installing the plug
Next, a plug is connected to the cable. The power plug is collapsible. Unscrew two fastening screws, remove the cover with contacts. The fixing strip holding the cable is also removed. The protective insulation is removed from the edge of the flexible cable (by about 5-6 cm), the conductors are straightened, their ends are also stripped of insulation by about 1.5-2 cm. The cut end of the cable is inserted into the plug body.
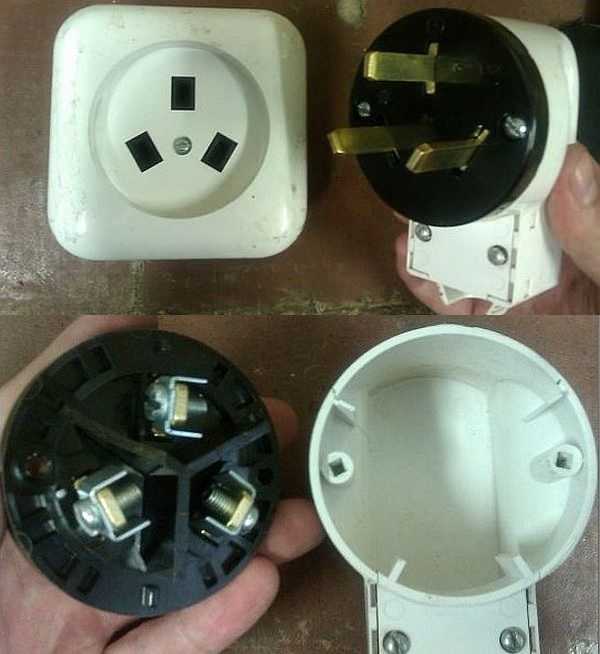
It looks like a plug for connecting an electric stove
The clamping screws on the contacts are loosened, The conductors, if they are stranded, are twisted into a bundle. These filaments are twisted around the contacts, tightened with clamping screws.
The distribution of conductors is important and must be connected carefully. The top pin of the plug is usually labeled - connect the "earth" wire (green) here. When plugging in the socket, connect the ground to a similar socket.
Connecting the wire to the electric stove
The other two contacts are "phase" and "zero". It is not important where to supply which of them, but when the socket is connected, the "phase" should fall on the "phase", "zero" - on "zero". Otherwise, there will be a short circuit. So before switching on, be sure to check again if the wires are screwed on correctly (phase and zero).
How to determine the phase in an installed outlet
If you already had an electric stove before, and there is an outlet, you need to find in it where the ground, phase and zero are located and, accordingly, connect the wires in the plug. The easiest way to determine is to use a voltage indicator in the form of a screwdriver.It works simply - you place the indicator in the place of the expected phase, and look at the LED built into the case. If it is on, then there is voltage and this is a phase. If there is no voltage, the LED does not light up, and this is zero.
The earth is even easier to define: it is contact above or below.
Connection to three-phase 380 V network
In this case, an automatic machine and an RCD for a three-phase network are bought, the wires must be five-core (the cross section is determined according to the same table, only the value must be looked at in the 380 V column). The plug and socket must also have five contacts.
The connection process itself will not differ in anything, only the number of wires. The difference will be when you connect the wire to the output terminals of the electric stove. Only one jumper will be installed - on pins 5 and 6. All others are connected with separate conductors.
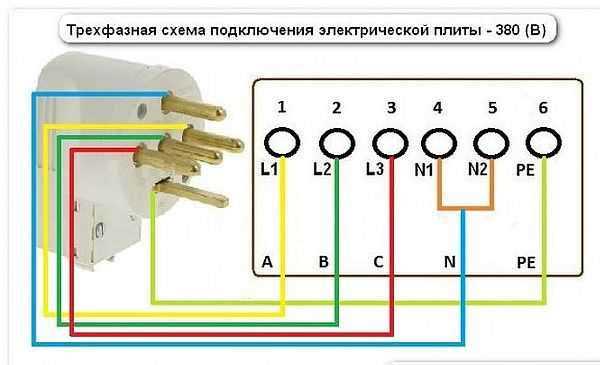
Electric stove connection diagram to a three-phase network
It is also necessary to track the position of "ground" and "neutral" (or they say "zero"). The color matching of the conductors on the phases is not critical, but it is more convenient if they also coincide.


Not spelled correctly. connecting to a three-phase network does not mean 380V. You will not buy a 380V electric cooker.
How can we not buy it? I just have this)))
Yes, something interesting. How does this three-phase network not mean 380V? Everything here rests on the fact that three phases were introduced. If technical capabilities allow, then it is quite possible to install a powerful plate of the Abat 2 type. In the manual it is written in black and white "Three-phase voltage 380V is required for connection".
The plates are all 380V and you need to buy an adapter for 220-250V for it
Probably an adapter in case there is no 380 V? According to my project, I have a 380 V stove and a five-core wire goes to the outlet.
If there is a five-core wire, then three phases are obtained, zero and ground - there are no problems with the connection, i.e. you will be able to squeeze full power out of the stove. I did not understand about the adapter for 220, jumpers are put for connecting to 220 and that's it.