How to make grounding in a private house, in the country
The operation of modern household and computer equipment without grounding is fraught with its failure. In a large part of our country, especially in rural areas, there are old-style power transmission systems. They do not have protective grounding, or they are in such a state that they simply do not meet the requirements of electrical safety. Therefore, the owners have to do the grounding of a private house or summer house themselves.
The content of the article
What does it give
Protective grounding is necessary to ensure electrical safety in the home. Correctly performed, the appearance of a leakage current leads to the immediate operation of the RCD (damage to the electrical insulation or when touching live parts). This is the main and main task of this system.
The second function of grounding is to ensure the normal operation of electrical equipment. For some electrical appliances, the presence of a protective conductor in the outlet (if any) is not enough. A direct connection to the ground bus is required. For this, there are usually special clips on the body. If we talk about household appliances, then this is a microwave oven, oven and washing machine.
The main task of grounding is to ensure the electrical safety of a private house
Few people know, but a microwave oven without a direct connection to the "ground" during operation can generate a significant amount of radiation, and the radiation level can be life-threatening. In some models, you can see a special terminal on the back wall, although the instructions usually contain only one phrase: “grounding is necessary” without specifying exactly how it is desirable to do it.
When touching the body of the washing machine with wet hands, a tingling sensation is often felt. It is harmless, but unpleasant. You can get rid of by connecting the "ground" directly to the body. In the case of the oven, the situation is similar. Even if it does not "pinch", direct connection is safer, as the wiring inside the unit operates under very harsh conditions.
Computers are even more interesting. By directly connecting the "earth" wire to the case, you can increase the speed of the Internet several times and minimize the number of "freezes". It's that easy because of the direct connection to the ground bus.
Do I need grounding in the country or in a wooden house
In summer cottages, grounding is mandatory. Especially if the house is built of combustible material - wood or frame. It's about thunderstorms. In summer cottages, there are a lot of elements that attract lightning. These are wells, boreholes, pipelines, lying on the surface or buried to a minimum depth. All these objects attract lightning.

At dachas, there is a high probability of lightning strikes
If there is no lightning rod and grounding, a lightning strike is almost equivalent to a fire. There is no fire station nearby, so the fire will spread very quickly. Therefore, in tandem with grounding, make also a lightning rod - at least a couple of meter-long rods attached to the ridge and connected with a steel wire with grounding.
Private house grounding systems
There are six systems in total, but mainly only two are used in individual buildings: TN-S-C and TT. In recent years, the TN-S-C system has been recommended. In this scheme, the neutral at the substation is grounded and the equipment is in direct contact with the ground. To the consumer, the earth (PE) and neutral / zero (N) are carried by one conductor (PEN), and at the entrance to the house it is again divided into two separate ones.
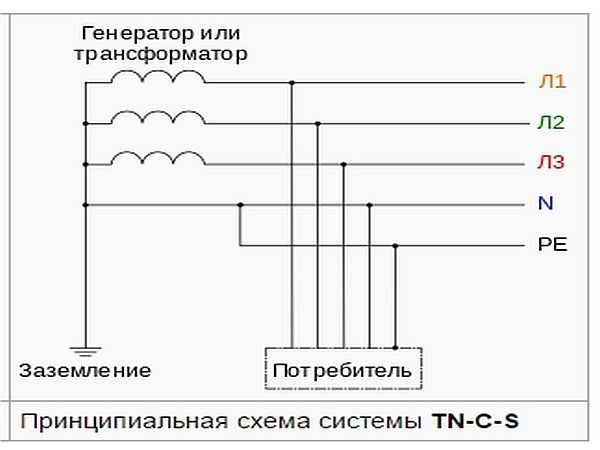
TN-S-C grounding system
With such a system, a sufficient degree of protection is provided by automatic devices (RCDs are optional). The disadvantage is that when the PEN wire burns out or is damaged in the area between the house and the substation, a phase voltage appears on the ground bus in the house, which is not disconnected by anything. Therefore, the PUE imposes strict requirements on such a line: there must be mandatory mechanical protection of the PEN wire, as well as periodic backup grounding on poles every 200 m or 100 m.
However, many rural transmission lines do not meet these conditions. In this case, the TT system is recommended. Also, this scheme should be used in free-standing open outbuildings with an earthen floor. There is a risk of touching ground and ground at the same time, which can be dangerous with a TN-S-C system.

Private house grounding system TT
The difference is that the "earth" wire to the shield comes from an individual ground loop, and not from a transformer substation, as in the previous diagram. Such a system is resistant to damage to the protective conductor, but requires the mandatory installation of an RCD. Without them, there is no protection against electric shock. Therefore, the PUE defines it only as a backup if the existing line does not meet the requirements of the TN-S-C system.
TT grounding system in a clearer picture
Private house grounding device
Some older power lines have no protective earth at all. All of them must change, but when this happens is an open question. If this is your case, you need to make a separate contour. Option two - to make grounding in a private house or in the country on your own, with your own hands, or entrust the execution of the campaign. Campaign services are expensive, but there is an important plus: if during operation there are problems caused by improper functioning of the grounding system, the company that carried out the installation will compensate for the damage (it must be spelled out in the contract, read carefully). In the case of self-execution, everything is on you.
Grounding device in a private house
The grounding system of a private house consists of:
- earthing rods,
- metal strips combining them into one system;
- lines from the ground loop to switchboard.
What to make grounding conductors
As pins, you can use a metal rod with a diameter of 16 mm or more. Moreover, you cannot take the reinforcement: its surface is hardened, which changes the current distribution. Also, the hardened layer in the ground is destroyed faster. The second option is a metal corner with 50 mm shelves. These materials are good because they can be driven into soft ground with a sledgehammer. To make this easier to do, one end is sharpened, a pad is welded onto the second, on which it is easier to beat.
Pipes, corner, metal rod can be used as rods.
Sometimes metal pipes are used, one edge of which is flattened (welded) into a cone. Holes are drilled in their lower part (about half a meter from the edge). When the soil dries out, the distribution of the leakage current is significantly deteriorated, and brine can be poured into such rods, restoring the grounding operation. The disadvantage of this method is that you have to dig / drill wells under each rod - it will not work to hammer them with a sledgehammer to the required depth.
Driving depth of pins
Grounding pins should go into the ground below the freezing depth by at least 60-100 cm. In regions with dry summers, it is desirable that the pins are at least partially in wet ground. Therefore, mainly corners or a rod with a length of 2-3 m are used. Such dimensions provide a sufficient area of contact with the ground, creating normal conditions for the dissipation of leakage currents.
What not to do
The function of protective grounding is to dissipate leakage currents over a large area. This happens due to the tight contact of metal ground electrodes - pins and strips - with the ground. thereforegrounding elements are never painted. This greatly reduces the conductivity between the metal and the ground, and the protection becomes ineffective. It is possible to prevent corrosion in welding places with anticorrosive compounds, but not with paint.
The second important point: grounding should have a low resistance, and for this good contact is very important. It is provided by welding. All joints are welded, and the quality of the seam must be high, without cracks, cavities and other defects. Pay attention once again: grounding in a private house cannot be done on threaded connections. Over time, the metal is oxidized, destroyed, resistance increases many times over, protection deteriorates or does not work at all.
Use only welded joints
It is very unreasonable to use pipelines or other metal structures in the ground as a ground electrode. For a while, such grounding works in a private house. But over time, the joints of pipes, due to electrochemical corrosion, activated by leakage currents, oxidize and collapse, grounding turns out to be inoperative, like the pipeline. Therefore, it is better not to use such types of ground electrodes.
How to do it right
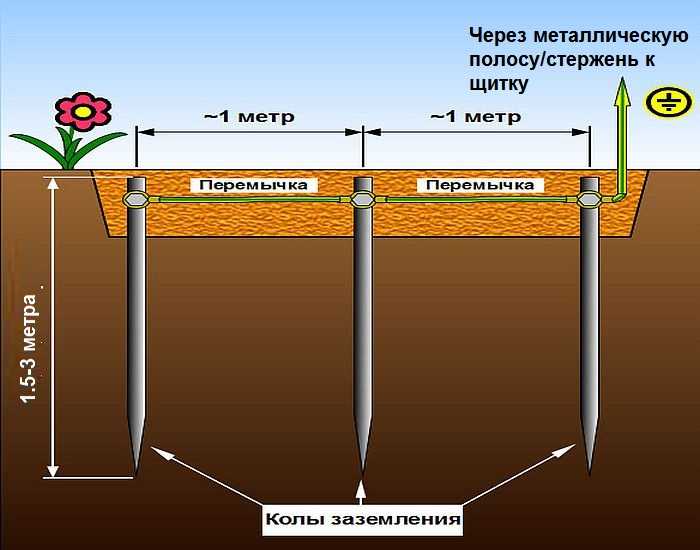
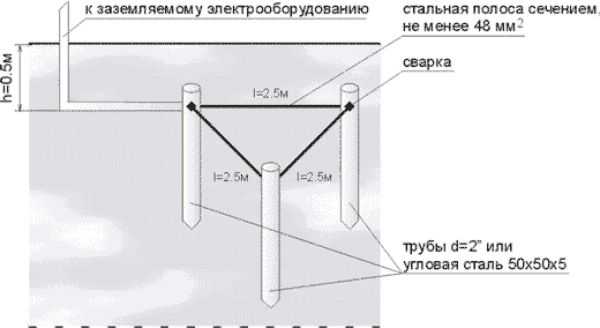
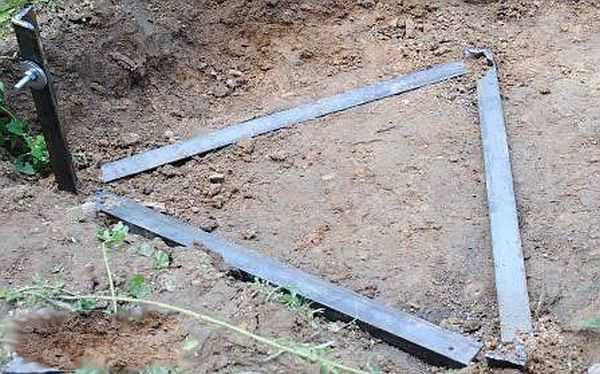
First, let's figure out the shape of the ground electrode system. The most popular is in the form of an equilateral triangle, at the tops of which pins are hammered. There is also a linear arrangement (the same three pieces, only in a line) and in the form of a contour - pins are hammered around the house with a step of about 1 meter (for houses with an area of more than 100 sq. M). The pins are interconnected by metal strips - metal bond.

The most popular ground electrode model
Procedure
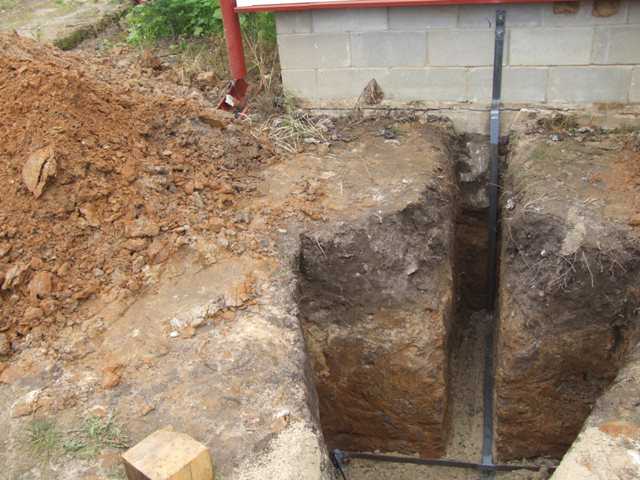
From the edge blind areas at home to the installation site of the pin should be at least 1.5 meters. At the selected site, a trench is dug in the form of an equilateral triangle with a side of 3 m. The depth of the trench is 70 cm, width - 50-60 cm - so that it is convenient to cook. One of the peaks, usually located closer to the house, is connected to the house by a trench with a depth of at least 50 cm.

Digging a trench
At the vertices of the triangle, pins are hammered (a round bar or corner 3 m long). About 10 cm is left above the bottom of the pit. Please note that the ground electrode is not brought to the surface of the earth. It is located 50-60 cm below ground level.
A metal bond is welded to the protruding parts of the rods / corners - a strip of 40 * 4 mm. The created earthing switch is connected to the house with a metal strip (40 * 4 mm) or a round conductor (section 10-16 mm2). The strip with the created metal triangle is also welded. When everything is ready, the welding places are cleaned of slag, covered with an anti-corrosion compound (not paint).
Welded strip
After checking the grounding resistance (in the general case, it should not exceed 4 ohms), the trenches are covered with earth. There should be no large stones or debris in the soil, the earth is compacted in layers.
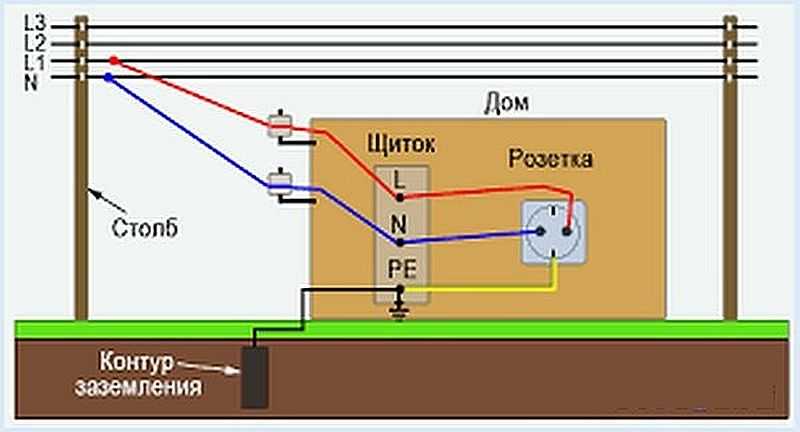
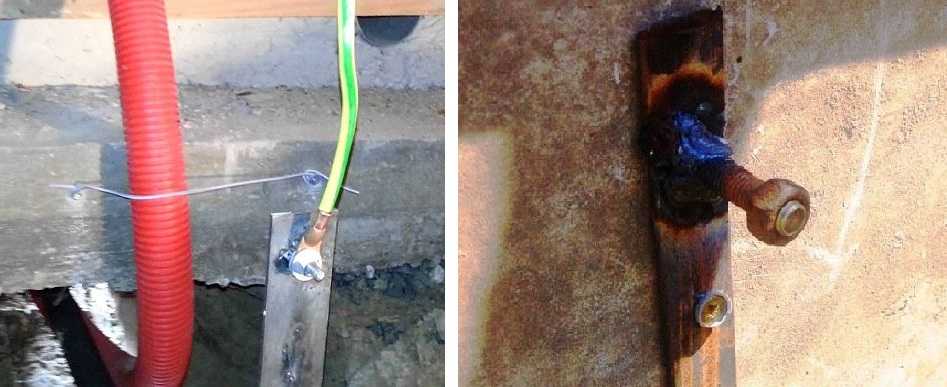
At the entrance to the house, a bolt is welded to a metal strip from the ground electrode, to which a copper conductor in insulation is attached (traditionally, the color of grounding wires is yellow with a green stripe) with a conductor section of at least 4 mm2.
Ground outlet at the wall of the house with a bolt welded at the end
In the electrical panel, grounding is connected to a special bus. Moreover, only on a special platform, polished to a shine and lubricated with grease. From this bus, "ground" is connected to each line that is wired around the house. Moreover, wiring "ground" by a separate conductor according to the PUE is unacceptable - only as part of a common cable. This means that if your wiring is wired with two-wire wires, you will have to completely change it.
Why it is impossible to make separate grounding
Redoing the wiring throughout the house, of course, is long and expensive, but if you want to operate modern electrical appliances and household appliances without any problems, this is necessary. Separately grounding certain outlets is ineffective and even dangerous. And that's why. The presence of two or more such devices sooner or later leads to the output of the equipment connected to these sockets.The thing is that the resistance of the circuits depends on the condition of the soil in each specific place. In some situation, a potential difference arises between the two grounding devices, which leads to equipment breakdown or electrical injury.
Modular pin system
All the previously described devices - made of driven corners, pipes and rods - are called traditional. Their disadvantage is a large amount of land work and a large area that is required when installing a ground electrode system. This is because a certain area of contact of the pins with the ground is required, sufficient to ensure the normal "spreading" of the current. The need for welding can also cause complexity - there is no other way to connect the grounding elements. But the plus of this system is relatively low costs. If you do traditional grounding in a private house with your own hands, it will cost $ 100 to the maximum. This is if you buy all the metal and pay for welding, and carry out the rest of the work yourself
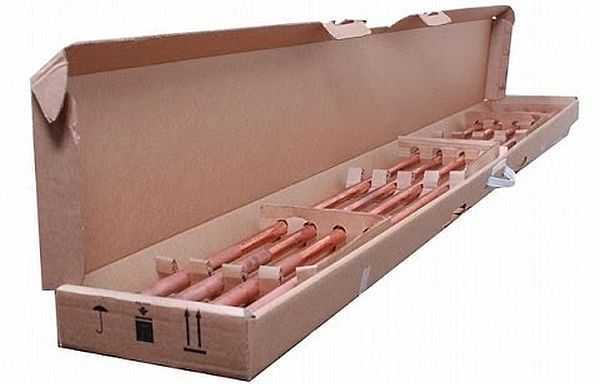
Modular Grounding System Kit
.
Modular pin (pin) systems appeared a few years ago. This is a set of pins that are driven to a depth of 40 m. That is, a very long ground electrode is obtained, which goes to a depth. Fragments of the pin are connected to each other using special clamps, which not only fix them, but also provide a high-quality electrical connection.
The plus of modular grounding is a small footprint and less work that is required. A small pit with sides 60 * 60 cm and a depth of 70 cm is required, a trench connecting the ground electrode with the house. The pins are long and thin and can be easily driven into suitable soil. Here we came to the main disadvantage: the depth is great, and if on the way you meet, for example, a stone, you will have to start over. And removing the rods is a problem. They are not welded, but whether the clamp will withstand is a question.
The second disadvantage is the high price. Together with the installation, such grounding will cost you $ 300-500. Self-installation is problematic, since it will not work to hammer these rods with a sledgehammer. We need a special pneumatic tool, which we have learned to replace with a hammer drill with an impact mode. It is also necessary to check the resistance after each hammered rod. But if you don't want to mess with welding and earthwork, modular grounding studs are a good option.


It is necessary to check the grounding in the house near Kubinka. Pulls the dishwasher and the gate outside.
The article is instructive, however, some terms cut the ear - "pillar" (support), "grounding stake" (grounding electrodes).
I advise everyone to read it properly, as well as ALL Articles on this topic. He considered himself a good electrician, wanted to save money, made wiring in steel pipes, bypassed the meter (to pay the minimum). I pushed everything into the wall, In winter, the current consumption was more than 50A. Felt there is a slight smell of insulation. The insulation melted about 8 !!!! years. I wanted to fix everything later, alter it. In the end, it was closed so (to the automatic devices) that everything caught fire ... and the house burned down !!! I advise you to pay special attention to the SECTION of the wire (do not save!), GROUNDING, the machine BEFORE entering the house, the QUALITY of the machines themselves (do not take cheap stuff!) And look, DO NOT OVERLOAD THE NETWORK !!!
Because of the wiring, many houses burned down, all this is sad.As for the wires in steel pipes, personally I am categorically against - steel conducts current and that says it all.
Tell me, can you make a ground loop inside the house in one of the rooms ???
If you need to issue an official permit to put a house into operation, then you should rely on the Rules for the technical operation of consumer electrical installations (PTEEP) 2.7.8:
"To determine the technical condition of the grounding device, visual inspections of the visible part, inspections of the grounding device with selective soil opening, measurement of the parameters of the grounding device in accordance with the standards for testing electrical equipment (Appendix 3)" should be carried out.
If the ground loop is inside the house, then obviously it will not be possible to open the ground, if necessary. It is better to consult with representatives of the organization that will issue documents for the electrical part.
I have a house and a garage under the same roof - a 3-pin ground loop is made in the garage. I suspect that no one will ever check the ground loop, unless of course I want to check it myself.
I believe that the most important grounding parameter is its resistance (the less, the better). If I'm not confusing anything, then for a 380 V network, the resistance of the ground loop should not be more than 30 ohms.
Due to the need to quickly make a ground loop, he was left without a favorite crowbar. There were not enough pins, I had to hammer in a good crowbar with a hole on top. I still remember 🙁