Installation of sectional doors in the garage - all the details of the installation
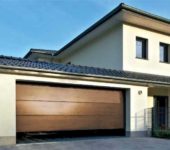
Sectional lifting gates are installed in garages, utility blocks, and other technical rooms. They are convenient in that when they are opened, they simply rise up, without requiring free space in front of the canvas. Another plus is that there are insulated models that have the same thermal insulation characteristics as a brick wall of one and a half bricks. And another important note - the installation of sectional doors can be done independently, with your own hands. Preferably - with an assistant. It will be more difficult to cope "in one hand", but it is possible. Just keep in mind: self-installation will take not 4 hours, which are spent by professional installers, but much more ... but you can do it exactly in a day.
The content of the article
Measurements and dimensions
Sectional doors are also called overhead sectional doors. This name is due to the structure and principle of action. The door leaf consists of separate sections, movably connected to each other. Hence the word "sectional" in the title. When opening, the sections move up along the guides, smoothly moving to the ceiling. When open, they are held on the ceiling. And this is the reason why the word "lifting" is added - they go up.

General arrangement of sectional doors with torsion springs
Sectional doors consist of two parts - a canvas and guides along which the canvas moves when opening / closing. In order to install the sectional doors with your own hands without problems, you need to carefully measure the opening. There is nothing particularly complicated in this part. All you need is a tape measure, a plumb line, if there is a laser level.
With the terminology, everything is clear, the design is clear in general terms, now in more detail about the measurements and preparation of the opening, without which the installation of sectional doors simply cannot do.
What and why to measure
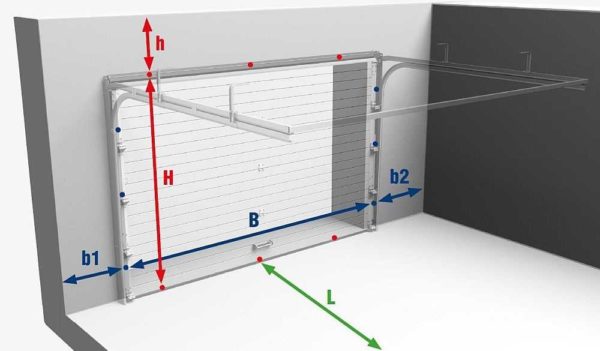
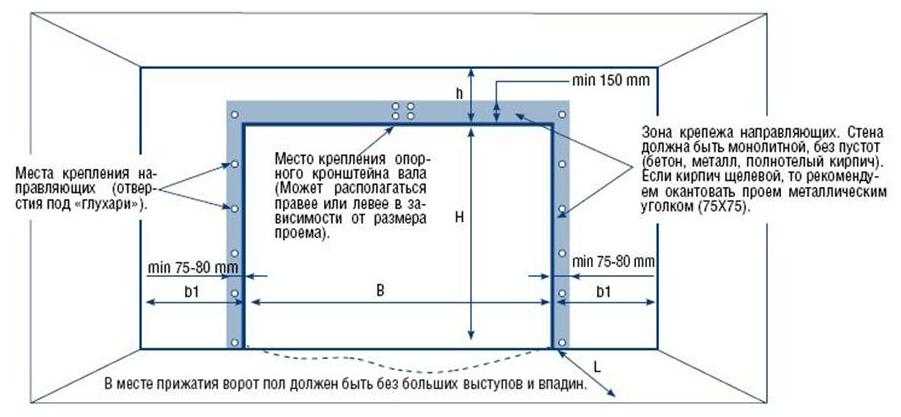
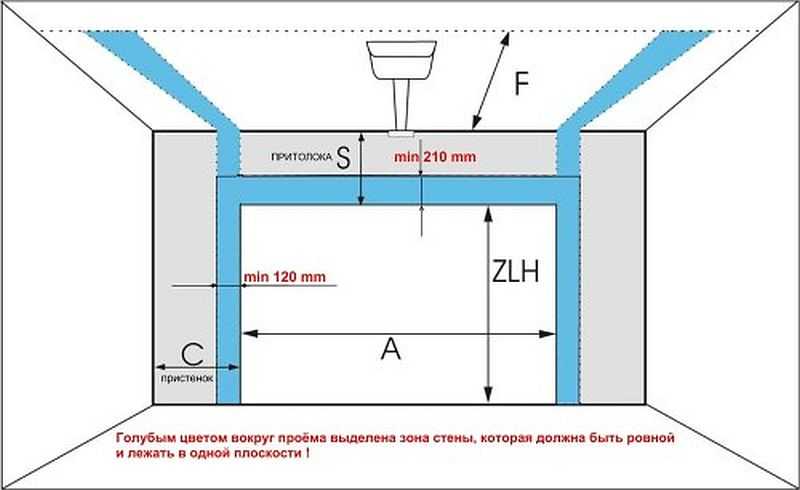
To order an overhead sectional door, you need to measure the following distances (shown in the figure):
- Height (H) and width (B) of the opening. Here, it seems, everything is clear, the measurements are simple. But, for normal operation of the gate, the planes of the opening must be parallel. The side walls must be strictly vertical, the floor and the lintel must be strictly horizontal, without deviations or sagging. Verticality and horizontalness can be verified using a level, a plumb line. You can also control the parameters of the opening by making changes at several points. If the data matches up to a millimeter, everything is fine. If not, you will have to prepare the opening - align and only then measure and order the sectional doors.
What parameters are needed and important
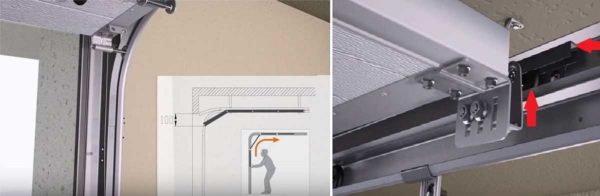
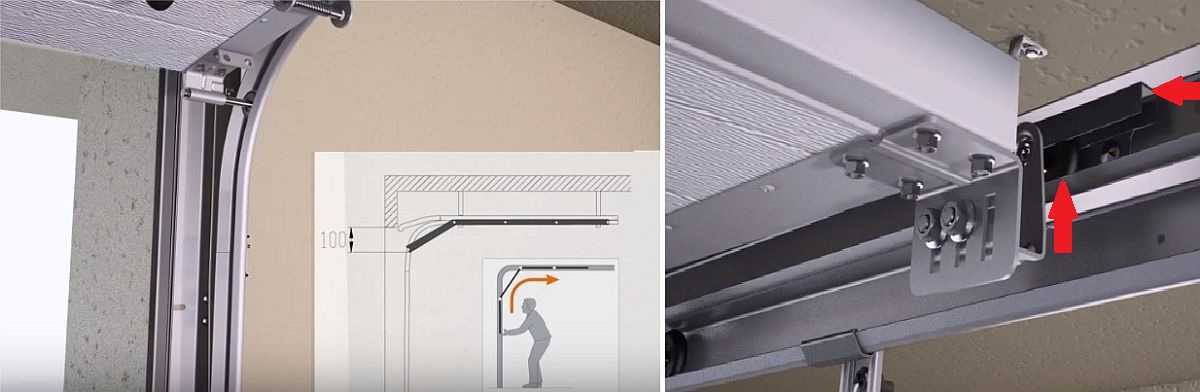
- Lintel height (lintel). Headroom is the distance from the top of the opening to the ceiling slab (h). The optimum lintel height is 400-600 mm. In this case, you can install the cheapest and, at the same time, the most reliable standard lifting system - the standard one.
- Distances from the edge of the opening to the side walls (right (b2) and left (b1). Also called “shoulders.” On the sides of the opening, guides are mounted and the distance from the opening to the side walls affects the choice of their design and installation method.
- Depth of entry (GV or L) into the room. This parameter is important, although it is often omitted.This is a calculated value that depends on the height of the opening and the type of lifting system installed. It is considered according to the following rules: a certain number is added to the height of the gate opening:
- gate area up to 8 m2, add 400 mm.
- the gate area is more than 8 m2 - increase by 450 mm.
- low rise (depth of entry) - add 550 mm;
- high rise - add 65 mm and 850 mm.

With standard installation, the installation of a sectional door does not affect the opening
Once again, we draw your attention: the last parameter is worth paying attention to - the depth of the room in which the sectional doors are installed cannot be less than this value.
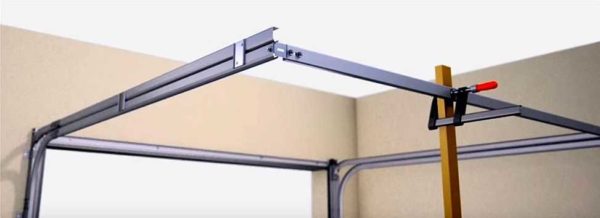
When installing the drive
If automatic opening is planned and the drive is conventional, you will also need space for it (in the figure below it is indicated by the letter W).
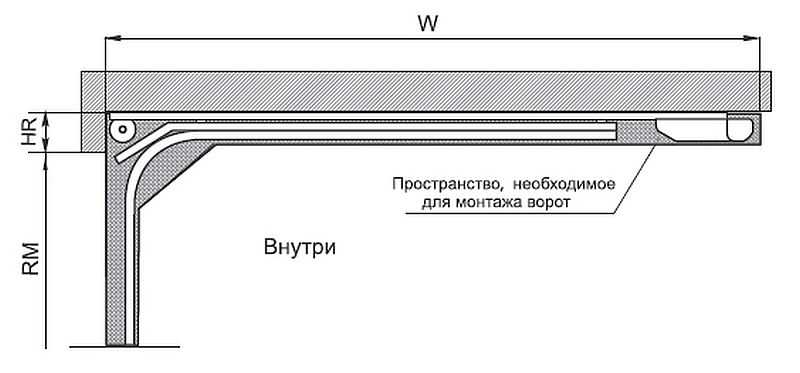
Indoor space should be sufficient for mounting the rail and drive system if an automated retrofit is used
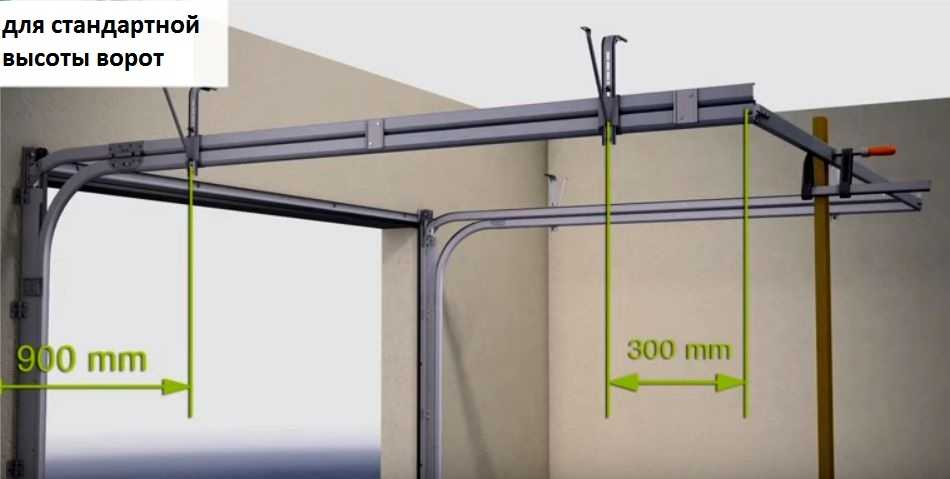
For you to be able to orient yourself, for installation of the operator on the ceiling, the minimum room depth must be between 3290 mm and 4400 mm (for different lifting systems). For shallower rooms, there is another way out - installing an axial drive. It is more expensive, but more powerful and requires installation space only on the side of the opening.
Read about the choice of the lifting height in this article.
These are all necessary measurements. As you can see, everything is easy. But at the same time it is very important that the door opening is even, without significant deviations. The condition of the floor and ceiling (in the area of the gate installation) is also important. It is important for the ceiling to align the part on which the ceiling rails will be mounted. The floor must also be level so that the frame does not warp. If there are irregularities, you will have to prepare the gate opening, only then carry out repeated measurements and order the gate.
Requirements for the opening and its preparation
Installation of sectional doors requires preliminary preparation of the opening. The opening, firstly, must have sufficient bearing capacity, secondly, there must be enough space on the sides and top for the installation of guides, and thirdly, it must be even. Let's sort it out in order.
To make it clearer why sectional doors can only be installed on flat walls
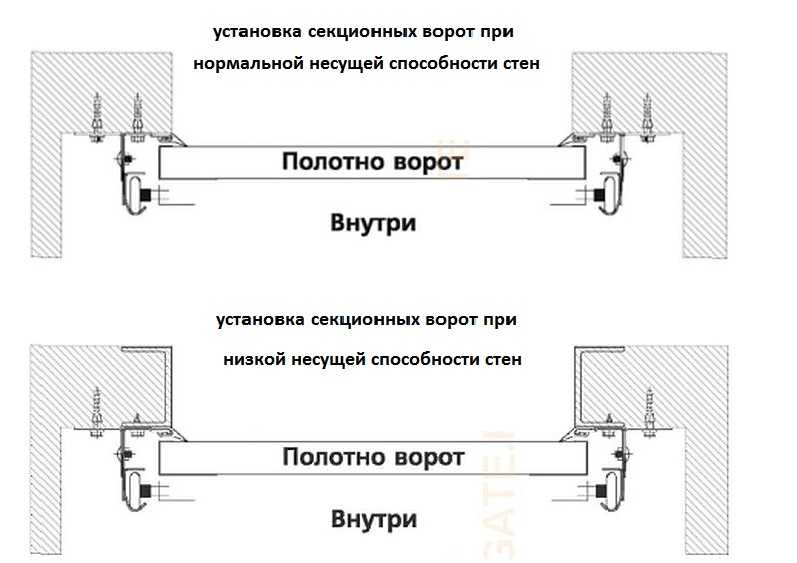
Bearing capacity and methods of its correction
If the walls to which the sectional doors will be attached are made of solid bricks, concrete, cinder block, even shell rock, it is possible to fasten the guides. Anchors or dowels are usually used for these materials. It is worse if the walls are made of hollow slotted bricks, foam blocks. You cannot put a heavy structure in them without modification. We'll have to reinforce the opening. There are two ways:
- Reinforce the opening from metal corners and attach the system to them. Everything will hold up, but the costs are high.
- Plaster the walls and try to anchor in the plaster joint. If something goes wrong, you can still use chemical anchors. This option is cheaper, but not the most reliable, so it's best not to use it.
It is better to take seriously the strengthening of the bearing capacity of the wall and make a frame from the corners. Yes, it is not cheap, but the gate is not installed for one day, and not for one year, so the costs are justified.
Ways to strengthen the opening if the walls are made of crevice brick or foam concrete
If the garage is planned to be heated, when reinforced with corners, do not forget to put thermal insulation under the metal. In this case, fiberglass cardboard is best suited. With a small thickness, it has good heat leakage prevention.
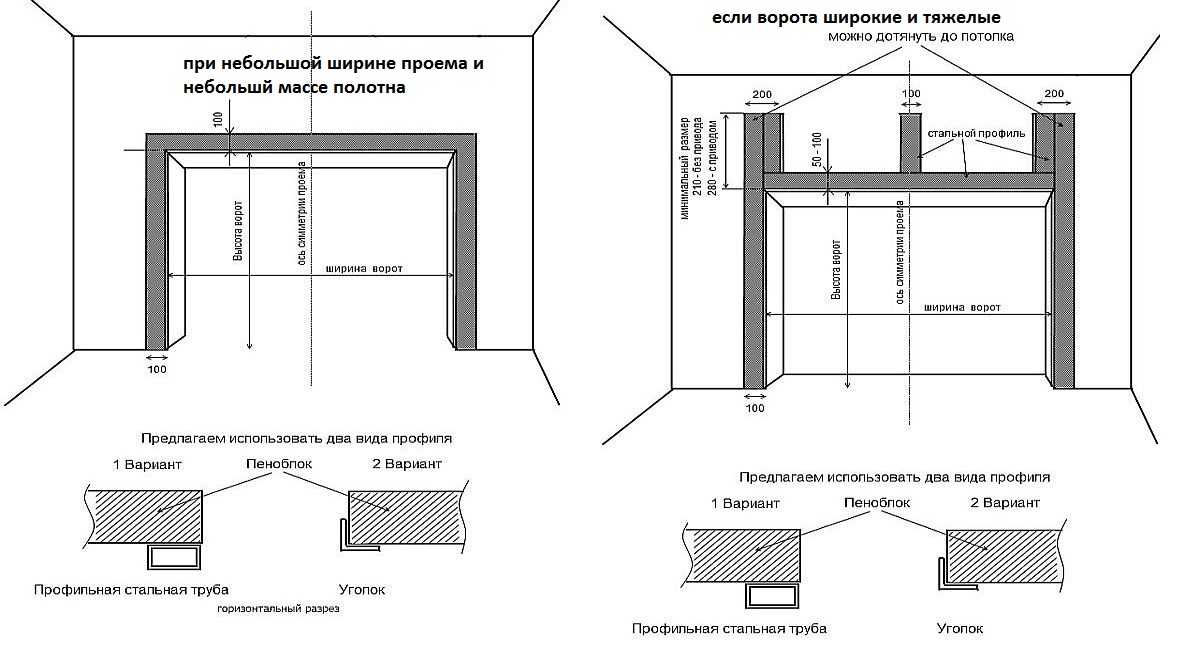
If there is not enough space for mounting the structure
It also happens that there is not enough space at the top or sides to install the structure. If the headroom is too small, there is a standard solution - a false panel. It is made of the same material as the door leaf and is attached to the supporting beam in the opening.This reduces the height of the door, but it becomes possible to install a more convenient standard lift system in installation.

This is what a false panel is. It can be attached in different ways
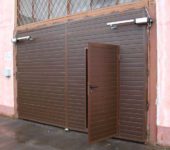
It also happens that there is not enough distance not only at the top, but also on the sides. Usually metal garages suffer from this disease.
In metal garages, there is usually no side or top clearance. It is necessary to weld such a frame and attach a gate to it, close up the gaps and insulate
The most convenient method for correcting the dimensions of the door opening in that case is to weld a profiled pipe of the required section along the perimeter. The section is chosen so that there is enough space both at the top and at the sides. Another option is to do as in the photo above - to make the gate not for the entire width of the garage.
Opening and ceiling alignment
In addition to the bearing capacity and parameters of the opening, it is necessary to check that its surface is even and smooth. The walls around the opening and two stripes on the ceiling should also be aligned. A system of guides will be attached to them, they must all be flat and lie in the same plane.
Opening requirements for sectional doors
The minimum strip width, on which there should be no deviations, is 210 mm. This is when mounting standard equipment and standard lifting. Other systems require a little more. So you can bring out about 300 mm at once. You definitely can't go wrong.
For leveling walls made of concrete, brick, building blocks use plaster on beacons... The surface is checked in all planes. Sectional door installation starts after the plaster has dried.
Installation of sectional doors with tension springs: a sequence of actions with step-by-step photos
The designs of sectional overhead doors from different manufacturers have some differences, but in general, the order of their assembly and installation is similar. The mounting method may differ, other minor details, but the principles are very similar. For example, the installation of sectional doors of the Belarusian company Alutex (Alutech) will be described.
Different manufacturers have their own installation details, but the general principles are still the same.
The Belarusian company Alutex (Alutech) has a good reputation. For quite reasonable money we get good quality sectional doors. All holes are drilled, the set includes fasteners of the required size, in the required quantity. When assembling everything matches, the installation of sectional doors from this company usually goes without problems.
First you need to unpack everything, unfold it, check the completeness, read the assembly instructions, carefully examine the design, accompanying drawings and explanations. Take the time to study the instructions in detail. It will be easier during the installation process, spend less nerves.
Assembling and fixing vertical guides
The installation of sectional doors begins with the installation of the frame, along which the sections move - guides. The ease and trouble-free movement of the sections, the density of their adherence to each other depends on how level they stand. During installation, it is necessary to constantly monitor the vertical and horizontal. You can do this with an ordinary building level, but it is much more convenient with a laser one. You can unfold two planes, set them at the required level. The glowing bright stripes will serve as a guide. Any deviation is immediately noticeable.
Further work is as follows:
- At a height of 1 m from the floor level, we put marks on the wall near the opening.
- We assemble the frame from the carriers that are attached to the doorway.
- An elastic sealing tape is put on the carriers, which is inserted into the groove with some effort.
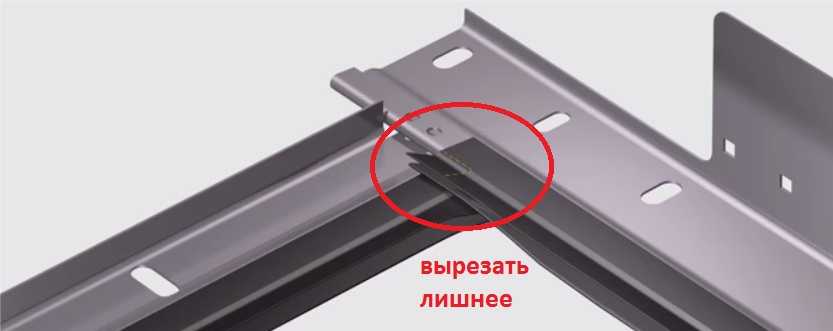
- A small piece of the seal must be cut out at the junction of the posts and the horizontal lintel. Where two elastic bands overlap. With the help of a pencil, an extra area is indicated, a small square is cut out with a sharp knife.
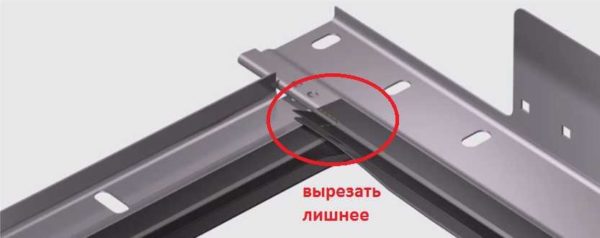
Cut out the interfering piece of sealant
- The vertical rails and the upper headroom are connected with screws. There are already holes for them, they just need to be combined.
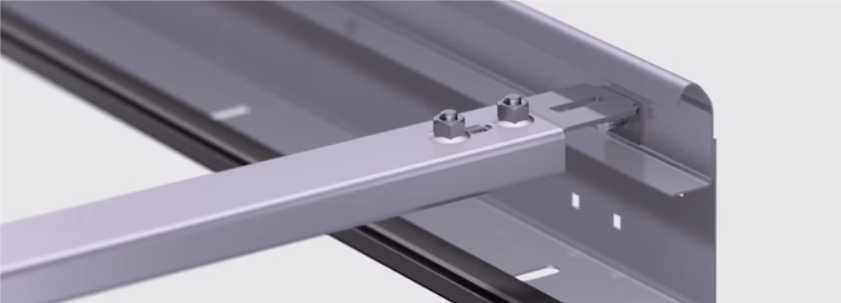
- A mounting jumper is installed at the bottom. It is temporary, but it stiffens the structure and allows it to withstand the required dimensions.
We put a temporary mounting jumper
- We attach the guides to the opening.
- We install the assembled structure close to the wall. Its internal dimensions must match the existing opening. Deviations of a few millimeters are permissible.
- Checking the vertical and horizontal. At a height of one meter, where the marks are, we fix it with clamps.

We align, fasten with clamps to the opening
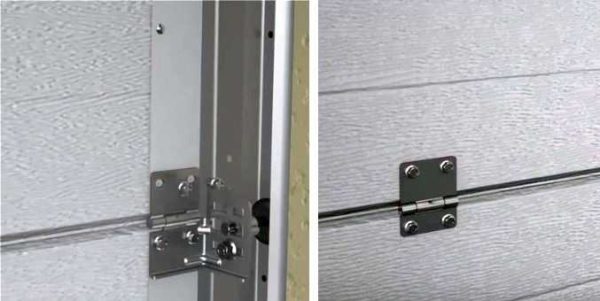
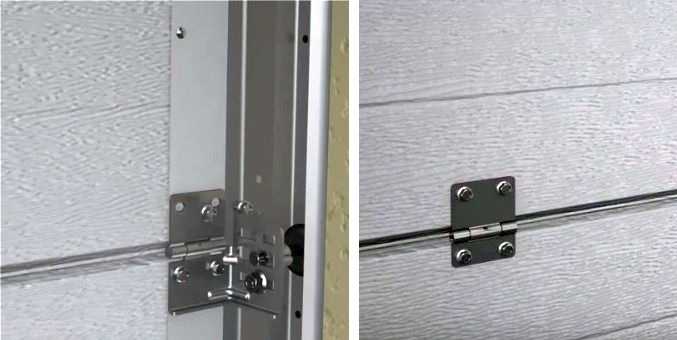
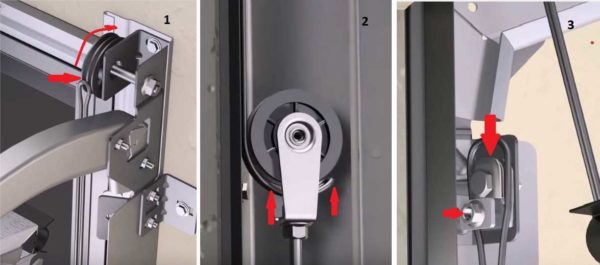
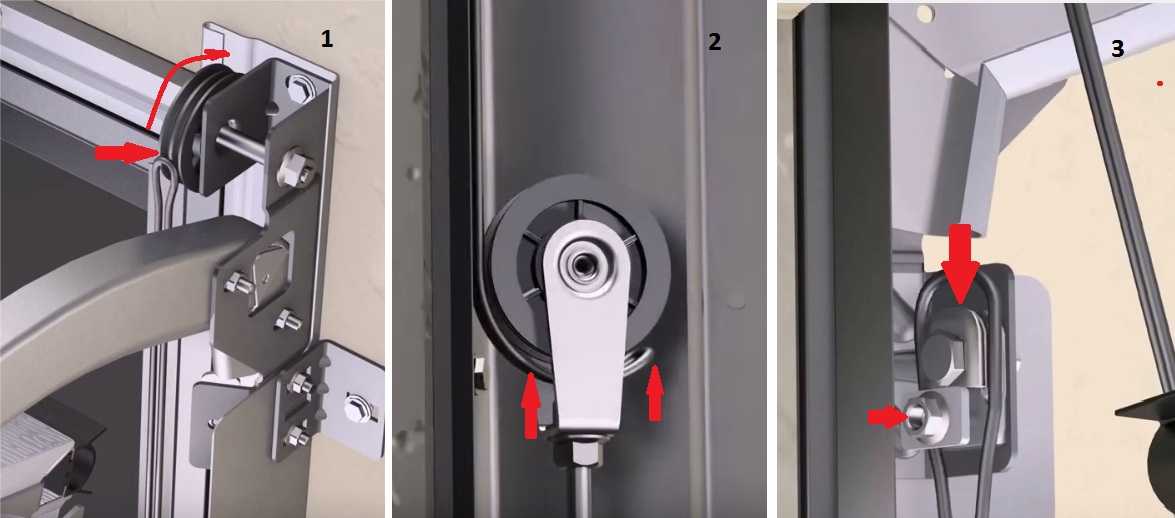
- We install rollers at the top of the racks. We align their edge with the edge of the posts, drill holes in the wall in those places where there are holes for fasteners in the roller housing. Through the hole in the rack (it is specially made wide), we insert the plastic inserts of the dowels (50 * 10 mm, so we take the 8 mm drill), insert and tighten the dowel screws.
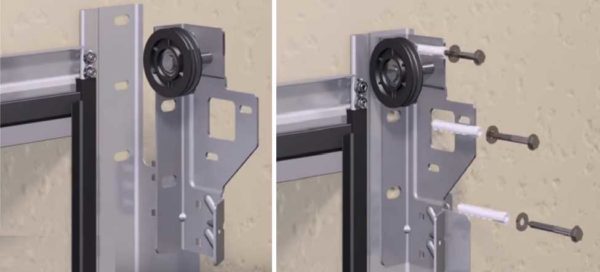
Wall fixing with castor angle
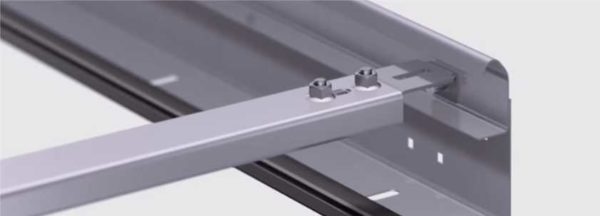
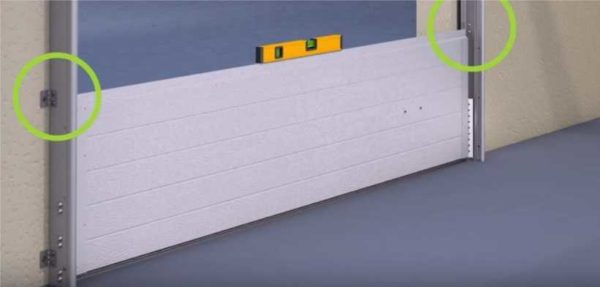
- Installation of rack fasteners.
- Each post is attached from two sides. On the outside, special L-shaped mounting plates are placed. Holes are made for them in the side surface of the racks. We combine the holes on the mounting plates with the holes in the posts, install screws (M6 * 16, 2 pcs for each plate).
- The plate attached to the rack must be fixed to the wall. There is a hole in the plate for this. Through it we drill the wall, insert the dowel plug, put the dowel itself (50 * 10 mm).
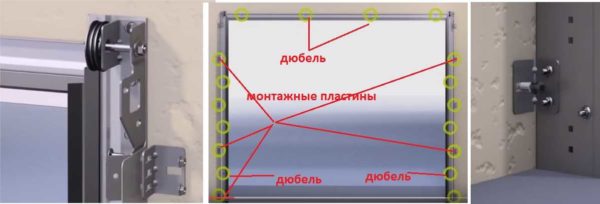
Installation of sectional doors starts with fixing vertical rails
- We fix the racks from the inside. The profile itself has holes for fasteners. In each, you need to install a dowel, after making a hole for the plastic part and installing it.
- In the same way, we fix the lintel over the opening - into the holes with dowels.
- Remove the clamps and the lower mounting jumper.


Once again, we draw attention to the fact that the racks must be strictly vertical and must be in the same plane.
Installing ceiling rails
Ceiling guides are attached to the ceiling using special telescopic hangers. It is convenient to set the plane with them - the height of the suspension is regulated by a screw that slides in a long slot. There are several types of hangers for different heights of the lintel. For standard / low installation and headroom up to 300 mm, use the CS1 weights. There is also CS2 - 500 mm long, CS3 - 800 mm, CS4 - 1000 mm, CS5 - 1500 mm. They are attached to the ceiling, set to the required height. If too large a piece of the suspension sticks out, it is cut off, leaving a couple of centimeters below the installed fixing bolt.
Ceiling guides have a characteristic shape - rounding on one side.
- We attach an additional half-arc to both ceiling guides. The rollers will slide along it, therefore we carefully align the edges so that there are no gaps. Align the holes, install and tighten the bolts.
Ceiling rails ready to install
- We attach the assembled horizontal runners for sectional doors to the posts. The plates with rollers have special projections for their fixation. Align the holes, insert and tighten the fasteners.
- We connect the free edges of the ceiling rails with a jumper.
We align the structure, support it with a bar
- Align the guides horizontally. To do this, we prop the installed jumper, adjusting the height using a level. For support, you can use any strip suitable for support, and a clamp can be used as a retainer.


Attaching the ceiling rails to the ceiling is described at the beginning of the paragraph. It is important to set them straight. They are attached in pairs. The first is at a distance of 900 mm from the opening, the second is at a distance of 300 mm from the opposite edge.
Installing the ceiling rail mount
Before and after fastening, we check the diagonals (must match up to a millimeter) and the horizontalness of each of the parts.
Installation of sections (collecting the canvas)
After assembling the frame, we assemble the door leaf. You will need the sections themselves, hinges / rollers and fasteners (6.3 * 16 mm). A distinctive feature of Alutech sectional doors is these very hinges, combined with rollers. Installation with them is easier, the sliding of the canvas is smoother.
- The first section is installed on the floor (by the way, it must be flat, the permissible deviation is 5 mm for the entire opening, without sharp drops). Having installed, we check the horizontalness of its upper edge. We also make sure that the edges are at an equal distance from the edge of the guides so that the fasteners do not interfere.
We expose the section exactly, strictly in the center, with equal gaps
- We attach a loop with a roller to the exposed section. We fill the roller in the guide, align the holes that are on the reinforcing strip fixed on the edge of the sandwich panel, fix it with the existing fasteners.
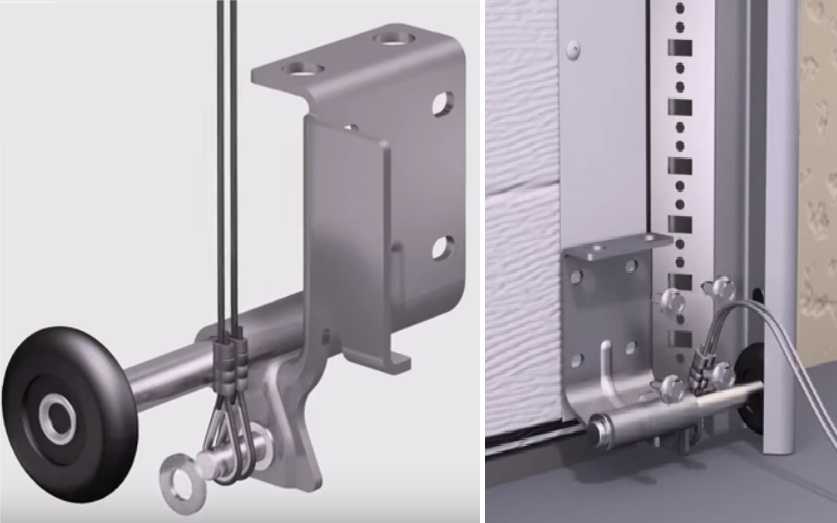
- We are preparing the lower roller for installation. It has a special shape - with a pin at the bottom. On the pin we put on the loops at the end of the two cables, install the washer, fix it with a hairpin (bending the protruding ends in different directions).
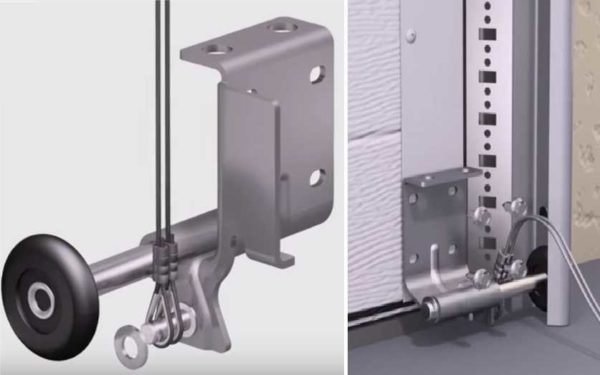
Lower rollers: preparation and installation
- We put the prepared videos at the bottom of the first section. As usual, there are holes, we combine, tighten the screws.
- We put the second section. We put it on the first, leveling the edges, fix the free end of the loop. Install the same loop at the top.
- We put two (or more, if the canvas is wide) additional loops.
Sectional door leaf assembly is a matter of minutes
- We mount the next section. And so on to the top of the canvas.
- We put rollers without loops on the last section. First, we fill the roller in the guide, align the holes and fix.

That's it, the installation of the sectional doors is almost complete. It remains to assemble the lifting mechanism and controls.
Installation of controls
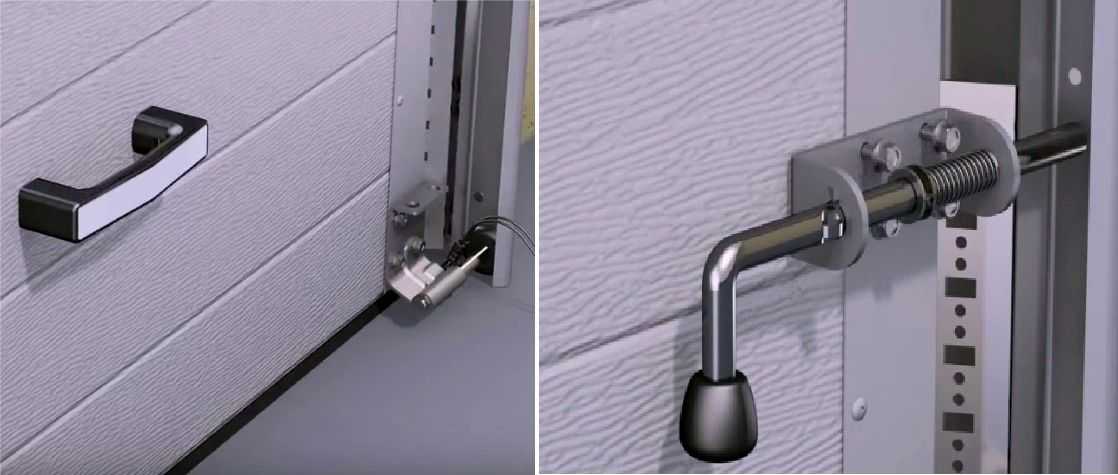
This loud phrase "controls" in the model with manual opening designates a handle, a spring lock and cables, by pulling the gate leaf, we lower it down.
- We put the handle. Under it, again, there are holes on the lower section. Remove the decorative panel on the handle, align the holes, tighten the bolts, put the cover back in place.
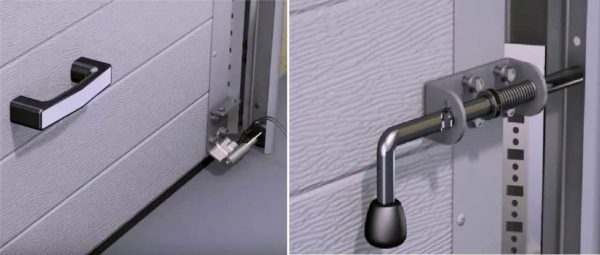
We put the handle and the latch
- We put a lock on the second or third section - a spring latch. Under it, it will be necessary to make a hole in the guide with a diameter slightly larger than the diameter of the bolt pin.
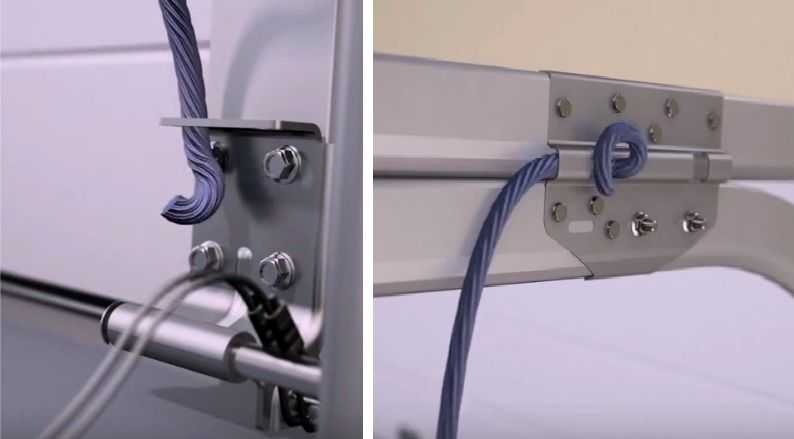
- We attach one end of the cable to the lower loop with a roller (two cables are already attached to the pin there). We pass it through the hole in the loop, tie a knot.
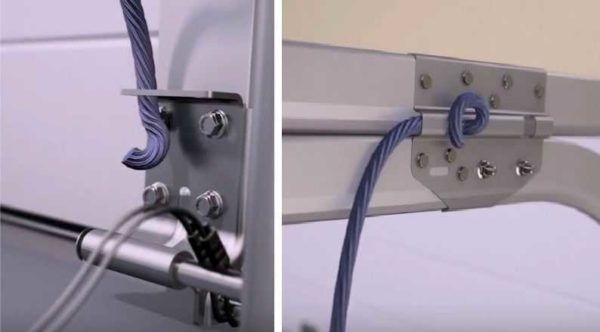
We fasten the cable
- We fix the second end of the cable at the top. In the place where the ceiling rail arc was attached, there is a ledge for the cable on the outside. We thread the free end into it, tie a knot.
The last step remains - installing the spring and assembling the mechanism for raising / lowering the sectional doors.
Assembly and installation of lifting mechanism
Carefully lift the door leaf and fix it with something in the open position. In this case, the lower edge of the blade should open the roller located at the very top of the guide.
- We take the edge of the cable attached to the lower roller, lift it up, pass it along the upper roller (not the one that is attached to the canvas, but which is installed on the stand.
- We stretch down to the second roller, which is factory installed inside the guide, bend around it.
- We pull the cable up, almost to the place where the jumper is installed. There is a mounting plate inside the guide. We release the lower fastening bolt a little, put the cable into it, the top of it lies in a special recess, the bolt is tightened.
Stretching the cable
- We tighten and adjust the spring that is attached to the rack and fasten it with four bolts. First, select an intermediate position somewhere in the middle, secure.
- We start adjusting the spring tension. We raise the gate to a height of 1 meter (where the marks were set), release the canvas. If it has lifted itself a little up, you need to reduce the tension of the spring by attaching it a little higher. If, at the same distance, releasing the canvas, it moves down, the spring is too weak, it must be tightened more.
Installing the blade holder
- The last thing to do is to install the web retainer. Raise the gate so that the bottom edge is 100 mm from the top edge of the opening. We take a pencil, mark on the ceiling guide the place where the canvas ends. We take the stopper / retainer / stop, apply it to the mark, put marks under the fasteners with a pencil (there are holes in the retainer). We drill holes, install the retainer. Now the open sectional door goes into the stopper by about half and does not go further.
Now that's all for sure. The sectional doors have been installed and are ready for use.
Video instructions for assembling other models
Installation is different for DoorHan and Hörmann. See the differences in the videos.
Sectional doors with a torsion spring are installed in a slightly different way. You can see the difference in the demo video.