How to make a stove for a garage
Unfortunately, heating is not provided for garages (although, perhaps, fortunately, given the current tariffs), so you have to heat yourself. Well, any heating is a stove. In this case, it should be small, but effective - you need to quickly move the room from "minus" to a good "plus". So when choosing a design, do not forget that the garage oven should quickly and easily ignite. It is also desirable that it can be heated with waste - it is very non-budgetary to buy good firewood, and there is no place to store it. Well, one more requirement - the design should be simple so that you can easily do it yourself.
The content of the article
What stoves can be made for a garage
It is very unpleasant to be in a cold garage in winter. Therefore, heating is required. Garage stoves are usually small steel stove-type stoves. They are made from thick-walled barrels, pipe pieces or from gas cylinders. Such garage ovens are simpler in design, require only minor modifications, because the body, and sometimes the bottom, is already there. Stoves are also cooked from sheet metal, but these are options for those who are close friends with welding... Brick stoves in garages are not very common - they are still more overall, they heat up less, which is not quite suitable for this case.
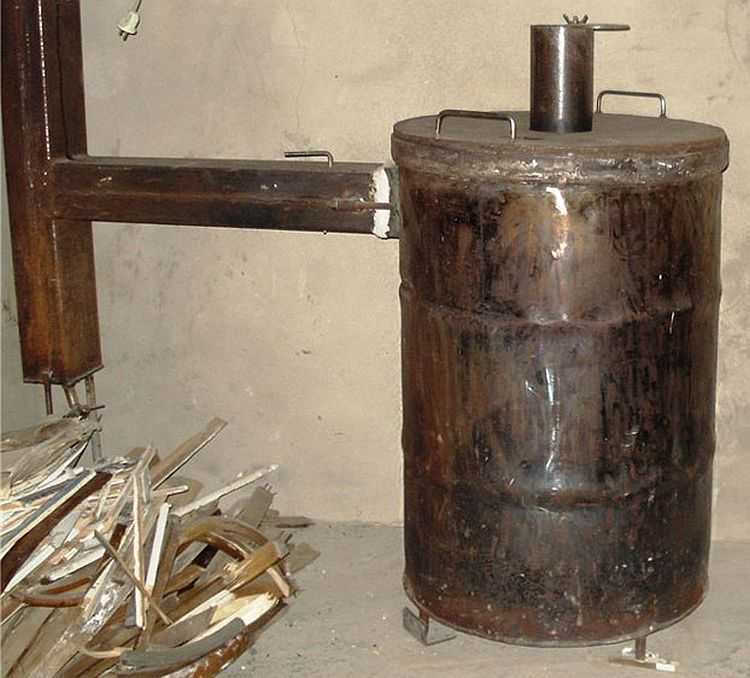
One of the ovens for the garage
The most common potbelly stoves, working on wood, are laid in them all that burns. Such omnivorousness and rapid heating are their main advantages. They also have a lot of shortcomings, and one of them is gluttony, therefore more economical long-burning stoves have recently begun to be made. The principle of top burning is usually used. They are good because one full bookmark (stove from a 50 liter propane cylinder) can burn up to 8 hours. All this time, the garage is warm.
Go alone stoves on working off... There is enough such fuel in garages, but you need to be careful with working off - there are heavy metals and they need excellent traction to prevent them from getting inside.
Potbelly stoves - proven and simple designs
Potbelly stoves are a hit of the 20s of the last century. Then these stoves competed with brick ones and stood everywhere, even in apartments. Later, with the advent of centralized heating, they lost their relevance, but they are used in garages, in summer cottages, for heating utility or outbuildings.

Sheet metal
Potbelly stoves from a cylinder, barrel or pipe
The most suitable material for making a potbelly stove for a garage is propane cylinders or a pipe with a thick wall. Barrels are also suitable, but you need to look for a not very large volume and with a thick wall. In any case, the minimum wall thickness is 2-3 mm, the optimal one is 5 mm. Such a stove will last more than one year.
By design, they are vertical and horizontal. It is more convenient to heat a horizontal one with firewood - longer logs fit. It is easier to make it stretched upward, but the firebox is small in size, you will have to cut the firewood finely.

A potbelly stove for a garage can be made from a cylinder or thick-walled pipe
Vertical
First, how to make a vertical garage oven from a cylinder or pipe. Divide the selected segment into two unequal parts. Below the smaller one - for collecting ash, above - the main one for laying firewood. Further, the order of work is as follows:
- We cut out the doors. At the bottom it is small, at the top - of solid size. We use the cut pieces as doors, so we don't throw them away.
- We weld the grates in the selected place.Usually it is steel reinforcement with a thickness of 12-16 mm, cut into pieces of the required length. The step of installing the reinforcement is about 2 cm.
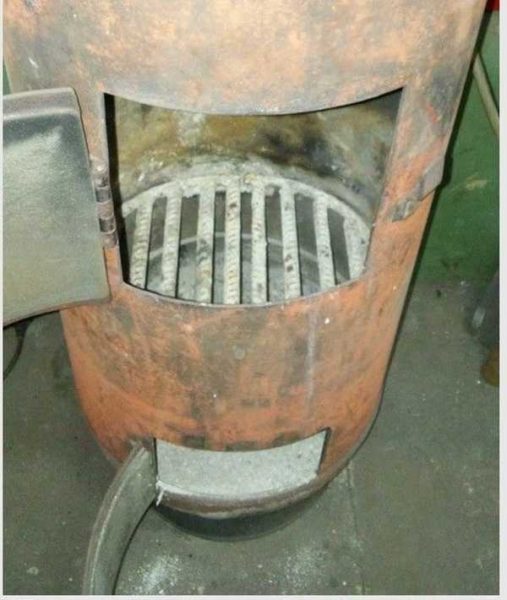
How to make grates
- We weld the bottom if it is not.
- Cut a hole in the lid for the chimney, weld on a strip of metal about 7-10 cm high. It is better to make the outer diameter of the resulting pipe for standard chimneys. Then there will be no problems with the chimney device.
- We weld the lid with the welded pipe in place.
- We attach locks, hinges to the cut-out pieces of doors using welding and put all this in place. As a rule, potbelly stoves are leaking, so the seals can be omitted. But if desired, a strip of metal 1.5-2 cm wide can be welded along the perimeter of the doors. Its protruding part will close a small gap around the perimeter.

All in all, that's it. It remains to assemble the chimney and you can test a new stove for the garage.
Horizontal
If the body is horizontal, the ash drawer is usually welded from the bottom. It can be welded to the required dimensions from sheet steel or use a piece of channel of a suitable size. Holes are made in the part of the body that will be directed downward. Better to cut something like a grate.

How to make a potbelly stove in a garage from a gas cylinder
Then, in the upper part of the body, we make a chimney pipe. To do this, you can weld a cut piece from a pipe of a suitable diameter. After a piece of pipe has been installed and the seam has been checked, the metal inside the ring is cut out.
Next, you can make the legs. The best fit are pieces of the corner, to which small pieces of metal are attached from below to stand firmly.
The next step is to install the doors. You can cut a piece of metal on the blower, attach hinges and constipation. Here without any problems. The gaps at the edges do not interfere - air for combustion will flow through them.
There will be no difficulties even if you make a door from metal - welding the hinges is not a problem. Only here, in order to be able to at least slightly regulate the combustion, the door must be made a little larger - so that the perimeter of the opening is closed.

How to Install Furnace Casting on a Metal Stove
It is problematic to install furnace casting. Suddenly someone wants to have not a steel door, but a cast iron one. Then it is necessary to weld a frame from a steel corner, attach the casting to it with bolts, and weld this entire structure to the body.
From two barrels
Everyone who has used a potbelly stove knows that very hard radiation comes from its body. Often the walls are heated to a red glow. Then it is impossible to be near her. The problem is solved by an interesting design: two barrels of different diameters, inserted into one another. The gaps between the walls are covered with pebbles mixed with sand with clay (ignite on fire, cover only when cooled). The inner barrel acts as a firebox, and the outer one is only the body.
This stove will take longer to warm up. It will not immediately begin to give off heat, but it will be more comfortable in the garage and after the fuel burns out, it will warm the room for a couple of hours by giving off the heat accumulated in the bookmark.
Long burning garage oven
All from the same gas cylinder you can make a stove for a long-burning garage. There are different designs, but the most proven and stable working is called Bubafonya - after the nickname of the author who invented it and posted it on one of the forums. It was about 5-6 years ago. Since then, many have had this miracle - a simple and original design, high efficiency and the fact that you can lay not only firewood, but also shavings and even sawdust. You can even modify Bubafonya for water heating in the garage, which has been done more than once (a water jacket around the body).

Wood stove in a long burning garage (diagram and photo)
This homemade wood-burning stove has only one drawback - to remove the ash, you will have to turn the body upside down. True, there are already improvements that eliminate this drawback.If you have a welding machine, you can make such a stove in a garage with your own hands in a few hours - it is very easy to manufacture.
Design
This stove uses the principle of top burning: the wood burns from above, the flame spreads downward as the upper layers burn out. This explains the long period of time for combustion - the flame spreads downward much more slowly. However, heating is efficient. Already in the first minutes, a sufficient amount of heat begins to be released.
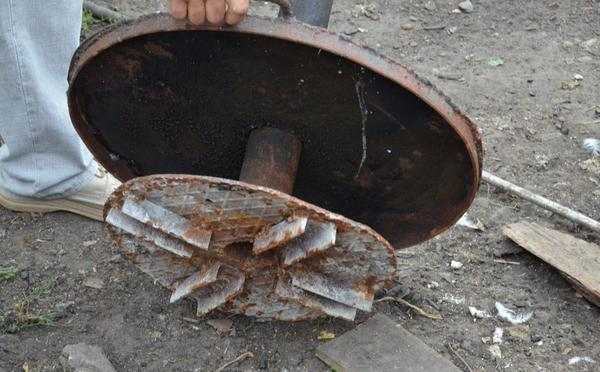
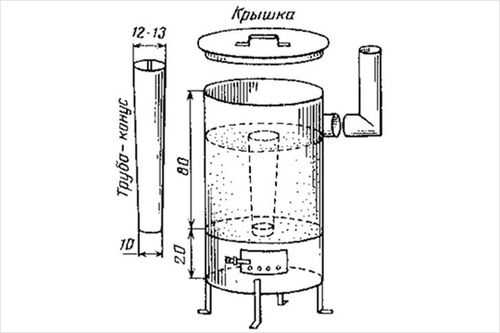
Something like this looks like a load with a lid on the pipe
This stove is traditionally round and vertical. The body is a conventional cylinder with a bottom without a welded cover. The main focus is in the shape and structure of the moving part. It is often referred to as "cargo", but this is only one of its functions. This part also supplies air to the combustion zone. It representsa metal circle to which a pipe is welded in the middle. On the back side of the metal circle - from the center to the edges - corners or pieces of a small channel are welded on. These are ducts through which air enters the periphery of the combustion area. There is also a cover with a hole cut in the center through which the load pipe is passed. The flue pipe is welded almost at the very top of the body. Its horizontal part should not be more than 40 cm, then the pipe rises up. The height of the chimney is at least 2-3 meters, but it must be determined by the draft - so that in any weather the smoke does not go into the garage.
Principle of operation
Having filled the body with firewood interspersed with shavings and sawdust, the bookmark is kindled. A lid is put on the pipe and, when the flame has ignited, the lid is placed on top. Since the pipe is hollow, air is supplied through it to the combustion zone, which supports combustion.
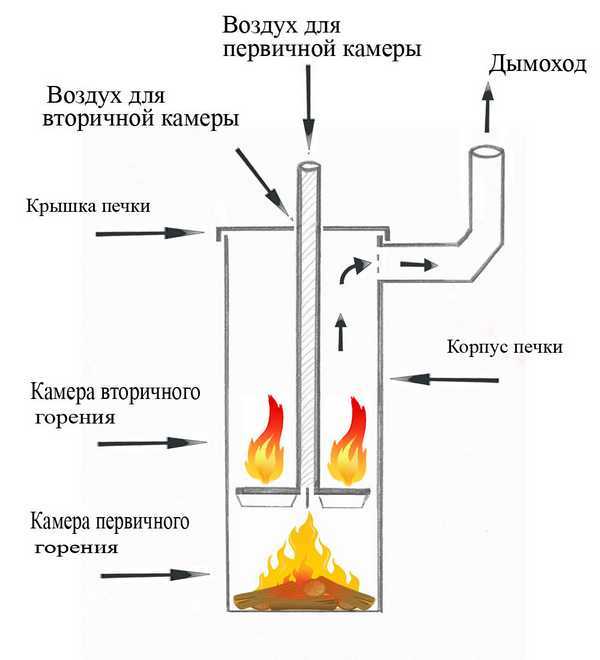
How Bubafoni works
The diameter of the “weight” circle is slightly less than the diameter of the body - through this slot, combustion products enter the upper part (in the figure it is labeled as “secondary combustion chamber”). As you know, they are themselves flammable and can generate a lot of heat. In this zone, with a well-heated oven, these gases ignite. Combustion air comes from a slot in the cover in the area of the pipe passage. Something can "pull up" and in a circle. It's not that important. It is important that the lid should not be made airtight and that, because of this, the draft in the pipe should be excellent.
Gases ignited in the upper part give no less heat than burning wood. This explains the effectiveness of heating when using this design. The burned-out gases go out into the chimney. As it burns, the load sinks lower and lower, until the entire bookmark burns out. After the stove goes out and cools down, you can lay a new batch of firewood and start the process over. It is necessary to remove the ash after several furnaces - the firewood burns out completely, only a small pile of ash and a couple of coals from the lowest firewood remain from the bookmark.
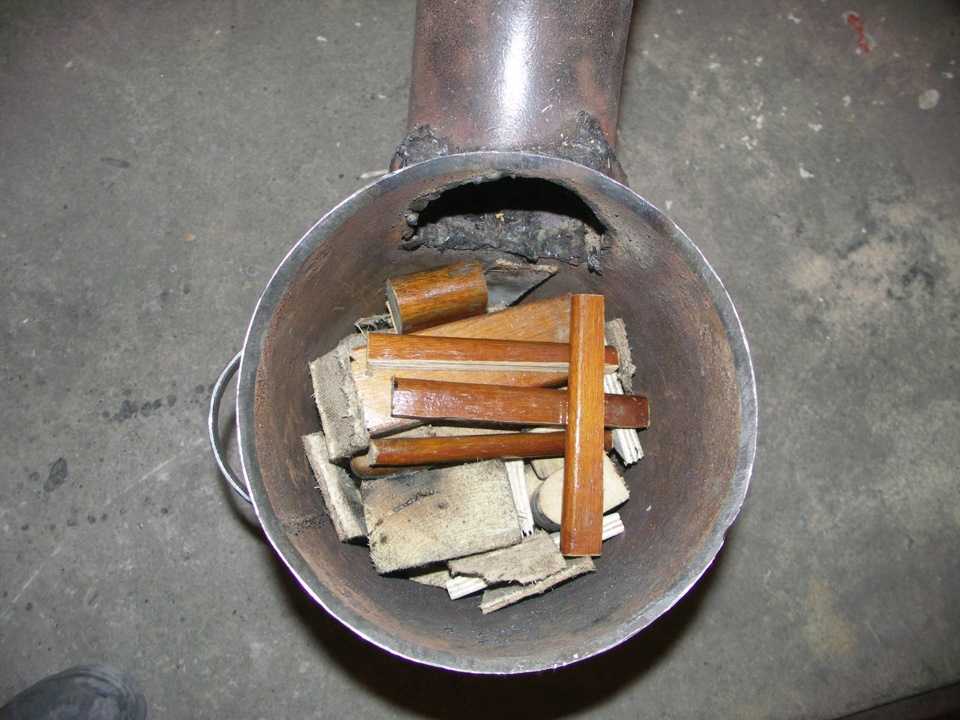
This oven for the garage is heated with such "wood"
Here is a brief summary of the whole principle of operation of this unit. As you can see, there is not only overhead combustion, but also afterburning of gases. A very simple and really well working design.
Manufacturing process
Most likely, you already figured out how to do everything, but we will briefly describe the process. First, let's talk about the materials that are needed for this stove. The most commonly used 50 liter propane cylinders. A barrel with thick walls and a piece of pipe with a diameter of 300 mm to 600 mm will do. The finished case height is from 110 cm to 200 cm. In addition, you will need:
- pipe with a diameter of 85-100 mm, length - about 1.4-2.3 meters - depends on the height of the body (for the duct);
- pipe with a diameter of 120-150 mm and a length of 40 cm (flue pipe);
- metal sheet with a thickness of 4-5 mm - cut a circle for the cargo / air duct;
- a strip of metal 3 cm wide with a thickness of 2-3 mm - weld the side to the lid;
- corners with a shelf thickness of 4-5 mm or the same channel, shelf width - 50-70 mm;
- metal handle - weld to the lid and to the body - 4 pcs (two each).
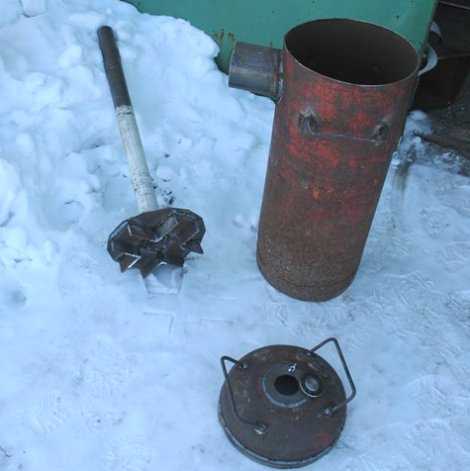
Details of a home-made long-burning stove Bubafonya disassembled
These are all the materials you need. Now, actually, what and how to do. We will proceed from the fact that we make a garage stove from a gas cylinder.
- Cut off the upper part of the bottle washed with water. This will be a lid, so we cut off 3-5 cm from the walls. We process the cut points with a file.
- Remove the valve in the upper part of the cut off cover. This will include the pipe. Correct the hole for the diameter of the duct. It makes no sense to achieve tightness - air must enter the gap, but it must be processed with a file.
- We weld a strip of metal around the circumference of the lid - its lower edge should protrude by 1.5-2 cm. This will keep the lid on the case.
- We weld the handles. They can be made from a thick bar. It is useless to put wooden linings - they will quickly char.
- Cut out a circle from a sheet of metal, the diameter of which is a couple of centimeters less than the diameter of the body. We process the edges with a file.
Another option
- We weld the duct pipe to the circle in the center of the side, cut a hole. We weld the seam again - so that there are no fistulas.
- From the back side of the circle we weld on the corners / channel. They do not reach the edges of the circle by a couple of centimeters.
- On the body, stepping back from the edge 5-8 cm (so that the lid "sat down"), we weld the smoke pipe. We weld the seam thoroughly on both sides - it must be 100% tight.
- We weld the handles to the body.

That's all. A do-it-yourself garage oven was made.
Improvements
Design improvements are swinging usability. Most of the inconvenience is the need to turn over a difficult case in order to shake out the ash. To get rid of this, an ash pan and traditional grates are made at the bottom. The solution is understandable, but this innovation can lead to the fact that firewood will burn faster - air will be sucked through the cracks in the door. If there is a lot of oxygen in the lower part, the wood will burn quickly, and not in the smoldering mode, as is the case in the original design. The way out is to make the door airtight, with sides and a seal.

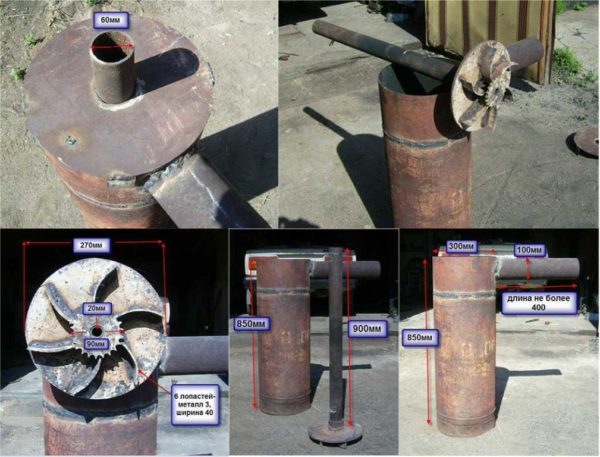
Efficient and Economical Garage Oven - Dimensioned Drawing
The second improvement concerns the number and shape of the ribs on the duct disc. They are made not from corners or channel bars, but from steel strips. They are bent and slightly displaced, so that the air passing through it seems to swirl. 6-8 pieces are welded instead of the original 4. This alteration gives only advantages - the air is more evenly distributed over the combustion zone, the firewood burns evenly over the entire area.
Ordering a brick oven for a garage
Brick ovens provide softer heat, but until they heat up themselves, the garage will not heat up. If you are going to heat daily, this option is good. If the garage will be heated periodically, it is better to make a metal stove - it takes a long time and dreary to disperse the frozen brick stove, and it will start heating in two hours.
For those who decide to put a brick oven in the garage, we will lay out the order of a small (relatively) oven with a heating shield and a hob (just in case).
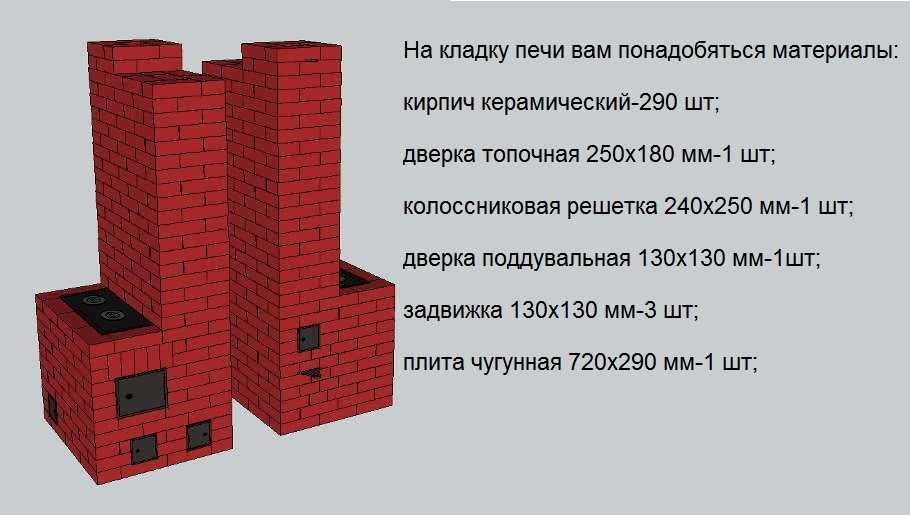
Furnace picture and required materials
The oven is made of solid ceramic bricks (not burnt). Excluding combat, 290 are required. Lay the masonry on clay mortar, the thickness of the seams is about 0.5-1.8 cm.
A separate foundation is needed for this furnace - the mass will be under 500 kg. Its dimensions are 15-20 cm larger than the furnace.
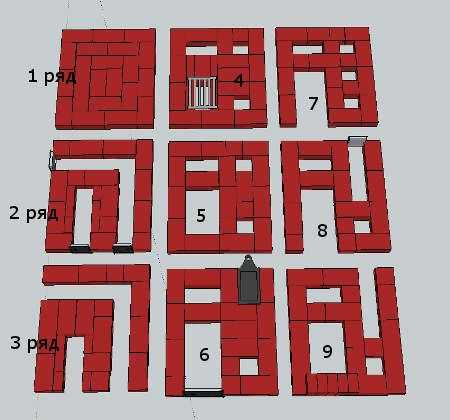
Ordering a brick oven for a garage
Furnace lining is desirable (laying fireclay bricks on fireclay mortar). Bricks are grinded under the furnace casting. The dimensions of the grate bed, plate and doors must be larger than the casting dimensions. The gap is necessary to compensate for thermal expansion and also to lay the thermal insulation layer around the doors. This will reduce the formation of cracks next to them (due to different thermal expansion).
An asbestos cord has traditionally been used as an insulating material.If you do not want to deal with asbestos, you can cut mineral wool cardboard into strips. Only it must withstand very high temperatures - up to 1200 ° C (minimum 850 ° C).
We are installed in the 6th row, the valve allows you to switch the stove in winter and summer modes. This is useful in the off-season when full power is not required but it is already damp.
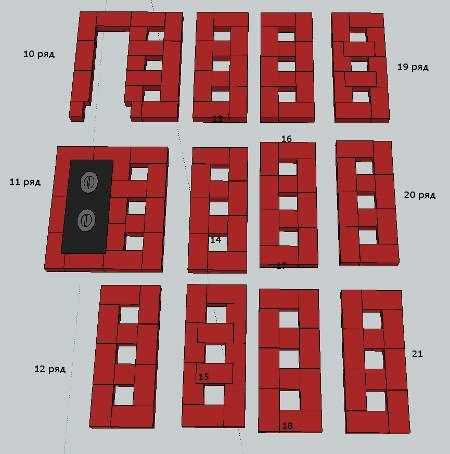
Continuation of masonry
The height of the oven can be increased by repeating rows 14 and 15.
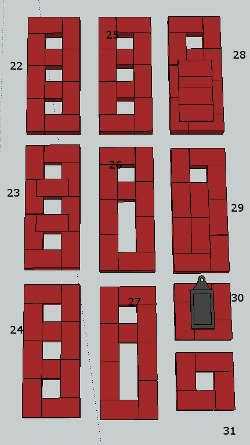
Continuation of the formation of the heating shield
The process of pre-laying a furnace without mortar (recommended in order to pick up bricks and understand what's what), see the video.
Drawings and diagrams
It is long to describe all constructions. Much can be understood from the drawings.
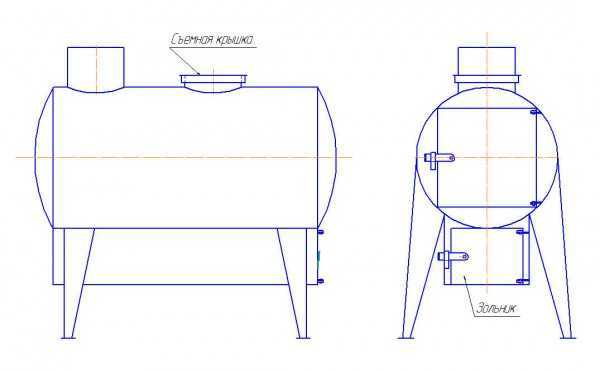
Scheme of a metal stove in a garage from a cylinder
Sawdust garage oven
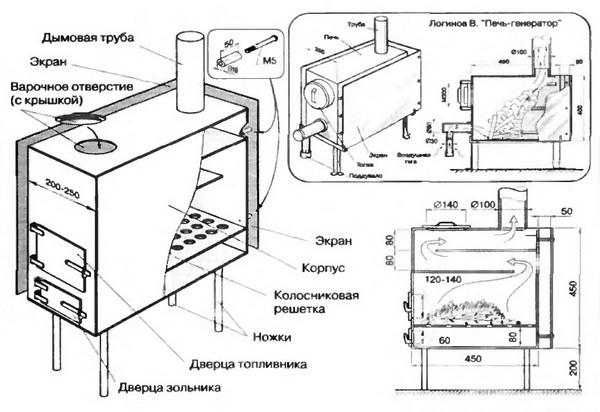
Diagram with dimensions for garage oven (sheet metal)