How to make shelves and racks in a garage
So that the "good" in the garage does not interfere with movement, it is required to somehow organize its storage. The most convenient shelving for the garage. If there is enough space, they can be made on an entire wall or even on several walls. If there is no place at the bottom, you will have to move upstairs - make shelves under the ceiling. Not the best option, but sometimes the only one. Still, floor-standing garage racks are safer, especially if they are securely attached to the wall (to avoid unpleasant situations).
The content of the article
Which shelving is better: welded or bolted
Garage racks are made of wood and metal. The wooden ones are mostly non-collapsible - on nails and screws. They are usually installed permanently, fixed to the wall. Metal shelving can be welded. Then they are non-collapsible. There are bolted racks. These structures are mobile and can be disassembled if necessary. Their disadvantage is insufficient rigidity, since there is always some backlash in such a connection. To make the structure more stable, it is attached to the walls. To do this, metal plates with a hole can be welded (bolted) to the extreme posts. Drive a crutch into this hole (after drilling a slightly smaller hole in the wall).
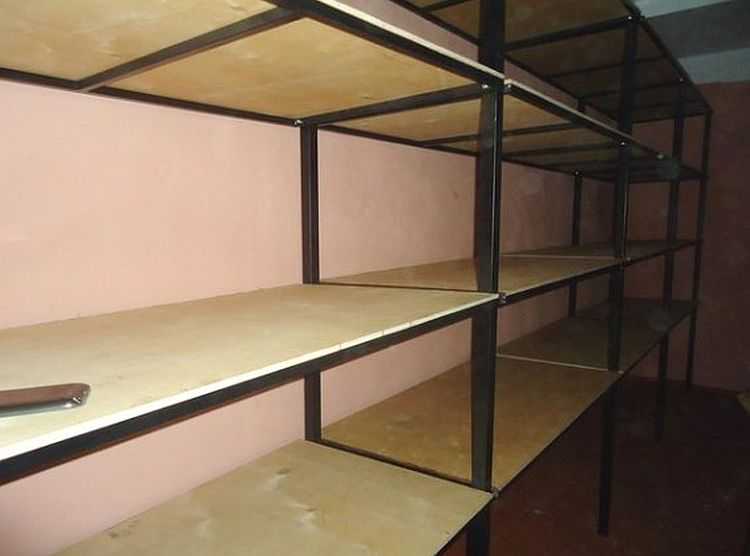
One of the options is a frame made of a shaped tube and plywood shelves
Both welded and bolted garage racks serve well, but welded structures are more common. The collapsible option is chosen in two cases. First, it is possible to move to another garage and all the equipment will need to be transported, and the structure weighs hundreds of kilograms, so moving it entirely is problematic. The second - there is no possibility or desire to use welding (if the racks for the garage are made by hand). The rest usually prefer welded ones - they are more stable and assemble faster with experience in welding.
On sale there are still metal shelves made of perforated corners. They are also mobile and can be disassembled, but they are connected with hooks (on the crossbars) and grooves (on the racks). Such storage systems are convenient - you can rearrange the shelves to the desired height. Their minus is expensive.
Designs and dimensions
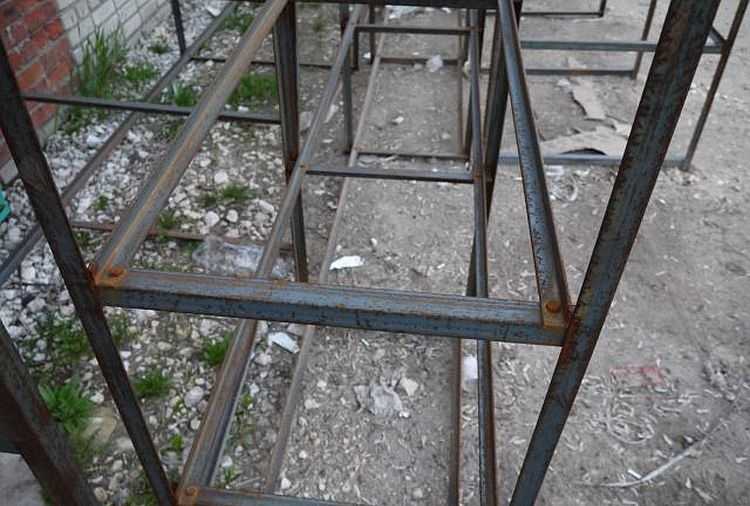
Structurally, garage racks consist of racks, crossbars and shelves. Sometimes, to increase rigidity, transverse tightening is also made on the back side - two steel strips welded / bolted to the extreme posts diagonally. They compensate for lateral loads increasing overall stability and reliability.

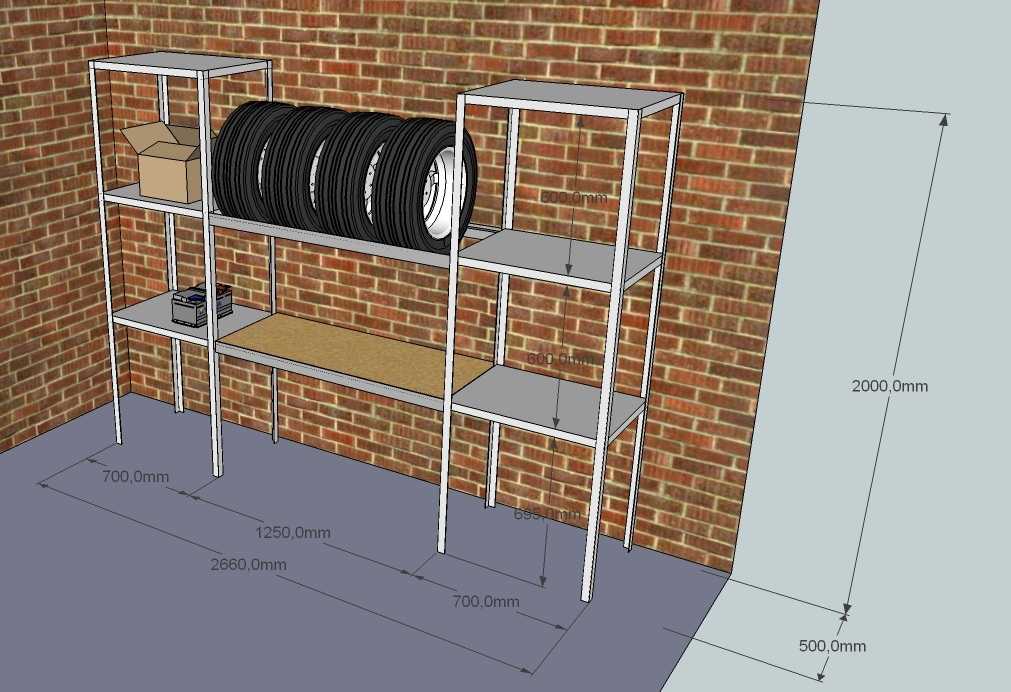
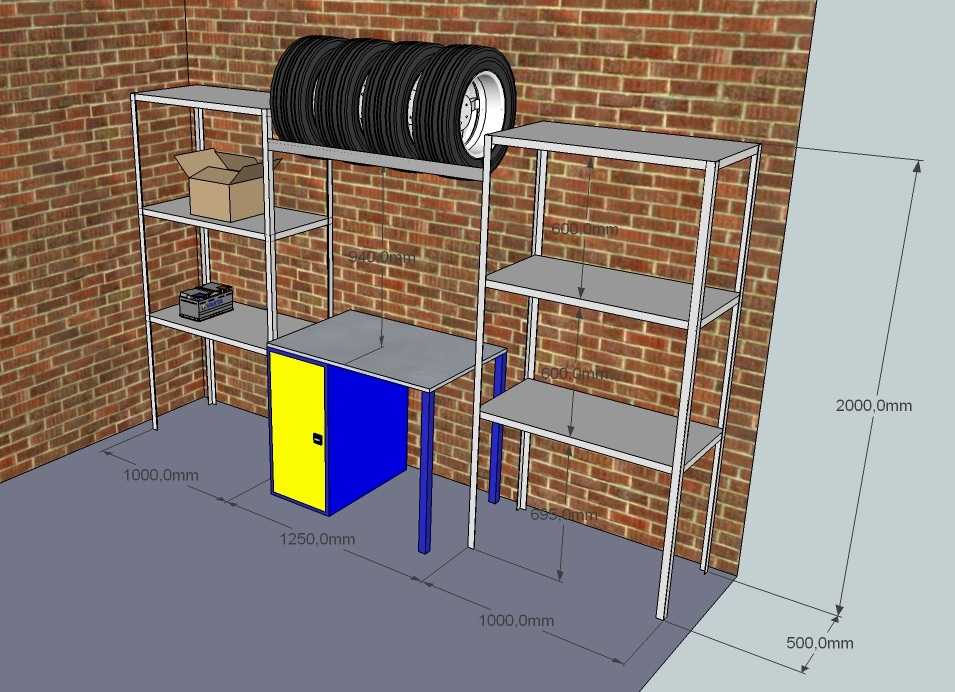
Garage racks can be made according to this drawing (dimensions are approximate)
The dimensions - the height and depth of the shelves - can be chosen almost arbitrarily - depending on what you intend to store. The only thing that needs to be selected carefully is the span length - the distance between the posts in one section. It depends on the stiffness of the material you decide to use: the shelves should not bend even under full load. For heavy things / objects, the span is about 1.5 meters long, if the load is not too large, the distance can be increased to 2 meters, but it is definitely not worth doing more. If you need a rack for a garage of greater length, put intermediate racks, the distance between which still cannot be more than 2 meters.
A few words about the height of the shelves in the rack. The lowest shelf can be raised from the floor level by 50-70 cm (even more if desired). The heaviest objects are usually placed here. The rest of the shelves can be made at different heights, 30 cm - this is inconvenient and impractical.In general, a 1.5 liter plastic bottle should fit optimally on the shelf, which is 35-37 cm. This distance is convenient for use.
What are they made of
As already mentioned, garage racks are made of wood and metal. Wooden ones are lighter in weight, it is easier to work with wood, but they do not withstand such heavy loads. Metal ones are heavier (at times heavier), but you can put an elephant on them.
There is also a question of price. Rolled metal is not cheap these days. If you buy everything on the market or in a store, at the price you will have one rack (including consumables) almost the same amount as a finished one. The only real way to save money is to buy metal at a metal warehouse with whole whips (there are 6 m and 12 m each), and then cut it into pieces of the desired length. Cutting can be right at the base, you will have to pay extra for services, but the amounts are very small. In this case, you will be able to reduce costs by about 20-30%.
One of the layout options
Lumber costs less than metal. But do not think that the costs will be small: you will have to buy high-quality wood without knots, and this is the "elite" or "premium" class with a corresponding price tag. So it won't be very cheap.
Made of wood
The operating conditions in the garage are far from the best - high humidity, frost, alternating frost / freeze, sometimes - heat. Not good for wood. Therefore, all material must be treated with antibacterial and protective compounds before work. Use wood products for outdoor use as conditions in an unheated garage are more similar. You can choose a product that simultaneously tints the surface to be treated and your product may not be painted. After processing, the materials are dried and only after that work begins.
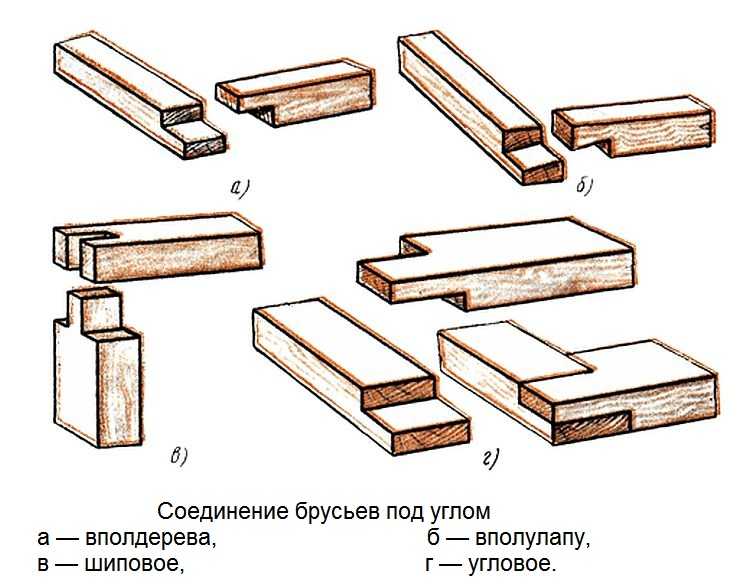
How to connect the bars
When connecting parts of a wooden rack, you can use the methods standard for carpenters - in a quarter or half-leg. If this is difficult for you, you can nail and butt, and use metal corners and / or patch plates to strengthen the joints.
Another point: it is better to connect with nails, and not with self-tapping screws. It turns out more steadily, less connections "loose". If you have chosen the option with reinforcement with plates, they can be mounted on self-tapping screws.
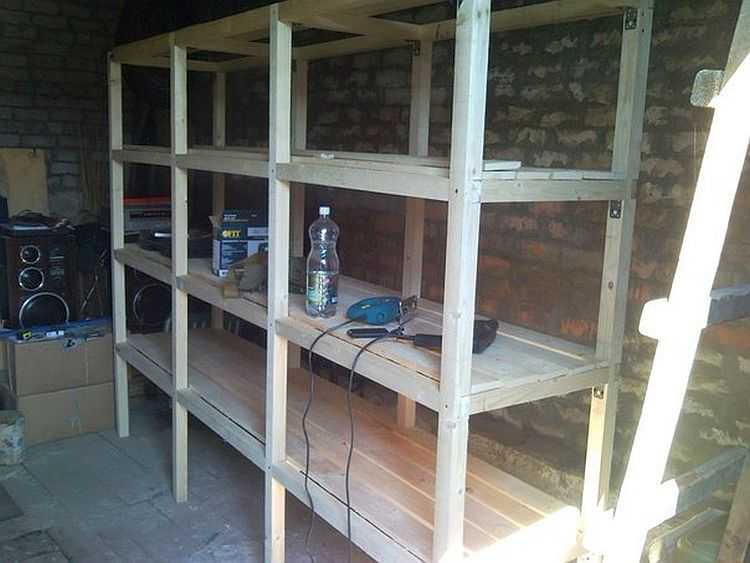
Wooden shelving for garage
Now in terms of size: for racks, usually a beam of 50 * 50 mm is used, for the crossbars, you can use the same beam or a little thinner - 50 * 30 mm. The flooring is made from:
- boards with a thickness of at least 21 mm;
- moisture resistant plywood with a thickness of 10 mm;
- laminated chipboard;
- OSB.
The cheapest are board and plywood. Laminated chipboard is much more expensive, but it does not need to be painted, which is a good plus. In order not to spend a lot, you can take the first and last sheets in a pack at the bases - they are scratched and are much cheaper.
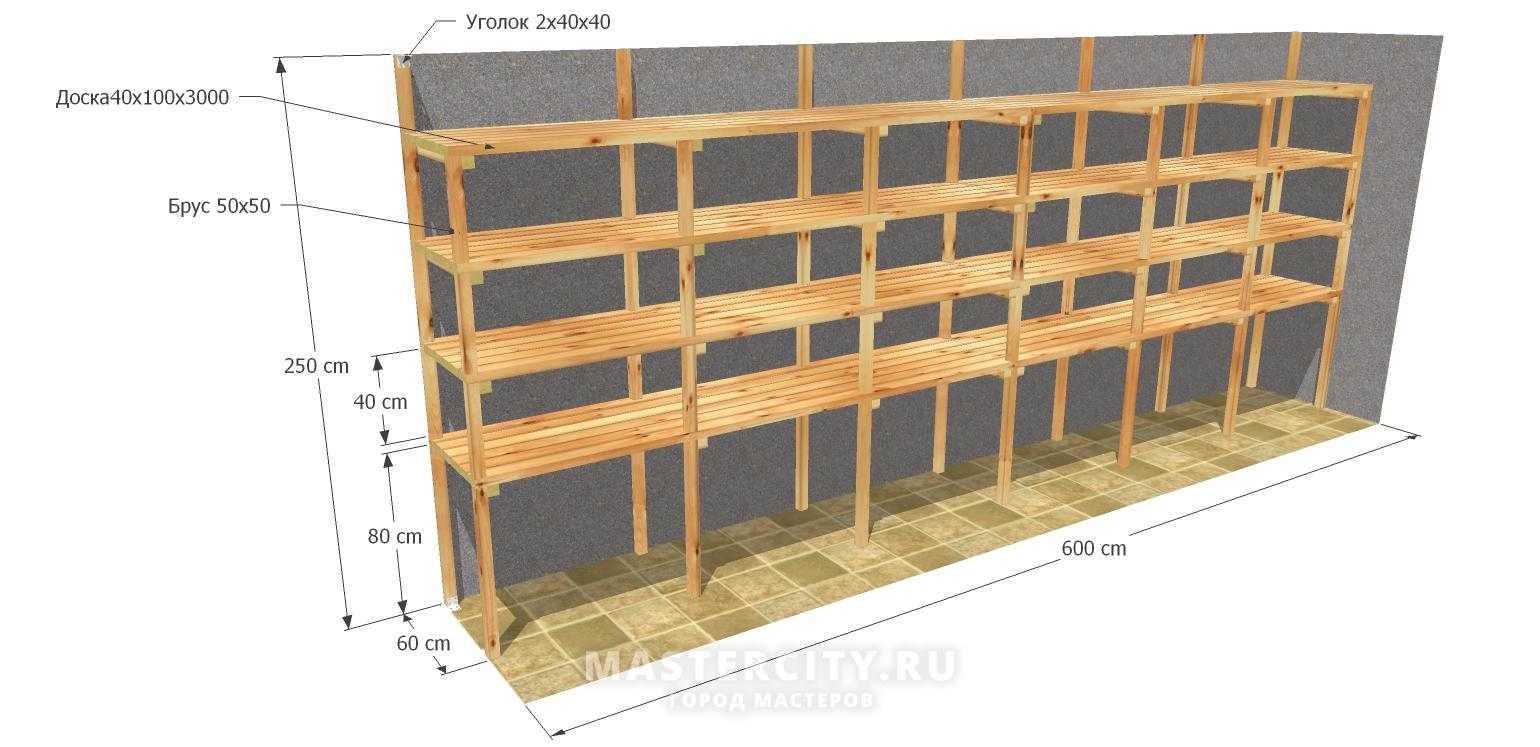
Wooden shelving in the garage - drawing with dimensions
Another point: the side cut of the chipboard shelves remains open. If it is not processed, the chips will swell when the humidity rises, and the shelf will warp. To prevent this from happening, coat the edges with silicone. With such processing, nothing will happen to the chipboard.
Metal
If you decide to make metal shelving for a garage, the choice of materials is wider - there are two options for rolled metal, plus standard solutions for storage facilities (perforated corners). You can also use metal parts intended for other purposes - for example, steel cable racks or cable channels that are used in communication are suitable.
Cable ducts and shelves - convenient and not very expensive
So, what is the frame of the metal rack made of in the garage:
- From a metal corner with a metal thickness of 3-4 mm. The width of the corner shelf is 25-45 cm - depending on the planned loads. Durable, but metal-intensive material, weighs a lot, is expensive.
- Profile pipe (rectangular in cross section).With a lower metal consumption (wall thickness is less), in comparison with a metal corner, it has better elastic characteristics (it is more difficult to bend), and is more resistant to torsion. Approximate dimensions for racks are 50 * 50 mm or 40 * 40 mm, for crossbars 50 * 25 mm or 40 * 25 mm, respectively.
- The racks are made from a professional pipe, and the crossbars from the corner. Metal thickness 2-3 mm, shelf width - 25 mm and more. Unfold the corner so that the flooring to be laid is like in a "nest".
Take a closer look at how the corners are located
The flooring on the shelves is made of the same materials as for the wooden shelving (board, plywood, OSB, chipboard), only sometimes non-standard options are added, which are used sharply with a wooden frame due to the high mass - sheet metal.
A board remains optimal for most regions - a reliable, not very expensive material. You need to take a floor, without knots (with a minimum of knots) with a thickness of 21 mm. Treat with antiseptics, then paint.
The advantage of metal shelves is high reliability with low thickness, the disadvantages are price, weight and "loudness". They also need to be painted, only first cleaned of rust, then go through with a rust converter and primer, then paint and preferably in two layers. Also, by the way, it is necessary to process the metal frame. Then the shelving in the garage will not rust.
Features of the assembly of metal shelving
Metal racks can be welded or bolted together. There are usually no questions with welding. If a corner is used, it can be overlapped - the difference of 3-5 mm when laying the shelves is invisible. If you wish, you can cut out the excess in one of the shelves, weld end-to-end, but trimming takes a lot of time, and you still won't see much difference.

How to cut corners for a smooth connection
With the assembly of the frame for the rack on bolts, the procedure is as follows: first, the squares of the sidewalls and shelves are assembled separately, then they are twisted together. For each connection, at least two bolts are desirable - for greater rigidity (less backlash).
If you assemble garage racks from a profile pipe with your own hands, the procedure is different. First, the sidewalls are assembled, short crossbars are attached to them. You get two rectangles with crossbars. Then they are connected by crossbars.
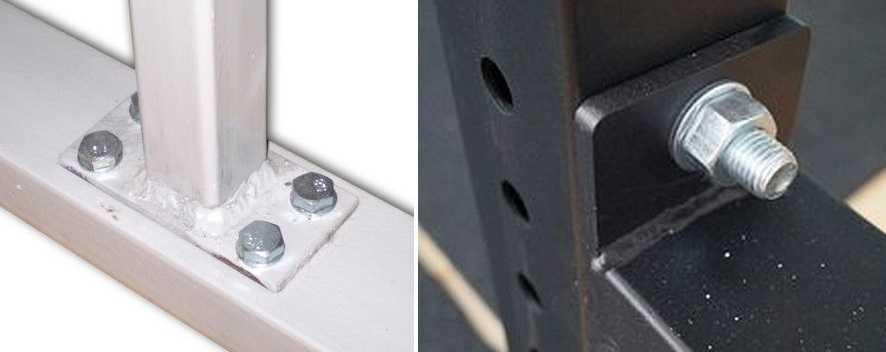
Methods for bolting profile pipes
How you can make connections, see the photo. In one case, welding is still needed - to weld the "heel", in the other, you can do without it - cut out the "ears", bend and cling to them.
There is another way - special crab systems. These are metal plates with recesses molded under the profile. Pipes are laid in the grooves, then two plates are tightened with bolts.
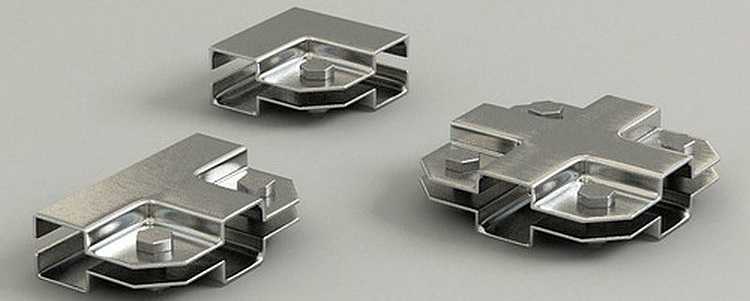
Crab systems for shaped pipes
Such a connection is unlikely to withstand very heavy loads, but there is an undeniable plus - no need to drill a bunch of holes in the metal. In a profiled pipe, this is certainly easier than in a thick-walled corner, but it still takes a lot of time and effort.
By the way, bolts are used M8 or M6, respectively, large holes are required for them. It is easier to first drill with a thin drill, then expand to the desired size with a thick one. Even with that order, you still need a decent number of drills. To make them less overheated and less likely to break, put a jar of water next to it, periodically lower the drill there.
Layout, diagrams, drawings, ideas
In the garage, you need not only a rack, but you also need a workbench and a stand for hand tools - all kinds of keys and other small things, of which there are a lot and it is difficult to come up with a certain convenient storage place.
The workbench can be made in the center of the rack. It is convenient - everything you need will be at hand, you don't have to constantly go to the shelves.
Garage shelving with workbench is convenient
The workbench can be part of the system, or you can make two separate modules, between which you can install the required table.If you don't like this arrangement, you can change the configuration - at least set it at an angle.
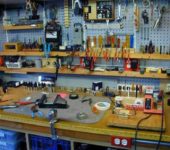
As for the tool stand. There is a factory option - a perforated sheet of metal with holders hung on it. The idea is pretty good except for the price.
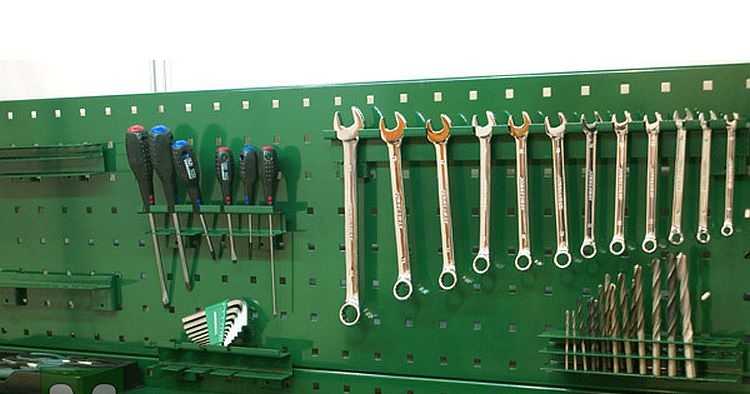
Conveniently))
As usual, there are also several homemade products (what a garage without them) on the same topic. The ideas are simple to execute, maybe not so elegant, but convenient:
- On boards, a sheet of chipboard, plywood, stuff nails under each tool. In order not to get confused where to hang something - circle the tool in place and paint over with some color.
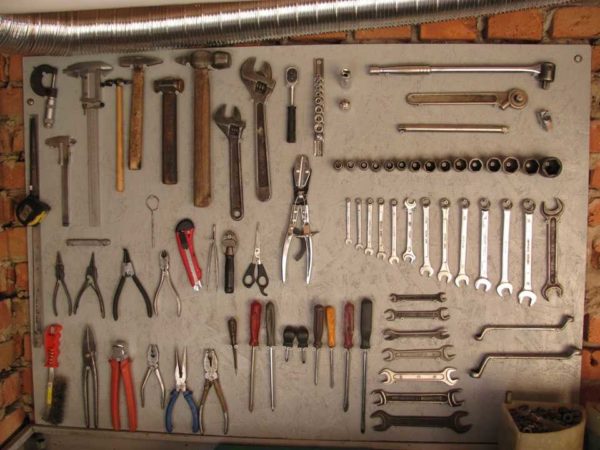
Everything is in order and in its place
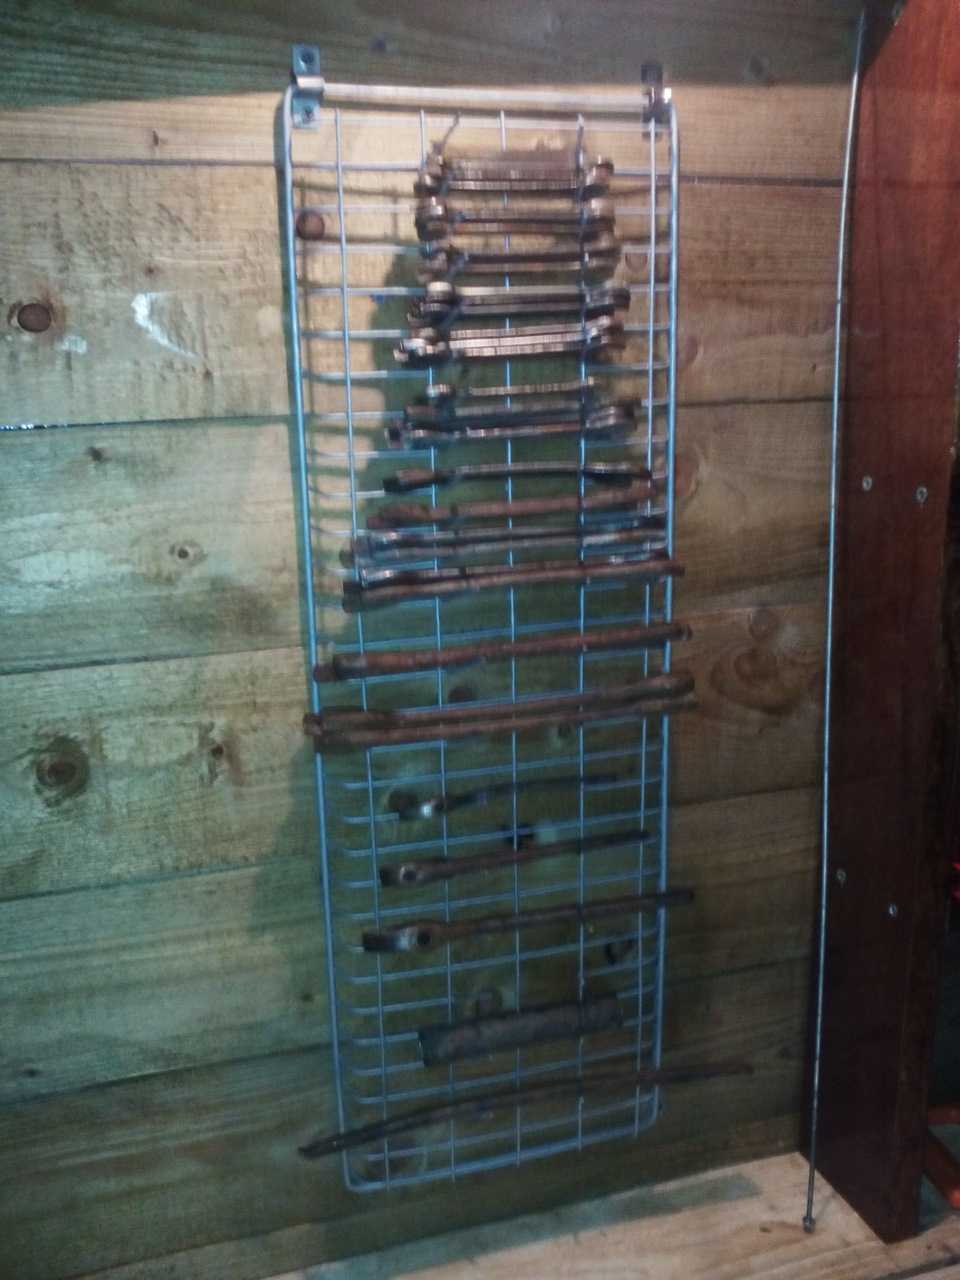
- For heavier equipment - large keys, etc. you can use a net on which hooks are welded from the dragging. Nail the net onto the wall.
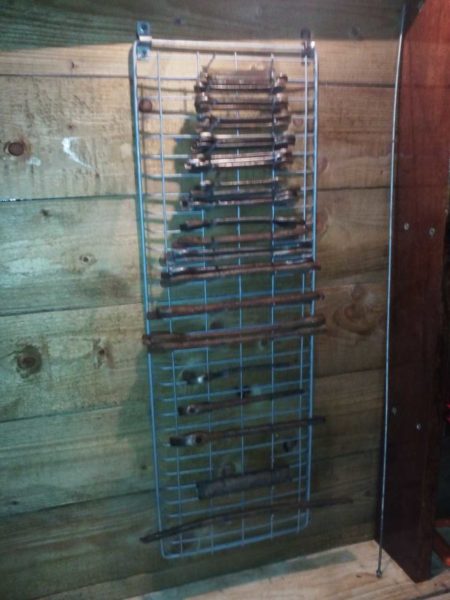
Option for heavier and cumbersome tools
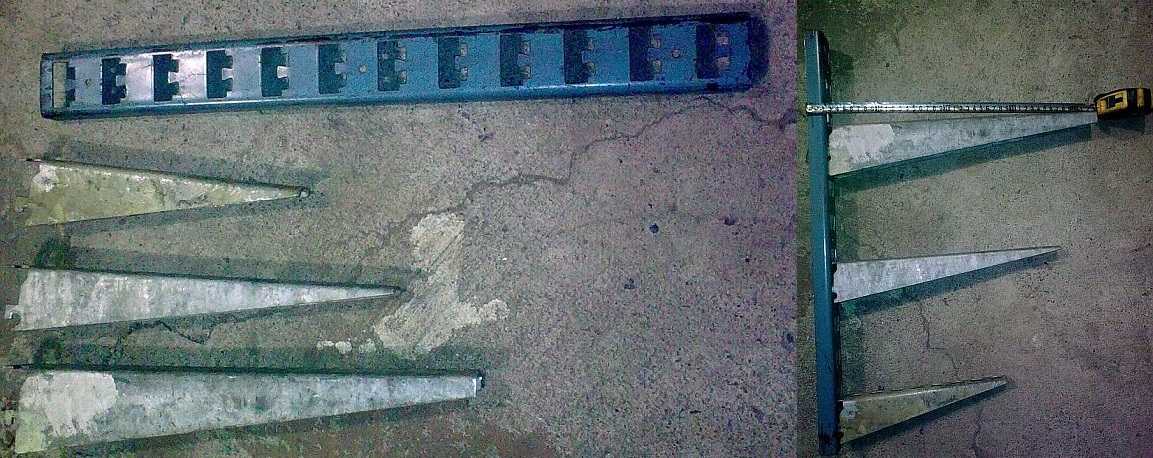
- Make a bar with holes cut in it, into which the tools are lowered.
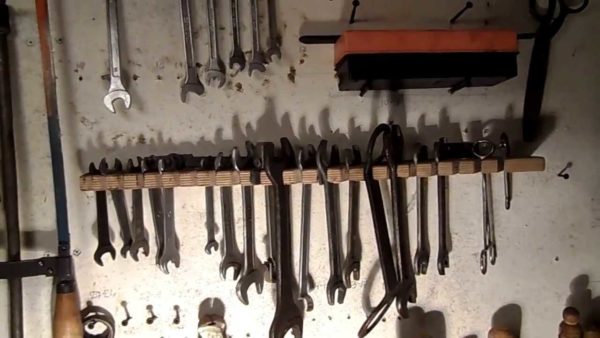
This tool stand is not difficult to make with your own hands.


And if desired, all this can be put on wheels - to make the stand for the tool mobile. This is the case if in the warm season you prefer to work with the machine outside.
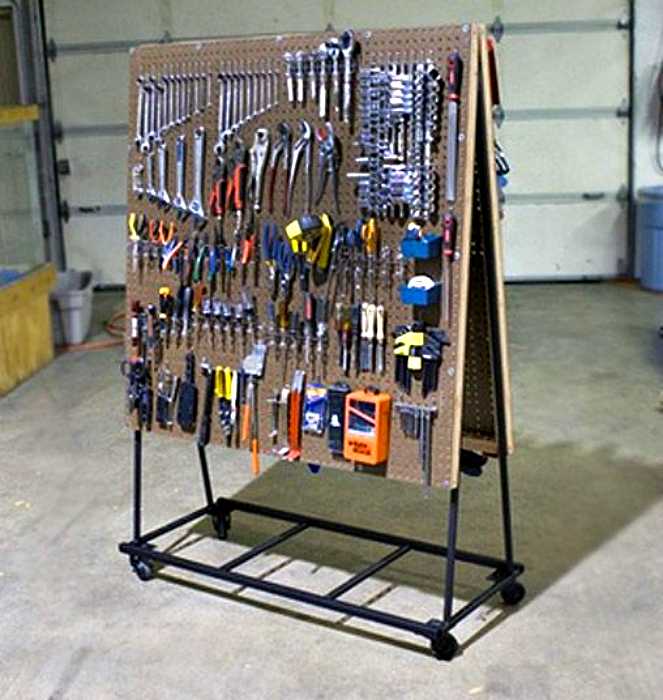
Can be easily rolled back where needed
Well, and for inspiration ... so that in general all the instruments are in place))

Full order))