How and what to make a sandbox
Young children love to play in the sand. To provide them with such an opportunity, caring adults set up sandboxes at home and in the country. Of course, there are ready-made ones on sale, but their price is not at all childish. The best solution is a DIY sandbox. When making it, you will certainly try to take into account all the features and preferences of your child.
The content of the article
What can you make a sandbox from?
The most popular material for building a children's sandbox is wood. These can be edged boards, small diameter logs, timber, block house. Basically, this is what they make. To make the work go faster, you can buy polished materials. They are more expensive but have a smoother finish. If you need to save money, take ordinary materials, then manually or with the help of a grinder, you will bring everything to perfect condition.
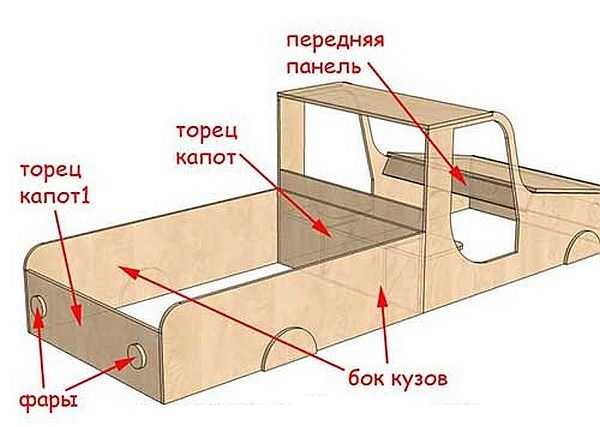
It is more convenient to make such a sandbox truck from plywood.
You can use plywood (moisture resistant) or OSB (OSB). Not everyone loves them, for the presence of glue and harmful fumes (formaldehyde). But in the air, these emissions are not terrible, and you can also use a material with an emission class E0 or E1. It guarantees safety - children's furniture is made of this material. It is convenient to work with plywood and OSB: I cut out the parts of the required shape, twisted them together, processed the ends and can be painted.
In the country, you can use the material at hand. For example, plastic bottles. Just so that they hold, they are attached to the board: they nail the lids with a certain pitch, they screw bottles into them. Having received one "sidewall", take a piece of thick wire equal to twice the length of the sidewall + 20 cm, pierce the bottle with a wire, stepping back about 5-7 cm from the bottom, unfold the wire upwards and pierce in the opposite direction from above. The ends are twisted, trying to hide the "tails".
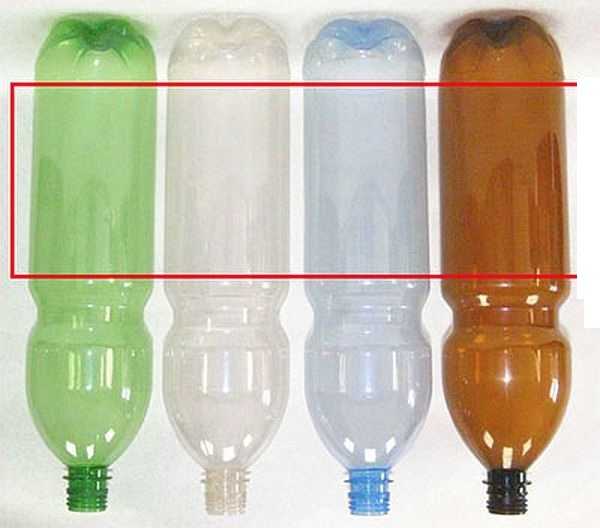
Approximately so it will be necessary to "flash" the bottles with wire
Such twisting is obtained only on one side - on the other, just a bent wire. When you put the sides, put them so that the "tails" are covered by the bottle. The finished sidewalls of the bottle sandbox are installed in a shallow ditch, sprinkle the board and the tapering bottom of the bottles with soil, and tamp it well. At the bottom, you can throw a sheet of plywood, and pour sand on top.
The second most popular "waste" material for summer cottages DIY Crafts - Car Tires... Sandboxes are also made of them. It is necessary to cut off the sidewall of the old tire on one side. Quite high sides will turn out. Then there are two ways:
- you can close the hole with cut-to-size plywood and use it as it is;
- cut off the second sidewall and get only the side.

Tire sandbox: how to make
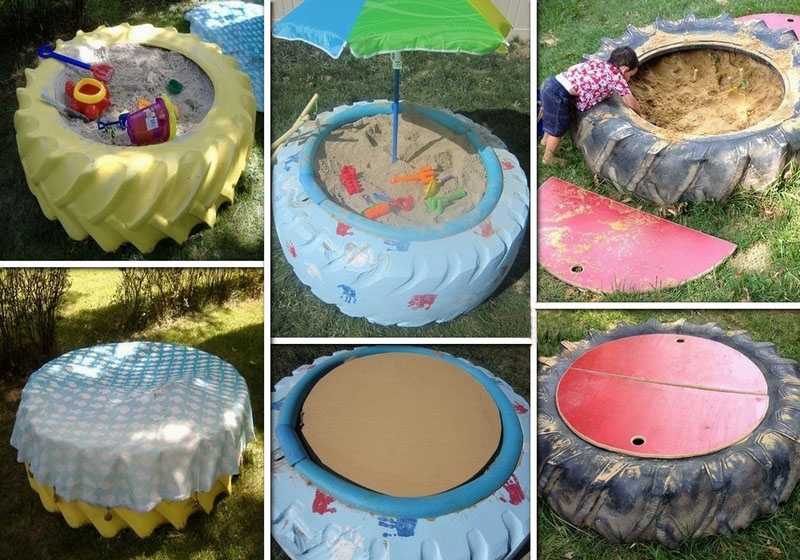
In any case, you will have to secure the slices. In some tires, the cord (reinforcing fiber) is plastic, in some it is metal. Plastic can be sanded, but metal will have to be closed somehow.
To make a sandbox, you can use the trunks of felled trees sawn into pieces. They make a very interesting and quite reliable fence. Before digging in, the wood must be processed - in order to serve longer. There are modern impregnations with a simultaneous tinting effect. Conveniently. The processed hemp must be dried, and while they dry, dig a ditch around the perimeter of the future sandbox. Its depth is at least 20-25 cm. You shouldn't do less - the kids will walk and jump on the stumps, so they should hold on well. Insert the logs into the moat, align, fill the gaps with soil and compact well.
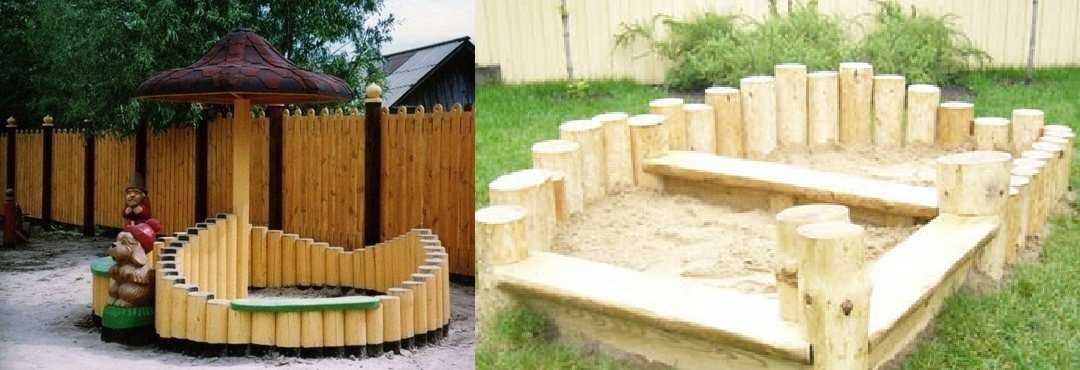
Sandbox fence made of logs
A traditional sandbox fence can also be made of logs. Put a base on the ground: a piece of linoleum, for example, in which to make several holes - to drain water after rain. Put logs on the base, making a rectangle / square out of them. You can fasten them with long nails, but it is more reliable with studs - steel rods with threads at both ends. Under them it will be necessary to drill a hole obliquely at the junction of the logs. The diameter is slightly larger than the diameter of the stud. Drill the edges of the hole so that the nuts and washers can be sunk in. Insert a rod into the hole, put on washers at both ends, tighten everything with nuts.
You can make benches on top - one or two boards and benches for kids are ready. They, of course, rarely sit on them. More often they build their sand castles on them.

Simple sandbox made of large logs
TOHow to make a playground for children, see here.
How to make a sandbox: step by step instructions
To begin with, let's analyze the general principles of making sandboxes of any design. With some modifications, they are repeated every time.
Step one.Seat selection... The place must be chosen so that part of the sandbox is in the shade, and part is in the sun. If this is not possible, we put it in a sunny place, and we make a canopy over it. Pay attention that there are no large trees or bushes nearby. They, of course, give a good shade, but leaves are falling from them, and the sand will have to be sifted often.
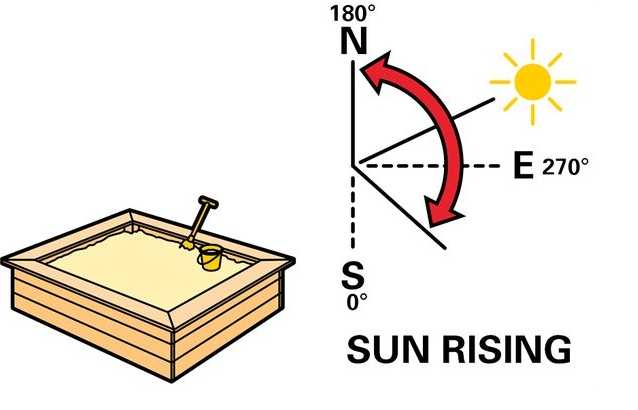
Choosing a place for the sandbox
Do not place the sandbox in strong sun, it should not be in a corner where there is absolutely no air movement. But she also has no place in a draft. Another important point: if you plan to let your baby out to play in the yard on your own, the play area should be clearly visible from the window of the room where you spend most of the time.
Step two. Markup... If the sandbox is rectangular, use pegs and threads stretched between them. We drove in the pegs, measuring the required dimensions (the standard size of a children's sandbox for children from 2 to 5 years old is 1.7 m * 1.7 m). Twine, rope, cord were pulled between them. Checked the diagonals, so that the angles are straight, they must be equal.
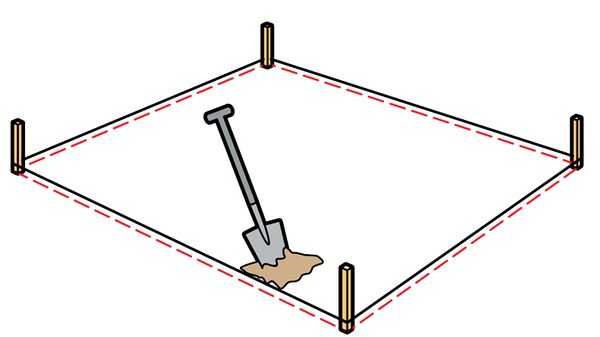
Marking a rectangular area
If the sandbox will have rounded corners or sides, you can draw an arc using sand poured into the bag. A small hole is cut in the corner of the bag and in this way "draw" the required shape.
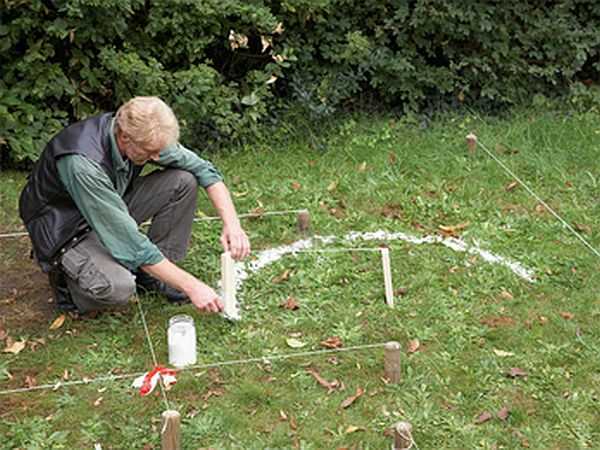
Sprinkle the rounded contours with sand
Step 3. Digging a pit.We remove the sod, and take it to the side, remove a little soil, cleaning the roots along the way, removing stones. The depth of the pit is 20-30 cm.
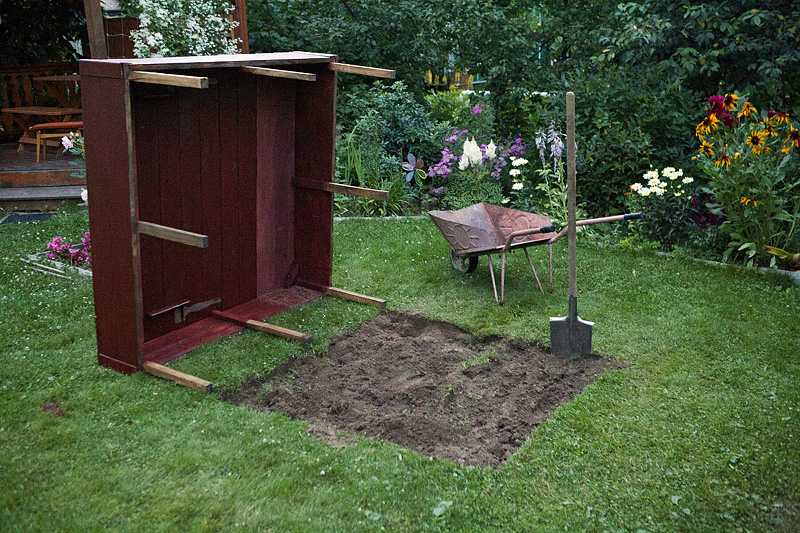
Getting down to earthworks - digging a pit
In the middle of the sandbox, make a small square of greater depth: with a side of about 60 cm and a depth of another 30-40 cm (the total depth of this hole will be 60-70 cm). Pour rubble into the pit. This will be a "water drainage system". If you form a small slope from the edges to it, the sand will dry quickly after rains.
Step 4. We lay the base.
Pour some sand (5-6 cm) on the bottom of the resulting pit, leveling it well. Now you need to lay the base. The best option is geotextile... It is a non-woven fabric, very tear-resistant. It will not let the grass germinate, it will not allow sand to mix with the ground. If you take him to the edges of the pit, he will also "hold" the earth, preventing it from flowing inside when it rains.
There must be some material inside
If the geotextile is not found, you can lay a piece of plywood or linoleum. Only in them you need to cut several holes (1.5-2 cm in diameter) for water drainage.
Further, there may already be differences - it depends on the chosen model and the method of installing the sandbox. The features of their construction are discussed below.
DIY sandbox: step by step photo reports
No matter how simple the design may seem, how it comes to implementation, questions arise.To make them smaller, we publish several models of homemade sandboxes with step-by-step photos that capture the main nodes.
Simple construction
The easiest thing to do is knock down a rectangle or square from the boards. For a sandbox, the normal side of the square is 1.7 m. So you will need 4 or 8, 12 boards of this length. To do more, sizes can be smaller - the choice is yours. The number of rows of boards depends on their width and how high you want it to be.
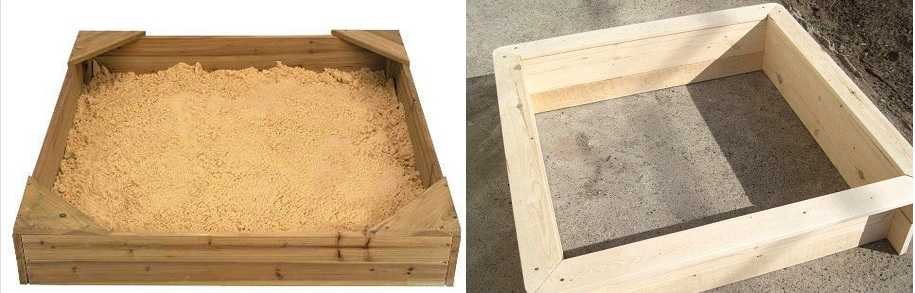
Simple sandbox box
If, as described earlier, a 25 cm pit was dug, then 5 cm of sand was poured, a depression of 20 cm was obtained.If you want the sides to protrude from the ground by 10 cm (for children 2 years old, this is convenient, for older children it is possible from 20 cm and above), the total height is 30 cm.If the board is 10 cm wide, you will need 3 tiers (boards, respectively, 3 rows * 4 pcs = 12 pcs).
You will also need a bar with a section of 40 * 40 mm. It will need to be cut into pieces equal to the height of the sides of the sandbox. In our case, this is 30 cm. You will need 4 pieces. The total length of the required timber is 1.2 m. All lumber is sanded well, then impregnated with protective impregnations, otherwise the wood will quickly lose its appearance.
We take two boards, fold them at an angle of 90 °. We put a bar in the place of the joint, we nail both boards with nails or screw in self-tapping screws - two for each fastener. Attach the next board to one of the ends, place a block and repeat the operation. So we collect the first row. It will look like the photo on the left.
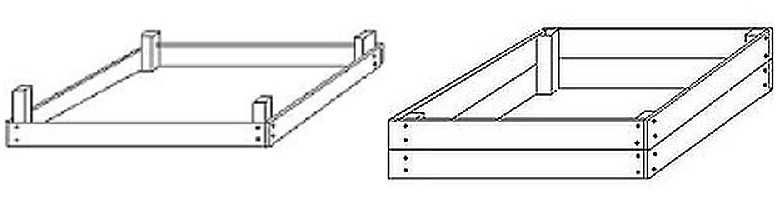
Sandbox build order
The second and third rows are assembled by analogy. We put two hardware (nail or self-tapping screw) on each connection. Just make sure that the heads do not protrude and the tips do not stick out.
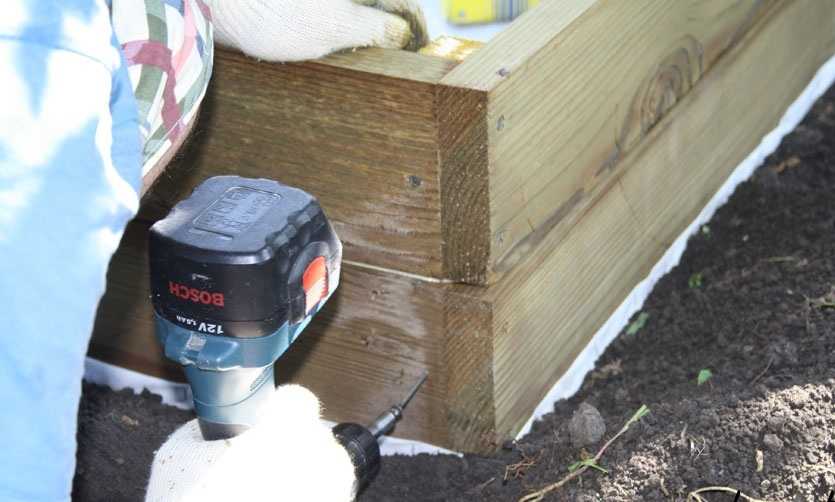
Twisting the boards
After the required height has been collected, we can assume that the sandbox is made by hand. But, as always, now I want to add something to make the kids more comfortable. They usually like to sculpt Easter cakes, but they need a playground. You can nail in the corners small triangles made of plywood or also assembled from cut boards. Another option is to nail in two longitudinal boards. They fit perfectly on the corner bars. In them we also pound nails.
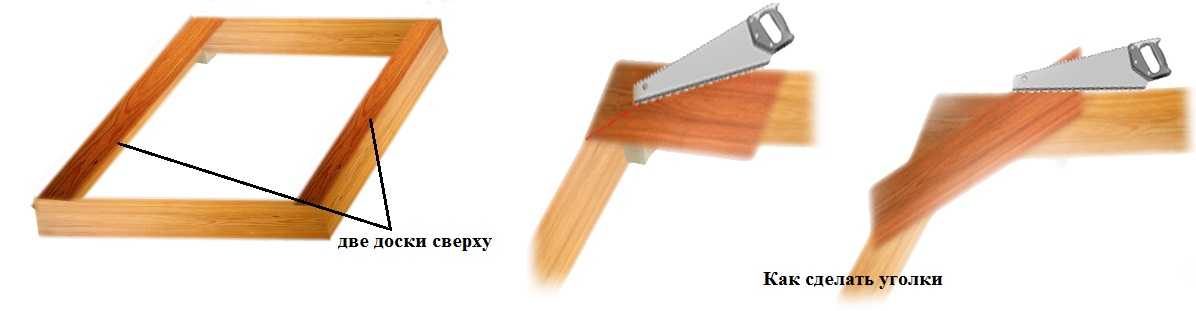
Add comfort
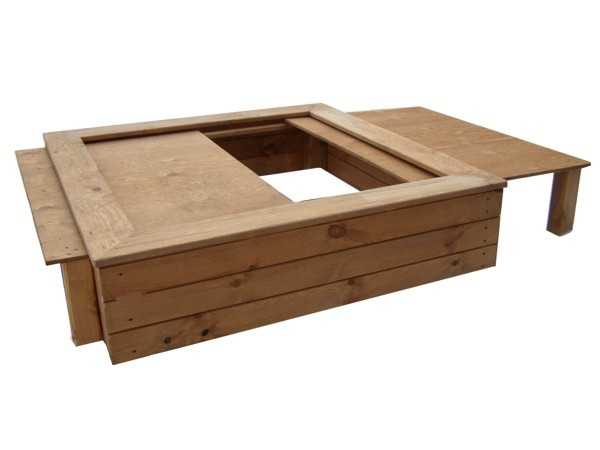
Continuing the theme of "improving" sandboxes. It is not very pleasant to carry home toys that are soiled in the sand every time. The problem is solved simply: fence off the part for toys. It is convenient for you and your child. An additional wall is placed, which is also attached to the existing ones with the help of bars.
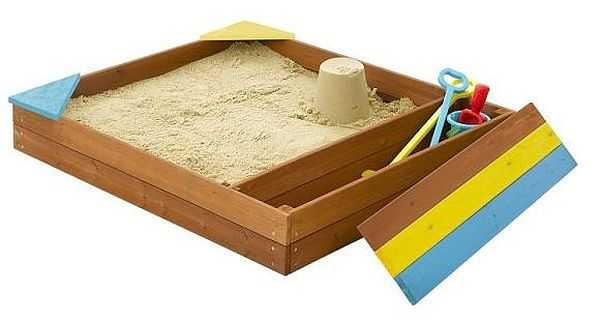
Fence off the compartment for toys - put an additional wall
And so that there is no temptation to pour sand there, you can come up with a cover. You can sit on it, or you can build Easter cakes.
A couple of boards, a little imagination and an ordinary box turns into a car. This will definitely please the boys.
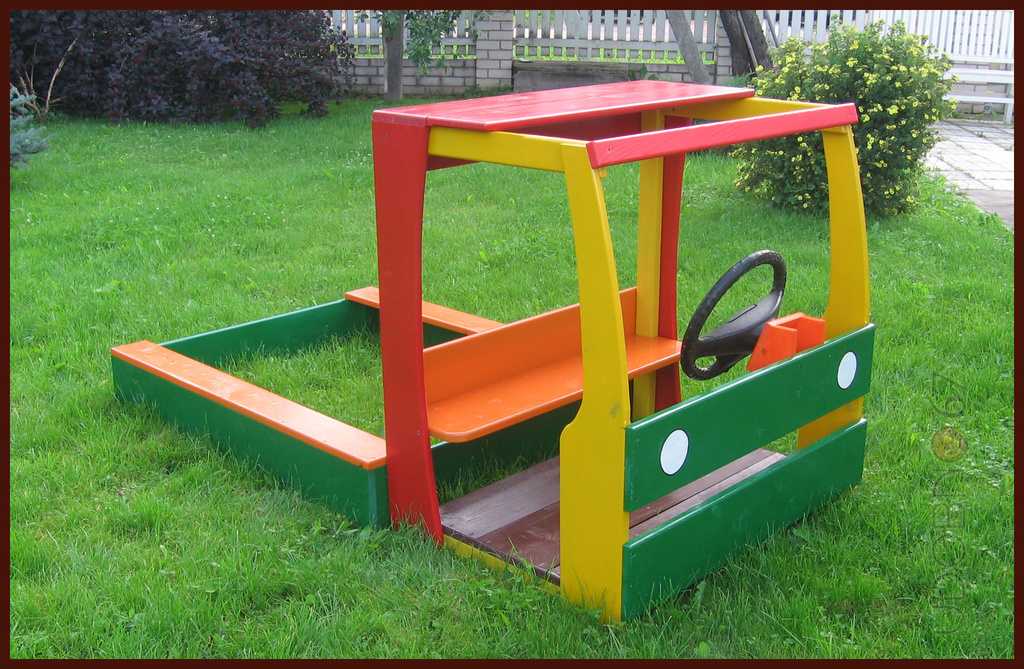
Sandbox machine
How to make a playhouse for children on the site, see here.
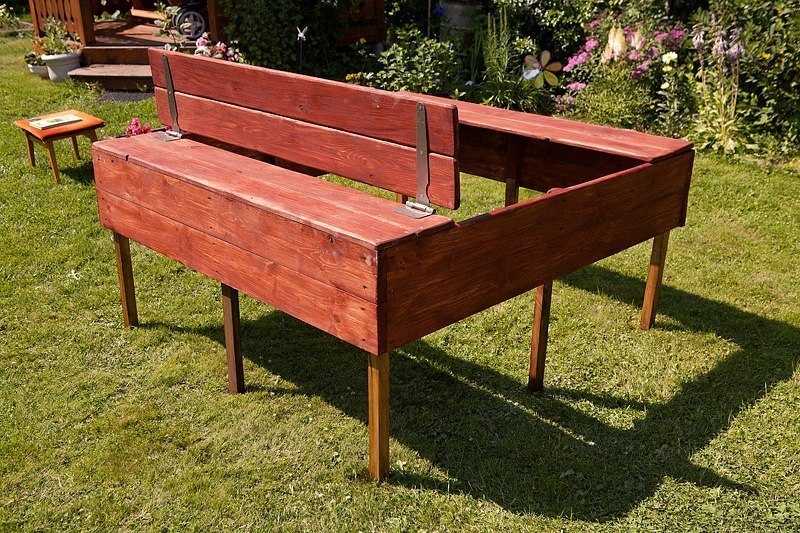
Transformable sandbox with folding lid
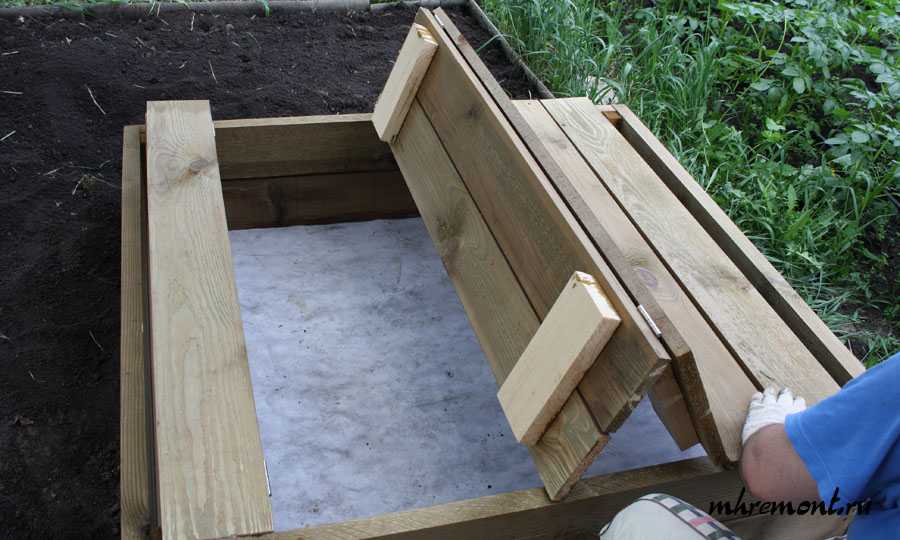
Construction begins in the same way as described earlier: a box of boards is assembled. The whole trick is in the design of the cover. You will also need boards for the lid and hinges - four ordinary doorways and four with one long shelf.
In our example, 6 boards went to each side of the lid. They were fastened in pairs. First, two boards were nailed to the finished box from one side and the other.

We nail in two boards
A short hinge shelf, similar to a barn one, was screwed to them. Two boards were also attached to the long shelf. It is important that the second one is attached at least half the width, otherwise it may turn out.
We attach hinges with long shelves
We fasten the following board to the usual door hinges. The shelves are on the other side. Then it turns out that the second part of the cover folds back to the other side. The second board is attached to the fixed one with an auxiliary bar. It is stuffed on both sides at a distance of about 15 cm from the edge.
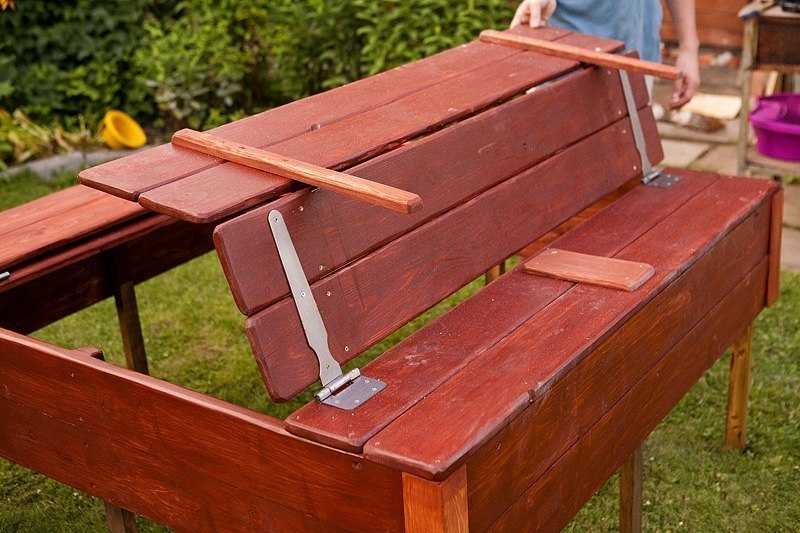
How to attach the last piece of the cover
So that the folded lid does not press on the hinges, an additional piece of board is stuffed onto the first two boards. It serves as a support; under load, the board does not bend.
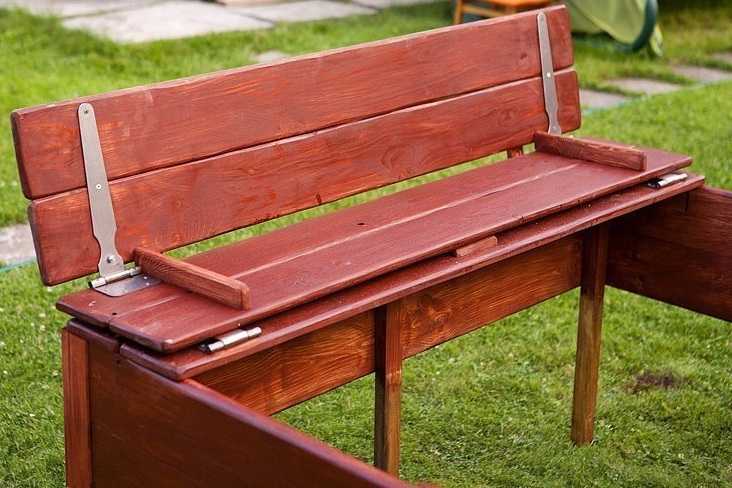
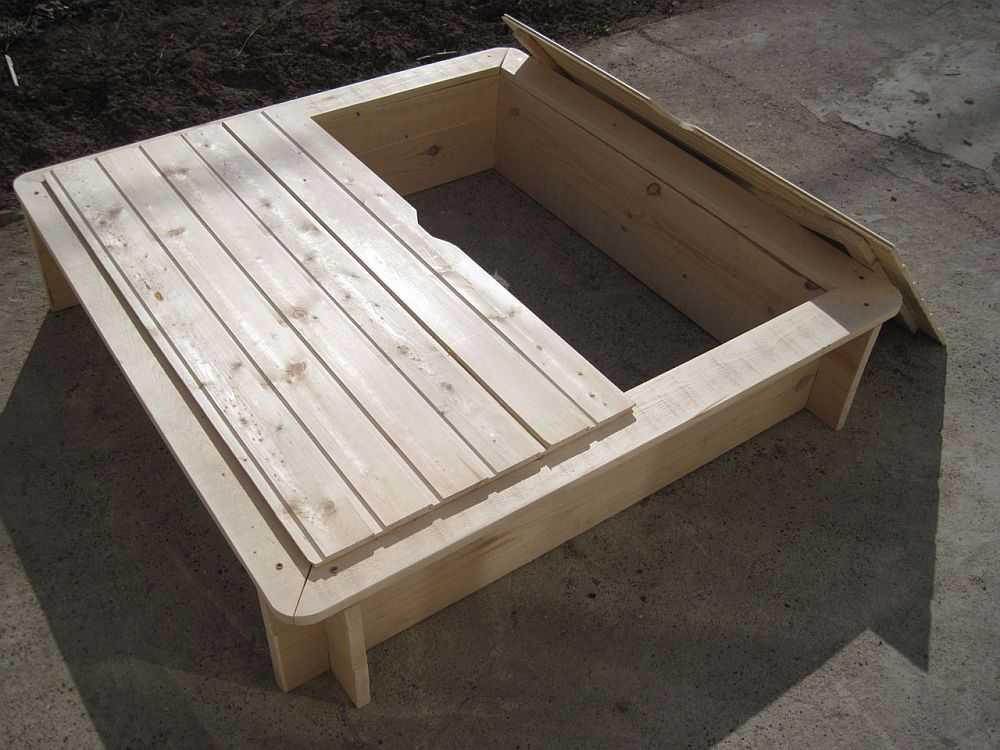
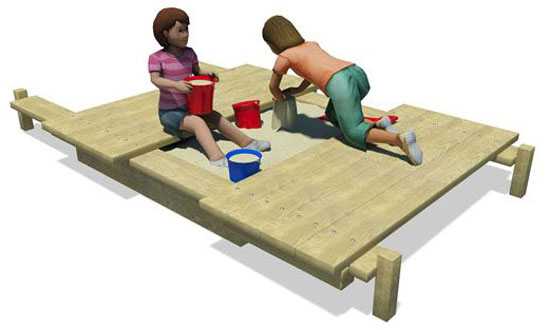
When folded down, the sandbox looks like this
From operating experience, we can say that children hardly play under the seats: it is inconvenient. To use this area more efficiently, it can be fenced off under a compartment for toys. Another plus of this solution is that less sand is required.
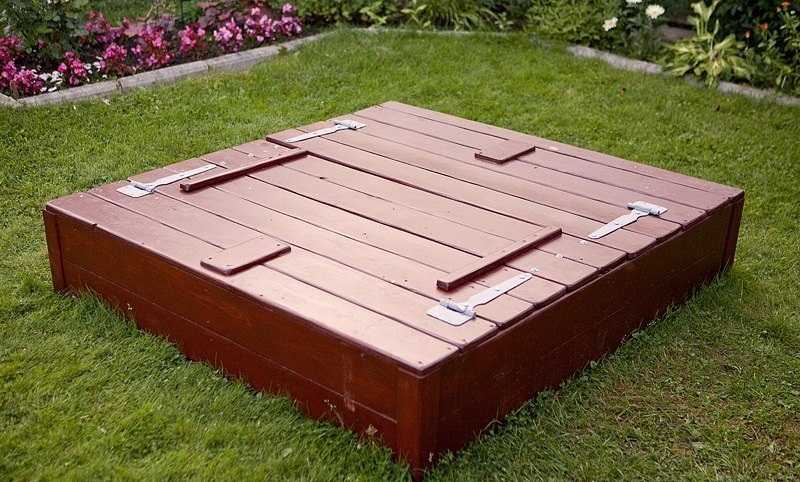
This is how the lids close
In this example, the docks are painted with an impregnation that simultaneously gives the wood a color. If desired, you can use a regular opaque paint. Just take for wood, for outdoor use. Otherwise, after a couple of rains, it will bubble or crack. Using paint, you can paint the sandbox in more "girlish" colors. Although the impregnations can also be of different colors, they just give a shade.
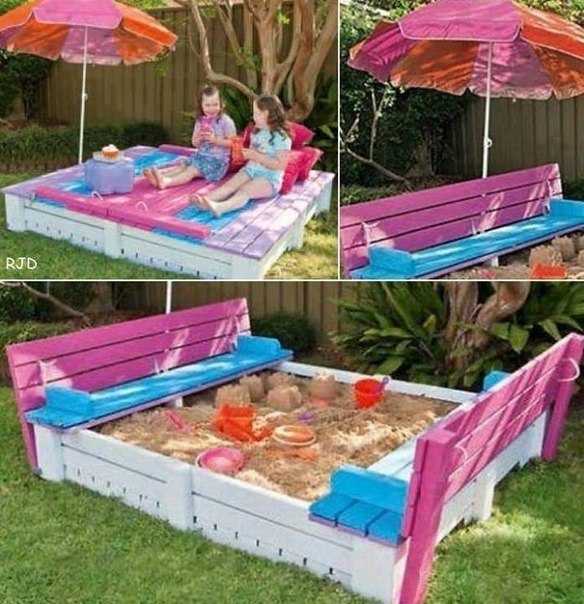
The same model in a different color
Sandbox boat
For boys, you can make a sandbox boat or ship. The main "body" is built as usual, all other superstructures are attached to it.
In this version, it was decided to make the sandbox low. A triangle was added to the downed hull - the nose of the future ship. It is much higher than the main part. To keep the boards tight, two boards on each side are driven into the ground 60 cm deep. Boards were nailed to them. In the corners, they are also fastened, but only to each other - with nails (they beat them obliquely).
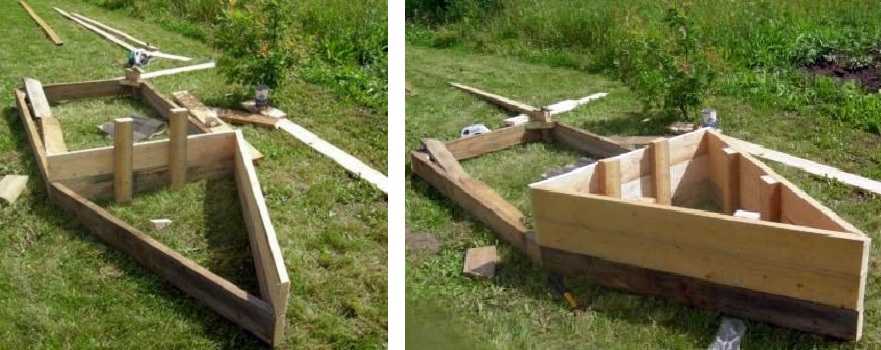
How to make a sandbox ship
Since the difference in heights was significant, a staircase was made from the "deck" to the bow. The top is sewn up with a board, the masts are reinforced.
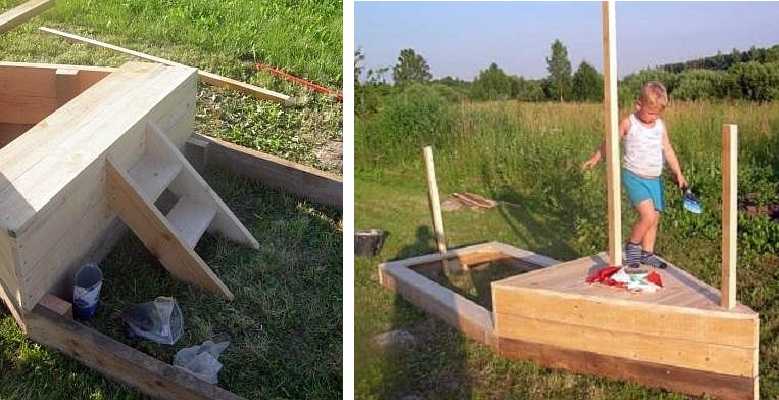
Almost ready
Only finishing work and equipment remained. After a while, it was decided to make an extension at the stern - and a place to hide from the sun, and put a box for toys there. They put up pillars from a bar, sheathed with cut-to-size plywood. In the final version, the ship looked like this.
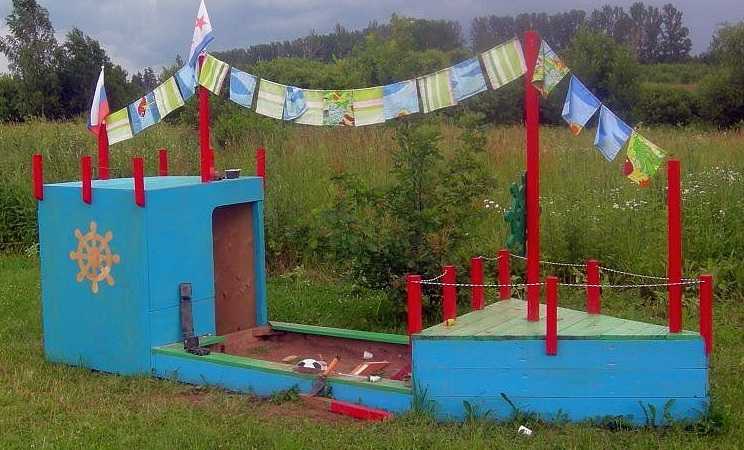
Homemade sandbox boat
Another boat was built using approximately the same technology.

Another sandbox option for boys
How to make a swing for children and adults read here.
Awnings
It is not always possible to put a sandbox in partial shade. More often they put it in the sun, and then they do shading - some kind of canopy or umbrella. There are many interesting designs of such awnings that are quick and easy to make.
A simple canopy over the sandbox
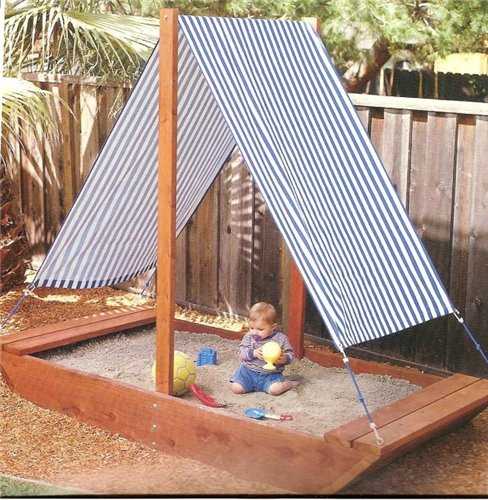
Perhaps the easiest to implement is this canopy: two posts are attached in the middle, between them is a crossbar. A dense tang is thrown over the crossbar and attached to the hammered hinges.
Sandbox boat and canopy
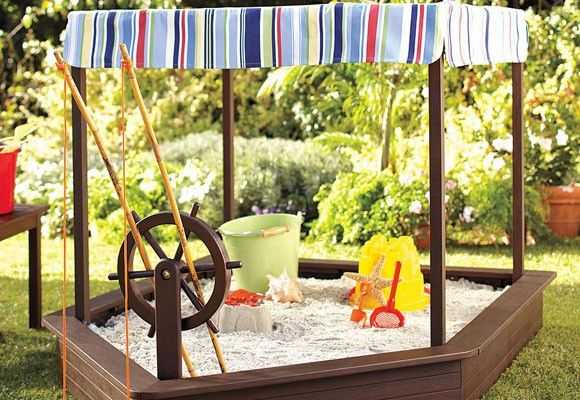
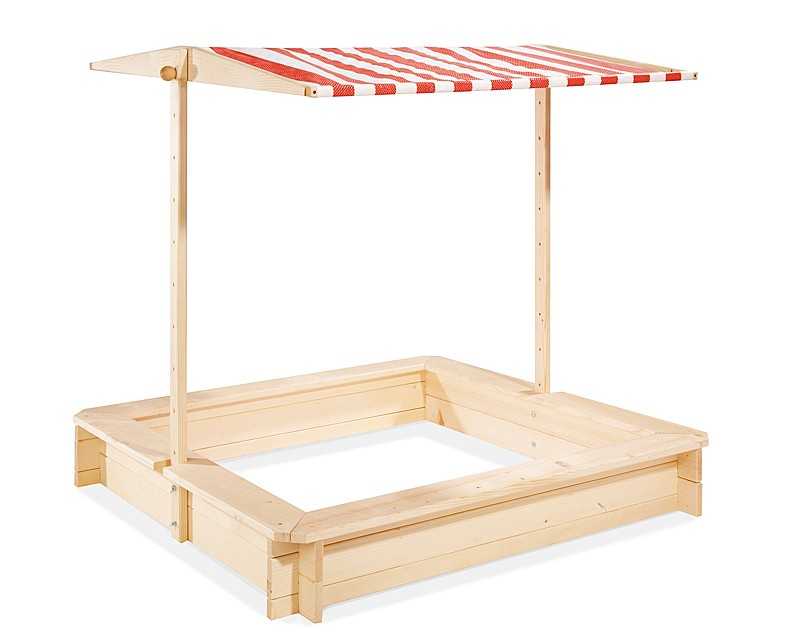
This canopy is not much more difficult. Four racks required. They are connected at the top with strips - they make the upper strapping. The awning is sewn in size and pulled on. You can fix it with buttons or decorative nails. The main thing is to have the opportunity to shoot in the fall.
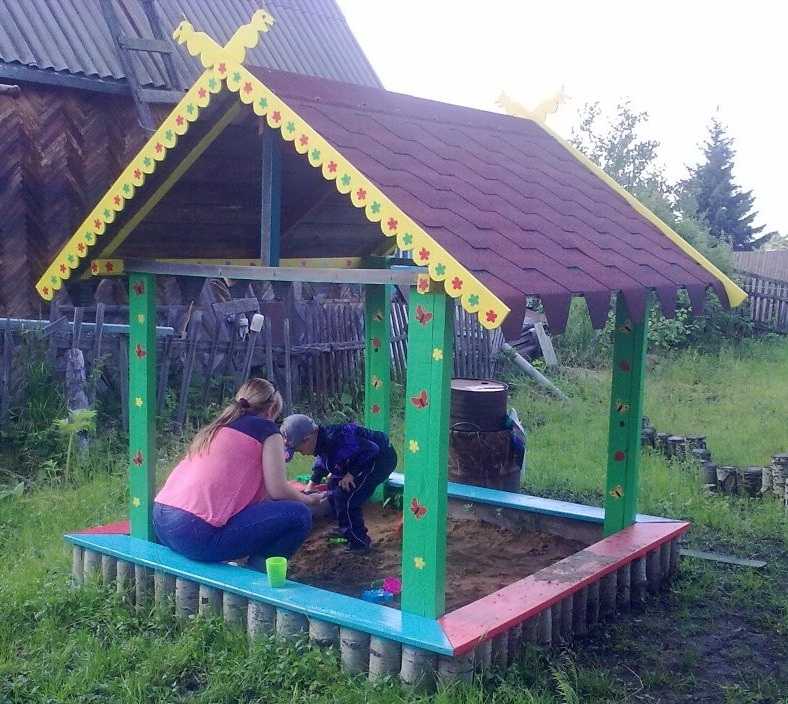
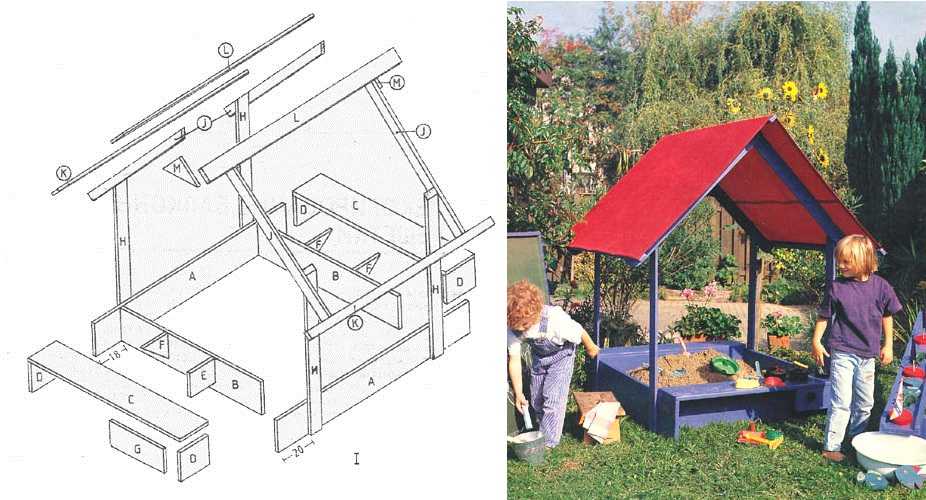
You can put a real roof over the sandbox
Such a roof is a little more difficult to make. Triangles are attached to the upper trim of the racks - the rafter system. They are connected at the top with a longitudinal bar, which is correctly called "ridge", and supports are placed in the middle. Plywood or OSB is nailed under the soft tiles, which are used in this case, and roofing material is already laid on top.
Pay attention also to the decor of the sandbox itself: birch chocks are driven / dug in / dug along the perimeter, which are covered with boards from the inside: so that the peeling bark does not fall into the sand. Quite an interesting solution.
Another canopy option
Another uncomplicated sandbox sun shade. The two triangles are connected by thin strips. Attached to the racks, it is only desirable to make the racks more solid. For small children, this section is enough, and for older children - from 4 years old - something more solid is required - at least 60 * 60 cm. To save money, you can sew two boards - knock them down with nails on both sides. Stretching the awning won't be difficult
How to make a sandbox with a "fungus" in a small boardwalk - see the video
Lids
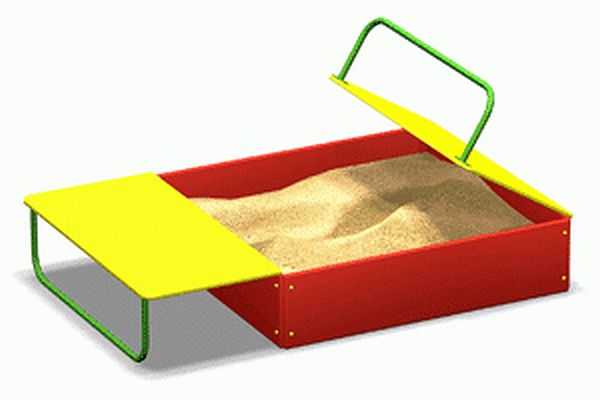
The second attribute required for sandboxes is lids. Not only do leaves fall into the sand and all kinds of rubbish get into the sand, but also animals love it ... it is there. To prevent encroachments on the cleanliness of the sand, you can use the cover. In the simplest version, this is a shield knocked out of boards or cut out of plywood, to which handles are attached.
Cover made of boards
So that you do not have to remove and install the shields every time, you can attach hinges, and so that the doors do not hang, weld the handles on which they can rest. When the lid is folded back, you will get two small playgrounds. Children can sit on them or build their own sandcastles. Therefore, it is more convenient to make such covers from plywood: there are no gaps and less weight.
Hinged cover
There is an even more interesting design - an exit one. This type of cover is definitely made from plywood. Nail the top bar so that a gap remains. A sheet of plywood is inserted into it. And so that the opposite end does not dangle, the legs are nailed - small pieces of a bar.
Interesting sandbox cover design
The same principle is implemented in a different way in the version in the photo below. It is already for those who are good at carpentry.
The cover rides on guides
Blueprints
To build a sandbox with your own hands quickly and easily, it remains to provide you with a few drawings. You can build on them, take them as a basis. It is possible and necessary to make adjustments.

Simple sandbox drawing with dimensions
Sandbox with a roof - photo and drawing
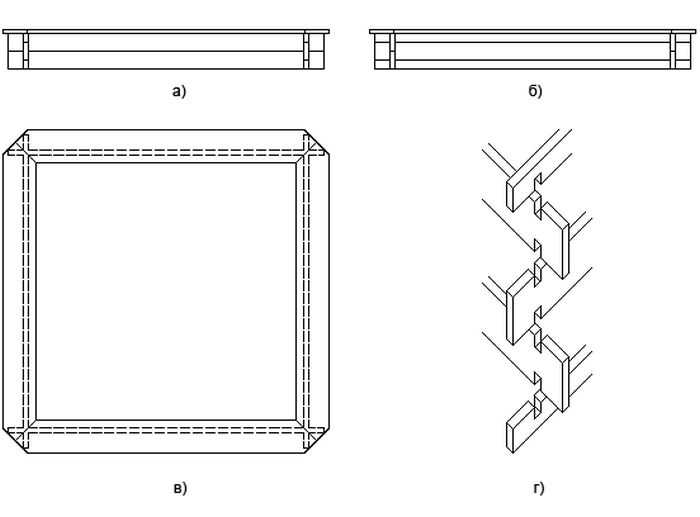
Prefabricated sidewall
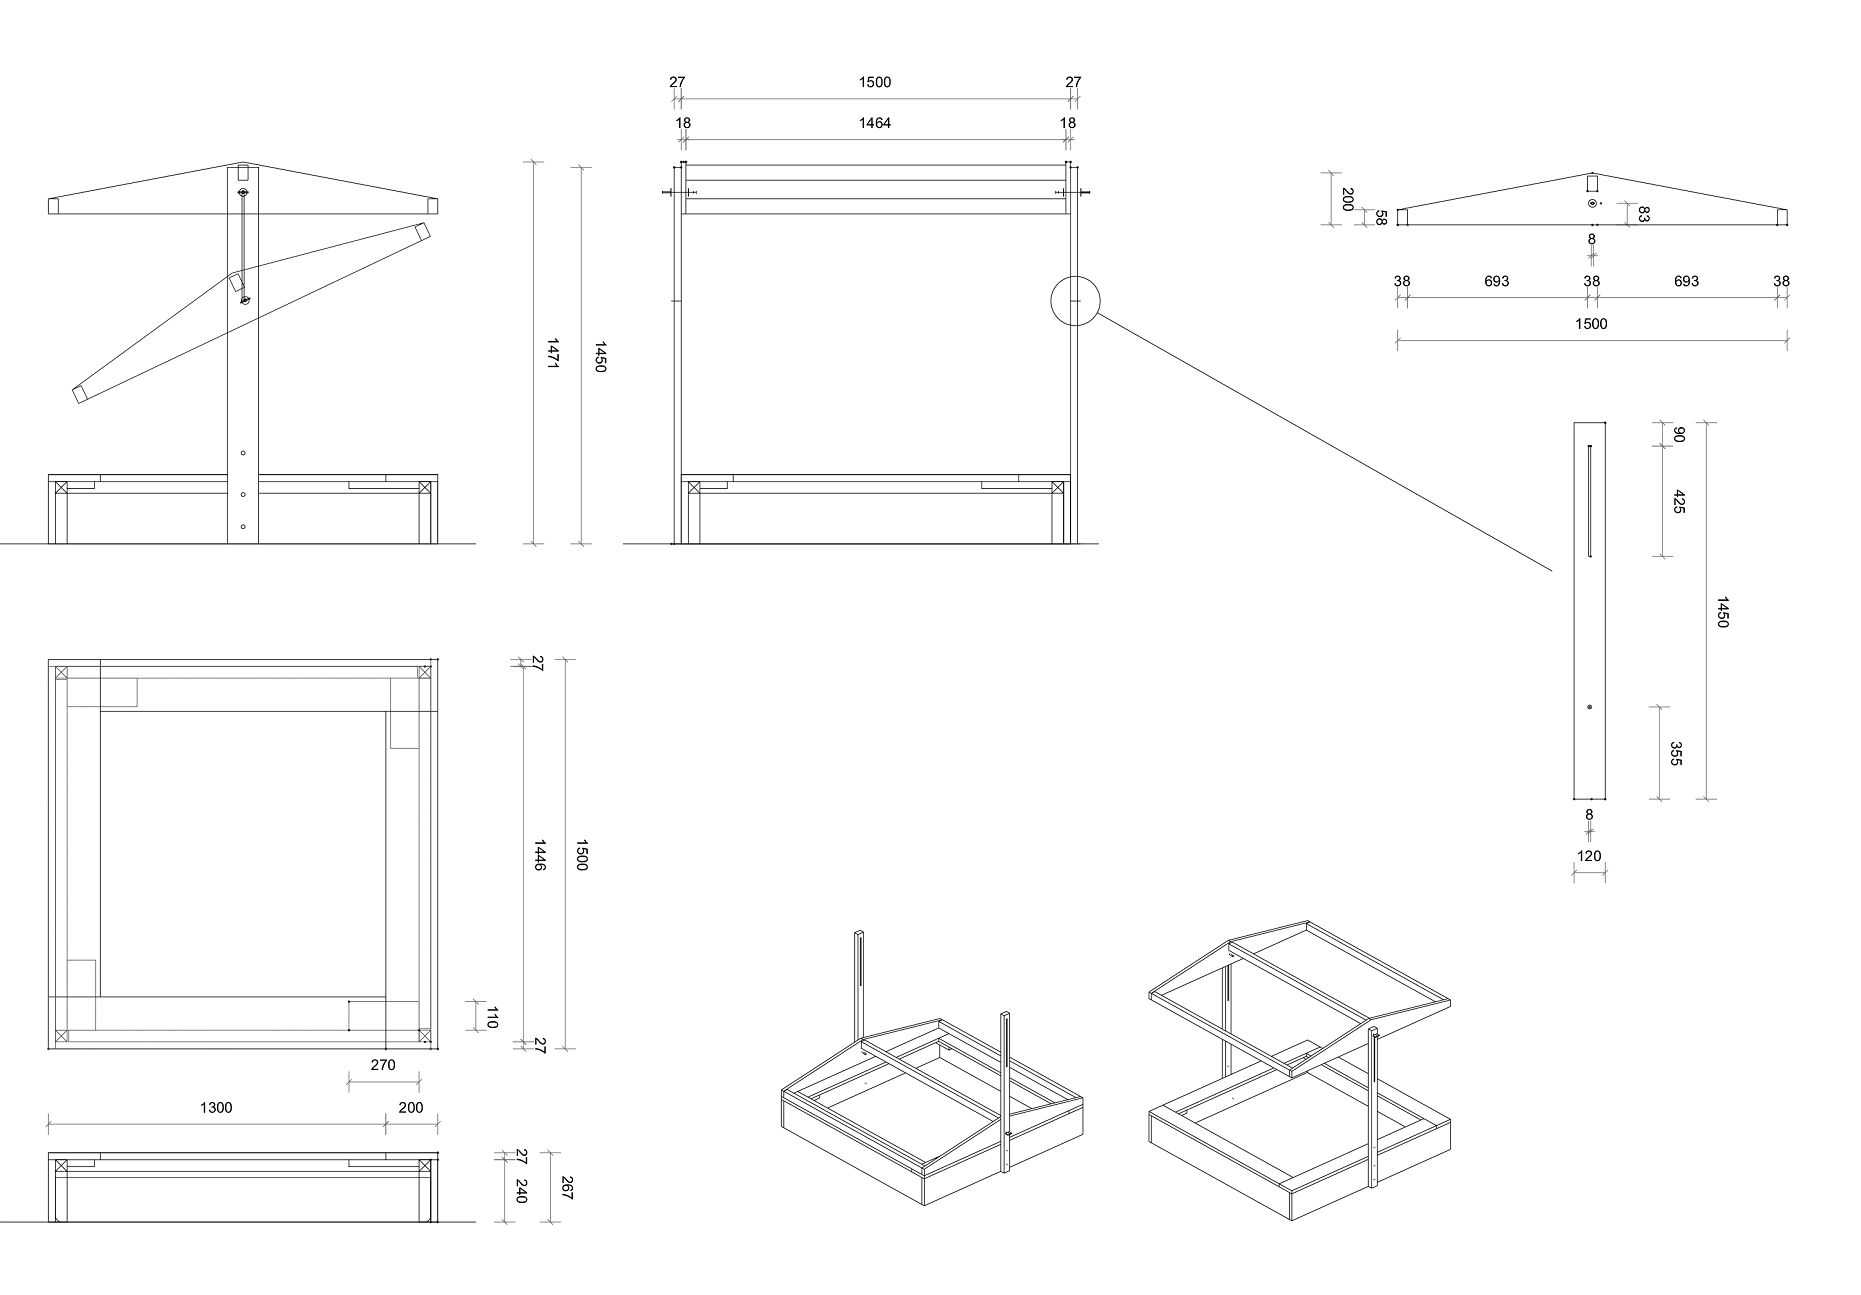
Sandbox drawing with a canopy