DIY construction of a mansard roof
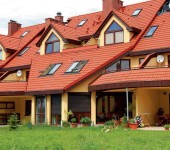
To use the entire possible area, give the house originality and significantly reduce heat loss through the roof - these are the tasks that the attic solves. If there is a certain margin of safety at the foundation, in this way, you can turn a one-story house into a two-level one. It is also attractive that a mansard roof was built with your own hands, even without the presence of special construction skills. It is important not to be mistaken with the choice of materials and do everything according to the rules.
The windows on the regular floor are located in the walls. There are no or almost no walls in the attic. They are replaced by a roof. Therefore, the windows are made special: they not only have to transmit light in sufficient quantities, but also withstand wind and snow loads, which are much greater on the roof than on the walls.
The content of the article
Roof windows
When planning an attic, it is worth considering the recommendations of SNiP. They recommend that the window area be at least 10% of the floor area. So if the attic is divided into several rooms, each should have a window.

Installation of skylights in the roof
Of all the methods shown in the photo for arranging skylights with an attic, an inclined installation is the easiest to implement. At the same time, it is necessary to ensure the proper degree of waterproofing of the junction, as well as use special models with a reinforced frame and reinforced glass - the load on the surface can be significant.
Advantages of a tilted roof window:
- more light, less sharp boundaries of light and shadow;
- the surface of the roof remains flat, its relief is not complicated;
- relatively easy installation.
When planning such a window, it must be remembered that its area increases with an increase in the angle of inclination. At what height it is more convenient to install such a window and how its height in centimeters increases depending on the tilt, look at the photo.
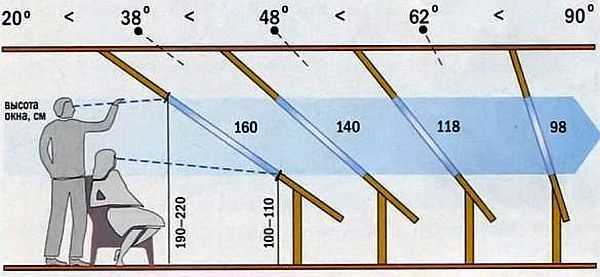
The steeper the slope relative to the floor, the lower the window height should be
The width of the window frame should be 4-6 cm less than the pitch between the rafters. Then it can be easily installed without disturbing the structure of the frame. If the window is wider, it is necessary to make a reinforced beam above it, calculate the load.
If you need to have a larger window, it is easier to put two narrow ones side by side. They look no worse than one big one, and there will be fewer problems.
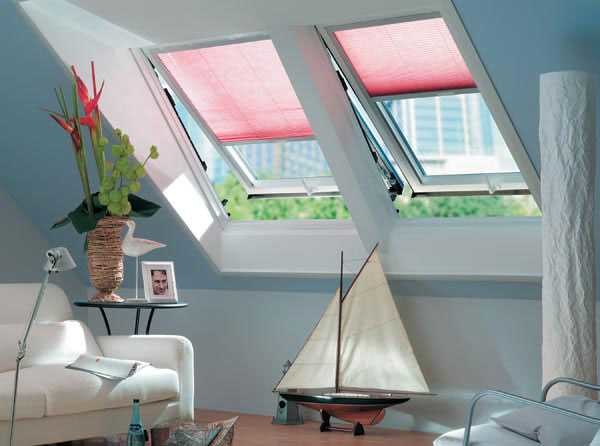
Two windows side by side look no worse than one wide
When installing a dormer window, the geometry of the roof becomes more complicated: a valley appears on top and on the sides. Because of this, the rafter system becomes more complex in both planning and assembly. The difficulty of installing the roof covering also increases. All valleys are where leaks are most likely to occur. Therefore, everything must be done very carefully here. In regions with a large amount of snow, it is advisable to install snow holders above such windows: so that they are not blown away during a sharp descent.
Installation of a vertical window-dormer in the mansard roof
The advantage of such a window: you can stand near it in full growth. But they let in less light, the relief becomes more difficult and the roof becomes more problematic.
A recessed window is usually used if you make an exit to the balcony through it. In other cases, this method of arrangement is not the best option: little light enters, the shadows are very deep, which is tiring for the eye, the geometry also becomes more complicated, although not to the same extent as in the previous version.
The easiest way is to make a window at the end of the attic. In this case, no reinforced frame or reinforced glass is needed.It is quite enough just high-quality glasses. It is this option that can most often be seen in summer cottages: this is the most inexpensive option, which is easily implemented with your own hands.
Read about the gable roof device here.
Rafter system
When self-building private houses with an attic, usually a broken roof is chosen. It allows you to get a room of a large area, larger than under the gable.
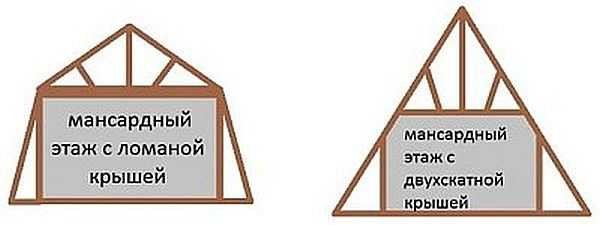
With an equal width of the base (house), an attic room under a broken roof turns out to be larger than under a conventional gable. The rafter system becomes more complex, but the gable roof with an attic under a sloping roof is still more popular.
The design of the sloping mansard roof is such that the overhangs can be lowered quite low, giving the house an interesting look. But the long overhang of the roof serves not only a decorative role. They also cover the upper part of the wall from precipitation and divert the bulk of the water away from the foundation. Although when planning you need to keep in mind that with strong winds they increase windage. Because of this, it is necessary to use more powerful boards and beams. Therefore, the size of the roof overhang is chosen based on several considerations, the main of which is weather conditions.
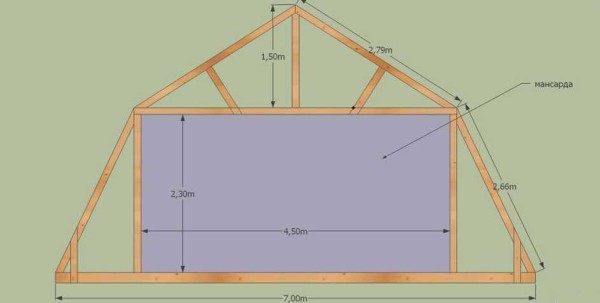
Tilt angle
Depends on the roofing material, but most of all on the region and weather conditions. The classic version is shown in the figure: the lower slopes in relation to the attic floor plane are inclined by 60 °, the upper ones - by 30 °. Based on this data and the parameters of your building, all lengths can be calculated. Only it is worth considering that according to SNiP, the ceiling height in the attic cannot be less than 2 m. Then, by definition, it is an attic. A person will feel comfortable if the ceiling is raised to a height of at least 2.2-2.3 m. Based on this, according to the rules of geometry, calculate the required lengths.

Tilt angles in the classic version
In the classic version, the load from precipitation on the side surfaces may not be taken into account. Precipitation can only be held on the upper part, the angle of inclination of which is less than 45 °.
In general, the inclination of the side surfaces usually ranges between 45 ° and 80 °. The steeper the slope, the more windage it has, this must be taken into account: in regions with strong winds, it is better to make flatter roofs. Then wind loads will be perceived much better.
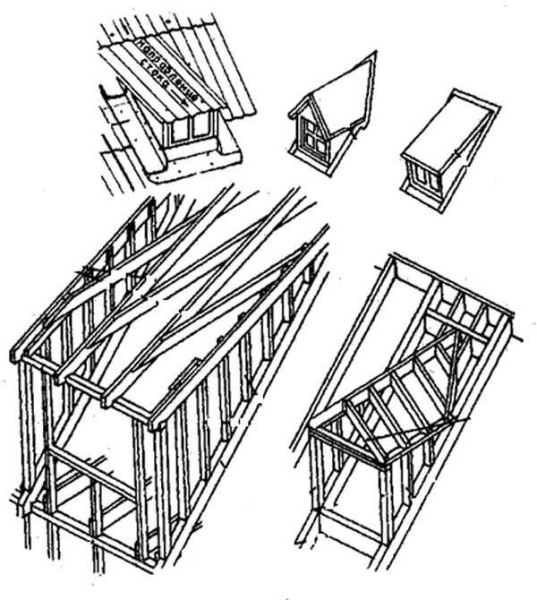
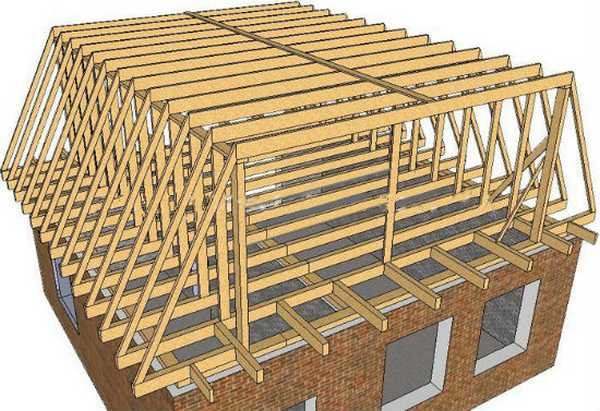
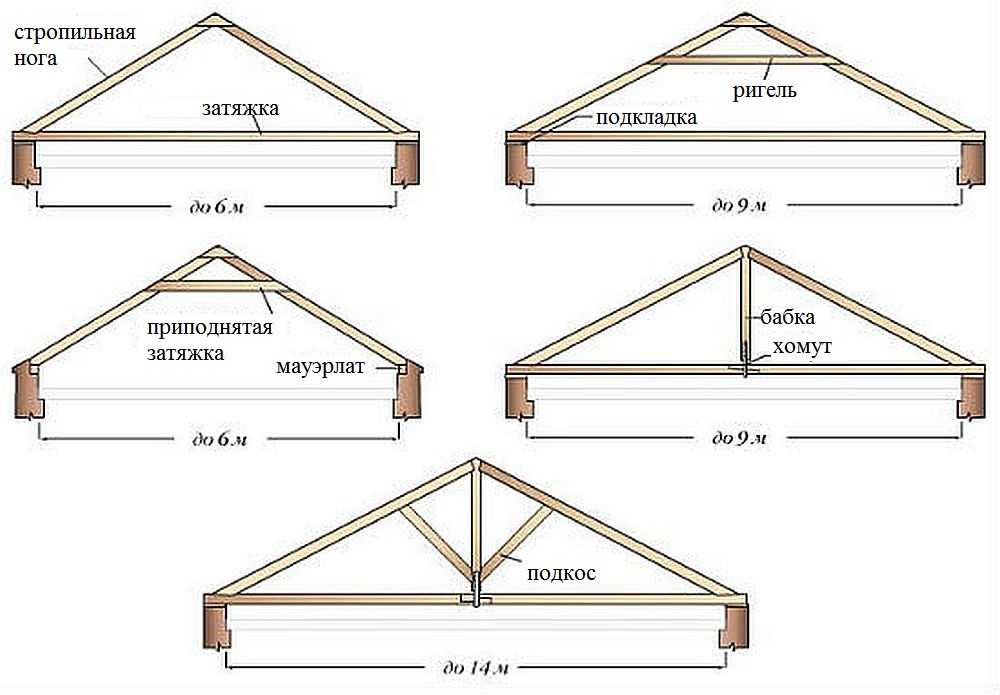
Types of rafter systems of sloping roofs
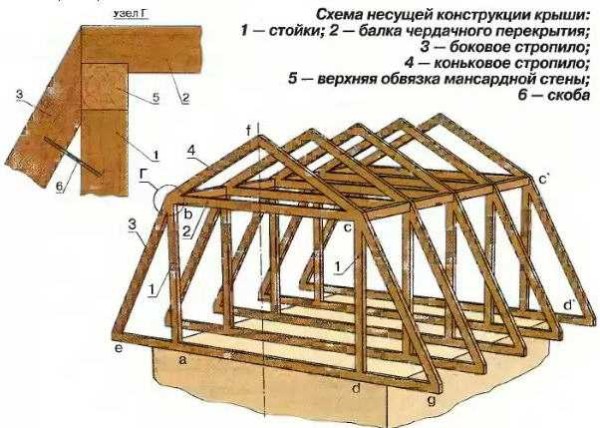
The construction of a sloping mansard roof is one of the options for the rafter system (the most common)
To make a broken roof frame with their own hands, they most often use pine lumber, grade - not less than 2. The choice of the section of the timber and boards depends on the size of the roof, the selected roofing (its weight), wind and snow load in the region, the step of installing the rafters. All these parameters are taken into account in the calculation. The technique is prescribed in SNiP 2.08.01-89 and TKP 45-5.05-146-2009.
One of the options for building a frame with hanging rafters
Above in the figure will lead a drawing of a frame with hanging rafters. It can be realized only if the base of the upper triangle is no more than 4.5 meters (in this case, this is the width of the attic room). If more, you will have to make layered rafters, which should rest on the supporting wall in the middle (the attic will turn out to be divided into two parts by a number of beams).
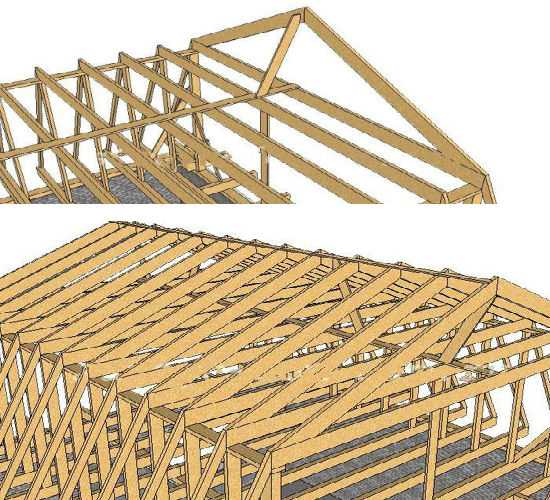
Another version of the upper part is shown in the photo below (the picture is clickable). In this case, the side rafters are reinforced with struts. They significantly increase the rigidity of the system.
There is a second way to achieve a similar effect - to establish contractions - in the figure they are only outlined with barely visible lines. The length of the side rafter leg is divided by three, in these places contractions are set. They will be needed if the roofing will have a solid weight.

A variant of the device of the rafter system of a broken roof - with struts that increase the rigidity of the system
For a small building in terms of dimensions, the roof frame can be generally simple: at the top there are two hanging rafter legs, a tightening, floor beams, racks and side rafters (pictured below).
The device of the rafter system of a broken attic roof for a small house
How to calculate a sloping roof
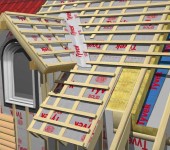
The broken roof attic of a small house (no more than 6-7 meters wide) has been built so many times that, based on experience, we can say which materials are worth using. Many parameters are dependent on other materials. For example, the step of installing the rafters is tied to the parameters of the insulation. In order for the insulation to have as little waste as possible, installation was easier, it is necessary that the distance from one rack to another be slightly less than the width of the insulation (by 20-30 mm). So, if you are going to use mineral wool, its width is 60 cm. Then the racks must be installed so that the gap between two adjacent ones is 57-58 cm and no more.
The width of the board for the rafter leg is again determined based on the insulation. For the middle zone of Russia, the required thickness of basalt wool is 200-250 mm. That's not all. In order for the insulation to dry out, a ventilation gap of 20-30 mm is required (without it, condensation will gradually rot the wood and render the mineral wool unusable). In total, it turns out that at a minimum the width of the rafter leg should be 230 mm. Board thickness - not less than 50 mm. This is in regions with light winds and not very heavy snowfalls. Summing up, for all rafters - ridge and side - a board of 230 * 50 mm is required.
If lumber with such characteristics turns out to be too expensive, it will be possible to make insulation in two directions: part along the rafters, part, filling the crate, across. You can lay at least 100 mm of basalt wool, therefore, you can take a standard board of 50 * 150 mm and leave 50 mm for the ventilation gap, or order a non-standard 130 * 50 mm. See what is more profitable for the money.
For racks and beams, it is better to take a bar of at least 80 * 80 mm, better - 100 * 100 mm. Especially in areas with difficult weather conditions - with heavy snowfalls or strong winds.
Order a more accurate calculation from specialists. This is a long-term process, which consists of collecting loads from the roofing material, the structural elements themselves, wind and snow loads. After that, according to a certain formula, the elements are selected. For more information on how the calculation is carried out, see the next video.
Features of roof insulation attic type are described here.
Do-it-yourself mansard roof: installation procedure
The Mauerlat device on mansard roofs is no different from the standard version. If the house is made of timber or logs, the upper crown can be used as a Mauerlat. It is only pretreated with an impregnation with high protective properties.
If the wall is made of foam blocks, a reinforced monolithic belt is arranged on top of it. On a brick wall or folded from shell rock, other similar materials, the device of such a belt is optional. Waterproofing is laid on the wall in two layers, and on top - a timber treated with an antiseptic - 150 * 150 mm or a log. It is secured with embedded pins.
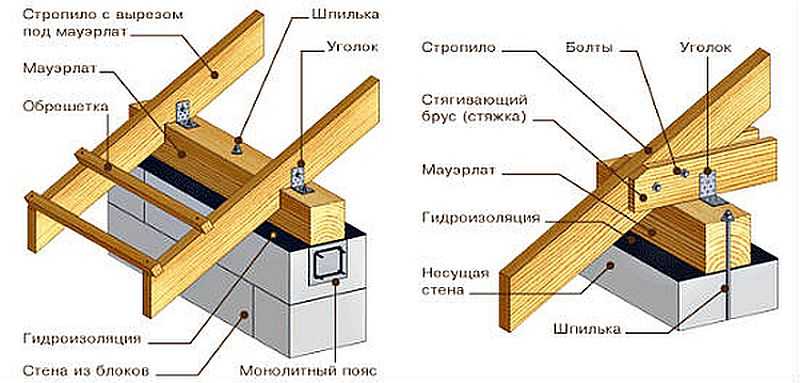
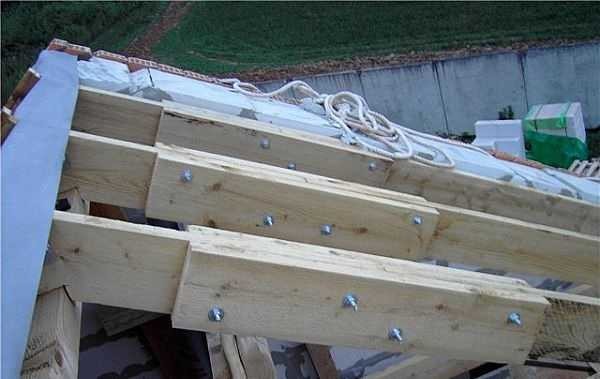
How to attach the Mauerlat and rafter legs to it
When assembling all the elements, long nails are used - at least 150 mm in length. In the most critical places, it is better to connect three or more elements with bolts or studs with double-sided threads. It is advisable to reinforce all joints with steel plates or corners.
ABOUT building a house from aerated concrete can be read in this article.
The first way
The installation of the roof rafters is done in two ways. First: they collect the parts on the ground, then they are raised up in finished form. There, the first to expose the extreme structures that will become gables. They are placed vertically, secured. It is often more convenient to secure them with long bars nailed to the wall (temporary).The following assembled structures are inserted into the prepared recesses in the Mauerlat (they are made with the required pitch). They are placed strictly vertically, carefully fixed. If necessary, install additional temporary spacers that fix them in the desired position. Side beams are installed.
How to build a sloping roof in this way, to collect nodes, see the video below.
Second way
The second method - the construction of a sloping roof is carried out sequentially collecting elements right on the spot. This method is more convenient if the structure is large and when assembled it can only be lifted using special equipment (crane).
First, the floor beams are laid. Racks and braces are attached to them, temporary spacers are placed to hold them in the vertical direction. Next, the rafter upper and side legs are assembled, puffs and jibs are installed.
During installation, the following sequence of actions is observed: first, the extreme elements are installed and set in the desired position, securely fixed. Use temporary spacers if necessary. A fishing line, rope, lace is stretched between them, which will serve as a guide for the installation of all subsequent elements. This simple move allows you to get perfect geometry (do not forget to check the slope angle, verticality or horizontalness).
On top of the racks, puffs are attached - bars, to which the side rafters are then fixed and on which the tightening of the upper triangle is installed. Puffs are attached with metal corners. Since the beams are long, they sag. This is further eliminated - after installing the upper rafter legs - using vertical beams of fixed or adjustable height. And temporarily they can be propped up with racks (so as not to pull the entire system).

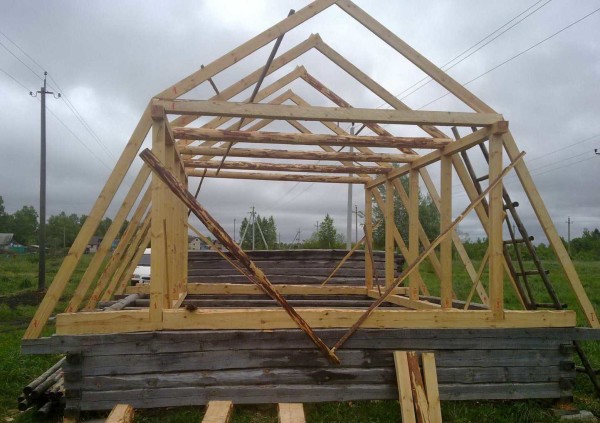
One of the stages of building a mansard roof with your own hands
To make it easier to maintain the desired angle when installing the side rafter legs, templates are made according to which cuts are made. But since the geometry of DIY buildings is rarely perfect, adjustments may be needed. To check the resulting angle of inclination, another template is knocked down from several boards, which checks the correct installation.
If the standard length of lumber - 6 meters - is not enough, or they order the required length (expensive) or build up. When building up, two boards at least 0.6 meters in size are nailed to the junction (30 cm on each side of the junction). They are nailed on both sides or bolts are used.
A reliable way to build rafters. Patch length - not less than 60 cm
After installing the side rafters, it remains to install the upper ones. For them, a template is also made, it is pre-cut on the ground, and installed at the top.
Almost finished frame
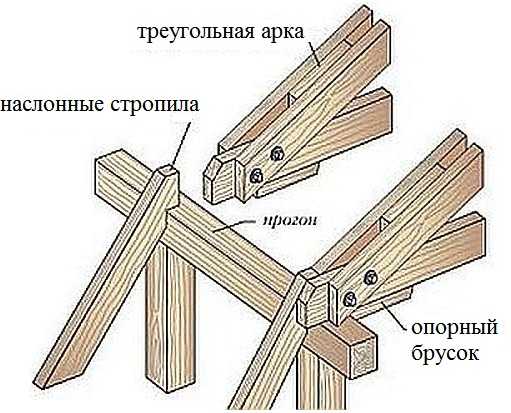
The top can be made in different ways. Its structure depends on the width of the base. How to do it, see the photo below.
How to make the upper triangle on a sloping roof
Since the device of a mansard broken roof does not provide for the presence of a ridge, a bar is packed for tightening in the middle, to which the slopes are attached, fixing the triangle in the required position.
The upper part is fixed with slopes nailed to the bar laid in the middle
In this case, we can assume that the mansard roof is assembled with our own hands. It remains to mount the roofing material and do the insulation (you can in this order, you can at the same time). The peculiarities of mansard roof insulation are described here.
Nodes and their drawings
When installing the rafter system, questions may arise about the assembly of nodes - the intersection and connection of several structural elements. In the photo you see drawings of key connections.
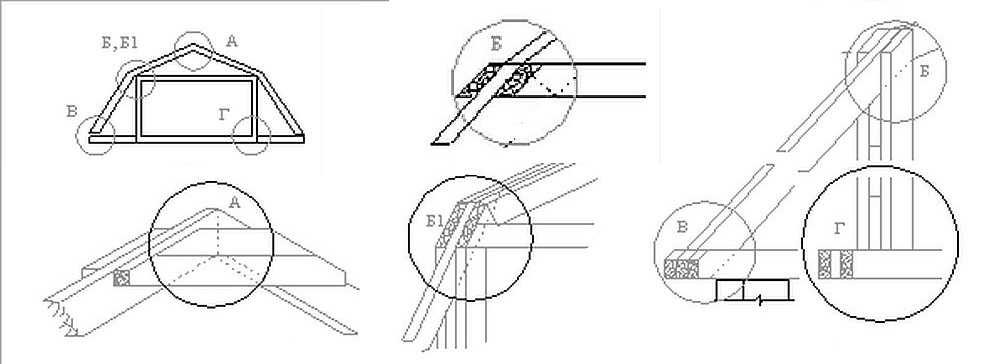
How to make the connection of the elements of the rafter system of a sloping roof
The second option is to connect the side layered rafters and the upper triangle.Bolts are used for more reliable fastening.
How to make a do-it-yourself fastening of the upper teangle and rafter legs on the attic roof
The methods of attaching the rafter legs to the Mauerlat or, as in this case, to the side beam are shown in the figure below. To make it easier to mount a heavy element, a stubborn board (bar) is nailed to the rafter from below, which limits its movement: the board rests against the edge and does not allow it to fall below.
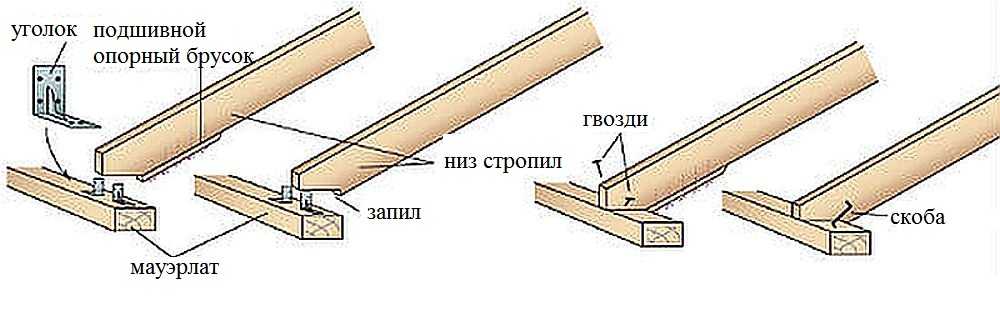
Several options for attaching rafters to the Mauerlat


How to make a do-it-yourself fastening of the upper teangle and rafter leg on the attic roof -
this drawing is incorrect at the place of the break, a hump turned out.
Afanasy! If you do not know how to correctly read the drawings! Contact a specialist!
Spets-Stroy! If you don't know how to write correctly, learn punctuation!
good fellows competently and many assembly options, we are assembling for the first time, it seems that everything works out thanks
Hello. Thanks for the material, it's interesting and understandable. But there is one question - how did you model wooden structures in SCAD, there is also no wooden section? What characteristics were introduced?