How to insulate a facade with foam
To reduce heating costs, many home and apartment owners think about insulation. One of the possible options is to insulate the facade with foam plastic (EPS or EPS). The work is not the easiest, but you can do it yourself. It is important to know the technology. We will talk about it in detail, in detail, further.
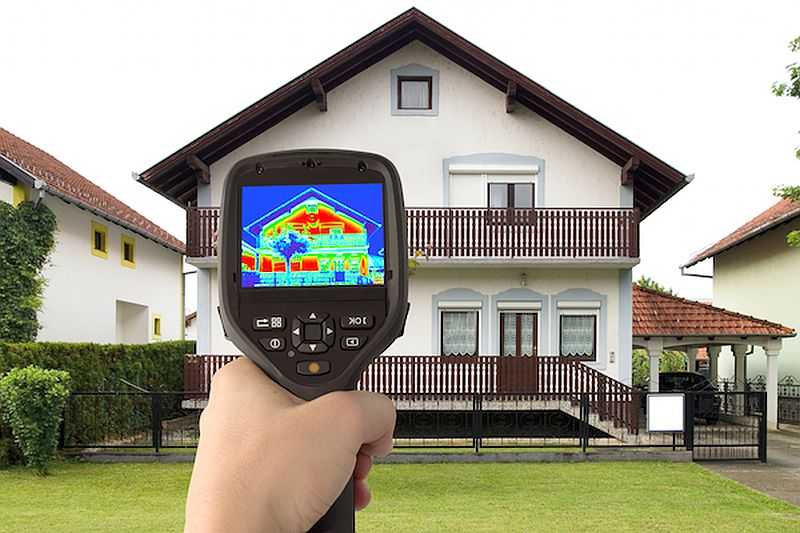
Correct insulation of the facade with foam gives good results
The content of the article
PPS or EPS (foam or extruded polystyrene foam)
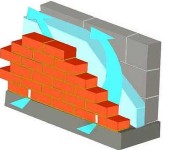
Insulation of the facade with foam begins with the solution of the question: what is better to use, foam plastic (PPS) or extruded polystyrene foam (EPS). Both materials are made from the same starting material (polystyrene), but they are used by different technologies. It is hardly worth going into the intricacies of the processes; it is important to know the main differences between these two materials. So, in short:
- Polyfoam is softer, absorbs moisture, insects and rodents like to force in it. With good characteristics, it has a low cost.
- EPS is more rigid and dense, practically does not absorb water, insects and rodents do not like it. Its main disadvantage is its high price. In the case of wall insulation from the outside, there is one more disadvantage - its preliminary processing is necessary (the surface must be scratched), and this is time.
There is another plus of EPS - usually the plates are made with a quarter, that is, there will be much less direct joints during insulation, and, therefore, there are fewer cold bridges. The choice is not easy, especially considering that the difference in price is significant - 2 times. To make it easier to decide, several positions at the prices of EPS and PPP are shown in the table.
| Manufacturer / name | Density | Thickness | Sheet dimensions | Price |
|---|---|---|---|---|
| PRIMAPLEX 35 (EPS) | 35 kg / m3 | 50 mm | 1200mm * 600mm | 4250 - 4400 rubles / cubic meter |
| PRIMAPLEX 35 (EPS) | 35 kg / m3 | 100 mm | 1200mm * 600mm | 4850-5100 rub / cubic meter |
| TEPLEX 35 (EPS) | 35 kg / m3 | 50 mm | 1200mm * 600mm | 4450-4650 rub / cubic meter |
| TEPLEX 35 (EPS) | 35 kg / m3 | 100 mm | 1200mm * 600mm | 4450-4650 rub / cubic meter |
| URSA XPS N-III (EPS) | 35 kg / m3 | 50 mm | 1250 mm * 600 mm | 4400-4500 rub / cubic meter |
| CARBON PROF 300 (EPS) | 35 kg / m3 | 50 mm | 1180 mm * 580 mm | 4500-4650 rub / cubic meter |
| CARBON PROF 300 (EPS) | 35 kg / m3 | 100 mm | 1180 mm * 580 mm | 4500-4650 rub / cubic meter |
| Penoplast Mosstroy 31 PSBS 25 | 17 kg / m3 | 50 mm | 1000mm * 2000mm | 2330-2480 rub / cubic meter |
| Penoplast Mosstroy 31 PSBS 25 | 17 kg / m3 | 100 mm | 1000mm * 2000mm | 2330-2480 rub / cubic meter |
| Polyfoam Mosstroy 31 PSBS 25F (50 mm.) Front | 16.5 kg / m3 | 100 mm | 1000mm * 2000mm | 3000-3150 rub / cubic meter |
| KNAUF Therm Wall | 25 kg / m3 | 50 mm / 100 mm | 1000mm * 1200mm | 2465-2600 rub / cubic meter |
| KNAUF Therm Fasade Light | 50 mm / 100 mm | 1000mm * 1200mm | 2850-2950 rub / cubic meter |
Having decided on the type of material, you can start installation.
Preparatory work
Insulation of the facade with foam begins with the preparation of the walls. Let's just say when it is better to start work - in a warm period of time. But the most important indicator is the moisture content of the walls. They must be dry. After the rain, it is advisable to wait a week for dry, preferably windy, weather. Then you can start.
Exterior wall preparation
Preparation for insulation of the facade with foam begins with cleaning everything that peels off and falls off. If the walls were covered with paint, it is removed, the lime is cleaned off. If there are swollen places of plaster or tiles, it is chipped. Only that which holds fast should remain.

All that can fall must be cleaned
Then it's time to level the walls. It is very good if the insulation plates lie on the wall with their entire surface, without voids. But such walls are more likely an exception than a rule, therefore irregularities of about 1 cm per square meter are permissible.Large in depth / height protrusions and pits must be leveled - filled with plaster mortar (pre-primed) or cut off. The smoother the surface, the easier the job will be.
To prime or not
It is not necessary to prime only those walls, running your hand along which, the palm remains clean. If there are white marks, pieces of plaster, sand, etc., it is better to prime. This will ensure better contact of the adhesive with the wall. The operation takes a little time, is simple, requires little money, and the benefits are great. So if you are insulating the facade with polystyrene or EPSP "for yourself", it is better to prime.
Priming is a simple process, but very useful
Any primer is suitable for facade work. Normal firms - Ceresit, Master, Stolit, Krysel, Tokan, Ecomix. The primer is diluted or not - depending on the form of release and instructions, it is applied with a brush or from a spray bottle. Sprayer is faster and easier, and brush is better.
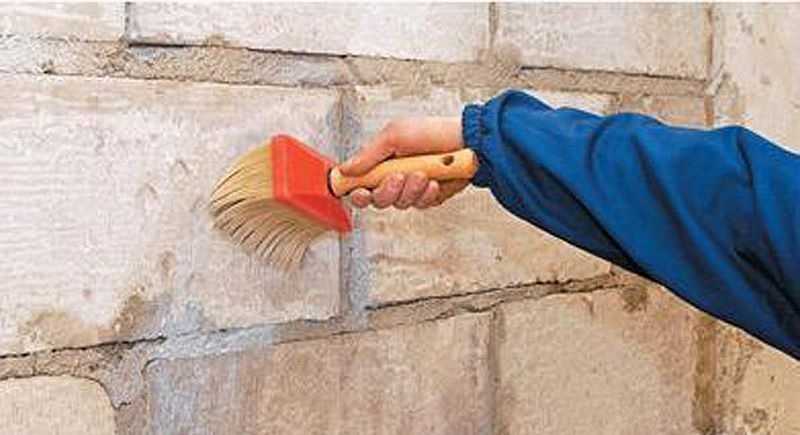
Preparation of EPS
If you decide to insulate the walls from the outside with expanded polystyrene (EPS), its surface must be made not so smooth. The foam has a looser structure and does not need preliminary preparation. On the surface of the EPS, it is necessary to make scratches, otherwise it will fall off from the glue.
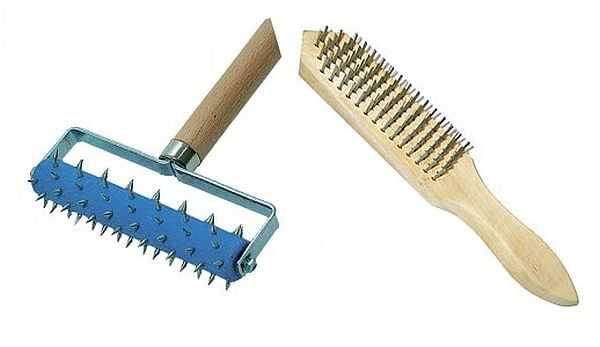
EPS preparation tools
They take a spiked roller, which is used to process drywall, and roll it well in all directions. The second way is to take a brush with metal bristles and make grooves with it. The softer methods don't work. The work is not hard, but it takes a lot of time. It must be done before you start installing polystyrene foam on the walls. If the insulation will be laid in two layers, it is necessary to process the sheets for both layers.
Finishing of window sills, slopes, low tide
All elements - window sills, slopes and ebb (drip) are best installed before installing the insulation on the walls. When installing, you must remember that you will still have a solid thickness of insulation + finishing. If the window sills and slopes have already been installed, they will have to be replaced - they will be too short. In order for everything to look organic and easily fit in with the insulation cake, the elements should have the following sizes:
- The window sill should protrude 3-4 cm beyond the wall plane (more or less is not necessary). If the thickness of the insulation is 60 mm, you will need a window sill 100-110 mm deep (60 mm insulation, 10 mm finishing, 30-40 mm projection). When installing the window sill, all the voids must be filled. You can lay the insulation plates, fill the gaps with foam and lay the window sill on all this, load it with something heavy and leave it for 3-4 hours.
Insulation of the facade with foam starts from the slopes
- When separating the slopes, they should protrude beyond the plane of the existing wall (without insulation) by 1 cm. So it will be easier to join it with insulation. They put it on glue (the same one that will be used when insulating the facade with foam). There is another subtlety here: for finishing the slopes, insulation of a smaller thickness is required - 20-30 mm maximum. The thicker one will simply "climb" on the glass (do not forget about the presence of finishing layers, we leave about 10 mm on them).
- An ebb tide is installed between the base and the insulation (also called "drip"). This is a powder coated galvanized steel strip. It is mounted on the base with self-tapping screws or dowels (depending on the material of the base) with a step of 20 cm.It is sold in pieces of two meters, during installation one piece goes over the other by 10-15 cm. The ebb is necessary so that the water flowing down the wall does not flow into the house, and merged into the street.
Installation of an ebb (drip)


As you can see, preparatory work before insulating the facade with polystyrene foam (polystyrene) also takes time. They are not difficult, but they have a significant impact on the overall result.
Foam installation technology on walls
For a normal result, the foam is first glued to the walls, then nailed. Exactly so, and not otherwise. Glue starts from the bottom, usually from the left corner.If the house is insulated with foam, then the first row is supported by the installed ebb, if the thermal insulation in an apartment building is improved, the starting bar is nailed. Without it, the probability is high that the foam will creep down.
Materials and tools
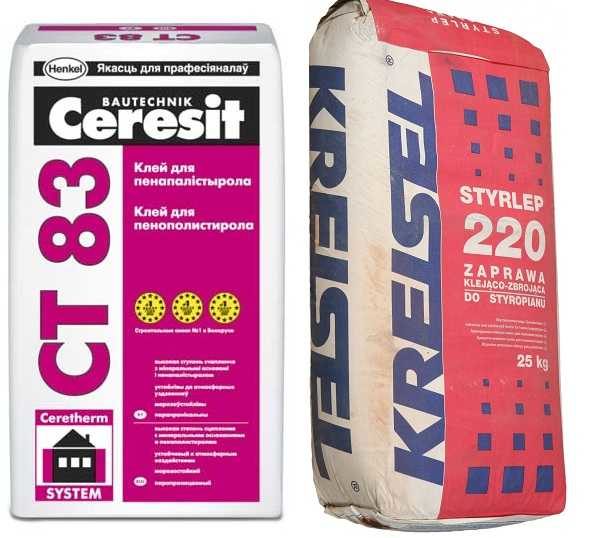
You will need two spatulas to stick the styrofoam on the walls. One is about 100 mm wide, the second is 180-200 mm. The narrow ones take glue from the container, and the wide ones apply it to the walls. You may also need a saw with a fine-toothed blade to trim material. All of the tools at this stage. We'll need some more glue. It requires a special one, the bag should be written "for polystyrene plates" or something similar. There are two types of this glue:
- Universal compound for polystyrene and subsequent facade finishing (gluing mesh and leveling layer).
- The composition is only for gluing polystyrene on walls. For other layers, universal is required.
If we approach the issue from the economic point of view, it is more profitable to buy two different compositions - the universal one is decently more expensive. A number of operations can be done with glue:
- glue polystyrene to the wall and to the slopes;
- grease the joints of the insulation;
- grease fixing mushrooms;
For gluing polystyrene on walls you need special glue

The list of works for which universal glue is required is as follows:
- gluing mesh on corners (and slopes too) and walls;
- applying a leveling layer.
The consumption of both compositions is approximately the same and amounts to 4-6 kg per square meter. Consumption can be less if the walls are initially flat and a smaller layer of glue is required (no need to level the depressions). The consumption for the leveling layer (after gluing the mesh) depends on how smoothly the polystyrene is fixed, whether its corners stick out or not.
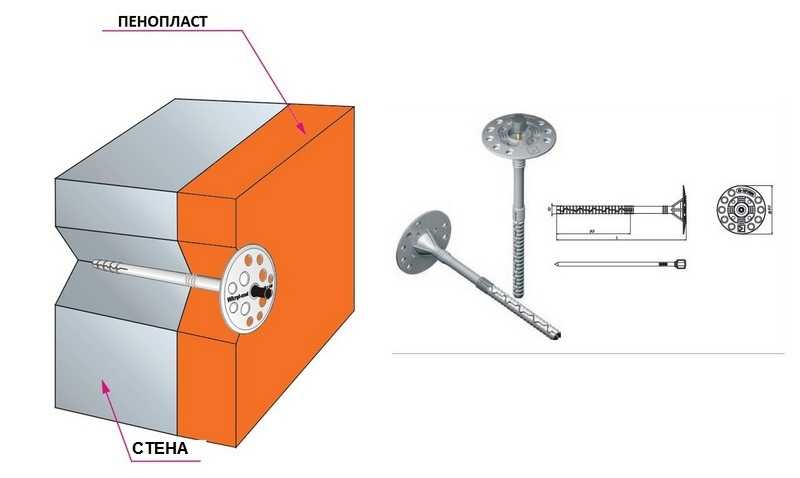
For additional fixation of polystyrene to the wall, fungi are needed
For the second stage - fixing polystyrene on the walls - fungi will be needed. This is a special shaped dowel with a large plastic cap and a long leg. Steel or plastic dowel-nails are inserted into the dowels. When insulating the facade with polystyrene, it is better to use plastic. They do not conduct cold, do not corrode, cost less, and a large insulated facade does not create loads.
To install the fungi, you will need a drill and a hammer. To apply the mesh and leveling layer, you will need a wide spatula - 300-350 mm or even more. To sand the leveling layer, you will need a plastic float and 400-500 grit sandpaper.
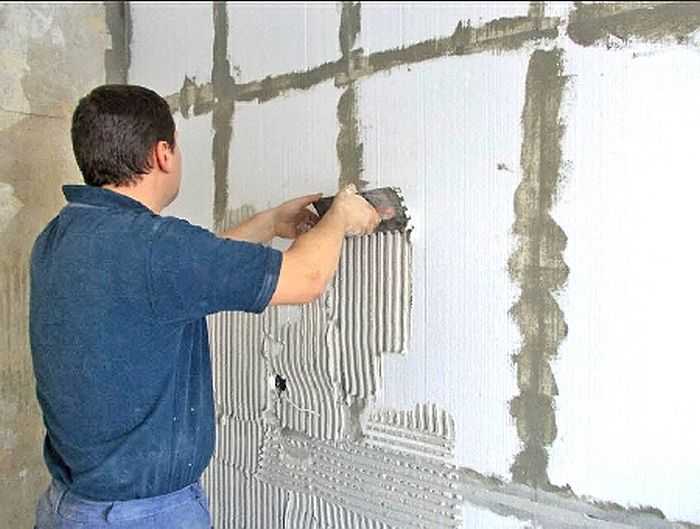
Technique of gluing polystyrene on walls
The glue is mixed with water according to the manufacturer's recommendations (stir with a drill with a nozzle or mixer). It is more convenient to work when it is a little thicker than it turns out if you follow the recommendations. Therefore, we do not add a little less water, but there we see how convenient it is to work.
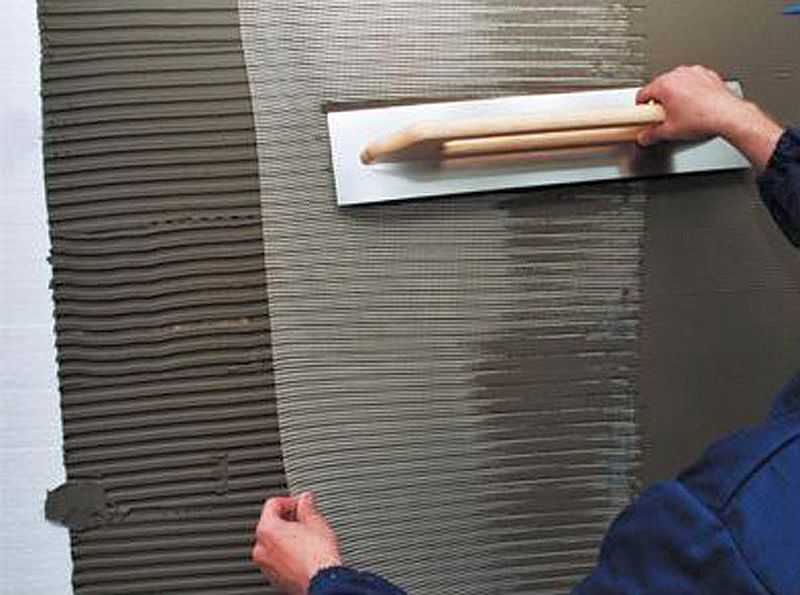
If the wall is uneven, apply the glue to the wall. This makes it easier to correct irregularities - put more in the grooves and less on the humps. If there is too much hump left to reduce glue consumption, a notch can be made in the foam. This trick will not work with EPS.
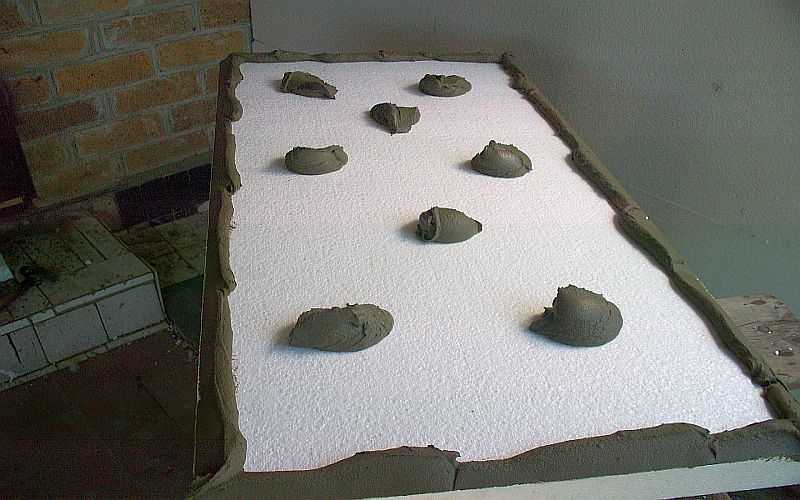
Apply glue like this, but only on walls, not on foam
Lay the solution with "cakes" up to 9-10 in area, and also make a roller (not continuous) around the perimeter of the plate, stepping back 3-4 cm from the edge. The sizes of the cakes are not necessarily the same. It is only important to level the surface as much as possible. After laying out the glue, apply the foam, press down, clap with your palm (not hard so as not to crush). Sausages spread out along the edges can crawl out of the seams or "float" under other sheets. The fact that they crawl onto other sheets is normal and even good, it will hold on more firmly. But the glue that has come out is better to pick up. Then there will be less alignment.
There is a second technique - to apply glue to the foam, level it with a comb (notched trowel) and glue it that way. But this method is suitable only on flat facades without drops.
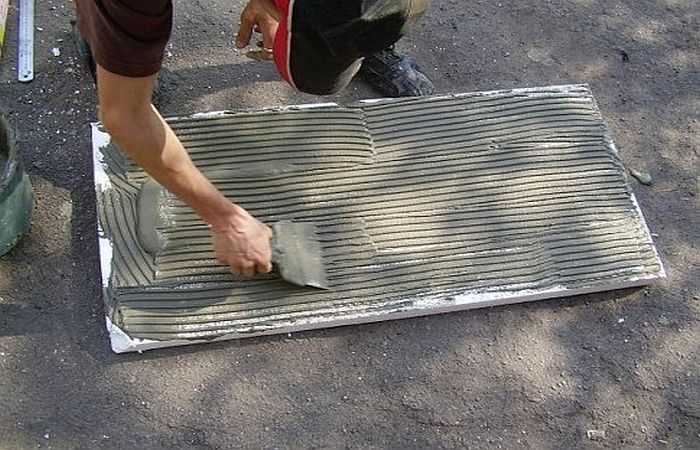
If the wall is even, apply in a continuous even layer on the foam
When laying the second row, the sheets are positioned so that the seams are not continuous (with an offset, such as brickwork). All subsequent rows also make sure that the seams do not match. We leave the styrofoam glued to the facade for 3 days - about how much the glue dries. In the meantime, we glue it in the second section.
A few words about how it is more convenient to glue foam on the facade and what kind of site. If a private house is insulated with foam, the area of work is significant, as is the height. Some of the work will be done from the ground, some will have to be done from the scaffold. To carry them less, it is more convenient to carry out work in sections. One section is done completely - from gluing the foam to the leveling layer, go to the next. In this order of work, there is another plus: less polystyrene remains open (it reacts poorly to ultraviolet light).
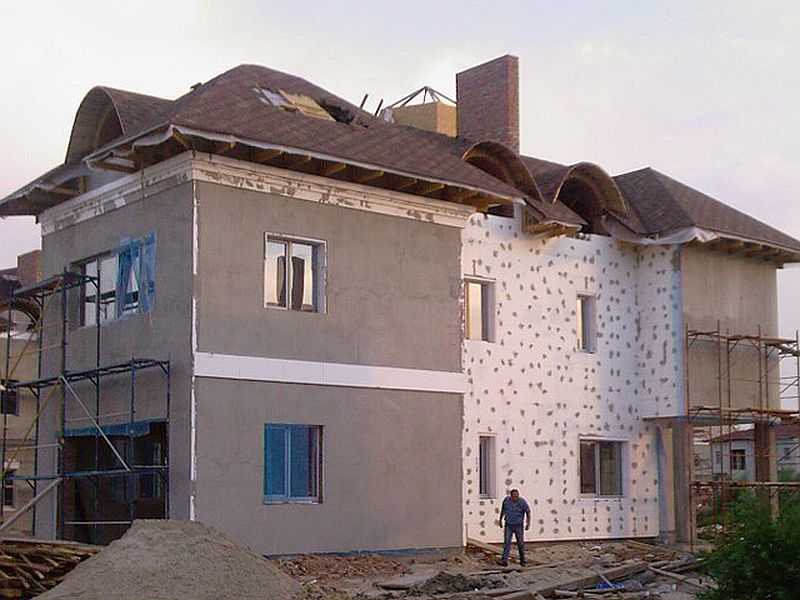
Divide the house into sections with different stages of work
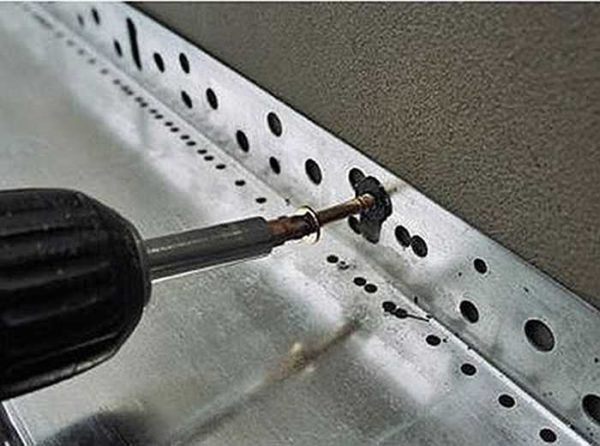
We nail down polystyrene (EPS)
So, after the glue has dried (3 days have passed after it was glued), we take plastic fungi (those that are more expensive, they are hard and clog well). Their length depends on the thickness of the insulation. To it (thickness) it is necessary to add 4-5 cm, by which the fungus should enter the wall. If you have a foam layer of 50 mm, then the fungi should be no shorter than 9-10 cm.
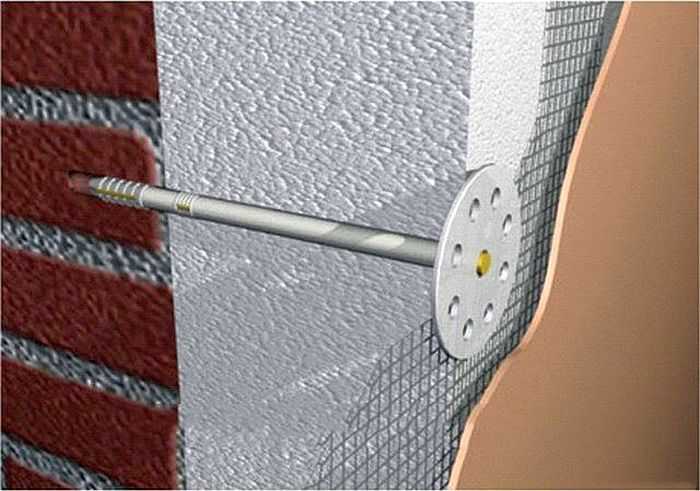
The fungi should go into the wall by 4-5 cm. The figure is inaccurate - the mesh is glued over the fungus
One plate requires 5-6 fungi. In the selected places, holes are drilled (drill 10 mm) 2-3 cm deeper than the length of the legs of the fungus. If the holes are made shorter, they become clogged with material dust and do not fit completely. The location of the fungi is one in the center of the slab and several at the joints. This position allows you to nail down the polystyrene and align the wall at the same time (pull the coal to the desired position).
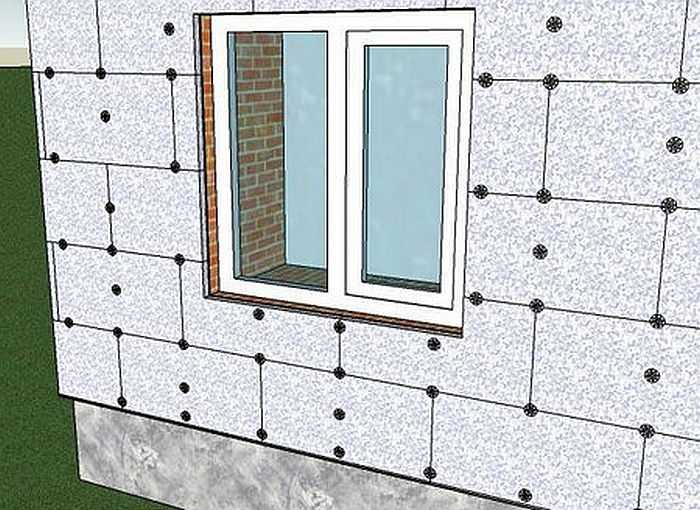
The layout of fungi when insulating the facade with foam
A fungus is inserted into the drilled hole, then hammered in with a hammer. His hat should lie tightly on the insulation. If not, take out, deepen the hole. Sometimes, after a certain amount of established fungi, they stop clogging. This means that the drill has worn off - it has become smaller in diameter - and it is time to change it.

We hammer plastic dowels into fungi
They clog the fungi so that the cap is slightly recessed in the foam - it leaves about 1 mm. Then the consumption of glue for the leveling layer will be less. It is easy to hammer with foam, but it is more difficult with expanded polystyrene (EPS).
If there are two layers of insulation
If the required thickness of the insulation is more than 50 mm, but less than 100 mm, two layers are applied. In this case, one layer is glued, as described above, the sheets of the second are positioned so that they do not coincide with the joints of the first. When applying the second layer, it is more convenient to apply the glue to the sheet, rather than to the wall. The joints of the first can not be rubbed or foamed - they will overlap.
If you have time, it is advisable to wait until the first one is dry before applying the second layer. If this is not possible, you can immediately glue the second one, but to a height of no more than 2 m, otherwise the sheets may move.

The seams of the first and second layers must not match
We begin to nail down the foam with fungi after the glue dries (the same 3 days). Just do not be mistaken in calculating the length of the fungus - the total thickness of the insulation + 1 cm for glue + 4-5 cm in the wall. The depth of the hole is another 2-3 cm more, the diameter is the same 10 mm. When the foam is nailed to the facade, you can move on.
Sealing joints and fungi
First, we align the section of the facade covered with foam. It often happens that the edges of the foam stick out somewhere. They can be cut with a stationery (wallpaper) knife. There are also special graters for foam. They are convenient for leveling the surface. You can also try to do this with EPS, but only with a knife, and then it is cut badly. The work is time-consuming, but worth spending time on - it will greatly reduce the consumption of expensive compounds for subsequent finishing layers.
Then, in order to exclude the ingress of cold air between the plates, the seams are rubbed.They take on the spatula the same composition with which the foam was glued to the facade, fill the seams. If there are seams larger than 3 mm, we put a narrow strip of insulation in them, then rub with glue. You can fill the seam with polyurethane foam. We leave it for 4-5 hours, then cut off the excess with a knife and rub it on top with glue. The caps of the fungi are recessed, we also gloss over them, leveling them with the main surface.
Stacked foam seams
When grouting joints and caps, we try to make the surface even - the glue should not protrude. If you have looked somewhere, after drying we take a grater, fix the sandpaper (grain 400-500) and level it. Just wait until it dries completely - once it gets into wet glue, the emery immediately clogs up, you just need to change it (the mesh is not suitable for this work).
Foam reinforcement and plastering
Sometimes the insulation of the facade with foam must be stretched over two seasons - left to overwinter at some stage. Can be left without harm to materials only after applying the leveling layer. The foam (EPS) that is simply attached should not be left. It is recommended to even keep it packed in packs indoors, and not outdoors. So you can only interrupt after plastering.
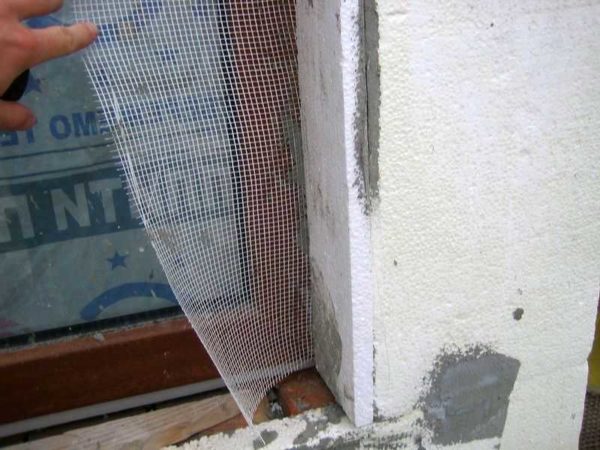
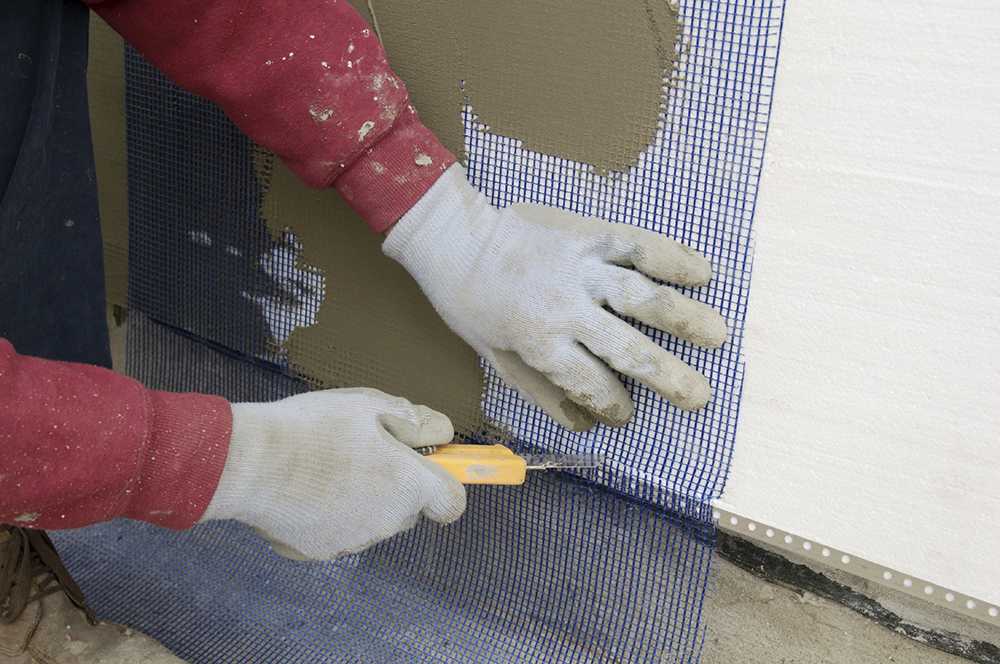
Applying reinforcement mesh to corners
The mesh is used for the front, for outdoor work (the inner one will simply crumble from the glue). Density 140-160 g / sq. m. First, the corners are glued. All corners are reinforced - both external and internal, and slopes. Important! From this point on, it is necessary to use a universal composition, and not the one on which the foam was glued. The glue is diluted a little thinner than indicated in the instructions - it should adhere well to the spatula, but it is easy to push through the mesh.
For reinforcement, you can use a ready-made corner with a mesh, you can cut strips from a roll (30 cm wide) and glue them. It's easier to work with a ready-made corner, cheaper - with a piece of mesh. If you make it from a roll, cut the strips across the roll, you get pieces of a meter in length. Fold them in half lengthwise and press the fold well with a spatula. It is necessary to fold so that the edges of the mesh are wrapped inward (it was also in the roll). If it turns out the other way around, they will stick out of the glue layer, it will be hard to work.
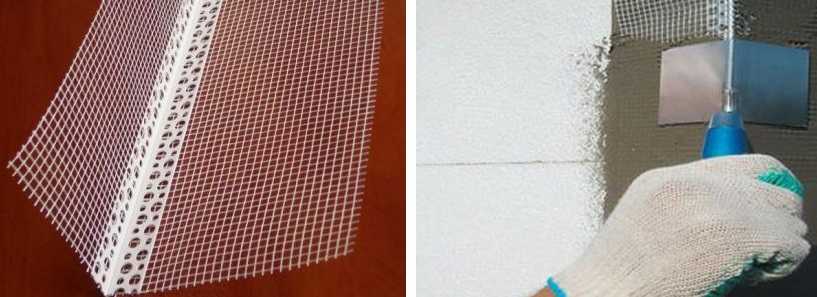
Corner reinforcement mesh
In any case, the work is almost the same. A strip of mortar 6-7 cm wide and 2-3 mm thick is applied to the corner on both sides. If you do not glue the finished corner, but the bent strips of the mesh, then the length of the area filled with the solution should be 5-7 cm shorter than the cut piece (93-95 cm).
A corner or a piece of a bent mesh is placed on top. Passing the spatula along the mesh, press it slightly into the glue. Herringbone movements - top-down and sideways.
About half of the mesh on the sides is left without glue. This is normal - it will be easier to join it with the foam reinforcement in the plane of the wall. Also, without glue, a strip remains at the top if you glue from pieces. Sticking the next piece above, apply the glue directly to this "empty" mesh, cover it on top with the next piece. This gives the joint the same thickness as the entire corner.
When forming the corner, we try to make it even. If it does not work with an ordinary spatula, you can take a corner one (pictured above). It won't be difficult - just lead from top to bottom with one click.
Styrofoam reinforcement on walls
Polyfoam and EPS are reinforced by applying a layer of plastic mesh, which is pressed into the adhesive (universal). The procedure is as follows:
- Apply a layer of glue (universal composition) to the wall with a spatula (width not less than 350 mm). The strip is 5-7 cm wider than the mesh (the mesh is usually 100 cm wide).
- Roll the mesh from top to bottom, so that 5-7 cm from one edge are free of glue.
- They pass with a spatula along the mesh, pressing it into the glue. They try to make the surface even.
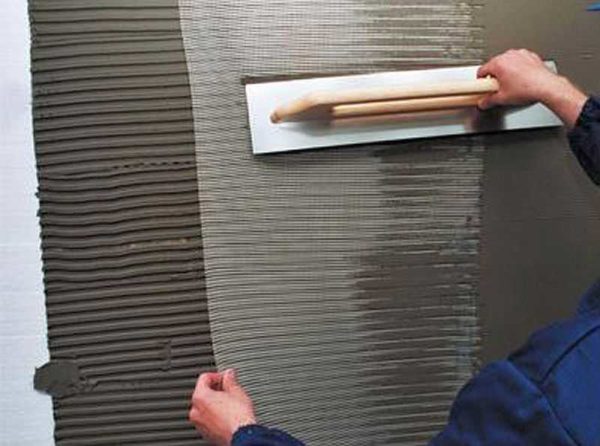
The mesh is rolled out onto the laid layer of glue, pressed into it with a spatula
- The second strip of glue is applied starting from the “empty” mesh section. A new piece of reinforcement is applied close to the one already laid.It turns out at the junction of two layers of stacks, but the thickness of the glue is the same as on the rest of the wall.
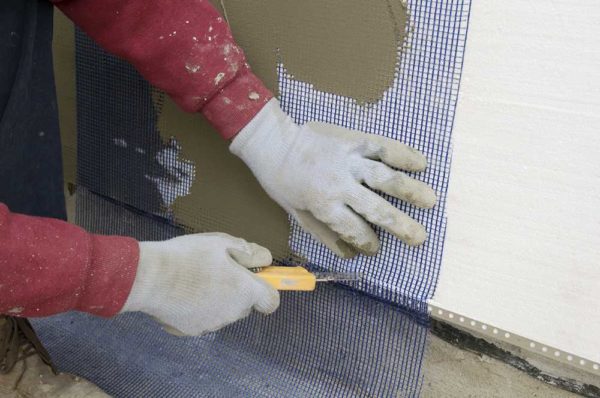
It can be seen that part of the mesh remains without solution.
The glued mesh is left to dry. It should take half a day at least, or better - a day. Then they take a grater with emery and level out all the irregularities.
Foam plaster (applying a leveling layer)
The technique of applying plaster to polystyrene is no different from the standard (about wall plastering see here). Determine the thickness of the leveling layer based on the result of the previous work. If the previous layer was applied evenly, the leveling layer can be very thin - a few millimeters.
There is only a feature - the mixture should be slightly watery. Slightly thinner than mesh. This consistency is easier to level.
The applied leveling layer is left to dry. Time depends on temperature and layer thickness. Wait until it is completely dry, otherwise the emery will clog. By the way, at this stage it is better to use it already shabby - the surface will be smoother. The new one leaves decent scratches. This is critical if further you plan to simply paint the facade, and you can work with new ones for applying decorative plaster.
This completes the insulation of the facade with foam. Next - finishing work. What they will be - you choose.
All stages are demonstrated in the video. There is only one mistake: when gluing the mesh, it rolls out onto the laid layer of glue, and not onto a dry wall. With technology like the one in the video, the chances are high that the entire trim will fall along with the mesh.
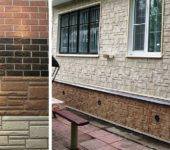


We still chose thermal panels on PPS insulation, they have more advantages over EPS. Firstly, they are easier to install, secondly, a wider choice of thickness, thirdly they are cheaper and fourthly they do not allow moisture to pass through. And many complain about EPS, they are capricious, and the tiles often fall off. And the price is of course expensive.
Can they be used to insulate a loggia? Those. will it really be possible to bypass corners, sheathe the slopes at the door block?
Why not?) We insulated the house, the same slopes, corners and doors. Only find smart masters