How to brick a house
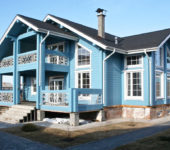
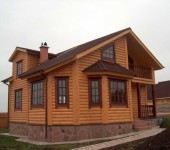
Building a house out of one brick in our climate is not the best idea: its thermal conductivity is too high, which makes the walls thick. But using it as a finishing material is already more economically justified: facing the house with bricks, with proper insulation, will help to save on heating, and the appearance will give the structure "capital". If the walls are kicked out of a foam block or other light and warm building blocks, then such a finish will also be windproof. Brick houses are also lined with bricks, but in this case there are some peculiarities: it is necessary to ensure the removal of vapors from the wood, otherwise mold, fungus and expensive repairs with a complete bulkhead finish.
The content of the article
Which brick to use
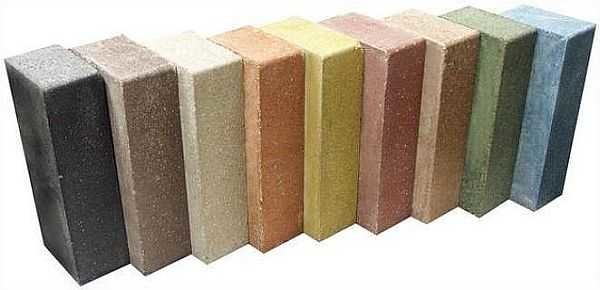
Facing brick is produced using different technologies, due to which it has different characteristics and prices:
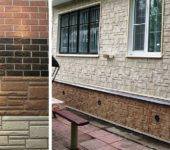
- Ceramic. Of all the finishing materials, it is the cheapest. The disadvantages include high hygroscopicity: 6-15% depending on technology and batch. The water trapped in the pores expands during freezing, causing destruction, the brick begins to crumble. Even a special finishing, in which in factories the bed (the part that turns out to be outside) is specially protected. Exit - after laying, cover the wall with a hydrophobic compound. Only those that do not form a vapor-tight film. When choosing, pay attention to this: excess moisture must be removed. Frost resistance of ceramic facing bricks 25-75 cycles (how many times it tolerates defrosting / freezing without deterioration in quality). The higher this indicator, the higher the price. This is explained by high production costs.
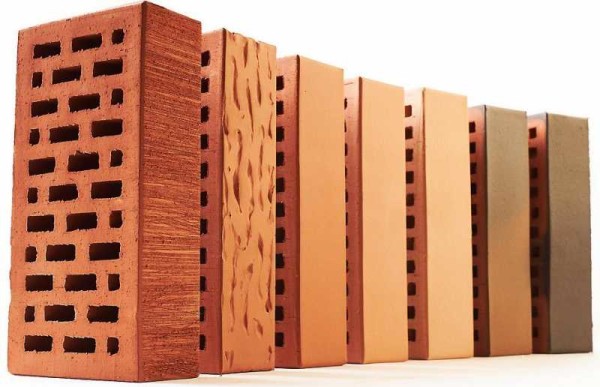
Ceramic facing brick can have more than just a smooth front surface. There are also different shades to allow the patterns to be folded
- Hyper-pressed or non-fired. This type of facing brick is obtained not by firing, but by pressing. Its composition is no longer clay, but lime with various fillers and pigments. The possibility of using pigments allows a wide range of colors to be obtained. The front surface is often non-linear, imitating a wild stone. It looks decorative. But such nonlinearity threatens delamination: an uneven surface, water flows more abundantly into the pores, freezes in frosts. It is treated in the same way as in the case of ceramics: hydrophobic impregnation. Frost resistance of high-quality non-fired bricks is declared by manufacturers from 75 to 150 cycles.
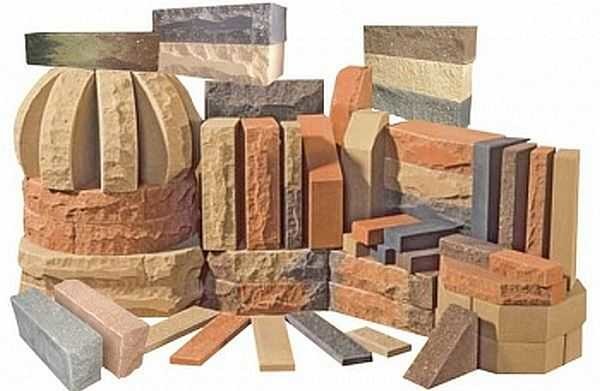
Hyper-pressed or non-fired finishing brick looks decorative in the wall cladding
- Clinker. This brick is also ceramic, but a special technology gives it a very high strength and density. The denser material absorbs water much worse. This is good for operation, but when laying it leads to difficulties: so that the wall does not "float", you need to put it on a hard, low-plastic solution, and it is more difficult to work with it. Another disadvantage that limits the wide distribution of material that is excellent in characteristics: it is expensive compared to previous materials: prices are 50-150% higher, depending on the manufacturer. Clinker frost resistance - from 100 to 150 cycles. Clinker cladding of a house with bricks is an expensive pleasure, but the most attractive in appearance.
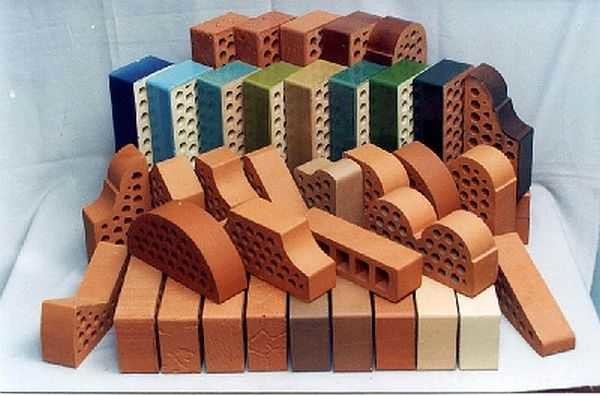
The high strength of clinker bricks allows you to create non-linear decorative elements when facing
- Silicate. The cheapest, but also the most "quickly deteriorating" of facing bricks: its frost resistance is 25-50 cycles. It conducts heat better. Not much, but still: the average thermal conductivity of ceramic is 0.16, silicate is 0.18. In addition, it is heavier: the average weight of ceramics is 2.4 kg, silicate of the same size is 3 kg. More weight requires a more powerful foundation and the price gain (silicate is cheaper) is not so great. If we consider that heating costs will also be higher, then the benefit is dubious. It is advisable to cover the house with silicate bricks in warm regions. In the northern ones it is completely unprofitable.
Facing a house made of silicate brick is the most inexpensive, but, unfortunately, the most short-lived type of decoration.
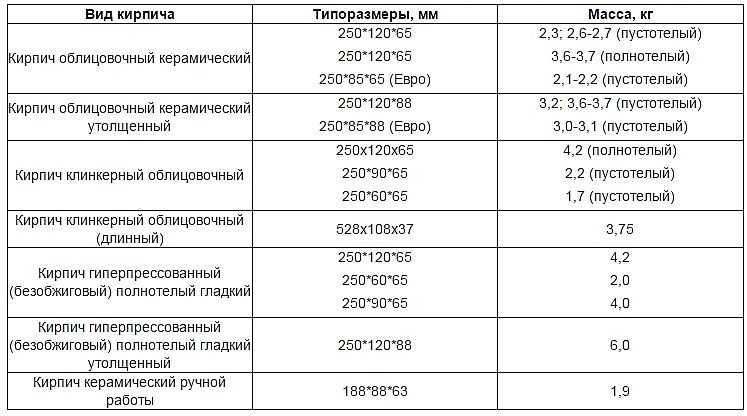
Choosing a type of brick is not all. It is also necessary to pay attention to the size and shape of the holes. Solid finishing brick is rarely used: it costs more, weighs more. On average, voids occupy about 28%, but they are large and small. With equal characteristics, give preference to bricks with small holes: the mortar will not flow into them. This will reduce the consumption of masonry mortar, and increase the strength of the masonry.
If they decided to cover the house with hyper-pressed bricks, it should be produced no earlier than 15-20 days ago. During this time, it gains basic strength (about 80%) and it can be safely transported and loaded without fear.
Please note that during storage, no water should enter the brick packaging. This is especially true if you are going to leave it for the winter.
Home decoration with siding is described here.
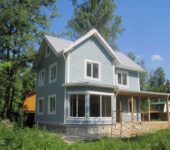
How to overlay a wooden house (log, log, frame) with brick
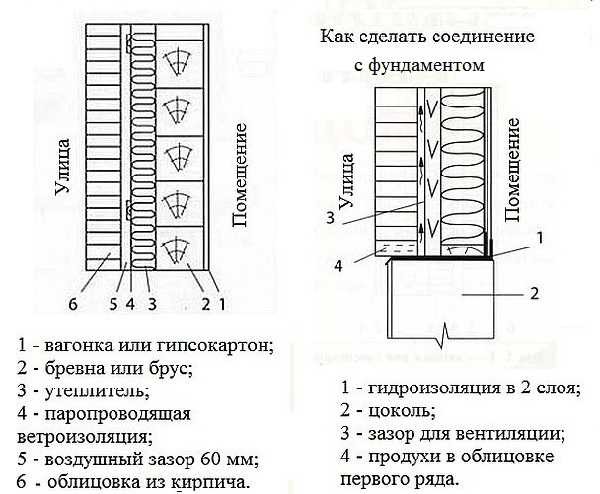
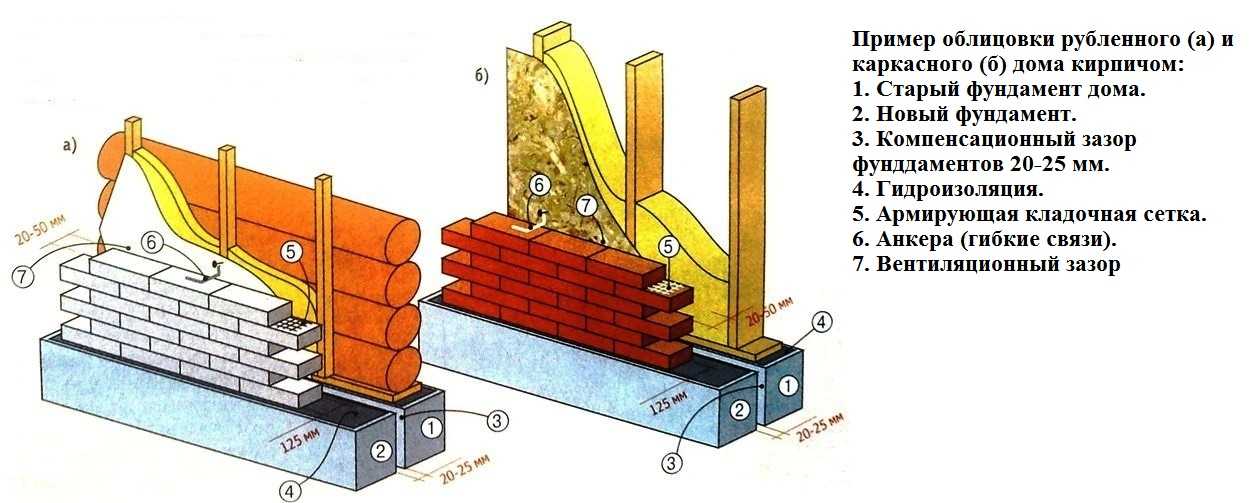
Most of the difficulties arise when decorating a wooden house with bricks: materials have very different characteristics, it is not easy to make a good bunch of them. The whole secret here is the need for a ventilation gap between the cladding and the insulation layer, which is usually stuffed onto a wooden wall. A windproof membrane is laid on top of the insulation. A prerequisite is that it must be vapor-permeable (Izospan A, Izospan AS, Tyvek HouseRap, Megaizol SD, etc.). Only under such conditions will there be normal humidity in the room and rot and fungus will not develop between the cladding and the wooden wall.
Instead of wind insulation, you can protect the surface of the insulation with fiberglass or fiberglass. With sufficient thickness of the wooden walls, the thermal insulation layer is simply absent, the wind insulation and ventilation gap remain.
How to brick a house with your own hands: cladding device
The ventilation gap must be at least 60 mm. It stretches from the very bottom of the wall - it starts after the basement - and to the top. To ensure the flow of air in the first row, ventilation ducts are made through which air enters. Outlets are arranged under the roof in the cornice part. Ventilation area 75 cm2 for every 20 m2 walls. The airflow in the bottom row can be done in several ways:
- put a brick with through holes on its side;
- partially fill the side seams with mortar (when laying the mortar, place a ruler, then remove it);
- make two or three holes and install the grates.
About what kind of insulation to use. The most acceptable option is mineral wool in mats or rolls. The use of foam or expanded polystyrene is undesirable: they do not conduct steam. This will lead to the fact that the wood will rot, and the humidity in the premises will be higher than normal.
Another important point: bricking a wooden house can be done only after the main shrinkage of the log house has passed. And this is at least 1.5-2 years. In this sense, it is easier with old wooden houses: in them the main processes have passed.
Read about other options for exterior decoration of the house here.
Pros and cons of a brick-lined wooden house
The combination of materials so different in all characteristics is a complex and completely controversial matter. Of the positive aspects, one can single out:
- Reducing fire hazard.
- Reducing heating costs.
- The wood is protected from direct contact with atmospheric precipitation.

In section, the brick cladding of a timber wall looks something like this
There are enough negative points:
- When building houses for a normal microclimate, it is necessary to adhere to the rule: the vapor permeability of materials changes from less to more from the inside to the outside. If you cover a blockhouse with a brick, the situation is the opposite. As a result, moisture accumulates in the insulation. In winter, it freezes there, turning mineral wool into dust. In summer, it creates conditions for the development of mold and rot. Only the creation of a ventilated cladding can correct the situation.
- A wooden house is constantly changing its dimensions, so hard connections with a brick wall cannot be made. Facing the house with bricks and the walls themselves must move independently of each other.
- Brick is a heavy material and its mass must be taken into account when calculating the foundation: the load becomes much higher. Therefore, or higher is required concrete grade, or large width in strip foundation, or greater thickness in slab. On pile or pile-grillage foundation the cladding can only be installed after calculations.
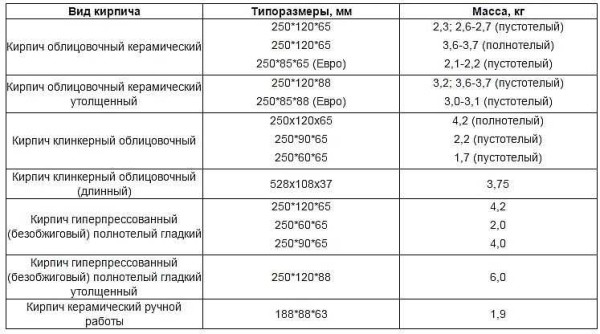
Weight table of finishing bricks of different sizes
In general, it is not an ideal solution. If the house is still being planned, think a few times. Maybe better build house from foam blocks (gas silicate), and then overlay them with bricks. These materials are much better matched and complement each other's qualities. It is worth covering a wooden house with bricks if the house is old, the wood has darkened, it is necessary to give it a more attractive look.
Wall cladding technology
First, the wood is treated with a protective impregnation for outdoor use. Then the lathing is made of planed timber (also impregnated). The dimensions of the timber depend on the required thickness of the thermal insulation layer. Usually, for Central Russia, the thickness of basalt wool is needed on the order of 50 mm, for more northern regions from 100 to 150 mm. But specifically, everything is considered depending on the thickness of the wall (from a bar or log) and the brick chosen for facing.
The insulation is laid very tightly, without gaps: the crate is packed taking into account its width. The distance between the bars should be a couple of centimeters less than the width of the insulation. This will force the material to fit. It will fit snugly against the crate, which minimizes the formation of cold bridges.
An example of a brick cladding of a wall of a wooden and frame house
A windproof membrane is laid on top of the insulation. It must be vapor-permeable, and if the vapor-permeability is one-sided, then moisture removal is necessary from the room. Fasten the membrane with staple brackets to the crate. Then leave a ventilation gap of at least 60 mm and put a wall of facing bricks.
How to do it right
There are several subtleties that you need to know. The house is usually covered with half a brick. Without support, the wall is wobbly, especially in large areas. To make it stand firmly, it is tied to a wooden wall. There are two ways:
- A nail (100-150 mm) is driven into the wall half the length, bent up. A piece of soft wire with a diameter of 3 mm is tied to it. The length of the piece is a little over a meter. The wire is fixed in the middle to the nail, twisted and led to the middle of the twisted brick, then spread out along the masonry to the sides. Finish the nail so that it twists into a ring.
- Use strips of sheet metal 25-30 mm wide and about a meter long. The strip in the middle is nailed with a nail (screw the self-tapping screw), just like the wire is led together to the middle of the brick, where it is bent and spread apart.
- Use a masonry net, cutting it so that the rods reach about the middle of the bricks. To prevent the bar from jumping out of the solution, it is better to bend it to the side, as in the photo. Such dressings are arranged in every fifth row.
In this way, you can tie the wall of the house and the brick cladding.
Single dressings should be spread over the entire wall surface. There are different recommendations - at a distance of about 50 cm from one another or 4 pieces per square meter.
If you are going to impose a brick on the house with your own hands, problems may arise with the horizontal and vertical masonry. The following technique can help, allowing you to simultaneously control all directions:
- Long pins are horizontally driven in the corners of the house under the roof and above the plinth. They should protrude from the wall at a distance greater than the entire thickness of the finish.
- At one corner, a wire is tied to the upper pin at a distance corresponding to the outer edge of the masonry and lowered down, movably fixed on the lower nail.
- Its verticality is checked and set with a plumb line, rigidly fixed.
- Also, at the same distance, a vertical wire is tied at the other end of the wall.
- A horizontal cord is tied between the two stretched strings. It will serve as a guide when laying: it can be moved up as the rows are laid. Only each time it is necessary to check the horizontal position using a level.
All of the above applies to frame houses. They also require a ventilation gap device. The situation is similar: outside there is a material that conducts moisture much worse than those located inside. In this case, only wire or strips of tin for dressing are attached to the frame posts.
Reinforce or not
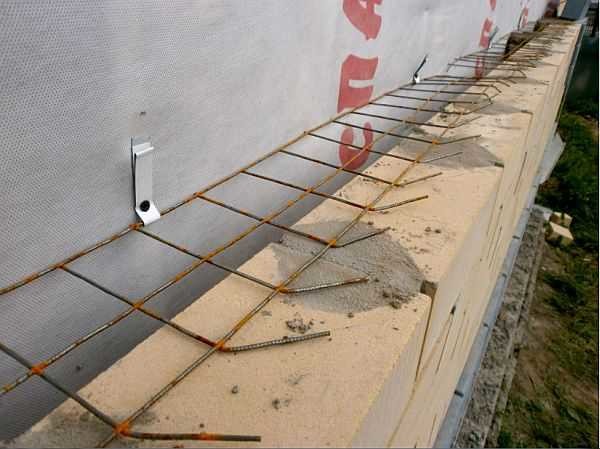
In general, the reinforcement makes the wall stronger and more reliable. Therefore, it is better to reinforce. But this complicates and slows down the laying, which leads to an increase in the cost of work (if the craftsmen were hired).
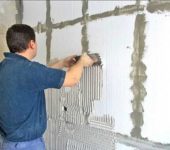
If you do it yourself, then rows with reinforcement should be laid approximately every 5th row. A special mesh with a cell of 50-50 mm or two longitudinal bars of reinforcement with a diameter of 6 mm is placed as reinforcement. In this case, the size of the seam, which, along with reinforcement, should be the same.
Facing the house with brick "live" filmed on video, the technique of laying "under the rod". The seams are beautiful, but water flows into them, which is absorbed by the brick. Therefore, the seams cannot be left in this form. They must be filled with mortar and embroidered in the same plane with the brick surface. Then the absorption of water during bad weather will be significantly reduced, and the "life" of the brick wall cladding will greatly increase. The masonry process itself is demonstrated correctly: the solution is laid neatly, drops that fall on the surface are immediately overwritten.
Facing the house with aerated concrete, foam concrete and gas silicate bricks
The vapor permeability of cellular concrete is also higher than that of bricks. That is, the situation is exactly the same: inside the room there is a material that better removes vapors. Therefore, to ensure a normal indoor climate and a long service life, a ventilation gap is required between the brickwork and the wall and foam blocks.
If you overlay a house made of aerated concrete (foam concrete, gas silicate) with a brick without a gap, its service life will decrease by about 60%: condensate will accumulate at the border of two materials. At low temperatures, the frozen moisture will destroy the bubble shell, gradually destroying the entire material and significantly degrading its performance.
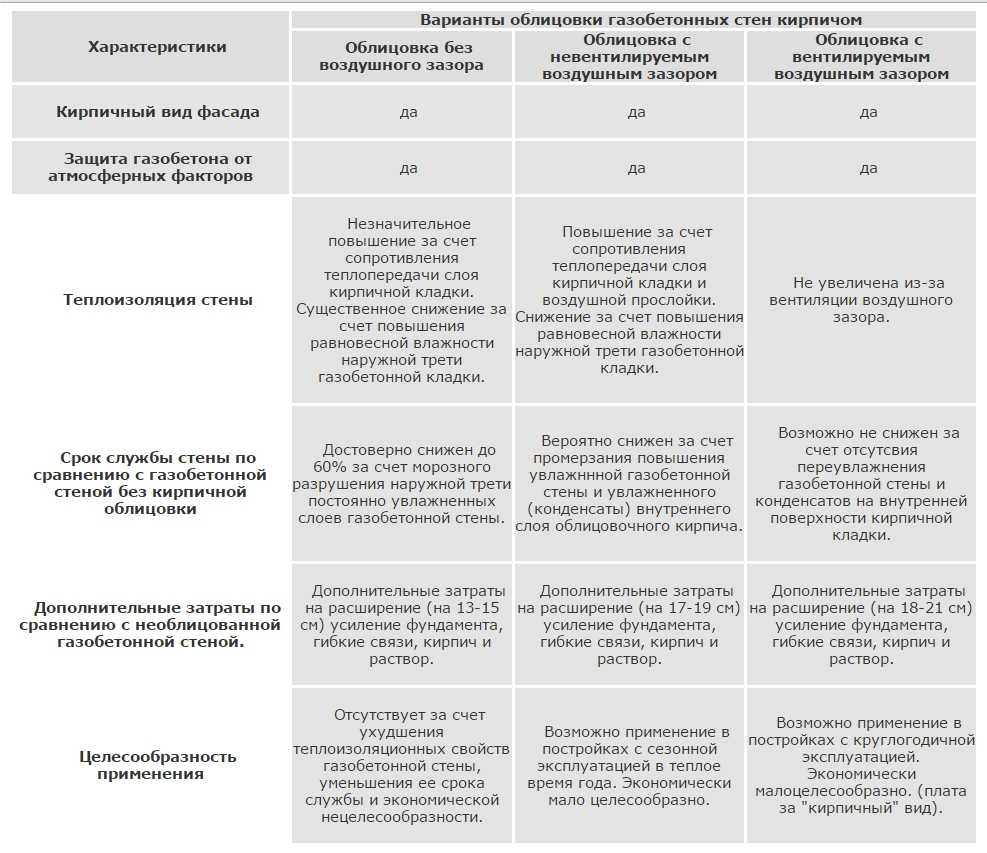
Options for cladding an aerated concrete house with bricks and their characteristics
Additional heaters are used very rarely, if they are still needed, all the rules are the same as when facing a wooden house: basalt wool, protected by wind insulation.
Read about the features of finishing a house made of aerated concrete (gas silicate) here.
The size of the ventilation gap is from 60 to 150 mm.The number of ties between two walls: at least 3 pcs per square meter of masonry, their cross-section is at least 5 mm2 1 m2... For connection, you can use screw or stainless steel nails with a length of at least 120 mm. They are not driven perpendicular to the wall, but at an angle of at least 45 °. You can use perforated galvanized strips, which are nailed to the building blocks on one side, and the other end is inserted into the brickwork, where it is bent at an angle. Note: ties should not be embedded in the masonry joints of the main wall. Only nailed to the face of the blocks.
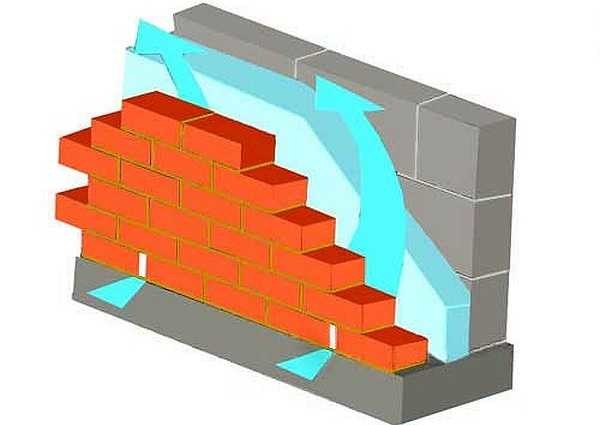
The best wall cladding made of aerated concrete and aerated concrete - bricks with a ventilation gap
Slag or slag filling house
Brick cladding in the case of buildings using slag is used more often when cracks are spreading along the walls. This happens mainly when the slag has exhausted its resource and began to crumble. On average, its service life is 50 years, it is reduced if the humidity of the walls was increased.
Brick cladding of a house made of cinder block (slag block) will only delay the inevitable: it will slow down the destruction, but will not stop it. The length of the grace period depends on the condition of the material and on the measures taken. On average, he is 8-15 years old. It is hardly possible to do without consulting a specialist: the cost of an error is too high.
In most cases, it is recommended to build a frame around the house, on which to transfer part of the load of the floor and roof, to carry out waterproofing work. One of which is the external protection of walls from atmospheric precipitation using brick cladding. The brick is selected with the lowest water absorption. For greater protection, the masonry can be impregnated with a hydrophobic compound (only not creating a vapor-tight film). The penetrating hydrophobic impregnation of the main wall will not be superfluous. For this, you can use impregnation type "Penetron" and analogs. They will simultaneously strengthen the material and significantly reduce water saturation.
Watch the video about the practice of facing old buildings with bricks.
On the choice of suppliers and prices
Prices for the same materials vary greatly from region to region. To correctly assess the situation, you need to conduct your own market research: call or visit the largest suppliers, see offers in the region on the network. During the call, you need to get technical data, find out prices. Then compare the characteristics of bricks, compare prices.
Best advice: Don't buy too cheap materials. If the difference from the average market price is 15-20%, most likely, these are last year's remnants of not the most successful batch. Otherwise, look at the price / performance ratio.
Average prices in Moscow are as follows:
- silicate facing brick - 11-21 rubles / piece;
- ceramic facing - 18-35 rubles / piece (full-bodied 45-65 rubles / piece);
- hyperpressed non-fired - 25-31 rubles / piece;
- clinker - 27-40 rubles / piece.
After choosing several possible suppliers, see their product in person. Smooth edges, uniform color, no cracks or any defects are what you should see.
About the size of the party. It is advisable to buy the entire volume of cladding material at once. This will save you about 10-15%. some suppliers offer large consignments to be brought directly from the factory by dumping norms. It is also cheaper, and additional overload is eliminated, which means less combat.
The advantage of bulk purchasing is that the batch is likely to be one, which guarantees uniformity of color. In any case, brick cladding of a house is carried out from several packages at the same time. So even slightly different shades will not create color spots.