How to repair a PVC window
Plastic windows are good for everyone, but without certain knowledge their maintenance is impossible - they are controlled by complex fittings, and there are many little things that their owner is simply unfamiliar with. Many breakdowns - a broken handle, replacement of a seal and a number of others - are easy to fix with your own hands. Such repair of plastic windows does not require a specialist call. How to eliminate the most common "sores" of PVC windows, we will consider further.
The content of the article
Replacing the handle
If PVC windows are not timely adjusted and lubricated, they close worse and worse. This happens smoothly and imperceptibly. It's just that you constantly have to make more and more efforts to close or open the sash. Often they only remember after the handle on the plastic window has broken. Then you have to repair plastic windows. But a broken pen is not the biggest problem. The job is very simple. The only difficulty is that before you change the handle on the plastic window, you have to buy it. They are sold in a store that sells plastic windows and accessories for them. They differ only in shape, color and price, but they are universal. So you can't go wrong. There are, however, also handles with a lock. They are useful in families with children: you can open the window only with a key.
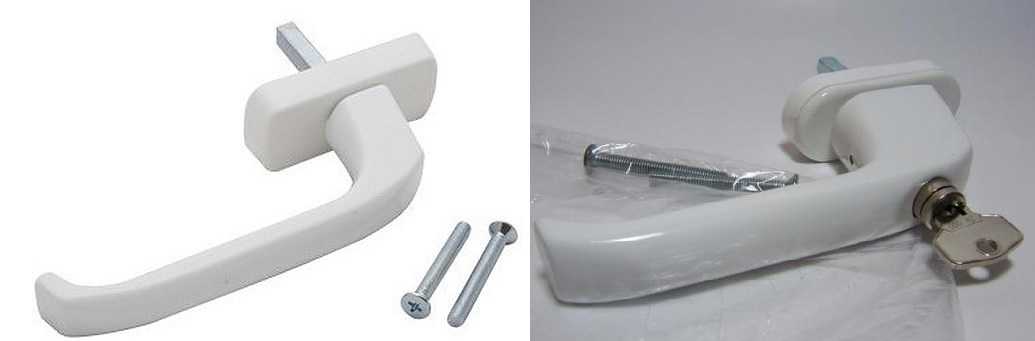
Plastic window handles differ in shape and color
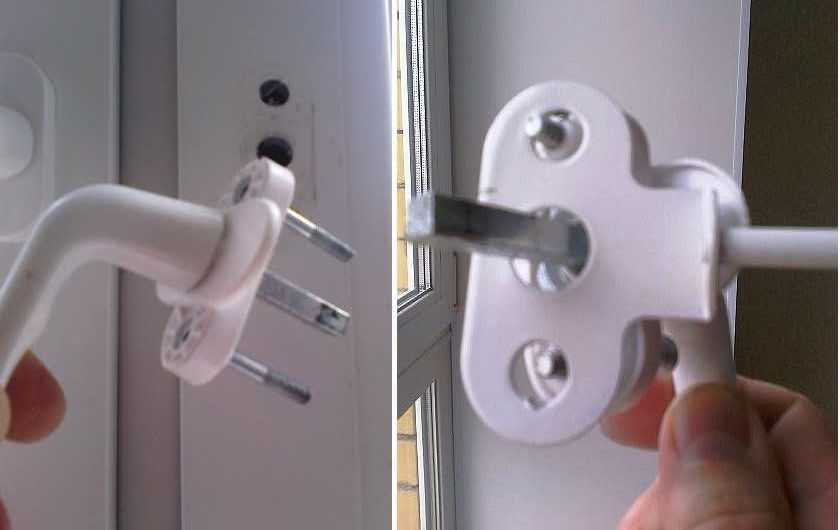
Having a new handle, you can start replacing the broken one. If you look closely, you will see that the base of the handle is in two parts. You need to grab the upper part with your fingers, pull it towards you and turn it "clockwise" or "counterclockwise".
The upper part of the handle base must be pulled and rotated
There are two screws hidden under the plate. We unscrew them by pulling towards ourselves, take out the handle. All of this is easy - no significant effort is required.
There are two screws under the plate
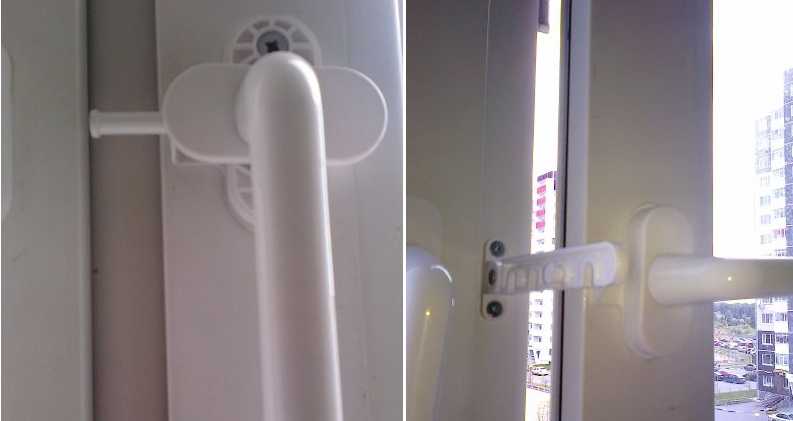
We put a new one in place of the old handle, fasten it with the same screws (the plate moves in the same way) and put the plate in place, check the work. That's all. The replacement of the handle on the plastic window is complete.
Installing the comb (opening limiter)
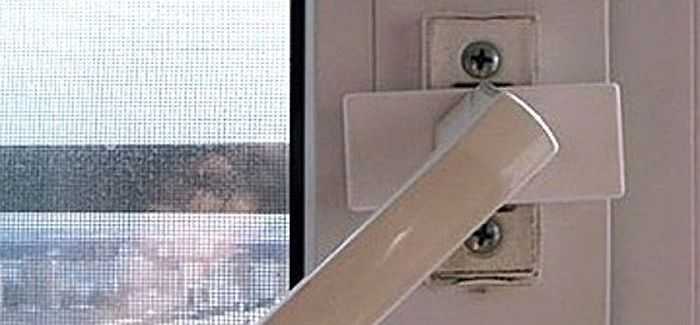
Not everyone has a micro-ventilation function on PVC windows. In order not to open the sash completely, it is propped up with something heavy. To do without such supports allows the limiter for opening a plastic window. This device consists of two parts - a strip with notches and a pin. Due to its characteristic shape, the stopper is called a comb, retainer or crocodile. This is no longer the repair of plastic windows, but their modernization, but this operation can be easily done with your own hands.
It looks like a PVC window opening limiter
To install the comb on a plastic window, you must first remove the handle on the sash that you will use for ventilation (as - see above). A retainer is put on the removed handle (see the photo). It is deployed so that it sticks out of the window sash.
How to put a restrictor on a PVC window for ventilation
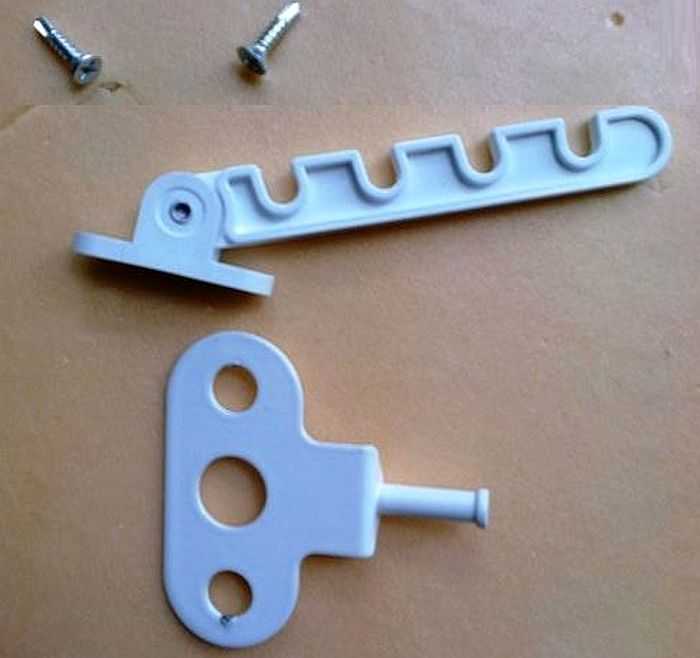
The handle with the lock is set in place. Now you need to screw on the locking bar. It will need two small screws and a drill with a 1.5-2 mm drill.
Ventilation limiter for plastic window installed
Place the plank on the window frame so that it "clings" to the protruding stopper. First, we apply, check if it works normally, put marks in those places where you need to drill holes. Drill carefully so as not to drill through the frame. Next, we fasten the bar. That's it, the comb (retainer) is installed on the plastic window.
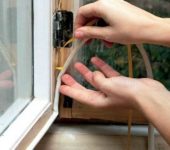
Replacing the seal
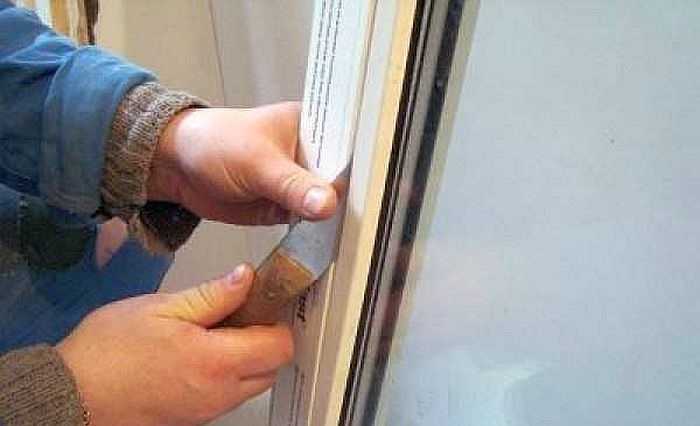
One of the most common problems is blowing around the sash.There are several methods of treatment. First, it is necessary to strengthen the sash clamp, which is done with pivot adjustment... If it does not help, the seal may have become inelastic and does not provide a tight seal. Then the repair of plastic windows consists in replacing the sealing gum. It is installed around the perimeter of the sashes and on the PVC window frame, and needs regular maintenance. In autumn and spring, it must be washed, dried, lubricated with silicone grease. But even under such conditions, it loses its elasticity over time, it can even crack or tear. It is very easy to change the seal on a plastic window, but first you need to buy a suitable one. The fact is that it has a different profile for different manufacturers (see photo).

Forms of seals for porch and double-glazed windows of different companies
The use of a seal of another shape does not guarantee the proper degree of thermal insulation. If you do not remember which company you have windows, you can take the removed seal with you. So you definitely can't go wrong. So this time too, the repair of a plastic window begins with a trip to the store.
Please note that the seal must be whole - one piece. Composite of two or more pieces do not give normal tightness.
The old rubber is taken out
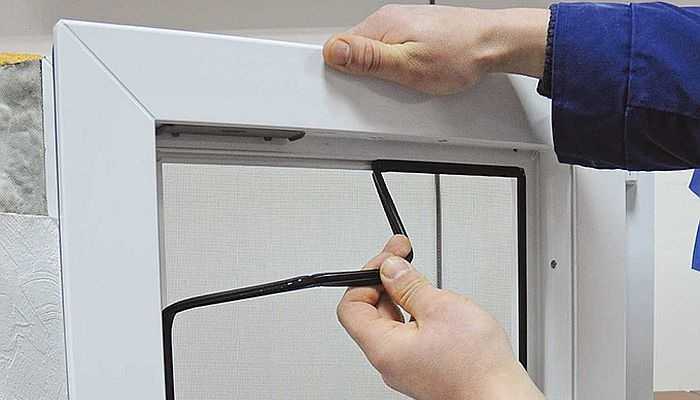
Remove the old gum first. You can simply pull it with your fingers. If it doesn't work, pry it off with something thin and sharp. It will come out easily. Then, dust that has accumulated there will be removed from the groove.
Laying the new seal begins from one of the corners. Bring a new elastic to the groove, insert, pressing down with your fingers. It takes some effort, but not prohibitive. It will be more difficult in the corners. Here we must try to lay it out exactly so that it does not wrinkle, but does not stretch either.
Install the seal from one of the corners
Once the seal has been installed around the entire perimeter, it can be cut. This is done with sharp scissors, and the joint is glued with good glue for rubber. This is how the seal on PVC windows is easily changed. Such do-it-yourself repair of plastic windows takes 20 minutes at most.
How to remove / install a plastic window sash
To replace the seal on the sash, it must be removed. To do this, decorative caps are removed from the hinges. They need to be pulled or pushed up, sometimes towards yourself. Next, we begin to remove the sash. Just keep in mind that it is much heavier than it seems. Get ready to take on a lot of weight. If there is one of the assistants, it is better that they insure. Actions are as follows:
- With your left hand, hold on to the sash from below. It will carry almost all of the weight, so be prepared.
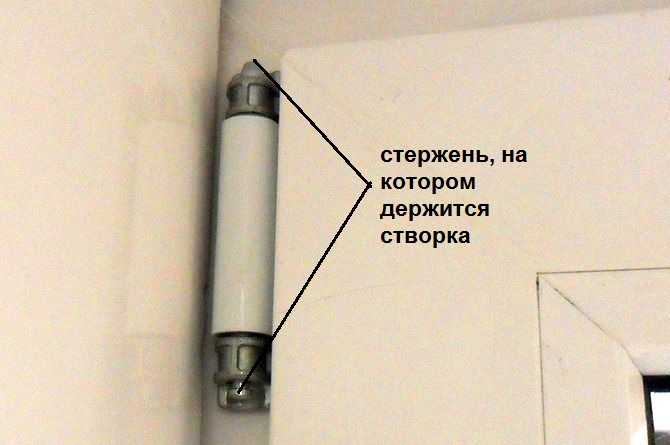
- We will work with the upper loop. We need to take out the metal rod that holds the sash. It protrudes a few millimeters at the top.
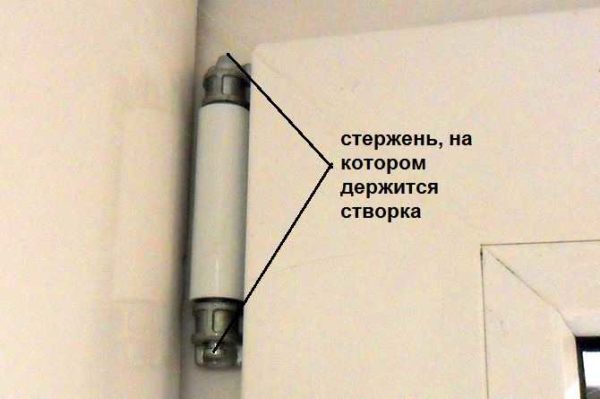
Upper hinge on which the sash is held
We take a regular screwdriver (flat, not Phillips), press down on the pin. It protrudes a few millimeters below. Insert a screwdriver into the resulting gap and squeeze the rod even lower. Now you can grab it with your fingers (pliers) and pull it down. It is not necessary to fully pull it out, pull it all the way (you will feel resistance).
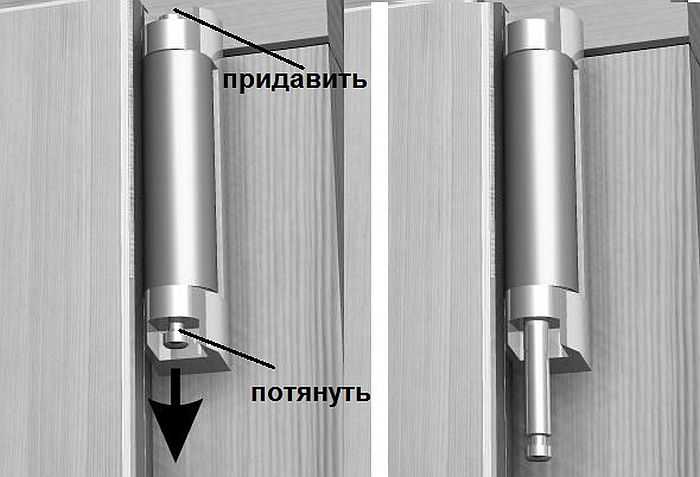
How to remove a plastic sash from its hinges
- Now, with our right hand, we grab the upper corner of the sash (left at the bottom), slightly raise the sash, simultaneously feeding it slightly "towards ourselves", remove it from the lower rod. That's it, the sash is free.
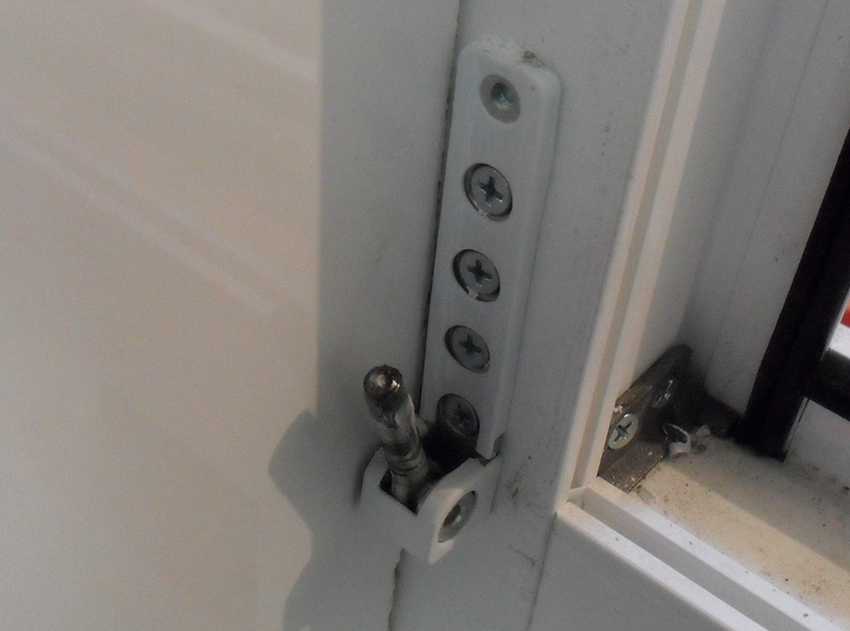
This is the bottom pivot of the sash. He is mobile
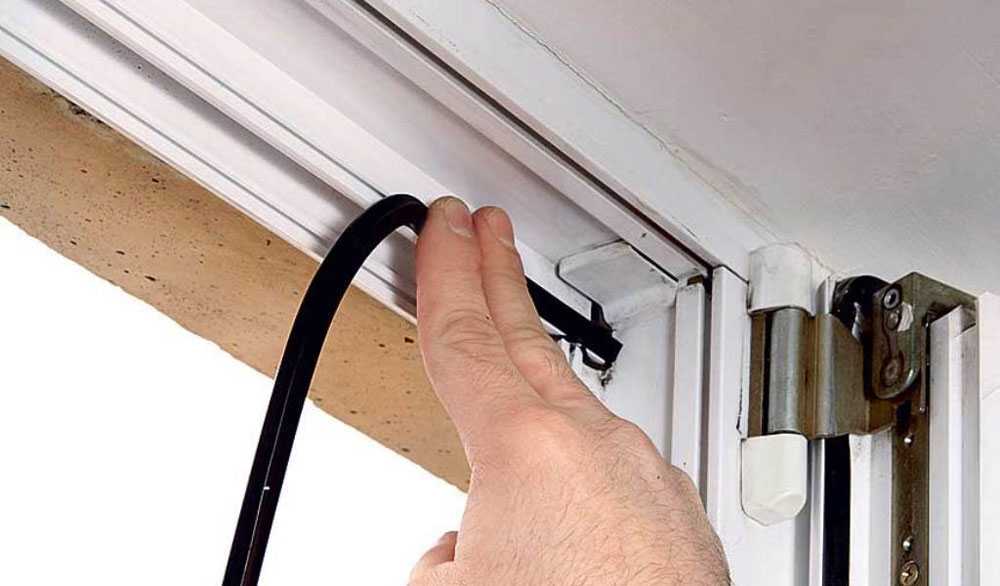
Further, the process of replacing the seal is similar: we take out the old one, wipe the groove from dust, dry it, insert a new seal. Just before putting the PVC window sash back in place, the pin of the lower hinge must be cleaned and greased. This simple maneuver - with the cleaning and lubrication of the pin - allows you to get rid of the annoying squeak that is heard when opening and closing a plastic window or door.
When installing the sash of a plastic window, the procedure is reversed:
- We put the flap on the lower pin.
- We place it vertically, aligning the upper loop.
- Finger (with a screwdriver blade) press on the rod until it pops out from above.
Everything, the sash of the PVC window is put in place, the repair of the plastic window is finished. The process is simple, but for better assimilation, watch the video.
How to remove and change a glass unit
It is sometimes necessary to disassemble a plastic window to replace a double-glazed window - the glass cracked or broke, became leaky (condensation settles between the glasses). Sometimes it is necessary to change the rubber seal, which is located along the perimeter of the glass from the side of the room and the street. Over time, it loses its elasticity, and begins to blow from under the glass. For all these works, the glass unit must be removed.
The glass unit is held in the frame by glazing beads - thin plastic strips. To remove the glass unit, they must be removed. There are four shtapiks on each double-glazed window - two long vertical, two short, horizontal. We start shooting with long ones.
For work, you need a spatula with rounded corners or an old knife with a thick blade, some other similar tool. This tool is inserted at an angle into the gap between the glazing bead and the frame.
There is a small gap between the glazing bead and the frame. We put the edge of the tool into it
Turning the blade slightly to the right or left, disconnect the glazing bead from the frame. It locks into the groove, and when pressed, it separates quite easily. Swiping the tool up and down, separate it at a greater length. Now, grasping the glazing bead with your hand, you can easily remove it. We carry out the same operation with the second vertical and horizontal strips.
To prevent the glass unit from falling out, it is better to remove the upper glazing bead last. In this case, you need to slightly hold the glass with your hand (just keep in mind, they have a solid weight). Slightly pulling the glass towards you at the top, take it out of the frame.
A new or refurbished glass unit is installed in the reverse order. First, the pads are exposed - rubber plates that soften the contact with the frame. Expose the glasses, aligning them relative to the center - the gaps on the right and left should be equal.
Glazing beads are installed in place. But this time, they put the top one first, then the bottom one, then the side ones. The procedure for installing glazing beads is as follows: we put one edge into the groove, we start the second edge. We knock in the middle with a palm until it clicks.
Glass replacement in a glass unit
Sometimes the repair of plastic windows includes glass replacement. This is much more difficult. First of all, you need glass that is cut strictly to size. You can, of course, cut it yourself, and then process the edge so as not to get hurt. You can also order glass from the workshop, asking for the edges to be sanded.
Then the glass unit is removed from the frame of the plastic window, laid on a flat surface. It is more convenient on the table, but also on stools. If you work on the table, cover it with something.
Then, with a sharp knife (you can use wallpaper), the silicone is cut along the perimeter. Then the damaged glass is finally separated from the glass unit and removed. In its place, a new washed to shine is laid, leveled. In size, it should match up to a millimeter.
Next, cover the glass with silicone sealant (not acrylic). We insert the tube with the sealant into the construction gun, go around the perimeter of the glass, making sure that the seam is filled evenly. We are waiting for the silicone to dry, then we take an adhesive tape 40 mm wide, glue the glass unit around the perimeter. The glass in the double-glazed window has been changed, you can put it back.
Eliminate blockages
Sometimes plastic window fittings do not work correctly. When this happens the first time, the window appears to have broken, although it usually is not. This situation cannot even be called a repair. You just need to return everything to working condition.
The handle does not turn
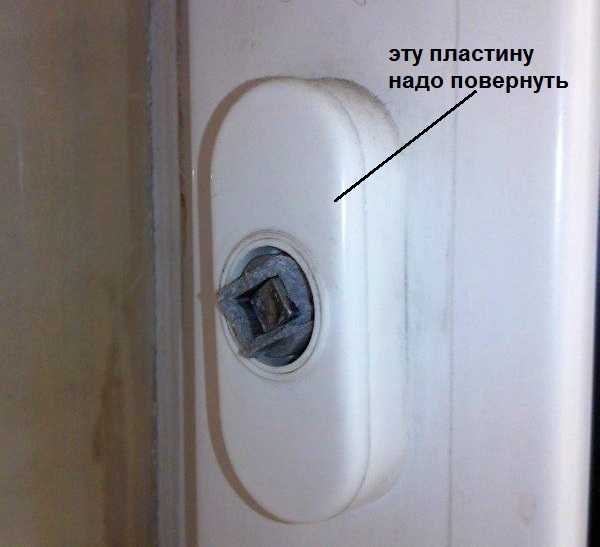
Sometimes in some position the handle of the plastic window "gets stuck" and does not want to turn. Usually the reason is the blocker being triggered. This is the plate that sits near the handle on the side of the frame. The shape of the plate is different for different manufacturers of accessories.
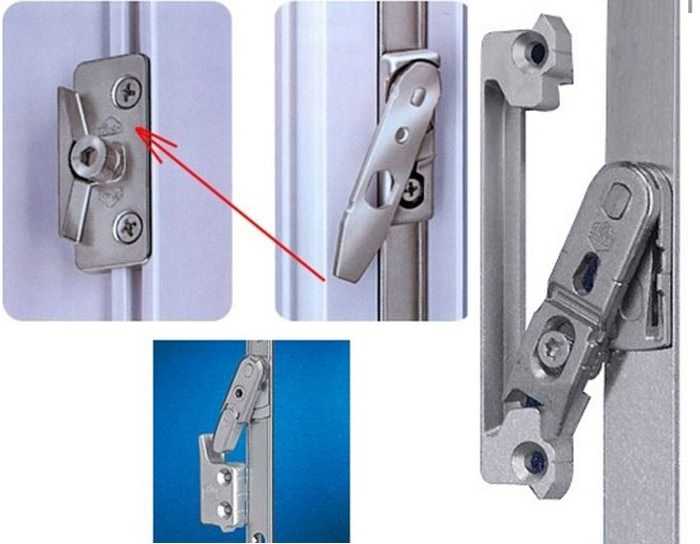
Types of blockers on PVC windows
To correct the situation with the handle, it is necessary to return the blocker to its normal position.If it is in the form of a long plate, pressing on the movable part, it is placed vertically, then the handle is turned. Then everything should work fine. Sometimes a plastic window blocker looks like a small tongue. We also press on it, turn the handle to the required position.
If this "treatment" did not help, you need to check whether the blocker enters the counterpart (pictured above). Sometimes, due to heat or cold, inconsistencies begin. If the tongue does not reach the mating part, you need to move it a little closer. The counter plate is unscrewed (there are two bolts), a plate the size of the counterpart of the blocker is cut out of white thin plastic, and it is installed between the frame and this plate. If the plastic sticks out somewhere, it is carefully trimmed with a sharp knife. The window should now close.
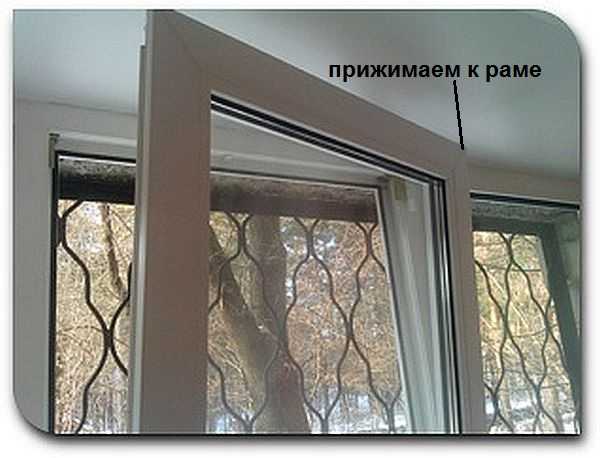
The sash only hangs on the bottom hinge
This situation occurs if the window is simultaneously opened in tilt and tilt modes. Do not panic, leaving the sash open, press the upper edge against the frame. Aligning the upper edge with the hinge, turn the handle to the "open" position - horizontally. If it does not turn, turn off the lock.
Plastic window fittings worked incorrectly
We close the sash, turn the handle down to the “closed” position. We slowly check the work in all positions. There are still a lot of nuances associated with blowing from under the window, but they are all solved mainly by adjusting, but about how how to adjust a plastic window, it is written here.
We have described the most common problems with plastic windows, which can be solved on your own without involving specialists.


Everything is so detailed that even a schoolboy can figure it out. Are there really those who will not figure it out even now?
There are some 🙂 Hello.
"Sow" 3 bolts out of 4 on 2 loggia handles. I did not find components in my city. I wanted to order and pick it up in a neighboring city at points. Don't know the pin size. Sash width approx. 59 mm. The protruding part of the pin is 35 mm, but a little more in the recess. Bolt with a head - about 44 mm, without a head - 40 mm (ruler). I suspect 35mm pin pens are needed. I even thought to buy a handle with bolts of different lengths for everyone. If I miss, I don't know when I will get to these points again. This option is just bolts:
vseinstrumenti.ru/krepezh/metricheskij/vinty/zubr/zubr-vint-zubr-din-965.-klass-prochnosti-8.8.-otsinkovannyi.-m5x30-mm.-tf6.-8-sht.-4-303116- 05-030 /
Does the M5 thread seem to fit? But the length is not 35 mm, but there are 30 mm and 40 mm. Interestingly, a little shorter will fit? Or is it generally better not to touch them, they are not windowed?
Maybe it makes sense to put new pens? It is easier to order them than to find the matching individual pins.
I would be glad. Only on store sites, these sizes are needed for a pin. As a characteristic of the handles to fit. Okay thank you. Nice site. In winter, with your help, I adjusted the window with pins.
To be honest, it doesn’t seem to be a “kettle”, but it’s not clear how to adjust the sash of the plastic window, it just falls when opening and doesn’t “want to be fixed.” And the parodox is that you cannot see any adjusting bolts or nuts! so that you can not open the window completely for ventilation "??