How to make a pitched roof
If you want to build an extraordinary, unlike the neighbors' house, take a closer look at the houses under a pitched roof. It gives the building originality. In addition, the pitched roof is the easiest to use. So simple that you can do it yourself.
The content of the article
- 1 Pros and cons
- 2 Shed roof device
- 3 Shed roof rafter system
- 4 The choice of the angle of inclination of the roof
- 5 Determine the height to which you want to raise the wall
- 6 Photo report from the construction site: a pitched roof on a house made of aerated concrete
- 7 Projects and photos of houses with a pitched roof
Pros and cons
Shed roofs are considered the most inexpensive and easiest to install. And this is true, especially with a small building width. Nevertheless, in our country, houses with pitched roofs are very rare. For the most part, this is due to the fact that two or four pitched roofs are more familiar to us - they look more familiar. The second snag is to find a project adapted to our weather conditions. There are a lot of projects on Western resources, but they are designed for a milder climate, as a rule, they have a large glazing area. Finding an architect who will competently change a project you like is very difficult. But if you succeed, and the harmony of the building is not disturbed, the house turns out to be very original.
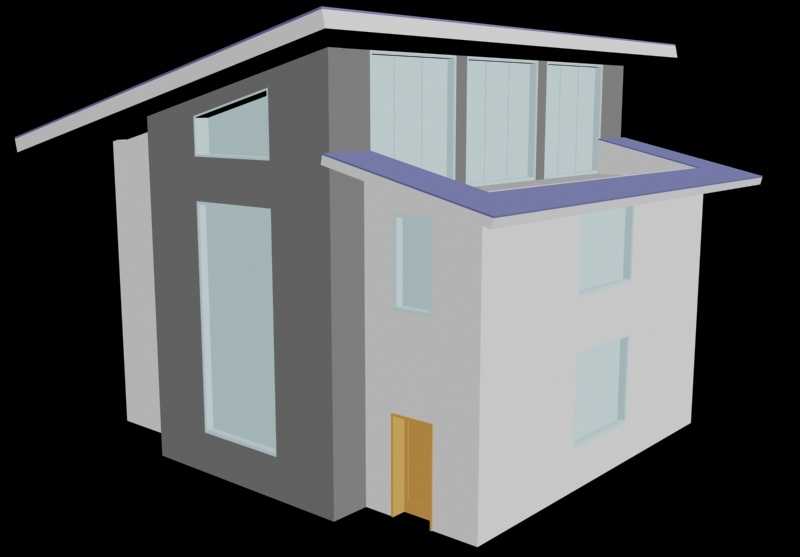
One of the projects of houses with a pitched roof
Many are intimidated by uneven ceilings in some part of the building. They are, of course, more difficult to beat than standard ones, but the result is also obtained on a completely different level - original by 100%. True, this time it is very difficult to find a designer who can develop such an interior in the vastness of our Motherland, nevertheless, it is possible.
There is another way out - to level the ceilings by overlapping, and use the free space under the roof as technical rooms. Such options have been implemented and the owners are very satisfied. Yes, the technical rooms are in the basement and upstairs, but there are no problems with groundwater.
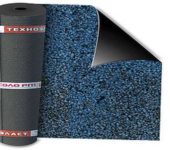
These are, perhaps, all the disadvantages or pitfalls that a pitched roof can bring. There is, however, one more thing that can hardly be called a drawback. Due to the peculiarity of the structure, the roofing material on such houses is not visible from the ground. If the terrain is flat, without large differences in height, it makes no sense to bother with the appearance of the roof. It is better to choose simple-looking, but high-quality materials, quiet (the plane is large, it makes a lot of noise when it rains) and reliable. One of the most popular options is a seam roof. It provides the proper degree of tightness and is not very noisy. Another option is soft weld roof from modern materials. Such roofs are even quieter, and modern materials can be used for 20-30 years without repair.
Shed roof device
Organize the required slope of the pitched roof due to the difference in heights of the opposite walls. One wall of the building turns out to be much higher than the other. This leads to an increased consumption of materials for the walls, but the rafter system is very simple, especially for buildings of small width.
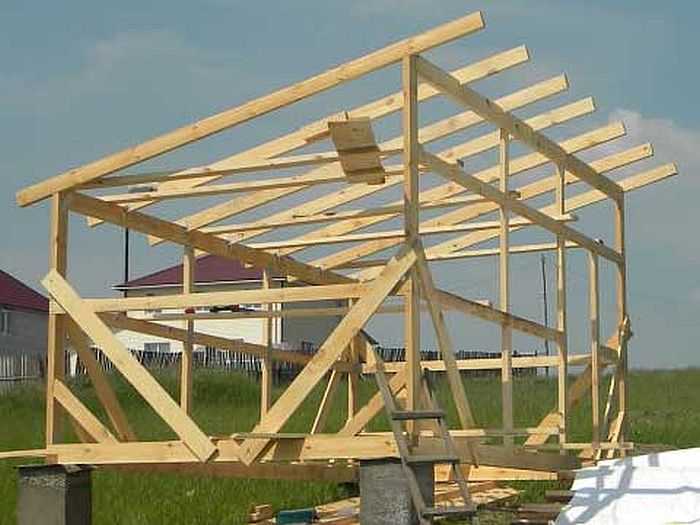
Shed roof for barn
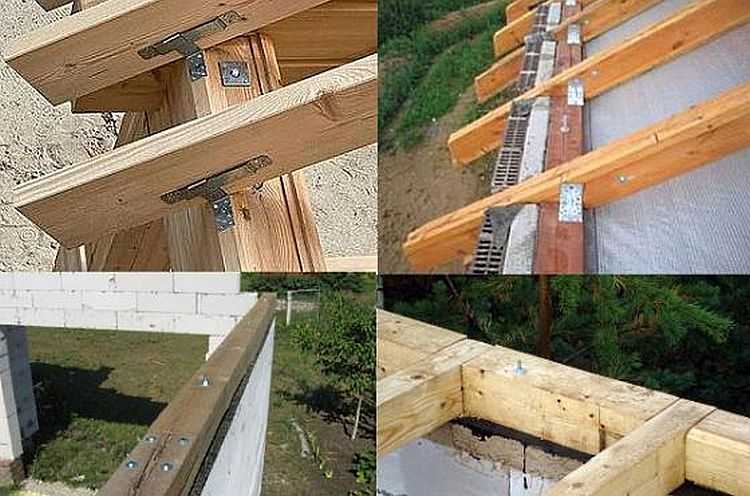
With sufficient bearing capacity of the walls, the shed roof rafter system rests on a Mauerlat fixed to the wall. To distribute the load more evenly, the upper row of the wall masonry is reinforced with longitudinal reinforcement (for brick walls, from concrete blocks) or an armo-belt is poured over the last row (for walls made of lightweight concrete, limestone, shell rock). In the case of a wooden or frame structure, the role of the mauerlat is usually performed by the last crown or upper strapping.
With insufficient strength of the building material of the walls, most of the load can be transferred to the floor.For this, racks are installed (step - about 1 meter), on which the girders are laid - long bars running along the building. Then the rafter legs rest on them.
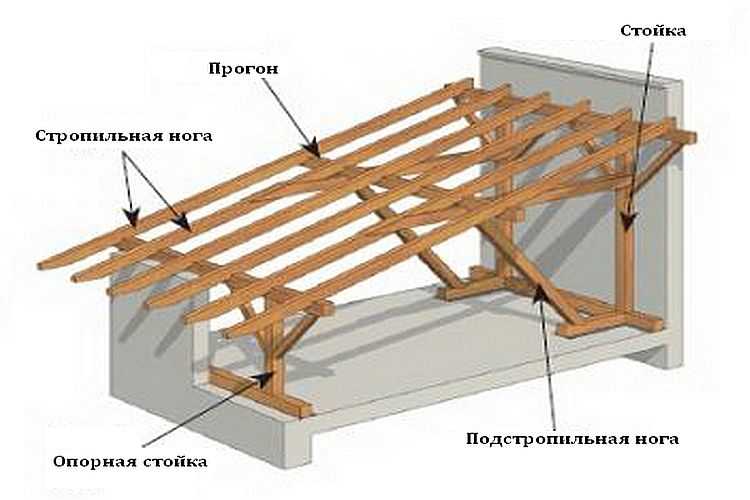
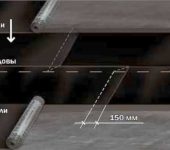
How to transfer the load from the walls to the floor
When pouring the armopoyas or laying the last row, studs are installed in it, with a step of 80-100 cm, with which the Mauerlat is then attached to the walls of the building. In wooden houses, if you do not make an armored belt, it is impossible to lay studs. In this case, installation on hex pins is allowed. A hole is drilled under the pin through the Mauerlat, a couple of millimeters less than the pin diameter. A metal rod is hammered into it, which attracts a wooden beam to the wall. The connection is tightened with the correct size hex wrench.
Shed roof rafter system
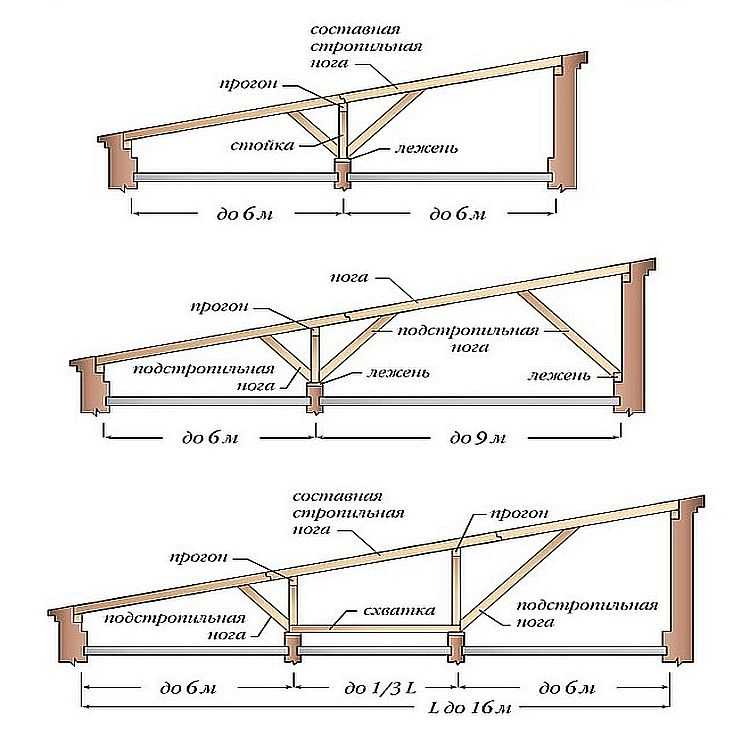
Such roofs are especially popular in the construction of yard buildings - sheds, garages. It's just that the size of the buildings allows the use of not very powerful beams, and beams are required in small quantities. With a building width up to 6 meters, the shed roof truss system contains almost no additional reinforcing elements (supports and girders), which is beneficial. Also attractive is the lack of complex knots.
For Central Russia, for a span of up to 5.5 meters, beams of 50-150 mm are taken, up to 4 meters, 50-100 mm is enough, although in an amicable way, you need to consider the snow and wind load specifically in your region, and, based on this, determine with the parameters of the beams.
Shed roof truss system with a small span (up to 6 meters)
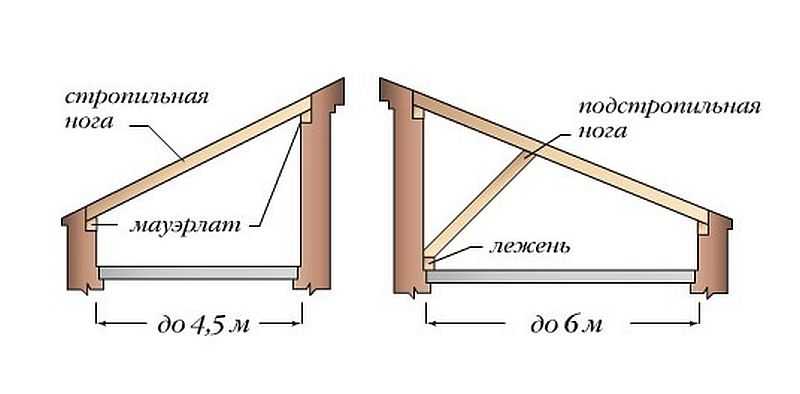
With a distance between the walls up to 4.5 meters, the pitched roof consists of two Mauerlat bars fixed to the walls, and rafter legs, which rest on the Mauerlat. A very simple construction indeed.
With a span width from 4.5 meters to 6 meters, a bed is also required, fixed on a higher wall at the level of the ceiling and a rafter leg, which rests against the beam almost in the middle. The slope angle of this beam depends on the distance between the walls and the level of installation of the slope.
More complex rafter systems in a pitched roof with buildings more than 6 meters wide. In this case, it is optimal if the house is designed so that inside there is also a load-bearing wall on which the racks rest. With a house up to 12 meters wide, the trusses are still simple and the roofing costs are minimal.
Construction of gable roof trusses with buildings more than 6 meters wide
For buildings more than 12 meters wide, the system becomes more complicated - there are more rafter legs. In addition, making beams over 6 meters long is expensive. If an increase is required only by the width of the roof overhangs, the beams are grown along the edges with fillets. These are pieces of beams of the same section, connected to the beam and fixed on the sides by two wooden plates at least 60 cm long, fastened with bolts or nails, allow the use of mounting plates.
Splice rafter option
If the total length of the beams is more than 8 meters, they are usually spliced. The joints are additionally reinforced by nailing boards or mounting plates.
Options for attaching the rafters to the Mauerlat: sliding glory at the top and rigid at the top right. At the bottom right, the option of a tie-in without overhangs (used very rarely)
There may still be questions about how to attach the rafters of pitched roofs to the Mauerlat. There are no fundamental differences. All the same, a cutout is made in the rafter leg, with which the bar rests against the Mauerlat. In order not to suffer with each rafter leg, leveling its landing, sawing out the first one, from a piece of board, thick plywood or timber they make a template that exactly repeats the resulting "drank". All subsequent rafters are filed before installation. A template is applied to them in the right place, a recess of the required shape and size is outlined and cut out.
This was a question of rigidly attaching the rafter legs to the Mauerlat. It is used on all buildings that exhibit low shrinkage.On wooden houses, this method of fastening cannot be used - the house settles all the time or rises a little, which may cause a distortion. If the roof is fixed rigidly, it can break. Therefore, when installing a shed or any other roof on wooden houses, a sliding connection of rafters and Mauerlat is used. For this there are the so-called "sliding". These are plates, a state of corners that are attached to the Mauerlat and metal strips movably connected to them, which are attached to the rafter leg. There are two such slides on each rafter.
The choice of the angle of inclination of the roof
The slope angle of the roof is determined by a set of indicators - wind and snow load and the type of roofing material. First, they are determined with an angle according to climatic conditions (depending on the amount of precipitation and wind loads). Then they look at the minimum recommended slope for the selected type of roofing material (in the table below).
| Name of roofing material | Minimum tilt angle (in degrees) |
|---|---|
| Asbestos-cement slate and ondulin | 6° |
| Cement-sand and ceramic tiles | 10° |
| Flexible bituminous shingles | 12° |
| Metal tile | 6° |
| Asbo-cement or slate slabs | 27° |
| Galvanized steel, copper, zinc-titanium sheets | 17° |
| Corrugated board | 6° |
If the desired angle is larger, everything is fine, if it is smaller (which happens very rarely), increase it to the recommended one. Making a roof with an angle less than the minimum angle recommended by the manufacturer of the roofing is not unambiguous - it will leak at the joints. To make it easier to navigate, let's say that for Central Russia the recommended slope of a pitched roof is 20 °. But it is desirable to count the figure for each region, and even for the different location of the building on the site.
By the way, keep in mind that different manufacturers of the same type of roofing material may require different minimum slopes. For example, laying of metal tiles one brand can be produced on a roof with a minimum slope of 14 °, the other - 16 °. And this despite the fact that GOST defines a minimum slope of 6 °.
It is also worth remembering that with a slope up to 12 °, in order to ensure the tightness of any roofing material, it is necessary to coat all the joints of the material with a liquid waterproofing compound (usually with bitumen mastic, less often with a roofing sealant).
Determine the height to which you want to raise the wall
To ensure the found slope angle of the pitched roof, one of the walls must be raised higher. How much higher we learn by recalling the formulas for calculating a right-angled triangle. On them we find the length of the rafter legs.
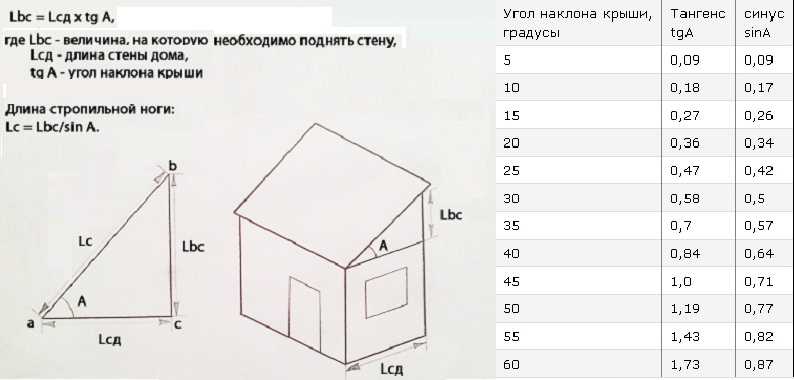
How to calculate the parameters of a shed roof
When calculating, do not forget that the length is obtained without taking into account the overhangs, and they are needed to protect the walls of the house from precipitation. The minimum overhang is 20 cm. But with such a small ledge outside the building, the lean-to roof looks scanty. Therefore, overhangs of at least 60 cm are usually made on one-story buildings. On two-story ones, they can be up to 120 cm. In this case, the width of the overhang is determined based on aesthetic considerations - the roof should look harmonious.

An example of a drawing in ScratchUp
The easiest way to determine how much you need to extend the roof is in design programs that allow you to draw a building to scale and play with overhangs. Everything should be displayed in 3 dimensions (the most popular program is ScratchUp). Twist different sizes of overhangs in it, decide which one looks better (if there is no project), and then order / make rafters.
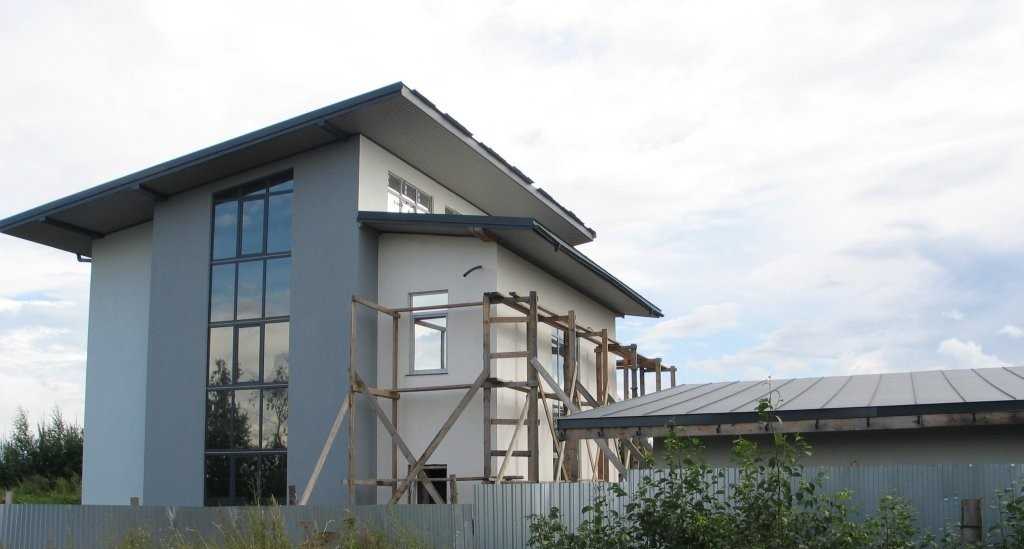
Photo report from the construction site: a pitched roof on a house made of aerated concrete
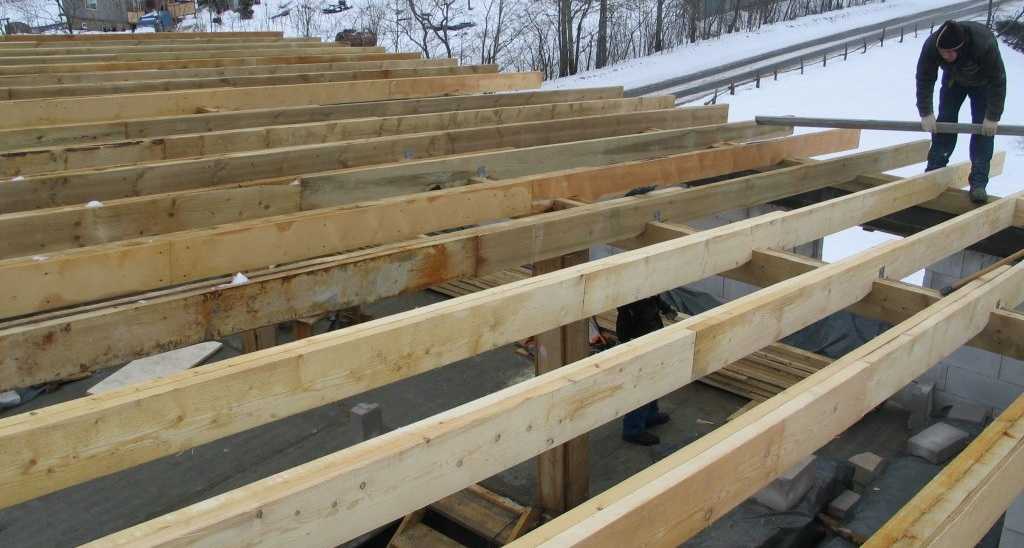
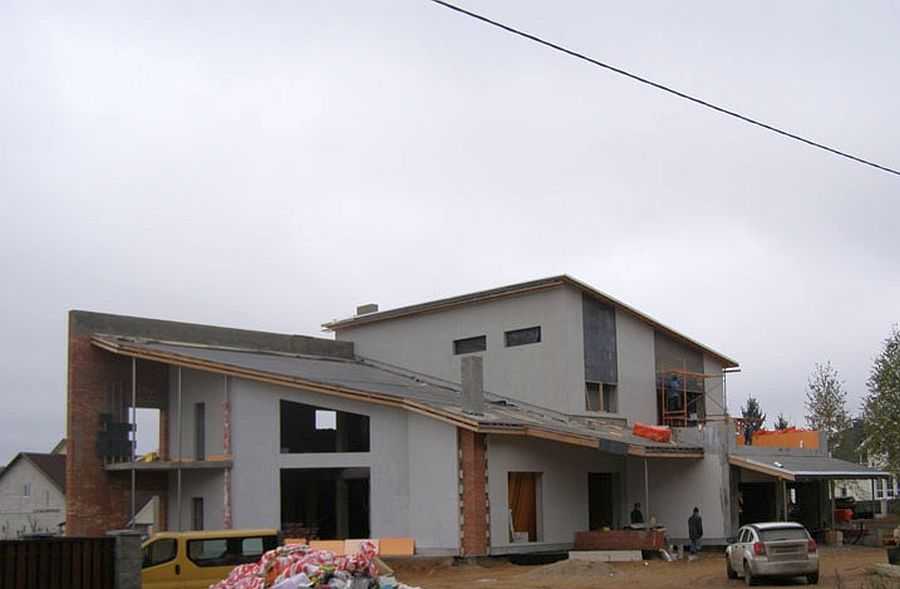
A house was built in St. Petersburg. There was no project, there was a general idea, which is presented in the photo. The house is made of aerated concrete, the finish is plaster, the roof is folded, selected based on its low cost, reliability, ease of installation.
The idea of a house under a pitched roof
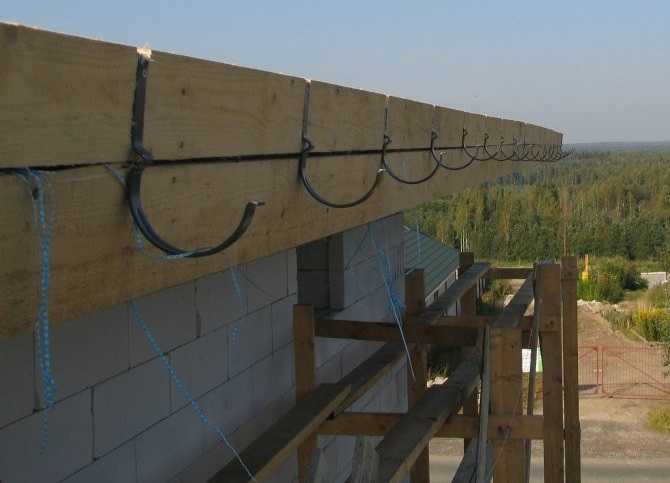
After the walls were driven out, an armo-belt was poured into them, into which studs (Ø 10 mm) were installed every meter.When the concrete in the armored belt reached the required perversity, a layer of waterproofing was laid on the bituminous mastic ("Gidroizol", cut lengthwise into strips of the required width). Mauerlat is laid on top of the waterproofing - a bar of 150-150 mm. All lumber that is used for roofing is dry, treated with protective impregnations, fire retardants.
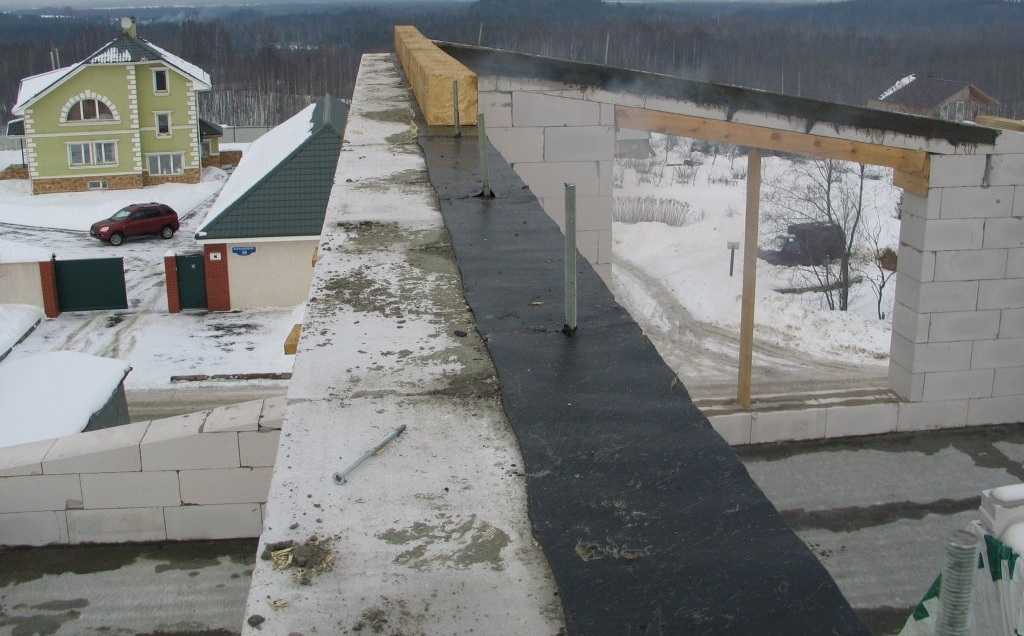
The beginning of the installation of a shed roof - laying the Mauerlat
First they put it in place (it lies on the hairpins, held by the assistants), walk along, knocking with a hammer on those places where the hairpins are. In the bar, the places where the studs stick out are imprinted. Now they drill holes and simply push it onto the studs.
Since the span turns out to be large, props from a bar (150-150 mm) are placed, on which a girder is laid, which will support the rafter legs.
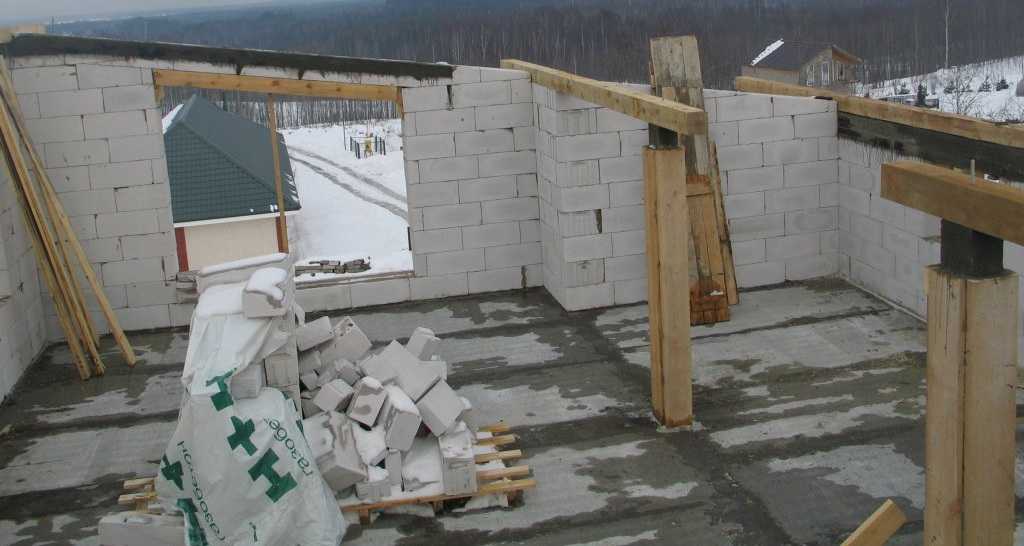
Installation of racks and purlins
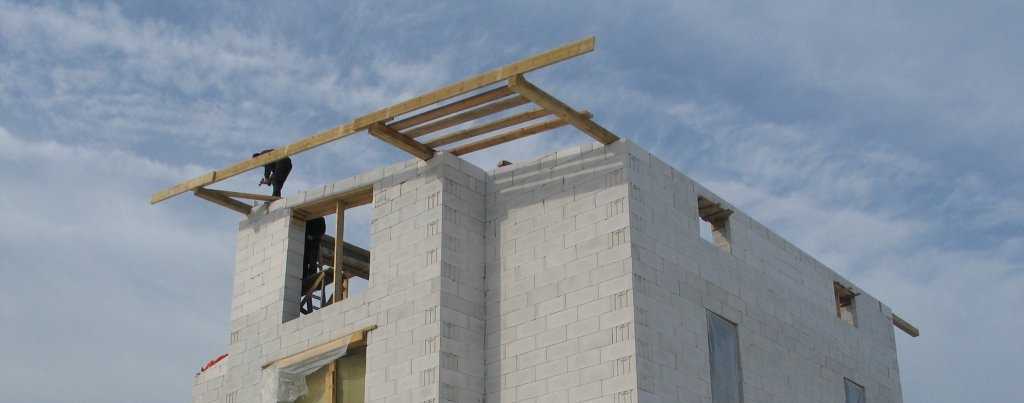
The width of the roof is 12 meters. This is taking into account the overhang of 1.2 meters from the front. Therefore, the beams of the Mauerlat and the run "stick out" beyond the walls exactly at such a distance.

To ensure the removal of the roof, the Mauerlat and the girder stick out along the wall
At first there were doubts about such a large offset - the rightmost beam hangs 2.2 meters. If this offset is reduced, it will be bad for the walls, and the appearance will deteriorate. Therefore, it was decided to leave everything as it is.
Laying rafters
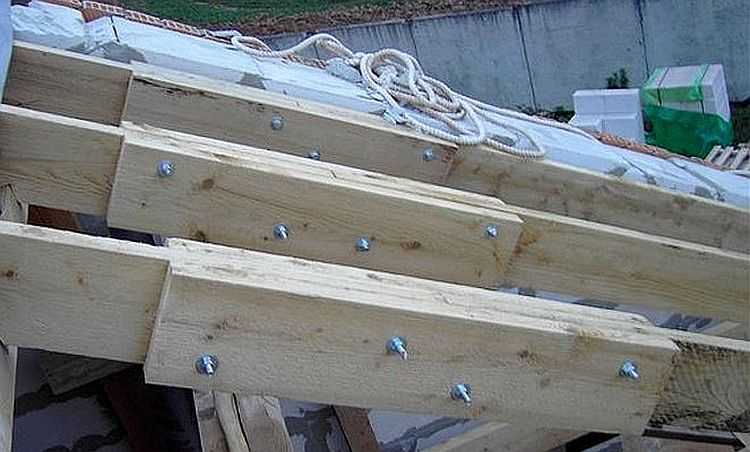
Rafters are laid from two spliced boards 200 * 50 mm, with a step of 580 mm. Boards are knocked down with nails, in a checkerboard pattern (top-bottom), with a step of 200-250 mm. Heads of nails right, left, in pairs Two top / bottom right, two top / bottom left, etc.). We spread the splice points of the boards by less than 60 cm. The resulting beam is much more reliable than a similar solid bar.
The rafters are laid

Method of fastening rafters
Further, the pie of a pitched roof for this case is this (from the attic side to the street): vapor barrier, stone wool 200 mm, ventilation gap (lathing, counter-lathing), moisture insulation, roofing material. In this case, it is a dark gray pural.
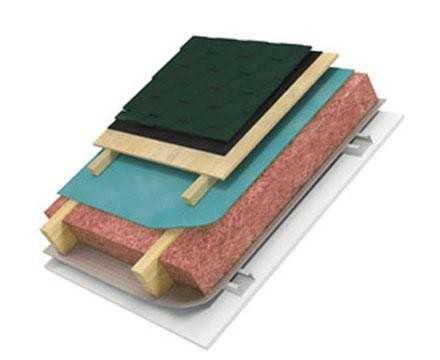
An example of a roofing pie for a pitched roof (it is generally standard)
We will carry out the insulation from the inside later, but for now we lay a hydro-wind-protective membrane Tyvek Solid (vapor-permeable) on top of the rafters.
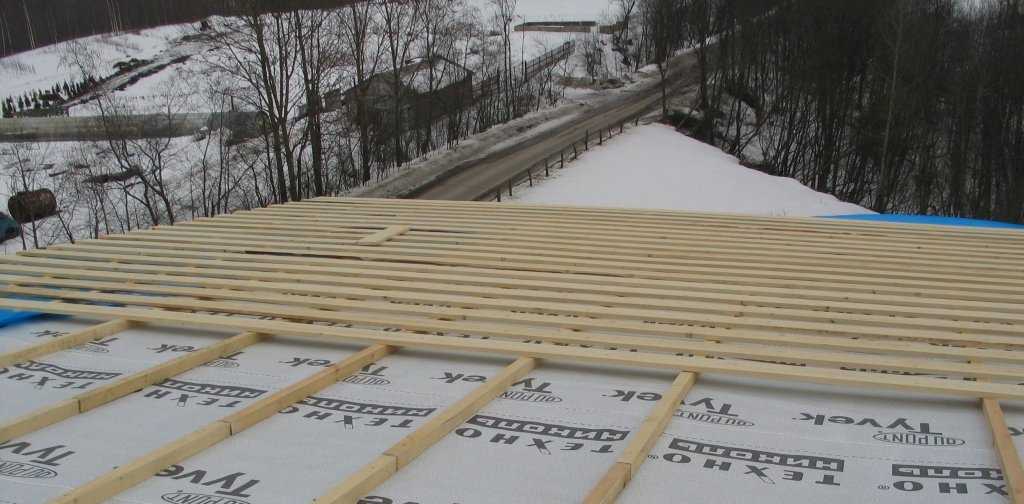
We lay a waterproofing windproof vapor-permeable membrane
The membrane is laid from bottom to top, fastened with staples from a stapler. The fabric that is rolled higher goes to the already laid one by 15-20 cm. The joint is glued with double-sided tape (bought together with the membrane). Then, over the membrane, strips are stuffed, on them - a crate for a folded roof.
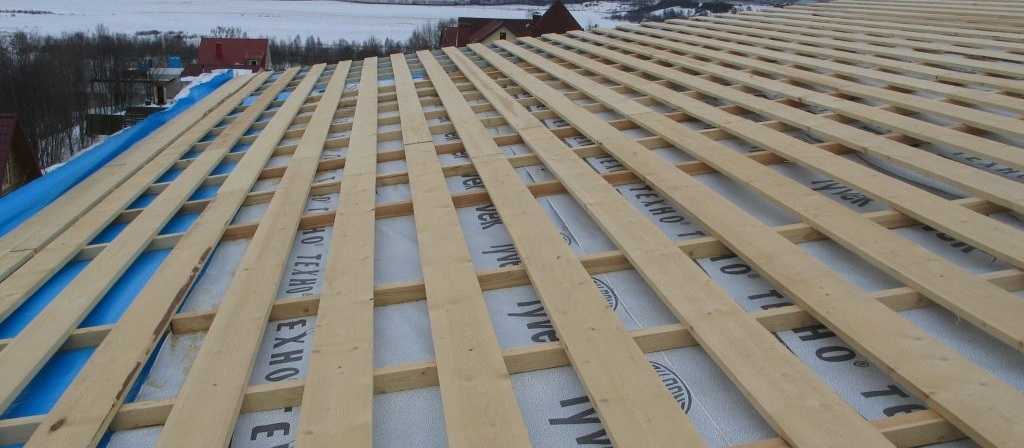
Lathing from a board 25 * 150 mm
First, a lathing was made from a board of 25 * 150 mm with a step of 150 mm. After laying, walking along the roof, it was decided to strengthen the crate. To do this, between the boards already laid, we fill boards 100 mm wide. Now there is a gap of 25 mm between the boards.
Shed roof lathing as a result
Further on the lower pediment hooks were filled for installation of the drainage system... They are packed unevenly, since due to the large length of the pediment, it was decided to make two receiving funnels at a distance of 2.8 meters from the edge. To ensure the flow in two directions, such a relief was made.
Stuffed hooks for the gutter system
Next, you need to bring in pieces of metal (paintings) 12 meters long. They are not heavy, but you cannot bend them, because the "sled" disappears. For lifting, a temporary "bridge" was built connecting the ground and the roof. The sheets were lifted along it.
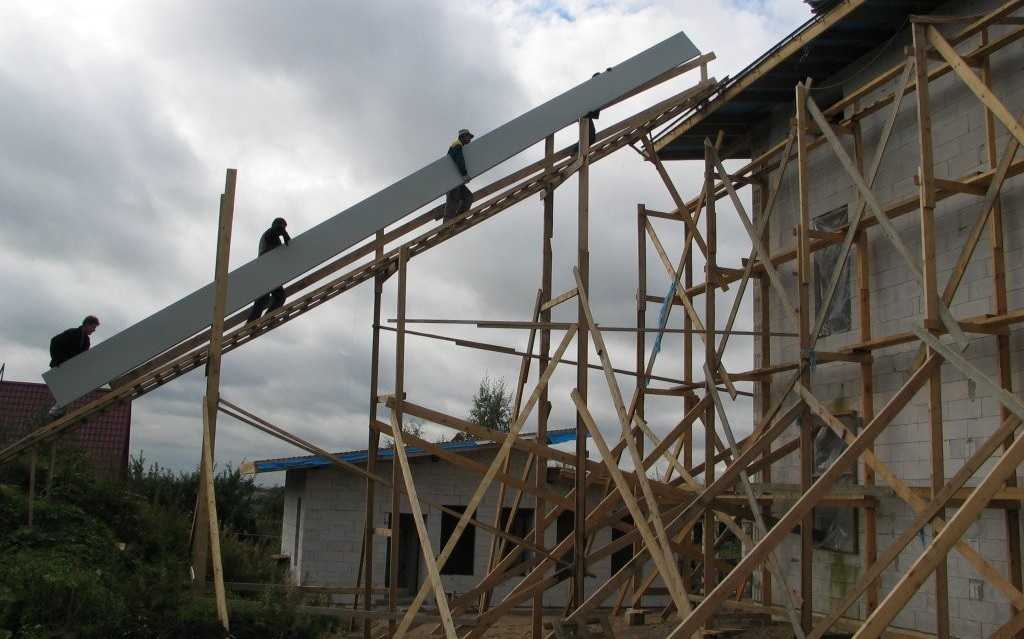
Lifting sheets along the bridge
Next comes the roofing work, which differs depending on the type of roofing material. In this case, it was necessary to solve the problem of thermal expansion of the material - galvanized steel (pural) significantly changes its dimensions when heated / cooled. To ensure freedom of expansion, it was decided to fasten the material to the lathing behind the fold with movable clamps with a freedom of movement of 15-20 mm.

Installation of clamps for standing seam roofs
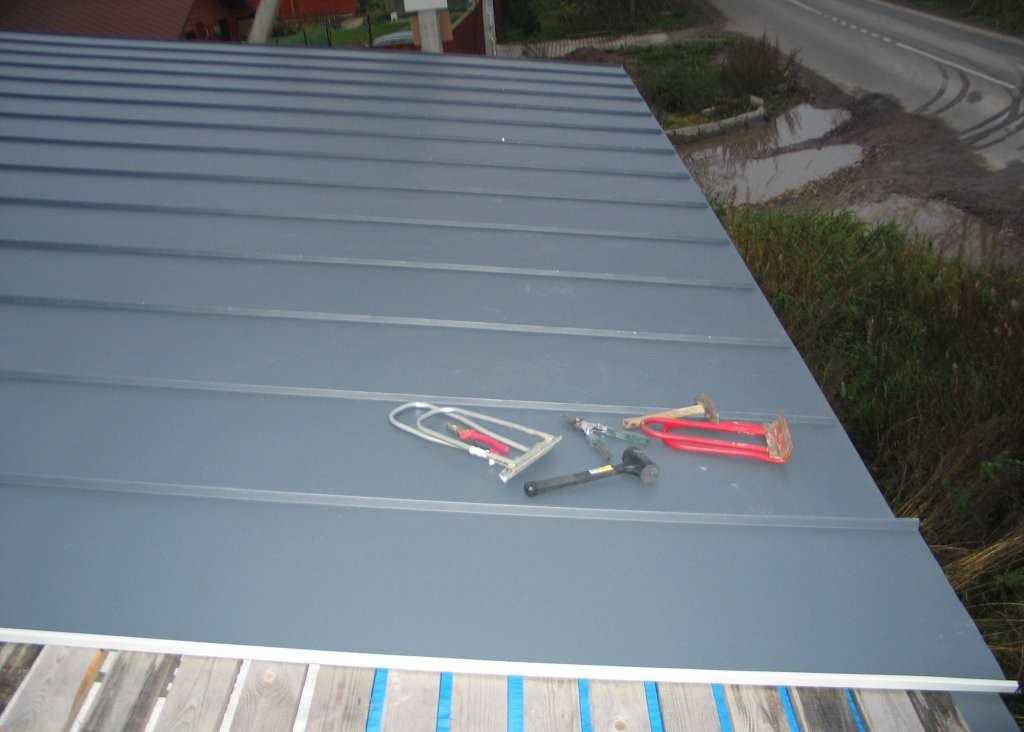
Pural seam roofing
After laying the roofing material, the overhangs are hemmed, and they are no different.

The roof needs to be brought "to mind" - the overhangs must be hemmed, but basically it is already ready
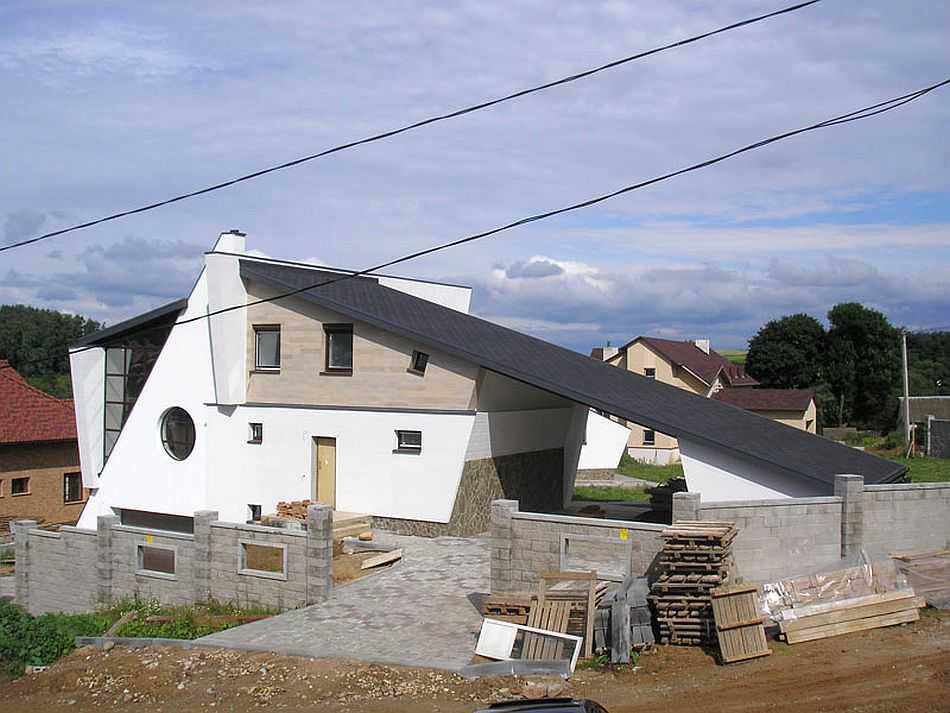
Well, in the photo below is what happened after finishing. Very modern, stylish and unusual.
House with a pitched roof - almost finished
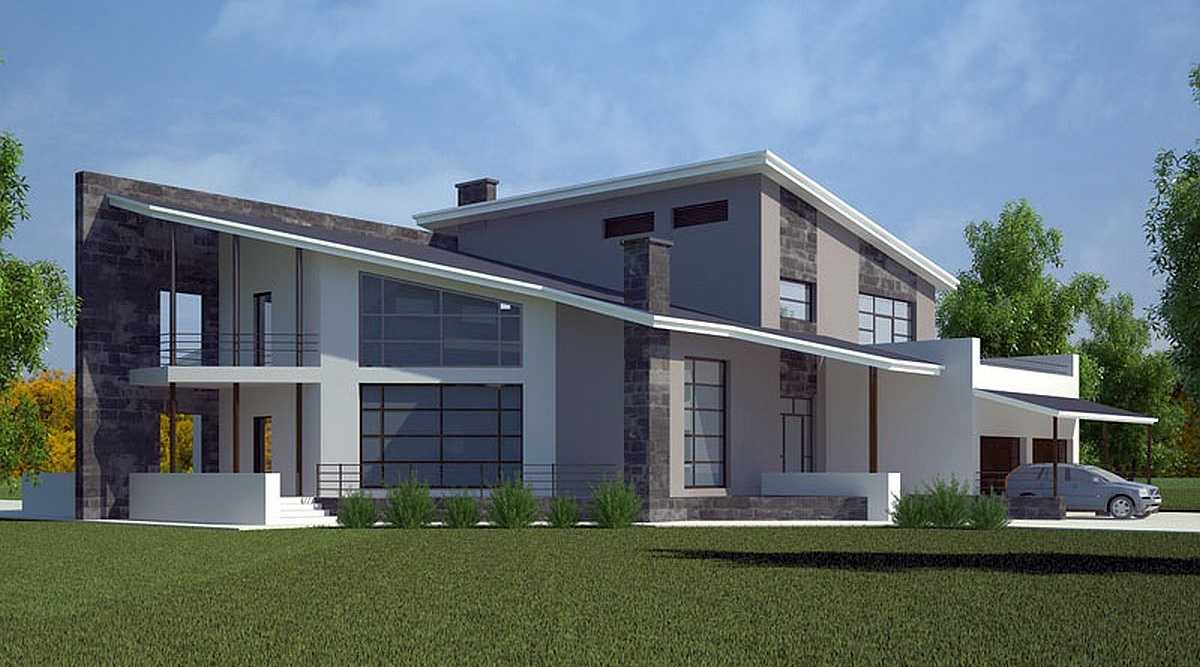
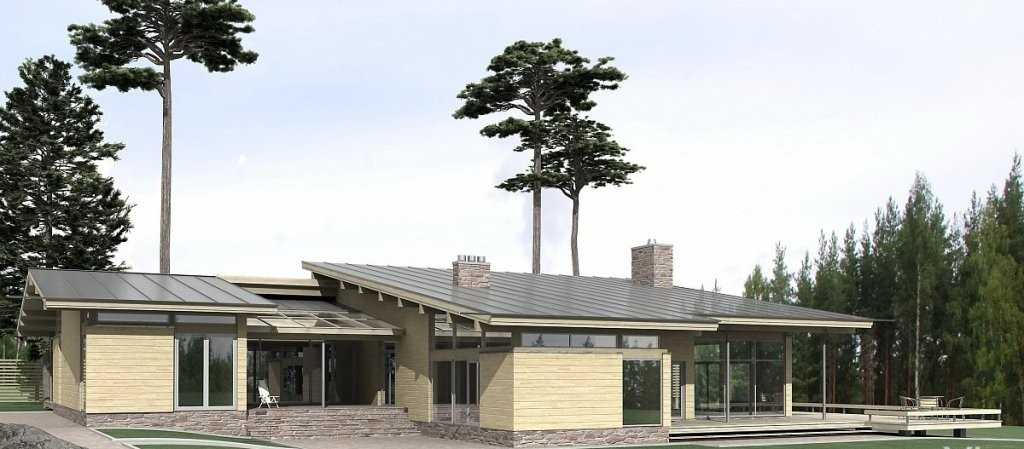
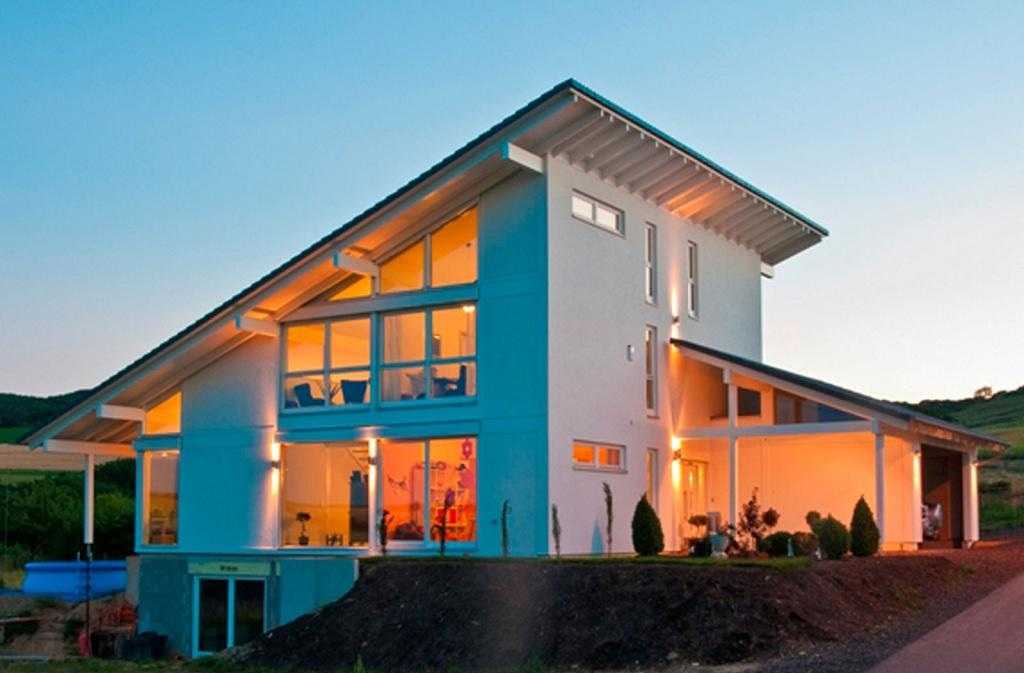
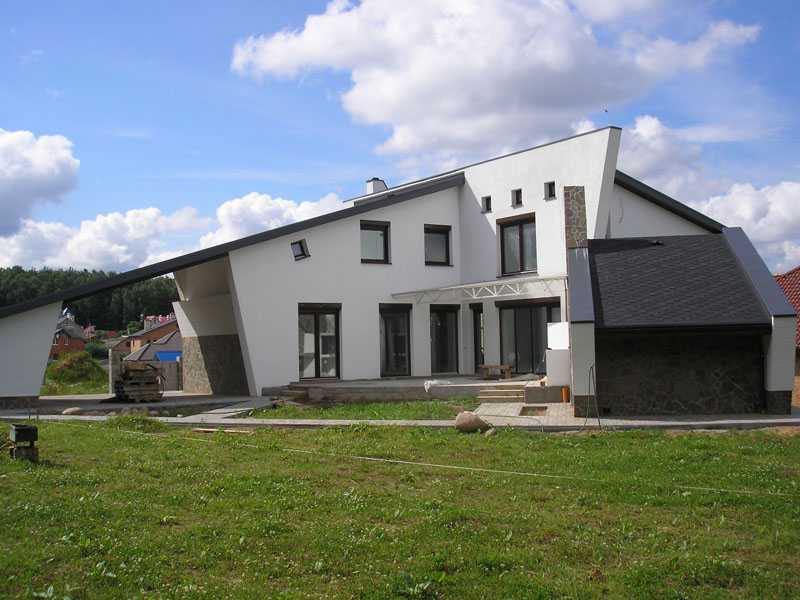
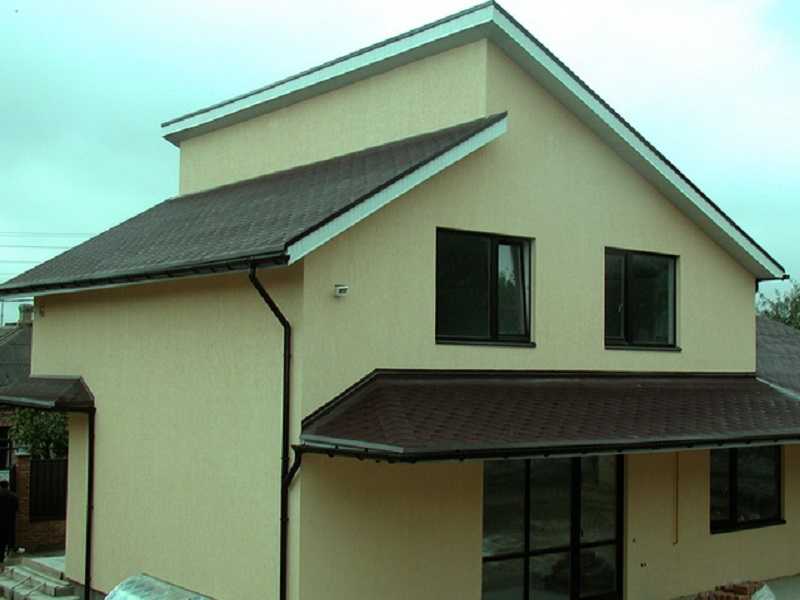
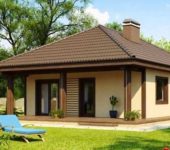
Projects and photos of houses with a pitched roof
As already mentioned, it is difficult to find interesting projects of residential buildings with a pitched roof. While these buildings are unpopular with us. Perhaps, just because of its eccentricity. This section contains several projects or photos of already built houses. Maybe someone will be useful at least as an idea.
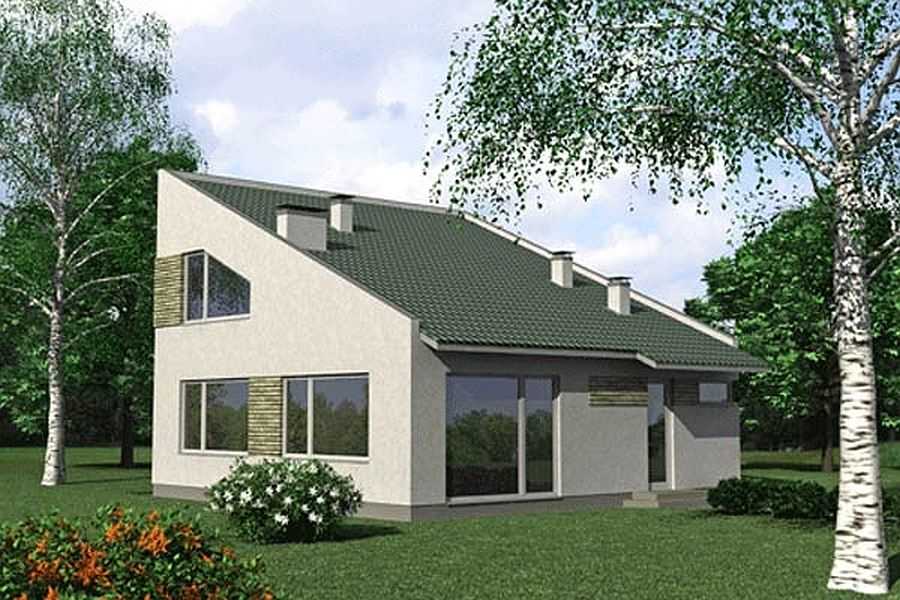
Project of a small house under a pitched roof

This house exists. pitched roofs are especially good in areas with a difference in height
One-storey house with a large pitched roof

Two-storey house with terraces on two floors

A large roof slope is required for natural tiles
Large windows are beautiful, but irrational in our climate
Split-level house - an interesting completed project

This is the prototype of what is above
The original house. Under one shed roof there is a house and a household building, and even a part - a canopy over the courtyard between two buildings
The same project as above, on the other side
Two pitched roofs at different levels


Somehow I got fired up with the idea of building a one-story house with a flat roof, the outreach of which is 2 meters around the perimeter of the whole house. Something like a high-tech house. And what my surprise was that there was zero information about this on the Russian Internet. Generally nothing. About the standard (gable and other) million articles, drawings and other things. As it turned out, American builders, compared to ours, are at their best, going to the English-language resources, I found many articles, calculations, calculators for these roofs, what and how to make, schemes. Unfortunately, our people will be making standard roofs for another ten centuries, which means that there will be no information on our resources about flat roofs with long overhangs without props in the future.
I don’t remember seeing a flat roof live. Apparently, Russian builders do not want to bear the risks associated with the possibility of collapse under snow load. Here it is necessary to look whether such roofs are made in Alaska, because America is big, somewhere there is no snow at all.
I originally had a typical project of a frame house, I assumed a pitched roof.)) Snow load, metal tile can withstand.