DIY gate: wooden, metal
Any area is equipped with a wicket made of wood, metal, plastic, or when combined. The style of the entrance is usually kept in accordance with the fence, but there may be something original. Making a gate with your own hands is not so difficult, in any case, there are some simple options.

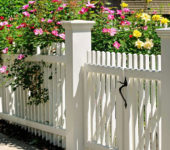
The design of the wicket can be varied
The content of the article
Device
The wicket consists of support pillars and a door leaf with or without a frame, fixed to the pillars with hinges (sometimes called awnings). The pillars can be brick (stone), wooden or metal. In brick during laying, small pieces of thick metal or metal rod are walled up, to which the hinges are subsequently welded.
Metal posts can be round or profiled pipes with thick walls. Round pipes are used less and less: it is more difficult to weld to them, to attach something. A profiled pipe with the same cross-section (diagonal versus diameter) and wall thickness withstands large wind loads; it is easier to weld or fasten to flat edges with self-tapping screws and bolts. Therefore, it is she who is increasingly used when installing gates. Another option is to weld a metal corner to the frame from the profile pipe. In this case, the filling will appear as if in a frame.

The device of gates with wooden and metal frames is the same
Wooden posts are usually used if wooden fence... Most often, it is a pine log treated with protective impregnations that prevent (or at least slow down) the destruction of wood. But there is a combination when the posts are made of metal, and the gate and the fence are wooden. This is because the wood in the ground rots quickly, even after protective treatment.
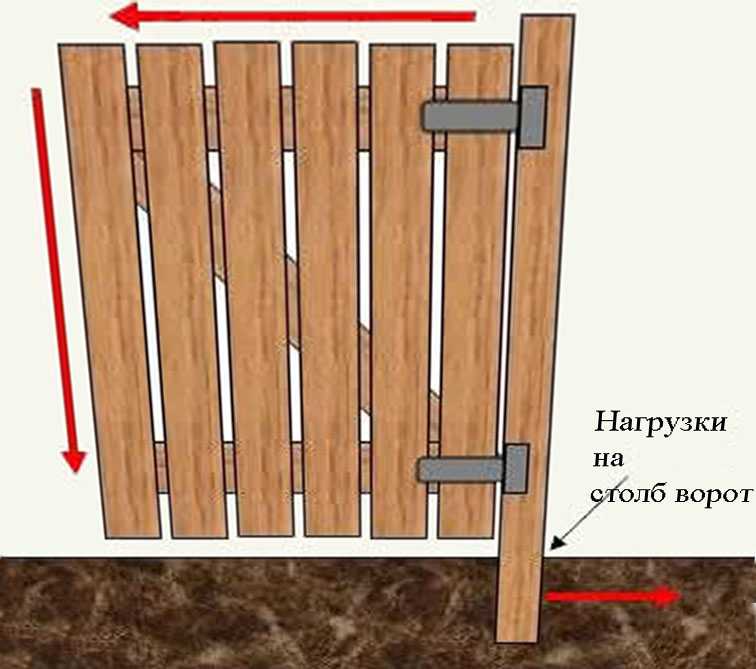
A little about the design of the support frame. It can be just two pillars dug into the ground - the option is suitable if the soil is not prone to heaving (sands, sandy loam, fertile, but not clayey soils).

The pillars led. If there are jumpers at the top and bottom (in this case, you can make an arch at the top), the likelihood of such a nuisance will be much reduced
For heaving soils (clay, loam), it is desirable that the pillars are connected at the top and bottom. In this case, the probability of the wicket skewing after winter is very small. If you do not want to make a nut in the opening, the lower lintel can be lowered below ground level (on a bayonet and a half). It will need to be carefully coated with an anti-corrosion compound, primed, and painted in several layers.
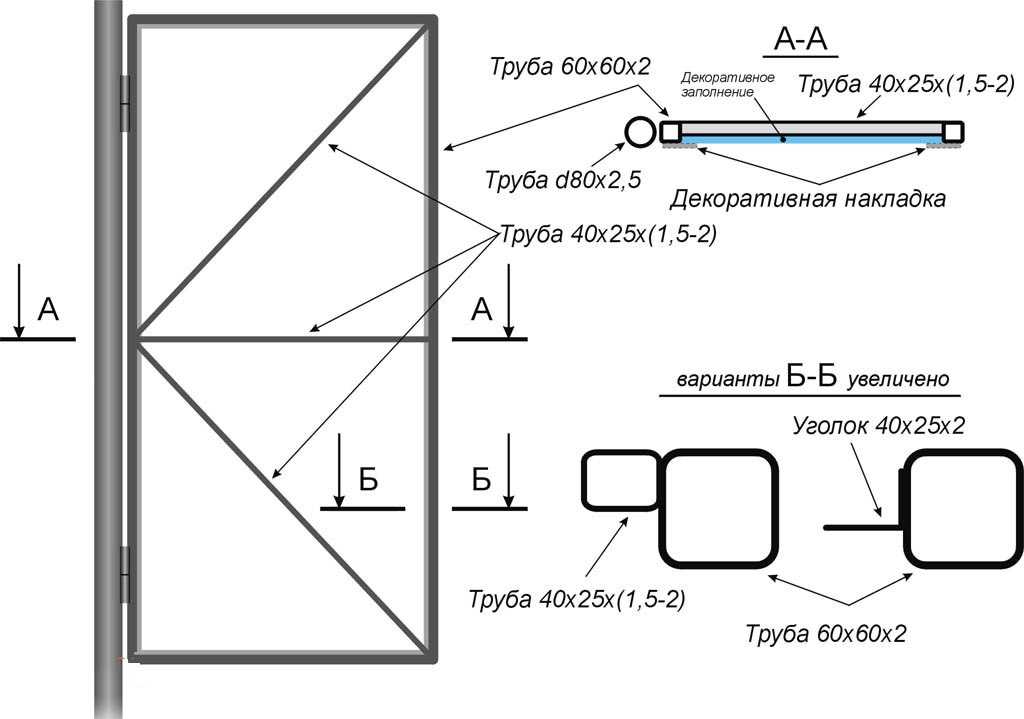
Profile pipe frame
The most, perhaps, universal version of the wicket is with a frame made of a shaped pipe or a metal corner. Any material can be attached to a metal base: wood, sheet metal, corrugated board, metal picket fence, flat slate, polycarbonate, netting, metal rods, forged or bent elements, or make a combination of several materials. There are a lot of options, and the design is selected in the same style as the fence.

The frame of the wicket from the profile pipe
In this case, the profile can be welded both with a narrow part and a wide one. Having welded the pipes with a wide part, you can easily fix the lock as on a regular door, without welding additional fasteners over the frame.

The wicket welded on the wide side has good strength and makes it easy to install the lock
Dimensions and materials
For a solid gate, a profiled pipe with a cross section of 60 * 60 * 3 mm is taken as pillars. In this case, it is better to choose thicker walls, as this will affect the durability of the structure. A 40 * 20 * 2.5mm rectangular tube is usually used for the frame. The strength of this pipe is sufficient for medium wind loads. With low wind loads, you can take a 2 mm wall, but it will be more difficult to cook. Anything thinner than 2.5-3 mm must be welded in a special mode and this is far from easy... If the winds are stronger, you can either increase the wall thickness or use rolled products with a larger section: 40 * 30 or 40 * 40, even 40 * 60.

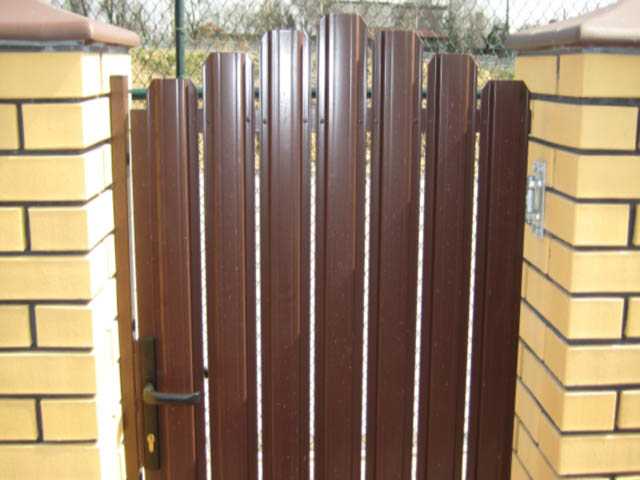
Wicket - device, dimensions
The height of a wicket with an upper crossbar is usually about two meters, without a crossbar - from 1.2 m. Low ones are usually made in internal fences that delimit the site or in semi-transparent low fences. For the deaf tall fences from professional sheet, wood, flat slate, the height at the level of the fence is more characteristic. The width of the wicket is a minimum of 90 cm, the optimum is 100-110 cm. These dimensions are based on practical considerations, since in winter or autumn it will be inconvenient to walk in outerwear in a narrow wicket with a width of 70-75 cm, and it will be then big things.
It is also worth talking about how deep the pillars should be buried. Standard solution - 15-20 cm below the freezing depth... Based on this value and adding the height of the wicket to it, supports are made.
Additional jibs increase rigidity
With a shovel or with borax a pit is made in the ground, at the bottom of which a bucket of crushed stone of the middle fraction is poured. Then the pillar is installed, placed vertically, covered with crushed stone (you can use broken brick) and poured with concrete mortar. When the mortar has gained at least 50% strength (after 7 days at a temperature of + 20 ° C), you can fix the frame of the gate.
Self-production with a photo report and explanations
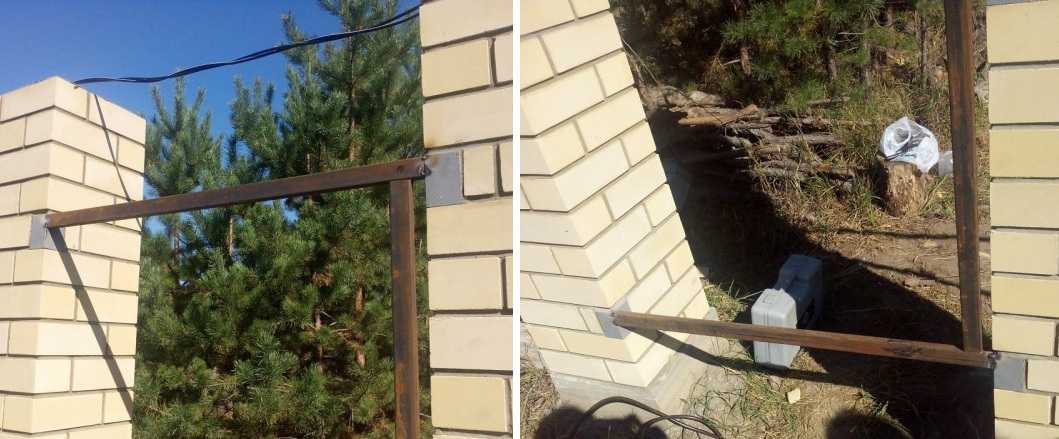
Fence - from a profiled sheet with brick pillars, respectively, and a wicket from a profiled sheet. During construction, metal plates welded to the pipe were immured into the pillars. It was decided to make a wicket with additional jibs - so that the profiled sheet was more rigidly fixed, as well as to strengthen the lock fastening area. The castle is still old, replacement is possible.
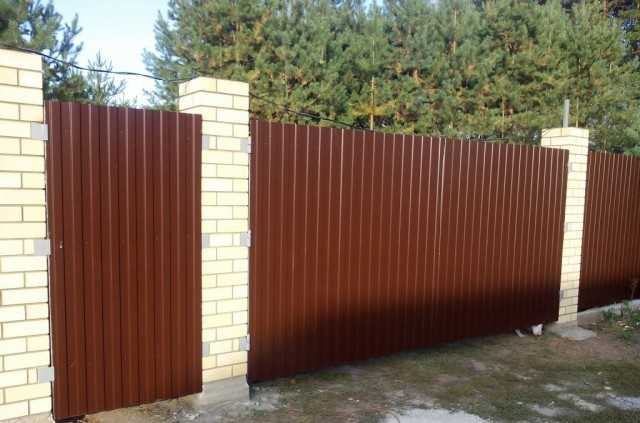
Final result
We cook the wicket frame with inverter welding machine from a profile pipe 40 * 20 * 3 mm. We will put "in place", welded to the mortgages. We cut off the blanks:
- two crossbars from one pillar to another (it turned out 108 cm),
- two racks - 185 cm high.
Cook the frame
We do not weld the crossbeams, but only "grab" them to the embedded plates - so that they hold. Literally two welding points per attachment point. Before welding the second side, we check the horizontalness of the crossbar. We put the building level, adjust the position, then grab it. So, it turns out that there are two horizontal jumpers in the opening.
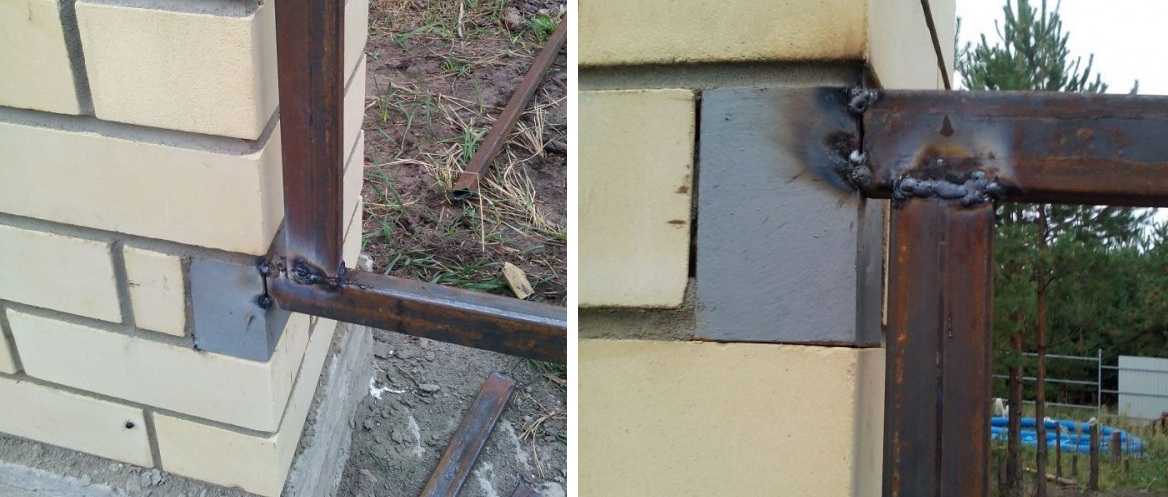
We grab the crossbars to the mortgages with two points
We weld the vertical parts to the installed crossbars. At the junction with the jumpers, the angle is strictly 90 °. We check during the connection process, adjust if necessary. The seam must be strong, so we scald it from all sides, along the perimeter of the pipe.
And on the other hand
The result is a frame tacked to the posts. We check the corners again, otherwise it may skew later, the gate will stop opening / closing.
We put the loops
Next, the most crucial moment is to weld the hinges. We took standard metal hinges for swing gates, which are abundant in any hardware store and on the market. They must be installed strictly vertically, and even both on the same axis. Otherwise, the gate will be difficult to open, and this will ultimately lead to its breakdown.
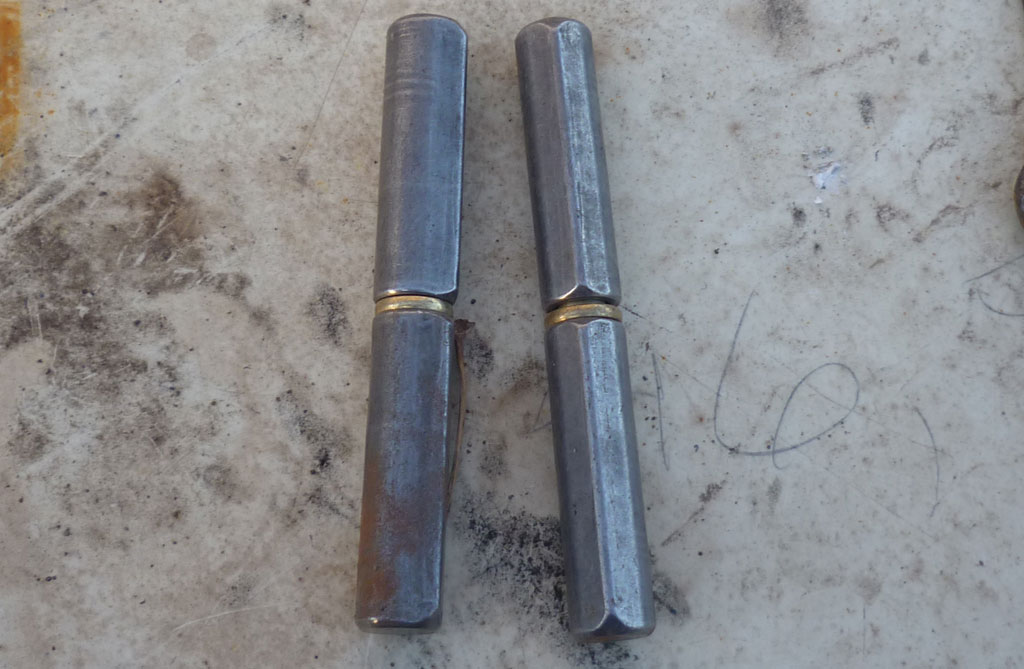
Small drop-shaped wicket hinges
First, weld the lower loop, rechecking its verticality with a level. Set the second one on the same axis.First, we grab it to the mortgage, check it and only then, if everything coincides, carefully weld the seam. If everything is calculated correctly, the loop adheres to the frame pipe, so it will not be difficult to weld.
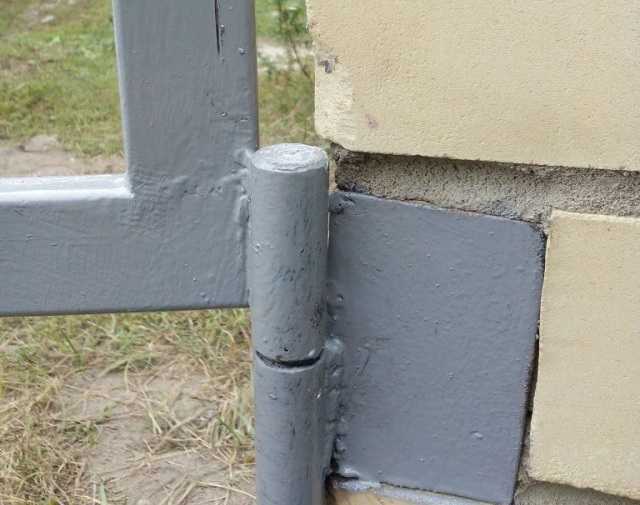
The hinge is welded to the gate
When the hinges are installed, remove the "potholders" that hold the gate. It now magically opens / closes. Next, it's up to the little - to weld the jibs, and for this we cut off pieces of pipe of the same length, apply to the intended installation site, mark with chalk how to cut. We take a grinder with a cutting disc for metal, cut it off, check it, if necessary, modify it (with a grinder or a file - depending on the size of the "joint"). When the jib "has become", we weld it.
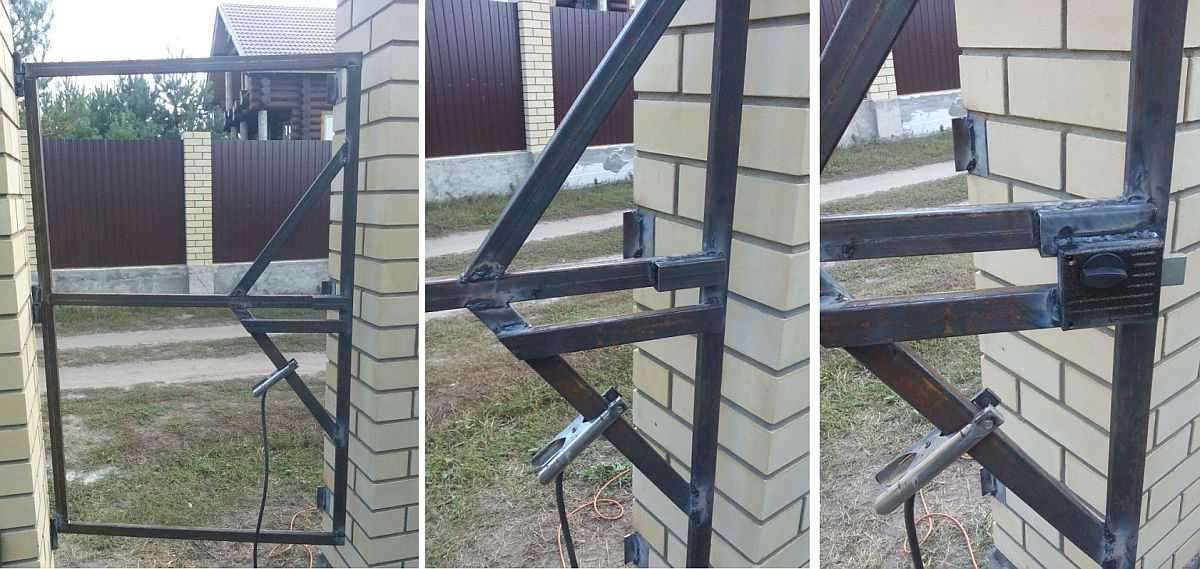
Welding jibs is easy
Next, we add reinforcement to the lock on the gate. To mount the old metal lock at the top, it was necessary to weld a piece of the corner, otherwise it would not work to fix it.
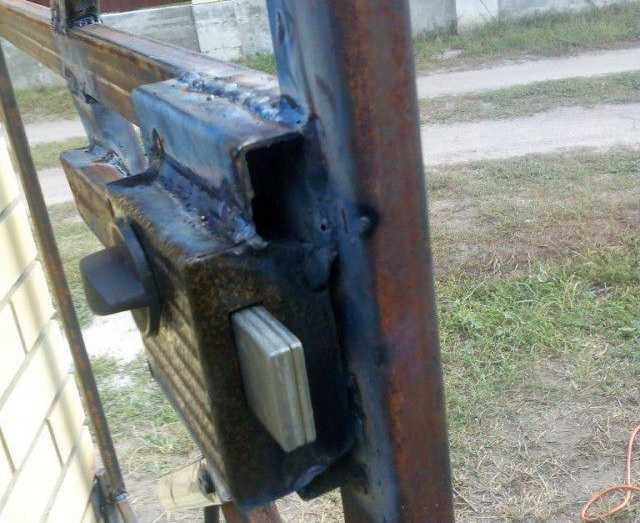
To make a gate is also to weld the lock (when you paint it will look better)
Last welded work - it is necessary to close the open cuts of the pipes, which are directed up and to the sides. If they are not closed, rainwater and snow will enter them, the pipes will begin to rust from the inside, which will accelerate the death of the frame. Welding is not necessary at this stage, you can seal up with silicone or find plastic caps of a suitable size.
Finishing works
We finish the work with metal - grinding, priming and painting the frame. At the end, we attach a professional sheet to the frame, and in this case it is no different from installation of a profiled sheet on a fence.
On the angle grinder (grinder) we put a grinding wheel for metal, we clean all welding places, removing rust, etc. By the way, it is more convenient to do all this when the gate is in place.
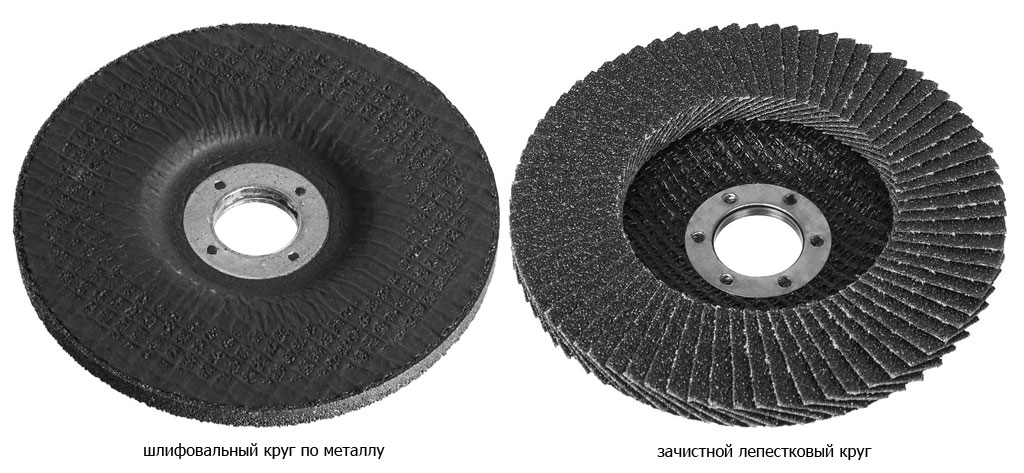
Grinding and grinding discs for grinder

Wicket after priming
To prevent the frame of the gate from peeling off for a long time, treat it with a primer and paint it in the desired color. Next, we fix the profiled sheet, having previously cut it to size.
And this is the final result: we decided to make a wicket, we made
Not necessary, but you will probably have to trim somewhere. Therefore, for a start, we attach the cut sheet to literally four self-tapping screws - in the corners, put marks - where to cut something, remove, cut, try again. When you have achieved normal work, you can fix it.
It can be fixed both with screws and rivets, the corresponding colors will not be difficult to choose.
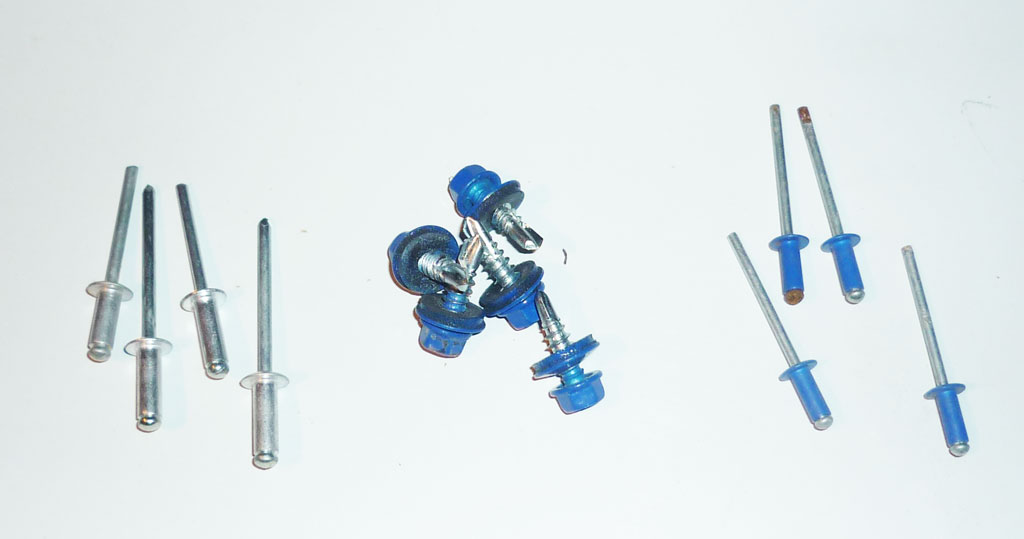
Most often, the fastening of the profiled sheet is done with self-tapping screws, but rivets are not a bad option either.
Wooden gate for giving
Fences at summer cottages are rarely an impregnable barrier. Usually these are not too high wooden fences. For such a fence, it makes sense to make a gate made of wood. There is a very simple one, no fancy. Only dry boards will be needed (provided that there are already poles).
If there are no woodworking machines (planer, milling cutter), it is easier to buy an edged board of the required parameters. The width / thickness of the boards is arbitrary, as are the distances between the planks. Most often they use a pine board with a width of 5-10 cm and a thickness of about 2 cm, the distance between the planks is 2-6 cm. More or less is possible, depending on the desired degree of "transparency".
One of the most common options
It is desirable to have the boards dry, otherwise they may subsequently bend with a screw or in an arc. So that the wood does not deteriorate longer, it must be treated with protective impregnations. Now there are compounds that protect even wood that lies on the ground (protective impregnation for wood in direct contact with the ground). But some of them give the wood an extraneous shade (most often greenish, olive). If you are going to paint the gate, it’s not scary. If you are going to use a light varnish, pay attention to this point.
Simple garden gate
This is the easiest option that can be done not by a carpenter, but by an ordinary person.If you can saw, hold a hammer, hammer in nails, everything will work out. You don't have to do anything complicated.
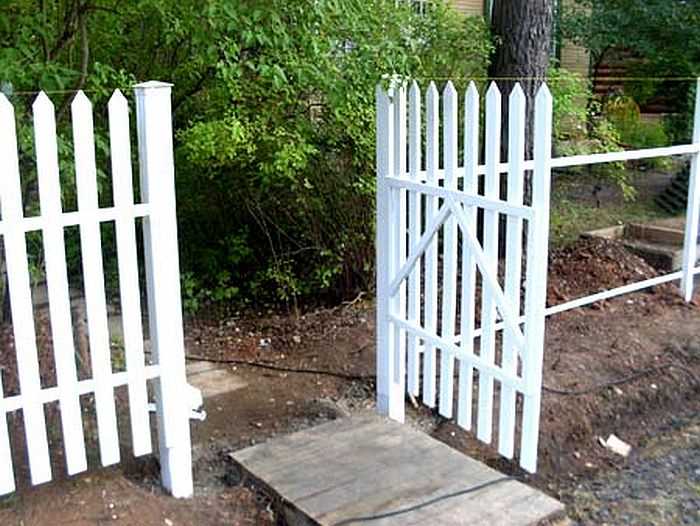
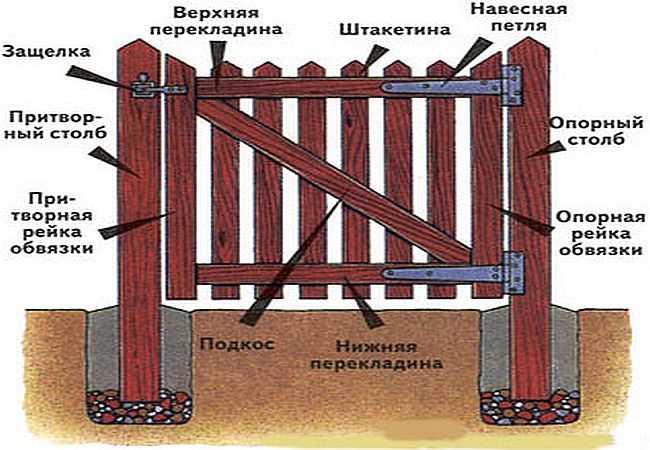
Take two strips or two beams (parameters depend on the weight of the gate). In length, they are equal to the width of the future wicket. The bars are laid across. The distance between them is slightly less than the height of the wicket. It makes sense to place them at the same distance as the bowstrings on the adjacent fence (as in the photo above). Then the gate will look like part of the fence.
Wooden wicket device
Select a level surface, lay the blocks down and measure the diagonal distance from the corners of the crossbars. It should be the same. This must be done otherwise the gate will turn out to be curved.
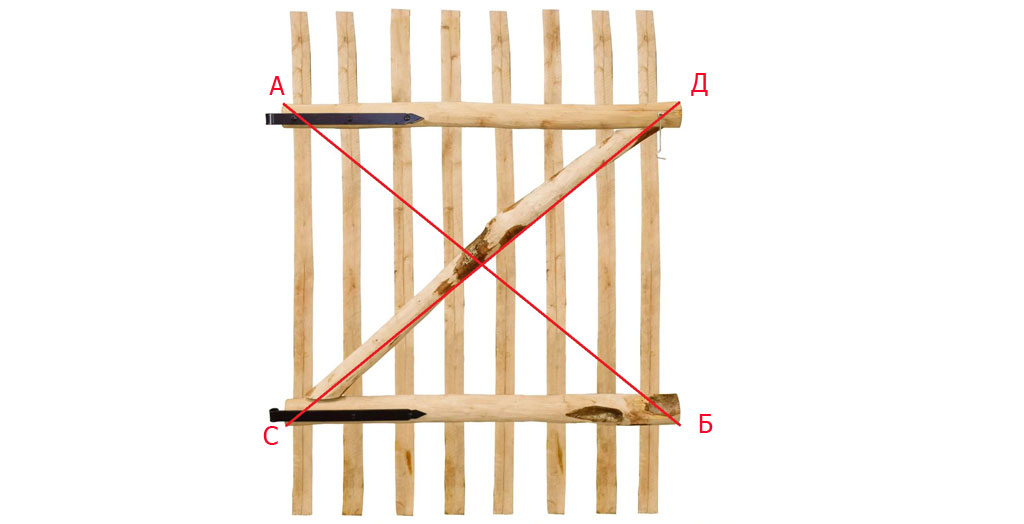
The diagonal distance AB and SD between the crossbars of the wicket must be equal
Treated and dried pickets are laid out with a specified distance on the crossbars. To keep the distances easier, you can use cutoffs of the same length, laying them between the boards (you can also use a matchbox if you are satisfied with its size). We take nails (two for the bar at the top and two at the bottom) and attach the boards to each crossbar.
After all the planks are nailed, we turn over the wicket door, try on the jib, outline the lines along which the jib should be cut. Saw off the excess with a hacksaw, put it in place, fasten it - two or three nails on both sides. Now we attach each board to the cut. This gives the wicket additional rigidity.
How to make a simple wooden gate for a summer residence
We choose metal hinges, or barn hinges. They are small in size, just for country gates. If desired, they are attached to the front of the gate - they give a certain zest. You can just as well fix them from the back.
We make a gate from boards: the correct design
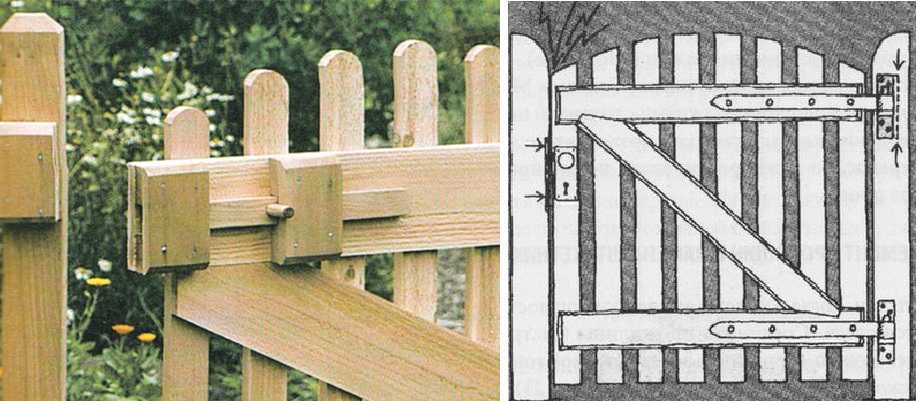
A simple garden and summer cottage option is described above, but there is a more complicated and more reliable design. Here, minimal carpentry skills are required, since it is going to the tenon / groove connection. This wooden wicket door consists of two thicker rails, two crossbars (top and bottom) and a brace. The thickness of the upper crossbars and shtaketin (vertical slats) is the same, and the thickness of the strapping strips is three times greater (thicker is possible, thinner is not). For example, pickets, crossbeams and bevels have a thickness of 20 mm, strapping rails - 60 mm.
Wooden gate with frame
A groove is cut out in the strapping rails, and a spike at the ends of the crossbars. The connection is coated with wood glue, clamped in a vice. The jib can also be installed on a tenon and a groove, but it will turn out to be of a complex shape. Therefore, more often it is simply attached to nails - it's easier this way. After the frame is assembled, pickets are nailed. They can be nailed from the side of the yard or from the side of the street. Instead of nails, bolted connections can be used, in this case the fasteners also serve as decoration. It makes sense to put stainless or bronze rivets.
Photo of beautiful gates
Making a gate not ordinary, but beautiful is not so difficult. And this does not always require expensive materials. What is always needed is fantasy. Then even a bicycle, a shovel, a twig or a pickaxe are materials for an exclusive design.
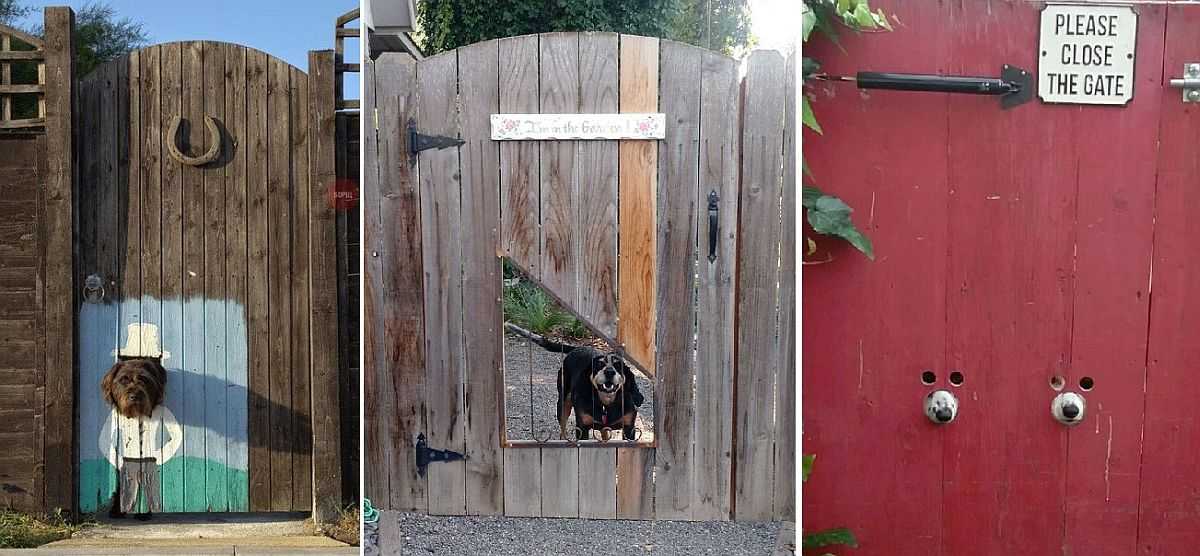
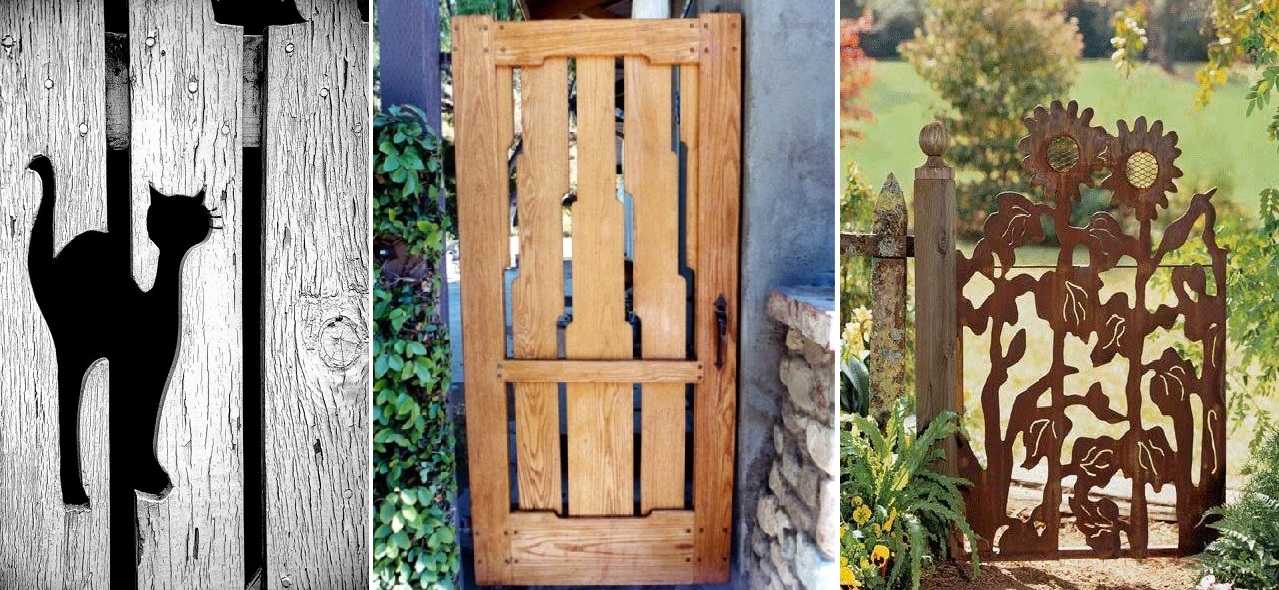
For pets))
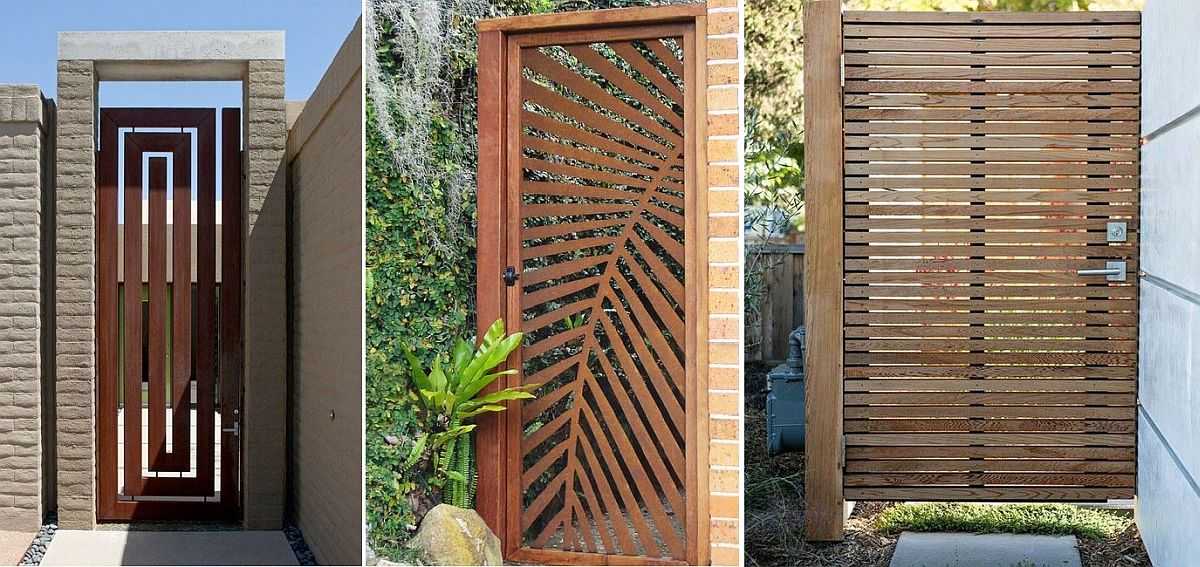
For houses in a modern style, wickets need appropriate
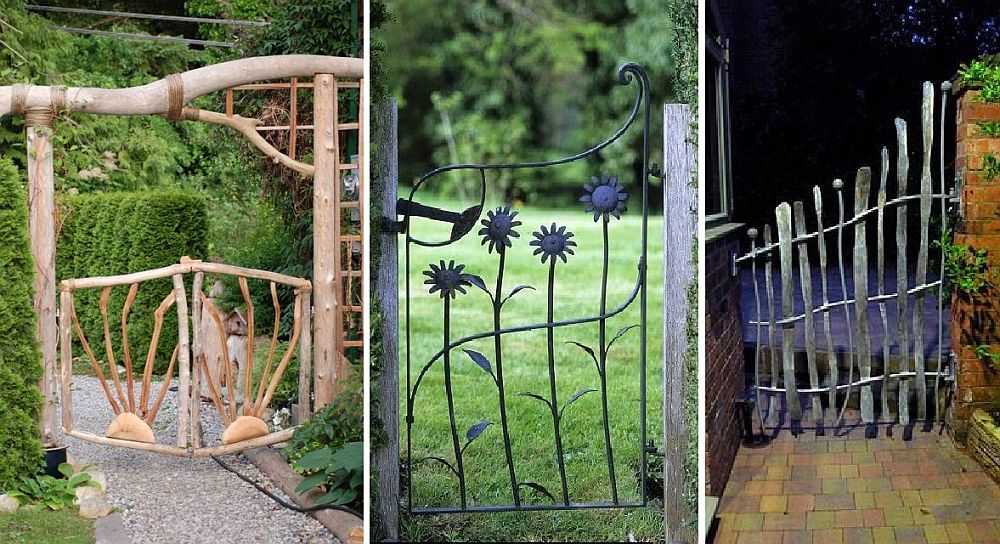
From a wide variety of materials ... even from knots
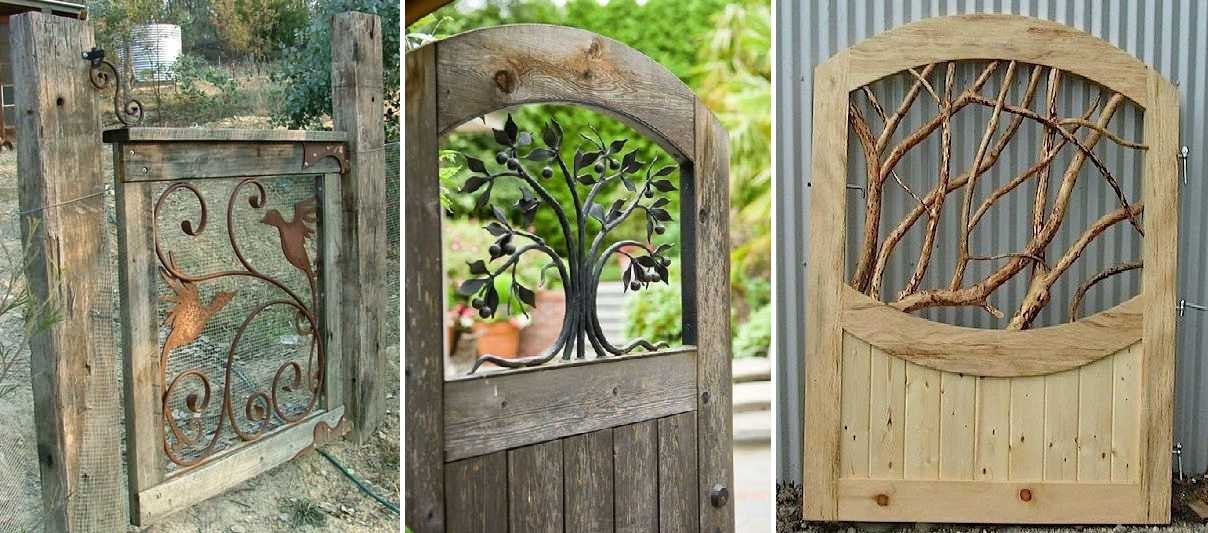
Wood and forged elements - a win-win combination
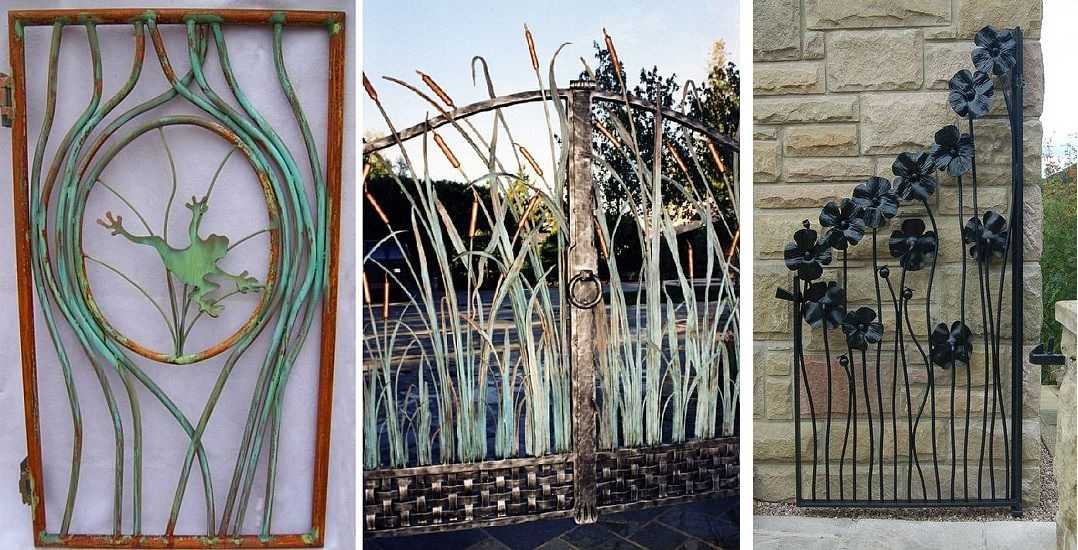
The main component is fantasy
The stencil changes even the simplest fence
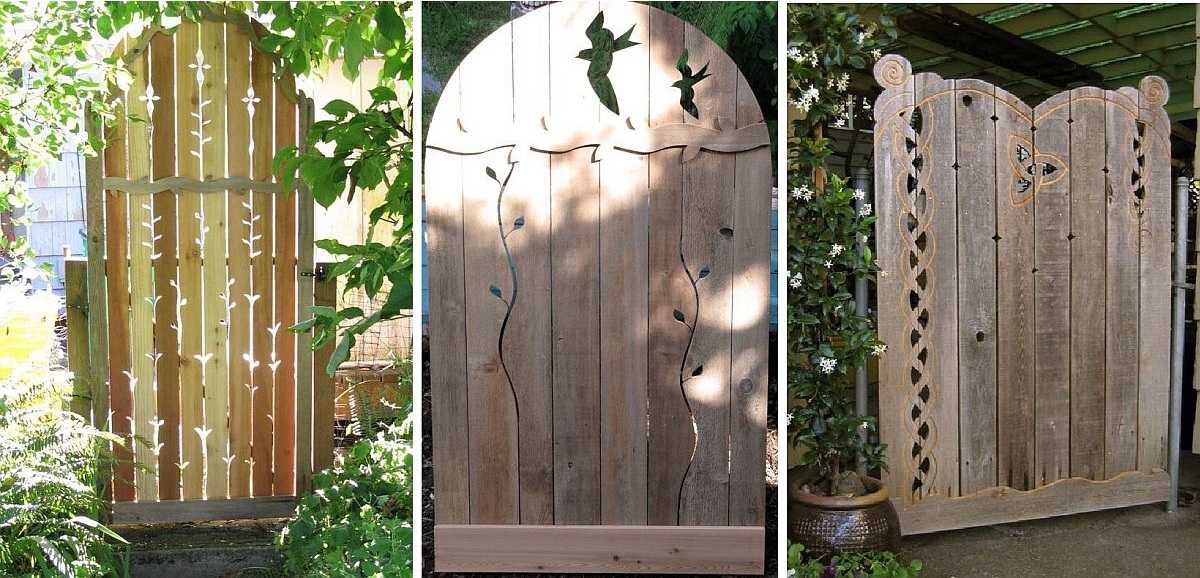
Make a couple of cutouts in the boards ... the original wooden gate is ready!

On a visit to fairy tales
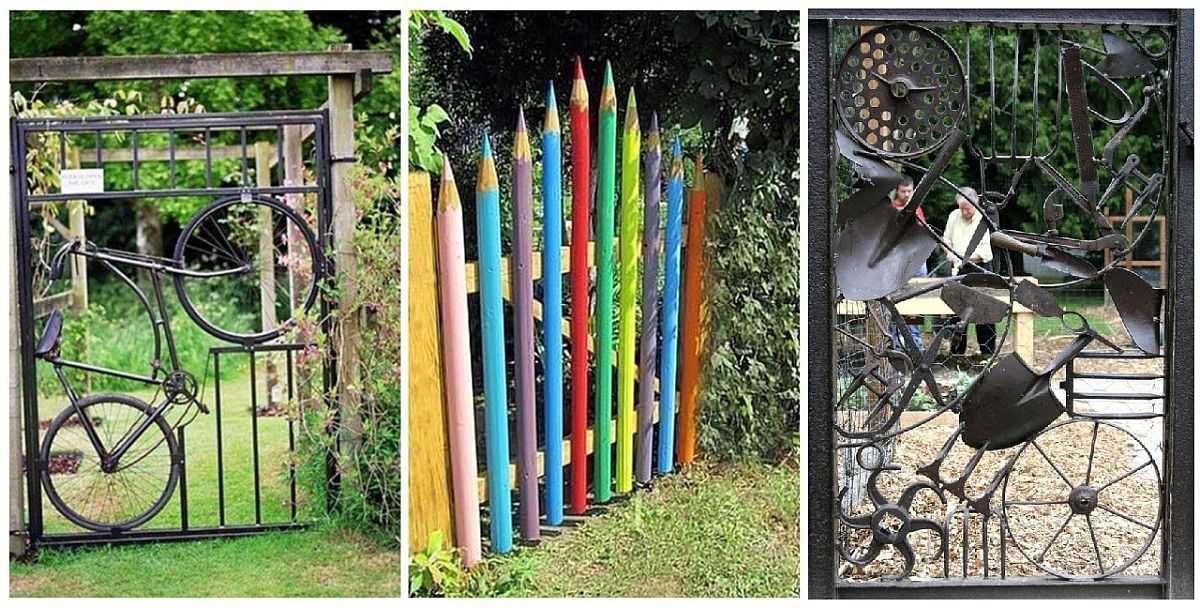
Bicycle, wheels, shovel - all materials for making gates
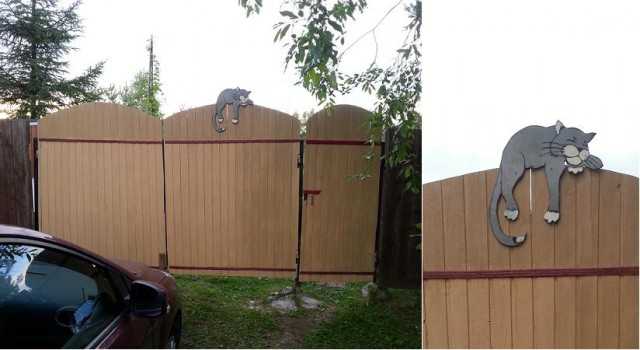
A small fragment - a cat made of plywood
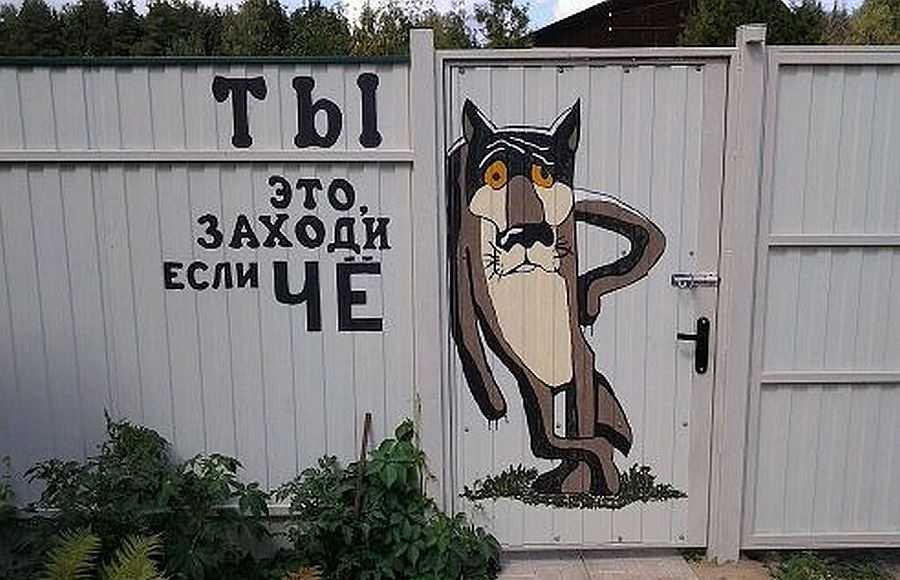
Original design from the courtyard side