Fasteners and fasteners for the cable
When installing or repairing wiring, you have to install wires and cables. Also, if you need to install new powerful household appliances, you sometimes have to pull a separate line from switchboard... In any case, you have to somehow mount the wires to the walls or ceiling. What can be the fastening of the cable for each of these cases and we will further understand.
The content of the article
General rules
When installing a cable hidden or open, indoors or outdoors, there are several general rules:
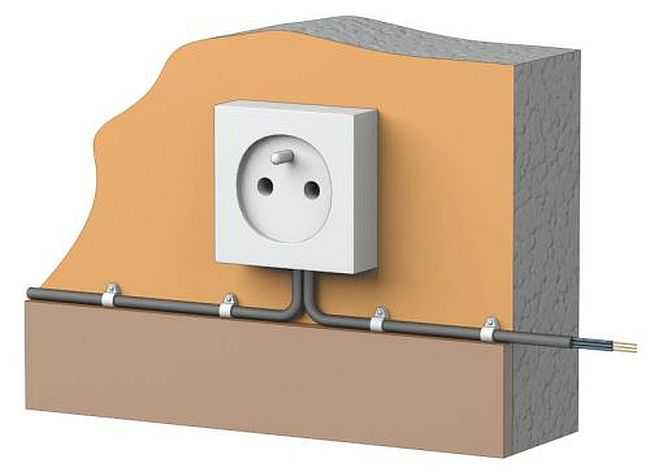
- The optimal distance between fasteners is 40-50 cm.
- If self-tapping screws, screws, dowels are used, they are tightened all the way - so that the protruding cap does not damage the insulation.
- The cable is laid evenly, without humps. If a stock is needed, it is placed in the least conspicuous place.
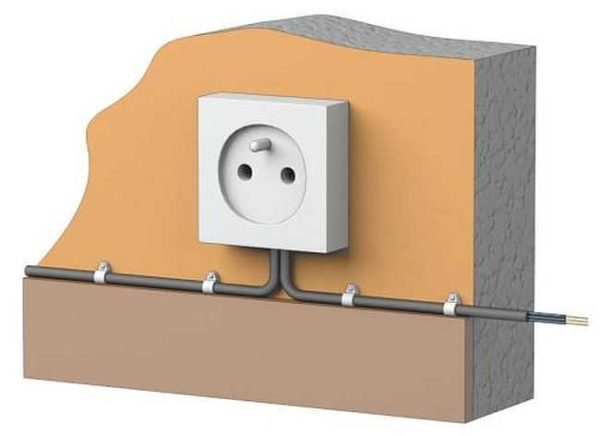
It is desirable to lay the cable in a straight line - vertically or horizontally
In principle, recommendations are all. They are versatile and uncomplicated. The distance can be reduced if necessary. For example, at the turns of the track, fasteners are installed at a short distance from the bend - 5-10 cm. The task is to ensure reliable fixation and prevent sagging.
Attachment methods to different surfaces
Walls and ceilings are made of various materials with different structures and densities. Depending on this characteristic, the mounting method changes:
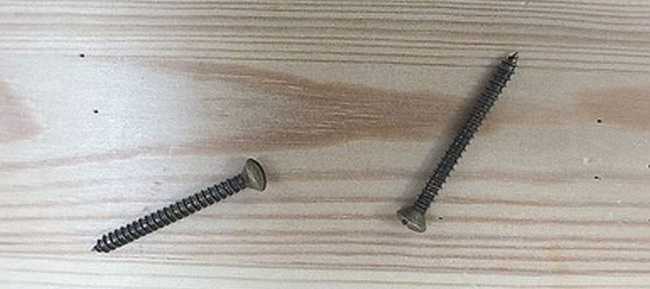
- Dense - wood in any form, plaster and soft plaster solutions (including gypsum). A nail or self-tapping screw fits perfectly into all these materials. In some - Chipboard, OSB and some others - it is better to first drill a hole of slightly smaller diameter than a self-tapping screw, and then screw it in. Nails are often driven in immediately without pre-drilling.

Self-tapping screws are screwed into wood and wood products. Only for attaching the cable is better to take them with a flat head.
- Solid. This category of materials includes brick, concrete, screeds, cements. You cannot screw a self-tapping screw into them, even with a pre-drilled hole. For such materials, dowel-nails are used (they are also called dowels). This is a fastener consisting of two parts - a plastic dowel cap and a metal (sometimes plastic) screw. In such cases, a hole is drilled in the material with a drill diameter equal to or slightly smaller than the dowel diameter. A plastic cap is inserted into the hole. Its upper edge should be flush with the surface (if necessary, you can hit it a couple of times with a hammer to level or cut off the excess with a sharp knife). Then a fastening element (plate, clamp, etc.) is applied, which is attached to the inserted dowel with a screw.
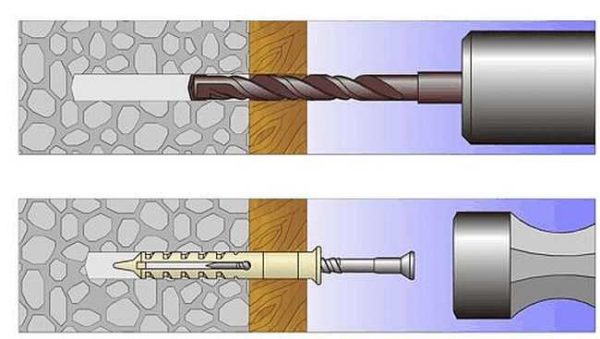
Dowel installation
- Thin or soft. These are plastic, drywall, fiberboard, aerated concrete, foam concrete, etc. In them, the usual fasteners do not hold, you need a special one, which has an extended "back" part. It has a large support area, due to which the fasteners can be held. Some examples of such fasteners (umbrella, butterfly dowel and dowel with a drill) are shown in the photo.
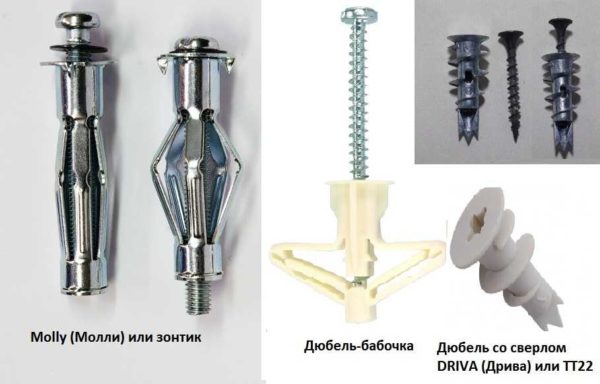
Special fasteners are required to fasten the cable to thin walls


Actually, these are all surfaces that are found inside the house when laying wiring.But sometimes the cable must be attached to the pole, for example, when the electricity input from the pole to the house stretches or to the pipe - when the cable rises along the combustible wall.
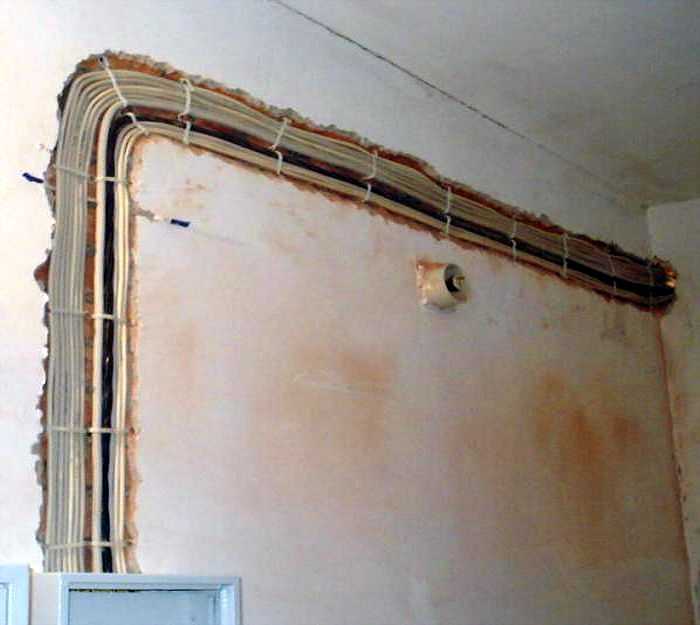
To the concrete pillar
The cable is attached to the reinforced concrete pole with long black plastic ties. They serve for about 5 years.
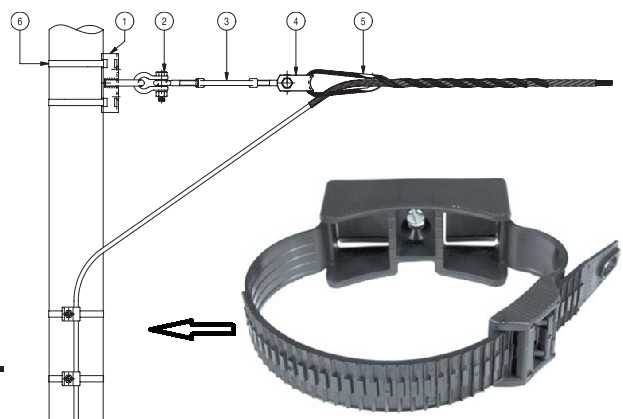
One way to lower the cable along a reinforced concrete post
You can use clamps for installing sewer pipes, but you need to drill holes for them, which is very difficult. Another option - if there is a ground wire on the pole - a round wire with a diameter of 5-6 mm, then you can fasten it with ties. Another option is to fix metal strips on the post - to make something like clamps, and attach the cable to them.
In a metal pipe
If the cable runs up the wall of a house in a metal pipe, it is simply run inside. Since quite solid cables are used for outdoor wiring, its rigidity is usually enough to more or less hold inside the pipe.
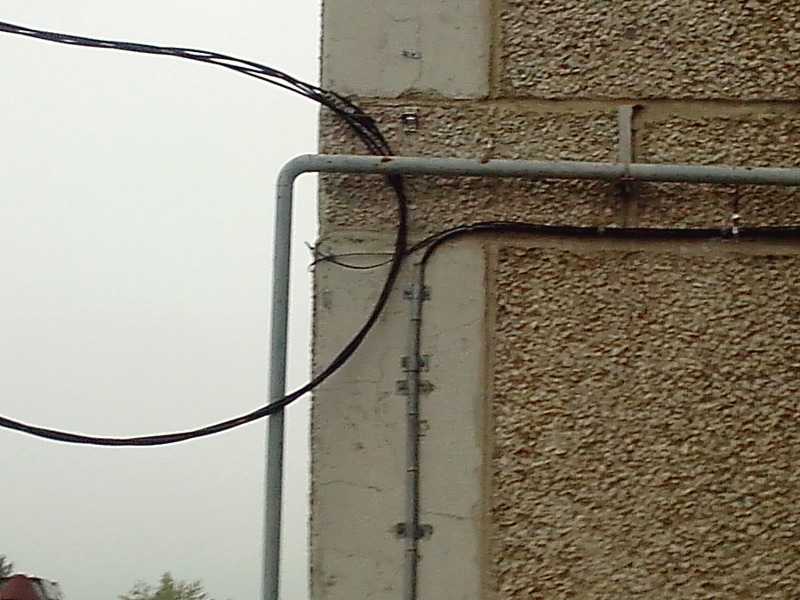
Laying the cable in the pipe. They fix the pipe, and the cable only exits it to the wall
Above and below the pipe is closed with some kind of cork (you can cut it out of foam and then paint it together with the pipe). This plug will additionally fix the position of the cable (do not press it against the edge), and so that it does not move inside the pipe, it is attached to the wall at the exit from it.
To the cable
To attach the cable to the cable, special metal and plastic hangers are used. They consist of two parts - there is a hole for the cable and a larger one for cable management.
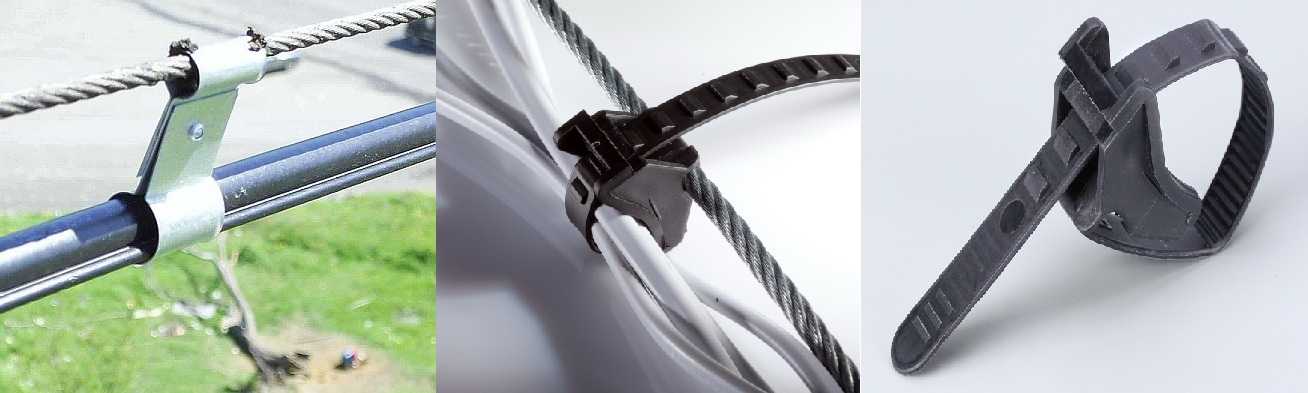
Hangers for attaching a cable to a cable
Which is better - metal or plastic? Metal ones are more durable, but they take longer to install - you need to tighten the screw. Plastic ones will last about 5 years, but they are installed quickly - the "tail" is pulled into the corresponding hole, tightened. That's all.
Fasteners for cables and wires: types and varieties
With a forehead mounting type of wiring and cable, the same types of fasteners can be used. It is selected based on the available conditions, capabilities and tastes of the owners. The main task is to ensure high-quality fixation and not break the insulation either during installation or during further work and operation. And choose the type of attachment from the possible options. There are quite a few of them - there are special ones that are produced specifically for cables, there are borrowed from other areas, there are homemade ones.
There are many options for securing cables
Clips for fastening the cable
With the help of clips, you can fix the cable on the wall, ceiling, floor. You just have to choose the right design, and there are many of them. Fastening the cable with clips is a very popular method - it can turn out very neatly and almost imperceptibly. This is if open wiring is expected.
There are metal and plastic clips for cable mounting, and of different shapes. The simplest ones have the form of a bow, which on one and the other side has holes for screws or dowels. They are all good, but installation requires two holes to be drilled, which is time consuming.
There is an option that allows you to maintain a fire gap when installing a power cable on combustible surfaces (in the photo on the left). This fastener is fixed with one self-tapping screw to the surface. It is good because, if necessary, threads can be added to the same fastener. To do this, you do not have to remove it, you will need to unscrew the screws holding the upper part of the clip.
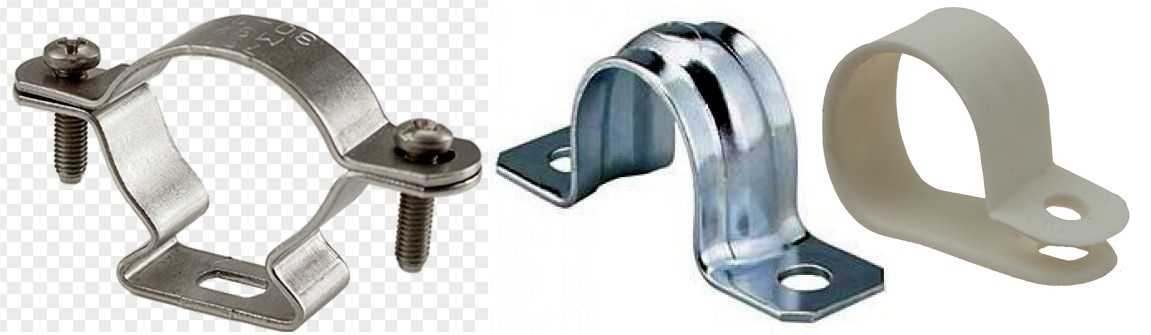
Metal clips for fastening the cable
The third option is a kind of metal strip loop. To install it, you first need to bring the cables inside, then align the holes and fix them to the surface.
All of these clips can be used both on the wall and on the ceiling. But when laying a large number of threads on the ceiling, they are inconvenient - too many holes are required for installation.They are made of metal, some are then painted - so that the fasteners stand out less during external laying.
Mounting on plastic clips
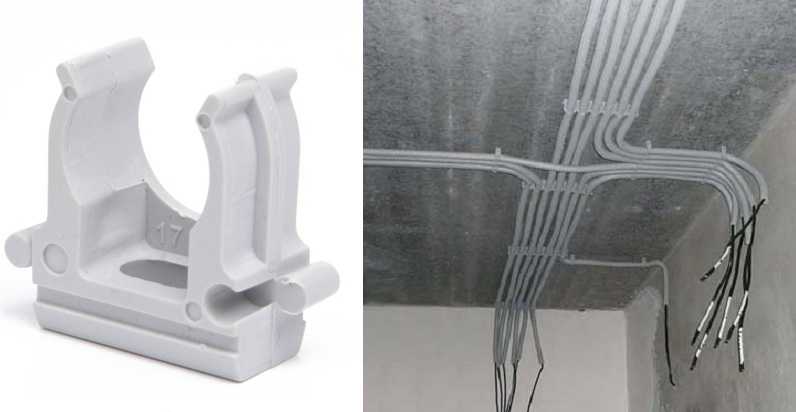
Plastic clips are mainly used for securing cables in corrugated hoses. They are available in different sizes for different corrugation diameters. They can be installed as a single unit or assembled into rulers - for more accurate installation of large bundles of wiring. This type of clips is used mainly for hidden gaskets, but if the corrugation is laid outside, then it is more convenient to fix it with their help.
Dowel clip
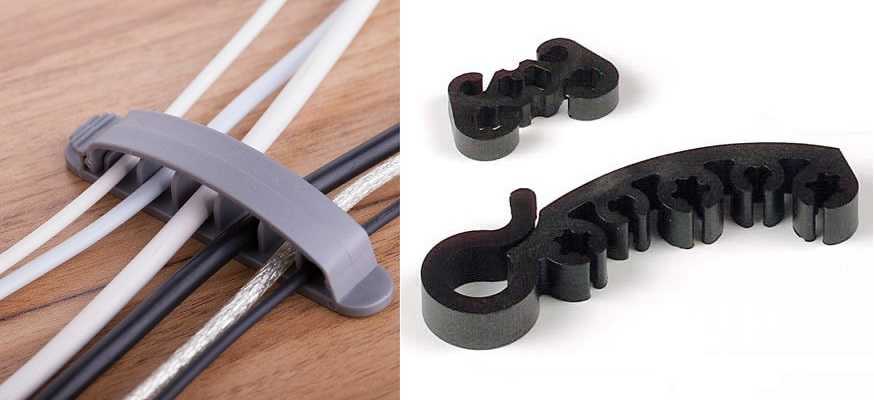
The dowel clip is more invisible during installation. This is a curved strip of plastic with characteristic branches at the ends, which, due to the elastic force, will hold the fasteners in the wall or ceiling material. The shape of these products is for round and flat cables of different sizes. But serious cables cannot be fixed with them - they are too small. But they look very neat on conductors of small cross-sections, including television, telephone and for the Internet.
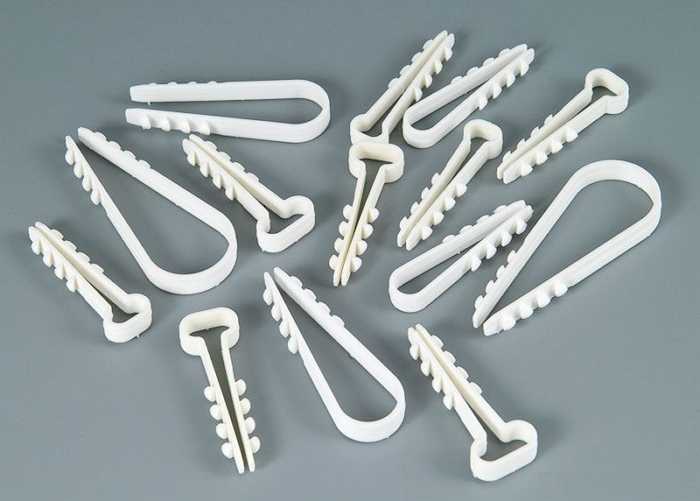
Dowel clips for cables of different shapes
They are installed simply: a hole of a suitable diameter is drilled, a conductor is inserted into the clip, the ends are tucked into the hole and inserted with effort. A really good option - it is quickly mounted, you look neat. Mainly used for exposed wiring.
Dowel-tie
Another option for quick fastening of the cable is the dowel tie. It is made of non-flammable self-extinguishing plasticizers, and allows you to quickly install cable lines. It can be used for both open and concealed installation.
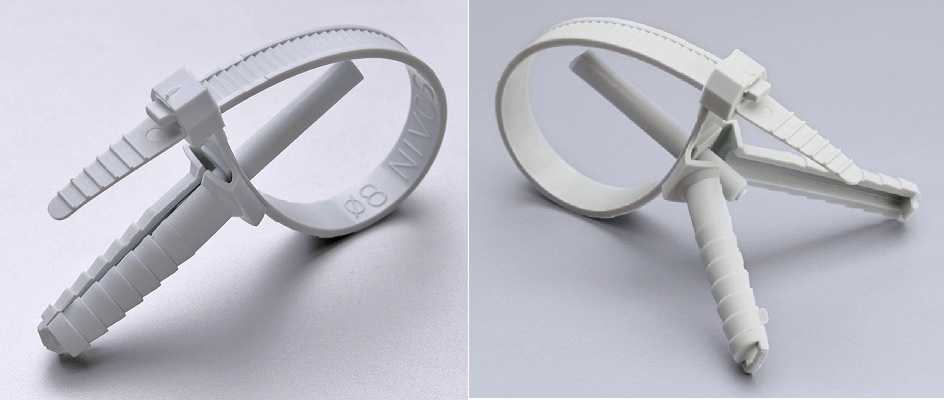
Dowel-tie - a quick and convenient way to fix the cable to concrete, brick and other surfaces
There is a tie with a detachable and one-piece lock. The split lock allows you to change the number of wires if necessary. The installation method is the same as for a conventional wall plug. The difference is that the dowel is also plastic.
Cable ties with a dowel pad (KSP)
Another option for quick installation. Consists of a threaded dowel and a platform with a coupler attached to it. First, a dowel is installed, a platform with a screed is screwed onto it. Wires are attached to the finished track.
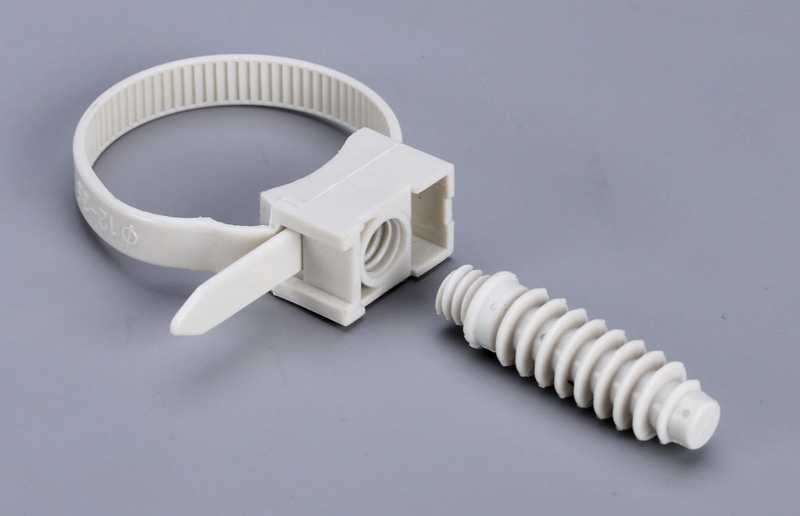
KSP - cable tie with mounting platform for dowels
Material - non-flammable plasticizer, color - gray, use temperature - from -45 ° C to + 85 ° C. Can be attached to concrete, brick and wood surfaces.
Clips (staples) with a nail
An excellent option for attaching the cable to dense surfaces - wood and its derivatives, plaster. There is a hole on the side of the plastic bracket for the stud to be inserted. The brackets are round rectangular in shape - for conductors of different shapes.
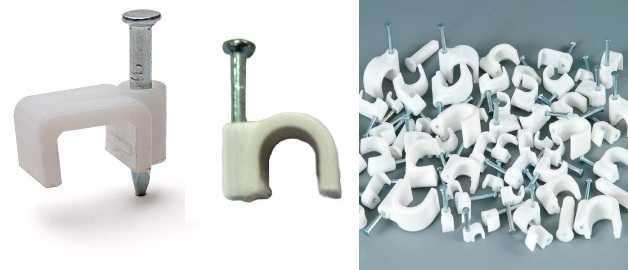
Plastic staples with nails for exposed cable installation
Fastening the cable with such brackets is quick and unobtrusive. Most often, small-sized wires are also attached - television, telephone, for the Internet.
U-shaped staples from a stapler
Even the smallest staples and clips are still quite noticeable. There is a way to make the fasteners virtually invisible, at least in some cases. In the presence of construction stapler to wooden surfaces or plaster, wires and telephone cables can be fastened with special brackets. They have long legs and a rounded back. There are special staples for stapling cables with plastic stops (middle picture). They do not allow the wire to be transmitted, which happens when working with conventional brackets, if too much force is applied to the trigger.
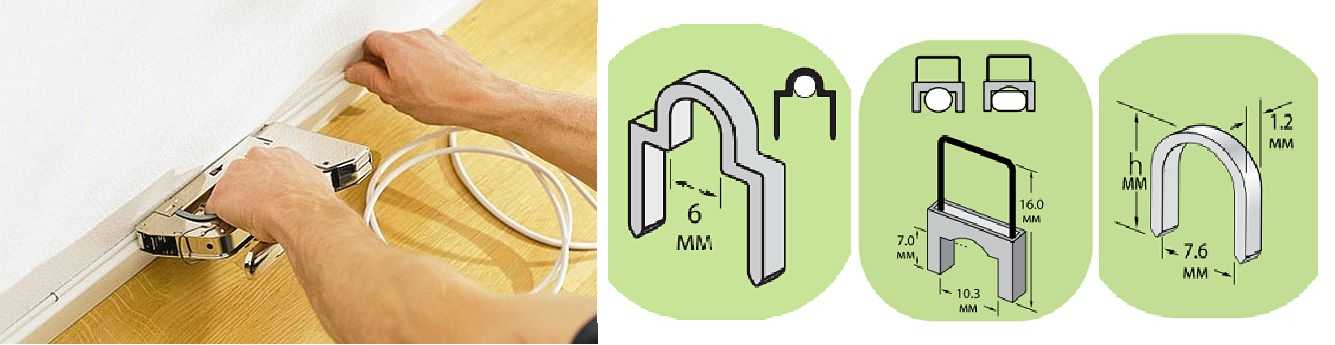
Fastening cables with a stapler and special brackets
A good way to do it at high speed - just one press on the stapler lever and the staple is already installed. For an hour, you can fix a decent footage.Another positive point is that the fasteners are hardly noticeable; when dismantled, very small holes remain in the wood, which are also practically invisible. With plaster and chipboard, OSB is somewhat more complicated - the damage may be greater, however, they are still less noticeable than from nails, even the smallest ones.
The disadvantage of attaching cables with a stapler is that there are significant size restrictions. Such staples are never large. The maximum size of the staple width is 12.5 mm, and even then not in all types. This is more than enough for the installation of a telephone "noodle", an Internet cable or other similar conductors, but already VVG or NYM cannot always be fixed in this way. In addition, these cables have more rigid insulation, which requires more frequent installation of staples.
Fasteners for organizing the conductor bundle
It is not always necessary to fix the wires permanently. In some cases, you just need to arrange the bundles so that they do not get confused. For example, there are usually a lot of wires to the desktop. There is no need to fix them rigidly - after a while, alterations may be required, and from hammered nails holes remain that cannot be masked on the table. There are various devices for these purposes. They are more commonly referred to as wire or cable holders.
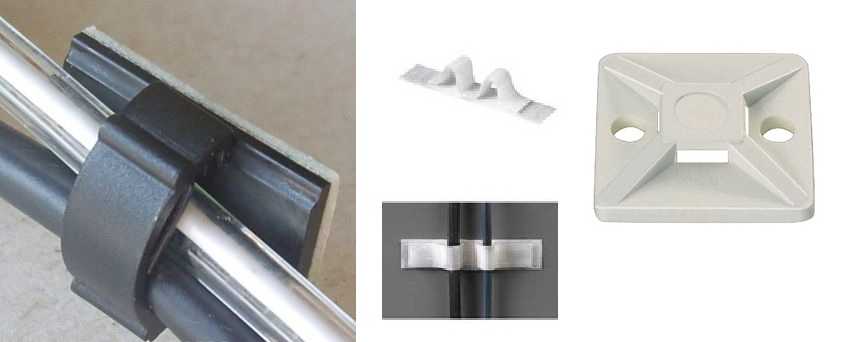
Velcro cable clips
For example, the same staples, but of a different structure. On the right in the photo above, you see a cable clip with double-sided adhesive tape attached to the back. It is very convenient for attaching to furniture or plastic panels - the glue can then be washed off, and the surface remains intact. In the center is the second option with the same idea, and on the left is the so-called mounting pad for attaching cable ties. First, these pads are attached to the surface - they also have Velcro on the back. Then the bundle of wires is attached to the holes with a regular plastic tie. Not so convenient and neat (the tails of the screeds will stick out), but can also be used.
Plastic cable holders on the table
You can see a few more options for attaching the electrical wiring harness in the photo above. The essence is the same, the technique is different.
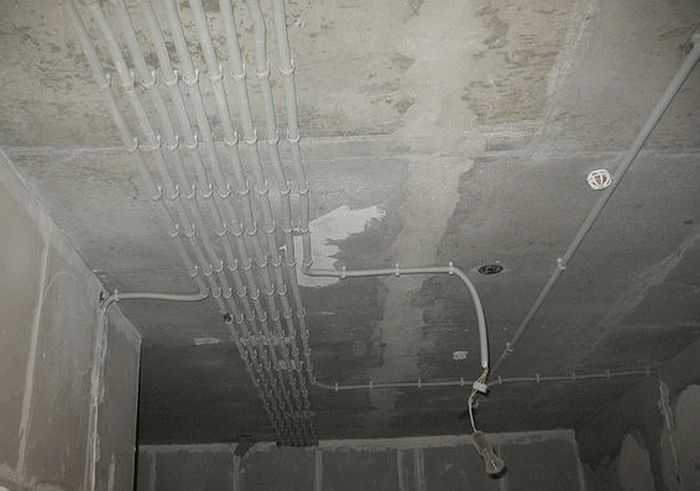
Cable trays - for hidden laying of large bundles
When device ceiling lighting from spotlights a large number of wires have to be laid, and they have to be fixed to the ceiling. When it comes to apartments, the floors are most often a concrete slab. It is difficult and long to drill a lot of holes in it; it is not much easier to fasten wires individually or in small groups. For such cases, overhead cable trays are used. They are usually made of galvanized wire or perforated metal.
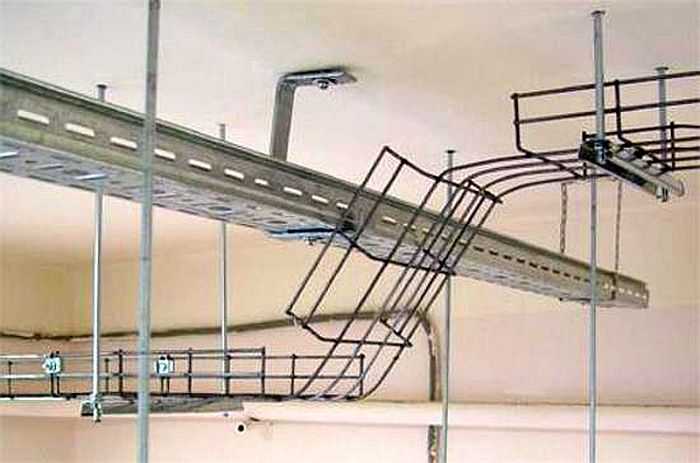
Hanging cable trays
They are of different sizes, there are several different types of fastening - on studs attached to the ceiling, on "T" or "L" -shaped suspensions.
The installation procedure is as follows: first, the structure is assembled and mounted on the ceiling, then cables are thrown into it. If desired, they can be fastened with ties to the gratings, but this is usually not necessary.
In addition, there are metal trays made of perforated and non-perforated metal. The latter are necessary when laying cables inside combustible walls - in frame houses, eg.
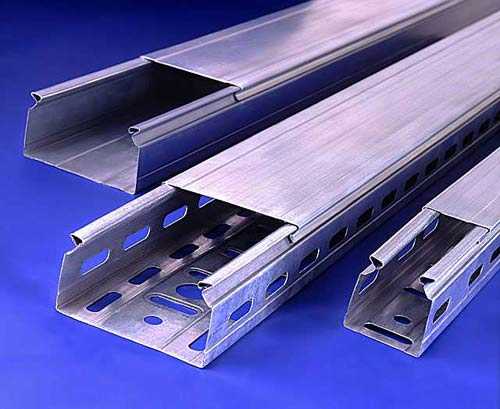
Types of metal cable trays
The same trays can be used for cable management in underground space. But then the perforated version can be used. It will also provide excellent protection against rodents and accidental damage.
Homemade cable fixtures
Many factory gadgets are relatively inexpensive, but when hundreds of them are required, the amount of money comes up. And if the wiring is hidden, it is required, for example, to fix the cable in the gutter, why brick up the extra money if you can get by with improvised means. Here's what a homemade cable mount is made of:
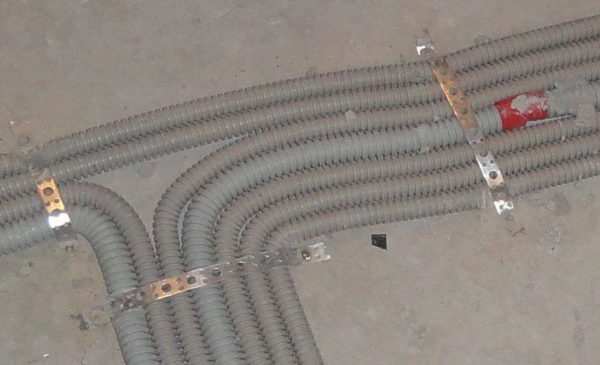
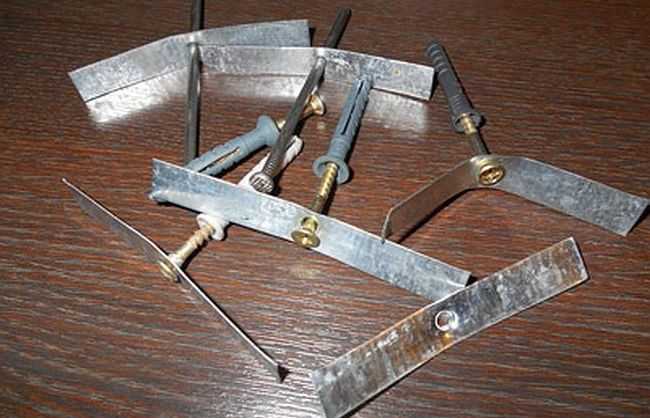
- Tin strips + nails or dowels - depending on the wall material. Tinplate is preferably galvanized, but it can be "obtained" from beer cans. It is cut into strips 7-10 mm thick, a hole is made in the center, into which a nail is threaded. First, fasteners are stuffed along the route with a step of 60-100 cm, then the cable or wire is clamped with tin strips. In order for the cable to be securely fastened, it is advisable to clamp the ends in a lock.

An example of homemade cable fasteners
- A simple U-shaped bracket can be made from galvanized metal cut into strips about 1 cm thick. Nails at the ends, use as ordinary staples - grabbing the conductor every 50-80 cm. Can be used to fasten wires to walls and ceilings.
Fixing wire bundles
These are the main types of cable fasteners that you can do yourself. Surely there are other options - the imagination of the craftsmen is inexhaustible, but these are the most common.
Fasteners for hidden gaskets
When cables are being installed during the renovation phase, they are increasingly being used inside walls, floors or ceilings. Since the result of the work is invisible, the minimum attention is paid to aesthetics. But a lot of attention is paid to reliability and safety - access for alteration is very, very difficult. Therefore, the fasteners for the cable when laying inside the wall, ceiling, under the floor are selected reliable. It can be:
- Any type of screed - with dowels, mounting pads, etc.
- You can choose a suitable size clip type.
- Make homemade fasteners.
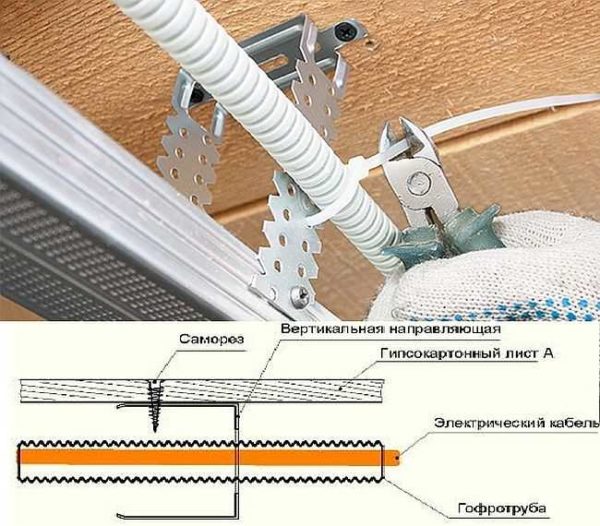
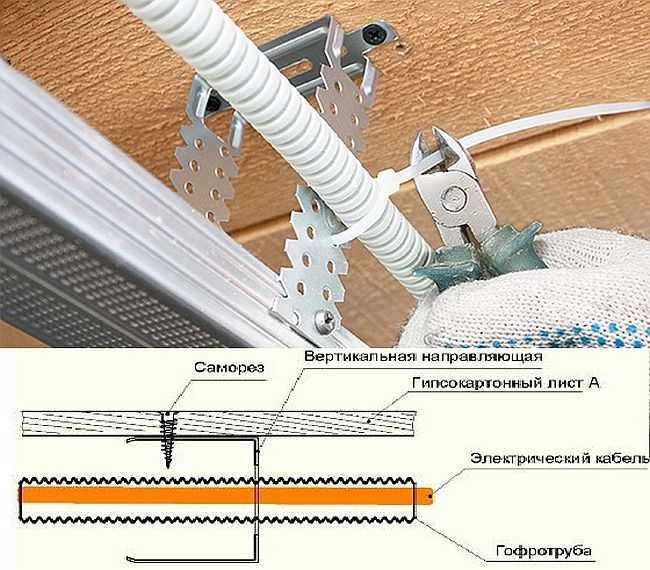
If you do plasterboard suspended ceiling, the wiring can be fixed to hangers or laid inside the profiles. Only during installation, do not lay the cables close to the profile wall - so as not to damage during operation
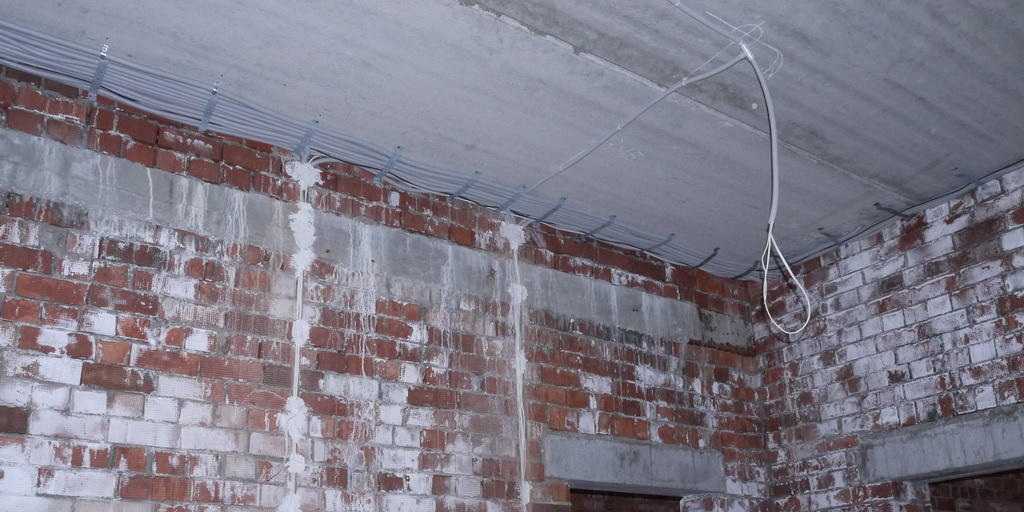
For laying large bundles of wires on the ceiling, it is more convenient and faster to use trays, but you can still use the same fasteners. The only bad thing is that you have to drill a lot of holes to install fasteners in concrete or brick. This is especially inconvenient when working on the ceiling. How best to optimize work in this case is a little below.
If the presence of false walls or a finished floor is not expected, grooves are made under the wires - grooves. Wires are laid in them, then they are covered with a solution and after that they are already finishing. From the point of view of aesthetics, the option is ideal. From the point of view of operation, it is problematic, since it is almost impossible to replace or repair the wiring without breaking the walls. Nevertheless, the wiring is done this way, just trying to lay high-quality cables, and even with some margin of power or the number of pairs.
Laying and fastening wires in the strobe
According to safety rules, a cable in a non-combustible sheath or in an all-metal tray is laid in combustible walls (wood, panel and frame). If we are talking about a non-combustible shell, then usually it is a corrugated pipe made of non-combustible plastic compound. In this case, the actual sheath is attached, inside which the cable is located. This does not particularly affect the choice of the type of fastener, but it does affect the selection of the size of the fastener - it is just necessary that the clips can cover the shell.
Laying cables inside combustible walls is difficult: the requirements are very strict. They can be made in frame or panel houses, but in squared or log cabins it is very difficult. All-metal trays must be laid in the walls. In this case, it is necessary to take out a large amount of wood, which does not improve the thermal performance characteristics, and it is not possible to make the appearance ideal. Therefore, in wooden houses they often resort to the open method of installation - over the walls.
Fasteners for exposed cable routing
With external cable routing, more stringent requirements are imposed on the fasteners in terms of appearance. Since everything is in sight, it is necessary to select the most inconspicuous options, or vice versa, the most decorative, for example, retro wiring.This is an extensive topic and is described in detail. here... Other options:
- Installation in cable channels. These are plastic trays that are attached along the walls. Not the best way from the point of view of aesthetics, but if it is necessary to lay a large number of wires in wooden houses, it is perhaps the cheapest to install and convenient from the point of view of operation: always free access for replacement, repair and modernization.
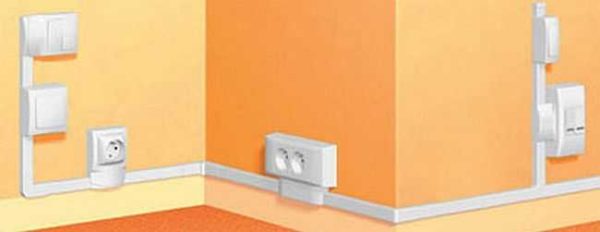
It is possible to lay wires in cable channels
- Laying a number of wires in special skirting boards.
- Using staples from a stapler. The most inconspicuous fastener, moreover, it is installed quickly.
- Fastening with staples and clips painted to match the cable.

There is a choice, but all methods are imperfect, because everyone decides for himself how and how to fix the cable.
Securing cables to the ceiling
It is necessary to fix cables to the ceiling mainly when the device stretch ceilings or ceilings made of plastic panels and drywall. In the case of drywall, everything is somewhat simpler: there is a system of suspensions to which you can fix the wiring harnesses with plastic ties. In other cases, everything is somewhat more complicated: you have to drill a large number of holes for fasteners, because all the same clips and brackets are used, and under each you need to install a dowel (if the ceiling is made of a concrete slab).
Fixing the cable to the ceiling is time consuming
There are several ways to speed up the installation:
- Using cable trays (described above).
- After attaching a number of lines to the ceiling, suspend small wire harnesses from them with plastic ties.
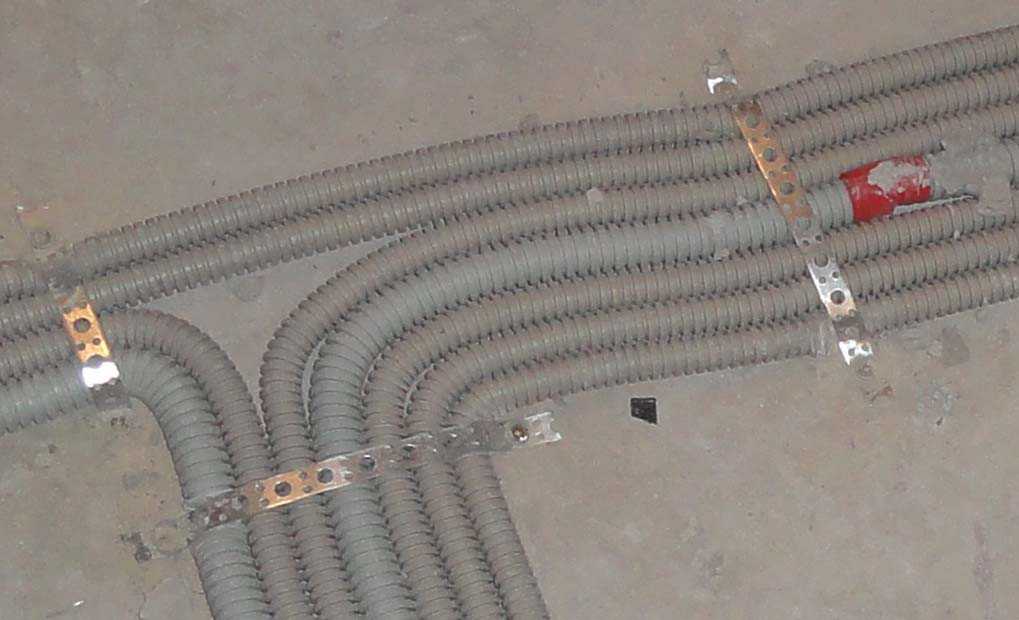
- Use a long, perforated metal strip for fastening.