DIY frame house: photos of construction stages
Prefabricated houses are attractive because with a ready-made foundation, the house itself can be installed very quickly. For example, building a frame house with your own hands, by the forces of two people, is possible in a month without haste. And this - if inexperienced workers are involved in the construction, who only know how to hold a hammer in their hands. This is because the assembly takes place step by step: the regular repetition of simple actions. It is only important to know how to properly assemble each node. Having instructions, understanding the principle of construction, anyone can assemble a frame house on their own.
Frame construction is no less attractive in that you can get by with minimal costs. How much money is required for a construction site depends on the size of the house, on the materials used (type and grade of wood, finishing materials). But in any case, this is one of the cheapest methods. (Read about house building technologies here)
Timber frame houses are not the only ones. There are regions where timber is a luxury. They put metal frames. Despite the fact that metal is not cheap today, it is still relatively inexpensive.
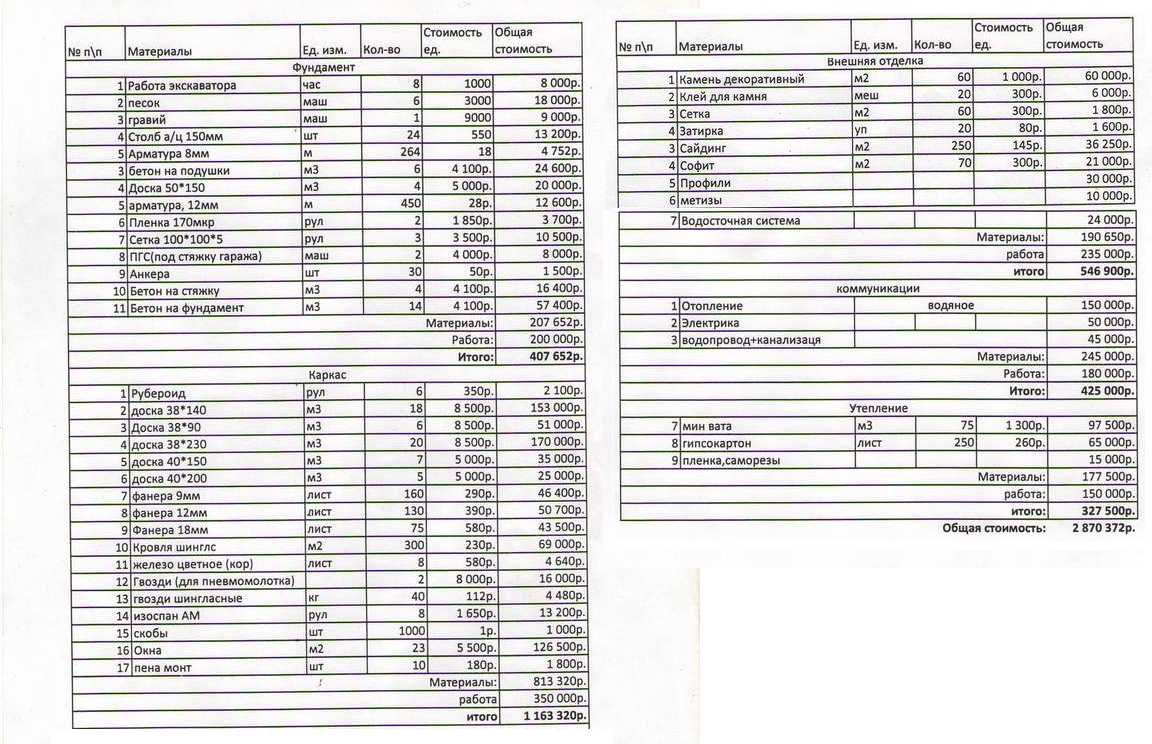
An approximate estimate for a frame house 12 * 9 meters, prices are for 2013. Can you estimate the current cost of components in your region
One more point. Many people are interested in whether it is possible to leave a frame house unfinished, and if so, at what stages. The answer is that you can, and the first stage is known to everyone: they leave the finished foundation to winter. Wintering options are also possible in the following form:
- foundation + frame + roof (no floor);
- foundation + frame + roof + OSB outer cladding + wind protection;
- foundation + frame + roof + OSB outer cladding + wind protection + mounted and insulated floor and ceiling + partitions.
Leaving windows and doors unattended for the winter is dangerous. In other cases, the postponement of completion of construction is even not bad: the wood will dry out. In winter, humidity is usually low and drying is active. At the same time, identify all the jambs in the already mounted part.
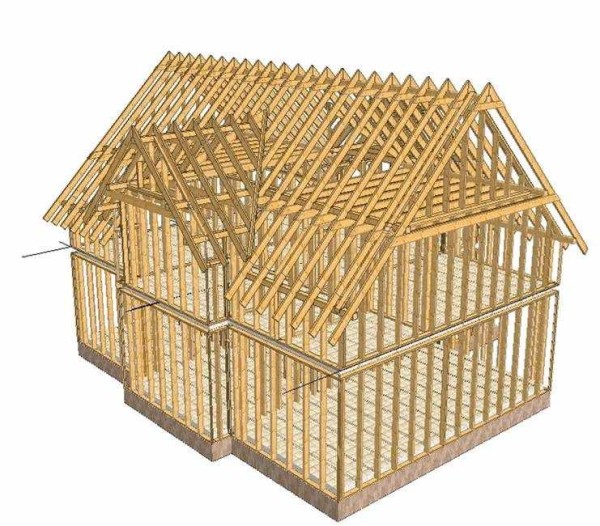
Skeleton wireframe houses with attic floor (in section)
In general, I must say that it is good to live in a frame house, in which all the nodes are made correctly. This technology does not forgive mistakes. Even minor ones. If you want to familiarize yourself with building codes, find SP 31-105-2002, which is called "Design and construction of energy efficient single-family residential buildings with a wooden frame". All descriptions and requirements are there.
The content of the article
Step-by-step construction instructions with photos
There are several different frame house building technologies, but the classic way of building is the Canadian one. It is also called the platform method, since the floor of the frame house is first assembled, and then the skeleton of the walls is assembled on it, as on a platform. We will tell you how to build a house using this technique. It will not be difficult to deal with the rest: only the sequence of actions differs.
Step 1: Foundation for a frame house
The choice of foundation is a separate complex and voluminous topic. The geological picture on the site, the height of the location of groundwater, the weight of the building and the seasonality of residence in it, the region in which the construction takes place, snow and wind loads are taken into account. But in general, pile, pile-grillage or strip foundations are most often made for frame frames.
In our country, the palm tree for frame house building with their own hands belongs to pile-grillage foundation... It is being built quickly, requires little material investment, correctly calculated and built, it is reliable. Combining the advantages of both pile and tape, it evenly transfers the load to all supports.
More reliable in the construction of a pile or pile-grillage foundation are TISE piles... Due to the extended heel, they have a greater load-bearing capacity and better resist heaving forces.
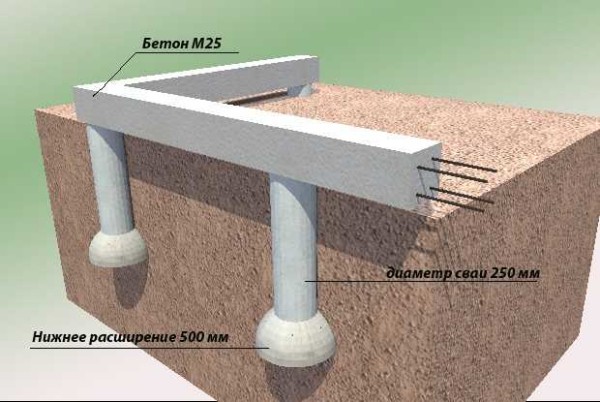
Construction of pile-grillage foundation with TISE piles
You can drill holes for piles with a hand drill or a motorized one. Roofing material rolled into pipes of the required diameter (at least three layers must be screwed on), fixed with scotch tape, is used as an opabulka. Other options are asbestos-cement or PVC pipes of a suitable diameter. Three or four rods of reinforcement are installed inside the piles, interconnected in the form of a triangle or square. The reinforcement rods are cut so that at least 0.7-0.8 meters stick out above the pile surface. Everything is poured with concrete of a grade not lower than M25 (read about concrete brands here).
After pouring the piles, it is installed formwork for tape (grillage), fittings are laid and knitted into it. Longitudinal bars are connected to bent outlets of reinforcement from piles. At this stage, holes are left in the tape for supplying communications and ventilation (insert pieces of plastic tubing across the tape).
A strapping bar will subsequently be attached to the foundation strip. For its installation, studs are fixed in the tape. They are installed in steps of 1-2 meters. 30 cm recede from each corner in both directions. Studs are required here, the rest, depending on the size of the house, but not less than 2 meters later. Please note that it is the studs that connect the frame of the house to the foundation. Therefore, it is better to put more often. And one more thing: no matter how short the wall is, there should be at least two studs.
When everything is ready, concrete is poured.

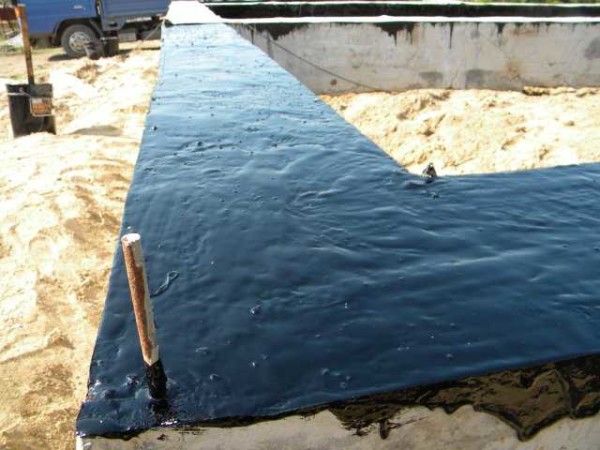
Filled grillage. The foundation for a frame house with your own hands is ready
After pouring the concrete, so that it does not dry, but gains strength, it is better to cover it with polyethylene (look at the photo). If the temperature after pouring the foundation is kept within + 20 ° C, construction can be continued after about 3-5 days. During this time, under such conditions, concrete will gain more than 50% of its strength. You can work with him freely. With a decrease in temperature, the period increases significantly. So at + 17 ° C, you need to wait for about 10 days.
Step 2: bottom rail and floor
To prevent the frame wood from pulling moisture from the concrete, a shut-off waterproofing of the foundation is required. The safest way to do this is with bituminous mastic. And better - in two layers. You can also use roll-up waterproofing. Roofing material is cheaper, but it breaks over time. More reliable waterproofing or other similar modern material.
You can coat the grillage once with mastic, and roll out the waterproofing on top. Another option for shut-off waterproofing for a frame house is two layers of waterproofing, smeared with mastic: the closer the underground water is, the more thorough the waterproofing should be.
The first layer is liquid waterproofing.While it is not dry, you can glue a layer of roll onto it
Then the beds are laid - boards measuring 150 * 50 mm. They must be dry, impregnated with bioprotective and flame retardant compounds. The edge of the bed is aligned with the outer edge of the foundation. Holes are drilled in the necessary places for the studs (the hole diameter is 2-3 mm larger than the stud diameter). Then the second board is laid. It is laid so as to cover the joint of the first row. It turns out a castle.
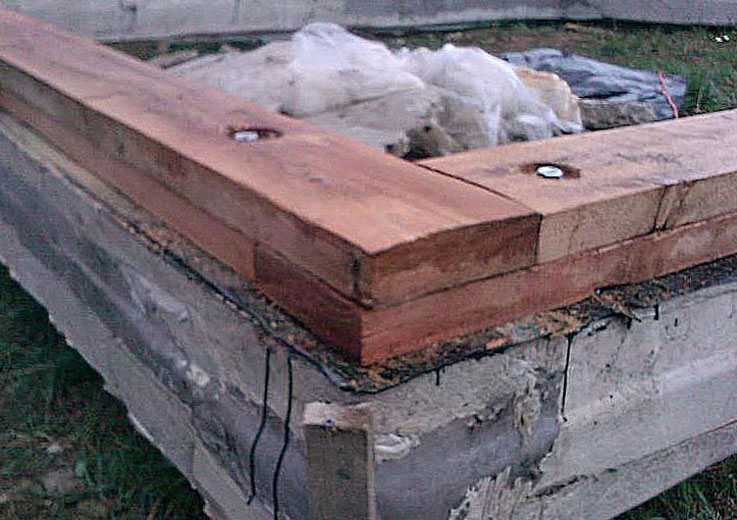
The second board is stacked so that the joints overlap
In general, one beam of 100-150 cm can be laid, but its price is much higher than that of two boards, which add up to the same thickness, and correctly fastened two boards have a large bearing capacity, although they take more time to install.To make them work as a single bar, they are knocked down with nails with a step of 20 cm in a checkerboard pattern.
We put the harness and logs
Next, a strapping board is attached to the bed. Its dimensions are also 150-50 mm, but it is placed on the edge. It is aligned along the outer edge of the foundation, nailed with long nails (9 cm) to the bed every 40 cm.
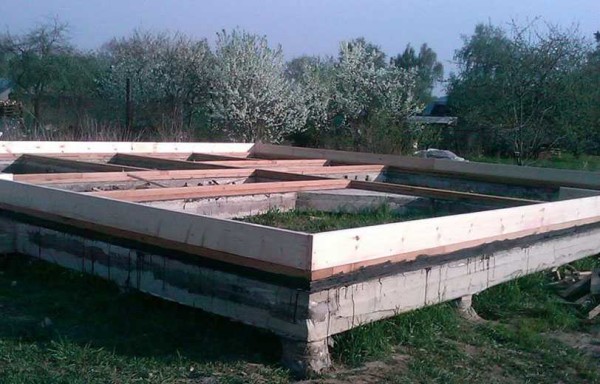
Installation of the strapping: according to the instructions, the assembly of the frame house continues by installing the strapping, to which. the floor joists will rest
The next stage is the installation and installation of the lag. These are the same boards 150 * 50 mm, placed on the edge. They are attached with two oblique nails (9 cm) at the end to the strapping board, two nails on the right and left to the bed. So each lag is on both sides.

An example of installing a lag floor
The photo shows that the first log is installed close to the second - this way the load on the foundation is better transferred. It is installed along the second edge of the bed. The installation step is 40-60 cm. Depends on the span length and section of the sawn timber used: the longer the length, the smaller the step.
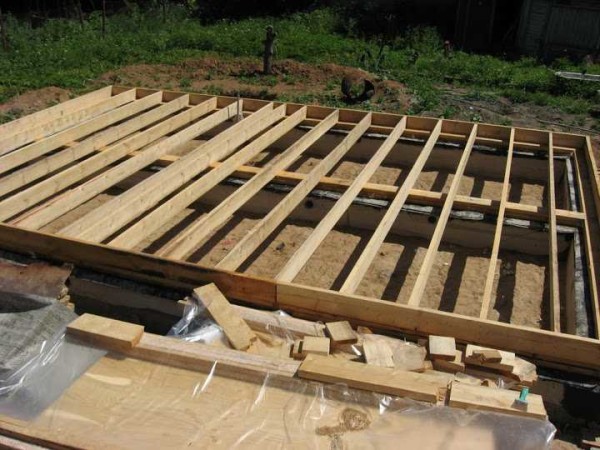
Installed and fixed floor joists
If the logs are long, and there is a transverse beam, as in the photo above, so that the logs do not "leave" over the transverse beam, jumpers are packed. They are equal in length to the pitch of the lag installation minus the doubled thickness of the board: if the pitch of the lag is 55 cm, the thickness of the board is 5 cm, then the jumper will be 45 cm long.
Insulation and flooring
After the base for the flooring is mounted, it is time to insulate the floor. It can be done in different ways, with different materials. We will show the economy option - with expanded polystyrene plates with a density of 15 kg / m3 (more is possible, less is not). He, of course, is not environmentally friendly, but the only one is not afraid of moisture and can be mounted without a subfloor. The estimated thickness of the insulation is 150 mm, two layers are laid: one 10 cm, the second 5 cm. The seams of the second layer should not coincide with the seams of the first (move).
To begin with, a 50 * 50 mm cranial block is stuffed along the lower edge of the lag. It will hold the foam in place.
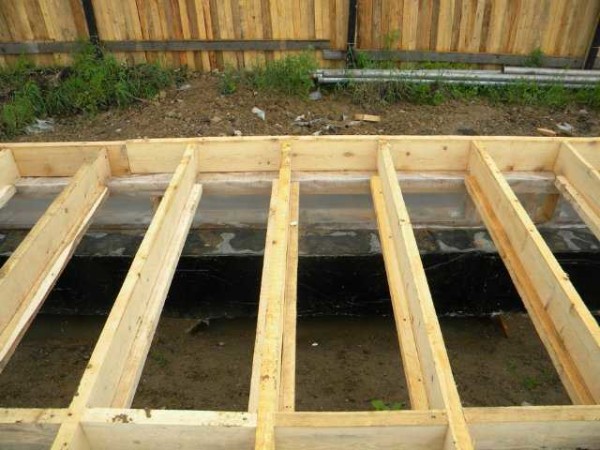
At the bottom, a frame is obtained from a cranial bar, which will prevent the expanded polystyrene from falling out
The foam is cut with a regular hacksaw. The canvas can be taken on wood - it is cut faster, but it turns out to be a ragged edge or on metal - it goes slower, but the edge is smoother. The cut slabs are laid in two layers, the seams overlap. Then they are glued around the perimeter with a sealant - to ensure waterproofing.
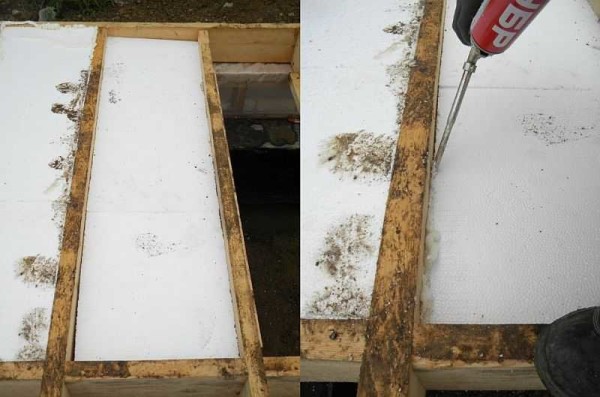
Styrofoam laying
Next, lay the subfloor from the boards, level it and lay plywood on top (preferably FSF 5-6 mm). To prevent the rough flooring from skewing, lay the boards alternating the direction of the wave. If you look at the cross section of the board, the annual rings run in a semicircle. So, you need the arc to look up and down (see photo).
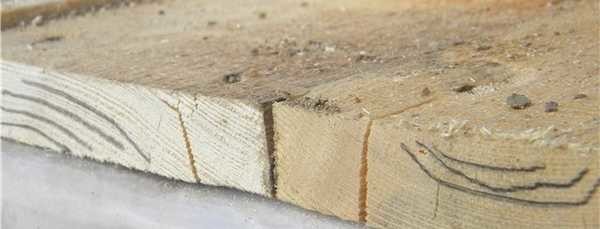
How to properly lay plank flooring
You can do without plank flooring. Then the thickness of the plywood must be at least 15 mm. Consider what is more profitable in your region and choose.
In any case, the sheets should be stacked apart - the seams should not match (as in brickwork). Do not forget to leave a gap of 3-5 mm between the plywood sheets to compensate for changes in dimensions with changes in humidity.
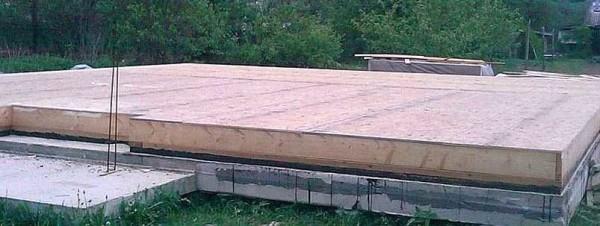
The second stage of building a frame house is completed: the floor is laid
Plywood is attached to self-tapping screws 35 mm long (white is better - less marriage) along the perimeter with a pitch of 12 cm, inside in a checkerboard pattern with a pitch of 40 cm.
An example of using frame technology to build a wooden shed is described here.
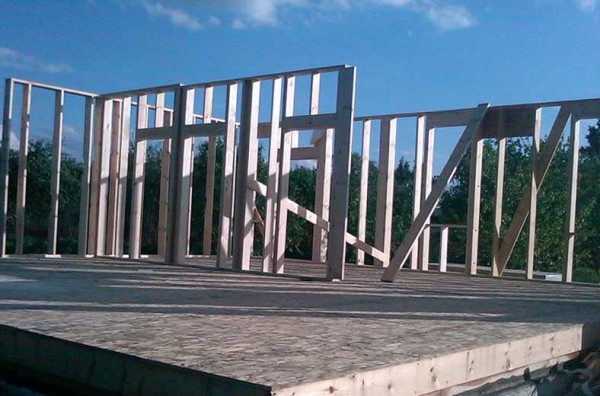
Step 3: frame walls
There are two ways: the frame of the wall (all or part - depending on the size) is assembled on the floor, then it is raised, exposed and fixed. Sometimes, with this method, OSB, GVL, plywood are attached directly to the floor from the outside of the frame: the rigidity is greater. This technology is called frame-panel or "platform". Factories generally operate according to this principle: they build ready-made panels according to the project in the workshop, bring them to the site and only mount them there.But frame-panel housing construction is possible with your own hands.
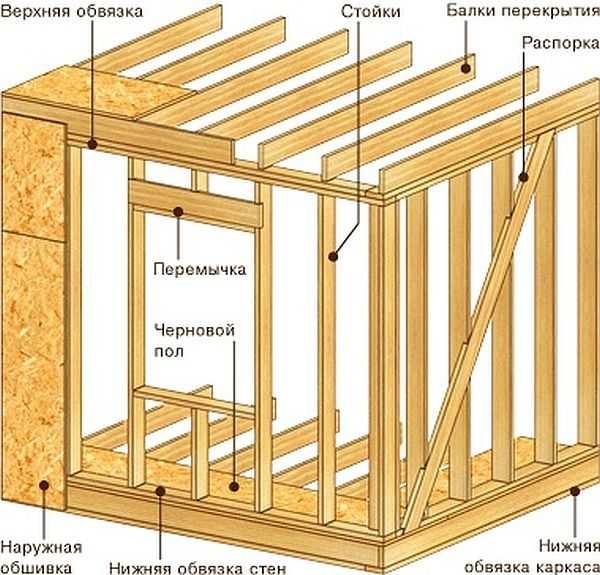
One of the options for assembling the frame wall, the names of the elements
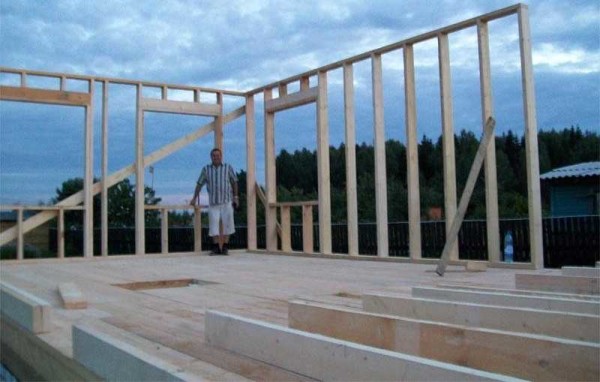
The second way: everything is collected gradually, in place. A bar of the lower strapping is nailed, corner posts are set, then intermediate ones, the upper strapping, etc. This is the technology called "frame house building" or "ballun".
Do-it-yourself wall frame assembly can be carried out gradually (ballun technology) or by block-shields (platform technology)
Which one is more convenient? It depends on how many people work and whether it is possible, at least periodically, to attract assistants. Working on the floor is faster and more comfortable than jumping up / down a ladder countless times. But if the section is assembled large, then it will be difficult to lift it even together. The way out is to either call assistants, or break the wall frame into small segments.
Installation step and section of racks
Corner posts should be 150 * 150 mm or 100 * 100 mm, depending on the load and the required width of the insulation. For a one-story frame house, 100 mm is enough, for a two-story house - at least 150 mm. The intermediate posts are the same in depth as the corner posts, and their thickness is at least 50 mm.
The step of installing the racks is selected taking into account the load, but in reality it is more often selected based on the width of the insulation. If you will be insulating with mineral wool in rolls or mats, first find out the real width of the material. The clearance between the posts should be 2-3 cm less than the width of the insulation. Then there will be almost no waste, gaps and crevices through which heat will go away - too. The density of the insulation in the frame is the main point, because only it will serve as protection from the cold. The slightest violation will lead to the fact that the house will be cold. Therefore, the selection of insulation and its installation must be treated with full attention.
An option for the gradual assembly of the frame of the house: the corner posts are exposed and fixed, the upper strapping is immediately mounted on them, then the vertical posts with the selected step
The racks can be fastened in several ways: with wooden pins, with a cut or on corners. The cut into the plank of the lower harness should be no more than 50% of its depth. Corners are attached on both sides. Fastening with dowels is an old technology, but complicated in execution: long dowels are cut out, a hole is drilled obliquely through the rack and the lower strapping bar, a wooden spike is driven into it, the excess of which is cut off. It works well if the wood is dry. If not, drying out and loss of fastening rigidity is possible. Installation on reinforced corners is much easier.
According to Canadian technology, the beams to which the windows and doors are attached are made double. The load is greater here, therefore, the support must be more powerful.

Reinforced pillars near windows and doors are a must. Only in this way will a self-built frame house be reliable
How to make a gazebo out of wood (also using frame technology) read here.
Slopes or braces
If the outer cladding is planned from high-strength slab material - OSB, GVL, GVK, plywood - the bevels are temporary and from inside the room. They are needed to align and maintain geometry until the outer skin is attached. The strength of this material is sufficient to create the required structural rigidity.
If the sheathing is planned type-setting - from the lining, etc. the installation of permanent jibs is required. Moreover, the best option is not those that are placed on several racks, but four small pieces for each: two on top and two on the bottom (as in the photo below).

Such braces will give sufficient rigidity to the walls of a frame house.
Pay attention, in the photo above, the stands are prefabricated: two boards are knocked together with nails all over in a checkerboard pattern. Such racks have an even greater bearing capacity than solid ones and cost less. This is a real way to reduce construction costs without losing quality.But the construction time increases: a lot of nails have to be hammered.
The corners of the frame house
Most of the questions arise when building corners. If you put a bar in the corner, then there seems to be no difficulty, except that the corner turns out to be cold. In regions with short and mild winters, this is not a problem, but already in central Russia it requires some kind of solution.
Even with this option, the corner will be colder.
There are several ways to warm the corner of a frame house. All of them are shown in the diagrams, so it is clearer.
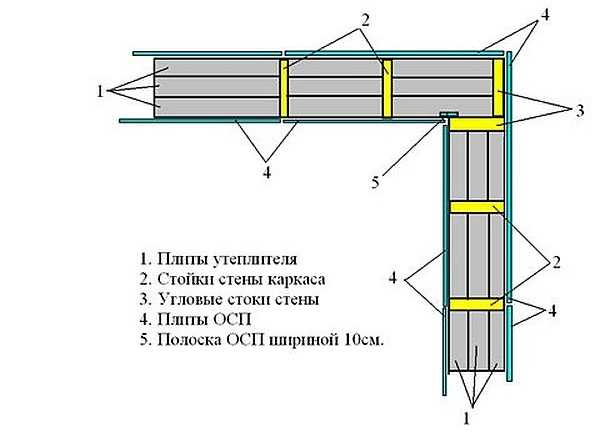
When building a one-story frame house, you can do this
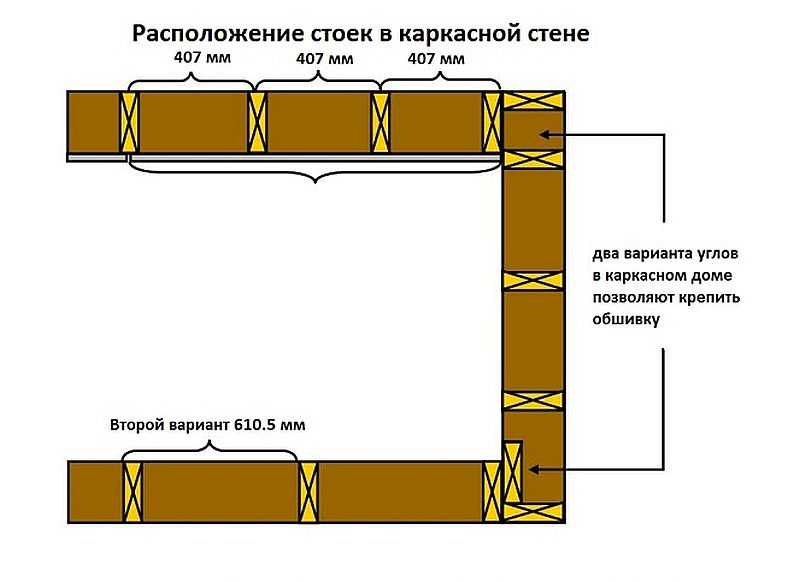
With a residential second floor, the corners are made in one of these ways
After assembling the frame, it is most often sheathed outside with OSB, plywood or other similar material.
The construction of a woodshed is described in this article.
Step 4: overlap
The floor beams are supported by the upper strapping beam. There are several ways to mount:
- on supporting steel brackets;
- to the corners;
- with a sidebar;
-
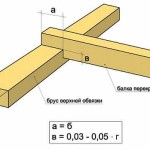
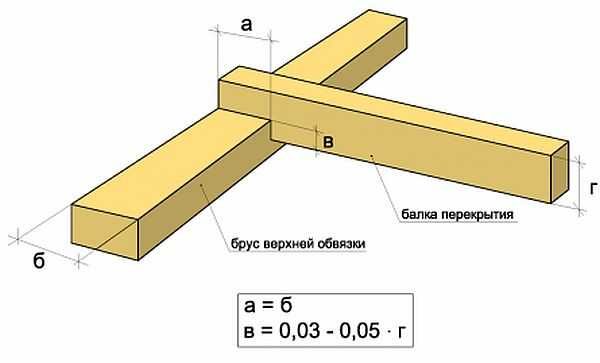
- Notch - the depth of cut should not exceed 50% of the thickness of the upper harness bar. It is hammered from above with two nails, which must enter the harness by at least 10 cm
-
- Corners are a familiar method. You can use reinforced, but not necessary

-
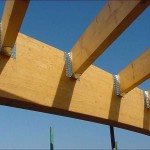
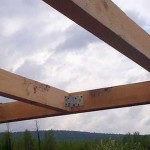
- Perforated staples - different shapes

-
- Fastening the ceiling beam with metal brackets
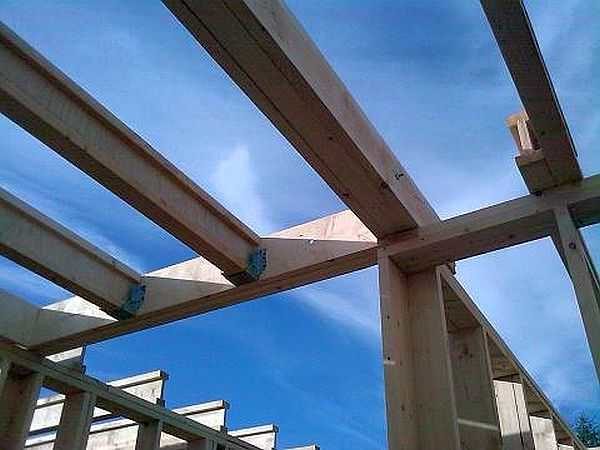
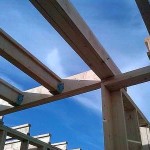
The dimensions of the beams, the step of their installation depend on what will be on top. If the second residential floor or attic, the section is taken more, the step is made less: so that the floor does not bend. If only the roof and the attic are supposed to be uninhabited on top, these are completely different calculations and sizes.
In this one-story frame house, the floor beams are at the same time the support for the rafters. Therefore, they are released 30 cm beyond the perimeter of the walls.
If the second floor is being completed, the floor is sheathed with a rough floor of the second floor. So it will be easier to work on creating the second floor of a frame house. Its assembly is no different from building the first one. Unless only the fact that all the lumber has to be dragged to the second floor.
Step 5: rafter system and roofing material
When developing a house project using frame technology, the most popular are gable or mansard roof... Their device is no different. All the same principles and calculations. The only limitation concerns the weight of the roofing: it must be a light material, the load from which wooden beams and ceilings can withstand.
-
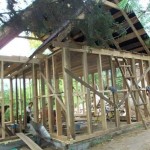
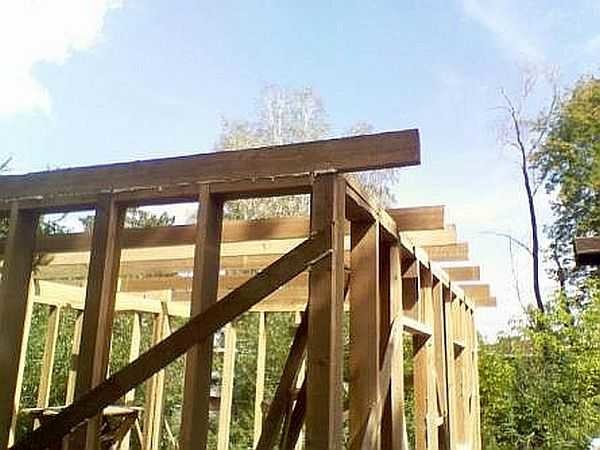
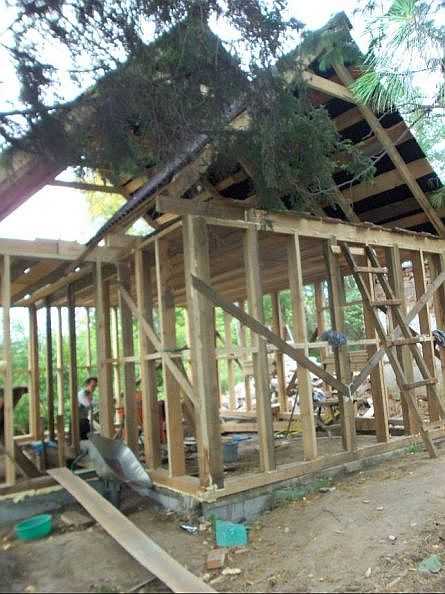
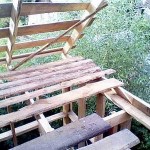
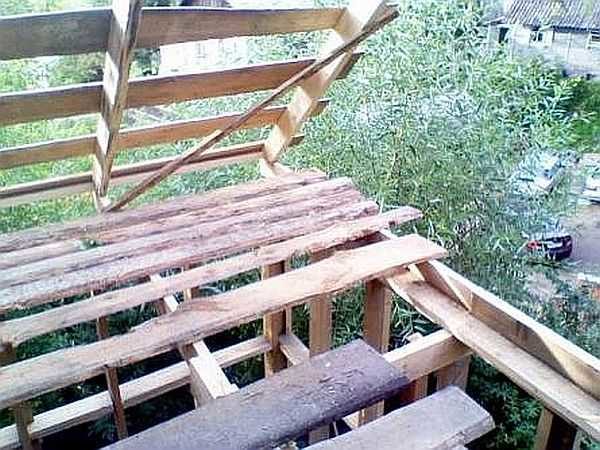
- This is what the frame looks like before sheathing. If the walls are not sheathed, small vibrations are felt when working on the rafter system. The outer sheathing makes the frame much more rigid
-
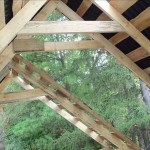
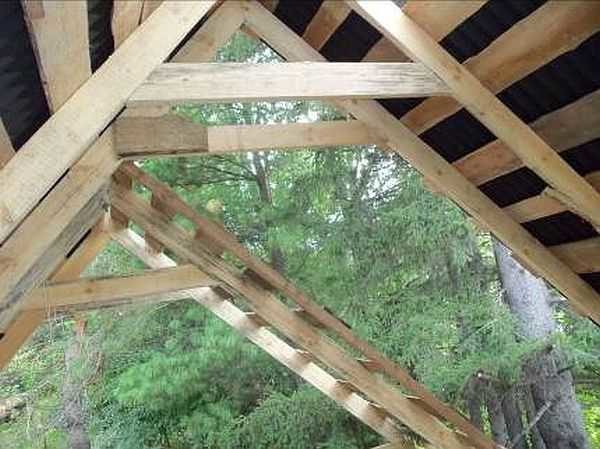
- A gable roof was chosen with a raised puff
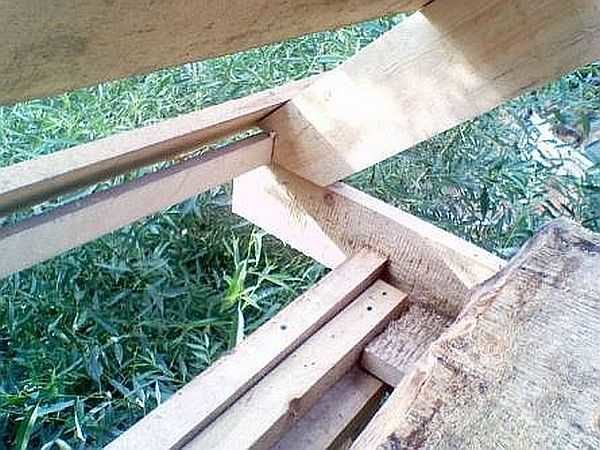
-
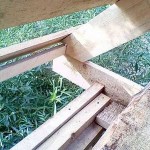
- For the convenience of fastening the rafter legs, a 50 * 50 mm bar was nailed along the edge of the floor beams. A gash was made in the rafters under it. During installation, they first simply rested against the bar, then they were attached
-
- To fix the rafters in a given position before filling the crate, temporary jibs were used
Another relatively inexpensive technology building a house from aerated concrete is described here.
Step 6: Warming
A frame house can be insulated with any of the materials available on the market with appropriate characteristics. They are all imperfect, but all problems have standard solutions.
The most popular insulation for frame walls is basalt wool. It is produced in the form of rolls or mats of different densities. It is more convenient to install mats in the walls: they are denser and hold well by themselves due to the bursting force. For this, as mentioned above, their dimensions should be 2-3 cm larger than the distance between the frame posts. The mats, of course, are additionally fixed with special fasteners, but it is more convenient to work than with a soft roll.
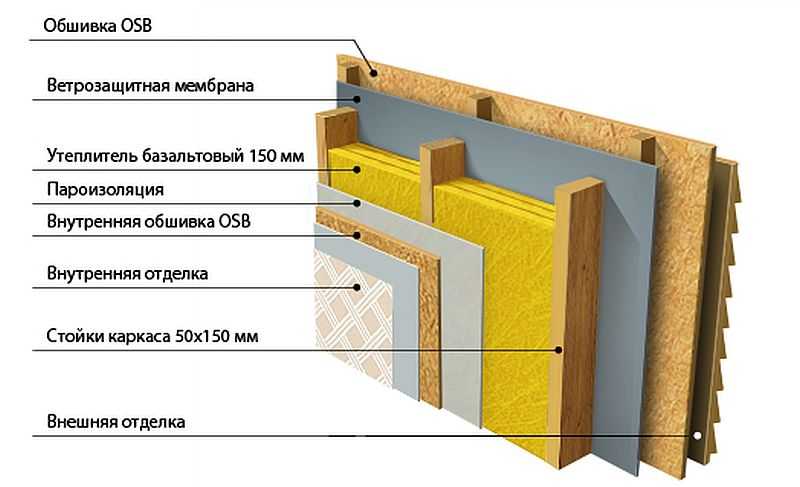
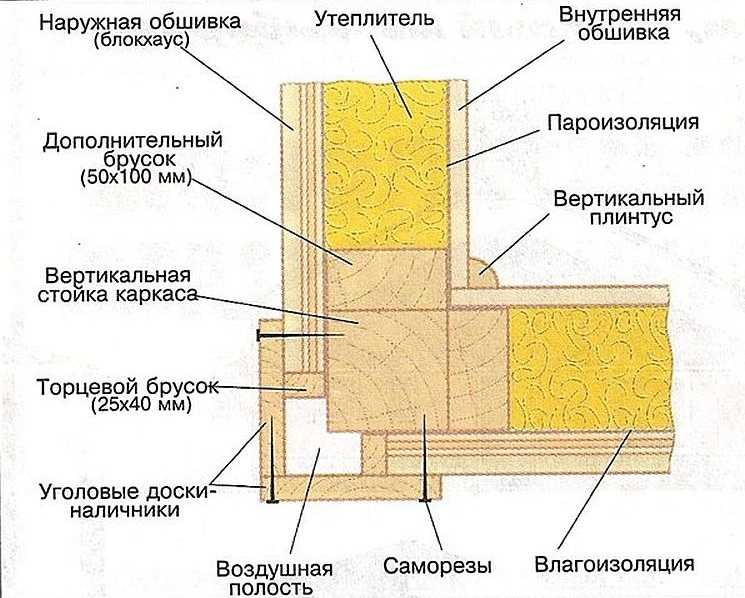
The most common frame wall insulation cake
Mineral wool has high thermal insulation characteristics, good sound insulation. But there is also a serious drawback: it is afraid of getting wet and it must be protected from all sides not only from moisture (rain), but also from steam penetration. Therefore, from the side of the room, it is closed with a layer of a vapor barrier membrane, which does not allow vapors to penetrate inside.
On the street side, the mineral wool insulation is covered with another membrane, but of a different type with different characteristics: a hydro-wind-protective vapor-permeable membrane. It is not blown through, from the street side it does not allow moisture in the liquid and gaseous state to pass through, and vapor can escape from the insulation: vapor permeability is one-sided. After installing the insulation, only finishing work remains. That's all, the construction is over.
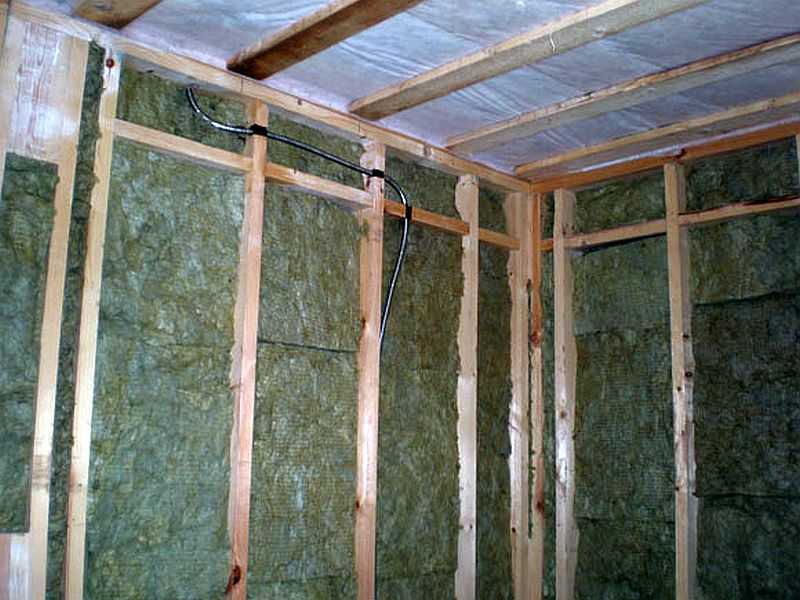
This is what a basalt mat looks like, installed between the posts.
Now you know how to build a frame house. The detailing of some processes is far from complete, but you have a general assembly sequence. Perhaps you will be helped by another video from a professional carpenter who has been building frame houses for decades (see below).
Video instructions for the installation of frame houses
These are three videos of great carpenter Larry Hon. Each of them is over an hour long. The technology for building a frame house on a finished foundation is described in great detail.
According to this instruction, self-erection is possible without questions: all stages of the construction of a frame house and little things are commented and explained, down to which nails, how long, how many pieces with what step, to hammer in each node. Demonstrates the main problems that may arise and methods of fixing them. If you decide to build a frame house with your own hands, take the time - watch the movie. Much will become clearer to you.
The first part is the bottom rail and the floor.
The second part of the video is the device and assembly of frame walls.
The third part is building the roof of a frame house.
If you still doubt whether it is worth building a frame house, this is probably because you heard that this is a bad technology, that it does not work for us. There is such an opinion. But it is based on the fact that in Canadian and American frame houses they are placed from dry forest, humidity. no more than 20-22%. In our conditions, timber of almost natural moisture is brought from sawmills, and this is up to 60%. Because the house leads and turns, they become cold.
But if you are going to build a house with your own hands, what will prevent you from using dry wood? It is expensive for chamber drying, the difference per cube turns out to be very decent - almost twice. But by folding the wood on the site in ventilated piles, it can be dried up to the same 20-22% in a year. You decide whether or not to saturate with biosecurity before drying. Dry wood does not rot and is not damaged by fungi, but it is advisable to impregnate it with bioprotection from insects.
An example of this opinion is in the video. With an explanation of why the technology is bad ...
-
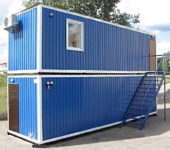 Modular houses from block containers: types, manufacturing features and layout options
-
 Houses from shipping containers: construction options, layout
-
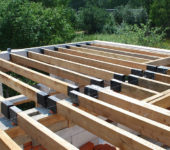 Types of wooden beams for floors, length calculation, installation
-
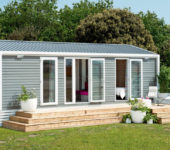 Mobile homes for year-round use
-
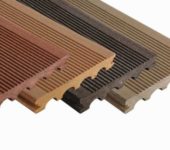 Polymer / composite decking (WPC decking): types, sizes, installation


An interesting article I read it with pleasure. The foundation of the house is piled with a grillage, we did something like that. The piles were driven into the depth of freezing, the house is stable.