Formwork for the foundation: how to make and install + ways to save
Formwork is a structure of shields, struts and stops, which serves to shape concrete and reinforced concrete products. If we talk about construction, then this system is necessary when pouring any type of foundation, but the largest structures are needed when installing ltape monolithic foundationa. Formwork is also used when creating reinforcing belts in the masonry of walls from building blocks. In the same buildings, a reinforced belt is often needed at the top to create a solid foundation for attaching the roofing system. It is also formed with the help of formwork. This design will also be needed when pouring concrete paths or concreting blind areas, for some other types of work.
The content of the article
Removable and non-removable
According to the principle of use, the formwork is removable (collapsible) and non-removable. As the name implies, the removable one is disassembled after the concrete gains strength above the critical one (about 50%). Therefore, it can be used several times. Depending on the material, one and the same set can withstand from 3 to 8 fillings, industrial versions can be used several dozen, and some hundreds of times.
Removable formwork is dismantled after the concrete has gained 50% strength
Permanent formwork becomes an integral part of the foundation. Such systems have been used relatively recently. They are made mainly of extruded polystyrene foam. Blocks of different configurations are produced, which are interconnected with locks and metal pins. From blocks, as from a constructor, the necessary form is typed.
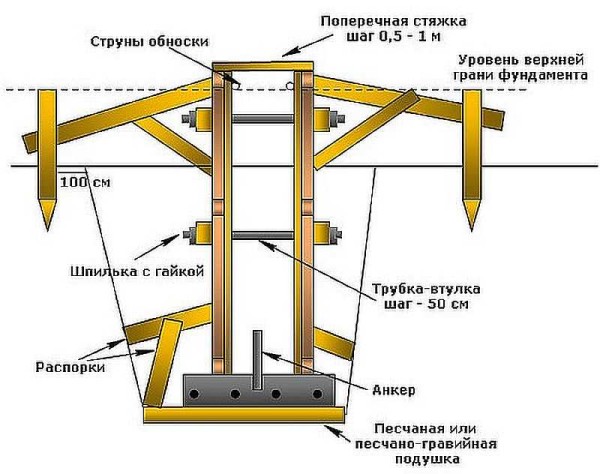
What does the formwork for a strip foundation look like in section
With a foundation height of up to 1.5 meters, the formwork board must have a thickness of at least 40 mm. Shields are fastened using bars with a section of 60 * 40 mm or 80 * 40 mm. If the height of the foundation is large, it deep-seated - such blocks will not be enough to support the mass of concrete. At a height of more than a meter, you need to use a bar of 50 * 100 mm or more. For assembly, use nails or screws. Their length is 3/4 of the total thickness of the board and the bar (for the above dimensions 60-70 mm).
Formwork is also made of plywood. There is even a special formwork laminated with synthetic paper. The coating has increased resistance to aggressive environments, which is liquid concrete. This material is marked with FSF (using formaldehyde glue).
The thickness of plywood for formwork is 18-21 mm. Shields are assembled on a metal or wooden frame. The wooden frame is made from a bar of 40 * 40 mm, you need to use a shorter fastener - 50-55 mm. When using plywood, it will be easier to work with self-tapping screws: nails are hard to hammer.
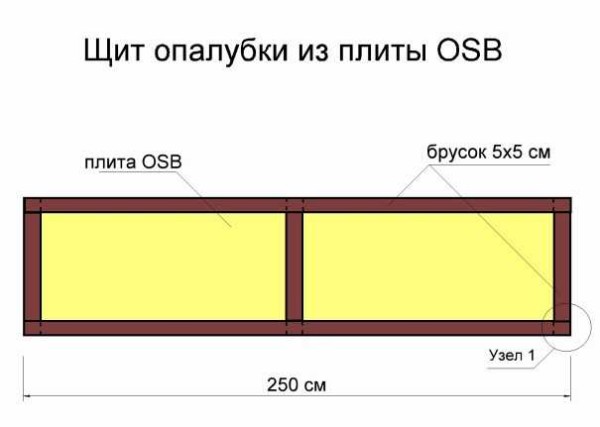
Construction of formwork panels made of plywood and OSB
RSD is rarely used for this purpose, but this option also takes place. The thickness is about the same: 18-21 mm. Structurally, it is no different from plywood boards.
Select the dimensions of the sheets of these sheet materials based on the dimensions of the required formwork panels - so that there is as little waste as possible. A special surface quality is not required, so you can take low-grade materials, which are usually called "building".
From what to make the formwork for the foundation, decide for yourself: it depends on the prices of these materials in your region.The usual approach is economic: what is cheaper is used.
Diy formwork for strip foundation
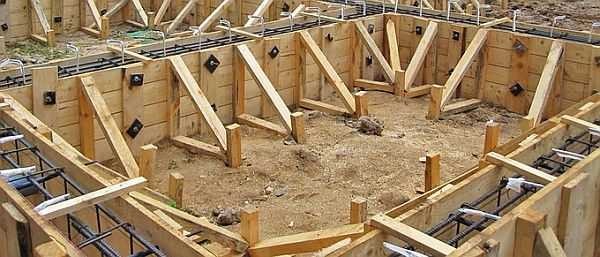
The most voluminous is the formwork for the strip foundation. It follows the contours of the house and all load-bearing walls on both sides of the tape. When building a more or less large building with a large number of partitions, the consumption of materials for the foundation formwork will be very significant. Especially with deep foundation.
Shield design and connection
When assembling the formwork with your own hands, it is important to make the boards strong: they will need to hold the mass of concrete until hardening occurs.
The dimensions of the formwork panels vary and depend on the geometry of the foundation. The height is slightly higher than the height of the foundation, you determine the length of each shield yourself, but usually it is from 1.2 to 3 m.It is inconvenient to work with very long structures, so the optimal length is about 2 m. The total length of the entire formwork should be such that they became exactly according to the marking of the foundation (do not forget to take into account the thickness of the shield).
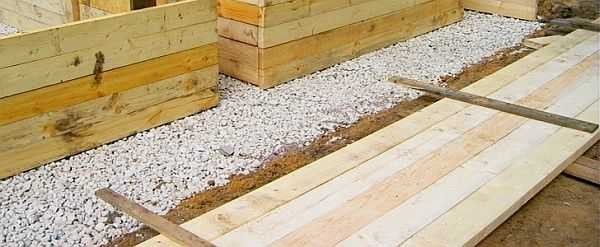
How can the formwork for the strip foundation be installed: in the trench dug by the dimensions of the tape and in the pit in the braces
When making formwork from boards, cut several pieces of the same length, fasten them with bars and nails or self-tapping screws. When using nails, they are hammered from the inside of the shield, bent on a bar. It is easier to work with self-tapping screws: they do not need to be bent, since, due to the thread, they provide a snug fit of the elements. They are twisted from the inside of the shield (the one that will face the foundation wall).
The first and last bar is fixed from the edge at a distance of 15-20 cm. Between them, at a distance of 80-100 cm, additional ones are placed. To install formwork panels it was convenient, two or three bars (at the edges and in the middle) are made 20-30 cm longer. They are sharpened and driven into the ground during installation.
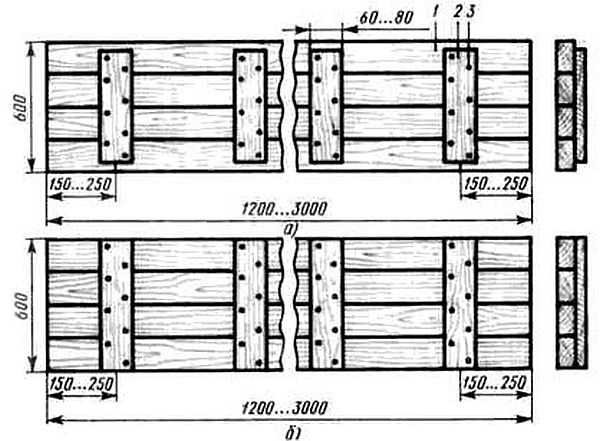
Approximate dimensions of edged board formwork panels
Plywood or OSB boards are assembled on a bar frame. It is important to reinforce the corners well when assembling. In this design, they are the weakest point. You can strengthen them with metal corners.
Do-it-yourself formwork installation
If the shields were made with several elongated bars, they must be set along the cords of the stretched markings. The difficulty lies in the fact that at the same time it is necessary to exhibit in a vertical plane. For fixing, you can use bars hammered along the mark and set vertically. When installing, the plane of the boards should be set close to these bars. They will be both support and guides.
Shields with elongated cross bars are easier to install
Since the bottom of the trench or foundation pit must be flat (they are compacted and leveled under the level), it should be easy to place the shields horizontally. Try not to hammer them too much: it will be easier to align later. Lower one of the corners to the bedding level. There should not be a gap, the solution should not flow out. Having achieved a snug fit, take the building level, apply it along the shield and hammer the second edge with a hammer until the upper edge is set horizontally. You are already exposing the next shield relative to the established one: they must be on the same level and in the same plane.
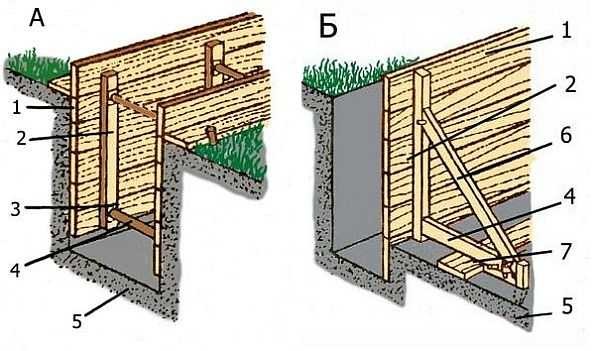
If the shields are made without long bars, a bar is fixed at the bottom of the pit, along the line marking the tape, which will serve as an emphasis. The shields are placed close to it, then they are fixed with the help of bevels and spacers.
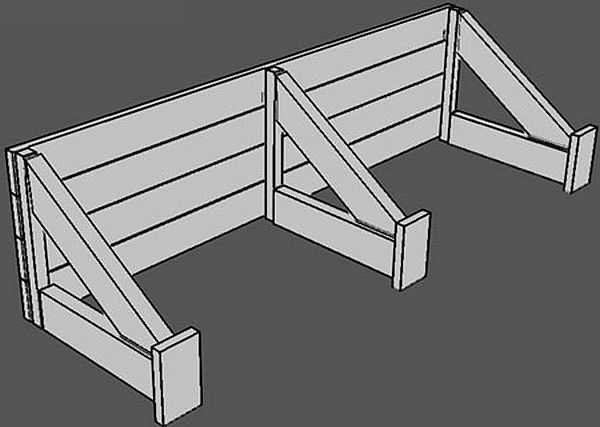
Reinforcement - braces and stops
In order for the formwork not to fall apart under the mass of concrete, it must be fixed from the outside and from the inside.
Braces are installed outside. The props should be at least every meter. Particular attention should be paid to the corners: here they put stops on both sides. If the height of the backboard is more than 2 meters, then one stop belt is not enough. In this case, at least two tiers of spacers are made: an upper and a lower one.
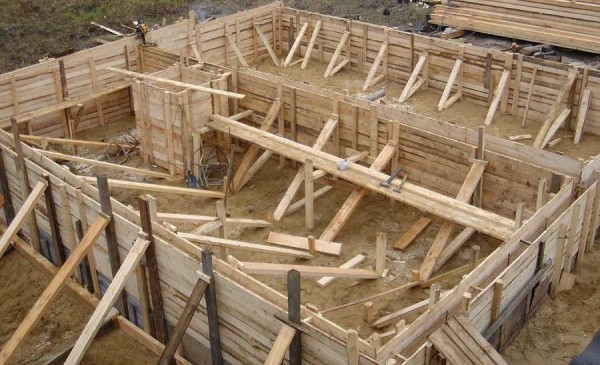
Outside the formwork, they put stops and braces.At high altitudes, they are made in several tiers. Pay attention to the thickness of the support bar
It is also necessary to stabilize the distance between two opposite shields. To do this, use studs made of reinforcement with a diameter of 8-12 mm, metal gaskets and nuts of the corresponding diameter. Studs are installed in two tiers: above and below, at a distance of 15-20 cm from the edge.
The length of the pins is about 10-15 cm larger than the width of the tape. There are two options:
- Threads are cut at both ends of the reinforcement. Then each stud will require two metal sealing plates and nuts.
- On one side, the hairpin is bent and flattened, a thread is cut with an arc. In this case, one nut is needed (there are still two plates).
The inner distance between the panels, equal to the design width of the tape, is fixed using pieces of plastic pipes. Their internal clearance should be slightly more than the thickness of the studs.
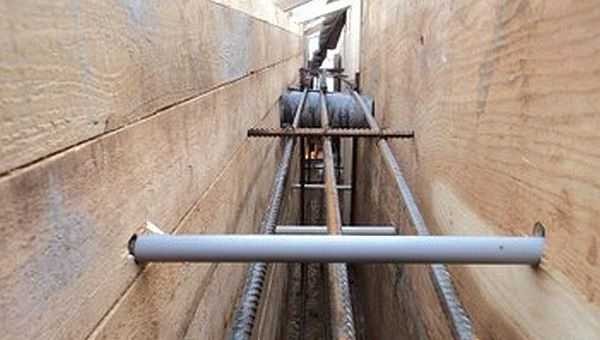
How to make spacer pins in the formwork
The assembly takes place as follows:
- Holes are drilled in both shields with a long drill.
- A pipe segment is installed between them.
- A hairpin is threaded.
- Metal plates are installed (they will not allow the hairpin to break the shield material).
- The nuts are tightened and tightened.
You need to work together, or better - three. One installs tubes inside between the shields, and one person for installing studs and tightening nuts.
When removing the formwork, first unscrew the nuts and remove the pins, then dismantle the slopes and stops. The released shields are removed. They can be used further.
How to spend less
It takes a lot of material to make the formwork for the strip foundation: the shields form the entire strip on both sides. At great depths, the consumption is very high. Let's say right away: there is an opportunity to save money. Make only a part of the formwork and pour not all of it in one day, but in parts. Despite the popular belief, this will hardly affect the strength of the foundation (if you know the secrets), and you can save a lot. You can divide the foundation either horizontally or vertically.
Fill with layers
When the depth is large, it is more profitable to fill in parts horizontally (in layers). For example, the required depth is 1.4 m. You can split the fill into two or three stages. At two stages, it will be necessary to make shields 0.8-0.85 m high, at three - 50-55 cm.
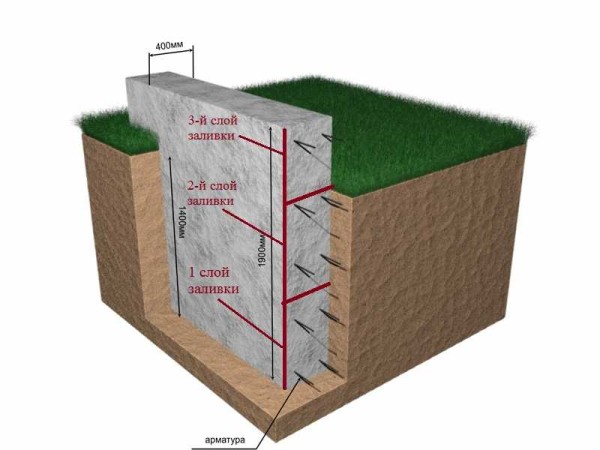
If the foundation has a great depth, it can be poured in two or three parts, dividing vertically into approximately equal shares
The order of work is as follows:
- The formwork is exposed from the made short shields, reinforcement is knitted for the entire required volume.
- Concrete is poured along the height of the made formwork.
- 7-8 hours after pouring, it will be necessary to remove the top layer from the entire surface of the tape with a trowel. When the concrete vibrates, the cement milk rises upward. As it freezes, it becomes brittle and brittle. It is this layer that will need to be removed. As a result, the surface will be uneven and rough, and this will improve adhesion (adhesion) to the next layer of concrete.
- At a temperature of + 20 ° C, after three days, the formwork can be removed, the panels can be cleaned and fixed higher. Removing the shields, take out the studs. The tubes can be left in the concrete. They have already become part of the monolith. Sometimes they are taken out and the holes are filled with mortar.
- Expose the formwork higher and fill it again.
The shield is simply installed on the already "set" concrete, and rests against the edges of the trench, but at a different level
When installing the second (and third, if necessary) tier, the shields are slightly found on the already filled area, covering the tape from the sides. The stop and stop is usually the bottom row of pins. Therefore, when installing them, put them all at the same level from the lower edge of the shields.
The armature is already tied, the inner studs are cut. It remains only to put other tubes back into place the pins and put the outer stops and braces. It takes less time to install the next layer of formwork.
Why does this method not affect the strength of the foundation? Because the strength of concrete is not taken into account when calculating. She goes to the "reserve". In addition, the load in strip foundations is distributed along the long side. And we have no gaps in length. So the foundation will last for a long time.
Vertical division
The second way is to split the plan vertically. The foundation can be divided into two or three parts. Only you need to divide not exactly "along the line", but to spread the joints to some distance.
In the part of the building chosen for installation, install the formwork with "plugs" in those places where the part to be installed ends. Knit a reinforcement cage inside the installed part. In this case, the bars of the longitudinal reinforcement must extend beyond the formwork by at least 50 diameters of the reinforcement used. For example, a 12 mm bar is used. Then the minimum release outside the formwork will be 12 mm * 50 = 600 mm. The next rod is tied to this release, and one by one they will go on these 60 cm.
One important detail: breaking the plan of the house in parts, make it so that the "pieces" poured during this period end at different levels (see the picture).
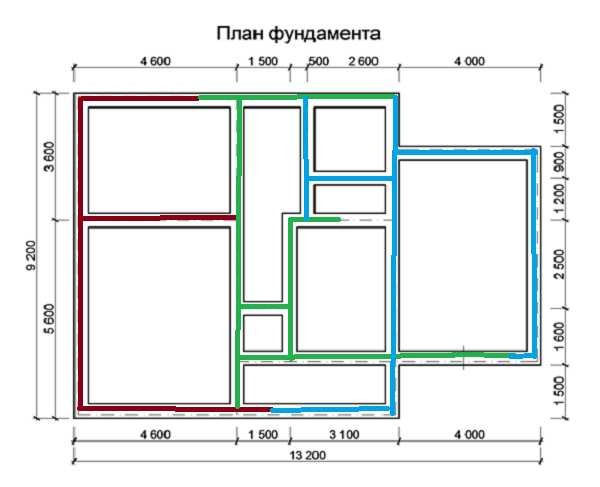
The second way is to divide the plan into several sections (in the figure they are marked with different colors)
Fill the assembled area with concrete. As in the previous method, after 7 * 8 hours it will be necessary to beat off the solution, but already on vertical surfaces. Take a hammer and, having removed the cover-sidewall, beat the cement-sand mortar to gravel (there will most likely be a layer of mortar without filler near the formwork). As a result, the surface will be chipped, which is good for adhesion to the next portion of the solution.
These methods can be safely used in private construction: they are practiced in the construction of monolithic multi-storey buildings, and there the workloads on concrete walls and foundations are incomparably greater.
There is one more trick. Everyone says that boards or plywood can then be used in auxiliary works. In practice, it turns out differently: it is impossible to saw wood or plywood soaked in cement. In addition, it becomes dirty and rough, and it is also unrealistic to clean and polish it: no grain "takes". So, in order for the wood (and plywood, if unlaminated) to remain usable, the front part of the shields is covered with a dense film. It is secured with a construction stapler and staples. If it gets damaged, it takes very little time to replace it. The formwork improved in this way gives an almost perfectly flat foundation surface, which facilitates subsequent work on hydro and thermal insulation.
-
 What is the best foundation for a two-story house, calculation of depth and its thickness
-
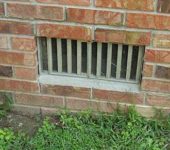 Air vents (vents) for ventilation of the foundation - are they needed or not?
-
 Reinforced concrete slab foundation
-
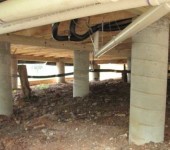 Types and stages of construction of columnar foundations
-
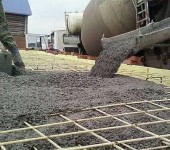 Concrete mark for the foundation of a private house


